BASIC COROPLAST HULLS FOUR HULLS, all single occupant designs. Choose the one that suites your needs.
|
|
|
- Basil Young
- 5 years ago
- Views:
Transcription
1 BASIC COROPLAST HULLS FOUR HULLS, all single occupant designs. Choose the one that suites your needs. The build notes for one hull 5 type should 8 apply to all hull types. 1 CUT these 2 lines First 20 Quick Assembly, Folds Up to a Small Package. Light Weight, Supports 215. Easy to Set-Up, and Easy to Paddle. Fits in any vehicle! 2 Cut Corner 9 Cut Corner 9 Fold to Inside these 2 lines First The KAYAK Folds to 30 x 24 x 4 Weighs 12 pounds. Supports 200 pounds. Fold to inside these 2 lines Next 10 S.F. 1/4 (6MM) Removable 2'x4' Plywood Floorboard CB 48 Cut Corner 4MM COROPLAST Material 2 Typical Hull Cross Section OAL= 92 OAW= 30 OAH = 9 Weight = 12 pounds Plus Seat and Paddles Rev Solid Lines are Cuts Dotted Lines are Folds 24 9 Ken Simpson Designs Print in Landscape Mode with ¼ inch borders center fold (Transport see text) NO Bulkhead or Transom necessary. Drawn No Cuts in Hull, just Folds! Tape all hull seams and edges. Cut Corner Removable 1x2 Lumber Outside Support Bars Bolted from Inside (3 places each side, page 4 for detail) 9 FOLDED Poly-Tarp Cover Each End 80 waterline Removable 1x2 Lumber Spacer Bars 4 draft Bolted in place. Page 18. Note: The wedge shape is designed to place the maximum buoyancy where the maximum load will be, your butt! 12 degrees a ken simpson design Page 1 of 24 This is an experimental design drawn up by an untrained amateur. The Designer accepts no liability for any loss, harm or damage sustained during construction or use. Builders may use these plans to construct a small quantity of boats for their own use only. Commercial manufacturers must ask the Designer for permission.
 4'x8' Coroplast, 4 MM (any color) Roll of Scotch Tough Duct Tape, No Residue 4'x4' ACX Plywood, ¼ inch (6 MM) thick 1 OD PVC Water Pipe, 10 foot length 6'")
2 READ PLANS THOROUGHLY PRIOR TO STARTING CONSTRUCTION. Basic Hull List of Materials (as of 3/2014) 4'x8' Coroplast, 4 MM (any color) Roll of Scotch Tough Duct Tape, No Residue 4'x4' ACX Plywood, ¼ inch (6 MM) thick 1 OD PVC Water Pipe, 10 foot length 6' x 6' Poly-Tarp material 1 x 2 x 8' Framing Lumber Total = $ 25 $ 10 $ 12 $ 3 $ 6 $ 4 $ 60 NOTE: All 4 of the designs shown use common assembly methods and materials. The difference is in the type of hulls presented, their capacity and utility. 4mm Coroplast can be purchased at your local Sign Company. Page 2
3 Motorized Version Bulkhead 25 Cut Corner Cut Corner Fold to the Inside these 2 lines First The PRAM 1 20 Folds to 30 x 24 x 4 Weighs just 16 pounds 215 pound capacity. Includes motor and battery. Fold to inside these 2 lines Next Batt. 11 S.F. 48 center fold (Transport see text) Cut Corner CB Best position for Bulkhead is at the center fold line. 4MM COROPLAST Material 5 Removable 1x2 Spacer Bar FOLDED Poly-Tarp Cover Solid Lines are Cuts Dotted Lines are Folds Removable 1x2 Lumber Outside Support Bars Bolted from Inside (3 places each side, page 4 for detail) 9 30 No Cuts in Hull, just Folds! Steering Arm Push/Pull Rope Steering 4-5 draft See pages 12 to 15 for Transom details waterline 20 degrees 9 1/4 Ply Floor 48 x width BULKHEAD 24 CUT these 2 lines First Motor Mount Transom (Plywood) Similar to The KAYAK, with transom modifications, to accept a trolling motor. Cut Corner 9 It is recommended that you use the folding seat design. See page 16. Plywood Mount bolted to outside of Transom, page 5 Note: The wedge shape is designed to place the maximum buoyancy where the maximum load will be, your butt! a ken simpson design Page 3
4 It may be necessary to add a strip of wood along each forward edge for rigidity. REAL BASIC HULL Advantage? Easier to fold, maximum buoyancy, and stable. Dis-advantage? Not much, just slower. 2 2 Folds Solid Lines are Cuts Dotted Lines are Folds Note the option of different materials for the Side Support Bars. 18 4MM COROPLAST Material 9 The JON Boat A FUN boat for all ages! Folds to 30 x 24 x 4 Weighs 12 pounds 210 pound capacity 1/4 Ply Floor 48 x CB. Great for a first attempt at Coroplast construction. 48 center fold (Transport see text) No Bulkhead or Transom necessary. Poly-Tarp Covers No Cuts in Hull, just Folds! 10.5 S.F. Buoyancy Area 24 Removable 1x2 Spacer Bars FOLDED Center Fold 4MM COROPLAST Material 9 18 Removable 1x2 Lumber Outside Support Bars Bolted from Inside (3 places each side) Makes a great paddle boat, for kids of all ages. Tough-Tape all edges of the hull prior to applying Tarp. The poly-tarp cover should be pulled tight and taped securely in place. 72 waterline 4 inch draft max. 15 degrees each end Tape the PolyTarp covers in place. Insure they are tight when the hull is open. a ken simpson design Poly-Tarp is the plastic tarp material available in small sizes at your local hardware store. Outside Surface 1/4-20 T-NUT Top view of Side Support Bar Removable 1x2 lumber spacer bars, bolted each end, for rigidity. See Page 18 Page 4
5 Maximum Water Line Length, and Maximum Freeboard for a Powered 1 Sheet Boat that is Stable and Comfortable. FOLDING COROPLAST HULL Solid Lines are Cuts Dotted Lines are Folds Bulkhead Fold on this line. Transom Taped Joints and Corners (folding is builders option) The SKIFF Folds to 28 x 48 x 15 1/4 Ply Floor 48 x width 18 Batt. 4/12/2014 Best position for Bulkhead is around the center fold line. CB S.F. Total Buoyancy Area 1 Dowel, 24 :long Permanent Note: The rope 28 steering attaches to the transom & bulkhead Use scrap to construct Foredeck 9 Constructed of 4 MM Coroplast /2 Coro-Cover 80 WLL 1 Dowel, 24 :long, Fixed Steering Arm 10 Push-Pull Rope Steering 5' PVC Side Supports SPEC'S 4 draft max. OAL = 7 feet OAW = 2-1/3 feet Paddle or Trolling Motor Powered FOLDED OAH = 10 inches 15 max Hull Speed = 4 mph Weight = 18 pounds + gear 28 W x 4' L x 15 H & 5 Pounds (hull only) Capacity = 225 pounds max (includes motor & battery) a ken simpson design Bulkhead and Transom are removable for storage. Optional Folds It is recommended that you use the folding seat design. Plans are free on the website. ASSEMBLY: *Cut Outline *Crease Folds *Bend Folds *Tape Joints *Make Supports *Cut Floorboard *Cut Deck Cover *Put it all together and go to the lake. Enjoy! Page 5


6 PHOTO ASSEMBLY I chose to build the more complex SKIFF, SKIFF, as shown, but the assembly process would be similar for any of the other designs presented. Note the bend at the 48 inch mark. I needed to fold the sheet in half, to fit in my PT Cruiser. It is also the bending point for the folded hull. When marking the Coroplast sheet, do not step or kneel on it, as this may leave a lasting impression. Basic layout materials for the Coroplast sheet. Note also the time stamps on the photos. It took less than ½ hour to layout and cut the hull form. Close-up showing intersecting pencil lines. Use a metal straightedge to support the knife edge when cutting, as shown at left. Also, when cutting, always place a strip of cardboard beneath the Coroplast. This prevents the knife from cutting into a hard surface below, and dulling it prematurely. Hull form cut to shape. Use a sharp utility knife to make cuts. Page 6


7 Creasing tool and 2x3 straightedge support. PHOTO ASSEMBLY It is critical that all folds be creased prior to bending. I used a screen assembly tool, which works quite well, but any dull edge tool should work. Use a straightedge to keep the tool on the marked line while pressing down. When bending, be sure to keep the panels flat, and bend evenly along the panel length. Creased line Bending up a side panel. Take your time creasing and bending the panels. It is easy to bend unevenly, and creating a bend line where you don't want one. It is best if two people perform this task. One holding the panels down with the 2x3, and the other bending them up evenly. Note that it is a little over 1 hour since the start of the process. Bow panels creased, ready for bending. Transom bent up, corner folds need to be creased. Page 7


8 PHOTO ASSEMBLY Folding the seams requires that you bend them 180 degrees, and flatten the seam as best you can, without crushing the material. Once all the hull seams are folded, you can start the taping process. Use only SCOTCH TOUGH DUCT TAPE, NO RESIDUE type. It is the best for Maximum Weatherability! Hull temporarily taped together, checking folds., Notice panel form, and general hull shape. See sketches, text and photo on next page for more taping information. I started by taping the outside of the transom panel to the side panels. This gives the hull some form. Next I taped each side panel center seam, on the outside, and finally the outside of the bow. All seams will have at least double tape application, and some triple tape, like the bow and stern. Inside bow triple taped seam. Bow seam holding tape. Page 8

9 ASSEMBLY All taped seams are described as follows: All seams have a single tape seal, spanning the gap between two panels, on both sides. Most will have an additional tape seal as reinforcement. Some, like the bow, will have a triple taped seam on the outside, for strength and durability. The simple sketches below should explain these variations. The samples are considered minimum tape requirements. Tape 4 MM Coroplast Typical Butt Joint (Side Panels) Single Taped Seam Inside and Outside (actual size) Typical Corner Joint (Transom) Single Tape Seal Inside Double Tape seal Outside Basic materials and tools needed to properly mark, cut, crease, form and tape the Coroplast hull. *Scotch Tough Duct Tape, No Residue type. *Dark Pencil *Utility Knife *Scissors *Creasing Tool also A good straightedge and a measuring tape. All work should be performed on a clean, dry flat surface. Basic Hull List of Materials (as of 3/2014) 4'x8' Coroplast, 4 MM (any color) Roll of Scotch Tough Duct Tape, No Residue 4'x4' ACX Plywood, ¼ inch (6 MM) thick 1 OD PVC Water Pipe, 10 foot length 6' x 6' Poly-Tarp material 1 x 2 x 8' Framing Lumber Total = $ 25 $ 10 $ 12 $ 3 $ 6 $ 4 $ 60 Typical Angled Bow Joint Triple Tape Seal Outside Double Seal Inside 'Coroplast' can be purchased at your local Sign Company. Page 9


10 ASSEMBLY It is important that all seams and edges be taped. This includes the top edges of the side panels, as shown at left, and all the bottom seams and edges, as shown at right. The tape not only seals cut edges, but it protects the outside corners from minor abrasion. Remember, if a taped edge gets damaged or the tape is compromised, it is easy to remove and replace the damaged area with fresh tape. I always carry a partial roll in the boat with me, just as a precaution. As you can see, this completes the basic hull assembly. Do not step in it until you have the ¼ plywood floor inserted, and then only on the floor. At this point the hull should weigh under 5 pounds! And, it is somewhat flimsy, with little torsional rigidity. This will improve once the floor is in place, and the bulkhead, poly-deck and transom are in place. Note the internal tape seals Depending on how you use the Skiff, paddle or trolling motor, determines where you place the Floorboard in the hull. The seat should be placed to the back of the floorboard, with plenty of room for your feet to rest on the plywood. Move it back and forth, until you find the right balancing location, where the hull is level in the water. Mark it's location on the hull, so you remember where to place it next time. Note the external tape seals Approximate weight: 5 pounds FLOORBOARD 1/4 ACX Plywood Round and sand all corners and edges. Complete with a waterproof finish, with a color of your choice. Approximate weight: 4 pounds Page 10
.")


11 ASSEMBLY The next step is to construct the 2 side supports. Depending on the hull chosen, these can be made of either 1x2 Lumber, for the KAYAK, PRAM and JON BOAT, or 1 O.D. PVC water pipe, for the SKIFF. The primary difference is that the first 3 hulls all have straight gunwales (top of the side panels). The Skiff has a curved gunwale, requiring a material that can bend to conform, which the PVC Pipe does. If you use the 1x2 lumber, each side will need to be about 4-1/2 feet long, with bolt holes about 1-1/2 from each end. The purpose of these supports is to hold the side panels together, bolted through, and to provide side stiffness. Refer to pages 1, 3, 4 & 5 for visual information. The SKIFF supports need to be 5 feet long, which is a standard 10' pipe cut in half. The next step is to cut a 1/4 slot the entire length of the 5' pipe, as show in the photo on the right. This may not be easy. I loosely clamped the pipe to my workbench and used a thin, carbide tipped blade, in my small circular saw. Two passes and the slot was cut. This could also be cut using a 1/4 router bit, but the setup would be more complicated. Once the slots are cut, file the slot edges smooth, so they do not upset the taped edged of the side panels. Next, starting at the transom end, press the support onto the side panel as shown at right. Note how the side panel bows out as the support is pressed in position. This will be amplified once the forward bulkhead is in place. These can be bolted in place, just like the 1x2's. I chose to also hold them down with small top extensions to the Transom and Bulkhead assemblies. See photos below for detail. PVC Pipe Side Supports. 1x2 Lumber on outside is an option. Preferred method of mounting the PVC Pipe option. Bolt through option Bulkhead Extension Option Transom Extension Option Bolt-through is best for hull security. Page 11


12 ASSEMBLY The Bulkhead and Transom both can be made from 5 or 6 MM plywood, with 1x2 side supports, as sown in photos. The transom needs a 2x4 top support, only if you are going to use a Trolling Motor for propulsion. Below are the basic sketches of each. Go to page 21 for latest details. 9-3/ Fits snug to inside. Non-motor version Notches cut to clear PVC side supports. 1-1/ / All wood components must be waterproofed prior to use. Round and sand all edges and corners. 28 Approximate Dimensions 5/16 Bolt Holes 5/16 Bolt Holes Bulkhead with 1x2 supports Approximate weight: 2 pounds 6 Transom (back) with 1x2 vertical supports spaced 16 apart Transom (inside) with 2x4 motor mount. Approximate weight: 3 pounds NOTE: The photos show that there is a lot of individual options in constructing these components. The Transom is held in place, on the outside of the hull, by through bolting it to an internal 1x4 Support Bar (see next page). The Bulkhead is bolted to the lower front of the folding seat, for a fixed location and rigidity. If you use a different seat you should bolt the Bulkhead to the top of the hull side panels, once you determine the best balance location. This is a trial and error process, based on your weight and position in the boat. The important thing is to provide torsional and side panel rigidity for the hull. The Coroplast material is very flexible, and must be supported, as shown, with the addition of a rigid floorboard and side panel supports. Page 12


13 1 x 4 Lumber Transom Internal Support Bar T-Nuts spaced 16 apart, on center. The Transom Support Bar serves two purposes; It adds necessary form to the rear panel when used as a paddle boat, and clamps the transom when used as a motor boat. The drilling of the bolt holes in the support bar and transom should be done at the same time, for proper alignment. The T-Nuts should be glued in place, on the side of the support bar facing inside the hull There are options when enclosing the ends of the hull. However, for the Kayak, Pram and Jon Boat, it is necessary to use the Poly-Tarp material, as shown at right, because it is very flexible and will fold-in when the hull is stored. It is important that it be pulled tight to the spacer bar, and taped in place, to maintain the hull shape. The dimensions are approximate, as you can modify to suite your needs. BUT remember, the need for the cover is critical to maintain hull shape and stiffness. The bow Foredeck for the SKIFF can be made of the same material, or can be constructed from the 2 scrap pieces left over from cutting the bow shape, page 5. Tape them together, and cut to size, as shown at right, and below. Make sure you tape the corners to the hull panels very securely, as they will take a lot of stress under use. It bears repeating; too much tape is better than too little tape! t ou Ab 1/4-20 T-Nuts ASSEMBLY Approximate finished weight: less than 15 pounds. Includes floorboard and seat. Best position for Bulkhead is at the center fold line. 22 1/4-20 T-Nut Page 13


14 ASSEMBLY VIEW FROM AFT, SEATING AND LEG ROOM FULLY ASSEMBLED, PADDLE VERSION Floorboard Folding Seat 8 foot paddle Light Storage Area ROPE STEERING, TROLLING MOTOR POWERED 1/4 Nylon Rope, from Motor to Tiller Detail of Tiller Assembly Open 1 Screw Eyes 1 PVC Pipe 14 long Spring Clip Rope to Steering Arm Under Power, Note Low Waterline Pivot Bolt Page 14


15 Tiller Detail, Knotted Rope Inside Slot Batt. ROPE STEERING Loaded Hull in Water. Waterline Collapsed Hull, Ready to Fold. These Coroplast Hulls are the latest designs utilizing this tough material. All are constructed in much the same way. Each has it's attributes, and faults, but all are durable, safe, and fun to build and operate. Depending on the builders needs, changes to the internal layout, seating and steering can be modified to suite. The in-water performance is stable and comfortable, with a maximum speed of about 4 mph under power. Keep the seating low in the hull for best balance and stability. The paddle versions will wander slightly from side to side, but within reason. Pay attention to the maximum load capacities, and do not overload the hull, as it could deform. Taped seams should be checked each time the boat is used, for safety. It is relatively easy to replace torn or worn tape, and should be done when noticed. Always carry some spare tape with you in the boat. And always wear a PFD when in the boat, and promote on-water safety. Happy Boating! Folded Hull, Ready for Transport All 4 Hull Models Page 15
16 MODIFICATIONS In an attempt to keep things simple, I have re-designed the interior of the hulls, to include a unified floor, seat and bulkhead assembly. This will keep weight down, lessens the number of components to assemble, and insure hull safety and rigidity. The outline shape of the floorboard is different for each design, but the overall functional concept is the same. Where specified, the bulkhead must be installed for hull torsional rigidity. 27 Seat panels These modifications are suggested to simplify the constructed of hull assembly process at the water. You may 3/8 Plywood have other ideas, and you should implement them minimum. to satisfy your needs. Take care in material selection, and overall weight. For example, by adding 1x2's on each top edge of the floorboard, Seat positioned 1/4 Plywood many lightening holes could be made in the on the center 27 wide x 48 long floorboard to reduce overall weight, and yet width of the floor maintain floor rigidity. The same treatment could be applied to the seat assembly. In contrast, changes to the hull should be kept to a minimum. The only exception is if you wish to fold some of the seams, rather than cut them, as described. Alternate Shapes 14 Steering Tiller Place a cushion on seat for more comfort. 3/4 Piano Hinge The Bulkhead assembly / Steering assembly should be placed just forward of the Seat assembly, as shown. Secure the Piano Style Hinge to a 1x2 mounted on the floorboard, as shown, using 3/4 flat head screws. Center Support 3/8 Plywood Seat Bottom & Back 18 Square Bulkhead 1x2 Forward Support 1 x 4 Lumber Fwd.& Ctr. Supports Round all Corners and Edges 3/4 Piano Hinge Nylon Support Strap each side Glue & screw the Forward and Center supports in place. Glue & screw the Seat Bottom to the supports, and the rear edge flush to the floor, as shown. The Back of the Seat should be hinged to the Seat Bottom, and should touch the floorboard when in the open position, as shown. To insure the hull is properly balanced on the water (level) when occupied, it may be necessary to move the whole floorboard assembly forward, or backward. Make sure the front of the floorboard will not interfere with the insides of the hull, so cut to fit.. Page 16


17 Cut Hull Form ADDITIONAL PHOTOS Taped & Folded Hull Hull Assembly Components Transom Support Screws Transom Support Bolt Knobs Fixed Forward Support Removable Floorboard Folding Seat Steering Arm & Bulkhead for Motorized Option Page 17


18 ASSEMBLY KNOBS This drawing defines a typical assembly bolt-knob, usually used to connect 2 hull modules together. However, variations of this design are also commonly used to clamp sub-assemblies together, such as the Transom Support Bar to Motor Mount, and Side Support Bars to Hull. For those applications, the bolt size should be 1/4-20 thread, about 2-1/2 inches long, and the Knob should be 1-1/2 inches square, still made from the same 1 x 2 stock. The center hole size should be 1/4 dia., and the 3/8 deep hole should be 9/16 in diameter. Use this type of bolt-knob for all component to component assemblies. The sketch below is one method of attaching the side-to-side Spacer Bars to the Coroplast hull side panels. These bars provide hull rigidity, and must be secured in position well. The little alignment tab cap can be eliminated, as it might interfere with the Tarp cover. You can modify this design to suite your needs, but make sure you have a tight connection. Optional Design Page 18


19 ADDITIONAL PHOTOS These photos shows the revised position of the rope steering screw-eye on the bulkhead. By moving it inward keeps it out of harms way, and makes it easier to paddle the boat without the paddle hitting it accidentally. NOTE: All 4 screw-eyes should be opened up to allow the 1/4 rope to be inserted. Use 2 vice grips to perform this operation, and file smooth any ridges created. It is important that the optional motor be situated on the center of the transom motor mount as shown, for balance and easy steering. I created a double loop wire ring, made out of a wire hanger, around the motor steering shaft, on which to attach the rope steering. The ends of the rope should be knotted to a spring clip for easy assembly, and dis-assembly, shown below. Also, note the new pivoting wire clamp. Any type of spring clip will do. Page 19


20 ADDITIONAL PHOTOS After a few voyages with the SKIFF, I realized that it was a better power boat than a paddle boat, no surprise. The slightly higher side panels, which provide good freeboard for a loaded hull, were not as friendly when paddling, as it was necessary to hold the paddles higher to prevent them from hitting the PVC side supports. This being said, the boat still made good forward progress, although a bit uncomfortable. As a consequence, I have made the paddle versions of these hulls 9 inches high, which also provides a little more buoyancy. The KAYAK and JON BOAT should both be comfortable paddlers. Wire Clamp Clamp in lowered position Clamp secured over the pipe Low profile paddle clearance You will note that I modified the method of clamping the PVC side rails in place. The new method lowers the profile of the bulkhead assembly, thereby allowing more comfortable paddle position. The new pivoting wire clamps were made from bending heavy-duty coat hanger wire to shape, and do a good job of snapping over the PVC pipe, and holding it in place. Use your imagination to create a secure method of insuring the PVC side supports do not come loose during use. These hulls can, and should, be modified to suite your boating style. However, do not make radical changes to the basic hull shape. Remember, the Coroplast material is tough, but flimsy, so pay particular attention to making sure the assembled structure is as rigid as can be, and that all the components are well secured together. You do not want this to un-fold while in the water. Always check the tape seals before, during and after a cruise, and repair as necessary. Happy Boating! Back on land after more in-water testing for stability and balance. Assembled Skiff fits in my PT Cruiser with passenger seat folded down. Page 20


21 ADDITIONAL ON-WATER PHOTOS At Waters Edge On the Water Under Motor Power Fully Loaded waterline Page 21


22 ADDITIONAL PHOTOS These photos show the detail of the 1x2 side supports. I would suggest the use of these 1x2's for most applications. They are removable for all versions. They can be permanently mounted, as shown, for the SKIFF design only, because it does not fold flat like the others. A 6 gap between the forward supports and the rear supports is required at the fold line. Further, by attaching the center bulkhead to the side panels, eliminates the need for additional support. A horizontal 1x1, 2 inches long was glued and screwed to the cutout at the top of the bulkhead, as shown below. A 1/4 T-Nut was installed inside, and 2 new Bolt-Knobs were made to clamp it all together, through the tape reinforced side panels. Using this method provides good side support and rigidity, while allowing some flex at the center fold line, necessary for folding, storage and transport. Note: For the versions that utilize the full length removable side supports, no bulkhead is used, or required, only the spacer bars. I have found that the bulkhead positioned at the center fold line, is the best location for hull balance. You may have to shift your seat, depending on your weight, fore or aft a little for final trim. It varies if you are motoring, or just paddling. But, it is important to balance the boat level for best performance! #6 x 3/4 screws & washers, about every 8 Abo ut 6 Center Fold Line END Page 22
23 OPTIONAL CANOPY See photos next page Canopy Bow Supports (2) 1/2 Plywood WLL Page 23

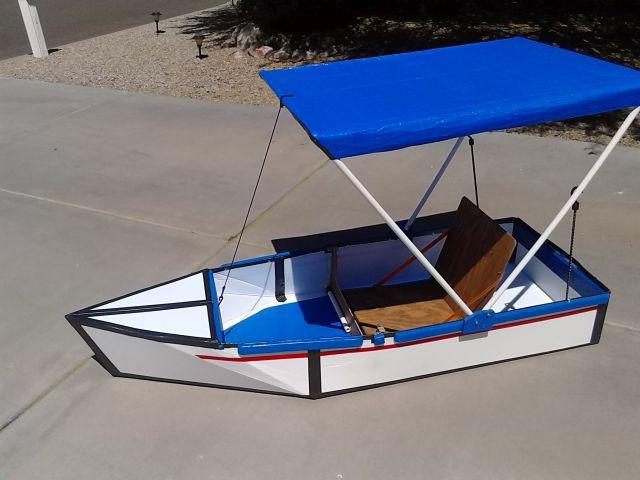
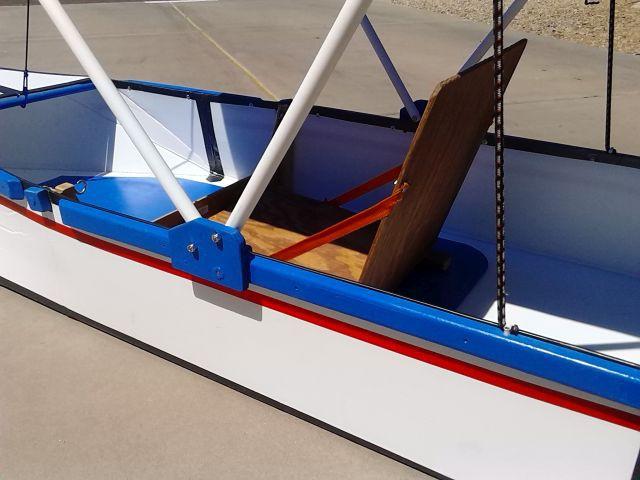
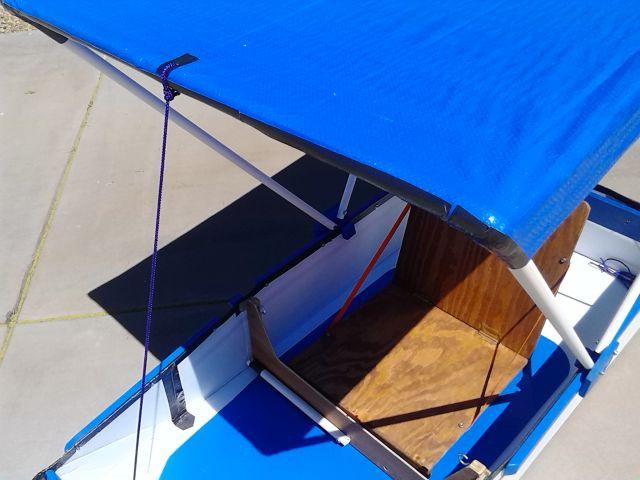
24 OPTIONAL CANOPY Page 24
BASIC COROPLAST HULLS
 BASIC COROPLAST HULLS Quick Assembly, Folds Up to a Small Package. FOUR + HULLS, most single occupant designs. Light Weight, Supports 215. Easy to Set-Up, and Easy to Paddle. Fits in any vehicle! Choose
NEW DESIGNS. Print in Landscape Mode with ¼ inch borders. Hinges (2) degrees. 1 Seating Type Optional
 degrees. 1 Seating Type Optional") 2017 IDEAS NEW DESIGNS Ken Simpson Designs Drawn 06-01-2017 Rev. 07-02-2017 The SPORTSMAN 10'L x 36 W x 15 H 475 pound Capacity Print in Landscape Mode with ¼ inch borders. Hinges (2) 36 30 8 degrees Click
2017 IDEAS NEW DESIGNS Ken Simpson Designs Drawn 06-01-2017 Rev. 07-02-2017 The SPORTSMAN 10'L x 36 W x 15 H 475 pound Capacity Print in Landscape Mode with ¼ inch borders. Hinges (2) 36 30 8 degrees Click
CORO POWER BOAT 3 in 1 Design
 3 in 1 Design A MULTI-PURPOSE COROPLAST BOAT Ideal for all generations to enjoy. Weighs only 20 pounds! Drawn 06-20-2014 Ken Simpson Designs Rev. 09-25-2014 Print in Landscape Mode with ¼ inch borders.
Small, Lightweight, Very Portable and Low Cost. Print in Landscape Mode with ¼ inch borders.
 The 1 SHEET WEDGE Drawn 09-20-2015 Small, Lightweight, Very Portable and Low Cost Ken Simpson Designs Rev 07-31-2016 Print in Landscape Mode with ¼ inch borders It may look similar to some of my other
Small, Lightweight, Very Portable and Low Cost. Print in Landscape Mode with ¼ inch borders.
 The 1 SHEET WEDGE Drawn 09-20-2015 Small, Lightweight, Very Portable and Low Cost Ken Simpson Designs Rev 03-14-2018 Print in Landscape Mode with ¼ inch borders It may look similar to some of my other
POD 2 Paddle On Demand & POD 2-XL Adult ( Page 17 ) SPECIFICATIONS:
 SPECIFICATIONS:") POD 2 Paddle On Demand & POD 2-XL Adult ( Page 17 ) SPECIFICATIONS: Simple to build, light weight, rugged, stable, unsinkable, & designed for the younger generation! Glue & Screw Assembly Nov. 2010 Hull
POD 2 Paddle On Demand & POD 2-XL Adult ( Page 17 ) SPECIFICATIONS: Simple to build, light weight, rugged, stable, unsinkable, & designed for the younger generation! Glue & Screw Assembly Nov. 2010 Hull
Soling Building Tips II
 Soling Building Tips II Prepared: Arthur Deane Jan 20, 2002 adeane@ic.net Introduction The following are some lessons learned and experience gained in building a Soling kit. The plan developed is based
POD 2-XL & & ( 17 ) SPECIFICATIONS:
 SPECIFICATIONS:") POD 2 Paddle On Demand & POD 2-XL Adult ( Page 17 ) Simple to build, light weight, rugged, stable, unsinkable, & designed for the younger generation! Kid Friendly! Nov. 2010 SPECIFICATIONS: Glue & Screw
POD 2 Paddle On Demand & POD 2-XL Adult ( Page 17 ) Simple to build, light weight, rugged, stable, unsinkable, & designed for the younger generation! Kid Friendly! Nov. 2010 SPECIFICATIONS: Glue & Screw
Constitution Instructions
 Constitution Instructions This kit will build a 1:48 scale hull for the USS Constitution frigate. The kit contains the following parts. 1/8 deck with laser etched deck lines 1/8 railing Ribs Center keel
A Boat Builders Story
 A Boat Builders Story By Ken Simpson September 2013 This is a tale about the experiences of Bayard Stix Cook of Florida, and his build of the 1 SHEET + pram. For the purpose of this story we will call
PAY N PAK, 1/12 th Scale, Limited Sport Hydro P Sport Hydro
 1980 82 PAY N PAK, 1/12 th Scale, Limited Sport Hydro P Sport Hydro Introduction: The 1980 turbine Pay N Pak is a good subject for a model race boat. It has a low profile, mild pickle-fork setback, long
1/10 th Scale 1956 Ted Jones Classic Hydroplane
 1/10 th Scale 1956 Ted Jones Classic Hydroplane Preparation These plans show outside sheeting of 3/32 balsa laminated with 1/64 birch ply. This makes a light and strong skin for this boat. Optionally you
TRIFECTA. 3 Boat Plans for the Price of 1 - FREE. Assembly Manual. The GUPPY. The TRIPOD. The TADPOLE. Nov.
 The GUPPY TRIFECTA 3 Boat Plans for the Price of 1 - FREE Assembly Manual 3 SIMPLE MODULAR BOATS THAT CAN BE NESTED AND EASILY STORED ON-BOARD SHIP, OR IN AN RV, SUV, TRUCK and GARAGE. Less than 5 feet
Blazer Marine, Whiplash Sport 40
 Blazer Marine, Whiplash Sport 40 Thank you for choosing to build the Whiplash 40. We have spent over 12 years perfecting this design, and finally we are making it available to the world. We are excited
PT 11 trouble-shooting and maintenance.
 PT 11 trouble-shooting and maintenance. Does your rudder not stay down?...your back seat slip off?...your knobs tight and your leather pads loose? Maybe we can help. We have used our PT 11 s hard enough
Step 1: Block sand the transom to remove the seam joint. The end result should be a flat transom without a ledge where the seam joint is.
 WhiplashGV Instruction Manual Email: Brian@Blazermarine.com Phone: 513-598-1769 Step 1: Block sand the transom to remove the seam joint. The end result should be a flat transom without a ledge where the
Plans and Instructions to build a folding reflector oven
 Plans and Instructions to build a folding reflector oven Kayak2go.com also has folding kayak plans available for purchase. The low cost and ease of construction make the folding kayaks a great youth group
Below are the instructions to build a roller-furling unit for under $10. Read the entire process before beginning the project.
 Greg Cowens' $10 PVC Roller Reefing for CP-16's by Greg Cowen Below are the instructions to build a roller-furling unit for under $10. Read the entire process before beginning the project. Materials: 2
Ref Part Part # Qty Letter A Rudder Catcher B X 1/2 PH Bolts C Rudder Bracket
 Ref Part Part # Qty A Rudder Catcher 07.2694.0000 1 J B Q A B 10-32 X 1/2 PH Bolts 07.2136.0000 10 C Rudder Bracket 07.2689.0000 1 D Kayak Pad Eye 01.1315.0430 2 E Cherry Rivets 01.1315.0459 4 H T N P
INSTALLING YOUR CLC RUDDER
 INSTALLING YOUR CLC RUDDER These instructions are written to help you install the CLC rudder kit on your wooden kayak. The rudder can be fitted to your boat during construction or after completion. Please
Making Spars for the Schooner Jeanette
 Making Spars for the Schooner Jeanette..... by Byron Rosenbaum Figure 1. Byron Rosenbaum s 1:16-scale radio-controlled model of the schooner Jeanette. All photographs by the builder. The spars required
Revisions to the Regulations for Agility Trials
 Revisions to the Regulations for Agility Trials Effective January 2, 2018 Equipment changes may be done prior to January 2, 2018, but must be completed by January 2, 2018 This insert is issued as a supplement
F-1279-R UPPER RIGHT SKIN F-1280-R RIGHT SIDE SKIN F-1281-R LOWER RIGHT SKIN F-1208-R FUSELAGE FRAME
 F-1282-R BOTTOM RIGHT SKIN F-1283C J-STIFFENER F-1278 TOP SKIN F-00009-L ADAHRS BRACKET F-00009-R ADAHRS BRACKET F-1279-R UPPER RIGHT SKIN F-1280-R RIGHT SIDE SKIN SECTION 10: TAILCONE F-1279-L UPPER LEFT
H ow To Buil d A Wa ter Rocket
 H ow To Buil d A Wa ter Rocket DESIGN AND DEVELOPMENT Brainstorm The first step in the design of a water bottle rocket is brainstorming. Brainstorming is a problem-solving technique that involves the spontaneous
(PLEASE CONTACT YOUR LOCAL DEALER or CUSTOMER SERVICE FOR WARRANTY INFORMATION)
") RUDDER KIT SOLO KAYAKS IMPORTANT: Tandem models will require the Wildy Supplemental kit in addition to this kit. The Supplemental kit provides extension straps and extra footbraces that allow rudder positioning
RUDDER KIT SOLO KAYAKS IMPORTANT: Tandem models will require the Wildy Supplemental kit in addition to this kit. The Supplemental kit provides extension straps and extra footbraces that allow rudder positioning
AGM 33 PIKE ALL FIBERGLASS. Specifications Length: 92 Diameter 5.5 Weight: 24 lbs Motor Mount: 75mm Fins: 6-3/16 G10 CP: 68 from nose tip Parts List
 ALL FIBERGLASS AGM 33 PIKE Specifications Length: 92 Diameter 5.5 Weight: 24 lbs Motor Mount: 75mm Fins: 6-3/16 G10 CP: 68 from nose tip Parts List (1) Filament Wound Nose Cone w/ Metal Tip (1) Nose Cone
Grandpa's Homemade Rocket for About a Dollar!
 Grandpa's Homemade Rocket for About a Dollar! Grandpa and Granny Co. 2012 The most common items needed: (The number of Rocket parts from each item is before the parts name and its proportionate cost is
INSTALLING THE PROWLER 13 RUDDER
 INSTALLING THE PROWLER 13 RUDDER Parts Included: Steering Parts: Foot Rail Parts: Rudder Parts: Retraction Parts: 4 Rubber 2 Rail Assemblies Rudder Body 1 Rudder Retraction Grommets (includes steering
Pakboats PakCanoe Assembly Instructions
 Pakboats PakCanoe Assembly Instructions Note: Please read these assembly instructions carefully before assembling the canoe. a A. Assembling the canoe Note: Don't be afraid to get into the canoe while
Stand-N-Fish FULL DETAIL INSTALLATION INSTRUCTIONS
 1 Stand-N-Fish FULL DETAIL INSTALLATION INSTRUCTIONS Thank you for purchasing the incredible new Stand-N-Fish Kayak Fishing System. Once installed on your kayak the Stand-N-Fish will take your kayak fishing
RUDDER KIT INSTRUCTIONS
 C I N S T R U C T I O N S RUDDER KIT INSTRUCTIONS PAMLICOS-0,0,T, T, 60T, Excel Rotomolded Pamlico 0, 0, T, T, 60T, Excel The addition of a rudder to a kayak results in additional control and efficiency,
A Table Top Wind Tunnel You Can Build
 A Table Top Wind Tunnel You Can Build Basic principles of aerodynamics can be studied in the classroom with this simple, inexpensive wind tunnel. All you need to build it is some cardboard boxes, glue,
Stevenson Projects Building the Hull Top Deck and Bulkheads
 Stevenson Projects Building the Hull 1. Print out both piece sheets. 2. Cut out one keel piece and glue it to a piece of balsa wood or dense cardboard. Cut out the second keel piece and glue it to the
Carving a Custom Seat
 Carving a Custom Seat Seat Carving your own seat from mini-cell, high-density foam is really quite simple and has proven to be more comfortable than any commercially produced seat and often more reasonably
AUSTRALIAN ARROW AND ARAFURA CADET ASSOCIATION ARROW CATAMARAN RESTRICTIONS AND MEASUREMENT CERTIFICATE
 AUSTRALIAN ARROW AND ARAFURA CADET ASSOCIATION ARROW CATAMARAN RESTRICTIONS AND MEASUREMENT CERTIFICATE 1 NOTE: The object of these restrictions is to provide uniform specifications and restrictions for
SECTION 10iS: TAILCONE
 VAN'S AIRCRAFT, INC. F-1282-R BOTTOM RIGHT SKIN F-1283C J-STIFFENER F-1278 TOP SKIN F-00009-L ADAHRS BRACKET F-00009-R ADAHRS BRACKET F-1279-R UPPER RIGHT SKIN F-1280-R RIGHT SIDE SKIN SECTION 10iS: TAILCONE
Boat Boat Loader Fitting Instructions
 Aerodynamic & Heavy Duty Roof Rack Systems Australian Made - Australian Owned www.rhinorack.com Boat Boat Loader Fitting Instructions CONTROLLED Balance point 3 Front eye nuts position 3 Transom eye nut
SEADUCER BOATS GAS SPORT HYDRO
 SEADUCER BOATS GAS SPORT HYDRO COME VISIT US ON THE WEB AT WWW.SEADUCERBOATS.COM 2 - Pkg. Of 440 push rod ends 2 - Pkg. of solder-on rod ends 2 -water outlet fitting 1-1/4" prop nut 1 -.250" x 30" flex
aero naut Order No. 3009/00
 aero naut Order No. 3009/00 Introduction: The model should be assembled following the sequence of the stages of construction described in these instructions. The laser-cut components are individually numbered.
INSTALLING THE TRIDENT 11, 13 OR 15 RUDDER
 INSTALLING THE TRIDENT 11, 13 OR 15 RUDDER Parts Included: Steering Parts: Foot Rail Parts: Rudder Parts: Retraction Parts: 4 - Rubber 2 - Rail Assemblies 1 - Rudder Body 1 - Rudder Retraction Grommets
8-GUN CORVETTE ASSEMBLY INSTRUCTIONS
 8-GUN CORVETTE ASSEMBLY INSTRUCTIONS THE HULL STEP 1 Fasten the Deck to the Hull. Find the hull. This is a large, pink, ship-shaped piece of insulating foam board. This will form the base of your model
Bladerider X8 Assembly Help Notes
 2.1 Remove All Parts & Have Some Tools Handy Remove all items from the box and identify each part as per the packing sheet and check that nothing is missing. If there is something missing, please email
Wooden Canoe. Building a One-Off Wood & Canvas Canoe. Ray Arcand: A Living Link to the Past. Issue 134, April 2006 Volume 29, No.
 Wooden Canoe Issue 134, April 2006 Volume 29, No. 2 Building a One-Off Wood & Canvas Canoe Courses, Classes, Early Summer Ray Arcand: A Living Link to the Past WCHA Annual Report Building a One-Off Wood
Seamax Boat Bimini Top User Manual
 Seamax Boat Bimini Top User Manual Size A / B / C 3 BOW Size D / E / F 4 BOW Thanks for your purchase. Seamax Bimini Top has built-in the aluminum eye-end fitting to install on standard oar lock pin (diameter
EPP Version Building Notes Updated
 EPP Version Building Notes Updated 12-10-2013 The Zulu covers a wide range of flying conditions: slope soaring in light to strong lift, thermalling, aerobatics, discus launches, and combat; for skill levels
Rudder Kit Assembly Instructions for Quest 13
 Rudder Kit Assembly Instructions for Quest 13 Revised 4/2/2015 78501 Rudder System The Hobie Quest is designed for the addition of an optional rudder system. Rudder systems in boats like this allow you
ASSEMBLY GUIDE US PATENT NO. 8,316,788. Cockpit handles. Deck buckles. Seat pad. Seam channels. Coaming (cockpit rim) straps. (front) (back) Cockpit
 straps. (front) (back) Cockpit") SSEMLY GUIDE 2014 Deck buckles Seam channels ackrest ockpit handles Seat pad oaming (cockpit rim) Deck straps (back) ow (front) Handle Handle ockpit fairing ulkhead ulkhead ow fairing US PTENT NO. 8,316,788
SSEMLY GUIDE 2014 Deck buckles Seam channels ackrest ockpit handles Seat pad oaming (cockpit rim) Deck straps (back) ow (front) Handle Handle ockpit fairing ulkhead ulkhead ow fairing US PTENT NO. 8,316,788
Kayak Trailer Project.doc
 Kayak Trailer Project.doc Note: the red trailer shown in some of the illustrations is no longer available from Northern Tools. However, may be able to adapt similar trailer, but measurements may not be
Tugster. Tug Boat. Competition or Sport Tug Kit. A Zippkits R/C Boat. Building Instructions
 Z I P P M A N U FA C T U R I N G Tugster Tug Boat Competition or Sport Tug Kit A Zippkits R/C Boat Building Instructions 2016 JMP Hobby Group St. Paul, Indiana 47272 www.zippkits.com Toll Free (866) 922-ZIPP
U STAND INSTALLATION INSTRUCTIONS
 U STAND INSTALLATION INSTRUCTIONS Thank you for purchasing the incredible new U STAND by Stand N Fish. Once installed on your kayak the U STAND will enhance your kayak fishing enjoyment to a whole new
Adaptation of the Paddle-One
 Adaptation of the Paddle-One Putting some into your paddling machine. Richard E. Butts richeb@frontiernet.net @Richard_Butts Bring balance and fun to your paddlesport training! January 2010 http://www.frontiernet.net/~richeb/
GREEK TRIREME, 480 B.C. Scale: 1/72 Length: 515mm Width: 180mm Height: 220mm
 GREEK TRIREME, 480 B.C. Scale: 1/72 Length: 515mm Width: 180mm Height: 220mm HISTORY: The model represents a Greek Trireme from the age of battle of Salamis (480 B.C.). The crew were 170 oarsmen and about
TWO KAYAK VERTICAL FOLD-DOWN CARRIER
 S P X O TWO KAYAK VERTICAL FOLD-DOWN CARRIER TA R 2 50mm 40mm Stax Pro2 Kayak Carrier Red Load Straps Jawz Adapters Mounting Bolts Foam Blocks 9 Safety Strap 12 Tie-Downs Installation & Loading Instructions
QUALITY ALUMINUM BOAT LIFTS, INC. INSTRUCTIONS. Dominator Lake Lift
 INSTRUCTIONS Dominator Lake Lift PHONE:251-986-3882 * FAX:251-986-3136 QABLDOMINATORINST.2014 P a g e 1 Quality Aluminum Boat Lifts, INC. Installation Instructions: Dominator Lake Lift Thank you for your
INTERNATIONAL SUNFISH CLASS ORGANIZATION CLASS RULES
 INTERNATIONAL SUNFISH CLASS ORGANIZATION November 2017 CLASS RULES 1. GENERAL The design and development of the Sunfish sailboat was directed to the creation of a one-design class where the true test is
VERTICAL SURFBOARD CARRIER READ ME! IMPORTANT WARNING!
 VERTICAL SURFBOARD CARRIER ENG RRAC09 30 min READ ME! Thank you for purchasing a Front Runner Vertical Surfboard Carrier. Before you start, take a moment to familiarize yourself with this Fitting Instruction
THE OWNER'S MANUAL IS IN TWO VOLUMES: VOLUME 2 TECHNICAL SPECIFICATIONS - ASSEMBLY PROCEDURE ZODIAC
 CAUTION NOTICE: CAREFULLY READ THIS MANUAL BEFORE OPERATING YOUR BOAT. THIS OWNER S MANUAL IS IN TWO VOLUMES THAT MUST BE KEPT TOGETHER. THE OWNER'S MANUAL IS IN TWO VOLUMES: - VOLUME 1 DEALS WITH OPERATING
8MAY15 US RACK, Inc Falcon Drive, Madera, CA
 8MAY15 US RACK, Inc. - 2850 Falcon Drive, Madera, CA 93637-559-661-3050 INSTRUCTIONS for Bedrail-mounted MOTORCYCLE RACK, Model 2001-4TRA WARNING: Do NOT attempt to install or use this rack without following
-Round Down- Description & Overview. VEX Classroom Competition Round Down
 -Round Down- Description & Overview Round Down is a head-to-head robotics competition designed and scaled to be run in a classroom environment by a single teacher. This game provides a challenge for designers
USG Ceiling Solutions. LOGIX Integrated Ceiling Systems INSTALLATION GUIDE
 USG Ceiling Solutions LOGIX Integrated Ceiling Systems INSTALLATION GUIDE LOGIX Integrated Ceiling Systems INSTALLATION GUIDE Logix Brand Integrated Ceiling Systems integrated ceiling systems from USG
IMPORTANT: RECEIVING INSTRUCTIONS:
 Instruction Sheet Sidewinder Mechanical Bender IMPORTANT: RECEIVING INSTRUCTIONS: Visually inspect all components for shipping damage. If any shipping damage is found, notify carrier at once.shipping damage
Inuit Owners Manual. Inuit 13.5
 Inuit Owners Manual We have advanced the design and comfort level of the Inuit series beyond any other touring kayak. The Tru-Track hull offers straight tracking despite the shorter hull length plus it
How To Build A Water Rocket
 How To Build A Water Rocket DESIGN AND DEVELOPMENT Brainstorm The first step in the design of a water bottle rocket is brainstorming. Brainstorming is a problem-solving technique that involves the spontaneous
SERIES 2 RAMP OWNER S MANUAL TOOLS REQUIRED: BEFORE YOU BEGIN... Read and understand these instructions before beginning a ramp setup.
 SERIES 2 RAMP OWNER S MANUAL BEFORE YOU BEGIN... Read and understand these instructions before beginning a ramp setup. Use caution and care for your back when lifting, pushing, pulling, folding or unfolding
CONSTRUCTION OF A GUNBOAT A CLASS YACHT by Brian Dill
 CONSTRUCTION OF A GUNBOAT A CLASS YACHT by Brian Dill The Gunboat design is the latest Radio A class from Graham Bantock, optimised to provide the best boat speed below 4 knots and to be as good as possible
ICE PROTECTION - PROPELLER
 ICE PROTECTION - PROPELLER. DESCRIPTION This section describes the portion of the Ice Protection System pertaining to the propeller. This includes the slinger ring and the de-icing propeller boots. Grooved
Peinert Dolphin. Assembly
 Peinert Dolphin Assembly The Dolphin is easily rigged; there are only four removable parts - the seat, the foot stretcher, the rigger arm, and the fin. Removal and installation of the seat. If the seat
Planning and general precautions ithrust Tunnel Systems installations.
 Version 1.0 This recommendation will go through the different factors to consider when choosing where and how to fit thruster tunnels in a boat. Some of these recommendations might be difficult, or even
Shoreline Cantilever Lift 2500lb Capacity Models: (108" inside width) - Part # (120" inside width) - Part #
 - Part # (120 inside width) - Part #") Shoreline Cantilever Lift 2500lb Capacity Models: 25108 (108" inside width) - Part # 1017402 25120 (120" inside width) - Part # 1017403 1. 2. 3. 4. 5. CAUTION - PUT SAFETY FIRST Before attempting to install
Shoreline Cantilever Lift 2500lb Capacity Models: 25108 (108" inside width) - Part # 1017402 25120 (120" inside width) - Part # 1017403 1. 2. 3. 4. 5. CAUTION - PUT SAFETY FIRST Before attempting to install
Hat s off to you for choosing a kit from Port Townsend Watercraft.
 Hat s off to you for choosing a kit from Port Townsend Watercraft. 1 A 30 year fascination with the challenges of nesting boat design, and many prototypes have led to the PT Eleven. Because you chose this
SEADUCER BOATS GAS MONO COME VISIT US ON THE WEB AT
 SEADUCER BOATS GAS MONO COME VISIT US ON THE WEB AT WWW.SEADUCERBOATS.COM 1 - Pkg. Of 440 push rod ends 1 - Pkg. of solder-on rod ends 2 -water outlet fitting 1-1/4" prop nut 1 -.250" x 24" flex shaft
Hansa COG 14 th century SCALE: 1/72 Length: 430mm Width: 210mm Height: 330mm
 Hansa COG 14 th century SCALE: 1/72 Length: 430mm Width: 210mm Height: 330mm HISTORY: The Hansa was a medieval association of German cities which engaged by in long distance business mainly in area of
Blazer Marine, Whiplash Sport Hydro
 Blazer Marine, Whiplash Sport Hydro Thank you for choosing to build the Whiplash Sport Hydro. We have spent over 12 years perfecting this design, and finally we are making it available to the world. We
CLEANROOM GEL GRID CEILING SYSTEM PRODUCT DATA Division
 5023 HAZEL JONES ROAD, BOSSIER CITY, LA 71111 888.315.1561 800.877.8746 FAX SALES@GORDONCLEANROOM.COM GORDONCLEANROOM.COM AN EMPLOYEE OWNED COMPANY CLEANROOM GEL GRID CEILING SYSTEM PRODUCT DATA Division
THOR 10 HAMMER CAGE INSTRUCTIONS
 75 " 7m 78 4" m 6" 8.8m 45 ".70m 4.9deg 6 4" 6m 44 4".67m 75 " 7m 9 4" 0m 44".m 497 4".64m The 70, Thor Hammer Cage, consists of four heavy duty aluminum net poles. The unique pole structure reduces the
Trogear Bowsprit Through Hull Installation Manual
 Trogear Marine Products, LLC www.trogear.com info@trogear.com 866-616-2978 Trogear Bowsprit Through Hull Installation Manual Congratulations on your purchase of the Trogear Bowsprit which can be installed
SECTION 23iS/U: SIDE SKINS
 SECTION 23iS/U: SIDE SKINS F-1203G-R BULKHEAD SIDE CHANNEL F-01248-R-1 ARM REST F-01205D SEAT BACK ADJUSTMENT GUIDE, 4 PLACES F-01205B-1 ROLL BAR ATTACH PLATE, F-01248B-1 FUSELAGE PIN LATCH, F-01204J BULKHEAD
CR 914 Class Rules. Revised July 15, 2000 See also CR-914 Class Rule Interpretations
 CR 914 Class Rules Revised July 15, 2000 See also CR-914 Class Rule Interpretations 1 GENERAL - CLASS: The CR 914 is a One-Design class. The Class objective is that the sailing skills of the skipper shall
THE AMERICAN BARN DOOR KITE
 THE AMERICAN BARN DOOR KITE Oregon Kitemaker s Retreat January 2007 Rod Beamguard 4104 NW 112 th Way Vancouver, WA 98685-3578 (360) 574-8050 home (360) 750-9833 office kytfevr@wa-net.com PLANFORM BARN
Installation Instructions Topo Ceiling System
 Topo Ceiling Page 1 of 12 Before beginning installation of the TOPO Ceiling, check the enclosed bill of materials to ensure that all parts are present and undamaged. Read all installation instructions
LITTLE TRI construction
 LITTLE TRI construction I have built almost anything that can sail. At the age of 12 my first sail thing, an ice boat. I used skates which had to be mounted on shoes as runners. Big fun, very fast, only
Building a Wind Tunnel
 Technical Report TR-5 Building a Wind Tunnel Estes Industries 1963 These reports are published as a service to its customers by Estes Industries, Inc., Box 227, Penrose, Colorado 81240 Building a Wind
Portlight Construction
 Portlight Construction Version 2, dated 28 th June 2012 Contents Opening Portlights - Requirements... 2 Opening Portlights Design Parameters... 2 An Opening Portlight Design... 3 Making the Opening Portlight
Horizontal Fuselage. Top Vertical Fuselage 1. Lay out the Top Vertical Fuse Front(1), Top Vertical Fuse Back(2), and Vertical Stabilizer(3).
, Top Vertical Fuse Back(2), and Vertical Stabilizer(3).") Rumbuilder 71 B-17 Congrats on your Rumbuilder B-17! We re glad you chose to fly with us! If you have any problems, or missing/broken kit pieces, please contact us. We d be happy to replace any damaged
Rumbuilder 71 B-17 Congrats on your Rumbuilder B-17! We re glad you chose to fly with us! If you have any problems, or missing/broken kit pieces, please contact us. We d be happy to replace any damaged
STERN MOTOR FOOT CONTROL KIT For use with the Torqeedo 403 Ultralight
 STERN MOTOR FOOT CONTROL KIT For use with the Torqeedo 403 Ultralight The Wilderness Systems Foot Control Kit is designed to connect directly to a Torqeedo 403 Ultralight motor mounted on the stern of
Highlander Specifications
 Highlander Specifications July 22, 2012 Highlander Specifications The intent of this section is to clarify and add to what is shown in the official plans. In case of conflict between these specifications
Building a coracle. Let's build a coracle roughly like this:
 Building a coracle Let's build a coracle roughly like this: Modeled loosely as Severn-Ironbridge. Width about 3 1/2' (105 cm), length about 4 1/2' (135 cm), depth about 14" (35 cm). The oval of the gunwale
(Specification changes are highlighted in yellow)
") APPENDIX II SCRUTINEERING (Specification changes are highlighted in yellow) 101. ICF Canoe Polo Kayak Manufacturers Scheme 1.1. - After January 1 st 2015 - All new composite canoe polo kayaks manufactured
APPENDIX II SCRUTINEERING (Specification changes are highlighted in yellow) 101. ICF Canoe Polo Kayak Manufacturers Scheme 1.1. - After January 1 st 2015 - All new composite canoe polo kayaks manufactured
INSTRUCTIONS FOR GLUING ON THE BUMPER FOR PORT TOWNSEND WATERCRAFT S NESTING DINGIES. (Or requires a 1 surface to adhere to.)
") INSTRUCTIONS FOR GLUING ON THE BUMPER FOR PORT TOWNSEND WATERCRAFT S NESTING DINGIES. (Or requires a 1 surface to adhere to.) The PT 11 bumper is made from a high quality, non marking EPDM rubber. This
INSTRUCTIONS FOR GLUING ON THE BUMPER FOR PORT TOWNSEND WATERCRAFT S NESTING DINGIES. (Or requires a 1 surface to adhere to.) The PT 11 bumper is made from a high quality, non marking EPDM rubber. This
TOWER INSPECTION REPORT
 3010 S. Hwy 77, Suite 600 Waxahachie, Texas 75165 http://ctctower.com Office: 972/923-9504 Fax: 972/923-9619 TOWER INSPECTION REPORT PREPARED FOR MR. CUSTOMER 1,563 GUYED TOWER NEAR CITY, STATE JANUARY
Cardboard Boat Basics
 Georgetown Wooden Boat Show 2016 What Floats Your Boat Cardboard Boat Basics 1 Construction Rules (Equal Opportunity) The ENTIRE BOAT must be built of CARDBOARD Only exceptions are the decorations Use
Pitts Model 12 Wing Leading edge Installation
 Pitts Model 12 Wing Leading edge Installation This procedure is used to install molded plywood leading edges included in the Pitts Model 12 kit. Nine (9) molded leading edge section are require per aircraft;
World s Most Versatile Home Gym
 World s Most Versatile Home Gym View Newest Owner s Manual: Assembly Instructions Video: Installation Videos: https://gorilla-gym.com/owners-manual/ http://gorilla-gym.com/gorilla-gym-assembly-video/ http://gorilla-gym.com/how-it-works/installation-video/
18. Tailplane torque-tube
 18. Tailplane torque-tube Step 1 Fu se lage rear bulkhead Remove the three part templates of the rear bulkhead: an A4 size sheet from Annex A (page 5) and two A3 size sheets from Annex F of the manual,
DRAGONFLITE 95 RESTRICTED CLASS RULES 2016
 DragonFlite Force 95, Restricted Class Rules 2016 2013 Version 1.0 DRAGONFLITE 95 RESTRICTED CLASS RULES 2016 Version 1.0 DF Racing Rules Committee 2016 Introduction The DragonFlite 95 (DF95) project started
E-trike Li Assembly Guide
 PREPARATION 1. Read this assembly manual BEFORE commencing assembly. 2. Carefully remove all the components and packaged hardware from the shipping boxes. 3. Unpack the contents of the large double box
In each step, the needed parts are shown the number right below. Locate all parts for the step.
 Tools Required for Assembly Phillips Screwdriver, Med Needle Nose Pliers Sandpaper (#400 grit) Hobby Knife Scissors CA Instant Glue Rubbing Alcohol Drill Bit 1/16", 1.6mm 5/64, 2mm 1/8, 3mm 5/32, 4mm Before
BC Shackle. Made in the China. Alloy Steel Anchor Shackle. Instructions for handling and use - Please read in full before using this device
 BC Shackle Made in the China Alloy Steel Anchor Shackle Instructions for handling and use - Please read in full before using this device Index 1.) Introduction 2.) Warnings / General Use Guidelines 3.)
PURSUIT. Standard Features. Custom-Height 360 Pinnacle Seat 2017 PRODUCT LIST
 PURSUIT With a hull that maximizes speed and stability, integrated features that keep your deck clean & open, and a comfort-redefining custom-height 360 seat, the Pursuit is not just an entirely new NuCanoe.
WHITE WOLF. X-ray View MID POWER MODEL ROCKET KIT BUILDING INSTRUCTIONS KIT SPECIFICATIONS:
 WHITEWOLF-38 PARTS LIST 1 - Nose Cone 1-17" Airframe 1-6" Motor Tube 3 - Aft Fins 3 - Forward Fins 2 - Centering Rings 1-15" Parachute 2 - launch lugs 1-12 Kevlar Shock Cord 1 - Motor Retention >>(screw/washer)