CORO POWER BOAT 3 in 1 Design
|
|
|
- Annabel Morgan Bradford
- 6 years ago
- Views:
Transcription
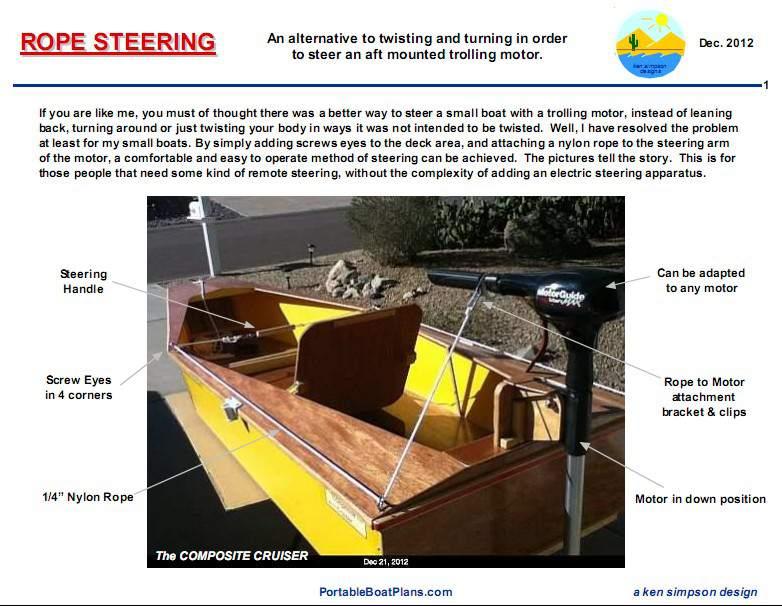
1 3 in 1 Design A MULTI-PURPOSE COROPLAST BOAT Ideal for all generations to enjoy. Weighs only 20 pounds! Drawn Ken Simpson Designs Rev Print in Landscape Mode with ¼ inch borders. SPECIFICATIONS OAL = 7 feet (Power) OAL = 10 feet (Kayak) OAW = 30 inches OAH = 12 inches Weight = 20 pounds Capacity = 250 pounds max. (includes motor & battery) Speed = Approx. 4 MPH Build for less than $100 FEATURES Low Maintenance Design Fits in all Trucks & SUV's, and some larger Hatchback Cars. Can be built in about a week. Can easily be cartopped. Virtually unsinkable. Easy to repair. PARTS LIST 1 Sheet 4' x 8' x 4mm COROPLAST 1 sheet 4' x 8' x 1/4 Plywood 1 roll of Scotch Tough Tape 2 Tubes of 100% Silicone 32oz. Bottle of TB3 Glue 3-1 X 2 x 8' Lumber Various screws. Paint of choice. See end of plans for elongated versions. Power Boat on ramp, ready for first outing. This basic hull can be retrofitted with added modules to become a Kayak or Sailboat. Read plans thoroughly prior to starting construction. Page 1 of 29 This is an experimental design drawn up by an untrained amateur. The Designer accepts no liability for any loss, harm or damage sustained during construction or use. Builders may use these plans to construct a small quantity of boats for their own use only. Commercial manufacturers must ask the Designer for permission.
2 General Notes The idea for the came from the desire for a simple, lightweight, yet useful portable hull design.. It includes an ample beam, good freeboard, generous volume, seating for up to two, and safety buoyancy. It is reasonably sturdy, easy to build, very portable and can utilize a standard trolling motor. To have strength and yet be lightweight, the plans use some non-traditional methods of assembly, specifically the COROPLAST construction process developed and incorporated by the designer. Coroplast can be purchased at most local sign making companies, about $25 per sheet. This provides a durable, yet truly portable, finished boat, and the building process is easily mastered by the home handyman and amateur boat builder. As a result, only hand tools, a jig-saw, a hand drill, utility knife and a carpenters square, scissors, and tape measure are all that will be required throughout the assembly process. Be selective in your choice of materials. Use plywood that is preferably exterior rated. Marine Plywood is very expensive, so the use of ACX Grade is recommended, but be choosy. It is important to note, the final choice of materials is the decision of the builder. We have made specific recommendations, but if the builder has previous experience with different methods and materials, that is their choice, and we respect that decision. Certainly, minor changes in design are encouraged, to provide a 'custom' boat to satisfy a builders specific needs. We do not make changes to the drawings. This would be up to the individual builder, and their responsibility. Also, it is very important that none of the basic design parameters be drastically modified, as this may adversely affect overall boat safety or performance. Seating choice is also up to the builder. The folding plastic seat shown is $25 at Bass Pro sporting goods stores. I also have a folding plywood seat plan available for free download on the website, about $15 to build.. It should also be noted that the hull modules can be glued and screwed together, for those that do not have limitations of storage or transportation. Any questions or comments regarding the construction and/or design of this project will be responded to in a timely fashion. Thank you for your interest, and for purchasing these plans, and good luck with your project. And don t forget to visit for new designs and updates. Happy Boating! Ken Simpson, Designer Page 2
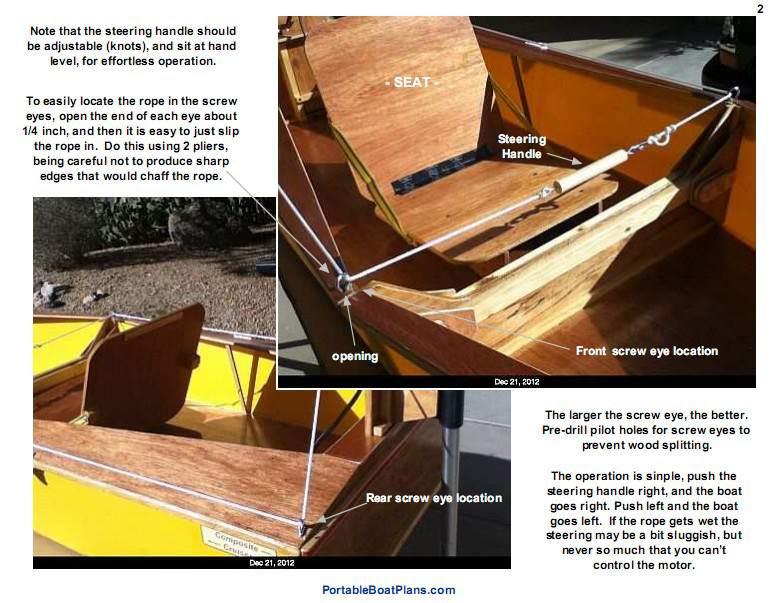
3 This is a Non-Fold-Up design. It should fit in all Trucks and SUV's, and some hatchbacks, like my PT Cruiser SPEC'S OAL = 84 OAW = 30 OAH = 12 Weight = 20 Cost = $ /2 Fold In Fold Out Fold In 4mm Coroplast Material 4' x 8' sheet, any color All lines are Creasing and Bending lines. 4 feet Skids 5 6 Silicone glue & screw transom to inside rear panel Fold In Trolling Motor or Paddle Powered Tape floorboard to side walls, and glue to base. Cut Out 6 1x4 Support Bar Fold In a ken simpson design Partial Creases 13 May Up to a 2 HP Motor. Fold In 1x2 Side Rails (outside) Tough Duct Tape All Edges & Seams In & Out BATT. Finished Hull Length = 7 feet 2x3 Motor Mount TRANSOM All Bends, No Cuts Tape Ends Closed Fold In FLOORBOARD 1/4 plywood floor & plywood transom, 1 x 2 lumber side rails Suggest rope steering for easier control Optional 28 Extension Module (see page 16) Finished Hull Weight = 20 pounds Alternate mechanical methods of joining the panels together can be utilized for greater security and reduced maintenance. A center bulkhead can also be used to enable a rope steering tiller and to provide additional structural rigidity. Assembly Steps: 1 - Mark, Crease & Fold as shown. 2 Clean all surfaces with denatured alcohol. 3 Silicone and Tape folds closed. 4 Tape all edges and seams. 5 Prepare side rails, floor board and transom. This includes cutting to size, and waterproofing. 6 Screw and glue in position all wood panels. Prepare skids, and glue and screw in place, from the inside. Page 3


4 The construction process of this boat will primarily be made of photos and text, briefly describing the different steps in assembly. The first step is to buy the 4 MM Coroplast 4' x 8' sheet material in the color of your choice. I like yellow or white. The material can be purchased at most Sign Companies, typically at $25 per sheet. I get mine at a franchised SIGNARAMA store. Because I do not have a truck or SUV, I have to fold the 4x8 sheet in half, to 4x4 size, to get it home in my PT Cruiser. This is done at the sign store parking lot, and does not affect the construction of the Coro Power Boat. MARKING The first thing is to clean the Coroplast surfaces with Denatured Alcohol, to remove any surface contaminates. MARKING Mark, per drawing on page 3, all bend lines, using a dark pencil, or Sharpie. Transom Area Bow Area CREASING CREASING Using a straightedge, and a dull pointed tool, crease the marked lines, as shown. I use a window screen assembly tool, but any non-sharp tool should work. Do not crease through the Coroplast. Transom Area Side Fold Page 4


5 FOLDED Bow Area Using a strong straightedge, like a 2x3 as shown, press firmly down on the bend line, and pull the Coropalst up slowly toward the straightedge. About half way up it will snap, and you can then bend the panel over. The photo at right is a good example of a corner bend line. FOLDED Transom Area Refer to Page 9 for crease & bend tools. Note the center bend, this is where I had to the bend the sheet in half to get it home. Bottom View The photo at right shows all the bends. Some have to be creased and bent from the opposite side of the sheet, such as the transom inside corner and the two side folds, and the center bow. Inside View NOTE: Some of these bends and folds are difficult to achieve, and require patience. An alternate method of assembly is to cut the corners away on the crease lines, which eliminates the folds. You can then butt the panels together, tape them on the outside, silicone the inside seam only, and then tape all the inside corners, using the Scotch Tough Duct Tape specified. Your choice. The downside is that this method can produce voids, and the possibility of allowing water to enter the hull. Folded corners prevent this from happening. Page 5


6 These 2 photos show the bow area bends. Note the 5 center cutout, the only one of the assembly. Note also the direction of the side bends. This provides better water flow of the hull. The photos below show what the finished bends look like at the various locations. Transom Corner Fold Side Fold Transom Outside View Side Fold Bow Bow Outside View Inside View Page 6


7 Bow Fold Deck and Inside View After all folds are made, and squeezed tight, it is now the time to add the 100% Silicone Adhesive. Lay down beads of adhesive, as shown below. Insure they are not too close to the edge, as it my squeeze out during assembly. Bring the panels together, and hold with small spring clamps. Or apply strips of Tough Tape to hold in place. 100% Silicone Adhesive, Clear Remember to be very cautious when applying the Silicone. If you get some on your hands, wash it off immediately. I suggest using DAWN soap, as it removes the adhesive well. TRANSOM Silicone Beads Allow the bonded panels to cure for at least eight hours (overnight). Patience is a virtue! TRANSOM Remember, wherever Silicone is present nothing else will stick. So use a reasonable amount, and do not get it on the outside surfaces. The primary purpose of using Silicone is to bond the panels together, for a better mechanical assembly. Because all seams are folded, no water will enter the hull. Page 7


8 Continue the bonding process as defined on the previous page. Scotch Tough Duct Tape Silicone Beads You may have to clamp the folds on the side panels, as shown at right. The hull also has 3 thicknesses of Coroplast here, and it is hard to get flat. Use strips of wood under the clamps so as not to indent the soft panels. Probably the most involved part of the assembly is the bow area. There are multiple bends and awkward shapes. Take your time. Align the top deck inside ends and bow point for proper fit. Use the Tough Tape to hold the bow tight together, and across the deck at both ends. Allow to cure overnight. Clamping Taped Seams Once all folds have been completed, it is time to apply Scotch Tough Tape to all the panel edges and seams. This seals the Coroplast edges, and prevents water from entering the individual corrugated cells. See photos on page 10. Page 8

9 These are the basic tools required to assemble the Coro Power Boat. The tape is very specific; It is Scotch brand Tough Duct Tape, No Residue. It has the best weatherability of any duct tape available. The other tools are generic, and the only requirement is that they be sharp and clean. Page 9


10 Applying the Scotch Duct Tape is easy. Unroll about a foot or two, and start at one end of a panel. Apply it so the edge of the panel is in the center of the tape. Tack it down each side of the panel at the same time. Press it firmly and smooth with your fingers. Unroll some more tape and repeat the process to the end of the panel, cut a with utility knife. Do the same for all edges, as shown below. If you make a mistake, you can pull the tape off and reposition it. But try to keep this to a minimum, as sometimes the tape will curl back onto itself, and that is difficult to undo. Bow Deck Although the tape is used for structural purposes, it also has to look good, so try to make the taped lines straight and even. Transom Corner In some cases you may want to apply more than one layer of tape, just to complete a corner, or for greater protection. The only inside seams that require taping are the 2 vertical side panel seams. Side Panel Note: Different colored tape can be applied elsewhere for decorative purposes. Bow Area Remember, it's the combination of mechanical fasteners (screws) and adhesive (tape & silicone) that makes the hull strong and waterproof. Page 10
11 Method of getting 2 floorboards and transoms out of one sheet of plywood. 28 4' x 8' Sheet of 1/4 plywood TRANSOM 6 1 FLOORBOARD 13 Floor Filler Approx. 42 FLOORBOARD TRANSOM 14 Top View of Hull This double cut floorboard is only necessary if you are going to construct more than one hull. Otherwise, make the floorboard 6 feet long, to fill out the inside bottom of the hull. See photos on page 15. Storage Tape floorboard to side panels. KAYAK 250 pound capacity Bolted Together Storage Standard Coro Power Boat 2 Modules create a 10 foot long KAYAK Additional Aft Module See page 16 for detail. Page 11


12 At left is the completed Coroplast hull. As pictured with temporarily mounted side Rubrails. They will be the next step to cut, waterproof, and paint. These are made from 1 x 2 lumber, each about 52 long, with the outside edges rounded, for hand comfort. They will be held in place by #8 x 3/4 Phillips Head Truss Screws, from the inside. These are large head screws, and holes need to be pre-drilled, but the screws should not be overtightened, to protect the side panels from deforming too much. Waterproof the rubrails, per page 13, and paint with a good water resistant paint, oil based preferred. At the right is the inside floorboard, cut per the drawing on the previous page. The edges have been rounded smooth, and a coat of waterproofing has been brushed on both sides and edges, per the process on the following page. Next it will be painted a color to coordinate with the hull, probably blue. NOTE : If you do not need to make duplicate floorboards, as I did for building a second boat, you should extend the floorboard to a length of 6 feet, to completely fill out the inside floor. Page 12

13 . NOTE: Use this process for all wood panels and supports. Not for use on Coroplast. Page 13


14 The assembly photos are becoming less detailed, because you are becoming better at building the CPB. The following are photos of the Transom area and side Rubrail assembly. Note that the motor mount may be different than the drawing shows. Transom 2x3Trolling Motor Mount The left photo is the waterproofing of the Transom assembly. The 2x3 motor mount now extends to the outer edges of the transom panel. This provides greater support for the aft end of the hull. At right is a close-up of how the rubrail is screwed into the motor mount, for greater strength and rigidity. 2-1/2 Screw Note : The 2x3 motor mount is not necessary if you decide to build and use only the KAYAK version. At left is a photo of the #8 x 3/4 Truss Screws holding the 1x2 rubrail to the hull side panels. They are spaced about every 6. I did not silicone the rubrail to the side panels, but you could, for added strength #8 x 3/4 Phillips Head Truss Screws & security. At right is another view of the transom, siliconed to inside the rear hull panel, with an outer 1x2 support bar clamped to the hull rear panel until the silicone is cured. The next photos will concentrate on the forward support bar, and the 3 skids on the bottom of the hull, to complete the hull assembly. Page 14


15 The forward 27 long support bar is necessary for structural rigidity. I made mine from a 1 dowel, but a 1x2 would work fine. Fasten from the outside, through the rubrail, with a 21/2 long screw. Place as far forward on the rubrail as practical. Silicone in place. The forward support bar. 17 Flush The rear skids are about 4 feet long and 17 apart. The forward skid is about 32 long and on center. A second person is always a welcome helper! The skids are necessary to protect the bottom from damage. They are also made of 1x2 lumber, with the ends and edges rounded. Waterproof all over, and paint the sides and bottom, not the surface touching the Coroplast hull. First mark their location on the bottom. Next, drill 1/8 clearance holes 2 from the skid ends, and then about every 8 inches apart. Apply Silicone to skid. Hold in place, flush to transom end, and screw from inside, through the floor, with 1 long #6 wood screws. Hand tighten. Note: this detail has changed, see page 19 Closeup of support bar end. Completed Hull. Only a seat and paddles required. This completes the assembly, unless you want to build the hull extension, as defined next. Page 15
16 ELONGATED CORO BOAT 15 OPTIONAL Cut Out Completely fill the inside bottom with a 1/4 plywood floor. THIS IS AN EXTRA COST OPTION 90 deg. 28 sq. 6 Forward or Aft Module 6 Tape all hull seams and edges. Motor Extension Module Cut Cut Out Out Opt. Opt. 6 Transom The complete Hull Requires 2 sheets of 4mm Coroplast Center Module same but 4 feet long. Builders option. 15 Cut Out 48 This module is for the Elongated or Kayak hull assemblies. Cutouts necessary 2 Occupants in bulkheads for OAL = 10 feet 2nd occupant. Constructed similar to the Power Boat. 4 Cut Out Plywood Bulkheads used to reinforce bolt together assembly. Custom mount for larger motors. Plywood Transom FORWARD MODULE MOTOR MODULE CENTER MODULE 4' long NOT TO SCALE Glue floorboards to base panels. 1 x 2 rubrails on all modules Optional Double Ender Page 16


17 ELONGATED CORO BOAT OPTIONAL This is an additional tapered module, to be fastened to the hull transom, that converts the CPB into a KAYAK type hull. This Aft Module is constructed in much the same way as the hull, only shorter. Some of the bends are difficult, but the end result is worth it. At left are all the creases that need to be made. At right, all the bends have been formed. Creased & Bent Pre Assembly Cutouts The final shape is a triangle, and it fits the transom of the hull exactly. A plywood panel will be inserted and glued to the inside of the rear panel, similar to the transom. The photo at right shows the Aft Module mounted to the boat. It extends the water line another 3 feet, and provides excellent handling. Aft Module The aft module can be modified with a floorboard and skids. It is useful for gear storage, and the opening could be covered with a tarp. The following pages display photos of the finished boat, with some further detail, and in the water views. This was a great project! Page 17


18 ELONGATED CORO BOAT OPTIONAL 4 Aft Module Top 1x2 Inside Support Inside Panel Cut ends 45 degrees Tape after Silicone is cured. Silicone all around panel The inside Panel is about 27 long and high, but should be cut to fit. Note the 1x2 support, which will be used to support the Aft Module to the Hull. Waterproof the assembly before painting. Apply Silicone to all inside folds of the Coroplast bends, and the outside that will be in contact with the Panel. Install the same way you did for the Transom. As with the hull design in general, changes can be made to accommodate any ideas you may have for the boat. Mounting of the two modules is easy, and requires only two 5/16 x 3-1/2 long bolts. See next page for more detail. Remember to apply silicone in the 3 corners of the rear panel to hull insides. 1x2 Support Panel Installed 4 4 #8 x 3/4 Truss Screws All wood panels and attachments must be waterproofed prior to painting. The Coroplast panels require no preservation treatment. Page 18


")

19 Steering Pulley 6 Steering rope Module assembly bolts Some detail photos of the finished hull modules. The boat has been set up for rope steering while under trolling motor power. Also, a canopy top has been fitted, and the hold down bungees are attached. Also please note the change to the forward support bar. The straight one has been replaced with an arched one for better leg room. It was cut from a scrap 1 x 4 x 27 long. And, the 2 hull module assembly bolts (5/16 x 3-1/2 long) have been installed, 6 up from the bottom and 16 apart, held firm by large washers and wingnuts. View from aft module More legroom Steering Rope 16 Assembly Bolts Folding plastic seat NEW arched forward support bar Page 19
20 COROPLAST HULLS Can be made larger or longer, depending on your needs. Keep the material selection simple and lightweight. OPTIONAL CANOPY See photos THIS IS AN EXTRA COST OPTION Top made of lightweight tarp material. Canopy Bow Supports (2) 1/2 Plywood About 9 x 6 size 1/4 Bolt Holes /16 Bolt Hole Supports are 1 thin wall PVC pipe. Bungee 1/4 Dowel Easily removable with the use of Bolt Knobs and T-Nuts on the 1x2 side supports. Nylon Cord The dowel prevents the support from rotating. 22 Extension 80 WLL 5/16 Bolt 1/4 Dowel Page 20

 for stability, ease of paddling and directional control. I weigh 160, and it only settled 2 inches into the water, providing easy handling.")

21 Optional Canopy Top IN THE SHOP The optional canopy top is necessary in sunny climates, and works best in the power boat mode. The vertical supports do hinder paddling. The cost of the canopy assembly is less than $20, so it is a worthwhile option. Changes to the size and setup should be made to satisfy your particular needs. Construction details are not necessary, due to the simplicity of the design. Notice the new red tape stripes! ON THE WATER The made its maiden voyage on I first tested it in the KAYAK mode (as shown at left) for stability, ease of paddling and directional control. I weigh 160, and it only settled 2 inches into the water, providing easy handling. It paddled effortlessly, and wandered very little, due to the nice long waterline. I then switched over to the Trolling Motor version, which takes only a few minutes. In this mode, the boat draws about 3 inches of water, due primarily to the 48 pound 80 AH deep cycle battery that I use. Still plenty of freeboard though. However, I am going to buy a 35 AH battery, to reduce the weight I have to carry by 20 pounds. The boat performs well under power, about 4 MPH with a 2 blade prop, and is comfortable and stable. No leaks were observed! Page 21


22 Trolling Motor Power Boat Paddle Power Kayak Forward Battery Location Observed Waterline Trolling Motor Setup Stored in PT Cruiser for the trip home. Although I enjoy not paddling (motor power), I think most people will choose the KAYAK version for its ease of use, and low entry cost. Happy boating! Page 22
. This will have a plywood floor and a plywood bulkhead and transom.")


23 ELONGATED CORO BOAT OPTIONAL These are assembly photos of the 28 inch Motor Extension Module (see page 16). This will have a plywood floor and a plywood bulkhead and transom. The transom will have the 2x3 Motor Mount option. The purpose of the module is to increase boat load capacity by 75 pounds, and hull speed by about 1 mph. Total hull capacity will now be 325 pounds, with a hull speed of 5 mph. Note the 45 degree corner fold, which will be at the bulkhead and transom ends. All panels creased and folded. This is the same method as used for the main hull. Hulls assembled, motor and battery installed, and the seat repositioned. There is now a lot of legroom. Bulkhead and Transom installed, and Floor is weighted down while being Silicone bonded to the hull panels. The finished module ready for assembly to the main hull. The same 2 bolt method of securing them together as the Kayak module, page 19. Page 23


24 ELONGATED CORO BOAT OPTIONAL Water Line Actual speed on water of 4.1 mph Aft view, showing the rope steering. Optional Sun Canopy Top Plenty of legroom in the extended version. Top support assembly detail. Draft, fully loaded, is only 2 inches. Canopy top folded forward, for entry & exit. These photos depict the third configuration of the Coro Power Boat. There is the basic hull, which can be rowed, paddled or motorized. Then there is the Kayak version, strictly for effortless paddling. And finally, this Extended version, primarily for greater load capacity. Each has its own attributes, but combined, they provide a craft that is multi-capable. There is even a longer extended version which can be modified to accept two occupants, by lowering the center of the bulkheads, as shown on page 16. In testing, I found the hull to be very stable, as long as the seat is kept low to the floor, as shown. Hull speed is achieved quickly and smoothly, with little hull wake. But the primary feature of this design is the low hull weight, 20 pounds. Easy to lift into and out of your vehicle. And, because all modules utilize folded corners and seams, there is no chance of water entering the hull. The skids provide hull bottom protection, and also help the hull from drifting while paddling. Overall, I am very pleased with this third generation Coroplast hull design. Thanks for your interest. Ken Page 24
25
26

27 Small pulleys would reduce rope friction, for smoother steering.
28 POTENTIAL SAILBOAT COROPLAST HULLS CONCEPT ONLY With proper structural supports, the mast, leeboards and rudder can all be added to produce a simple, yet exciting, sailing version of the Coro Power Boat. 11' Mast Sail area = 35 sq.ft. 3 Stays No Boom Halyard Sheet Vang 15 Seating type is optional. Can be a removable bench seat the width of the hull. Rudder & Tiller Assembly mounts to back of Transom. Rope Steering Flotation Noodles Buoyancy Ball Mast Step Standard Coro Power Boat 42 Motor Module Kick-up Rudder Twin Retractable Leeboards Page 28
29 COROPLAST HULLS CONCEPT ONLY 3 Module 10' Canoe (nesting type for transport) Side Motor Mount 26 Capacity = 250 pounds max. The CANOE option is but another variation of the Coro Boat theme. It will fit in most cars for transport, and provides very good balance and handling for one, when in the water. 30 All new slanted side Coro Hull. Similar in construction to the CPB, but sides slanted 2 per side.. Front View Optional side mounted trolling motor Plywood Bulkheads 9 2-1/2' 4' 3-1/2' Page 29
NEW DESIGNS. Print in Landscape Mode with ¼ inch borders. Hinges (2) degrees. 1 Seating Type Optional
 degrees. 1 Seating Type Optional") 2017 IDEAS NEW DESIGNS Ken Simpson Designs Drawn 06-01-2017 Rev. 07-02-2017 The SPORTSMAN 10'L x 36 W x 15 H 475 pound Capacity Print in Landscape Mode with ¼ inch borders. Hinges (2) 36 30 8 degrees Click
2017 IDEAS NEW DESIGNS Ken Simpson Designs Drawn 06-01-2017 Rev. 07-02-2017 The SPORTSMAN 10'L x 36 W x 15 H 475 pound Capacity Print in Landscape Mode with ¼ inch borders. Hinges (2) 36 30 8 degrees Click
BASIC COROPLAST HULLS
 BASIC COROPLAST HULLS Quick Assembly, Folds Up to a Small Package. FOUR + HULLS, most single occupant designs. Light Weight, Supports 215. Easy to Set-Up, and Easy to Paddle. Fits in any vehicle! Choose
BASIC COROPLAST HULLS FOUR HULLS, all single occupant designs. Choose the one that suites your needs.
 BASIC COROPLAST HULLS FOUR HULLS, all single occupant designs. Choose the one that suites your needs. The build notes for one hull 5 type should 8 apply to all hull types. 1 CUT these 2 lines First 20
Small, Lightweight, Very Portable and Low Cost. Print in Landscape Mode with ¼ inch borders.
 The 1 SHEET WEDGE Drawn 09-20-2015 Small, Lightweight, Very Portable and Low Cost Ken Simpson Designs Rev 07-31-2016 Print in Landscape Mode with ¼ inch borders It may look similar to some of my other
Small, Lightweight, Very Portable and Low Cost. Print in Landscape Mode with ¼ inch borders.
 The 1 SHEET WEDGE Drawn 09-20-2015 Small, Lightweight, Very Portable and Low Cost Ken Simpson Designs Rev 03-14-2018 Print in Landscape Mode with ¼ inch borders It may look similar to some of my other
POD 2 Paddle On Demand & POD 2-XL Adult ( Page 17 ) SPECIFICATIONS:
 SPECIFICATIONS:") POD 2 Paddle On Demand & POD 2-XL Adult ( Page 17 ) SPECIFICATIONS: Simple to build, light weight, rugged, stable, unsinkable, & designed for the younger generation! Glue & Screw Assembly Nov. 2010 Hull
POD 2 Paddle On Demand & POD 2-XL Adult ( Page 17 ) SPECIFICATIONS: Simple to build, light weight, rugged, stable, unsinkable, & designed for the younger generation! Glue & Screw Assembly Nov. 2010 Hull
POD 2-XL & & ( 17 ) SPECIFICATIONS:
 SPECIFICATIONS:") POD 2 Paddle On Demand & POD 2-XL Adult ( Page 17 ) Simple to build, light weight, rugged, stable, unsinkable, & designed for the younger generation! Kid Friendly! Nov. 2010 SPECIFICATIONS: Glue & Screw
POD 2 Paddle On Demand & POD 2-XL Adult ( Page 17 ) Simple to build, light weight, rugged, stable, unsinkable, & designed for the younger generation! Kid Friendly! Nov. 2010 SPECIFICATIONS: Glue & Screw
TRIFECTA. 3 Boat Plans for the Price of 1 - FREE. Assembly Manual. The GUPPY. The TRIPOD. The TADPOLE. Nov.
 The GUPPY TRIFECTA 3 Boat Plans for the Price of 1 - FREE Assembly Manual 3 SIMPLE MODULAR BOATS THAT CAN BE NESTED AND EASILY STORED ON-BOARD SHIP, OR IN AN RV, SUV, TRUCK and GARAGE. Less than 5 feet
The Micro Camper Cruiser by Ken Simpson
 9/10/2016 The Micro Camper Cruiser by Ken Simpson The following is a record of the design, build and use of the newest ship in my portfolio, the MICRO CAMPER CRUISER. Although similar to the larger sister
Stevenson Projects Building the Hull Top Deck and Bulkheads
 Stevenson Projects Building the Hull 1. Print out both piece sheets. 2. Cut out one keel piece and glue it to a piece of balsa wood or dense cardboard. Cut out the second keel piece and glue it to the
A Boat Builders Story
 A Boat Builders Story By Ken Simpson September 2013 This is a tale about the experiences of Bayard Stix Cook of Florida, and his build of the 1 SHEET + pram. For the purpose of this story we will call
Bladerider X8 Assembly Help Notes
 2.1 Remove All Parts & Have Some Tools Handy Remove all items from the box and identify each part as per the packing sheet and check that nothing is missing. If there is something missing, please email
PT 11 trouble-shooting and maintenance.
 PT 11 trouble-shooting and maintenance. Does your rudder not stay down?...your back seat slip off?...your knobs tight and your leather pads loose? Maybe we can help. We have used our PT 11 s hard enough
INSTRUCTIONS FOR GLUING ON THE BUMPER FOR PORT TOWNSEND WATERCRAFT S NESTING DINGIES. (Or requires a 1 surface to adhere to.)
") INSTRUCTIONS FOR GLUING ON THE BUMPER FOR PORT TOWNSEND WATERCRAFT S NESTING DINGIES. (Or requires a 1 surface to adhere to.) The PT 11 bumper is made from a high quality, non marking EPDM rubber. This
INSTRUCTIONS FOR GLUING ON THE BUMPER FOR PORT TOWNSEND WATERCRAFT S NESTING DINGIES. (Or requires a 1 surface to adhere to.) The PT 11 bumper is made from a high quality, non marking EPDM rubber. This
Uncle John's Choupique Road Sulphur, LA Materials needed to build the basic boat 1/4" x 48" x 96" exterior plywood ~ 3 sheets
 Uncle John's 5229 Choupique Road Sulphur, LA 70665 Thank you for purchasing our plans. Have a safe and enjoyable experience building and using your craft. Materials needed to build the basic boat 1/4"
1/10 th Scale 1956 Ted Jones Classic Hydroplane
 1/10 th Scale 1956 Ted Jones Classic Hydroplane Preparation These plans show outside sheeting of 3/32 balsa laminated with 1/64 birch ply. This makes a light and strong skin for this boat. Optionally you
LITTLE TRI construction
 LITTLE TRI construction I have built almost anything that can sail. At the age of 12 my first sail thing, an ice boat. I used skates which had to be mounted on shoes as runners. Big fun, very fast, only
Blazer Marine, Whiplash Sport 40
 Blazer Marine, Whiplash Sport 40 Thank you for choosing to build the Whiplash 40. We have spent over 12 years perfecting this design, and finally we are making it available to the world. We are excited
We hope you ll enjoy the Drifter as much as we have! Scott DeTray Model Aero Specifications:
 We are excited to bring you the Drifter RC airboat. You re probably thinking it doesn t fly so what is Model Aero thinking??? We have always liked RC vehicles of all types and have had a fondness for airboats
An Australian Classic by spectre.com
 An Australian Classic by www.go spectre.com Your Bug! Welcome to the Balain Bug experience!!!!!! The Bug kit has been designed so as to be a modern version of the Traditional Bug now you can sail like
PAY N PAK, 1/12 th Scale, Limited Sport Hydro P Sport Hydro
 1980 82 PAY N PAK, 1/12 th Scale, Limited Sport Hydro P Sport Hydro Introduction: The 1980 turbine Pay N Pak is a good subject for a model race boat. It has a low profile, mild pickle-fork setback, long
aero naut Order No. 3009/00
 aero naut Order No. 3009/00 Introduction: The model should be assembled following the sequence of the stages of construction described in these instructions. The laser-cut components are individually numbered.
Soling Building Tips II
 Soling Building Tips II Prepared: Arthur Deane Jan 20, 2002 adeane@ic.net Introduction The following are some lessons learned and experience gained in building a Soling kit. The plan developed is based
Pre-Paint>Fuselage>Empennage>Fit vertical tail fin. Objectives of this task: Materials and equipment required: Fit the spar extender
 Pre-Paint>Fuselage>Empennage>Fit vertical tail fin Objectives of this task: To fit the vertical tail fin to the fuselage, including fitting the static probe, static tube, optional strobe light wiring and
Kayak Trailer Project.doc
 Kayak Trailer Project.doc Note: the red trailer shown in some of the illustrations is no longer available from Northern Tools. However, may be able to adapt similar trailer, but measurements may not be
RUDDER KIT INSTRUCTIONS
 C I N S T R U C T I O N S RUDDER KIT INSTRUCTIONS PAMLICOS-0,0,T, T, 60T, Excel Rotomolded Pamlico 0, 0, T, T, 60T, Excel The addition of a rudder to a kayak results in additional control and efficiency,
(PLEASE CONTACT YOUR LOCAL DEALER or CUSTOMER SERVICE FOR WARRANTY INFORMATION)
") RUDDER KIT SOLO KAYAKS IMPORTANT: Tandem models will require the Wildy Supplemental kit in addition to this kit. The Supplemental kit provides extension straps and extra footbraces that allow rudder positioning
RUDDER KIT SOLO KAYAKS IMPORTANT: Tandem models will require the Wildy Supplemental kit in addition to this kit. The Supplemental kit provides extension straps and extra footbraces that allow rudder positioning
AGM 33 PIKE ALL FIBERGLASS. Specifications Length: 92 Diameter 5.5 Weight: 24 lbs Motor Mount: 75mm Fins: 6-3/16 G10 CP: 68 from nose tip Parts List
 ALL FIBERGLASS AGM 33 PIKE Specifications Length: 92 Diameter 5.5 Weight: 24 lbs Motor Mount: 75mm Fins: 6-3/16 G10 CP: 68 from nose tip Parts List (1) Filament Wound Nose Cone w/ Metal Tip (1) Nose Cone
OPPI Rigging Guide 3/2008
 OPPI Rigging Guide 3/2008 McLaughlin Boat Works optistuff.com Thanks for purchasing OPPI, the most durable and F-U-N sailboat available. Rigging your OPPI is easy and the following pictures make it a breeze
8-GUN CORVETTE ASSEMBLY INSTRUCTIONS
 8-GUN CORVETTE ASSEMBLY INSTRUCTIONS THE HULL STEP 1 Fasten the Deck to the Hull. Find the hull. This is a large, pink, ship-shaped piece of insulating foam board. This will form the base of your model
275 RID Assembly Instructions
 75 RID Assembly Instructions Part No. 0003003 v. Lscsep0 PARTS LIST (Specifications and contents subject to change without notice) Description Part # A. RID Track...0000050 B. Capacity Plate...0053 C.
Peinert Dolphin. Assembly
 Peinert Dolphin Assembly The Dolphin is easily rigged; there are only four removable parts - the seat, the foot stretcher, the rigger arm, and the fin. Removal and installation of the seat. If the seat
WHITE WOLF. X-ray View MID POWER MODEL ROCKET KIT BUILDING INSTRUCTIONS KIT SPECIFICATIONS:
 WHITEWOLF-38 PARTS LIST 1 - Nose Cone 1-17" Airframe 1-6" Motor Tube 3 - Aft Fins 3 - Forward Fins 2 - Centering Rings 1-15" Parachute 2 - launch lugs 1-12 Kevlar Shock Cord 1 - Motor Retention >>(screw/washer)
Boat Building Basics. How To Build Your Cardboard Boat
 Boat Building Basics How To Build Your Cardboard Boat Construction Rules The ENTIRE boat must be built of cardboard, duct tape, and one-part polyurethane. Only exceptions are the paddles & decorations
SERIES 2 RAMP OWNER S MANUAL TOOLS REQUIRED: BEFORE YOU BEGIN... Read and understand these instructions before beginning a ramp setup.
 SERIES 2 RAMP OWNER S MANUAL BEFORE YOU BEGIN... Read and understand these instructions before beginning a ramp setup. Use caution and care for your back when lifting, pushing, pulling, folding or unfolding
Trixie 7. Study Plans. for a 7' 2" x 4' 6" Tender. Andrew Walters. For Rowing, Sail and Short Shaft Outboard Motors
 Trixie 7 Study Plans for a 7' 2" x 4' 6" Tender For Rowing, Sail and Short Shaft Outboard Motors Andrew Walters Trixie 7 Study Plans for a 7' 2" x 4' 6" Tender For Rowing, Sail and Short Shaft Outboard
How do you build a cardboard boat?
 How do you build a cardboard boat? 2015/2016 Campaign Kick-Off 8 th Annual Cardboard Boat Race Saturday, September 12, 2015 Dundee Lake Park Cardboard Boat Race 2015/2016 1 Boat Construction Rules The
(PLEASE CONTACT YOUR LOCAL DEALER or CUSTOMER SERVICE FOR WARRANTY INFORMATION)
") RUDDER KIT SOLO AND TANDEM KAYAKS IMPORTANT: For Tandem kayaks, the Supplemental Kit will be needed in addition to this kit and can be purchased through a registered dealer. The addition of a rudder to
RUDDER KIT SOLO AND TANDEM KAYAKS IMPORTANT: For Tandem kayaks, the Supplemental Kit will be needed in addition to this kit and can be purchased through a registered dealer. The addition of a rudder to
Tugster. Tug Boat. Competition or Sport Tug Kit. A Zippkits R/C Boat. Building Instructions
 Z I P P M A N U FA C T U R I N G Tugster Tug Boat Competition or Sport Tug Kit A Zippkits R/C Boat Building Instructions 2016 JMP Hobby Group St. Paul, Indiana 47272 www.zippkits.com Toll Free (866) 922-ZIPP
INTERNATIONAL SUNFISH CLASS ORGANIZATION CLASS RULES
 INTERNATIONAL SUNFISH CLASS ORGANIZATION November 2017 CLASS RULES 1. GENERAL The design and development of the Sunfish sailboat was directed to the creation of a one-design class where the true test is
INSTALLING THE PROWLER 13 RUDDER
 INSTALLING THE PROWLER 13 RUDDER Parts Included: Steering Parts: Foot Rail Parts: Rudder Parts: Retraction Parts: 4 Rubber 2 Rail Assemblies Rudder Body 1 Rudder Retraction Grommets (includes steering
DRAGONFLITE 95 RESTRICTED CLASS RULES 2016
 DragonFlite Force 95, Restricted Class Rules 2016 2013 Version 1.0 DRAGONFLITE 95 RESTRICTED CLASS RULES 2016 Version 1.0 DF Racing Rules Committee 2016 Introduction The DragonFlite 95 (DF95) project started
WILLEY CAT SHEET B. Daggerboard - 9mm x 2 Daggerboard Ballast - Lead/Epoxy - 6" diameter
 WILLEY CAT Willey Cat was designed for performance. The flexible reefing arrangement allows tailoring your sail area to wind conditions. Best with a crew of -. DESIGN FEATURES Flexible Reefing - reefs
Blazer Marine, Whiplash Sport Hydro
 Blazer Marine, Whiplash Sport Hydro Thank you for choosing to build the Whiplash Sport Hydro. We have spent over 12 years perfecting this design, and finally we are making it available to the world. We
Cardboard Boat Basics
 Georgetown Wooden Boat Show 2016 What Floats Your Boat Cardboard Boat Basics 1 Construction Rules (Equal Opportunity) The ENTIRE BOAT must be built of CARDBOARD Only exceptions are the decorations Use
Carving a Custom Seat
 Carving a Custom Seat Seat Carving your own seat from mini-cell, high-density foam is really quite simple and has proven to be more comfortable than any commercially produced seat and often more reasonably
Aruba 8 ss Sit-In Kayak. Aruba 10 Sit-In Kayak RECREATIONAL KAYAKS. 2 sundolphin.com
 PRODUCT CATALOG RECREATIONAL KAYAKS Aruba 8 ss Sit-In Kayak Aruba 10 Sit-In Kayak Lightweight easy to carry Adjustable, padded seat back Storage compartment On-board storage with shock cord deck rigging
Pitts Model 12 Wing Leading edge Installation
 Pitts Model 12 Wing Leading edge Installation This procedure is used to install molded plywood leading edges included in the Pitts Model 12 kit. Nine (9) molded leading edge section are require per aircraft;
Model Aero Sportster Indroduction
 1 Model Aero Sportster Indroduction We are excited to introduce the Model Aero Sportster! Inspired by classic designs of the past, the Sportster is a relaxing slow flyer, equally at home indoors or outside
Step 1: Block sand the transom to remove the seam joint. The end result should be a flat transom without a ledge where the seam joint is.
 WhiplashGV Instruction Manual Email: Brian@Blazermarine.com Phone: 513-598-1769 Step 1: Block sand the transom to remove the seam joint. The end result should be a flat transom without a ledge where the
RUDDER KIT INSTRUCTIONS
 A I N S T R U C T I O N S RUDDER KIT INSTRUCTIONS TARPON 0/40/60/60i The Tarpon series is designed as a high performance sit-on-top kayak tailored for the sport paddler. Our rudder system is designed to
Horizontal Fuselage. Top Vertical Fuselage 1. Lay out the Top Vertical Fuse Front(1), Top Vertical Fuse Back(2), and Vertical Stabilizer(3).
, Top Vertical Fuse Back(2), and Vertical Stabilizer(3).") Rumbuilder 71 B-17 Congrats on your Rumbuilder B-17! We re glad you chose to fly with us! If you have any problems, or missing/broken kit pieces, please contact us. We d be happy to replace any damaged
Rumbuilder 71 B-17 Congrats on your Rumbuilder B-17! We re glad you chose to fly with us! If you have any problems, or missing/broken kit pieces, please contact us. We d be happy to replace any damaged
Vanguard Sailboats 300 Highpoint Avenue Portsmouth, RI For the dealer nearest you call SAIL
 Vanguard Sailboats 300 Highpoint Avenue Portsmouth, RI 02871 For the dealer nearest you call 800. 966.SAIL Unpack the major parts listed below and lay them out on a soft piece of ground free of sharp objects.
Model Aero AT-6 Texan Introduction
 1 Model Aero AT-6 Texan Introduction We are excited to introduce the Model Aero AT-6 Texan! Originally used as an advanced trainer by the U.S. Armed Forces, the AT-6 is a relaxing slow flyer, equally at
GREEK TRIREME, 480 B.C. Scale: 1/72 Length: 515mm Width: 180mm Height: 220mm
 GREEK TRIREME, 480 B.C. Scale: 1/72 Length: 515mm Width: 180mm Height: 220mm HISTORY: The model represents a Greek Trireme from the age of battle of Salamis (480 B.C.). The crew were 170 oarsmen and about
Installation Instructions
 116-3027, 116-3017 X-Pando Adjustable Steel Protector Installation Instructions 1404 N. Marshall Ave. El Cajon CA. 92020 For technical support call us at (800) 368-3075 NB 6/28/10 607-0112 Step 1. Mounting
Seamax Boat Bimini Top User Manual
 Seamax Boat Bimini Top User Manual Size A / B / C 3 BOW Size D / E / F 4 BOW Thanks for your purchase. Seamax Bimini Top has built-in the aluminum eye-end fitting to install on standard oar lock pin (diameter
EXTRACTOR PRO MODEL PWC RESCUE SLED
 EXTRACTOR PRO MODEL PWC RESCUE SLED PRO MODEL SPECIFICATIONS recommended for three-seat pwcs for all types of waterborne rescue operations or recreational activities, including tow-in surfing, spear fishing.
CATBOX. A Puddle Duck Racer. By Jim Michalak
 CATBOX A Puddle Duck Racer By Jim Michalak CAT BOX HULL SPECIFICATIONS 1. Bow transom from 1/4" plywood. Top and bottom edges framed with 3/4 x 1-1/2" lumber with bevels as shown. Mark centerlines boldly.
Trim Tab Wind Vane for boats with transom mounted rudders
 Trim Tab Wind Vane for boats with transom mounted rudders If your boat has a transom mounted rudder, you can build this self-steering windvane for around $150, using regular wood working tools and some
Constitution Instructions
 Constitution Instructions This kit will build a 1:48 scale hull for the USS Constitution frigate. The kit contains the following parts. 1/8 deck with laser etched deck lines 1/8 railing Ribs Center keel
Designed by Steve Shumate Adapted from the North Star design by Laddie Mikulasko. Polaris EX Introduction
 1 Model Aero Polaris Designed by Steve Shumate Adapted from the North Star design by Laddie Mikulasko Polaris EX Introduction We re excited to introduce the Polaris EX seaplane parkflyer! Based on the
Hip Block Installation Instructions:
 Hip Block Installation Instructions: The instructions that follow are shown for our low profile hip blocks installed in a Storm Chaser M C-1. However, the very same technique can be used for any of our
SEADUCER BOATS GAS SPORT HYDRO
 SEADUCER BOATS GAS SPORT HYDRO COME VISIT US ON THE WEB AT WWW.SEADUCERBOATS.COM 2 - Pkg. Of 440 push rod ends 2 - Pkg. of solder-on rod ends 2 -water outlet fitting 1-1/4" prop nut 1 -.250" x 30" flex
North American Waterway
 North American Waterway Pontoon Enclosures Boating just became more 1447027 Ontario Corporation, P.O. Box 1613, Peterborough, Ontario, CA, K9J 7S4 exciting. 3 Easy Ways to Order: By Phone: 1-705-745-6849
Place a rope coil here
 1 2 3 4 The anchor buoys were made from Sculpey. You could however, carve them from wood but I wanted to continue my experimentation with this material. A buoy from this time period would have ranged from
PURSUIT. Standard Features. Custom-Height 360 Pinnacle Seat 2017 PRODUCT LIST
 PURSUIT With a hull that maximizes speed and stability, integrated features that keep your deck clean & open, and a comfort-redefining custom-height 360 seat, the Pursuit is not just an entirely new NuCanoe.
DURAS INFLATABLE BOAT OWNER'S MANUAL
 DURAS INFLATABLE BOAT OWNER'S MANUAL Table of Contents About your new Duras Inflatable Boat Page 1 Assembly Instruction Page 3 Motor Installation Page 5 Capacities Page 5 Troubleshooting Page 6 Using
QUALITY ALUMINUM BOAT LIFTS, INC. INSTRUCTIONS. Dominator Lake Lift
 INSTRUCTIONS Dominator Lake Lift PHONE:251-986-3882 * FAX:251-986-3136 QABLDOMINATORINST.2014 P a g e 1 Quality Aluminum Boat Lifts, INC. Installation Instructions: Dominator Lake Lift Thank you for your
Making Spars for the Schooner Jeanette
 Making Spars for the Schooner Jeanette..... by Byron Rosenbaum Figure 1. Byron Rosenbaum s 1:16-scale radio-controlled model of the schooner Jeanette. All photographs by the builder. The spars required
Grandpa's Homemade Rocket for About a Dollar!
 Grandpa's Homemade Rocket for About a Dollar! Grandpa and Granny Co. 2012 The most common items needed: (The number of Rocket parts from each item is before the parts name and its proportionate cost is
Construction of the Eddie Drifter Versions 1.0 through 1.2
 Construction of the Eddie Drifter Versions 1.0 through 1.2 (Revised 20 October 2010 by JiM.) Introduction In the summer of 2010, we began experimenting with alternative drifter designs. While the standard
Pico rigging manual 2007.doc Page 1 of 28
 Pico rigging manual 2007.doc Page 1 of 28 Pico Rigging Instructions The Pico rigging instructions are a guide to rigging your boat. Due to production supplies certain parts may be slightly modified from
Trogear Bowsprit Through Hull Installation Manual
 Trogear Marine Products, LLC www.trogear.com info@trogear.com 866-616-2978 Trogear Bowsprit Through Hull Installation Manual Congratulations on your purchase of the Trogear Bowsprit which can be installed
Below are the instructions to build a roller-furling unit for under $10. Read the entire process before beginning the project.
 Greg Cowens' $10 PVC Roller Reefing for CP-16's by Greg Cowen Below are the instructions to build a roller-furling unit for under $10. Read the entire process before beginning the project. Materials: 2
 Photo Essay: How to Build a Nova Scotian Grand Banks Dory By Jeff Spira Plans available at: http://spirainternational.com/ How to Build a Nova Scotian Grand Banks Dory By Jeff Spira In Lunenburg, Nova
aero naut Electric Model Aeroplane Quido Order-No. 1303/00
 aero naut Electric Model Aeroplane Quido Order-No. 1303/00 Quido is a small model that accompanies you wherever you go. The prefabricated parts are mostly balsa and just need to be assembled according
OWNER S MANUAL ALWAYS WEAR A GOVERNMENT APPROVED FLOATATION DEVICE WHEN FISHING. Know the limits of your ability and the limits of your equipment.
 OWNER S MANUAL ALWAYS WEAR A GOVERNMENT APPROVED FLOATATION DEVICE WHEN FISHING. Know the limits of your ability and the limits of your equipment. Changes in air temperature and elevation could cause the
Planning and general precautions ithrust Tunnel Systems installations.
 Version 1.0 This recommendation will go through the different factors to consider when choosing where and how to fit thruster tunnels in a boat. Some of these recommendations might be difficult, or even
ASSEMBLY MANUAL HOBIE CATSY
 ASSEMBLY MANUAL HOBIE CATSY HOBIE CAT EUROPE ZI Toulon Est, BP 50 8078 Toulon cedex 9, France Tel : + (0)9 08 78 78 - Fax : + (0)9 08 99 Email : hobiecat@hobie-cat.net - http://www.hobie-cat.net ASSEMBLY
Little Dog Dual Deploy
 Little Dog Dual Deploy John Wilke & Paul Fechtmeister September 2010 All dimensions are in inches unless specified Construction Notes: Other items you will need: One set of epoxy Motor One sheet of 120
Installation Instructions for your Winter Storage Cover
 Installation Instructions for your Winter Storage Cover QUINTE CANVAS MANUFACTURING 1120 CLYDE COURT, KINGSTON, ONTARIO K7P 2E4 (613) 384-6316 (613) 384-0002 Fax topshop@kos.net www.topshop.on.ca Before
Marine 6-Boat Free-Standing Racks SKU: Updated November 2011
 Marine 6-Boat Free-Standing Racks SKU: 30-061 Updated November 011 Contains: Marine -Boat Free-Standing Racks (SKU 1-003) Marine 3 rd Boat Expansion Racks (SKU 1-0303) Marine Back Legs (SKU -001) 3 Sets
Inuit Owners Manual. Inuit 13.5
 Inuit Owners Manual We have advanced the design and comfort level of the Inuit series beyond any other touring kayak. The Tru-Track hull offers straight tracking despite the shorter hull length plus it
SASK-A-POLE OWNERS AND USERS MANUAL
 SASK-A-POLE OWNERS AND USERS MANUAL GENERAL INFORMATION The Saskatchewan Abilities Council s Sask-a-Pole accessibility and transfer aid is designed to help provide safe and easy access to chairs, beds,
Dornier Do R 4 Super-Wal
 Dornier Do R 4 Super-Wal Model Aviation Laddie Mikulasko s Dornier Do R 4 Super-Wal Build the multiengine, record-setting seaplane. Article, plans, instructions, and photos by Laddie Mikulasko. Complete
Highlander Specifications
 Highlander Specifications July 22, 2012 Highlander Specifications The intent of this section is to clarify and add to what is shown in the official plans. In case of conflict between these specifications
ICE PROTECTION - PROPELLER
 ICE PROTECTION - PROPELLER. DESCRIPTION This section describes the portion of the Ice Protection System pertaining to the propeller. This includes the slinger ring and the de-icing propeller boots. Grooved
TOURNAMENT ICE. 8Ft-Gold Standard Manual Score Home Air Hockey Game Assembly Instructions / Manual
 TOURNAMENT ICE 8Ft-Gold Standard Manual Score Home Air Hockey Game Assembly Instructions / Manual Thank you for purchasing a Gold Standard Games product. All of us at Gold Standard Games want you to be
CAPE CORAL CARDBOARD BOAT REGATTA
 CAPE CORAL CARDBOARD BOAT REGATTA Presented by the Rotary Club of Cape Coral Saturday April 21st (Rain date 4/22), 2018 at Four Freedoms Park, Cape Coral, FL Boat Builder Registration Form Registration
CIRRUS AIRPLANE MAINTENANCE MANUAL
 RUDDER 1. GENERAL The rudder provides airplane directional (yaw) control and includes a rudder trim tab used for yaw trim adjustment. The rudder is of conventional design with skin, spar and ribs manufactured
In each step, the needed parts are shown the number right below. Locate all parts for the step.
 Tools Required for Assembly Phillips Screwdriver, Med Needle Nose Pliers Sandpaper (#400 grit) Hobby Knife Scissors CA Instant Glue Rubbing Alcohol Drill Bit 1/16", 1.6mm 5/64, 2mm 1/8, 3mm 5/32, 4mm Before
CONSTRUCTION OF A GUNBOAT A CLASS YACHT by Brian Dill
 CONSTRUCTION OF A GUNBOAT A CLASS YACHT by Brian Dill The Gunboat design is the latest Radio A class from Graham Bantock, optimised to provide the best boat speed below 4 knots and to be as good as possible
INSTALLING THE TRIDENT 11, 13 OR 15 RUDDER
 INSTALLING THE TRIDENT 11, 13 OR 15 RUDDER Parts Included: Steering Parts: Foot Rail Parts: Rudder Parts: Retraction Parts: 4 - Rubber 2 - Rail Assemblies 1 - Rudder Body 1 - Rudder Retraction Grommets
Revisions to the Regulations for Agility Trials
 Revisions to the Regulations for Agility Trials Effective January 2, 2018 Equipment changes may be done prior to January 2, 2018, but must be completed by January 2, 2018 This insert is issued as a supplement
John with his stiff back, rows Caravan Leghorn ashore in the KISS dinghy.
 The Kiss Dinghy (Keep It Stupid, Simple.) My friend Caravan had been using the prototype for a year when I asked him how it was going. It is phenomenally sensible. He replied. John is crippled with a bad
3. Sail Kit. Table of Contents: Portland Pudgy Safety Dinghy: 3. Sail Kit
 Table of Contents: 3. Sail Kit Sailing the Portland Pudgy... 1 Sailing Tips... 1 Reducing the Sail Area (Reefing the Sail)... 2 Method 1. Reducing Sail without the Exposure Canopy... 2 Method 2. Reducing
Boat Registration Form
 Port Washington Pirate Festival Boat Registration Form Registration Type Entry Fee Per Boat $25 must be paid by May 1 st, 2018 Awards: 1st Place Fastest time around course (per division/per Design Type
Manual 1: working with cutting films. MANUAL 1. Working with cutting films. March 2017
 Manual 1: working with cutting films. MANUAL 1 R Working with cutting films March 2017 Manual 1: working with cutting films. R 1 NECESSARY TOOLS It goes without saying that you need the right tools if
Adaptation of the Paddle-One
 Adaptation of the Paddle-One Putting some into your paddling machine. Richard E. Butts richeb@frontiernet.net @Richard_Butts Bring balance and fun to your paddlesport training! January 2010 http://www.frontiernet.net/~richeb/