Blazer Marine, Whiplash Sport 40
|
|
|
- Melissa Sutton
- 5 years ago
- Views:
Transcription

1 Blazer Marine, Whiplash Sport 40 Thank you for choosing to build the Whiplash 40. We have spent over 12 years perfecting this design, and finally we are making it available to the world. We are excited to release the plans/kits to everyone so you can experience the pride that comes from building your own hydroplane. If you have questions during the building process, feel free to me and I will get back with you in a timely manner. Take your time, do things to the best of your ability and you will have an outstanding Sport40! Best Wishes! Building Supplies: Scroll Saw Sander / Sand paper CA glue with accelerator Epoxy, I highly recommend West System or MAS (slow set) Several Spring Clamps. STEP #1: Look at the layout to get a good idea what the boat will look like before you glue anything together. STEP #2: THE MOST IMPORTANT PART OF THE BUILDING PROCESS IS BUILDING AN ACCURATE JIG. The jig is the building block in which the boat will
2 take shape. If the jig is out of square, the boat will be out of square. Make certain that everything is perfect, within 1/32. If it isn t right, fix it until you are satisfied. Included in the kit is (1) piece of 10-1/16 x 16 piece of fiberboard, (4) pieces of pine spacers, and (2) luan side rails. Follow the assembly drawing below to build your jig. You can use wood glue to hold everything together, with screws or nails for extra support. Figure 1 Step #3: The kit is cut on a CNC router, which leaves a 1/32 radius in all of the slots. Remove the radius using a file or band saw. Sand any burrs off the frames if necessary. Step #4: The weakest parts of the boat are the transom and where the deck starts. As you can see from step #3, the kit contains (2) transoms, (2) #4 frames and (2) #5 frame. Use CA to glue those frames together. Before going any further, place a straight-edge on the frames 4 and 5. You will notice that one side is flat, while the other side has a slight dihedral angle. The side with the dihedral angle is the left side (as if you are sitting in the boat). Mark it accordingly (LH). Step #5: Test-fit all of the frames together, making sure the LH frames are on the left side. The frames should match up perfectly. If they don t, make sure everything is snug. All of the frames must rest flush on the jig. Determine where the boat sits on the jig best (probably 2 from the end of the jig), and draw a perpendicular line where the transom is. You will use this line as a reference guide during the building process. With the frames resting flush on the jig, measure the distance from each sponson tip to your table. Be sure these dimensions are the same. The boat is fairly symmetrical, the only difference being the sponsons. Measure different points of the boat to make sure both dimensions are the same. Once you are sure the boat is square and true (if you have a table saw, cut 4 wide pieces of scrap and place them between the engine rails. This will make sure everything is square), start to tack the frames together using CA. Just apply a couple of drops at each
 sticks to all of the places where skin will be added.")
3 joint. Do not glue the entire joint with CA. (we will come back later and use epoxy on all of the joints). Step #6: In order to get a maximum gluing surface without adding too much weight, add 1/8 x1/8 basswood (or spruce) sticks to all of the places where skin will be added. This essentially doubles the gluing surface. Step #7: The nose of the boat tapers-in a little for aesthetic reasons. The kit contains a piece of 3/8 plywood for you to tack in place to give it the proper shape. Tack this in place, to be removed later. This will ensure that the nose tapers in at the same angle. Gluing the bottom of the boat in place is a very critical step. Take the bottom piece and lay a straight edge along the front tip of the piece. Use a razor blade and club a slit all the way to frame #4. Be sure to glue the bottom sheet to the boat while it is on the jig (be sure to place wax paper between the jig and the boat). See figure #2. Figure 2 Take your time, make sure everything is laying on the jig correctly and tack the bottom skin to the frames using CA. BE SURE THE BOAT IS SYMMETRICAL. See figure 3 for completed frame and bottom.

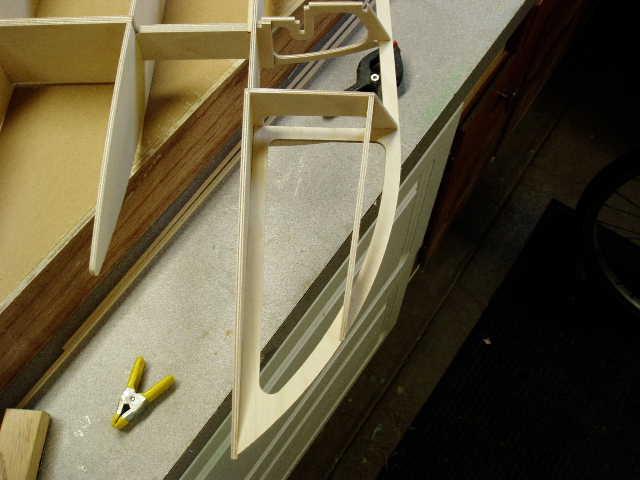
4 Figure 3 Figure 4
 Step #9: The sponson skins need to be glued on in sequence.")
5 Step #8:. Tack the #8 frame, as shown in figure 4 (previous page). The tip of the frame will taper in towards the inner sponson, while the vertical edge is in line with the outer edge of frame #7. (If the frame bows in towards the inner sponson, temporarily place a wedge to push the frame out) Step #9: The sponson skins need to be glued on in sequence. The first piece of skin to put on is the outermost piece. Sand the side of the sponson so that the skin will lay flat on all of the edges. Be sure the ride pad is the same width from front to back. The second piece of skin to tack on is the inner piece. Simply cut the shape and tack in place. The third piece to tack on is the ride pad. Cut this piece a bit larger so you can sand-tofit after it is tacked on. The final piece to put on is the sponson tip. Cut this piece out a bit larger also. Then, sand-to-fit once the piece is glued. This piece requires more CA in the front due to the curve. Add as much CA as you feel necessary. See Figures 5. Figure 5
 Step #10: The engine wall needs to have two")

6 Figure 5 (a different view) Figure 5 (completed sponsons) Step #10: The engine wall needs to have two 1/8 pieces glued to each wall. See Figure 6. ¾ hardwood triangles must be glued to tie in the transom to the engine walls


7 Figure 6 Step #11: Since people will use different engines, rudders, mounts etc. placement will vary. The center of gravity should be approximately 1 in back of the sponson. Don t worry if you are a little off this boat is pretty forgiving. Place all hardware in the boat, and move the engine until you get the correct CG. When you mount the engine, mount it flat and put an S bend in the shaft. If you spin the shaft by hand with the S bend, it will seem tighter than what a straight shaft would feel. But when the engine spins at 20,000+ rpm, the shaft will not flop inside the stuffing box nearly as much, thus increasing speed. See figure 7. Figure 7


8 Turn Fin Mount 1/8 strut doubler should be added for extra strength to the inside of the hull. The turnfin and engine should be mounted prior to installing the deck. Use Blind nuts to install all hardware, and should be installed prior to putting the deck on. Mount the rudder on the left side of the boat, place the strut in the center of the boat, and mount the turn fin so that the inner edge is in line with the outside edge of the ride pad. The turn fin should be mounted vertically with a slight hook. Be sure the slope of the hook rides on the same plane as the riding surface. Strut and Strut Configuration

9 Step #12: The nose of the boat is strengthened using a piece of hardwood sanded to shape. Glue this in with epoxy. See figure 8 Figure 8. Step #13: After all of the blind nuts and reinforcements are installed, the inside of the boat must be sealed with Epoxy. I recommend using West System epoxy, but you can use any high end epoxy. Do not use cheap epoxy! If you want, you can do step #13 and # 14 in the same step. Step #14: Aesthetically, the most important part of the boat is the deck. Considerable planning must be done to figure out a way to hold down the deck while the glue dries. Install floatation in the boat using pink insulation foam or pool noodles. Apply a heavy coat of epoxy to the inside deck as well as the frames. Place the deck on the frames and secure it using anything you can think of to keep the deck securely on the frames. Once the glue dries, the boat will be very rigid. I have used staples, tape, clamps, weights and a lot of other things to keep the deck down. Since the boat is square from the previous steps, it is safe to glue the deck to the boat when the boat is not on the jig. ** IF YOU DO THIS, BE SURE THE BOAT IS RESTING ON A FLAT SURFACE WITH THE SPONSONS OVERHANGING THE EDGE OF THE FLAT SURFACE** Once the deck dries, sand it smooth to finish it off. Step #15: Pine (or similar wood) must be added to the front of the deck for strength, aerodynamics, as well as legality issues. See figure 8 and 9. When making the nose pieces, get them very close to the correct shape before gluing them in place. A template is included with the kit to give you the approximate shape. Be sure the distance from the tip of the sponson to the end of the nose is no less than 9, otherwise the boat will not be legal in competition according to IMPBA rules.


.")
10 Figure 9 Step #16: The radio box should be located in the nose of the boat. See figures 10 for a good method of installing your servos. The radio box compartment must have a frame glued to the engine walls. This will hold a plastic lid which will make everything waterproof. Figure 10 (bottom of mount) Figure 10 (servo assembly) Step #17: The fuel tanks should be placed under the deck at the center of gravity (CG). Each side should have at least a 8oz tank. I made my own tanks, but the Sulivan SO8 slides under the deck perfectly.

11 Figure 11 Hardware used: 40 size Speedmaster rudder (101-40) 40 size Speedmaster flat bottom strut (VM-3) Speedmaster Univeral motor mount (UMM) Props used: The prop that works very well is the Octura X450/3. This prop keeps the boat glued to the water. The X450/2 work very well also, but tends to loosen the boat up a little. Octura 1455 is a very fast prop if the lift is taken out. Experiment a lot with props. Your boat may like a prop that a different boat doesn t. Don t give up on anything, and try everything. Engines used: CMB Hydro 2005 Good luck with your Whiplash sport40. You should see speeds in the upper 50 s to low 60 s in heat racing form. The boat is very stable and turns on a dime. If you find out something that works very well with the boat, please let me know. We can learn from each other. Thanks for your support and have a lot of fun! Thanks, Brian Blazer Brian@BlazerMarine.com (513)
Blazer Marine, Whiplash Sport Hydro
 Blazer Marine, Whiplash Sport Hydro Thank you for choosing to build the Whiplash Sport Hydro. We have spent over 12 years perfecting this design, and finally we are making it available to the world. We
Step 1: Block sand the transom to remove the seam joint. The end result should be a flat transom without a ledge where the seam joint is.
 WhiplashGV Instruction Manual Email: Brian@Blazermarine.com Phone: 513-598-1769 Step 1: Block sand the transom to remove the seam joint. The end result should be a flat transom without a ledge where the
PAY N PAK, 1/12 th Scale, Limited Sport Hydro P Sport Hydro
 1980 82 PAY N PAK, 1/12 th Scale, Limited Sport Hydro P Sport Hydro Introduction: The 1980 turbine Pay N Pak is a good subject for a model race boat. It has a low profile, mild pickle-fork setback, long
1/10 th Scale 1956 Ted Jones Classic Hydroplane
 1/10 th Scale 1956 Ted Jones Classic Hydroplane Preparation These plans show outside sheeting of 3/32 balsa laminated with 1/64 birch ply. This makes a light and strong skin for this boat. Optionally you
We hope you ll enjoy the Drifter as much as we have! Scott DeTray Model Aero Specifications:
 We are excited to bring you the Drifter RC airboat. You re probably thinking it doesn t fly so what is Model Aero thinking??? We have always liked RC vehicles of all types and have had a fondness for airboats
SEADUCER BOATS GAS SPORT HYDRO
 SEADUCER BOATS GAS SPORT HYDRO COME VISIT US ON THE WEB AT WWW.SEADUCERBOATS.COM 2 - Pkg. Of 440 push rod ends 2 - Pkg. of solder-on rod ends 2 -water outlet fitting 1-1/4" prop nut 1 -.250" x 30" flex
BUILDING INSTRUCTIONS
 Z I P P M A N U FA C T U R I N G A Zippkits R/C Boat BUILDING INSTRUCTIONS 2010 Zipp Manufacturing Frankfort, New York 13340 www.zippkits.com Table of Contents Introduction 1 Engine Mounting 30 S E C T
Tugster. Tug Boat. Competition or Sport Tug Kit. A Zippkits R/C Boat. Building Instructions
 Z I P P M A N U FA C T U R I N G Tugster Tug Boat Competition or Sport Tug Kit A Zippkits R/C Boat Building Instructions 2016 JMP Hobby Group St. Paul, Indiana 47272 www.zippkits.com Toll Free (866) 922-ZIPP
SEADUCER BOATS GAS MONO COME VISIT US ON THE WEB AT
 SEADUCER BOATS GAS MONO COME VISIT US ON THE WEB AT WWW.SEADUCERBOATS.COM 1 - Pkg. Of 440 push rod ends 1 - Pkg. of solder-on rod ends 2 -water outlet fitting 1-1/4" prop nut 1 -.250" x 24" flex shaft
aero naut Electric Model Aeroplane Quido Order-No. 1303/00
 aero naut Electric Model Aeroplane Quido Order-No. 1303/00 Quido is a small model that accompanies you wherever you go. The prefabricated parts are mostly balsa and just need to be assembled according
MICRO - DLG. This kit should only take 30 minutes to compile, very simple and quick.
 MICRO - DLG This kit should only take 30 minutes to compile, very simple and quick. You will need: Hot Glue ( small tip preferably ) Sharp razor blade Ruler a strip of strong fiber tape Thin nose Pliers
INSTALLING YOUR CLC RUDDER
 INSTALLING YOUR CLC RUDDER These instructions are written to help you install the CLC rudder kit on your wooden kayak. The rudder can be fitted to your boat during construction or after completion. Please
Soling Building Tips II
 Soling Building Tips II Prepared: Arthur Deane Jan 20, 2002 adeane@ic.net Introduction The following are some lessons learned and experience gained in building a Soling kit. The plan developed is based
SLR Missile Thunderboat
 J M P H O B B Y G R O U P L L C SLR Missile Thunderboat Zippkits R/C Boats BUILDING INSTRUCTIONS 2017 JMP Hobby Group LLC Indiana USA 1 Introduction Thank you for purchasing this kit. We are sure that
Model Aero AT-6 Texan Introduction
 1 Model Aero AT-6 Texan Introduction We are excited to introduce the Model Aero AT-6 Texan! Originally used as an advanced trainer by the U.S. Armed Forces, the AT-6 is a relaxing slow flyer, equally at
Horizontal Fuselage. Top Vertical Fuselage 1. Lay out the Top Vertical Fuse Front(1), Top Vertical Fuse Back(2), and Vertical Stabilizer(3).
, Top Vertical Fuse Back(2), and Vertical Stabilizer(3).") Rumbuilder 71 B-17 Congrats on your Rumbuilder B-17! We re glad you chose to fly with us! If you have any problems, or missing/broken kit pieces, please contact us. We d be happy to replace any damaged
Rumbuilder 71 B-17 Congrats on your Rumbuilder B-17! We re glad you chose to fly with us! If you have any problems, or missing/broken kit pieces, please contact us. We d be happy to replace any damaged
aero naut Order No. 3009/00
 aero naut Order No. 3009/00 Introduction: The model should be assembled following the sequence of the stages of construction described in these instructions. The laser-cut components are individually numbered.
Miss Mayflower. Build Manual
 Miss Mayflower Build Manual Thank you for the purchase of the Miss Mayflower, this new exciting craft will give you fun on many types of terrain including snow, gravel, pavement, grass, water, and when
Your kit contains the following items. Additional Items You May Need. Pre- cut parts Propeller rigging and rubber Sandpaper Covering sheet
 Your kit contains the following items Pre- cut parts Propeller rigging and rubber Sandpaper Covering sheet The SkyFox offers great glide performance in a rubber powered plane due to its built up wing.
CONSTRUCTION OF A GUNBOAT A CLASS YACHT by Brian Dill
 CONSTRUCTION OF A GUNBOAT A CLASS YACHT by Brian Dill The Gunboat design is the latest Radio A class from Graham Bantock, optimised to provide the best boat speed below 4 knots and to be as good as possible
Model Aero Sportster Indroduction
 1 Model Aero Sportster Indroduction We are excited to introduce the Model Aero Sportster! Inspired by classic designs of the past, the Sportster is a relaxing slow flyer, equally at home indoors or outside
Making Spars for the Schooner Jeanette
 Making Spars for the Schooner Jeanette..... by Byron Rosenbaum Figure 1. Byron Rosenbaum s 1:16-scale radio-controlled model of the schooner Jeanette. All photographs by the builder. The spars required
Super Sport. Building Instructions Z I P P M A N U FA C T U R I N G. A Zippkits RC Boat. 46 inch Gas Mono Hull
 SS Z I P P M A N U FA C T U R I N G Super Sport 46 inch Gas Mono Hull A Zippkits RC Boat Building Instructions 2018 JMP Hobby Group LLC Indiana USA (866) 922-9477 www.zippkits.com 1 D E S I G N C U S T
QRPGuys Single Lever Mini Paddle
 QRPGuys Single Lever Mini Paddle First, familiarize yourself with the parts and check for all the components. If a part is missing, please contact us and we will send one. You must use qrpguys.parts@gmail.com
Dornier Do R 4 Super-Wal
 Dornier Do R 4 Super-Wal Model Aviation Laddie Mikulasko s Dornier Do R 4 Super-Wal Build the multiengine, record-setting seaplane. Article, plans, instructions, and photos by Laddie Mikulasko. Complete
400/488 Rotating Davit Installation Instructions
 400/488 Rotating Davit Installation Instructions These instructions were written with the owner in mind. If you are the installer make sure these instructions are passed along to the owner of the boat.
Constitution Instructions
 Constitution Instructions This kit will build a 1:48 scale hull for the USS Constitution frigate. The kit contains the following parts. 1/8 deck with laser etched deck lines 1/8 railing Ribs Center keel
Designed by Steve Shumate Adapted from the North Star design by Laddie Mikulasko. Polaris EX Introduction
 1 Model Aero Polaris Designed by Steve Shumate Adapted from the North Star design by Laddie Mikulasko Polaris EX Introduction We re excited to introduce the Polaris EX seaplane parkflyer! Based on the
Building Instructions ME 163 B 1a M 1:5 Turbine
 Building Instructions ME 163 B 1a M 1:5 Turbine Thank you for choosing our kit of the Me-163B. We ask you to read the instruction once in advance before building this kit in order to avoid mistakes. Make
Pre-Paint>Fuselage>Empennage>Fit vertical tail fin. Objectives of this task: Materials and equipment required: Fit the spar extender
 Pre-Paint>Fuselage>Empennage>Fit vertical tail fin Objectives of this task: To fit the vertical tail fin to the fuselage, including fitting the static probe, static tube, optional strobe light wiring and
PACK 24 RAINGUTTER REGATTA November 19, 2010 (7pm at Hawthorne)
") PACK 24 RAINGUTTER REGATTA November 19, 2010 (7pm at Hawthorne) Welcome to the Pack 24 Raingutter Regatta! Get ready for a night of excitement, action and a lot of hot air. The premise of Raingutter Regatta
PACK 24 RAINGUTTER REGATTA November 19, 2010 (7pm at Hawthorne) Welcome to the Pack 24 Raingutter Regatta! Get ready for a night of excitement, action and a lot of hot air. The premise of Raingutter Regatta
Max Bee. Part II: Building Max Bee Stunt News 8. lighter: the building of Max. all published.
 Max Bee Can you say Exotic? Igor s World Championship winning design has lots of interesting aerodynamics as well as interesting aesthetic design cues. I know, I know, the designing article about Max Bee
V-Tail Flamingo. Included in Kit * Pre- cut balsa parts * Ballast weights * Diagram sheet * Sandpaper sheet
 V-Tail Flamingo Included in Kit * Pre- cut balsa parts * Ballast weights * Diagram sheet * Sandpaper sheet Additional Items You May Need * Wood Glue * Epoxy Glue * Sanding block * Hobby knife Overview:
Surfboard Repairs Chapter 7
 Surfboard Repairs Chapter 7 The Complete Surfing Guide for Coaches - Bruce "Snake" Gabrielson Repair Problems Boards continuously get bumped, hit rocks, break fins, get dropped, and many other things that
Cub Scout Pack Rain Gutter Regatta
 Cub Scout Pack 350 2014 Rain Gutter Regatta Event Location & Date: Advance Firehouse, Saturday November 22nd 11:00am-1:00pm (racing as soon as everyone registers) 106 E Wall Street Advance, IN 46102-9407
WHITE WOLF. X-ray View MID POWER MODEL ROCKET KIT BUILDING INSTRUCTIONS KIT SPECIFICATIONS:
 WHITEWOLF-38 PARTS LIST 1 - Nose Cone 1-17" Airframe 1-6" Motor Tube 3 - Aft Fins 3 - Forward Fins 2 - Centering Rings 1-15" Parachute 2 - launch lugs 1-12 Kevlar Shock Cord 1 - Motor Retention >>(screw/washer)
Below are the instructions to build a roller-furling unit for under $10. Read the entire process before beginning the project.
 Greg Cowens' $10 PVC Roller Reefing for CP-16's by Greg Cowen Below are the instructions to build a roller-furling unit for under $10. Read the entire process before beginning the project. Materials: 2
Pitts Model 12 Wing Leading edge Installation
 Pitts Model 12 Wing Leading edge Installation This procedure is used to install molded plywood leading edges included in the Pitts Model 12 kit. Nine (9) molded leading edge section are require per aircraft;
Instructions for Fun Foam Critter 4/25/2007 BP Hobbies LLC 140 Ethel Road W Suite J Piscataway NJ,
 Instructions for Fun Foam Critter 4/25/2007 BP Hobbies LLC 140 Ethel Road W Suite J Piscataway NJ, 08854 http://www.bphobbies.com Specifications: Wing Span: 20" Length: 20" Flying Weight: 5.5-7.0 oz Controls:
Trim Tab Wind Vane for boats with transom mounted rudders
 Trim Tab Wind Vane for boats with transom mounted rudders If your boat has a transom mounted rudder, you can build this self-steering windvane for around $150, using regular wood working tools and some
Cardboard Boat Basics
 Georgetown Wooden Boat Show 2016 What Floats Your Boat Cardboard Boat Basics 1 Construction Rules (Equal Opportunity) The ENTIRE BOAT must be built of CARDBOARD Only exceptions are the decorations Use
Boat Building Basics. How To Build Your Cardboard Boat
 Boat Building Basics How To Build Your Cardboard Boat Construction Rules The ENTIRE boat must be built of cardboard, duct tape, and one-part polyurethane. Only exceptions are the paddles & decorations
FlyingFoam Nurf. General Assembly Instructions
 FlyingFoam Nurf General Assembly Instructions These instructions apply to the Nurf, an all EPP forward swept flying wing available from FlyingFoam.com. Building and operating a remote controlled aircraft
Riviera Draft Shaft Hole Boring
 Riviera Draft Shaft Hole Boring a. Height from bottom of hull thru the hull to the center of the drive shaft. This will be calculated. b. Height of drop of strut. The strut for the Riviera is 7.5 c. Distance
X-29 Canard Jet. A Simple Depron Foam Build.
 X-29 Canard Jet. A Simple Depron Foam Build. Two full sized X-29 s were built and the first flew in 1984. They were experimental aircraft, testing this unusual configuration of a canard jet with swept
Star 45 Short Kit Build by Bob Szczepanski
 Star 45 Short Kit Build by Bob Szczepanski An old used Star 45 showed up at our pond one day last Fall. Nostalgia struck and I was hooked! A flood of memories sailing an International Star boat on Lake
NEW DESIGNS. Print in Landscape Mode with ¼ inch borders. Hinges (2) degrees. 1 Seating Type Optional
 degrees. 1 Seating Type Optional") 2017 IDEAS NEW DESIGNS Ken Simpson Designs Drawn 06-01-2017 Rev. 07-02-2017 The SPORTSMAN 10'L x 36 W x 15 H 475 pound Capacity Print in Landscape Mode with ¼ inch borders. Hinges (2) 36 30 8 degrees Click
2017 IDEAS NEW DESIGNS Ken Simpson Designs Drawn 06-01-2017 Rev. 07-02-2017 The SPORTSMAN 10'L x 36 W x 15 H 475 pound Capacity Print in Landscape Mode with ¼ inch borders. Hinges (2) 36 30 8 degrees Click
Hat s off to you for choosing a kit from Port Townsend Watercraft.
 Hat s off to you for choosing a kit from Port Townsend Watercraft. 1 A 30 year fascination with the challenges of nesting boat design, and many prototypes have led to the PT Eleven. Because you chose this
Steps for W17, W14,W07, Wing Assembly Sonex #815
 CAUTION: This document is in no way a publication of Sonex Aircraft LLC. or any other corporation. All products mentioned are not necessarily recommended for use, but are included for informational purposes
Small, Lightweight, Very Portable and Low Cost. Print in Landscape Mode with ¼ inch borders.
 The 1 SHEET WEDGE Drawn 09-20-2015 Small, Lightweight, Very Portable and Low Cost Ken Simpson Designs Rev 07-31-2016 Print in Landscape Mode with ¼ inch borders It may look similar to some of my other
Uncle John's Choupique Road Sulphur, LA Materials needed to build the basic boat 1/4" x 48" x 96" exterior plywood ~ 3 sheets
 Uncle John's 5229 Choupique Road Sulphur, LA 70665 Thank you for purchasing our plans. Have a safe and enjoyable experience building and using your craft. Materials needed to build the basic boat 1/4"
INSTRUCTIONS FOR GLUING ON THE BUMPER FOR PORT TOWNSEND WATERCRAFT S NESTING DINGIES. (Or requires a 1 surface to adhere to.)
") INSTRUCTIONS FOR GLUING ON THE BUMPER FOR PORT TOWNSEND WATERCRAFT S NESTING DINGIES. (Or requires a 1 surface to adhere to.) The PT 11 bumper is made from a high quality, non marking EPDM rubber. This
INSTRUCTIONS FOR GLUING ON THE BUMPER FOR PORT TOWNSEND WATERCRAFT S NESTING DINGIES. (Or requires a 1 surface to adhere to.) The PT 11 bumper is made from a high quality, non marking EPDM rubber. This
Small, Lightweight, Very Portable and Low Cost. Print in Landscape Mode with ¼ inch borders.
 The 1 SHEET WEDGE Drawn 09-20-2015 Small, Lightweight, Very Portable and Low Cost Ken Simpson Designs Rev 03-14-2018 Print in Landscape Mode with ¼ inch borders It may look similar to some of my other
AGM 33 PIKE ALL FIBERGLASS. Specifications Length: 92 Diameter 5.5 Weight: 24 lbs Motor Mount: 75mm Fins: 6-3/16 G10 CP: 68 from nose tip Parts List
 ALL FIBERGLASS AGM 33 PIKE Specifications Length: 92 Diameter 5.5 Weight: 24 lbs Motor Mount: 75mm Fins: 6-3/16 G10 CP: 68 from nose tip Parts List (1) Filament Wound Nose Cone w/ Metal Tip (1) Nose Cone
PUT TING SCIENCE TO FLIGHT T E A C H E R S G U I D E
 PUT TING SCIENCE TO FLIGHT T E A C H E R S G U I D E Rocco Fer rario Teacher, American Canyon Middle School Napa, CA 55747 TECH TIPS Building Tips for the Raven Broken wings are a bummer. Unless the dihedral
How do you build a cardboard boat?
 How do you build a cardboard boat? 2015/2016 Campaign Kick-Off 8 th Annual Cardboard Boat Race Saturday, September 12, 2015 Dundee Lake Park Cardboard Boat Race 2015/2016 1 Boat Construction Rules The
Carving a Custom Seat
 Carving a Custom Seat Seat Carving your own seat from mini-cell, high-density foam is really quite simple and has proven to be more comfortable than any commercially produced seat and often more reasonably
CARL GOLDBERG PRODUCTS, LTD. P.O. Box 818 Oakwood GA Phone # Fax #
 Superfloats 36 ARF WARNING A radio-controlled model is not a toy and is not intended for persons under 16 years old. Keep this kit out of the reach of younger children, as it contains parts that could
8-GUN CORVETTE ASSEMBLY INSTRUCTIONS
 8-GUN CORVETTE ASSEMBLY INSTRUCTIONS THE HULL STEP 1 Fasten the Deck to the Hull. Find the hull. This is a large, pink, ship-shaped piece of insulating foam board. This will form the base of your model
Build This World Record Fuselage Model
 Build This World Record Fuselage Model Here You Have Complete Instructions and Plans to Build a Plane of Sure-fire Performance that Established a World Record at the 1932 National Airplane Model Competition
MiniTwin by Acer
 MiniTwin 250 - by Acer ASSEMBLY INSTRUCTIONS Thank you for choosing the MiniTwin 250 as your next project. This kit is easy to build and only requires a few hours to complete. Once finished, you will be
VALDIVIA BUILD LOG Dr Ron
 VALDIVIA BUILD LOG Dr Ron The Robbe kit of the two-masted schooner Valdivia was purchased in 2007, along with the fitting set and propulsion accessories, and has been staring me in the face since then
Outbound Progress Report
 Outbound Progress Report 7-11-17 Tank Install The new 20 plus gallon fuel tank is underway. In a matter of weeks we should be getting the first article and placing a first run order. The tank fits like
S A N S I B E A R S P L I N T 2 0 X
 SANSIBEAR SPLINT 20X This is just a short documentation of one way you can assemble the Cylon/Splint I'm sure the pics will speak for themselves. Good pictures are better than to many words. If you have
EPP Version Building Notes Updated
 EPP Version Building Notes Updated 12-10-2013 The Zulu covers a wide range of flying conditions: slope soaring in light to strong lift, thermalling, aerobatics, discus launches, and combat; for skill levels
Construction Chapters Index
 Construction Chapters Index 9 7 8 Chapters Index c. c. c. c. c. c. c7. c8. c9. c0. c. c. c. c. c. c. c7. Balsa Wood Skeleton Strip Planking Hull Fairing Keel Bulb Mould Lead Bulb Casting Keel Construction
LITTLE TRI construction
 LITTLE TRI construction I have built almost anything that can sail. At the age of 12 my first sail thing, an ice boat. I used skates which had to be mounted on shoes as runners. Big fun, very fast, only
Wooden Canoe. Building a One-Off Wood & Canvas Canoe. Ray Arcand: A Living Link to the Past. Issue 134, April 2006 Volume 29, No.
 Wooden Canoe Issue 134, April 2006 Volume 29, No. 2 Building a One-Off Wood & Canvas Canoe Courses, Classes, Early Summer Ray Arcand: A Living Link to the Past WCHA Annual Report Building a One-Off Wood
West River 180. There are 3 main types of home built kayaks that are within the abilities of anybody:
 West River 180 During the months of July and August 2001 I lost my last remnants of sanity, covered my back deck with plastic, and spent every spare moment I had building my own kayak. Since I have yet
Adaptation of the Paddle-One
 Adaptation of the Paddle-One Putting some into your paddling machine. Richard E. Butts richeb@frontiernet.net @Richard_Butts Bring balance and fun to your paddlesport training! January 2010 http://www.frontiernet.net/~richeb/
In each step, the needed parts are shown the number right below. Locate all parts for the step.
 Tools Required for Assembly Phillips Screwdriver, Med Needle Nose Pliers Sandpaper (#400 grit) Hobby Knife Scissors CA Instant Glue Rubbing Alcohol Drill Bit 1/16", 1.6mm 5/64, 2mm 1/8, 3mm 5/32, 4mm Before
SECTION 10iS: TAILCONE
 VAN'S AIRCRAFT, INC. F-1282-R BOTTOM RIGHT SKIN F-1283C J-STIFFENER F-1278 TOP SKIN F-00009-L ADAHRS BRACKET F-00009-R ADAHRS BRACKET F-1279-R UPPER RIGHT SKIN F-1280-R RIGHT SIDE SKIN SECTION 10iS: TAILCONE
Chapter Twelve. Starting the rigging process
 Chapter Twelve Starting the rigging process Before I begin describing the rigging process, I must remind folks that it would be a great time to slip that traveler ring onto the bowsprit. I forgot to mention
Akcent-2 - Building Instructions
 Akcent-2 Home Pictures Building Instructions Ordering Akcent-2 - Building Instructions Note! The pictures show older kits with "diser" wings. The new kits come with nicer D-box wings. Servo locations are
SERIES 2 RAMP OWNER S MANUAL TOOLS REQUIRED: BEFORE YOU BEGIN... Read and understand these instructions before beginning a ramp setup.
 SERIES 2 RAMP OWNER S MANUAL BEFORE YOU BEGIN... Read and understand these instructions before beginning a ramp setup. Use caution and care for your back when lifting, pushing, pulling, folding or unfolding
F-1279-R UPPER RIGHT SKIN F-1280-R RIGHT SIDE SKIN F-1281-R LOWER RIGHT SKIN F-1208-R FUSELAGE FRAME
 F-1282-R BOTTOM RIGHT SKIN F-1283C J-STIFFENER F-1278 TOP SKIN F-00009-L ADAHRS BRACKET F-00009-R ADAHRS BRACKET F-1279-R UPPER RIGHT SKIN F-1280-R RIGHT SIDE SKIN SECTION 10: TAILCONE F-1279-L UPPER LEFT
How to Set-Up an 18-Cell Monohull for 4 Minute Offshore & Sprint Oval Racing Using the FDM Turbo Transmission
 How to Set-Up an 18-Cell Monohull for 4 Minute Offshore & Sprint Oval Racing Using the FDM Turbo Transmission By Ralph von Eppinghoven Metro Marine Modelers Toronto, Canada Offshore style, Fast Electric
Snowbird Stick Job. by Alan Orthof
 Snowbird Stick Job by Alan Orthof After AI Orthof hoiked his big dogs into galoshes the other day to plod through the first snow of the season, he realized that models need winter boots, too. So he got
5. Tailplane assembly
 5. Tailplane assembly Overview This section covers the fitting of your completed tailplanes to the torque tube assembly. Included is the insertion of the TP13 bushes in the inboard rib and the fitting
Table Of Airplanes. Arrow 1. Bulldog 4. Bullet 8. Canard 11. Classic Dart. Condor 17. Delta 20. Dragonfly 23. Raptor 26. Spade 31
 Table Of Airplanes Plane Page Arrow 1 Bulldog 4 Bullet 8 Canard 11 Classic Dart 14 Condor 17 Delta 20 Dragonfly 23 Raptor 2 Spade 31 Arrow This plane is easy to fold and flies straight and smooth. Add
CONSTRUCTION NOTES BY: MARK HUNT ISSUED:
 INSIGHT V4 CONSTRUCTION NOTES BY: MARK HUNT ISSUED: 3/22/06 Pg.1 INDEX Title Page 1 Index 2 Introduction 3 Material list 4 Foam Cutting Notes 5 Wing 5 Stab 8 Vertical Fin 8 Fuselage Foam Parts 9 Fuselage
Insanity is doing the same thing over and over again and expecting a different result
 ZIROLI P40 KITTYHAWK Insanity is doing the same thing over and over again and expecting a different result I have built four Ziroli Kittyhawks over the past umpteen years and this is a picture of the fourth
IVAN S LAKEMASTER BY IVAN PETTIGREW CONSTRUCTION NOTES
 IVAN S LAKEMASTER BY IVAN PETTIGREW CONSTRUCTION NOTES August 2015 The LakeMaster started out to be a scaled down version of Ivan s Seagull which has been a fantastic model for over 20 years. The Seagull
DIY Shallow Water Anchor Assembly Instructions for Rods, T-grips, Stainless Tips, Stainless Couplers, and the 4-in-1 Paddle
 DIY Shallow Water Anchor Assembly Instructions for Rods, T-grips, Stainless Tips, Stainless Couplers, and the 4-in-1 Paddle All Shallow Water Anchor Parts First, start by laying out and identifying all
2018 Lucerne Seafair Milk Carton Derby Presented by Safeway/Albertsons BOAT BUILDING GUIDE
 2018 Lucerne Seafair Milk Carton Derby Presented by Safeway/Albertsons BOAT BUILDING GUIDE Pick Your Strategy Do you have a need for speed? Do you like to make your own wind? If Yes, maybe consider building
Last Revised 3/17/15 RMRC Mako
 Ready Made RC, LLC Assembly Instructions for: Last Revised 3/17/15 RMRC Mako Page 1 Thank you for purchasing the RMRC Mako! It is important to read the manual in its entirety before your maiden flight.
-Round Down- Description & Overview. VEX Classroom Competition Round Down
 -Round Down- Description & Overview Round Down is a head-to-head robotics competition designed and scaled to be run in a classroom environment by a single teacher. This game provides a challenge for designers
The slots for 7V4-5 have two predrilled holes. Locate them and connect them with a line. These will be at rib #1,3,4,6.
 7V7-1 Nose Skin The slots for 7V4-5 have two predrilled holes. Locate them and connect them with a line. These will be at rib #1,3,4,6. 7V7-1 Nose Skin The best way to cut the slot is by drilling a series
Aegea Assembly Notes:
 Aegea Assembly Notes: The Aegea model is a thermal Duration (TD) model made up of components from Phil Barnes 1 (bagged wing and tail group) and Terry Luckenback 2 (Pretty Mantis fuse). Due to its construction
QRPGuys Single Lever Paddle w/base
 QRPGuys Single Lever Paddle w/base First, familiarize yourself with the parts and check for all the components. If a part is missing, please contact us and we will send one. You must use qrpguys.parts@gmail.com
 Photo Essay: How to Build a Nova Scotian Grand Banks Dory By Jeff Spira Plans available at: http://spirainternational.com/ How to Build a Nova Scotian Grand Banks Dory By Jeff Spira In Lunenburg, Nova
Ref Part Part # Qty Letter A Rudder Catcher B X 1/2 PH Bolts C Rudder Bracket
 Ref Part Part # Qty A Rudder Catcher 07.2694.0000 1 J B Q A B 10-32 X 1/2 PH Bolts 07.2136.0000 10 C Rudder Bracket 07.2689.0000 1 D Kayak Pad Eye 01.1315.0430 2 E Cherry Rivets 01.1315.0459 4 H T N P
Installation Instructions MODEL VSTI-A020 Tank Indicator Installation Model: VSTI-A020, Stainless Reverse Read System Versa Steel Inc. Guide Cables No
 Tank Indicator Installation Model: VSTI-A020, Stainless Reverse Read System Guide Cables No Guide Cables 1 August 4, 2011 Assembly Instructions: (Shown with a 2 board, 12 ft kit) ITEM NO. PART NUMBER DESCRIPTION
How to Cut Shafts and Glue T-tops on KIALOA Stand-Up Paddles
 How to Cut Shafts and Glue T-tops on KIALOA Stand-Up Paddles Sizing: Determine the size for your paddle by adding 6-10 to your overall height. If you paddle more frequently in the surf, lean towards the
Trogear Bowsprit Through Hull Installation Manual
 Trogear Marine Products, LLC www.trogear.com info@trogear.com 866-616-2978 Trogear Bowsprit Through Hull Installation Manual Congratulations on your purchase of the Trogear Bowsprit which can be installed
CATBOX. A Puddle Duck Racer. By Jim Michalak
 CATBOX A Puddle Duck Racer By Jim Michalak CAT BOX HULL SPECIFICATIONS 1. Bow transom from 1/4" plywood. Top and bottom edges framed with 3/4 x 1-1/2" lumber with bevels as shown. Mark centerlines boldly.
AVA Building Instructions
 Suggested Assembly Sequence: AVA Building Instructions 1. Insert fittings in rudder and trial fit rudder on boom 2. Attach stab to v-mount and position ahead of rudder ¼, sanding the v-mount as needed.
General Build Instructions for Mach 1 BT50 and BT55 Single Fin Kits. Needed Items for Assembly
 General Build Instructions for Mach 1 BT50 and BT55 Single Fin Kits 60-80 grit sandpaper Hobby knife Tape measure Scissors CA Super glue 30-minute epoxy 5-minute epoxy Masking tape 1/16 drill bit Needed
Carving Ship Model Hulls Laminated and Machine Carved Hulls
 Carving Ship Model Hulls Laminated and Machine Carved Hulls Pete Jaquith 09 June 2015 Topsail Schooner Eagle 1847 Topsail schooner rig Built in Arrowsic Island, ME in 1847 3/16 to the foot, 1:64 scale
BASIC COROPLAST HULLS FOUR HULLS, all single occupant designs. Choose the one that suites your needs.
 BASIC COROPLAST HULLS FOUR HULLS, all single occupant designs. Choose the one that suites your needs. The build notes for one hull 5 type should 8 apply to all hull types. 1 CUT these 2 lines First 20