SEADUCER BOATS GAS MONO COME VISIT US ON THE WEB AT
|
|
|
- Magdalene Thornton
- 6 years ago
- Views:
Transcription
1 SEADUCER BOATS GAS MONO COME VISIT US ON THE WEB AT Pkg. Of 440 push rod ends 1 - Pkg. of solder-on rod ends 2 -water outlet fitting 1-1/4" prop nut " x 24" flex shaft 1-5/16" x 36" brass tubing 1-1/4 x 12" brass tubing 3-12" 440 push rods 1 - Pkg. of push rod seals 1 - Switch rnount 1-4' of fuel line 1-1/4 " drive dog 1 prather 270 prop 4-8/32 screws and nuts 1 1/2 x 1/2 x 12" hardwood 6' length pipe insulation 1 -Sullivan 16 oz fuel tank HARDWARE: We recommend the Seaducer Hardware Kit, which consists of Strut, Rubber shock absorbing Motor Mount, Rudder, & antenna mount & Pipe Mount. IF YOU Don t USE OUR HARDWARE THE BOAT WILL NOT RUN WELL AND YOU WON T BE HAPPY WITH THE BOAT.. With our mount you can actually sit the engine against the bottom of the boat. RADIO BOX SETUP : Use a Futaba / Hi Tec 1/4 scale servo for steering & a Futaba S-148 for throttle. To allow for proper steering servo height use Aeromarine 1/4 scale servo holder. Use 1/4 square wood between the mount
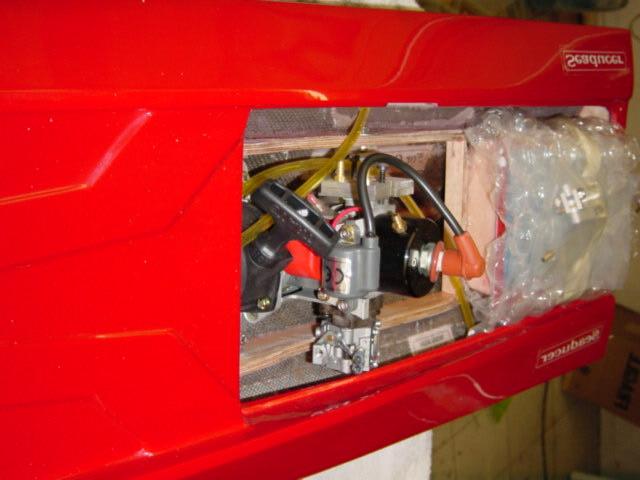
2 & the bottom of the radio box. Align the servo horn with the steering lever then mark the bottom of the radio box with a pencil where the wood will be attached. Mount the servo in the Aeromarine mount so the horn is close to the center of the box. Sand both spots with 80 grit paper then permanently attach both pieces of wood with good epoxy. Use self-tapping screws to attach the Aeromarine mount to the wood. To secure the radio box in the boat, at the center line of the radio box (from left to right) install 2 cup holders in the top of the stringer. Now stretch 2 rubber bands from hook to hook to hold radio box in place. With a 1/4 drill bit go threw the hole in the transom for the rudder push rod & drill a hole threw the radio box in alignment with the top of the servo horn. Install the throttle servo vertically to the port-side stern of the steering servo. Use wood to make a platform to install this servo. Then drill a 1/4 hole threw the front of the radio box in alignment with carburetor linkage & servo horn. use whatever push rod seals, you wish. THE NEW LITTLE HI-TEC TORQUE SERVO S - DO NOT HAVE ENOUGH MASS TO MANEUVER THE BOAT. INITIALLY THEY WILL STEER THE BOAT, BUT AFTER A COUPLE OF GALLONS OF FUEL, THE WILL FAIL. SO, DON T USE ONE, IT WILL GIVE YOU PROBLEMS LATER. INSTALLATION OF FUEL TANK: Run the brass tubes into the fuel tank, the fuel pick-up to the lower left front corner of the tank & the vent line to the top center of the tank. you also need a return line from the carb to the tank so use a short pieces for that. For the vent use a water outlet fitting and put it as high on the deck as possible and run the fuel tank vent to it. Place the fuel tank in the tank mount provided. PUT THE TANK IN THE TRAY FIRST. Secure the tank with tie-wraps across the tank. Mount the fuel tank 20 from the rear of the boat to the starting edge of the tank tray. To attach the tank assembly to the hull use polyester resin & the fiberglass provided or 2-hour epoxy. DO NOT USE SILICONE CAULKING BECAUSE THE GAS WILL DISSOLVE IT, and YOU WILL END UP WITH A BIG MESS. For the gas engine use 5/32 brass tubing in the tank. If you don t use 5/32 brass tubing your gas engine will lean-out. FLOTATION: Be sure to add SOME TYPE OF FLOTATION! We suggest air conditioning pipe insulation, found in hardware stores, or use the pool floaties you can buy at any home /toy store
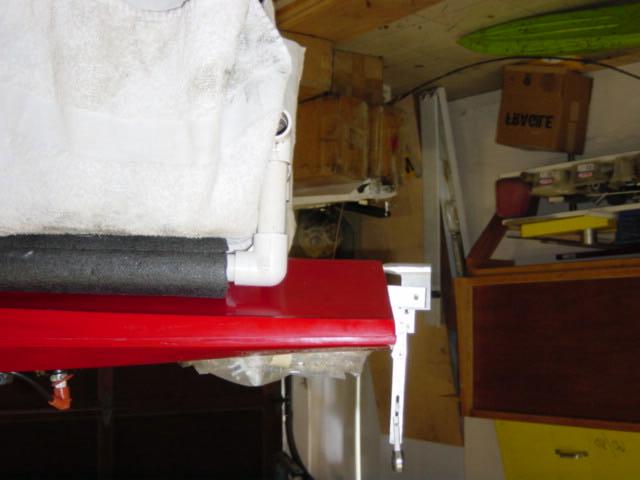
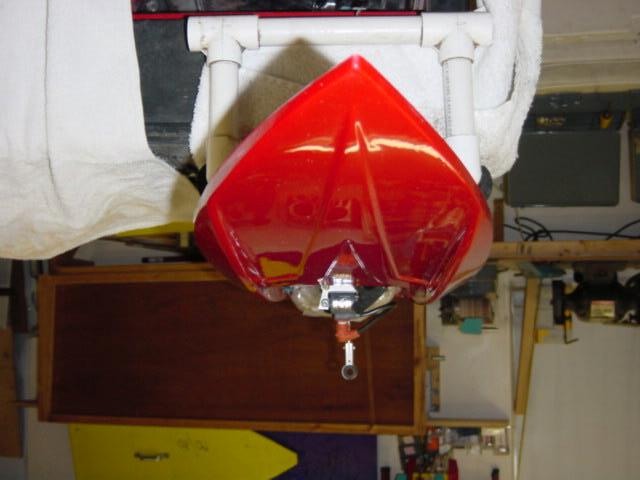
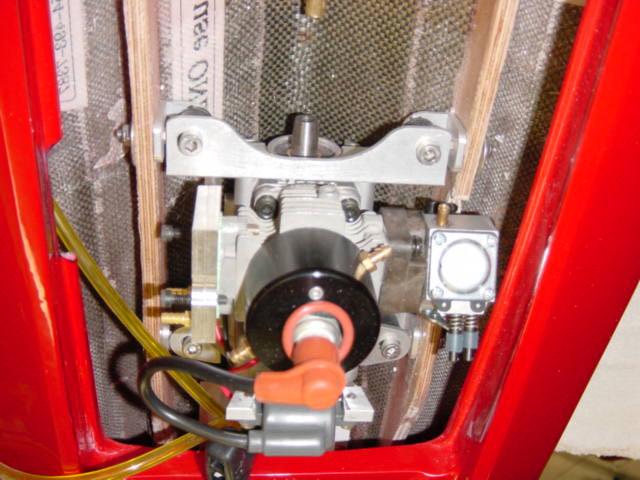
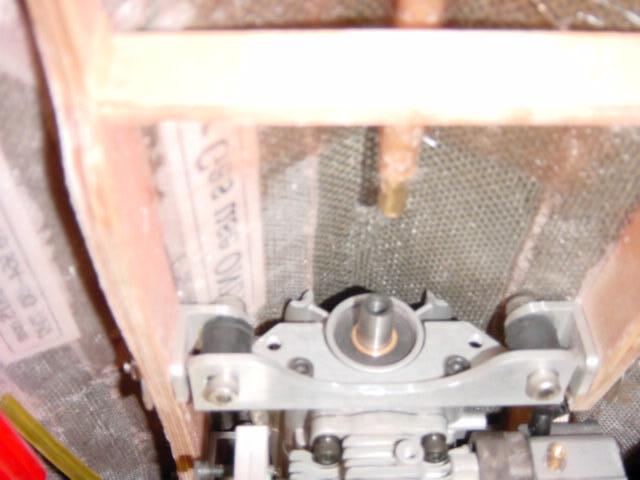
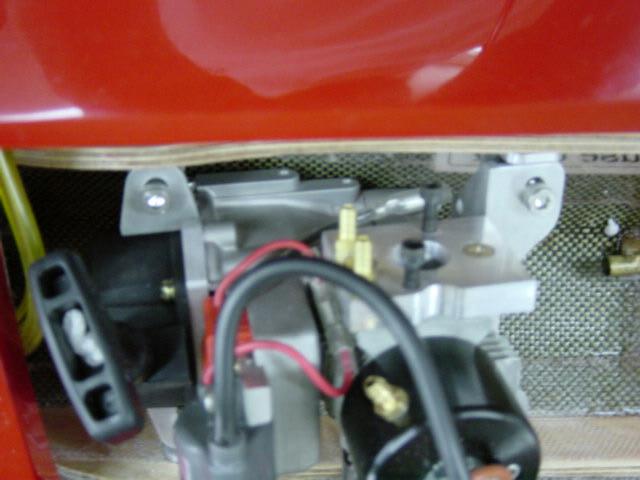
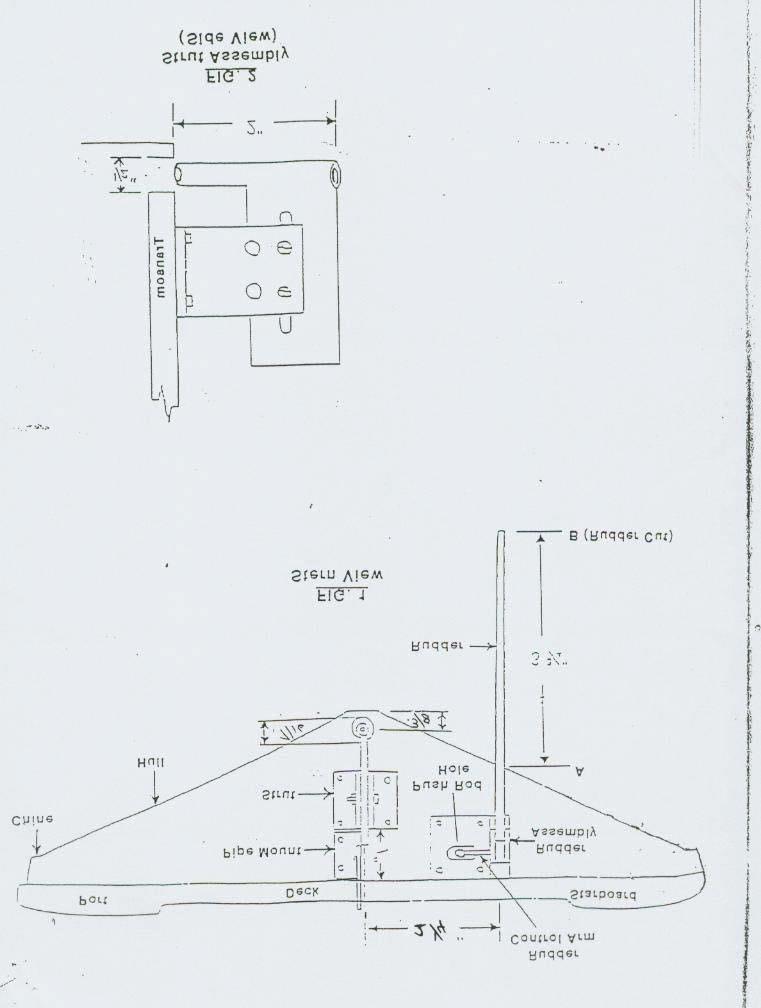
3 MOTOR MOUNT INSTILLATION: This boat will run "surface drive". Mount the engine on the Seaducer motor mount and attach the flex coupler to the engine. Insert a short piece of 1/4" material about 3" long into the flex coupler and position the mount between the stringers. Try to get the motor as low in the hull as possible. Tilt the engine so the 1/4" material touches the bottom of the hull and measure 13 1/2 from the inside of the transom to the center of the engine. FOR THE ALLUNIMUM PIPE and 14 3/4 FOR THE STEEL PIPE Make sure the engine is at the angle when measuring With the piece of 1/4" material touching the hull, take a cut off pencil and mark the holes for the engine mount. Drill the holes in the stringer and bolt the motor in the boat using 8/32 screws and lock nuts. You may need to move the coil to the top of the motor I put my coil on top of the magneto. If you do not do this make sure the coil is not hitting the bottom of the boat. PROPELLER DRIVE SHAFT: Drill a 1/2 hole in the back of the transom, 1/8" from the bottom to allow for up and down movement for the brass tubing for the shaft log. Now start to bend the brass tubing so that it will line up with the motor. Run the brass tubing all the way through the strut, so that it s even with the back. You may have to sand the brass tubing slightly to achieve a nice tight fit. Cut a piece of 1/4 wood to brace the brass where the brass starts to bend up. Fiberglass in the brass tubing with mat and polyester resin. Two pieces of mat is more than enough. DO NOT GLASS IT ALL THE WAY BACK. IF YOU DO YOU CANNOT ADJUST THE STRUT UP AND DOWN! TRANSOM : See attached page. STRUT: On the center line of the transom measure up from the bottom 7/16 and make a line. At this point either drill or rout a 1/2 hole. Install the strut bracket 5/8 down from the deck. This 5/8 will allow space for installation of a pipe mount. FOR THE GAS MONO, YOU LL NEED TO INSTALL A 3 DEGREE SHIM (thin side to PORT FROM LEFT TO RIGHT). THESE SHIMS ARE CALLED ENGINE MOUNT THRUST PLATES MANUFACTURED BY ERNST # 102, #103, #104. RUDDER: With rudder in hand, you ll see a squared area at the top of the leading edge, FILE the square area to match the rest of the rudder. Draw a center line on your transom & measure to starboard 2 1/4. Install rudder assemble as high on the transom as possible. Make sure that you maintain a
4 perfect 2 1/8 from the center line of the transom to the leading edge of the rudder blade. With the rudder installed put a straight edge against the bottom of the boat extending past the rudder. Make a mark on the rudder, then measure down 3 3/4 and make a mark. Cut the rudder off at this point. The rudder needs to be 2 1/4 from the transom to the leading edge of the rudder. Drill a 1/4 hole threw the transom to accommodate the push rod. PIPE MOUNT: Cut the pipe mount bracket so that it will fit between the strut & the deck lid. Use 1 screw to attach. TURN FIN: Sharpen the leading edge of the provided turn fin. Install the turn fin 3/8 from the starboard side of the boat. Bend the turn fin tab 90 degrees so the tab points to the center of the boat. Notch the overlapping deck lip as much as possible so that the turn fin is as high on the transom as possible. If you don t notch the lip you will have a difficult time, threwbolting, the turn fin. The turn fin must be mounted at a right angle to the bottom. FLEX SHAFT : Install the prop on the hard part of the shaft, keeping 3/8" of threads exposed behind the prop. Slide the drive dog onto the 1/4 part shaft up against the front of the prop. Mark this position and remove the drive dog and prop. File a flat spot on the shaft where the set screw touches it. Reinstall the drive dog, using Lock-Tite, tighten the set screw. Cut 4 pieces of 1/4" brass tubing 3/8" to 1/2 long and 1 piece 1/4 long. Solder the 1/4." piece just before the weld on the flexible side. This technique is more efficient than using lead Teflon bearings, and lasts a lot longer. PROP INFO. The prop you buy for the boat is very critical. Don t use any 3 blades they don t work very good. The bigger the prop does not mean faster!! The bigger the prop the more torque you have then the boat won t run as good. The prop suggestions I gave is all you will need TROUBLE SHOOTING: I - Yes, we know the bottom has a HOOK in it. Leave it alone, it's there for a reason. 2. If the boat stuffs You are running the boat to lose, you may need to put some weight under the motor to stop the boat

5 from stuffing but, If the boat is set up right you won t have to do this. 3. If the boat skips sideways, slow down a little! 4. The Strut should be straight with the bottom. Watch the attitude of the boat and trim to your driving skills. Try it are way first if you don t like it then do it your way!! IF YOU HAVE ANY QUESTIONS, PLEASE CALL US AT (954) fax / home OR E MAIL AT SEADUCERJ@CS.COM
6
7

8
9
10
SEADUCER BOATS GAS SPORT HYDRO
 SEADUCER BOATS GAS SPORT HYDRO COME VISIT US ON THE WEB AT WWW.SEADUCERBOATS.COM 2 - Pkg. Of 440 push rod ends 2 - Pkg. of solder-on rod ends 2 -water outlet fitting 1-1/4" prop nut 1 -.250" x 30" flex
Step 1: Block sand the transom to remove the seam joint. The end result should be a flat transom without a ledge where the seam joint is.
 WhiplashGV Instruction Manual Email: Brian@Blazermarine.com Phone: 513-598-1769 Step 1: Block sand the transom to remove the seam joint. The end result should be a flat transom without a ledge where the
Blazer Marine, Whiplash Sport Hydro
 Blazer Marine, Whiplash Sport Hydro Thank you for choosing to build the Whiplash Sport Hydro. We have spent over 12 years perfecting this design, and finally we are making it available to the world. We
Constitution Instructions
 Constitution Instructions This kit will build a 1:48 scale hull for the USS Constitution frigate. The kit contains the following parts. 1/8 deck with laser etched deck lines 1/8 railing Ribs Center keel
Rudder Kit Assembly Instructions for Quest 13
 Rudder Kit Assembly Instructions for Quest 13 Revised 4/2/2015 78501 Rudder System The Hobie Quest is designed for the addition of an optional rudder system. Rudder systems in boats like this allow you
1/10 th Scale 1956 Ted Jones Classic Hydroplane
 1/10 th Scale 1956 Ted Jones Classic Hydroplane Preparation These plans show outside sheeting of 3/32 balsa laminated with 1/64 birch ply. This makes a light and strong skin for this boat. Optionally you
BUILDING INSTRUCTIONS
 Z I P P M A N U FA C T U R I N G A Zippkits R/C Boat BUILDING INSTRUCTIONS 2010 Zipp Manufacturing Frankfort, New York 13340 www.zippkits.com Table of Contents Introduction 1 Engine Mounting 30 S E C T
Tugster. Tug Boat. Competition or Sport Tug Kit. A Zippkits R/C Boat. Building Instructions
 Z I P P M A N U FA C T U R I N G Tugster Tug Boat Competition or Sport Tug Kit A Zippkits R/C Boat Building Instructions 2016 JMP Hobby Group St. Paul, Indiana 47272 www.zippkits.com Toll Free (866) 922-ZIPP
Blazer Marine, Whiplash Sport 40
 Blazer Marine, Whiplash Sport 40 Thank you for choosing to build the Whiplash 40. We have spent over 12 years perfecting this design, and finally we are making it available to the world. We are excited
PAY N PAK, 1/12 th Scale, Limited Sport Hydro P Sport Hydro
 1980 82 PAY N PAK, 1/12 th Scale, Limited Sport Hydro P Sport Hydro Introduction: The 1980 turbine Pay N Pak is a good subject for a model race boat. It has a low profile, mild pickle-fork setback, long
Methylethycetone (MEC) - PMS 60 polyurethane glue - Grease - White silicone
 - PMS 60 polyurethane glue - Grease - White silicone") CHAPTER PLAN page : 1/8 SAILING BOAT SUSPENDED WITHOUT DECK BEARING SAILING BOAT SUSPENDED WITH DECK BEARING SAILING BOAT SUSPENDED WITH AUTOMATIC BEARING ALIGNMENT RUDDER SYSTEM FOR ANTARES MOTOR BOAT
CHAPTER PLAN page : 1/8 SAILING BOAT SUSPENDED WITHOUT DECK BEARING SAILING BOAT SUSPENDED WITH DECK BEARING SAILING BOAT SUSPENDED WITH AUTOMATIC BEARING ALIGNMENT RUDDER SYSTEM FOR ANTARES MOTOR BOAT
QUALITY ALUMINUM BOAT LIFTS, INC. INSTRUCTIONS. Dominator Lake Lift
 INSTRUCTIONS Dominator Lake Lift PHONE:251-986-3882 * FAX:251-986-3136 QABLDOMINATORINST.2014 P a g e 1 Quality Aluminum Boat Lifts, INC. Installation Instructions: Dominator Lake Lift Thank you for your
SLR Missile Thunderboat
 J M P H O B B Y G R O U P L L C SLR Missile Thunderboat Zippkits R/C Boats BUILDING INSTRUCTIONS 2017 JMP Hobby Group LLC Indiana USA 1 Introduction Thank you for purchasing this kit. We are sure that
How to Set-Up an 18-Cell Monohull for 4 Minute Offshore & Sprint Oval Racing Using the FDM Turbo Transmission
 How to Set-Up an 18-Cell Monohull for 4 Minute Offshore & Sprint Oval Racing Using the FDM Turbo Transmission By Ralph von Eppinghoven Metro Marine Modelers Toronto, Canada Offshore style, Fast Electric
AVA Building Instructions
 Suggested Assembly Sequence: AVA Building Instructions 1. Insert fittings in rudder and trial fit rudder on boom 2. Attach stab to v-mount and position ahead of rudder ¼, sanding the v-mount as needed.
CARL GOLDBERG PRODUCTS, LTD. P.O. Box 818 Oakwood GA Phone # Fax #
 Superfloats 36 ARF WARNING A radio-controlled model is not a toy and is not intended for persons under 16 years old. Keep this kit out of the reach of younger children, as it contains parts that could
Procedures for Winter Sailing
 Procedures for Winter Sailing With winter upon us, most of the Cal 20 s (keelboats) are now in the boat yard for maintenance and storage. However, we keep two of the Cal 20 s in the water for winter sailing.
Fairlane & Meteor Instruction Package RC-114K. Rear Coilover Suspension Kit NOTE...
 ROD & CUSTOM Motorsports INCORPORATED 1962-1965 Fairlane & Meteor Instruction Package RC-114K Rear Coilover Suspension Kit NOTE... PLEASE READ ALL INSTRUCTIONS INCLUDED WITHIN THIS PACKAGE. IF AFTER READING
Riviera Draft Shaft Hole Boring
 Riviera Draft Shaft Hole Boring a. Height from bottom of hull thru the hull to the center of the drive shaft. This will be calculated. b. Height of drop of strut. The strut for the Riviera is 7.5 c. Distance
INSTALLING THE TRIDENT 11, 13 OR 15 RUDDER
 INSTALLING THE TRIDENT 11, 13 OR 15 RUDDER Parts Included: Steering Parts: Foot Rail Parts: Rudder Parts: Retraction Parts: 4 - Rubber 2 - Rail Assemblies 1 - Rudder Body 1 - Rudder Retraction Grommets
STERN MOTOR FOOT CONTROL KIT For use with the Torqeedo 403 Ultralight
 STERN MOTOR FOOT CONTROL KIT For use with the Torqeedo 403 Ultralight The Wilderness Systems Foot Control Kit is designed to connect directly to a Torqeedo 403 Ultralight motor mounted on the stern of
Trim Tab Wind Vane for boats with transom mounted rudders
 Trim Tab Wind Vane for boats with transom mounted rudders If your boat has a transom mounted rudder, you can build this self-steering windvane for around $150, using regular wood working tools and some
Troyer s Gourd Rack 8 unit F R H O P
 B E A D I M-N L Vertical Parts F R H O P Horizontal Parts C G J Updated 11/16 Parts List A: Top of Pole B: Bottom of Pole C: 48 Ground Stake D: Top Perch rods 48 long E: Hub F: Rope Winder w/ attached
INSTRUCTION MANUAL. January 23, 2003, Revision 0
 INSTRUCTION MANUAL Model 810A In-Vitro Test Apparatus for 310B Muscle Lever January 23, 2003, Revision 0 Copyright 2003 Aurora Scientific Inc. Aurora Scientific Inc. 360 Industrial Parkway S., Unit 4 Aurora,
INSTALLING YOUR CLC RUDDER
 INSTALLING YOUR CLC RUDDER These instructions are written to help you install the CLC rudder kit on your wooden kayak. The rudder can be fitted to your boat during construction or after completion. Please
Annex E(M) - Final inspection checklist - monowheel
 - Final inspection checklist - monowheel") Annex E(M) - Final inspection checklist - monowheel A/C Reg... Owner...Kit S/N...Date... (U.K. Only) L.A.A No...Inspector...Insp. No... Note: This check list only covers specific items for inspection of
Annex E(M) - Final inspection checklist - monowheel A/C Reg... Owner...Kit S/N...Date... (U.K. Only) L.A.A No...Inspector...Insp. No... Note: This check list only covers specific items for inspection of
SERIES 2 RAMP OWNER S MANUAL TOOLS REQUIRED: BEFORE YOU BEGIN... Read and understand these instructions before beginning a ramp setup.
 SERIES 2 RAMP OWNER S MANUAL BEFORE YOU BEGIN... Read and understand these instructions before beginning a ramp setup. Use caution and care for your back when lifting, pushing, pulling, folding or unfolding
Assembly Instructions. -Cantilever Boat Lifts
 Assembly Instructions -Cantilever Boat Lifts Winch Instruction Page Safety Information 1. The winch is built for the multipurpose of hauling and lifting operations. It is not to be used as a hoist for
Bladerider X8 Assembly Help Notes
 2.1 Remove All Parts & Have Some Tools Handy Remove all items from the box and identify each part as per the packing sheet and check that nothing is missing. If there is something missing, please email
RUDDER KIT INSTRUCTIONS
 C I N S T R U C T I O N S RUDDER KIT INSTRUCTIONS PAMLICOS-0,0,T, T, 60T, Excel Rotomolded Pamlico 0, 0, T, T, 60T, Excel The addition of a rudder to a kayak results in additional control and efficiency,
Stromberg Fuel Tee Replacement Michael Hartman Version 1.1 February 14, 2017
 Stromberg Fuel Tee Replacement Michael Hartman Version 1.1 February 14, 2017 The plastic fuel tee supplying fuel to the twin Stromberg 150CDs on my Sunbeam Alpine Series V had cracked and was spewing gas
R/C'ing the Revell 1/72 GATO Class Static Submarine Kit, Part-14. A Report to the Cabal:
 R/C'ing the Revell 1/72 GATO Class Static Submarine Kit, Part-14 A Report to the Cabal: I've invested over two weeks of continuous work to this project, and it's time to stick the WTC into the hull, install
CARL GOLDBERG PRODUCTS LTD.
 CARL GOLDBERG PRODUCTS LTD. P.O. Box 818, Oakwood, GA 30566 678-450-0085 Fax: 770-532-2163 www.carlgoldbergproducts.com copyright 2003 Carl Goldberg Products, Ltd. WARNING! THIS IS NOT A TOY! THIS IS NOT
Ref Part Part # Qty Letter A Rudder Catcher B X 1/2 PH Bolts C Rudder Bracket
 Ref Part Part # Qty A Rudder Catcher 07.2694.0000 1 J B Q A B 10-32 X 1/2 PH Bolts 07.2136.0000 10 C Rudder Bracket 07.2689.0000 1 D Kayak Pad Eye 01.1315.0430 2 E Cherry Rivets 01.1315.0459 4 H T N P
Super Sport. Building Instructions Z I P P M A N U FA C T U R I N G. A Zippkits RC Boat. 46 inch Gas Mono Hull
 SS Z I P P M A N U FA C T U R I N G Super Sport 46 inch Gas Mono Hull A Zippkits RC Boat Building Instructions 2018 JMP Hobby Group LLC Indiana USA (866) 922-9477 www.zippkits.com 1 D E S I G N C U S T
RAVE SUP STAND UP PADDLE BOARD User Guide/Owner s Manual
 RAVE SUP STAND UP PADDLE BOARD User Guide/Owner s Manual ! W A R N I N G This product is not a lifesaving device. Always wear a nationally approved personal floatation device when using this product. Not
(PLEASE CONTACT YOUR LOCAL DEALER or CUSTOMER SERVICE FOR WARRANTY INFORMATION)
") RUDDER KIT SOLO KAYAKS IMPORTANT: Tandem models will require the Wildy Supplemental kit in addition to this kit. The Supplemental kit provides extension straps and extra footbraces that allow rudder positioning
RUDDER KIT SOLO KAYAKS IMPORTANT: Tandem models will require the Wildy Supplemental kit in addition to this kit. The Supplemental kit provides extension straps and extra footbraces that allow rudder positioning
ANGEL 2000 glider ARF ASSEMBLY MANUAL. Specifications: MS: 129
 WWW.SEAGULLMODELS.COM ASSEMBLY MANUAL ANGEL 2000 glider Graphics and specifications may change without notice. MS: 129 ARF Specifications: Wingspan---------------78.7 in ( 200cm). Wing area---------------582.8sq.in
Intro: by firechim on October 3, 2013
 by firechim on October 3, 2013 Intro: Step 1: Guide for installing chimney liners with a tee connection This guide is to give you step by step instructions to install a chimney liner that utilizes a tee
No.5550 INTRUCTION MANUAL WARRANTY WARNING. Notice This is not a toy. Assembly and operating of this boat requires adult supervision.
 INTRUCTION MANUAL WARRANTY Thunder Tiger guarantees this model kit to be free from defects in both material and workmanship. The total monetary value under warrant will in no case exceed the cost of the
aero naut Order No. 3009/00
 aero naut Order No. 3009/00 Introduction: The model should be assembled following the sequence of the stages of construction described in these instructions. The laser-cut components are individually numbered.
Peinert Dolphin. Assembly
 Peinert Dolphin Assembly The Dolphin is easily rigged; there are only four removable parts - the seat, the foot stretcher, the rigger arm, and the fin. Removal and installation of the seat. If the seat
RUDDER KIT INSTRUCTIONS
 A I N S T R U C T I O N S RUDDER KIT INSTRUCTIONS TARPON 0/40/60/60i The Tarpon series is designed as a high performance sit-on-top kayak tailored for the sport paddler. Our rudder system is designed to
ANGEL INSTRUCTIONS ALMOST READY TO SAIL MODEL YACHT
 ANGEL INSTRUCTIONS ALMOST READY TO SAIL MODEL YACHT Long: 920mm High:1840mm Toatl sail area: 0.4 m2 1 MODEL YACHT ASSEMBLY INSTRUCTIONS & SAILING HINTS Thank you for purchasing one of our range of model
THUNDER INSTRUCTIONS A LMOST READY TO SAIL MODEL YACHT
 THUNDER INSTRUCTIONS A LMOST READY TO SAIL MODEL YACHT Long: 1000mm High:1890mm Toatl sail area: 0.4 m2 1 MODEL YACHT ASSEMBLY INSTRUCTIONS & SAILING HINTS Thank you for purchasing one of our range of
In each step, the needed parts are shown the number right below. Locate all parts for the step.
 Tools Required for Assembly Phillips Screwdriver, Med Needle Nose Pliers Sandpaper (#400 grit) Hobby Knife Scissors CA Instant Glue Rubbing Alcohol Drill Bit 1/16", 1.6mm 5/64, 2mm 1/8, 3mm 5/32, 4mm Before
SAVE THESE INSTRUCTIONS DEALER/INSTALLER: GIVE TO HOMEOWNER OCEAN BLUE ABOVE GROUND POOL LADDERS
 SAVE THESE INSTRUCTIONS DEALER/INSTALLER: GIVE TO HOMEOWNER OCEAN BLUE ABOVE GROUND POOL LADDERS ASSEMBLY AND INSTALLATION MANUAL FOR A-FRAME AND INPOOL LADDERS A-FRAME Part No. 400100 PROUDLY MADE IN
Hydrotherapy Jets System for a Fiberglass Pool
 Page 1 of 5 Parts List 1-50 Flex PVC pipe 2-1 1 / 2 " Ball Valves 4-1/2" 90 degree elbows 4 - Lengths of 1/2" PVC 4 - Jet bodies 4 - Jet nozzles 6 - Female slip/female slip unions 2 - Female slip/fpt union
QRPGuys Single Lever Mini Paddle
 QRPGuys Single Lever Mini Paddle First, familiarize yourself with the parts and check for all the components. If a part is missing, please contact us and we will send one. You must use qrpguys.parts@gmail.com
Installation Instructions
 116-3027, 116-3017 X-Pando Adjustable Steel Protector Installation Instructions 1404 N. Marshall Ave. El Cajon CA. 92020 For technical support call us at (800) 368-3075 NB 6/28/10 607-0112 Step 1. Mounting
INSTALLING THE PROWLER 13 RUDDER
 INSTALLING THE PROWLER 13 RUDDER Parts Included: Steering Parts: Foot Rail Parts: Rudder Parts: Retraction Parts: 4 Rubber 2 Rail Assemblies Rudder Body 1 Rudder Retraction Grommets (includes steering
Kari-Tek. Kari-Tek. Hydro Skeg Retro-Fitting Instructions. Instructions for retro-fitting of Hydro Skeg
 Kari-Tek Instructions for retro-fitting of Hydro Skeg A good knowledge of fibreglassing will be required to fit the Hydro Skeg successfully. When working with fibreglass and cutting the holes, safety glasses,
Soling Building Tips II
 Soling Building Tips II Prepared: Arthur Deane Jan 20, 2002 adeane@ic.net Introduction The following are some lessons learned and experience gained in building a Soling kit. The plan developed is based
Stand-N-Fish FULL DETAIL INSTALLATION INSTRUCTIONS
 1 Stand-N-Fish FULL DETAIL INSTALLATION INSTRUCTIONS Thank you for purchasing the incredible new Stand-N-Fish Kayak Fishing System. Once installed on your kayak the Stand-N-Fish will take your kayak fishing
400/488 Rotating Davit Installation Instructions
 400/488 Rotating Davit Installation Instructions These instructions were written with the owner in mind. If you are the installer make sure these instructions are passed along to the owner of the boat.
Mount the actuator in the bracket provided and install a 24-foot EFTC cable to the actuator.
 . Mount the actuator in the bracket provided and install a 4-foot EFTC cable to the actuator. Route the cable through left stanchions,, and 4. Be sure that the cable does not contact any spring or push
Check the relevant hardware pertaining to your specific order.
 Check the relevant hardware pertaining to your specific order. ENGINE PACKAGE ( ) 1 Engine (with oil injection) Serial number: ( ) Rotax 447 SDCI ( ) Rotax 503 DCDI ( ) Rotax 582 DCDI ( ) 1 973 198 Rotax
PT 11 trouble-shooting and maintenance.
 PT 11 trouble-shooting and maintenance. Does your rudder not stay down?...your back seat slip off?...your knobs tight and your leather pads loose? Maybe we can help. We have used our PT 11 s hard enough
Instruction Manual. Features. Specification: Length: 730mm Width: 500mm Height: 1000mm Sail Area: 0.15m 2. Weight: 692g (w/o battery & receiver)
") AN UNBELIEVABLE SPEED MACHINE Instruction Manual Features Specification: Length: 730mm Width: 500mm Height: 1000mm Sail Area: 0.15m 2 Weight: 692g (w/o battery & receiver) Thank you for purchasing your
AN UNBELIEVABLE SPEED MACHINE Instruction Manual Features Specification: Length: 730mm Width: 500mm Height: 1000mm Sail Area: 0.15m 2 Weight: 692g (w/o battery & receiver) Thank you for purchasing your
CIRRUS AIRPLANE MAINTENANCE MANUAL
 RUDDER 1. GENERAL The rudder provides airplane directional (yaw) control and includes a rudder trim tab used for yaw trim adjustment. The rudder is of conventional design with skin, spar and ribs manufactured
CONFER ABOVE GROUND CURVE STEP / ABOVE GROUND CURVE STEP SYSTEM ASSEMBLY AND INSTALLATION MANUAL
 SAVE THESE INSTRUCTIONS DEALER/INSTALLER: GIVE TO HOMEOWNER CONFER ABOVE GROUND CURVE STEP / ABOVE GROUND CURVE STEP SYSTEM ASSEMBLY AND INSTALLATION MANUAL Model CCX-AG Note: 40 lbs. of sand required!
(PLEASE CONTACT YOUR LOCAL DEALER or CUSTOMER SERVICE FOR WARRANTY INFORMATION)
") RUDDER KIT SOLO AND TANDEM KAYAKS IMPORTANT: For Tandem kayaks, the Supplemental Kit will be needed in addition to this kit and can be purchased through a registered dealer. The addition of a rudder to
RUDDER KIT SOLO AND TANDEM KAYAKS IMPORTANT: For Tandem kayaks, the Supplemental Kit will be needed in addition to this kit and can be purchased through a registered dealer. The addition of a rudder to
1982 Hydrostream Viking Restoration
 1982 Hydrostream Viking Restoration Part 2c: The Rebuild Daniel W. Rickey Winnipeg, Manitoba Canada daniel@cancercare.mb.ca 2000-09-22 Introduction Part one of this report showed how the shoddy manufacturing
Pitts Model 12 Wing Leading edge Installation
 Pitts Model 12 Wing Leading edge Installation This procedure is used to install molded plywood leading edges included in the Pitts Model 12 kit. Nine (9) molded leading edge section are require per aircraft;
aero naut Electric Model Aeroplane Quido Order-No. 1303/00
 aero naut Electric Model Aeroplane Quido Order-No. 1303/00 Quido is a small model that accompanies you wherever you go. The prefabricated parts are mostly balsa and just need to be assembled according
Helium Micro Air Vehicle (MAV)
") Helium Micro Air Vehicle (MAV) By Fawaz Alenezi, Hamoud Alkhaldi, Abdulrahman Almuqhawi, Matthew Kohr, Conrad Nazario, Randal Spencer Operations Manual May 6, 2016 Submitted towards partial fulfillment
Helium Micro Air Vehicle (MAV) By Fawaz Alenezi, Hamoud Alkhaldi, Abdulrahman Almuqhawi, Matthew Kohr, Conrad Nazario, Randal Spencer Operations Manual May 6, 2016 Submitted towards partial fulfillment
A-FRAME RESIN IN & OUT FLIP UP LADDER
 A-FRAME RESIN IN & OUT FLIP UP LADDER NE1222 NOTE FOR SAFETY PURPOSES ALL LADDERS SHOULD BE SECURED BY ATTACHING THEM TO THE TOP LEDGE OF THE POOL. (See step 13 for details) In order for the ladder to
Fiber Optic Lighted Bubbler Spillway Pot (DLP-45) Installation Manual
 Installation Manual") Fiber Optic Lighted Bubbler Spillway Pot (DLP-45) Installation Manual 27.75 23.75 25.50 20.75 Specifications: 8-13 GPM 100 strand fiber - Bubbler 75 strand fiber - Spillway Light Bar 45 ft. fiber tail
Fiber Optic Lighted Bubbler Spillway Pot (DLP-45) Installation Manual 27.75 23.75 25.50 20.75 Specifications: 8-13 GPM 100 strand fiber - Bubbler 75 strand fiber - Spillway Light Bar 45 ft. fiber tail
We hope you ll enjoy the Drifter as much as we have! Scott DeTray Model Aero Specifications:
 We are excited to bring you the Drifter RC airboat. You re probably thinking it doesn t fly so what is Model Aero thinking??? We have always liked RC vehicles of all types and have had a fondness for airboats
QRPGuys Single Lever Paddle w/base
 QRPGuys Single Lever Paddle w/base First, familiarize yourself with the parts and check for all the components. If a part is missing, please contact us and we will send one. You must use qrpguys.parts@gmail.com
AGM 33 PIKE ALL FIBERGLASS. Specifications Length: 92 Diameter 5.5 Weight: 24 lbs Motor Mount: 75mm Fins: 6-3/16 G10 CP: 68 from nose tip Parts List
 ALL FIBERGLASS AGM 33 PIKE Specifications Length: 92 Diameter 5.5 Weight: 24 lbs Motor Mount: 75mm Fins: 6-3/16 G10 CP: 68 from nose tip Parts List (1) Filament Wound Nose Cone w/ Metal Tip (1) Nose Cone
CONFER IN-GROUND CURVE STEP / IN-GROUND CURVE STEP SYSTEM ASSEMBLY AND INSTALLATION MANUAL
 SAVE THESE INSTRUCTIONS DEALER/INSTALLER: GIVE TO HOMEOWNER CONFER IN-GROUND CURVE STEP / IN-GROUND CURVE STEP SYSTEM ASSEMBLY AND INSTALLATION MANUAL Model CCX-IG Note: 40 lbs. of sand required! SAND
[ ] 10 YEAR HULL WARRANTY [ ] GEL COAT: [ ] RESIN: [ ] FIBERGLASS [ ] VACUUM BAGGING:
![[ ] 10 YEAR HULL WARRANTY [ ] GEL COAT: [ ] RESIN: [ ] FIBERGLASS [ ] VACUUM BAGGING:](/thumbs/96/127756955.jpg "[ ] 10 YEAR HULL WARRANTY [ ] GEL COAT: [ ] RESIN: [ ] FIBERGLASS [ ] VACUUM BAGGING:") Progression 22 This list is provided to help you to evaluate the many advantages that come STANDARD with a PROGRESSION 22. As you compare Progression s many superior features to the competition, it will
Progression 22 This list is provided to help you to evaluate the many advantages that come STANDARD with a PROGRESSION 22. As you compare Progression s many superior features to the competition, it will
Sanibel Owners Manual
 Sanibel 36-600 Owners Manual TM Specifications Length (Hull):... 36 inches Height (Mast):... 51.5 inches Height (Overall):... 69 inches Beam:... 7.5 inches Radio: JR Beat Gear w/sail winch servo Sail area:
Lectric Cycles Mid-Drive Electric Motor Installation
 Lectric Cycles Mid-Drive Electric Motor Installation This write-up describes the installation of a Lectric Cycles electric motor. The model is the e-rad Mid-Drive 750 Watt conversion kit, installed on
VALDIVIA BUILD LOG Dr Ron
 VALDIVIA BUILD LOG Dr Ron The Robbe kit of the two-masted schooner Valdivia was purchased in 2007, along with the fitting set and propulsion accessories, and has been staring me in the face since then
55 Wind Rider Instruction Manual
 55 Wind Rider Instruction Manual 2012 Sport Version It is vitally important that you read this manual thoroughly to obtain the correct set up and the safest, most rewarding operation of your Arrow Shark
IMPORTANT PLEASE READ BEFORE COMMENCING INSTALLATION
 IMPORTANT PLEASE READ BEFORE COMMENCING INSTALLATION This Fitting Guide is designed to assist in the Installation of your Reverse Osmosis System. Some of the parts that are supplied with each system may
ATV 90 Y-12 YOUTH 2-STROKE RED (A2004ATB2BUSR) Page 1 of 52 A-ARM, FLOOR PANEL, AND BUMPER ASSEMBLY
 Page 1 of 52 A-ARM, FLOOR PANEL, AND BUMPER ASSEMBLY") 2004 ATV 90 Y-12 YOUTH 2-STROKE RED (A2004ATB2BUSR) Page 1 of 52 A-ARM, FLOOR PANEL, AND BUMPER ASSEMBLY 2004 ATV 90 Y-12 YOUTH 2-STROKE RED (A2004ATB2BUSR) Page 2 of 52 A-ARM, FLOOR PANEL, AND BUMPER
2004 ATV 90 Y-12 YOUTH 2-STROKE RED (A2004ATB2BUSR) Page 1 of 52 A-ARM, FLOOR PANEL, AND BUMPER ASSEMBLY 2004 ATV 90 Y-12 YOUTH 2-STROKE RED (A2004ATB2BUSR) Page 2 of 52 A-ARM, FLOOR PANEL, AND BUMPER
DIY Shallow Water Anchor Assembly Instructions for Rods, T-grips, Stainless Tips, Stainless Couplers, and the 4-in-1 Paddle
 DIY Shallow Water Anchor Assembly Instructions for Rods, T-grips, Stainless Tips, Stainless Couplers, and the 4-in-1 Paddle All Shallow Water Anchor Parts First, start by laying out and identifying all
CIRRUS AIRPLANE MAINTENANCE MANUAL MODELS SR22 AND SR22T CHAPTER 55-40: RUDDER GENERAL. Rudder 55-40: RUDDER. 1. General
 CIRRUS AIRPLANE MAINTENANCE MANUAL Rudder CHAPTER 55-40: RUDDER GENERAL 55-40: RUDDER 1. General The rudder provides airplane directional (yaw) control and includes a rudder trim tab used for yaw trim
ASSEMBLY INSTRUCTIONS
 XR 9-2009:new odc 1018 revised 2/17/10 9:11 AM Page 1 ODC XR 9 OUTDOOR DISCOVERY CRAFT ASSEMBLY INSTRUCTIONS Your ODC XR 9 Pontoon Boat comes in two separate cartons consisting of the following parts:
The following is a walk-around that should be done on each day of use before starting the airboat.
 Do not enter the cage area for any reason unless the key switch and battery switch are both in the off position. Audibly alert and visually check for people in the cage area, path of the propellers or
Below are the instructions to build a roller-furling unit for under $10. Read the entire process before beginning the project.
 Greg Cowens' $10 PVC Roller Reefing for CP-16's by Greg Cowen Below are the instructions to build a roller-furling unit for under $10. Read the entire process before beginning the project. Materials: 2
PARTS - FORWARD. Kayaking + Fishing Parts & Accessories Hook HATCH SEAL "TRIM-LOC" (TOP MOLDED) 5 REQ
 5 REQ") PARTS - FORWARD 72104001 Hook 71301001 HATCH SEAL "TRIM-LOC" (TOP MOLDED) 5 REQ 71302001 HULL FLANGE SEAL (pre 2012 ADV) "TRIM-LOC" (SIDE GLUED) 5 REQ 80012001 Pedal Retainer Bungee w/ Hook 84560001 Mast
PARTS - FORWARD 72104001 Hook 71301001 HATCH SEAL "TRIM-LOC" (TOP MOLDED) 5 REQ 71302001 HULL FLANGE SEAL (pre 2012 ADV) "TRIM-LOC" (SIDE GLUED) 5 REQ 80012001 Pedal Retainer Bungee w/ Hook 84560001 Mast
SECTION 10iS: TAILCONE
 VAN'S AIRCRAFT, INC. F-1282-R BOTTOM RIGHT SKIN F-1283C J-STIFFENER F-1278 TOP SKIN F-00009-L ADAHRS BRACKET F-00009-R ADAHRS BRACKET F-1279-R UPPER RIGHT SKIN F-1280-R RIGHT SIDE SKIN SECTION 10iS: TAILCONE
2019 MADONE ASSEMBLY MANUAL
 2019 MADONE ASSEMBLY MANUAL 2019 MADONE Rim brakes and Di2 drivetrain Rim brakes and mechanical drivetrain Disc brakes and Di2 drivetrain Disc brakes and mechanical drivetrain TABLE OF CONTENTS Common
8-GUN CORVETTE ASSEMBLY INSTRUCTIONS
 8-GUN CORVETTE ASSEMBLY INSTRUCTIONS THE HULL STEP 1 Fasten the Deck to the Hull. Find the hull. This is a large, pink, ship-shaped piece of insulating foam board. This will form the base of your model
How to Replace Ball Joints
 How to Replace Ball Joints This is a big write up with a lot of pictures but I thought it would help some people. I know a lot of people have been having problems with ball joints so when I did mine I
CR-914 Kit Assembly Instructions Revised Oct 16, 2001
 Parts Inventory CR-914 Kit Assembly Instructions Revised Oct 16, 2001 Read these instructions before starting to build the boat. Parts list continued on the next page Parts list Continued - Upgrade Kit
Great Central Models
 Great Central Models February 2013 GCR Group Standard Tender 4000 Gallons Version 3 This kit is optimised for P4 and EM standards. Parts for an 00 version are now included. Both the narrow and wider fronted
Rowing Terminology. The person at the starting dock who aligns the boats evenly for a fair start.
 Rowing Terminology ALIGNER BACK ARM BACK CHOCKS BLADE BOW BOW(MAN) BOW BALL BOW SIDE BUTTON CANVAS CATCH CHECK IT COCKPIT The person at the starting dock who aligns the boats evenly for a fair start. Supports
55DEHD 07 (63S5) 1F63S-561E1
 1F63S-561E1") 55DEHD 07 () 1F63S-561E1 ( ) 55DEHD PARTS CATALOGUE 2006 by Yamaha Motor Co., Ltd. 1st edition, November 2006 All rights reserved. Any reprinting or unauthorized use without the written permission of Yamaha
55DEHD 07 () 1F63S-561E1 ( ) 55DEHD PARTS CATALOGUE 2006 by Yamaha Motor Co., Ltd. 1st edition, November 2006 All rights reserved. Any reprinting or unauthorized use without the written permission of Yamaha
Assembly Instructions And User Guide
 EZ-1/EZ-CLASSIC QUADRIBENT By Blackbird Designs Inc. Mark 5.2 June 2011 Assembly Instructions And User Guide 1 The Quadribent is 2-seat, side-by-side, human powered vehicle that enables almost anyone to
MODEL CCX-AG CURVE STEP / CURVE STEP SYSTEM
 To reduce the risk of drowning, entrapment, falls, paralysis, electrocution, or other serious injury or death: Dealer/Installer: Give manual to homeowner. Installer: Read "Safe Installation" on p. 2 and
This document to be used with Hurley traditional Davits
 ~ InstructIon Manual ~ This document to be used with Hurley traditional Davits WarnIngs WarnIng - Failure to install, maintain, protect, and operate the system properly can cause malfunction resulting
K Page 1 of 48 Air Intake - Pg. 17
 K532-53168 Page 1 of 48 Air Intake - Pg. 17 Ref # Part Number Qty Description 24 25 041 06-S 1 Gasket, elbow 25 48 054 09 1 Elbow, air cleaner Discontinued not available at Kohler Co. 35 277116-S 1 Brace,
Model Aero AT-6 Texan Introduction
 1 Model Aero AT-6 Texan Introduction We are excited to introduce the Model Aero AT-6 Texan! Originally used as an advanced trainer by the U.S. Armed Forces, the AT-6 is a relaxing slow flyer, equally at
TUNE YOUR SAILS SPEED. Optimist Tuning Guide. Photo Wavelength
 TUNE YOUR SAILS FOR OUTRIGHT SPEED Photo Wavelength PEAK / HEAD THROAT TACK CLEW THANK YOU for choosing North Sails for your Optimist. Whether you are just starting out in an Optimist you are an experienced
Booster Pump PB4-60 Replacement Kits
 Booster Pump PB4-60 Replacement Kits FOR YOUR SAFETY - This product must be installed and serviced by a contractor who is licensed and qualified in pool equipment by the jurisdiction in which the product