ANGEL 2000 glider ARF ASSEMBLY MANUAL. Specifications: MS: 129
|
|
|
- Anthony Hancock
- 6 years ago
- Views:
Transcription
. Wing area---------------582.8sq.in ( 37.6sq.dm).")

1 ASSEMBLY MANUAL ANGEL 2000 glider Graphics and specifications may change without notice. MS: 129 ARF Specifications: Wingspan in ( 200cm). Wing area sq.in ( 37.6sq.dm). Weight lbs ( 1.1 kg). Length in ( 114.6cm). Motor brushless outrunner motor. Radio channel with 2 servos. Electric conversion: Optional. 1

2 Angel 2000 Glider Instruction Manual. INTRODUCTION. Thank you for choosing the ANGEL 2000 GLIDER ARTF by SEAGULL MODELS COMPANY LTD,. The ANGEL 2000 GLIDER was designed with the intermediate/advanced sport flyer in mind. It is a semi scale airplane which is easy to fly and quick to assemble. The airframe is onventionally built using balsa, plywood to make it stronger than the average ARTF, yet the design allows the aeroplane to be kept light. You will find that most of the work has been done for you already. The motor mount has been fitted and the hinges are pre-installed. Flying the ANGEL 2000 GLIDER is simply a joy. This instruction manual is designed to help you build a great flying earoplane. Please read this manual throughly before starting assembly of your ANGEL 2000 GLIDER. User the parts listing below to indentify all parts. WARNING. Please be awere that this aeroplane is not a toy and if assemble or used incorrectly it is capable of causing injury to people or property. WHEN YOU FLY THIS AEROPLANE YOU ASSUME ALL RISK & REPONSIBILITY. If you are inexperienced with basic RC flight we strongly recommend you contact your RC supplier and join your local RC model Flying Club. RC Model Flying Clubs offer a variety of training procedures designed to help the new pilot on his way to successful RC flight. They will also be able to advise on any insurance and safety regulations that may apply. KIT CONTENTS


3 KIT CONTENTS. HINGING THE RUDDER. SEA12901 SEA12902 SEA12903 Fuselage Wing set Tail set Note : The control surfaces, including the ailerons, elevators, and rudder, are prehinged with hinges installed, but the hinges are not glued in place. It is imperative that you properly adhere the hinges in place per the steps that follow using a high-quality thin C/A glue. Hinge. Epoxy. ADDITIONAL ITEMS REQUIRED. 15 brushless outrunner motor. Radio 4 chanel with 2 servos. TOOLS & SUPPLIES NEEDED. Thick cyanoacrylate glue. 30 minute epoxy. 5 minute epoxy. Hand or electric drill. Assorted drill bits. Modelling knife. Straight edge ruler. 2mm ball driver. Phillips head screwdriver. 220 grit sandpaper. 90 square or builder s triangle. Wire cutters. Masking tape & T-pins. Thread-lock. Paper towels. Epoxy. 3


 With the stabilizer held firmly in place, use a pen and draw lines onto the stabilizer where it and the")

4 Angel 2000 Glider HINGING THE ELEVATORS. Glue the elevator hinges in place using the same techniques used to hinge the rudder. Instruction Manual. 3) Slide the stabilizer into place in the precut slot in the rear of the fuselage. The stabilizer should be pushed firmly against the front of the slot. INSTALLING THE HORIZONTAL STABILIZER. 1) Using a ruler and a pen, locate the centerline of the horizontal stabilizer, at the trailing edge, and place a mark. Use a triangle and extend this mark, from back to front, across the top of the stabilizer. Also extend this mark down the back of the trailing edge of the stabilizer. 4) With the stabilizer held firmly in place, use a pen and draw lines onto the stabilizer where it and the fuselage sides meet. Do this on both the right and left sides and top and bottom of the stabilizer. Pen. Draw center line. 2) Using a modeling knife, carefully remove the covering at mounting slot of horizontal stabilizer ( both side of fuselage). 5) Remove the stabilizer. Using the lines you just drew as a guide, carefully remove the covering from between them using a modeling knife. Remove covering. Cut. 4

 Using a modeling knife, carefully remove the covering that overlaps the stabilizer mounting platform sides in the fuselage.")

 When you are sure that everything is aligned correctly, mix up a generous amount of 30-minute epoxy.")

5 When cutting through the covering to remove it, cut with only enough pressure to only cut through the covering itself. Cutting into the balsa structure may weaken it. 6) Using a modeling knife, carefully remove the covering that overlaps the stabilizer mounting platform sides in the fuselage. Remove the covering from both the top and the bottom of the platform sides. 8) Next assemble and install the elevator control horn. Start each screw partway into the holes in the control horn, as shown. Thread the screws in until the tip of each screw protrudes just slightly from the bottom of the horn base. 7) When you are sure that everything is aligned correctly, mix up a generous amount of 30-minute epoxy. Apply a thin layer to the top and bottom of the stabilizer mounting area and to the stabilizer mounting platform sides in the fuselage. Slide the stabilizer in place and realign. Double check all of your measurements once more before the epoxy cures. Hold the stabilizer in place with T-pins or masking tape and remove any excess epoxy using a paper towel and rubbing alcohol. Remove covering. Epoxy. Then hold the control horn clamping plate in place while you finish threading the screws all the way in. When done, you can file or grind off the protruding sharp point of the screws if you desire. Epoxy. 5
 Using a modeling knife, remove the covering from over the precut")


6 Angel 2000 Glider Instruction Manual. 2) Using a modeling knife, remove the covering from over the precut hinge slot cut into the lower rear portion of the fuselage. 2x15mm Remove covering. INSTALLING VERTICAL STABILIZER. 3) Next assemble and install the rudder control horn as the process for elevator control horn. 1) While holding the vertical stabilizer firmly in place, use a pen and draw a line on each side of the vertical stabilizer where it meets the top of the fuselage. Epoxy. When cutting through the covering to remove it, cut with only enough pressure to only cut through the covering itself. Cutting into the balsa structure may weaken it. 4) Slide the vertical stabilizer back inplace. Using a triangle, check to ensure that the vertical stabilizer is aligned 90º to the horizontal stabilizer. 6
 Install the rubber grommets and brass collets onto the fuselage servo.")
 When you are sure that everything is aligned correctly, mix a generous amount of 30-minute epoxy. Apply a thin layer to the mouting slot and to bottom of the vertical stabilizer mounting area.")

7 INSTALLING THE FUSELAGE SERVOS. Horizontal Stabilizer. 90º Vertical Stabilizer. Because the size of servos differ, you may need to adjust the size of the precut. opening in the mount. The notch in the sides of the mount allow the servo lead to pass through. 1) Install the rubber grommets and brass collets onto the fuselage servo. Test fit the servo into the aileron servo mount. 2) Secure the servos with the screws provided with your radio system. 6) When you are sure that everything is aligned correctly, mix a generous amount of 30-minute epoxy. Apply a thin layer to the mouting slot and to bottom of the vertical stabilizer mounting area. Apply epoxy to the bottom and top edges of the filler block and to the lower hinge also. Set the stabilizer in place and realign. Double check all of your measurments once more before the epoxy cures. Hold the stabilizer in place with T-pins or masking tape and remove any excess epxy using a paper towel and rubbing alcohol. Allow the epoxy to fully cure before proceeding. Rudder. Elevator. SERVO ARM INSTALLATION. Install adjustable servo connector in the servo arm as same as picture below: Rudder. Elevator. 7


8 Angel 2000 Glider Instruction Manual. ELEVATOR - RUDDER PUSHROD HORN INSTALLATION. Nylon Snap keeper. 1) Install the elevator control horn using the same method as with the aileron control horns. 2) Position the elevator control horn on the both side of elevator. M2 clevis. 8mm M2 lock nut. Elevator pushrod. Control horn Elevator pushrod. 8mm Fuel tubing. Control horn Rudder pushrod. Hex Nut. M2 clevis. 8

9 WING ASSEMBLY. Remove covering. ELECTRIC POWER CONVERSION. Locate the items neccessary to install the electric power conversion included with your model. 9


10 Angel 2000 Glider Instruction Manual. 2x8 mm INSTALLING THE SPINNER. Install the spinner backplate, propeller and spinner cone. The propeller should not touch any part of the spinner cone. If it does, use a sharp modeling knife and carefully trim away the spinner cone where the propeller comes in contact with it. 10


 Wrap the receiver and battery pack in the")


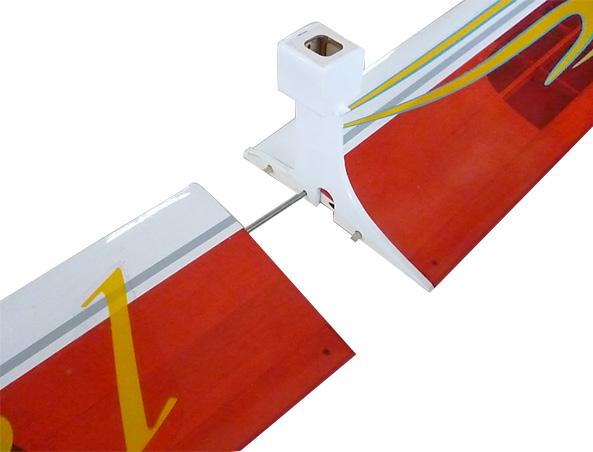
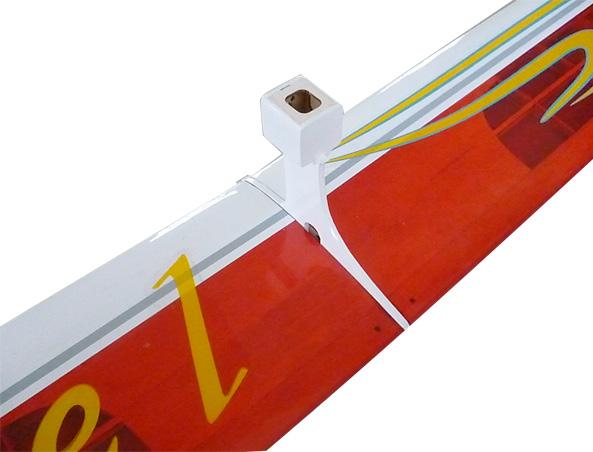
11 INSTALLING THE BATTERY - RECEIVER. 1) Plug the five servo leads and the switch lead into the receiver. Plug the battery pack lead into the switch also. 2) Wrap the receiver and battery pack in the protective foam rubber to protect them from vibration. ATTACHMENT WING- FUSELAGE. 3) Route the antenna in the antenna tube inside the fuselage and secure it to the bottom of fuselage using a plastic tape. Wing bolt. ATTACHMENT HATCH COVER ON THE FUSELAGE. Cut 11
 It is critical that your airplane be balanced correctly.")


 It should hang level when suspended at the recommended balance point.")

12 Angel 2000 Glider Instruction Manual. BALANCING. 1) It is critical that your airplane be balanced correctly. Improper balance will cause your plane to lose control and crash. THE CENTER OF GRAV- ITY IS LOCATED 86MM BACK FROM THE LEADING EDGE OF THE WING AT THE WING ROOT. 2) Mount the wing to the fuselage. Using a couple of pieces of masking tape, place them on the bottom side of the wing 86mm back from the leading edge of the wing at the wing root. 3) It should hang level when suspended at the recommended balance point. Place your fingers on the masking tape and Accurately mark the balance point on the botttom of the wing on both sides of the fuselage. The balance point is located 86mm back from the leading edge of the wing at the wing root. This is the balance point at which your model should balance for your first flights. Later, you may wish to experiment by shifting the balance up to 10mm forward or back to change the flying characteristics. Epoxy. 12
, and empty fuel tanks, hold the model at the marked balance point with the stabilizer level.")
13 Moving the balance aft makes the model more agile with a lighter and snappier feel. In any case,please start at the location we recommend. 86 mm With the wing attached to the fuselage, all parts of the model installed ( ready to fly), and empty fuel tanks, hold the model at the marked balance point with the stabilizer level. Lift the model. If the tail drops when you lift, the model is tail heavy and you must add weight* to the nose. If the nose drops, it is nose heavy and you must add weight* to the tail to balance. Elevator: Up : Down : CONTROL THROWS. 15 mm 15 mm *If possible, first attempt to balance the model by changing the position of the receiver battery and receiver. If you are unable to obtain good balance by doing so, then it will be necessary to add weight to the nose or tail to achieve the proper balance point. Rudder: Right : Left : 20 mm 20 mm 13
14 Angel 2000 Glider FLIGHT PREPARATION. Check the operation and direction of the elevator, rudder, ailerons and throttle. A) Plug in your radio system per the manufacturer s instructions and turn everything on. B) Check the elevator first. Pull back on the elevator stick. The elevator halves should move up. If it they do not, flip the servo reversing switch on your transmitter to change the direc- C) Check the rudder. Looking from behind the airplane, move the rudder stick to the right. The rudder should move to the right. If it does not, flip the servo reversing switch on your transmitter to change the direction. Instruction Manual. PREFLIGHT CHECK. 1) Completely charge your transmitter and receiver batteries before your first day of flying. 2) Check every bolt and every glue joint in the ANGEL 2000 GLIDER to ensure that everything is tight and well bonded. 3) Double check the balance of the airplane. Do this with the fuel tank empty. 4) Check the control surfaces. All should move in the correct direction and not bind in any way. 5) If your radio transmitter is equipped with dual rate switches double check that they are on the low rate setting for your first few flights. 6) Check to ensure the control surfaces are moving the proper amount for both low and high rate settings. 7) Check the receiver antenna. It should be fully extended and not coiled up inside the fuselage. 8) Properly balance the propeller. An out of balance propeller will cause excessive vibration which could lead to engine and/or airframe failure. We wish you many safe and enjoyable flights with your ANGEL 2000 GLIDER
CARL GOLDBERG PRODUCTS LTD.
 CARL GOLDBERG PRODUCTS LTD. P.O. Box 818, Oakwood, GA 30566 678-450-0085 Fax: 770-532-2163 www.carlgoldbergproducts.com copyright 2003 Carl Goldberg Products, Ltd. WARNING! THIS IS NOT A TOY! THIS IS NOT
aero naut Electric Model Aeroplane Quido Order-No. 1303/00
 aero naut Electric Model Aeroplane Quido Order-No. 1303/00 Quido is a small model that accompanies you wherever you go. The prefabricated parts are mostly balsa and just need to be assembled according
Horizontal Fuselage. Top Vertical Fuselage 1. Lay out the Top Vertical Fuse Front(1), Top Vertical Fuse Back(2), and Vertical Stabilizer(3).
, Top Vertical Fuse Back(2), and Vertical Stabilizer(3).") Rumbuilder 71 B-17 Congrats on your Rumbuilder B-17! We re glad you chose to fly with us! If you have any problems, or missing/broken kit pieces, please contact us. We d be happy to replace any damaged
Rumbuilder 71 B-17 Congrats on your Rumbuilder B-17! We re glad you chose to fly with us! If you have any problems, or missing/broken kit pieces, please contact us. We d be happy to replace any damaged
Instructions for Fun Foam Critter 4/25/2007 BP Hobbies LLC 140 Ethel Road W Suite J Piscataway NJ,
 Instructions for Fun Foam Critter 4/25/2007 BP Hobbies LLC 140 Ethel Road W Suite J Piscataway NJ, 08854 http://www.bphobbies.com Specifications: Wing Span: 20" Length: 20" Flying Weight: 5.5-7.0 oz Controls:
Whisper 1400 Glider Operation Manual
 Whisper 1400 Glider Operation Manual Specifications: Wingspan: 55 (1400mm) Length: 32.5 (825mm) Wing area: 323 sq. in. Weight: 16 oz.(453g) Ace R/C Whisper 1400 Glider R/C Sailplane (4104-F) Distributed
Aegea Assembly Notes:
 Aegea Assembly Notes: The Aegea model is a thermal Duration (TD) model made up of components from Phil Barnes 1 (bagged wing and tail group) and Terry Luckenback 2 (Pretty Mantis fuse). Due to its construction
WE GET PEOPLE FLYING INSTRUCTION MANUAL
 TM WE GET PEOPLE FLYING INSTRUCTION MANUAL 90% pre-built Pre-covered in Goldberg UltraCote transparent blue and white covering Includes sailplane hardware package with adjustable tow hook Superb stability
Akcent-2 - Building Instructions
 Akcent-2 Home Pictures Building Instructions Ordering Akcent-2 - Building Instructions Note! The pictures show older kits with "diser" wings. The new kits come with nicer D-box wings. Servo locations are
MiG-29 Scale EDF Radio Control model airplane
 MiG-9 Scale EDF Radio Control model airplane Wingspan : 45mm Model No : FF-D004 UNDER SFETY PRECUTIONS This radio control is not a toy! - lways keep this instruction manual ready on hand for quick reference.
Miss Mayflower. Build Manual
 Miss Mayflower Build Manual Thank you for the purchase of the Miss Mayflower, this new exciting craft will give you fun on many types of terrain including snow, gravel, pavement, grass, water, and when
Building Instructions ME 163 B 1a M 1:5 Turbine
 Building Instructions ME 163 B 1a M 1:5 Turbine Thank you for choosing our kit of the Me-163B. We ask you to read the instruction once in advance before building this kit in order to avoid mistakes. Make
Your kit contains the following items. Additional Items You May Need. Pre- cut parts Propeller rigging and rubber Sandpaper Covering sheet
 Your kit contains the following items Pre- cut parts Propeller rigging and rubber Sandpaper Covering sheet The SkyFox offers great glide performance in a rubber powered plane due to its built up wing.
Model Aero Sportster Indroduction
 1 Model Aero Sportster Indroduction We are excited to introduce the Model Aero Sportster! Inspired by classic designs of the past, the Sportster is a relaxing slow flyer, equally at home indoors or outside
MEMO. Assembly Manual. Warranty
 MEMO Assembly Manual No.4344 Specifications Wing Span: 59.84" (1520mm) Length: 36.42" (925mm) Wing Area: 341sq. in.(22dm2) Weight: 1.3 lbs.(600g) Motor: OBL29/09-07A Airfoil: RG-15 Warranty This kit is
Release :
 Release : 25.01.08 1 Technical datas : Wingspan : 936 mm Lenght : 444 mm Surface : 5.07 dm² Mass : 90g Wing loading : 17.8 g/dm² 2 A quick summary of the design The Nexus 900 is the result of a long research
Model Aero AT-6 Texan Introduction
 1 Model Aero AT-6 Texan Introduction We are excited to introduce the Model Aero AT-6 Texan! Originally used as an advanced trainer by the U.S. Armed Forces, the AT-6 is a relaxing slow flyer, equally at
AVA Building Instructions
 Suggested Assembly Sequence: AVA Building Instructions 1. Insert fittings in rudder and trial fit rudder on boom 2. Attach stab to v-mount and position ahead of rudder ¼, sanding the v-mount as needed.
CARL GOLDBERG PRODUCTS, LTD. P.O. Box 818 Oakwood GA Phone # Fax #
 Superfloats 36 ARF WARNING A radio-controlled model is not a toy and is not intended for persons under 16 years old. Keep this kit out of the reach of younger children, as it contains parts that could
Last Revised 3/17/15 RMRC Mako
 Ready Made RC, LLC Assembly Instructions for: Last Revised 3/17/15 RMRC Mako Page 1 Thank you for purchasing the RMRC Mako! It is important to read the manual in its entirety before your maiden flight.
Instruction Manual. Almost-Ready-to-Fly Speed 400 motor w/folding propeller included Lightweight fiberglass fuse w/bolt-on wing.
 Instruction Manual Almost-Ready-to-Fly Speed 400 motor w/folding propeller included Lightweight fiberglass fuse w/bolt-on wing Specifications Wingspan... 54 in (1384 mm) Length... 32 3 8 in (822 mm) Wing
Dornier Do R 4 Super-Wal
 Dornier Do R 4 Super-Wal Model Aviation Laddie Mikulasko s Dornier Do R 4 Super-Wal Build the multiengine, record-setting seaplane. Article, plans, instructions, and photos by Laddie Mikulasko. Complete
WHITE WOLF. X-ray View MID POWER MODEL ROCKET KIT BUILDING INSTRUCTIONS KIT SPECIFICATIONS:
 WHITEWOLF-38 PARTS LIST 1 - Nose Cone 1-17" Airframe 1-6" Motor Tube 3 - Aft Fins 3 - Forward Fins 2 - Centering Rings 1-15" Parachute 2 - launch lugs 1-12 Kevlar Shock Cord 1 - Motor Retention >>(screw/washer)
SEADUCER BOATS GAS SPORT HYDRO
 SEADUCER BOATS GAS SPORT HYDRO COME VISIT US ON THE WEB AT WWW.SEADUCERBOATS.COM 2 - Pkg. Of 440 push rod ends 2 - Pkg. of solder-on rod ends 2 -water outlet fitting 1-1/4" prop nut 1 -.250" x 30" flex
FlyingFoam Nurf. General Assembly Instructions
 FlyingFoam Nurf General Assembly Instructions These instructions apply to the Nurf, an all EPP forward swept flying wing available from FlyingFoam.com. Building and operating a remote controlled aircraft
Designed by Steve Shumate Adapted from the North Star design by Laddie Mikulasko. Polaris EX Introduction
 1 Model Aero Polaris Designed by Steve Shumate Adapted from the North Star design by Laddie Mikulasko Polaris EX Introduction We re excited to introduce the Polaris EX seaplane parkflyer! Based on the
Tugster. Tug Boat. Competition or Sport Tug Kit. A Zippkits R/C Boat. Building Instructions
 Z I P P M A N U FA C T U R I N G Tugster Tug Boat Competition or Sport Tug Kit A Zippkits R/C Boat Building Instructions 2016 JMP Hobby Group St. Paul, Indiana 47272 www.zippkits.com Toll Free (866) 922-ZIPP
AGM 33 PIKE ALL FIBERGLASS. Specifications Length: 92 Diameter 5.5 Weight: 24 lbs Motor Mount: 75mm Fins: 6-3/16 G10 CP: 68 from nose tip Parts List
 ALL FIBERGLASS AGM 33 PIKE Specifications Length: 92 Diameter 5.5 Weight: 24 lbs Motor Mount: 75mm Fins: 6-3/16 G10 CP: 68 from nose tip Parts List (1) Filament Wound Nose Cone w/ Metal Tip (1) Nose Cone
EPP Version Building Notes Updated
 EPP Version Building Notes Updated 12-10-2013 The Zulu covers a wide range of flying conditions: slope soaring in light to strong lift, thermalling, aerobatics, discus launches, and combat; for skill levels
Annex E(M) - Final inspection checklist - monowheel
 - Final inspection checklist - monowheel") Annex E(M) - Final inspection checklist - monowheel A/C Reg... Owner...Kit S/N...Date... (U.K. Only) L.A.A No...Inspector...Insp. No... Note: This check list only covers specific items for inspection of
Annex E(M) - Final inspection checklist - monowheel A/C Reg... Owner...Kit S/N...Date... (U.K. Only) L.A.A No...Inspector...Insp. No... Note: This check list only covers specific items for inspection of
Constitution Instructions
 Constitution Instructions This kit will build a 1:48 scale hull for the USS Constitution frigate. The kit contains the following parts. 1/8 deck with laser etched deck lines 1/8 railing Ribs Center keel
BUILDING INSTRUCTION Glider TASER unplugged. Taser unplugged Building instruction September
 Wingspan [mm]: 2000 Takeoff weight [g]: From 400 Airfoil: AG 455ct-02f AG47ct-02f by Mark Drela BUILDING INSTRUCTION Glider TASER unplugged www.pcm.at 1 CONTENTS DATA 1. Kit contents 2. What else do you
Pre-Paint>Fuselage>Empennage>Fit vertical tail fin. Objectives of this task: Materials and equipment required: Fit the spar extender
 Pre-Paint>Fuselage>Empennage>Fit vertical tail fin Objectives of this task: To fit the vertical tail fin to the fuselage, including fitting the static probe, static tube, optional strobe light wiring and
MICRO - DLG. This kit should only take 30 minutes to compile, very simple and quick.
 MICRO - DLG This kit should only take 30 minutes to compile, very simple and quick. You will need: Hot Glue ( small tip preferably ) Sharp razor blade Ruler a strip of strong fiber tape Thin nose Pliers
X-29 Canard Jet. A Simple Depron Foam Build.
 X-29 Canard Jet. A Simple Depron Foam Build. Two full sized X-29 s were built and the first flew in 1984. They were experimental aircraft, testing this unusual configuration of a canard jet with swept
General Build Instructions for Mach 1 BT50 and BT55 Single Fin Kits. Needed Items for Assembly
 General Build Instructions for Mach 1 BT50 and BT55 Single Fin Kits 60-80 grit sandpaper Hobby knife Tape measure Scissors CA Super glue 30-minute epoxy 5-minute epoxy Masking tape 1/16 drill bit Needed
CIRRUS AIRPLANE MAINTENANCE MANUAL MODELS SR22 AND SR22T CHAPTER 55-40: RUDDER GENERAL. Rudder 55-40: RUDDER. 1. General
 CIRRUS AIRPLANE MAINTENANCE MANUAL Rudder CHAPTER 55-40: RUDDER GENERAL 55-40: RUDDER 1. General The rudder provides airplane directional (yaw) control and includes a rudder trim tab used for yaw trim
Parkzone Vapor Repair tutorials
 Propeller replacement The propeller is held on by the threaded shaft. You will need to grip the shaft/cog with your fingers or some pliers and rotate the propeller anticlockwise when viewed from the front.
PAY N PAK, 1/12 th Scale, Limited Sport Hydro P Sport Hydro
 1980 82 PAY N PAK, 1/12 th Scale, Limited Sport Hydro P Sport Hydro Introduction: The 1980 turbine Pay N Pak is a good subject for a model race boat. It has a low profile, mild pickle-fork setback, long
MiniTwin by Acer
 MiniTwin 250 - by Acer ASSEMBLY INSTRUCTIONS Thank you for choosing the MiniTwin 250 as your next project. This kit is easy to build and only requires a few hours to complete. Once finished, you will be
SEADUCER BOATS GAS MONO COME VISIT US ON THE WEB AT
 SEADUCER BOATS GAS MONO COME VISIT US ON THE WEB AT WWW.SEADUCERBOATS.COM 1 - Pkg. Of 440 push rod ends 1 - Pkg. of solder-on rod ends 2 -water outlet fitting 1-1/4" prop nut 1 -.250" x 24" flex shaft
Sunbird 60 (1.5 Meter) Instruction Manual
 Instruction Manual") Sunbird 60 (1.5 Meter) Instruction Manual Who is that ugly bar-steward? Sunbird is a CNC machine moulded, CAD designed slope model aircraft. This plane has had a development period of over 2 years, and
Sunbird 60 (1.5 Meter) Instruction Manual Who is that ugly bar-steward? Sunbird is a CNC machine moulded, CAD designed slope model aircraft. This plane has had a development period of over 2 years, and
Falcon 3 145, 170, 195 and Tandem Owner / Service Manual
 Falcon 3 145, 170, 195 and Tandem Owner / Service Manual January 2007 - Second Edition Removing The Sail From The Airframe And Short Packing The Glider Many maintenance and repair procedures will require
S A N S I B E A R S P L I N T 2 0 X
 SANSIBEAR SPLINT 20X This is just a short documentation of one way you can assemble the Cylon/Splint I'm sure the pics will speak for themselves. Good pictures are better than to many words. If you have
Blaster 2 & 2e Assembly Guide
 Blaster 2 & 2e Assembly Guide from 123 Radford Road Leamington Spa Warwickshire UK CV31 1LG www. sales@ 2009 HyperFlight Revision 5, 1/05/09 R5.odt Warning, this is not a toy! If you are new to the hobby
In each step, the needed parts are shown the number right below. Locate all parts for the step.
 Tools Required for Assembly Phillips Screwdriver, Med Needle Nose Pliers Sandpaper (#400 grit) Hobby Knife Scissors CA Instant Glue Rubbing Alcohol Drill Bit 1/16", 1.6mm 5/64, 2mm 1/8, 3mm 5/32, 4mm Before
We hope you ll enjoy the Drifter as much as we have! Scott DeTray Model Aero Specifications:
 We are excited to bring you the Drifter RC airboat. You re probably thinking it doesn t fly so what is Model Aero thinking??? We have always liked RC vehicles of all types and have had a fondness for airboats
Yes! It s the very first one with me holding it! Top picture is the incredible Greg Dakin flying another prototype (Photo from Kevin Newton)
") Vector III Instruction Manual Vector III is a CNC machine moulded, CAD designed slope aerobatics model aircraft. This plane has had a development period of over 20 years, and three separate models to evolve
Vector III Instruction Manual Vector III is a CNC machine moulded, CAD designed slope aerobatics model aircraft. This plane has had a development period of over 20 years, and three separate models to evolve
V-Tail Flamingo. Included in Kit * Pre- cut balsa parts * Ballast weights * Diagram sheet * Sandpaper sheet
 V-Tail Flamingo Included in Kit * Pre- cut balsa parts * Ballast weights * Diagram sheet * Sandpaper sheet Additional Items You May Need * Wood Glue * Epoxy Glue * Sanding block * Hobby knife Overview:
robart HOW-TO Series Model Incidence Meter
 robart HOW-TO Series Model Incidence Meter The term incidence is something of a misnomer since this highly versatile tool is capable of measuring or comparing angles other than incidence of a wing or tail.
CIRRUS AIRPLANE MAINTENANCE MANUAL
 RUDDER 1. GENERAL The rudder provides airplane directional (yaw) control and includes a rudder trim tab used for yaw trim adjustment. The rudder is of conventional design with skin, spar and ribs manufactured
ASSASSIN Building Instructions by CRASHTESTHOBBY.COM
 ASSASSIN Building Instructions by CRASHTESTHOBBY.COM The Assassin is the toughest plane on the planet!!! The Assassin can take more abuse and keep on flying better than any other plane we have seen. It
Addiction Review by David Boyd
 Addiction Review by David Boyd Hi, I m Dave the guy flying the purple Addiction in GOT AN ADDICTION-The Movie. When PA asked me to do this Review I said I d love to. But I am just an average pilot and
No.5550 INTRUCTION MANUAL WARRANTY WARNING. Notice This is not a toy. Assembly and operating of this boat requires adult supervision.
 INTRUCTION MANUAL WARRANTY Thunder Tiger guarantees this model kit to be free from defects in both material and workmanship. The total monetary value under warrant will in no case exceed the cost of the
BUIDLING INSTRUCTION GLIDER MINI-RACE. MINI-Race building instruction January
 Wingspan [mm]: 950 Aspect ratio: 7,7 Wing area [dm2]: 11,7 Wing loading [g/dm²] : 16 Takeoff weight [g]: 190 Airfoil: AG03 mod BUIDLING INSTRUCTION GLIDER MINI-RACE www.pcm.at 1 CONTENTS DATA 1. Kit contents
Southern Eagles Soaring
 Southern Eagles Soaring N56LS Standard Cirrus Disassembly / Assembly Procedure. Version 2, 2017 You landed out so what now? First, hopefully you made arrangements with someone who has a hitch on their
Foam Plate Glider: Sonic Silhouette
 Designed by: Ritchie Kinmont Project #40 Page 1/25 Foam Plate Glider: Sonic Silhouette About this project: The Foam Plate Glider Sonic Silhouette is the first in a series of flying glider projects made
Lectric Cycles Mid-Drive Electric Motor Installation
 Lectric Cycles Mid-Drive Electric Motor Installation This write-up describes the installation of a Lectric Cycles electric motor. The model is the e-rad Mid-Drive 750 Watt conversion kit, installed on
BlueArrow. Venus DLG. Construction and Flight Manual. Note: Read this manual carefully before construction and flight!
 BlueArrow Venus DLG Construction and Flight Manual Note: Read this manual carefully before construction and flight! 1 1. Introduction Thank you for choosing this fantastic Venus DLG brought to you by BlueArrow
BUILDING INSTRUCTIONS
 Z I P P M A N U FA C T U R I N G A Zippkits R/C Boat BUILDING INSTRUCTIONS 2010 Zipp Manufacturing Frankfort, New York 13340 www.zippkits.com Table of Contents Introduction 1 Engine Mounting 30 S E C T
Sanibel Owners Manual
 Sanibel 36-600 Owners Manual TM Specifications Length (Hull):... 36 inches Height (Mast):... 51.5 inches Height (Overall):... 69 inches Beam:... 7.5 inches Radio: JR Beat Gear w/sail winch servo Sail area:
GT-4130 STUNT PLANE. 3 Channel 2.4GHz RC Aeroplane Modelled after the famous Cessna 182 Skylane SKYLARK (GT-4130) Contents & Accessories
 Contents & Accessories") GT-4130 STUNT PLANE 3 Channel 2.4GHz RC Aeroplane Modelled after the famous Cessna 182 Skylane SKYLARK (GT-4130) Contents & Accessories Remote Control Remote Control Setup BATTERY & POWER SPECIFICATION
GT-4130 STUNT PLANE 3 Channel 2.4GHz RC Aeroplane Modelled after the famous Cessna 182 Skylane SKYLARK (GT-4130) Contents & Accessories Remote Control Remote Control Setup BATTERY & POWER SPECIFICATION
TOURNAMENT ICE. 8Ft-Gold Standard Manual Score Home Air Hockey Game Assembly Instructions / Manual
 TOURNAMENT ICE 8Ft-Gold Standard Manual Score Home Air Hockey Game Assembly Instructions / Manual Thank you for purchasing a Gold Standard Games product. All of us at Gold Standard Games want you to be
REPLACING THE AFT RUDDER CABLES
 REPLACING THE AFT RUDDER CABLES Note: You must have the assistance of a qualified Aircraft Mechanic to perform this procedure. A logbook entry with the mechanics signature is required. Please read these
Simple Entry Level Construction Stable Flight Characteristics Excellent R/C Trainer
 Simple Entry Level Construction Stable Flight Characteristics Excellent R/C Trainer READ THROUGH THIS INSTRUCTION MANUAL FIRST. IT CONTAINS IMPORTANT INSTRUCTIONS AND WARNINGS CONCERNING THE ASSEMBLY AND
Kari-Tek. Kari-Tek. Hydro Skeg Retro-Fitting Instructions. Instructions for retro-fitting of Hydro Skeg
 Kari-Tek Instructions for retro-fitting of Hydro Skeg A good knowledge of fibreglassing will be required to fit the Hydro Skeg successfully. When working with fibreglass and cutting the holes, safety glasses,
Little Dog Dual Deploy
 Little Dog Dual Deploy John Wilke & Paul Fechtmeister September 2010 All dimensions are in inches unless specified Construction Notes: Other items you will need: One set of epoxy Motor One sheet of 120
WAR WING Ultimate Combat Delta
 WAR WING Ultimate Combat Delta Assembly Instructions BEFORE YOU BEGIN: Thank you for purchasing this plan set. The plans contained in this set were created after extensive testing and design modifications
Installation Guide, MPower Echelon Console
 Installation Guide, MPower Echelon Console AC Performance, AC Sport and AC Performance Plus Schwinn Echelon Console (External Routing) 1. Install batteries to console. Mount the console to the bike. 2.
Outbound Progress Report
 Outbound Progress Report 7-11-17 Tank Install The new 20 plus gallon fuel tank is underway. In a matter of weeks we should be getting the first article and placing a first run order. The tank fits like
Fiber Optic Lighted Bubbler Spillway Pot (DLP-45) Installation Manual
 Installation Manual") Fiber Optic Lighted Bubbler Spillway Pot (DLP-45) Installation Manual 27.75 23.75 25.50 20.75 Specifications: 8-13 GPM 100 strand fiber - Bubbler 75 strand fiber - Spillway Light Bar 45 ft. fiber tail
Fiber Optic Lighted Bubbler Spillway Pot (DLP-45) Installation Manual 27.75 23.75 25.50 20.75 Specifications: 8-13 GPM 100 strand fiber - Bubbler 75 strand fiber - Spillway Light Bar 45 ft. fiber tail
1939 STOUT TROPHY WINNER
 1939 STOUT TROPHY WINNER This model's 36-minute flight won the Stout Trophy and qualified the builder as captain of the American Moffett team. Bob Toft. Has won a second in gas, first in rubber at Nationals.
Scythe Building Instructions by CRASHTESTHOBBY.COM
 Scythe Building Instructions by CRASHTESTHOBBY.COM The Scythe is a 26 plane that can be built as a floater or a combat plane using the same building techniques as the Widowmaker and Assassin. It can be
Building a light indoor foamy aircraft
 Building a light indoor foamy aircraft THE PLUG The statistics for this foamy airplane are: Wing Span: 31 Wing Area: 288 sq/in Aircraft Flying Weight: 168grms (6.01oz) Wing Loading: 3oz/ft Building Material:
Pitts Model 12 Wing Leading edge Installation
 Pitts Model 12 Wing Leading edge Installation This procedure is used to install molded plywood leading edges included in the Pitts Model 12 kit. Nine (9) molded leading edge section are require per aircraft;
Savage Cub RTF Assembly Manual
 Savage Cub RTF Assembly Manual Aircraft Type & Model: Savage Cub 912 100hp Aircraft Registration Number: Aircraft Serial Number: Zlin Aviation S.R.O. 2. Kvetna N.685 763 61 Napajedla Czech Republic www.zlinaero.com
Construction Chapters Index
 Construction Chapters Index 9 7 8 Chapters Index c. c. c. c. c. c. c7. c8. c9. c0. c. c. c. c. c. c. c7. Balsa Wood Skeleton Strip Planking Hull Fairing Keel Bulb Mould Lead Bulb Casting Keel Construction
" A " "B " F G H P PARTS LIST
 K-57 SkyDart usiness SST Concept SUSIDIRY OF DMON ESTES INDUSTRIES PENROSE COLO. 8120 Designed by Larry H. Renger "G " " " " F " R "H " SP-57 U " " "C " I M C O T T L "D " E F G H P D J "E " N K Q S 1
Step 1: Block sand the transom to remove the seam joint. The end result should be a flat transom without a ledge where the seam joint is.
 WhiplashGV Instruction Manual Email: Brian@Blazermarine.com Phone: 513-598-1769 Step 1: Block sand the transom to remove the seam joint. The end result should be a flat transom without a ledge where the
Wing assemblyfinal Master 4/29/04 11:20 PM Page 1. Issued January 1, Sabre Aircraft. Assembly Manual. Sabre 16ss Wing
 Wing assemblyfinal Master 4/29/04 11:20 PM Page 1 Issued January 1, 2002 Sabre Aircraft Assembly Manual Sabre 16ss Wing Wing assemblyfinal Master 4/29/04 11:20 PM Page 2 1. 2. 1. Unzip the cover and remove
Instruction Manual. Features. Specification: Length: 730mm Width: 500mm Height: 1000mm Sail Area: 0.15m 2. Weight: 692g (w/o battery & receiver)
") AN UNBELIEVABLE SPEED MACHINE Instruction Manual Features Specification: Length: 730mm Width: 500mm Height: 1000mm Sail Area: 0.15m 2 Weight: 692g (w/o battery & receiver) Thank you for purchasing your
AN UNBELIEVABLE SPEED MACHINE Instruction Manual Features Specification: Length: 730mm Width: 500mm Height: 1000mm Sail Area: 0.15m 2 Weight: 692g (w/o battery & receiver) Thank you for purchasing your
TABLE OF CONTENTS FRAME FEATURES INTRODUCTION
 S3 DISC MANUAL TABLE OF CONTENTS Introduction...1 Frame Features...2 Fork Preparation...3 Small Parts...5 Frame Preparation...6 Brake Housing Installation...7 Mechanical Cable Routing...9 Electric Cable
2019 MADONE ASSEMBLY MANUAL
 2019 MADONE ASSEMBLY MANUAL 2019 MADONE Rim brakes and Di2 drivetrain Rim brakes and mechanical drivetrain Disc brakes and Di2 drivetrain Disc brakes and mechanical drivetrain TABLE OF CONTENTS Common
STOL 500. Once you get past circuits and bumps. John Stennard tries out an ARTF model from Art-Tech with slats and flaps for short field performance
 John Stennard tries out an ARTF model from Art-Tech with slats and flaps for short field performance STOL 500 Once you get past circuits and bumps there is quite a bewildering number of different types
On the Wing... By Bill & Bunny Kuhlman,
 On the Wing... By Bill & Bunny Kuhlman, bsquared@themacisp.net Redwing XC, Part 4 August 2008 29 After nearly a year of work, our Redwing XC has finally taken wing. At the end of the last installment we
SERIES 2 RAMP OWNER S MANUAL TOOLS REQUIRED: BEFORE YOU BEGIN... Read and understand these instructions before beginning a ramp setup.
 SERIES 2 RAMP OWNER S MANUAL BEFORE YOU BEGIN... Read and understand these instructions before beginning a ramp setup. Use caution and care for your back when lifting, pushing, pulling, folding or unfolding
L-23 Super Blanik Rigging (assembly/disassembly) Guide Maj Carl Kerns
 Guide Maj Carl Kerns") L-23 Super Blanik Rigging (assembly/disassembly) Guide Maj Carl Kerns The L-23 Blanik is a difficult Sailplane to rig (assemble). The wings are heavy and are secured via a single
L-23 Super Blanik Rigging (assembly/disassembly) Guide Maj Carl Kerns The L-23 Blanik is a difficult Sailplane to rig (assemble). The wings are heavy and are secured via a single
Installation Instructions MODEL VSTI-A020 Tank Indicator Installation Model: VSTI-A020, Stainless Reverse Read System Versa Steel Inc. Guide Cables No
 Tank Indicator Installation Model: VSTI-A020, Stainless Reverse Read System Guide Cables No Guide Cables 1 August 4, 2011 Assembly Instructions: (Shown with a 2 board, 12 ft kit) ITEM NO. PART NUMBER DESCRIPTION
Slipso400 August 17, 2006
 Slipso400 August 17, 2006 Contents 1 Introduction 3 2 Preparation 4 3 Wing 5 3.1 Preface.............................................. 5 3.2 Building.............................................. 5 3.2.1
Hobby Services 3002 N. Apollo Dr. Suite 1 Champaign IL USA
 Wingspan: 68 in [1725mm] Wing Area: 462 sq in [29.8 dm 2 ] Weight: 42 46 oz [1190 1305 g] Wing Loading: 13.1 14.3 oz/sq ft [40 44 g/dm 2 ] Length: 45 in [1130mm] Radio: 3-channel with 2 standard servos
The Marion Eagle Newsletter
 The Marion Eagle Newsletter Club Officers 2017 President: Wayne Brown (507) 319-4406 rotoman@charter.net Vice President: Dallas Gardner (507) 867-4269 Dallas.Gardner@mchsi.com Treasurer: Judi Snyder (507)
Learning to Fly: The Wright Brothers Adventure EG GRC 39
 Learning to Fly: The Wright Brothers Adventure EG 2002 12 007 GRC 39 The Wright Brothers 1900 aircraft was flown repeatedly at Kitty Hawk, North Carolina, during the fall of 1900, mostly as a kite but
Wowings Booby CONSTRUCTION MANUAL. Copyright 2005 Wowings
 Wowings Booby CONSTRUCTION MANUAL Copyright 2005 Wowings www.wowings.com - 1 - Thank you very much for purchasing the Booby. Although made primarily of soft EPP foam, this RC slope glider is still capable
RUDDER KIT INSTRUCTIONS
 A I N S T R U C T I O N S RUDDER KIT INSTRUCTIONS TARPON 0/40/60/60i The Tarpon series is designed as a high performance sit-on-top kayak tailored for the sport paddler. Our rudder system is designed to
Table of Contents. Career Overview... 4
 Table of Contents Career Overview.................................................. 4 Basic Lesson Plans Hot-Air Balloons Activity 1 Your First Hot-Air Balloon.... 5 Activity 2 Surface Area and Volume...
CONSTRUCTION NOTES BY: MARK HUNT ISSUED:
 INSIGHT V4 CONSTRUCTION NOTES BY: MARK HUNT ISSUED: 3/22/06 Pg.1 INDEX Title Page 1 Index 2 Introduction 3 Material list 4 Foam Cutting Notes 5 Wing 5 Stab 8 Vertical Fin 8 Fuselage Foam Parts 9 Fuselage
STATEMENT OF LIABILITY
 STATEMENT OF LIABILITY LASERLINE IS MANUFACTURED BY WEST INDUSTRIES INC. LASERLINE IS PATENTED AND TRADEMARKED. This device is not a toy. Misuse may cause serious injury. The user and any person within
FUN-FLY MISSION; DART-LIKE STABILITY
 FUN-FLY MISSION; DART-LIKE STABILITY by BLAINE STETLER Kenny Martin, 11, pilots his Notforsale. (Photo by Jeff Tibbetts.) Below: left to right: Kenny Martin (kneeling), 11, of Summerfield, FL; Scott Roddenberry,
5. Tailplane assembly
 5. Tailplane assembly Overview This section covers the fitting of your completed tailplanes to the torque tube assembly. Included is the insertion of the TP13 bushes in the inboard rib and the fitting
Ascent 450 BL Park Glider PNP
 Ascent 450 BL Park Glider PNP Assembly Manual Specifications Wingspan: 54 in (1370mm) Wing Area: 330 sq in (21.4 sq dm) Length: 32 in (825mm) Weight w/ Battery: 18 19 oz (510 540 kg) Weight w/o Battery:
ICE PROTECTION - PROPELLER
 ICE PROTECTION - PROPELLER. DESCRIPTION This section describes the portion of the Ice Protection System pertaining to the propeller. This includes the slinger ring and the de-icing propeller boots. Grooved