PATIENT USER GUIDE CANÈ
|
|
|
- Augustus Wilkinson
- 6 years ago
- Views:
Transcription

1 PATIENT USER GUIDE
2
3 PATIENT USER GUIDE CANÈ S.p.A. Medical Technology Via Cuorgnè 42/a 098 Rivoli (TO) Italy Tel Fax mailbox@canespa.it

4 Manual code: MAN 01/06/USA/p CRONO Five 11/ Date of publication: /08 Firmware version: P2I Firmware date: 08/04/08
5 TABLE OF CONTENTS SECTION 1 Introduction page 9 Warnings page 9 Note page 12 Intended Use page 12 Information-Technical assistance page 12 SECTION 2 Description of the pump page 13 Infusion system page 14 Technical features page 14 Factory settings page 16 SECTION 3 Standard equipment supplied page 17 Optional accessories page 18 How to use the standard equipment supplied page SECTION 4 Pump overview page 21 Liquid crystal display page 22 Main screen indications page 23 Key-pad page 25 SECTION 5 Syringe page 26 Luer-lock cap page 26 Filtrajet page 27 Infusion set page 28 Preparation for infusion page 28 Syringe preparation page 29 Connecting the syringe to the pump page 30 Safety system to avoid free-flow page 31 5 MAN 01/06/USA/p CRONO FIVE 11.
6 SECTION 6 Device activation page 33 SECTION 7 Key-pad lock out page 34 Table of key-pad functions page 35 SECTION 8 Programming page 36 Programming of flow rate page 38 Programming of bolus dose page 39 Minimum interval time between bolus doses page 40 Programming of bolus doses per hour page 42 Programming of partial volume page 44 SECTION 9 Starting the pump page 46 Priming page 47 Pump in on (running) page 49 Bolus dose page 50 Bolus dose limitations page 51 Clinician bolus page 51 Occlusion of infusion set page 53 Post occlusion bolus page 53 End of infusion page 54 Reversal of the pump pusher page 55 Switching off the pump page 57 SECTION Displaying programmed parameters page 58 Displaying delivered volumes page 60 Clearing the number of bolus doses delivered page 62 Displaying the number of complete infusions page 63 SECTION 11 Low battery alert page 65 Battery installation or replacement page 66 MAN 01/06/USA/p CRONO FIVE 11. 6
7 SECTION 12 General cautions page 68 User guide update page 68 Maintenance page 69 Cleaning page 69 Storage page 69 Pump life page 69 Disposal of the pump page 69 User information page 70 SECTION 13 Manufacturer s guarantee page 71 SECTION 14 Alarm message page 73 Short instructions page 75 SECTION 15 Pump icon table page 79 Syringe blister package icon table page 80 SECTION 16 Statement of conformity page 81 SECTION 17 Glossary page 83 ANNEX Annex page 85 Annex page 87 Annex page 88 Annex page 89 7 MAN 01/06/USA/p CRONO FIVE 11.
8
9 SECTION 1 INTRODUCTION CAUTION: US Federal law restricts this device for sale by or on order of a physician. The instructions included in this manual are intended only for the ambula - tory drug infusion pump CRONO Five and are addressed to the pump user. The pump is provided with key-pad lock-out in order to avoid accidental or non authorised variations of the selected parameters. The information as to lock or unlock the key-pad are exclusively addressed to the physician. When the key-pad is locked any attempt to modify the protected parameters will cause the indication Lo,1 to appear on the screen. WARNINGS Do not use the Crono Five without first reading and understanding the complete pump user guide. Improper programming and/or incomplete understanding of the operating functions and of the warnings could result in death or serious injury to the patient. Keep the user guide together with the pump for references. Before using the pump for a specific infusion therapy check the suita - bility of the device for the use and for the patient considering carefully the following aspects: the technical specifications of the pump; the infusion set that will be used; the eventual use of infusion set with various lines and clamps along the infusion line; the kind of therapy for which the patient has to undergo; the psycho-physical and cognitive condition of the patient. The above list given is only an illustration, not exhaustive, concerning the procedural clinical aspect whose responsibility is on the part of the doctor or the medical assistant. 9 MAN 01/06/USA/p CRONO FIVE 11.
10 SECTION 1 The pump must be used: under strict medical control, using proper procedure and suitable measure to the patient that could suffer serious consequences (injury or death) following involuntary misuse and/or device failure with consequently interruption of the drug administration. Do not prime any kind of tubing when connected to a patient, as this could result in over-delivery of medication and air embolism. Eliminate all air bubbles in all lines before starting an infusion to avoid air embolism. Inspect the whole fluid path for kinks or closed clamps or any other obstruction before the infusion is started. Accuracy, time to an occlusion alarm signal and post-occlusion bolus size may deviate from the information in this user guide depending on which type of extension set, tubing and access devices are used for the administration of a medication (details are supplied on ANNEX 1, 2 and 3). The improper connection between the syringe piston and the pump pusher can cause a free flow of medication, in other words, medication administered by gravity and not controlled by the pump, (for example when the pump is positioned much higher than the infusion site). Such situation can cause serious injury or death of the patient. Please refer to Section 5 of this User Guide for detailed instructions of Safety System to Avoid Free-Flow. For patients that are likely to be adversely af fected by interrupted medica - tion or fluid delivery from Crono Five, close supervision for immediate cor - rective action should be provided. If you know or suspect that the pump has been damaged in any way, for example through water or impact, please contact your local Customer MAN 01/06/USA/p CRONO FIVE 11.
11 SECTION 1 Service representative to verify if the pump is operational. Do not use a pump that is damaged. Liquid on the outside of the pump should be wiped off immediately with a soft cloth. Please observe that any liquid penetrating the pump can cause serious damage to the pumps electronic circuits. Epidural drug infusions delivering drugs dif ferent from the ones specifically indicated for those kinds of administrations can cause serious lesions or death. CANÈ S.p.A. recommends an annual check up on all Crono Five pumps with the aim of evaluating the correct function and accuracy. Such check ups must be carried out only by CAN È S.p.A. or an authorized distributors. 11 MAN 01/06/USA/p CRONO FIVE 11.
12 SECTION 1 NOTE The manufacturer only takes the responsibility for the safety and reliability of this pump, provided that it is used in accordance with the current instructions for use and only in case any repairs and changes to the device are made exclusively by the manufacturer. INTENDED USE The ambulatory infusion pump of drug Crono Five has been designed to be used in the pain treatment for subcutaneous, intravenous and epidural infusions. The pump is not designed for life sustaining treatments. INFORMATION TECHNICAL ASSISTANCE For further information, technical assistance or if you have questions concerning the operation of the pump, please contact: UNITED STATES: INTRA PUMP INFUSION SYSTEMS 9 Minters Chapel Road, Suite 0 Grapevine, Texas Tel: Fax: info@intrapump.com MANUFACTURER: CANÈ S.p.A. MEDICAL TECHNOLOGY Via Cuorgnè, 42/a 098 Rivoli (T ORINO) Italy Tel: Fax: mailbox@canespa.it MAN 01/06/USA/p CRONO FIVE
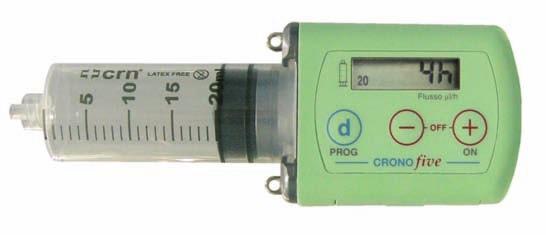
13 SECTION 2 DESCRIPTION OF THE PUMP CRONO Five is a new, innovative PCA pump that is very appreciated by health care professionals and patients due to its small size and technical features. CRONO Five is an ambulatory infusion pump especially suited for control - led drug administration on patients in hospital or undergoing a therapy at home. The pump is suitable for subcutaneous, intravenous and epidural infusions allowing 4 different administration modalities: 1. Continuous 2. Bolus dose upon request (PCA) 3. Clinician bolus (managed by clinician) 4. Combined (continuous + bolus upon request + clinician bolus) The chart below explains the different combined methods of administration. ml Clinician Bolus Bolus dose upon request Bolus dose upon request Clinician Bolus Continuous t The pump is provided with key-pad lock-out functions in order to avoid unauthorized reprogramming of the drug administration protocol. The liquid crystal display (LCD) shows the information which are helpful both for the clinician and the patient like programming, reading of administered drug volumes and control functions of the pump. 13 MAN 01/06/USA/p CRONO FIVE 11.
14 SECTION 2 INFUSION SYSTEM The pump administers shots of 5 microliters (µl or mcl) for any given flow rate. The time interval between shots decrease proportionally to increases in programmed flow rates. Pump size Weight Battery Syringe TECHNICAL FEATURES Administration volumes Priming Flow rate Bolus dose Clinician bolus Minimum time between bolus doses 77 x 47 x 29 mm. 115 g (battery included). CR 123A 3V Lithium battery (battery life: about 6 months). Dedicated and ml capacity with luer-lock connector. From 1 ml to ml with increments of 1 ml. Available only at the beginning of an infusion or partial infusion. The maximum deliverable volume is 1.5 ml with 0.5 ml increments. Programmable from 5 to 5000 mcl/h with the following increments: - from 5 to 00 mcl/h with 5 mcl/h increments; - from 00 to 5000 mcl/h with mcl/h increments; The flow rate can be programmed to 0 ml. Programmable from 0.01 to 2.00 ml with 0.01 ml increments: The bolus dose can be programmed to 0 ml. Programmable from 0.01 to 2.00 ml with 0.01 ml increments: This function is always locked. Programmable from 5 to 24 h as follows: - from 5' to 1h with increments of 5'; - from 1 h to 24 h with increments of 15'; - this function can be deactivated by programming 0. MAN 01/06/USA/p CRONO FIVE
15 SECTION 2 Number of boluses doses per hour Flow accuracy Max. occlusion pressure 2.2 bar +/ from 1 to 12 boluses. - this function can be deactivated by programming 0. +/-2% (observation period 40 minutes). Time to an occlusion alarm Please, see ANNEX 2. Post-occlusion bolus Electric circuit Data storage Display Motor Safety circuits Anti free-flow system About 0.4 ml (details are supplied on ANNEX 3). Electric circuit managed by a micro controller equipped with a dedicated software. The selected data are automatically stored in the pump memory and they are not lost when the battery is removed. LCD. Direct current coreless motor.the microcontroller manages the rotation through infrared encoder. To monitor the correct working of the device intervening in case of anomalies with acoustic warnings and error messages. To avoid a non controlled flow inside the delivery set due to the force of gravity. Operating conditions + C / +45 C 30% / 75% RH 700 hpa / 60 hpa Storage conditions - C / +60 C % / 0% RH 500 hpa / 60 hpa 15 MAN 01/06/USA/p CRONO FIVE 11.
16 SECTION 2 FACTORY SETTINGS The following factory settings are programmed at the delivery of the pump: Key-pad lock-out level Syringe Flow rate Bolus dose Interval between bolus doses L0 ml 00 mcl/h 0.2 ml 1 h Number of bolus doses in 1 hour 1 Clinician Bolus 0.00 ml Number of infusions 0 MAN 01/06/USA/p CRONO FIVE
. 7. Battery tool. 8. User guide. 2 1 3 8 6 5 4 7 17 MAN 01/06/USA/p CRONO FIVE 11.")
17 SECTION 3 STANDARD EQUIPMENT SUPPLIED 1. Ambulatory infusion pump. 2. Pump case. 3. Elastic belt. 4. Collar strap. 5. Fabric holder batteries (one already inserted in the pump). 7. Battery tool. 8. User guide MAN 01/06/USA/p CRONO FIVE 11.


18 SECTION 3 OPTIONAL ACCESSORIES Heightwise leatherette case similar to a cellular phone holder. Detail belt clip Detail opening Color: black Size: 14 x 5,5 x 4 cm Weight: about 36 g Article code: CM/15 MAN 01/06/USA/p CRONO FIVE


19 SECTION 3 Lengthwise leatherette case similar to a glasses case. Detail of belt loop Color: black Size: 13 x 5,5 x 4 cm Weight:: About 50 g. Article code: CM/14 19 MAN 01/06/USA/p CRONO FIVE 11.
20 SECTION 3 HOW TO USE THE STANDARD EQUIPMENT SUPPLIED The following illustrations show how the pump and its accessories can be set up. How to attach collar strap to the pump and the fabric holder. ml How to use elastic belt with pump and fabric holder. MAN 01/06/USA/p CRONO FIVE 11.


21 SECTION 4 PUMP OVERVIEW Syringe fin hook Display Collar strap locking rings - + Button d Button Button Pusher Battery compartment Serial number Short instructions CE mark 21 MAN 01/06/USA/p CRONO FIVE 11.
22 SECTION 4 LIQUID CRYSTAL DISPLAY (LCD) This is a screen on the front of the pump where symbols and messages are displayed informing the user about operations in pro - gress as well as giving warnings and alarm messages. Symbol " ml" : indicates the device has been set to use ml (CRN ) syringe setting. Symbol " ml" : indicates the device has been set to use ml (CRN ) syringe setting. Low battery symbol: appears when the battery charge is low (see page 65). Drip symbol: separates whole numbers from decimals. apostrophe symbol: used when the duration of infusion is given in minutes. MAN 01/06/USA/p CRONO FIVE
23 SECTION 4 MAIN SCREEN INDICATIONS Pump OFF Prime function Prime execution Flow rate Time left to end of infusion (hours) Time left to end of infusion (mins.) Bolus dose Minimum time interval between boluses No time interval between boluses Number of bolus doses in 1 hour No restriction of bolus doses per hour Partial volume Operation not performed Pump unlocked Pump locked Number of delivered infusions Error message (see page 73) 23 MAN 01/06/USA/p CRONO FIVE 11.
24 SECTION 4 Occlusion Feed/reversal motion of the pump pusher End of infusion Low battery Battery discharged Volume delivered (ml) as basal flow rate Volume delivered (ml) as bolus doses Number of bolus doses already delivered Volume delivered (ml) as clinician bolus Total volume delivered (ml) (basal flow rate + bolus doses + clinician bolus) ml syringe selected ml syringe selected The above screens are given as example of what can be displayed. MAN 01/06/USA/p CRONO FIVE


25 SECTION 4 KEY-PAD The key-pad has 3 buttons for pro - gramming and for the operation of the pump. The buttons are time-controlled: keep buttons pressed for a few seconds to activate commands. CAUTION Press the buttons with your fingertips only, do not use sharp or poin - ted objects. Buttons activation is confirmed by a ticking sound, except when inserting the battery. Command execution is confirmed by a brief acoustic signal. During the selection of the parame - ters the button is used to decrease the value displayed on the screen, the button to increase the value. NO YES 25 MAN 01/06/USA/p CRONO FIVE 11.

26 SECTION 5 SYRINGES The ambulatory infusion pump CRONO Five uses dedicated - ml syringes. The - ml syringes are: Sterile. Single use only. Pyrogen-free. To be used only if packaging is not damaged. Piston Rod Needle s cap Piston Syringe structure Luer-Lock cap Needle LUER LOCK CAP The luer lock cap should be used to protect a filled syringe from contamination if the syringe isn't used immediately after filling. Luer-Lock cap MAN 01/06/USA/p CRONO FIVE
27 SECTION 5 FILTRAJET Filter can be used to: Prevent bacterial infections. Eliminate air in the syringe and in the infusion set. Trap any fragments of glass or plastic to secure a safe and proper drug administration. Luer Lock cap - female insert Luer Lock Male blue fitting Tubing 1 x 2.3 PVC - NO DOP Filter 0.2 micron Luer Lock Female transparent fitting Luer Lock cap - Male insert 27 MAN 01/06/USA/p CRONO FIVE 11.
28 d 0.2 ml h min OFF SECTION 5 INFUSION SET For information about infusion sets, please see the instruction supplied with the products. Epidural drug infusions must be delivered using infusion sets specifically suitable for such purpose. PREPARATION FOR INFUSION Before the pump and other disposa - bles are prepared to be used, make sure that you take the following pre - cautions to avoid any contamination: 1. Wash your hands; 2. Prepare a clean working area. MICROJET CRONO MAN 01/06/USA/p CRONO FIVE
29 SECTION 5 SYRINGE PREPARATION 1. Attach the supplied needle to the syringe with a clockwise rotation; 2. Draw up the liquid slowly to avoid disconnection between the rubber piston and the piston rod and make sure the volume corresponds exactly to the prescription; 3. Attach luer-lock cap then unscrew the piston rod of the syringe counter-clock wise with a fairly swift movement; MAN 01/06/USA/p CRONO FIVE 11.


30 SECTION 5 CONNECTING THE SYRINGE TO THE PUMP Connect the dedicated syringe, CRN -, to the pump with a 90 rotation: a click is confirming that the syringe is correctly attached to the pump. Top view WARNING It is important to draw up the intended quantity as accurate as possible, independently if it is a full syringe of ml or ml or a partial volume 1-9 ml or 1-19 ml. 1. By excess volumes, it will be very dif ficult to attach the syringe to the pump without aspirating the excess volume. 2. By incomplete volumes, the infusion will not start before the pusher reaches the piston and the free flow function will not be activated. MAN 01/06/USA/p CRONO FIVE

31 SECTION 5 SAFETY SYSTEM TO AVOID FREE-FLOW "Free flow" means an uncontrolled release of the infusion solution from the syringe caused by gra - vity. In order to prevent this from happening, the tip of the pump pusher has been knurled, which part must be inserted inside the rubber piston of the Crono - ml syringe, allowing a secure connection to be made with the syrin - ge piston. WARNING This safety system will only work if the connection between the syringe rub - ber piston and the pump pusher is made correctly, as shown in the dra - wing below. CAUTIONS Before the drug administration is started the rubber piston has to be connected to the pump pusher,if this is not the case the following unwanted effects may occur: The infusion starts late and is not performed with accuracy. The anti free flow function is not operational. WARNING The improper connection between the syringe piston and the pump pusher can cause a free flow of medication, in other words, medi - cation administered by gravity and not controlled by the pump, (for example when the pump is posi - tioned much higher than the infu - sion site). Such situation can cause serious injury or death of the patient. 31 NO YES MAN 01/06/USA/p CRONO FIVE 11.
32 SECTION 5 4. Attach the syringe to the pump with a 90 rotation and continue the movement until the syringe clicks into its correct position. 5. Attach the butterfly needle cone onto the syringe 4 5 MAN 01/06/USA/p CRONO FIVE
33 SECTION 6 DEVICE ACTIVATION When you insert the battery the pump starts a sequence of activation during which: 1.The pump will carry out a self-test with brief acoustic signals and all symbols will appear on the screen. 2. Select the syringe size options. 3.The pump s mechanical pusher will place itself in the correct starting position and at the end of this self-adjusting, OFF will appear on the screen. NOTE The pump is supplied with a battery already inserted. Refer to the relevant paragraph for instructions how to insert a new battery (see page 66). Take out the battery of the pump if it is not going to be used for a long period of time (1-2 months). SELECTING THE SYRINGE SIZE While syringe size symbol is flashing (the number or ), the selection of syringe size may be made. Use the or buttons to make your selection. The information regarding the syringe size will always be shown on the display. WARNING Selecting the syringe size option can only be carried out during the device acti - vation phase, immediatly after the insertion of the battery. 33 MAN 01/06/USA/p CRONO FIVE 11.
34 SECTION 7 KEY PAD LOCK OUT The pump is provided with a key-pad lock-out in order to avoid non authorised or accidental variations of the selected parameters. The CRONO Five pump has 2 lock levels: L0: permits complete access to all settings and operating functions. L1: permits restricted control of operating functions. Before proceeding to the pump settings make sure that the lock level selected is L 0. CAUTIONS The key pad lock-out is retained even when the battery is removed. When the key-pad is locked any attempt to access protected operations is signalled by the device through an acoustic message and L 1will appear on the screen. The information relating to the operations of key-pad lock/unlock are exclusively to be used by the physician. MAN 01/06/USA/p CRONO FIVE
35 SECTION 7 TABLE OF KEY-PAD FUNCTIONS The following table lists the accessible functions at any key-pad lock-out level (L 0or L 1) both when the pump is in OFF and ON condition. FUNCTIONS AND SELECTIONS Switching ON the pump Switching OFF the pump Prime Bolus dose Displaying delivery time Displaying volume delivered as flow rate Displaying volume delivered as bolus dose Displaying number of bolus dose delivered Clearing the number of bolus doses delivered Displaying volume delivered as clinician bolus Displaying total volume delivered Displaying programmed parameters Flow rate setting Bolus dose setting Interval between bolus doses setting Number of bolus dose in one hour setting Partial volume setting Displaying the number of complete infusions Clearing the number of complete infusions Lock/Unlock the keyboard Clinician bolus OFF ON L0 L1 L0 L1 YESYES NO NO NO NO YES YES NO NO YES*YES* NO NO YES YES NO NO YES YES NO NO YES YES NO NO YES YES NO NO YES YES YES NO NO NO NO NO YES YES NO NO YES YES NO NO YES YES YES NO NO NO YES NO NO NO YES NO NO NO YES NO NO NO YES NO NO NO YESYES NO NO YES NO NO NO YESYES NO NO YESYES NO NO * Available only at the beginning of a new infusion or a new partial infusion. 35 MAN 01/06/USA/p CRONO FIVE 11.
36 SECTION 8 PROGRAMMING For programming, the pump must be: In OFF condition. With key-pad lock-out in L0. Depress the button for about 1 second to access the pump program - ming sequence. The first programming option displayed on the screen is flow rate. The flow rate can be changed with the button or the button as long as the presently programmed flow rate is flashing. The second depressing of the button will display the second programming option bolus dose volume. The bolus dose volume can be changed with the button or the button as long as the presently program - med bolus dose volume is flashing. The third depressing of the button will display the third programming option minimum time interval between bolus doses. The minimum time interval between bolus doses can be changed with the button or the button as long as the presently programmed interval time is flashing. The fourth depressing of the button will display the fourth program - ming option number of bolus doses per hour. The number of bolus doses per hour can be changed with the button or the button as long as the presently programmed number of bolus doses per hour is flashing. The fifth depressing of the button will display the fifth programming option partial volume. The partial volume can be changed with the button or the button as long as the presently programmed partial volume is flashing. The partial volume can only be programmed when the pusher is in the start position. NOTE If the key pad lock-out is programmed to L1, depressing the display L1 (key pad lock-out: programming is not allowed). button will MAN 01/06/USA/p CRONO FIVE
37 SECTION 8 OFF Flow rate Bolus dose volume Minimum time interval between bolus doses Number of bolus doses per hour Partial volume d d d d d The following screen displays are examples of programmed values as they appear on the screen. 37 MAN 01/06/USA/p CRONO FIVE 11.
38 SECTION 8 PROGRAMMING OF FLOW RATE The flow rate can be programmed from 5 mcl/h to 5000 mcl/h as follows: From 5 mcl/h to 00 mcl/h with increments of 5 mcl/h. From 00 mcl/h to 5000 mcl/h with increments of mcl/h. Programming procedure: 1. When the button is depressed for about 1 second with the pump in OFF condition, the presently programmed flow rate will be displayed and flashing 2. By depressing the button the value will increase; by depressing the button the value will decrease. Any change in value is followed by an acoustic signal. 3. If no button is depressed within 8 seconds in the programming phase, the value stops flashing and OFF appears on the screen. 4. Depressing the button before the OFF message appears (the flow rate value is still flashing) moves the programming sequence to the next option: bolus dose. NOTE You can accelerate (scrolling) the display of new values by depressing the or the button continuously (in increments of or 40 mcl/h depending on the range). Programmed flow rates are automatically stored. By programming 0 the flow rate is eliminated. MAN 01/06/USA/p CRONO FIVE
39 SECTION 8 PROGRAMMING OF BOLUS DOSE The bolus dose can be programmed from 0.01 ml to 2.00 ml with increments of 0.01 ml. The bolus dose is accessed by the second depressing of the button in the pump programming sequence (see page 37). Programming procedure: 1. When the button is depressed for a second time, a "d" is displayed and the presently programmed bolus dose is flashing. 2. By depressing the button the value will increase; by depressing the button the value will decrease. Any change in value is followed by an acoustic signal. 3. If no button is depressed within 8 seconds in the programming phase, the value stops flashing and OFF appears on the screen. 4. Depressing the button before the OFF message appears (the bolus dose is still flashing) moves the programming sequence to the next option: minimum time interval between bolus doses. NOTE You can accelerate (scrolling) the display of new values by depressing the or the button continuously (in increments of 0,04 ml). Programmed bolus doses are automatically stored. By programming d 0,00, the bolus dose is eliminated. 39 MAN 01/06/USA/p CRONO FIVE 11.
40 SECTION 8 MINIMUM TIME INTERVAL BETWEEN BOLUS DOSES The minimum time interval between bolus doses can be programmed from 5 minutes to 24 hours as follows: From 5 minutes to 1 hour with increments of 5 minutes. From 1 hour to 24 hours with increments of 15 minutes. This function limits the patient to access the programmed bolus dose before a certain time has elapsed from the latest administered bolus dose. The minimum time interval between bolus doses is accessed by the third depressing of the button in the pump programming sequence (see page 37). Programming procedure: 1. When the button is depressed for a third time, a "t" is displayed and the presently programmed interval time is flashing. 2. By depressing the button the value will increase; by depressing the button the value will decrease. Any change in value is followed by an acoustic signal. 3. If no button is depressed within 8 seconds in the programming phase, the value stops flashing and OFF appears on the screen. 4. Depressing the button before the OFF message appears (the interval time is still flashing) moves the programming sequence to the next option: bolus doses per hour. MAN 01/06/USA/p CRONO FIVE
41 SECTION 8 NOTE "t" appears only before the programmed interval time when the interval time is less than hours. You can accelerate (scrolling) the display of new values by depressing the or the button continuously (in increments of or 30 minutes depending on the range). Programmed interval time is automatically stored. By programming " no,lt", the minimum time between bolus doses is eliminated. 41 MAN 01/06/USA/p CRONO FIVE 11.
42 SECTION 8 PROGRAMMING OF BOLUS DOSES PER HOUR The number of bolus doses per hour can be programmed between 1 and 12 boluses per hour. This function limits the patient to access more boluses per hour than programmed. The number of bolus doses per hour is accessed by the fourth depressing of the button in the pump programming sequence (see page 37). Programming procedure: 1. When the button is depressed for a fourth time, an "n" is displayed and the presently programmed number of bolus doses per hour is flashing. 2. By depressing the button the value will increase; by depressing the button the value will decrease. Any change in value is followed by an acoustic signal. 3. If no button is depressed within 8 seconds in the programming phase, the number of bolus doses per hour stops flashing and OFF appears on the screen. 4. Depressing the button before the OFF message appears (the number of bolus doses per hour is still flashing) moves the programming sequence to the next option: partial volume. NOTE Programmed bolus doses per hour is automatically stored. By depressing the button when the dis- MAN 01/06/USA/p CRONO FIVE
43 SECTION 8 play is showing "n 1", will eliminate the bolus dose per hour function and the display will show "n 0", which means that no boluses can be administered. By depressing the button when the display is showing n 12, will eliminate the bolus number per hour restriction and the display will show no,ln, which means that there is no longer any restriction how many boluses that can be administered by the patient. 43 MAN 01/06/USA/p CRONO FIVE 11.
44 SECTION 8 PROGRAMMING OF PARTIAL VOLUME Partial volume is used when less than ml is drawn up in the syringe for a specific treatment or for a specific patient, for example children who needs less than the adult dose. Partial volume can be programmed between 1 ml and ml with increments of 1 ml. Partial volume is accessed by the fifth depressing of the button in the pump program - ming sequence (see page 37). Please observe that partial volume is only available at the beginning of a new or new partial infusion. Programming procedure: 1. When the button is depressed for a fifth time, the presently programmed volume in ml is flashing: 2. By depressing the button the value will increase; by depressing the button the value will decrease. Any change in value is followed by an acoustic signal. 3. If no button is depressed within 8 seconds in the programming phase, the selected volume in ml stops flashing and P,cc appears on the screen. 4. The pusher will automatically position itself for the programmed partial volume. During the movement of the pusher, there will be an acoustic signal and the delivery time corresponding to the selected partial volume will be displayed on the screen. 5. When the pusher reaches its programmed position, the display will show OFF. MAN 01/06/USA/p CRONO FIVE
45 SECTION 8 NOTE Partial volume is automatically stored for the next delivery, unless reprogrammed. At the end of a partial infusion the pusher moves automatically back to the programmed partial volume position. By depressing the button and button simultaneously, the movement of the pusher is interrupted and OFF is displayed on the screen. This position of the pusher is not stored but the programmed partial volume remains active. WARNINGS Do not perform this operation with an infusion set attached to the syringe. It is not possible to reprogram the partial volume during an ongoing infusion. The partial volume is automatically stored until you remove or replace the battery at which time the programmed volume will revert to the standard volume of or ml. 45 MAN 01/06/USA/p CRONO FIVE 11.
46 SECTION 9 STARTING THE PUMP Depress the button when the pump is in OFF and there will be a short acoustic signal and the display will show either: Pr (priming function) provided that the pusher is in the start position for a new, full or partial volume, infusion or remaining infusion time in hours and (minutes) when the pump is restarted during an ongoing infusion NOTE The remaining time to the end of the infusion is displayed in days until less than one day remains, in hours until less than one hour remains, then in minutes. MAN 01/06/USA/p CRONO FIVE 11. WARNINGS Before starting an infu - sion: in order to avoid the free flow make sure that the connection between the syringe rubber piston and the pump pusher is made correctly; inspect the flow line in order to check that there aren t any kinks, closed clamps and other occlu sions before proceeding; eliminate eventual air bubbles. 46
47 SECTION 9 PRIMING The priming function is used for filling the infusion set with drug from the syringe. A total of 1.5 ml, in steps of 0.5 ml, can be primed using the priming function. Priming can only take place when the pusher is in the starting position for a new, full or partial volume infusion. If another priming is necessary during an ongoing infusion, the cli - nician bolus can be used. The prime function is available at all the two lock levels. WARNINGS Do not prime the infusion set when attached to the patient. The infusion set should be attached to the syringe before priming starts The infusion set must be completely filled before it is attached to the patient. Check that all air is eliminated from the infusion set before administration starts. Priming procedure: 1. Depress the button when the pump is in OFF. 2. The display shows Pr. There are three different alternatives to choose from: a. To postpone priming b. To skip priming c. To start priming a. To postpone priming Depress the button and the button simultaneously; the pump will switch to OFF; or wait seconds and the pump will automatically switch to OFF. 47 MAN 01/06/USA/p CRONO FIVE 11.
48 SECTION 9 b. To skip priming Depress the button; the pump will start the infusion and the display will show the remai - ning infusion time. c. To start priming Depress the button: the pump will deliver 0,5 ml and the display will show a P followed by the volume in ml that has been primed. After the first priming of 0.5 ml, the display will show Pr again and the procedure can be repeated two more times up to 1,5 ml has been primed. There is no time limit to finish the priming procedure. NOTE If no button is depressed for seconds in Pr, the pump will switch to OFF. The priming volume is not included in the administration volume. The priming can be interrupted at any time by depressing the button and the button simultaneously. The display will show Pr and alternative a, b or c can be selected again. MAN 01/06/USA/p CRONO FIVE
49 SECTION 9 PUMP IN ON (RUNNING) The remaining infusion time is displayed in days hours and minutes when the pump is in ON (running). The letter d flashes when the remaining infu - sion time is displayed in days. The letter h flashes when the remaining infu - sion time is displayed in hours. The apostrophe symbol flashes when the remaining infusion time is displayed in minu - tes. When the flow rate is programmed to 0, only patient and clinician boluses will be delivered and the display will show F0,00 with the letter F flashing. 49 MAN 01/06/USA/p CRONO FIVE 11.
50 SECTION 9 BOLUS DOSE The bolus dose is used by the patient to administer an additional dose of medication as needed. If the bolus dose is programmed to 0 ml, no bolus dose can be administered. Delivering a bolus dose Bolus doses can only be delivered when the pump is in ON (running). 1. Depress the button and the pump will emit an acoustic signal, which indica - tes that the pump starts to deliver the programmed bolus dose. The display will show a flashing d followed by the current volume in ml being delivered. For every ml being delivered, the pump emits an acoustic signal, makes a pause of 2 seconds and continues to deliver the next ml of the programmed bolus dose. 2. When the delivery of the bolus dose is completed, the pump will emit an acoustic signal and the remaining infusion time will be displayed. If the flow rate is program - med to 0.00 ml, F0,00 will be displayed instead of remaining infusion time. NOTE By depressing the, and the buttons simultaneously, the bolus dose delivery can be interrupted at any time. If the bolus dose is programmed to d0,00 and the button is depressed in ON, the error message Er,d, will be displayed. MAN 01/06/USA/p CRONO FIVE
51 SECTION 9 BOLUS DOSE LIMITATIONS Time interval between bolus doses (t limitation) Number of bolus doses per hours (n limitation) Bolus doses cannot be delivered before the time (t) has expired or when the number of programmed boluses per hour (n) has already been administered. The pump will always choose the program - med (t) or (n) that administer the lowest amount of bolus doses in ml. If a bolus dose is requested during limitation time (t) or after the maximum number of bolus doses (n) has been reached, the display will show error message Er,t and Er,n respectively. 51 MAN 01/06/USA/p CRONO FIVE 11.
52 SECTION 9 CLINICIAN BOLUS The access to the clinical bolus function is reserved to physicians or para - medic staff. MAN 01/06/USA/p CRONO FIVE
53 SECTION 9 OCCLUSION OF INFUSION SET The pump has been designed to recognise when the drug delivery is interrupted by external circumstances such as involuntary kink of the infusion set tubing. In this case the pump stops running the infusion, the display will show the symbol for occlusion and the pump will emit an acoustic signal every seconds. Drug administration is interrupted as long as the occlusion remains. Find and remove the reason for the occlusion and press thereafter the button to silence the acoustic signal and to resume the infusion. NOTE Search for the occlusion along the infusion set and in the connection point of the set to the patient. It is recommended to use kink-free infusion sets to prevent or reduce occlusions to occur. POST OCCLUSION BOLUS When the occlusion alarm signal is triggered, the pump has built up a certain overpressure in the administration line(s), which has to be eliminated to avoid an accidental post occlu - sion bolus that could result in serious injury or death of the patient. The size of a post-occlusion bolus for Crono Five in combination with an infusion set with 27G needle, 80 cm lenght with very stif f lining is about 0.4 ml. 53 WARNINGS The size of a post-occlusion bolus can increase if there is air in the line, when other catheter sizes, filters and extension set tubing with softer materials are used, or when the lines from the pump are connected to other access devices. After an occlusion signal use appropriate precaution with the aim to avoid the admini - stration of a post-occlusion bolus to the patient. MAN 01/06/USA/p CRONO FIVE 11.
54 SECTION 9 END OF INFUSION Ten and five minutes before the end of infu - sion, the pump will emit an intermittent acou - stic signal lasting two seconds per signal. At the end of infusion, the pump will emit a acoustic signal and END will be displayed. By depressing the and the buttons simultaneously, the acoustic message will be silenced and the pusher will move back to the starting position. NOTE The reversal for a cc volume lasts about minutes; the duration is proportionally shorter for lower volumes. CAUTIONS Disconnect the infusion set from the patient or put a clamp on the infusion set before starting the reversal of the pusher to avoid that medication is aspirated from the infu - sion set. MAN 01/06/USA/p CRONO FIVE
55 SECTION 9 REVERSALS OF THE PUMP PUSHER Reversal of pusher before the end of infusion. It is possible to interrupt an infusion in pro - gress and reverse the pusher to its starting position: Depress the and the buttons simultaneously to switch off the pump. Depress the and the buttons simul - taneously, End will be displayed for about seconds and the pump will start to reverse the pusher. The reversal request of the pusher can be cleared/canceled by depressing the and button simultaneously during the seconds the screen is displaying End. Reversal of pusher at the end of infusion. The pump will emit an acoustic signal at the end of infusion and End will be displayed. Depress the and the buttons simultaneously and the pusher will revert to the infu - sion starting position. Pump pusher movement When the pump pusher reverses with a conti - nuous movement, a symbol depicting move - ment will be displayed. NOTE The reversal of the pusher before the end of infusion can be interrupted by depressing 55 MAN 01/06/USA/p CRONO FIVE 11.
56 SECTION 9 the and the buttons simultaneously; OFF will be displayed; End and OFF will alternate on the screen. By depressing the button, the pump will resume the reversal of the pusher. If pump reversal is requested when the pusher already is in the starting position for an infusion, the pump will emit an acoustic signal and Err will be displayed. The reversal of the pusher at the end of infusion can be interrupted by depressing the and the buttons simultaneously; End and OFF will alternate on the screen. By depressing the button, the pump will resume the reversal of the pusher. CAUTIONS Disconnect the infusion set from the patient or put a clamp on the infusion set before starting the reversal of the pusher to avoid that medication is aspirated from the infusion set. Do not remove the syringe before the pusher has reached the starting position for a new infusion. MAN 01/06/USA/p CRONO FIVE
57 SECTION 9 SWITCHING OFF THE PUMP Depress the and buttons simultaneously. The display will show OFF. If the pump is switched OFF while an infusion is ongoing the device will emit a sequence of 5 short sounds every 5 seconds and OFF will flash on the display. To silence the acoustic alarm press down the button for 5 seconds. Such a condition will be repeated any time the device is switched of f w hile an infusion is in progress. 57 MAN 01/06/USA/p CRONO FIVE 11.
58 SECTION DISPLAYING PROGRAMMED PARAMETERS To display programmed parameters/values the pump must be running ( ON). The screen will show either remaining delivery time or F0,00 if the flow rate is programmed to 0. Display procedure: 1.Depress the button for about 1 second and the programmed flow rate will be displayed 2. If no button is depressed for 5 seconds, the pump will revert to remaining delivery time or F0, If the button is depressed again within the 5 seconds time interval, the next value of the programming phase will be displayed and so on. The sequence is as follows: bolus dose, minimum interval between bolus doses, number of bolus doses per hour, partial volume, clinician bolus. NOTE The lock level of the key pad does not interfere with displying programmed parameters. The chart beside explains the sequence of screens related to the display of the parame - ters. MAN 01/06/USA/p CRONO FIVE
59 SECTION Remaining delivery time Flow rate Bolus dose Minimum time interval between bolus doses Number of bolus doses per hour Partial volume Clinician bolus The screens above are examples of what can be displayed. 59 MAN 01/06/USA/p CRONO FIVE 11.
60 SECTION DISPLAYING DELIVERED VOLUMES This display procedure will show the delivered volume in ml since the start of the infusion for the different delivery options. The pump has to be running (ON) and the screen will either show the remaining delivery time or F0,00. Display procedure: 1. Depress the button for about 1 second and the programmed flow rate will be displayed. 2. If no button is depressed for 5 seconds, the pump will revert to remaining delivery time or F0, If the button is depressed again within the 5 second time interval, the next value will be displayed as follows: Volume delivered as bolus doses, Number of bolus doses delivered, Volume delivered as clinician boluses, Total volume delivered. NOTE The lock level of the key-pad lock out does not interfere with programmed values. The values of the volumes delivered are constantly updated during the infusion. All values related to delivered volume and number of bolus doses are automatically reset to zero at the beginning of a new or partial new infusion. The chart beside shows the sequence of the screens related to the volumes delivered by the pump during an infusion. MAN 01/06/USA/p CRONO FIVE
61 SECTION Remaining delivery time Volume delivered as flow rate during the infusion in progress. Volume delivered as bolus doses during the infusion in progress. Number of bolus doses already delive - red. Volume delivered as clinician boluses during the infusion in progress. Total volume delivered (flow rate + bolus doses + clinician bolus doses). The screens above show examples of what can be displayed. 61 MAN 01/06/USA/p CRONO FIVE 11.
62 SECTION CLEARING THE NUMBER OF BOLUS DOSES DELIVERED The number of bolus doses delivered can be set to zero at any time, provided that the lock level is L0. Clearing procedure: 1. Depress the and the buttons simultaneously for about 4 seconds with the pump in OFF and the number of bolus doses delivered will start flashing on the screen. 2. Depress the button within 5 seconds, the pump will emit an acoustic signal and the number of the bolus doses delivered will be set to zero and OFF will be displayed. WARNING If the key pad lock-out is programmed to L1, clea - ring the number of bolus doses delivered is not possible. The display will show L1, indicating that clearing is not allowed. MAN 01/06/USA/p CRONO FIVE
63 SECTION DISPLAYING THE NUMBER OF COMPLETE INFUSIONS The pump has to be in OFF to be able to dis - play the number of complete infusions performed by the pump. Depress the button for about 5 seconds and the number of complete infusions will be displayed. Clearing the number of complete infusions performed by the pump. Clearing procedure: 1. The pump has to be in OFF and lock level L0. 2. Depress the button for about 5 seconds and the number of complete infusions will be displayed. 3. Without releasing the button, depress the button as well and the number of complete infusions will start flashing on the screen. 4. Depress the button for about 1 second and thereafter the button for about 1 second (in sequence) and the button within 7 seconds. The pump will emit a tic - king sound followed by a longer signal. Then the number of complete infusions is cleared. 63 MAN 01/06/USA/p CRONO FIVE 11.
64 SECTION 5. If the clearing sequence is correctly performed, the message 0000 will appear on the screen for about 3 seconds followed by the sound of the buzzer. If not, or if no buttons are depressed for more than 7 seconds, the message UNDO will appear on the screen (operation not performed correctly). 6. OFF will be displayed at the end of zero setting. WARNING If the key-pad lock level is in L1 when the clearing sequence is started to be performed, the pump will emit an acoustic signal and L1 will be displayed. MAN 01/06/USA/p CRONO FIVE
65 SECTION 11 LOW BATTERY ALERT The LOW BA TTERY symbol will be conti - nuously displayed when the battery level is low. The battery should be changed as soon as the ongoing infusion is completed. If the battery is completely discharged, BA T- TERY DISCHARGED, the symbol batt will be displayed and the pump will emit a short acoustic signal. The pump will stop and the infusion cannot be completed without changing bat - tery. CAUTIONS Avoid that the pump stops during an ongoing infusion by changing the battery as soon as the LOW BATTERY symbol appears and the ongoing infusion is completed. Do not replace the battery: - during an ongoing infusion. - when the infusion set is connected to the patient. 65 MAN 01/06/USA/p CRONO FIVE 11.
66 CRONO PID CRONO PID CRONO PID CRONO PID CRONO PID CRONO PID CRONO PID CRONO PID CRONO PID CRONO PID CRONO PID CRONO PID SECTION 11 BATTERY INSTALLATION OR REPLACEMENT Use only lithium 3 Volt 123 A batteries. Make sure the pump is in OFF condition (OFF will be displayed), then replace the battery. Battery exchange procedure: 1. Open the battery compartment using the blue key-ring device that is included with the pump. CRONO PID CRONO PID 2. Pull out the cover. CRONO PID CRONO PID CRONO PID CRONO PID 3. Use the small ribbon strap (which lies under the battery) to facilitate the removal of the battery. CRONO PID CRONO PID CRONO PID CRONO PID CRONO PID CRONO PID 4. Remove the discharged battery and discard it properly. 5. Wait for seconds, then insert the new battery checking that it is placed in the correct position as to polarity indicator and that the ribbon strap is under the battery. 6. Close the cover after the battery has been installed. MAN 01/06/USA/p CRONO FIVE

67 SECTION 11 If it is dif ficult to remove the battery using the ribbon strap, do not use any other object to remove the battery but try the following procedure: Hold the pump and the battery compartment firmly in your right hand. Tap your right hand on the palm of your left hand until the battery falls out. NOTE When a battery is installed, the pump performs a self-test during which all symbols will be displayed and the pump will emit acoustic signals. Under average operating conditions, each battery should last about six months. The pump retains all programmed values. The data are not lost when the battery is replaced or removed or if the pump isn't used for prolonged periods. Programmed partial volume is the only value that is not saved if the battery is removed. WARNINGS Do not use rechargeable batteries. The use of batteries of a different type could result in device malfunctions. Battery life will vary depending on the battery age, temperature and storage conditions. Make sure that a new battery is kept available for emergency replacement. Do not store the pump for prolonged periods (1-2 months) with the battery installed. Make sure that the battery door is properly closed. Dispose of used batteries in an environmentally safe manner and accordingly to any regulations which may apply. The door is fitted with a silicone seal that must remain in its lodging as shown in figure. Silicon seal 67 MAN 01/06/USA/p CRONO FIVE 11.
PATIENT USER GUIDE CANÈ
 PATIENT USER GUIDE PATIENT USER GUIDE CANÈ S.p.A. Medical Technology Via Cuorgnè 42/a 098 Rivoli (TO) Italy Tel.+39 011 9574872 - Fax +39 011 9598880 www.canespa.it - mailbox@canespa.it Manual code: MAN
Crono PAR. Ambulatory infusion pump NEW MODEL USER GUIDE
 Crono PAR Ambulatory infusion pump NEW MODEL USER GUIDE Canè S.p.A. Medical Technology Via Cuorgnè 42/a 10098 Rivoli (TO) Italy Tel.+39 011 9574872 - Fax +39 011 9598880 www.canespa.it - mailbox@canespa.it
Ambulatory infusion pump USER GUIDE
 0476 USER GUIDE Ambulatory infusion pump US Federal law restricts this device for sale by or on order of a physician. Canè S.p.A. Medical Technology Via Cuorgnè 42/a 098 Rivoli (TO) Italy Tel.+39 011 9574872
CRONO S-PID 30 Ambulatory infusion pump
 CRONO S-PID 30 Ambulatory infusion pump USER GUIDE Canè S.p.A. Medical Technology Via Cuorgnè 42/a 10098 Rivoli (TO) Italy Tel.+39 011 9574872 - Fax +39 011 9598880 www.canespa.it - mailbox@canespa.it
CADD-Micro. Model 5900 Operator s Manual. Note: Colors are Black and Cyan (as second color) Deltec. Ambulatory Infusion Pump
 Deltec. Ambulatory Infusion Pump") Note: Colors are Black and Cyan (as second color) CADD-Micro Ambulatory Infusion Pump Overview Programming Examples Model 5900 Operator s Manual Deltec SIMS Deltec, Inc., St. Paul, MN 55112 U.S.A. 87 Overview
Note: Colors are Black and Cyan (as second color) CADD-Micro Ambulatory Infusion Pump Overview Programming Examples Model 5900 Operator s Manual Deltec SIMS Deltec, Inc., St. Paul, MN 55112 U.S.A. 87 Overview
Nimbus II PainPRO Ambulatory Infusion Pump
 Nimbus II PainPRO Ambulatory Infusion Pump Patient Manual PCA Mode Infusions Read this entire manual prior to operating the Nimbus II PainPRO Ambulatory Infusion Table of Contents Section 1: General Description...
Introduction. Medley TM Medication Safety System. Alaris Medical Systems
 Medley TM Medication Safety System Alaris Medical Systems Introduction The ALARIS Medley Medication Safety System is designed to help you provide the best possible patient care, by avoiding potential adverse
Making Life Easier Easypump II
 Making Life Easier Easypump II The elastomeric pump system for short- and long-term infusion therapy Elastomeric Infusion Systems Technical Guide Easypump II Disposable Elastomeric Infusion Pump System
Nimbus II PainPRO Ambulatory Infusion Pump
 Nimbus II PainPRO Ambulatory Infusion Pump Patient Manual PCA Mode Infusions Read this entire manual prior to operating the Nimbus II PainPRO Ambulatory Infusion Table of Contents Section 1: General Description...
BODYGUARD 2CH TWIN CHANNEL INFUSION PUMP
 BODYGUARD 2CH TWIN CHANNEL INFUSION PUMP The BodyGuard 2CH Twin Channel Infusion Pump is an ambulatory multi-therapy pump suitable for hospital and homecare environments with five infusion programs (continuous,
AQUADEX FLEXFLOW SYSTEM QUICK REFERENCE GUIDE
 AQUADEX FLEXFLOW SYSTEM QUICK REFERENCE GUIDE AQUADEX FLEXFLOW SYSTEM DISCLAIMER The quick reference guide is not intended to replace CHF Solutions, Inc. Aquadex FlexFlow Direction For Use (DFU). Always
The Univentor 1250 Anaesthesia Unit
 THE UNIVENTOR 1200/1250 ANAESTHESIA UNIT The Univentor 1250 Anaesthesia Unit TABLE OF CONTENTS EDITION 1 Section 1 - WARRANTY & SERVICE 1.1. WARRANTY 2 1.2. DAMAGED SHIPMENTS 2 1.3. SERVICE 2 Section 2
MANITOBA RENAL PROGRAM
 MANITOBA RENAL PROGRAM SUBJECT Fresenius 5008 Preparation for Hemodialysis using the ONLINEplus System SECTION CODE 30.10.02 30.10 Hemodialysis: Equipment and Procedures AUTHORIZATION Professional Advisory
Alaris Pump module FAQs
 Alaris Pump module FAQs 1. What makes the Alaris Pump module unique? Unparalleled safety (Guardrails Suite MX software), modularity, common user interface, ease of use and versatility. 2. Where are pump
Contacts. Quick Start Guide
 Contacts Clinical Support Specialist: Phone: Cell Phone: Email: Fresenius Renal Technologies A division of Fresenius Medical Care North America 920 Winter Street Waltham, MA 02451 Technical Service Customer
Negative Pressure Wound Therapy
 Guide to Continuous Therapy DeRoyal Pro Series easy use guide to continuous therapy To turn unit On: Press the ON or OK button. To reach option mode to input settings: Hold the up arrow button and the
A4s Operation Manual
 A4s Operation Manual Safety Instruction Please read this manual carefully, also with related manual for the machinery before use the controller. For installing and operating the controller properly and
Roller AC Servo System
 Safely Instruction Roller AC Servo System HMI-15 User Manual Please read this manual carefully, also with related manual for the machinery before use the controller. For installing and operating the controller
Peristaltic Infusion Pump AP 31P OPERATOR S MANUAL
 Peristaltic Infusion Pump AP 31P Version 4.5 Edition: 001 page 1 PERISTALTIC INFUSION PUMP AP 31P Dear Customer, Thank you very much for purchasing medical equipment from Ascor S.A. We can assure you that
ECHO MANUAL WARNING. L B A ltim e te rs. ECHO is a trademark of LB Altimeters, Denmark
 ECHO MANUAL L B A ltim e te rs ECHO is a trademark of LB Altimeters, Denmark LB Altimeters operates a policy of continuous development Therefore, we reserve the right to make changes and improvements to
Instructions for Use
 Select-380 T-Auto T-Auto Contents Page Instructions for Use Ref: 3.0 IFU 380 T-Auto Mar 18 2 Schematic layout of the doser 3 Quick-fit instructions 4 Description/Installation/Operation Pump tubes & Water
Endo-Flush Order # ZUTR30004 OPERATION MANUAL. Zutron Medical, LLC W 98 th St #40-27 Lenexa, KS Phone Fax
 OPERATION MANUAL Zutron Medical, LLC 17501 W 98 th St #40-27 Lenexa, KS 66219 Phone 877-343-5873 Fax 913-967-5944 ZUT-Lab-004-30004 REV. 03312017 Table of Contents 2 Introduction 1. Intended Use 2. Labels,
Fingertip Pulse Oximeter
 Instruction Manual Fingertip Pulse Oximeter Item # 40-810-000 Item # 40-811-000 Item # 40-812-000 Item # 40-813-000 Please read this guidebook completely before operating this unit. Limited Two-Year Warranty
Volumat Agilia _Volumat_Presentation_customer.ppt
 Volumat Agilia Volumat Agilia What is Volumat Agilia? Volumat Agilia is the volumetric pump of the Agilia range, our new family of intuitive infusion devices Volumetric Pumps Syringe Pumps Disposable Products
A4 Operation Manual. Fig.1-1 Controller Socket Diagram
 A4 Operation Manual Safety Instruction Please read this manual carefully, also with related manual for the machinery before use the controller. For installing and operating the controller properly and
Troubleshooting Guide Aquarius
 Low Access Pressure Access pressure has dropped below the lower alarm limit of 0 to - 250mmHg Blood pump is off Blood flow is too low Turn blood pump on Check blood flow rate. Consider increasing the blood
EASYPUMP II THE FLEXIBLE SOLUTION FOR SHORT AND LONG TERM INFUSION THERAPIES
 THE FLEXIBLE SOLUTION FOR SHORT AND LONG TERM INFUSION THERAPIES CONTENT 4 PATIENT INFORMATION 5 Patient data 6 Treatment monitoring 7 Further notes 8 PRODUCT INFORMATION 9 Easypump II 9 Working principle
User manual. MNPG 102 Rev. 04 Edition 04/02/16. Pressotherapy model. Power-Q1000 Premium
 User manual MNPG 102 Rev. 04 Edition 04/02/16 Pressotherapy model Power-Q1000 Premium I.A.C.E.R. Srl Via S. Pertini 24/A 30030 Martellago (VE) ITALY Tel. 041.5401356 Fax 041.5402684 e-mail: iacer@iacer.it
Contents. 6. Infusion Mode...10
 Contents 1. General Description 2 1.1 Features and product purpose 2 2. Principle of Operation....2 3. Specification.2 4. Front View 5 5. Basic Setting.6 5.1 Installation.6 5.2 Power On 6 5.3 Time Setting...7
User manual. PG132 Rev01 Editi Compressive Limbs Therapy System DVT-7700
 User manual PG132 Rev01 Editi 220114 Compressive Limbs Therapy System DVT-7700 I.A.C.E.R. Srl Via S. Pertini 24/A 30030 Martellago (VE) ITALY Tel. 041.5401356 Fax 041.5402684 e-mail: iacer@iacer.it http://www.itechmedicaldivision.com
NEXUS TKO. Specialty Neonatal/Pediatric. Safety Infusion Sets. Blood Reflux Protection 24/7! Anti-Reflux Technology Provides
 Specialty Neonatal/Pediatric Safety Infusion Sets Anti-Reflux Technology Provides Blood Reflux Protection 24/7! NEXUS TKO TECHNOLOGY THAT NEVER SLEEPS! Nexus TKO Neonatal Safety Catheter Nexus Tri-Seal
Operating instructions Electrical switching facility pco
 Operating instructions Electrical switching facility pco from software version V1.33 on TABLE OF CONTENTS 1. Before you start... 4 1.1 Brief description... 4 1.2 Using this manual... 4 2. pco integrated
Blood Pressure Monitoring: Arterial Line
 Approved by: Blood Pressure Monitoring: Arterial Line Gail Cameron Senior Director, Operations, Maternal, Neonatal & Child Health Programs Dr. Ensenat Medical Director, Neonatology Neonatal Nursery Policy
Quiz for Module 2: Aquarius Training (Rev. 1) Lesson 1: Introduction to Aquarius
 Lesson 1: Introduction to Aquarius") Quiz for Module 2: Aquarius Training (Rev. 1) Lesson 1: Introduction to Aquarius page 1 of 2 Name: Date: Score: Instructor: Location: Please circle the correct answers: 1. Select the answer(s) that represent
Quiz for Module 2: Aquarius Training (Rev. 1) Lesson 1: Introduction to Aquarius page 1 of 2 Name: Date: Score: Instructor: Location: Please circle the correct answers: 1. Select the answer(s) that represent
Concentrate Distribution System (Stand Mounted) A-CDS-70-X & A-CDS-TANK-X-ST Industrial Drive, Orlinda, TN 37141
 A-CDS-70-X & A-CDS-TANK-X-ST Industrial Drive, Orlinda, TN 37141") 0 Operation Manual Concentrate Distribution System (Stand Mounted) A-CDS-70-X & A-CDS-TANK-X-ST 615-654-4441 sales@specialtyh2o.com 615-654-4449 fax TABLE OF CONTENTS Section 1 GENERAL 1.1 Warnings and
0 Operation Manual Concentrate Distribution System (Stand Mounted) A-CDS-70-X & A-CDS-TANK-X-ST 615-654-4441 sales@specialtyh2o.com 615-654-4449 fax TABLE OF CONTENTS Section 1 GENERAL 1.1 Warnings and
New. The high security connection
 L ON Cata C lo gu e O O G Y New The high security connection Preparation devices for medications/solutions Bag qimospike B 7218.01 qimospike B is an IV fluid bag access spike fitted with qimo. Aspiration
Using the Akta Prime plus October 22, 2012
 Some starting precautions: 1. Vacuum filter all buffers. Removes any large particles/debris that may clog your column De-gases the buffers 2. Clarify lysates first by centrifugation and then filtration
Device overview. 6 Breathing circuit connection. Note: When the remote control foot pedal is connected, the manual switch is disabled.
 CoughAssist E70 Quick start guide 1 2 3 4 5 Device overview Starting therapy Modifying therapy settings Monitoring view and icons 6 7 Suggested guidelines for therapy Device menu Mask fitting 1 Device
AQUARIUS Continuous Renal Replacement Therapy Competency
 Preparation Explain the procedure to the patient and significant others Prepare the patient. Prepare the environment. Ensure a safe environment for the patient and staff Gather equipment required to Setup
SPECIFICATIONS APCEPH1
 APCEPH1 ph CONTROLLER SPECIFICATIONS APCEPH1 Input voltage 120 Volts AC Maximum amperage 14.5 amps @ 120 VAC ph Accuracy +/- 0.2 ph ph Control range Adjustable 4.5 8.5 ph Weight < 1 lbs Dimensions 3" x
AQUARIUS Continuous Renal Replacement Therapy with Regional Citrate Anticoagulation (RCA) Competency
 Competency") Demonstrates an understanding of why RCA has been prescribed Explain the anticoagulation protocol Demonstrate an understanding of potential complications associated with CRRT. Explain potential indications
Demonstrates an understanding of why RCA has been prescribed Explain the anticoagulation protocol Demonstrate an understanding of potential complications associated with CRRT. Explain potential indications
Patients Guide for Self Administering Intravenous Antibiotics General points
 Patients Guide for Self Administering Intravenous Antibiotics General points An intravenous line is an open route for infection therefore you need to prevent this by washing your hands before any procedure
6900 Maintenance Instruction System Flush
 Equipment Required FA74005 Damper Drain Tube FA16005 Cover Removal Tool FA900005 Beaker 0.25 Litre FA900003 Solvent Cleaning Bottle FA940021 Syringe Polypropylene 50 ml as required FA999045 Gloves Latex
User Manual GRI- 1500Li
 User Manual GRI- 1500Li Your Cart Tek caddy cart was thoroughly quality control checked and road tested before being shipped to your address. We do everything possible to assure that your caddy is in perfect
SomnoSuite FAQ. Setup. Calibration 4. What are the calibration requirements for the SomnoSuite? Settings
 SomnoSuite FAQ V1.3 January 2015 Setup 1. How do I connect the SomnoSuite to my oxygen source? 2. Is there a way to speed up the downward movement of the pusher block when setting the empty position? 3.
Pipettor. User Manual
 Pipettor User Manual Product Code Description Single Chanel Pipettor Variable 550.002.055 Volume 0.5 to 10ul 550.002.060 2 to 20ul 550.002.065 10 to 100ul 550.002.070 20 to 200ul 550.002.075 100 to 100ul
My CoughAssist. A patient guide to CoughAssist T70. Please visit
 Philips Healthcare is part of Royal Philips Electronics Europe, Middle East, Africa +49 7031 463 2254 How to reach us www.philips.com/healthcare healthcare@philips.com Latin America +55 11 2125 0744 Asia
450P AUTOMATIC PORTABLE COMPRESSOR EXTREME SERIES
 EXTREME SERIES PART NO. 45043 IMPORTANT: It is essential that you and any other operator of this product read and understand the contents of this manual before installing and using this product. SAVE THIS
Model 405 &407 Small Animal Ventilator. User Manual v3.5
 Model 405 &407 Small Animal Ventilator User Manual v3.5 First of all, sincerely thanks for selecting the RWD405 or RWD407 small animal ventilator made by RWD company. Please read this instruction manual
Clinician Guide. Baxter Elastomeric Devices. Promoting patient-centric care
 Clinician Guide Baxter Elastomeric Devices Promoting patient-centric care Portfolio Overview Portfolio Overview Baxter Elastomeric Devices are non-electronic medication devices designed to provide ambulatory
Stellant with Certegra Workstation Operation Manual
 Stellant with Certegra Workstation Operation Manual 3033823 Rev. F MEDRAD Stellant with Certegra Workstation Operation Manual i Stellant with Certegra Workstation MEDRAD Contact Information MEDRAD, INC.
CONTENTS DESCRIPTION INTENDED USE. WARNINGS & NOTES. PRECAUTIONS. INSTALLATION & SET-UP (Including battery charging & powering up)
") NO CONTENTS DESCRIPTION PAGE 1.0 2.0 3.0 4.0 5.0 6.0 7.0 7.1 7.2 7.3 7.4 7.5 7.6 7.7 7.8 7.9 7.10 7.11 7.12 7.13 7.14 7.15 7.16 7.17 8.0 10.0 BODYGUARD PUMP OVERVIEW PUMP DESCRIPTION AND FUNCTIONS SYSTEM
NO CONTENTS DESCRIPTION PAGE 1.0 2.0 3.0 4.0 5.0 6.0 7.0 7.1 7.2 7.3 7.4 7.5 7.6 7.7 7.8 7.9 7.10 7.11 7.12 7.13 7.14 7.15 7.16 7.17 8.0 10.0 BODYGUARD PUMP OVERVIEW PUMP DESCRIPTION AND FUNCTIONS SYSTEM
MODEL NUMBER: P-A AUTOMATIC PORTABLE COMPRESSOR
 MODEL NUMBER: 45043-450P-A AUTOMATIC PORTABLE COMPRESSOR IMPORTANT: It is essential that you and any other operator of the product read and understand the contents of this manual before installing and
CONSOLE-320 ENGLISH. 230A: CONSOLE-320 with cable data output Item 230B: CONSOLE-320 with cable + wireless radio data output
 CONSOLE-320 Item 230A: CONSOLE-320 with cable data output Item 230B: CONSOLE-320 with cable + wireless radio data output Table of contents 1. INTRODUCTION...2 1.1 Power supply...2 1.2 Connections...2 1.3
AHE58/59 AC Servo System
 AHE58/59 AC Servo System HMI-12 User Manual Safely INstruction Please read this manual carefully, also with related manual for the machine head before use. For perfect operation and safety, installing
6800 Maintenance Instruction System Flush Procedure
 Equipment Required FA74005 FA65318 FA900005 FA900003 Damper Drain Tube 6800 Cover Removal Tool Beaker 0.25 Litre Solvent Cleaning Bottle FA940021 Syringe Polypropylene 50 ml as required FA999045 Gloves
Table of Contents. Operating Instructions. Resource v.2 Conserving Regulator
 Operating Instructions Table of Contents Resource v.2 Conserving Regulator Safety Information Device Precautions Introduction Product Features Product Specifications Feature Illustrations Set Up Usage
Multi Channel Solutions
 Multi Channel Solutions Caesarea Medical Electronics BodyGuard 121 Twins Flexible 2 Channels Infusion Manage two regimens for your patient, bedside or on the go, using the BodyGuard 121 Twins dual-channel
The pipettes cover a volume range from 0.1µl to 10ml.
 CONTENTS 1. YOUR NEW PIPETTE 1 1.1. Adjustable volume pipettes 1 1.2. Fixed volume pipettes 2 1.3 Fully autoclavable 3 2. UNPACKING 3 3. INSTALLING THE PIPETTE HOLDER 4 4. PIPETTE COMPONENTS 5 5. PIPETTE
Manual Weighingblock VB2 series and Uniscale
 Manual Weighingblock VB2 series and Uniscale Note: At page 8 in this manual you will find a short form instruction. Normally the only instruction shipped together with the Scale. Overview different ranges.
Liberty Cycler Handi-Guide
 Liberty Cycler Handi-Guide A Patient s Reference to the Most Commonly Asked Questions about the Liberty Cycler This information is not intended to replace the advice or training from your physician or
RayPette Plus Autoclavable Pipette. User Manual
 RayPette Plus Autoclavable Pipette User Manual CONTENTS 1. YOUR NEW PIPETTE... 1 1.1. Adjustable volume pipettes... 1 1.3 Fully autoclavable... 2 2. UNPACKING... 3 3. INSTALLING THE PIPETTE HOLDER... 4
THE UNIVENTOR 400 ANAESTHESIA UNIT
 THE UNIVENTOR 400 ANAESTHESIA UNIT TABLE OF CONTENTS EDITION 3 Section 1 - WARRANTY & SERVICE 1.1. WARRANTY 2 1.2. DAMAGED SHIPMENTS 2 1.3. SERVICE 2 Section 2 - INTRODUCTION 2.1. INTRODUCTION 3 Section
Compatible Baxter IV Sets
 SIGMA Spectrum and Spectrum IQ Infusion System Compatible Baxter IV Sets (For use with SIGMA Spectrum and Spectrum IQ Infusion Pumps that have been calibrated for Baxter IV set tubing). NOTE: The superscript
COMBAT SWIM BOARD. RJE International, Inc. RJE International Feb 1, TAC-300 Revision 6
 COMBAT SWIM BOARD RJE International, Inc. YOUR SOURCE FOR DIVER NAVIGATION AND UNDERWATER RELOCATION EQUIPMENT RJE International Feb 1, 2017 12 TAC-300 Revision 6 RJE International, Inc. 15375 Barranca
VENTI-O 2 plus. O 2 switching valve for: VENTImotion from serial number 4000 VENTIlogic from serial number 4000 VENTImotion 2
 VENTI-O 2 plus O 2 switching valve for: VENTImotion from serial number 4000 VENTIlogic from serial number 4000 VENTImotion 2 Device description and operating instructions Overview VENTI-O 2 plus with therapy
RH800 & 2000 BASIC OPERATIONS
 RH800 & 2000 BASIC OPERATIONS 2 General information This manual contains technical information regarding Bayer SeedGrowth Equipment. Please read and understand these instructions completely before proceeding
Defibtech AED Training Equipment. User Manual
 Defibtech AED Training Equipment - Standalone AED Trainer - Training Battery Pack System - Semi and Fully Automatic Version User Manual ELECTRONIC DISTRIBUTION DAC-515E-EN-BD Notices Defibtech shall not
Oxygen Dialflow Meter. Instructions for Use
 Oxygen Dialflow Meter Instructions for Use 702-0031.12 December 2017 1. Symbols Warning! Caution! Indicates a potentially hazardous situation which, if not avoided, could result in injury to the patient,
OPERATOR S MANUAL Ar-Gone Weld Gas Analyzer
 July 2011 OPERATOR S MANUAL Ar-Gone Weld Gas Analyzer WARNING! Before operating this product, read and understand this Operator s Manual. Become familiar with the potential hazards of this unit. Contact
INSTRUCTION MANUAL. Automatic Blood Pressure Monitor with Fit Cuff. =Fit Cuff=!"#$% IA1B. Model
 IA1B INSTRUCTION MANUAL Automatic Blood Pressure Monitor with Fit Cuff =Fit Cuff=!"#$% Model IA1B Contents Introduction... 2 Notes on Safety... 3 Know Your Unit... 5 Quick Reference Guide... 7 Initial
Module 2: Aquarius Training
 Module 2: Aquarius Training Module 2: Aquarius Training 1 AQUARIUS TRAINING TABLE OF CONTENTS Lesson 1. Introduction to Aquarius Platinum Lesson 2. Preparing Aquarius Lesson 3. Treatment Mode Lesson 4.
JOLLY2. Installation user s manual. 6 different operating modes selectable. version 3.3. DATA TO BE FILLED OUT BY THE INSTALLER (Page 1)
") ENGLISH ENGLISH ENGLISH ENGLISH Installation user s manual Warning! electrical scheme modified JANUARY 2005 version 3.3 JOLLY2 DATA TO BE FILLED OUT BY THE INSTALLER (Page 1) 6 different operating modes
ENGLISH ENGLISH ENGLISH ENGLISH Installation user s manual Warning! electrical scheme modified JANUARY 2005 version 3.3 JOLLY2 DATA TO BE FILLED OUT BY THE INSTALLER (Page 1) 6 different operating modes
Latest 3D Technology for Speed + Distance & Heart Rate - Built in USB. 3D SENSOR FROM GERMANY MEASURES YOUR MOVEMENT ACCURATELY HEART RATE BELT
 PHRM20 Latest 3D Technology for Speed + Distance & Heart Rate - Built in USB. 3D SENSOR FROM GERMANY MEASURES YOUR MOVEMENT ACCURATELY EL/RESET ST/SP/+ MODE/SET LAP/SAVE/- HEART RATE BELT This unit is
C O L O G Y. New. g u O N. l o t a C a. The high security connection
 O N g u e C O L O G Y New l o t a C a The high security connection Preparation devices for medications/solutions Bag qimospike B 7218.01 qimospike B is an IV fluid bag access spike fitted with qimo. Aspiration
450P- RV AUTOMATIC PORTABLE COMPRESSOR EXTREME SERIES
 450P- RV AUTOMATIC PORTABLE COMPRESSOR EXTREME SERIES PART NO. 45053 IMPORTANT: It is essential that you and any other operator of this product read and understand the contents of this manual before installing
TorMinal. Operating instructions V OCE-Rev.L_EN
 TorMinal Operating instructions 1-138 3800-20310V001-112016-0-OCE-Rev.L_EN Table of contents General Information... 4 Symbols... 4 General safety instructions... 4 Safety information for batteries... 4
UsER manual for Watersens ph -REDOX
 UsER manual for Watersens -REDOX Cl 8 1 2 6 3 3 7 7 4 4 4 4 Parts List 1 Redox Probe 1 x 2 PH Probe 1 x 5 Tube Weight 2 x 6 Connection Valve 1 x chlorine 3 Chlorine and Pumps 2 x 7 Dosing Valve 2 x 5 5
VWR UHP j :01 Page 1. ENGLISH 1 22 DEUTSCH FRANÇAIS ESPAπOL ITALIANO
 VWR UHP 01.09.2010 5j 240.9001.0.09 1-09-10 16:01 Page 1 1 22 DEUTSCH 23 44 FRANÇAIS 45 66 ESPAπOL 67 88 ITALIANO 89 110 VWR UHP 01.09.2010 5j 240.9001.0.09 1-09-10 16:01 Page 2 Pipettors are equipped
6 digital caliper with case
 6 digital caliper with case Model 98563 Set up And Operating Instructions Diagrams within this manual may not be drawn proportionally. Due to continuing improvements, actual product may differ slightly
Tourniquet System. Ideal for single or bi-lateral orthopaedic surgery and pain management. AT4 Tourniquet System. Introduction.
 Tourniquet System Ideal for single or bi-lateral orthopaedic surgery and pain management Innovative technology practically applied Renowned for innovation and high quality, Anetic Aid listens to customers
G2W PRO ROBOT. User Manual. paddlepalace.com
 G2W PRO ROBOT paddlepalace.com 1-800-547-5891 503-777-2266 Putting Robot Technology to Work for You The Paddle Palace G2W Pro robot is everything you need in a robot! This robot has two throw wheels with
S4W PRO ROBOT. User Manual. paddlepalace.com
 S4W PRO ROBOT paddlepalace.com 800-547-5891 503-777-2266 S4W Pro Taking Robot Technology to the Next Level The Paddle Palace S4W Pro takes robot technology to the next level. This innovative robot has
COMBAT SWIM BOARD. RJE International, Inc. RJE International January 16, TAC-300 Revision 4
 COMBAT SWIM BOARD RJE International, Inc. YOUR SOURCE FOR DIVER NAVIGATION AND UNDERWATER RELOCATION EQUIPMENT RJE International January 16, 2017 RJE International, Inc. 15375 Barranca Pkwy, Ste. I-112,
FOR SAFE AND CORRECT USE
 FOREWARD Thank you for purchasing the Model AP-20 sampling pump. The Model AP-20 pump is designed specifically for use with Kitagawa detector tubes. This system with the available Kitagawa detector tubes
OXY Integral. INTERCON ENTERPRISES INC Tel: Fax: Internet:
 OXY Integral INTERCON ENTERPRISES INC Tel: 800 665 6655 Fax: 604 946 5340 E-Mail: sales@intercononline.com Internet: www.intercononline.com Manual Integral 2006 1 INDEX 2-3 PREFACE 4 INTRODUCTION 5 Principle
DIAGNOSTIC CARDIOLOGY
 DIAGNOSTIC CARDIOLOGY For Your Procedural Needs Manufactured to the Highest Standards, Customised to Your Specific Needs MEDLINE PROCEDURE PACKS The items contained within this brochure are perfect for
Liberty Handi-Guide A Patient s Reference to the Most Commonly Asked Questions About the Liberty Cycler
 0408 Liberty Handi-Guide_update_Layout 1 11/22/13 4:53 PM 11/22/13 Page 1 Liberty Handi-Guide A Patient s Reference to the Most Commonly Asked Questions About the Liberty Cycler This information is not
RECONSTITUTION AND ADMINISTRATION INSTRUCTIONS FOR HEALTHCARE PROFESSIONALS
 RECONSTITUTION AND ADMINISTRATION INSTRUCTIONS FOR HEALTHCARE PROFESSIONALS TRUST THE POWER OF PREVENTION WITH CINRYZE Whether your patients are new to treatment or are continuing their journey, remind
Oxygen Dialflow Meter. Instructions for Use
 Oxygen Dialflow Meter Instructions for Use 702-0031.9 May 2014 1. Symbols Warning! Caution! Indicates a potentially hazardous situation which, if not avoided, could result in personal injury to the user
AS/NZS 1801 USE AND CARE BOOKLET OCCUPATIONAL PROTECTIVE HELMET
 AS/NZS 1801 USE AND CARE BOOKLET OCCUPATIONAL PROTECTIVE HELMET 2 EN DANGER! intended use of this helmet involves activities that are extremely dangerous. FAILURE TO HEED AND FOLLOW THESE INSTRUCTIONS
Indications for Use: Caution: Note:
 IV 1 2 IV This reference is to be used in conjunction with the Crit-Line IV Monitor User s Guide (P/N CL80050002). Refer to the User s Guide for a complete description of alerts, warnings, cautions, and
RECONSTITUTION AND ADMINISTRATION INSTRUCTIONS FOR HEALTHCARE PROFESSIONALS. Hereditary Angioedema
 RECONSTITUTION AND ADMINISTRATION INSTRUCTIONS FOR HEALTHCARE PROFESSIONALS Hereditary Angioedema TRUST PROVEN PREVENTION WITH CINRYZE Whether your patients are new to treatment or are continuing their
A few seconds after turning on, the screen changes to Set Up Screen Before adjusting the pressure, calibrate the O 2 sensors
 SiPAP Set-Up Plug into mains, air & O 2, then setup the circuit as shown below Set-up & test before spiking water bag A few seconds after turning on, the screen changes to Set Up Screen Before adjusting
BOC: Living healthcare. Manual. LIV IQ BOC Integrated Valve with digital display portable delivery system for Medical Oxygen. BOC: Living healthcare
 BOC: Living healthcare Manual LIV IQ BOC Integrated Valve with digital display portable delivery system for Medical Oxygen. BOC: Living healthcare 02 Manual LIV IQ Oxygen Manual LIV IQ Oxygen 03 Contents.
PNEUMATIC STOPPERS OPERATING MANUAL. Type F G H - FOG
 OPERATING MANUAL PNEUMATIC STOPPERS Type F G H - FOG This document is property of SO.CA.P. s.r.l. LISSONE - ITALY - ANY DUPLICATION IS FORBIDDEN Rev 07 del 01/11/2016 info@socapsrl.com - www.socapsrl.com
BMR 2100XL Operating Instructions Page 1 of 13
 BMR 2100XL Operating Instructions Page 1 of 13 Thank you for deciding to purchase a Swisswing BMR 2100XL (Biomechanical Stimulation Device will be referred to in these operating instructions as the BMR).
FAULT CODE TROUBLESHOOTING INDEX
 FAULT CODE TROUBLESHOOTING INDEX 1. Display indicates Change Filters 2. Display indicates Drip Tray Full Continuous Alarm will Sound 3. Display indicates Cold Fault 4. Display indicates Hot Fault 5. Display
AKTA pure 25 New Owner s Intro
 AKTA pure 25 New Owner s Intro The exercise below will give a quick demonstration of how easy and intuitive the AKTA pure 25 will be for you in demonstrating downstream processing to your students. Steps
Welcome to the Specialized Medical Services Respiratory training webinar series!
 Welcome to the Specialized Medical Services Respiratory training webinar series! SMS is your Long Term Care (LTC) facility single source for oxygen, medical equipment, respiratory care services and supplies