Dedication. To Anielle and Acho
|
|
|
- Brice Watkins
- 5 years ago
- Views:
Transcription
1
2
3
4 Dedication To Anielle and Acho
5 Huggable Amigurumi: 18 Cute and Cuddly Animal Softies 2016 by Shannen Nicole Chua Martingale th Ave. NE, Ste. 102 Bothell, WA USA ShopMartingale.com ebook Edition: 2016 No part of this product may be reproduced in any form, unless otherwise stated, in which case reproduction is limited to the use of the purchaser. The written instructions, photographs, designs, projects, and patterns are intended for the personal, noncommercial use of the retail purchaser and are under federal copyright laws; they are not to be reproduced by any electronic, mechanical, or other means, including informational storage or retrieval systems, for commercial use. Permission is granted to photocopy patterns for the personal use of the retail purchaser. Attention teachers: Martingale encourages you to use this book for teaching, subject to the restrictions stated above. The information in this book is presented in good faith, but no warranty is given nor results guaranteed. Since Martingale has no control over choice of materials or procedures, the company assumes no responsibility for the use of this information. Library of Congress Cataloging-in-Publication Data is available upon request. eisbn: Original Source ISBN:
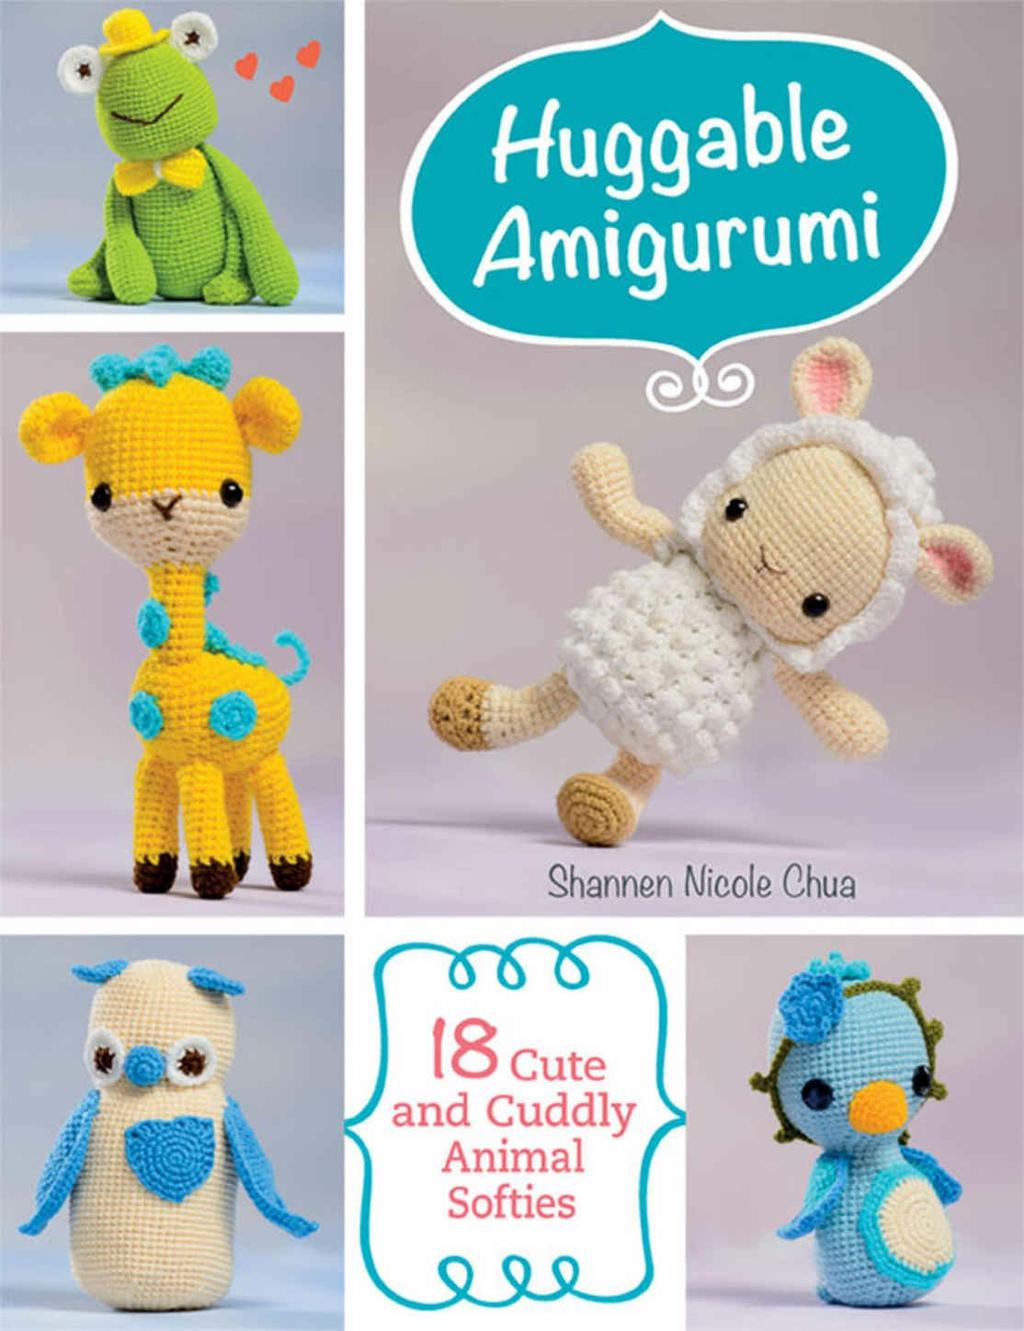
6 Contents Introduction Belle Bluebird Henry Elephant Sofie Swan Lila, Littlun s Lamb Mia Bunny Connor Frog Brian Turtle Elliott Giraffe Moby Whale Monty Monkey Tommy Turkey Snowie Owl George Lion Stella Squirrel Sammie Seal Ellie Penguin Rocco Raccoon

7 Gunny Bear Crochet Basics Abbreviations About the Author Acknowledgments
8 Introduction Hi there! Welcome to the wonderful world of Huggable Amigurumi. As you flip through this book and make the projects, I hope you ll experience one feeling FUN! Feel free to use unique colors and customize your projects using the Tips and Tricks (page 31) to truly make each amigurumi yours. I ve tried to fill this book with various projects that use different styles of making an amigurumi, from basic egg-shaped bodies to more realistic versions and even a more cartoon-like approach. I hope that you will see how easy making amigurumi is and that you will L-O-V-E it! I, together with the amazing team at Martingale, have worked very hard to make sure that this book is everything you want and more. Working late nights, doing multiple proofreads, and everything in between all of those hardships were so very worth doing, as shown by this finished book. If you ever want to share your own work using the patterns and tricks you find here, feel free to tag me on Instagram or or even post it to my Facebook wall. I d love to see the wonderful toys you make!
9

10 Belle Bluebird What better way to start this book than with a bluebird in the sweetest shades of blue! With her simple pattern and basic color changes, Belle will be ready to chirp along as your new singing buddy in no time.

11 Skill Level: Easy Finished Size: 9" tall Materials See page 60 for more about yarns. Yarn: Light worsted- or DK-weight 4-ply acrylic yarn 120 yds in powder blue for head, body, and tail 10 yds in sky blue for top feathers, wings, and tummy 6 yds in blue for wings and flower 4 yds in yellow gold for beak 4 yds in cream for tummy 2 yds in moss green for vines
12 Hooks and Notions: US Size F-5 (3.75 mm) crochet hook 2 buttons, 20 mm diameter, for eyes Stitch marker, fiberfill stuffing, tapestry needle Flower Crown For flower, with blue, make a magic circle (page 61). Rnd 1: Work 6 sc in ring. Rnd 2: *Sc 2 in next sc; rep from * around 12 sts. Rnd 3: *Dc 4 in same st, sl st in next st; rep from * 6 times 30 sts. For vine, with moss green, ch 62 for foundation ch, join in a ring. Sl st in next 12 ch, [sl st in next 4 ch, ch 4, sc in 2nd st from hook and in next 2 ch (leaf made), sl st in next ch of foundation ch] 7 times, sl st in last 15 ch. Fasten off. Bird The bird is assembled from multiple pieces, including feathers, wings, a head, tummy, and so on. TOP FEATHERS With sky blue, ch 15. Sc in 2nd ch from hook and in next 2 ch, *ch 4, sc in 2nd st from hook and in next 2 ch (feather made), sl st in next ch of foundation ch; rep from * to end.
 6 times 18 sts. Rnd 4: (Sc in each of next 2 sts, 2 sc in following st) 6 times 24 sts.")
13 Top-down view of Belle s head feather. WINGS Make 2. With sky blue, make a magic circle. Rnd 1: Work 6 sc in ring. Rnd 2: *Sc 2 in next sc; rep from * around 12 sts. Rnd 3: (Sc in next st, 2 sc in following st) 6 times 18 sts. Rnd 4: (Sc in each of next 2 sts, 2 sc in following st) 6 times 24 sts. Rnd 5: (Sc in each of next 3 sts, 2 sc in following st) 6 times 30 sts. Rnd 6: With blue, sc in next st, 2 hdc in next st, hdc in next st, [(2 dc, ch 1, 2 dc) in same st, sk next st, sl st in next st] twice, (2 dc, ch 1, 2 dc) in same st, hdc in next st, 2 hdc in next st, sc in each of rem 18 sts 42 sts.

14 Belle s wings are made from two yarn colors. TUMMY With cream, make a magic circle. Rnd 1: Work 7 sc in ring. Rnd 2: *Sc 2 in next sc; rep from * around 14 sts. Rnd 3: Sc in each of first 4 sts, 2 sc in each of next 7 sts, sc in each of rem 3 sts 21 sts. Rnd 4: Sc in each of first 3 sts, (sc in next st, 2 sc in next st) 7 times, sc in each of rem 4 sts 28 sts. Rnd 5: Hdc in each of first 3 sts, (hdc in each of next 3 sts, 2 hdc in next st) 7 times, hdc in each of rem 4 sts 35 sts. Rnd 6: With sky blue, (sc in each of next 4 sts, 2 sc in following st) 7 times 42 sts. Rnd 7: (Sc in each of next 5 sts, 2 sc in following st) 7 times 49 sts. BEAK With yellow gold, make a magic circle. Rnd 1: Work 5 sc in ring. Rnd 2: *Sc 2 in next sc; rep from * around 10 sts.
, (dc, ch 1, 2 dc) in first st, sl st in next st, [(2 dc, ch 1, 2 dc) in same st, sl st in next st] 2 times. Tail view.")
15 Rnd 3: (Sc in next st, 2 sc in following st) 5 times 15 sts. Rnd 4: Sc around. Rnd 5: (Sc in each of next 2 sts, 2 sc in following st) 5 times 20 sts. TAIL With powder blue, make a magic circle. Row 1: Work 6 sc in ring, turn. Do not join. Row 2: Ch 3 (counts as dc), (dc, ch 1, 2 dc) in first st, sl st in next st, [(2 dc, ch 1, 2 dc) in same st, sl st in next st] 2 times. Tail view. HEAD AND BODY With powder blue, make a magic circle. Rnd 1: Work 6 sc in ring. Rnd 2: (Sc in each of next 2 sts, 2 sc in following st) 2 times 8 sts. Rnd 3: *Sc 2 in next sc; rep from * around 16 sts. Rnd 4: (Sc in next st, 2 sc in following st) 8 times 24 sts. Rnd 5: Sc around.
16 Rnd 6: (Sc in each of next 2 sts, 2 sc in following st) 8 times 32 sts. Rnd 7: (Sc in each of next 3 sts, 2 sc in following st) 8 times 40 sts. Rnd 8: (Sc in each of next 4 sts, 2 sc in following st) 8 times 48 sts. Rnd 9: (Sc in each of next 7 sts, 2 sc in following st) 6 times 54 sts. Sew top feathers in place on head, wrapping in a spiral from rnds 1 5 of head. Rnds 10 21: Sc around. Rnd 22: (Sc in each of next 7 sts, sc2tog) 6 times 48 sts. Rnd 23: (Sc in each of next 6 sts, sc2tog) 6 times 42 sts. Rnd 24: (Sc in each of next 5 sts, sc2tog) 6 times 36 sts. Rnd 25: (Sc in each of next 4 sts, sc2tog) 6 times 30 sts. Rnd 26: (Sc in each of next 3 sts, sc2tog) 6 times 24 sts. Rnd 27: (Sc in each of next 2 sts, sc2tog) 6 times 18 sts. Rnd 28: Sc around. Sew eyes in place at rnds 18 21, leaving 10 sts between them. Sew beak 2 sts away from each eye between rnds 20 and 25. Rnd 29: (Sc in each of next 5 sts, 2 sc in following st) 3 times 21 sts. Rnd 30: (Sc in each of next 6 sts, 2 sc in following st) 3 times 24 sts. Rnd 31: (Sc in each of next 3 sts, 2 sc in following st) 6 times 30 sts. Rnds 32 and 33: Sc around. Rnd 34: (Sc in each of next 4 sts, 2 sc in following st) 6 times 36 sts. Rnds 35 38: Sc around. Rnd 39: (Sc in each of next 5 sts, 2 sc in following st) 6 times 42 sts. Rnds 40 42: Sc around. Rnd 43: (Sc in each of next 6 sts, 2 sc in following st) 6 times 48 sts. Rnds 44 and 45: Sc around. Rnd 46: (Sc in each of next 6 sts, sc2tog) 6 times 42 sts. Rnd 47: (Sc in each of next 5 sts, sc2tog) 6 times 36 sts. Rnd 48: (Sc in each of next 4 sts, sc2tog) 6 times 30 sts. Rnd 49: (Sc in each of next 3 sts, sc2tog) 6 times 24 sts. Rnd 50: (Sc in each of next 2 sts, sc2tog) 6 times 18 sts. Rnd 51: (Sc in next st, sc2tog) 6 times 12 sts. Rnd 52: Sc in every other st 6 sts. Assembly
17 Sew tummy to body. Sew tail in place, near rnd 30. Sew flower to vines and sew in place on head. Sew wings to body. Stuff. Weave in ends.

18 Henry Elephant Elephants are normally gray, but little Henry here is all white with accents of blue. Suited up with his fabulous minty green collar, he s ready for a day around town! His pattern is all about simple shapes and pops of color.
19 Skill Level: Easy Finished Size: 11" tall Materials See page 60 for more about yarns. Yarn: Light worsted- or DK-weight 4-ply acrylic yarn 180 yds in white for body 45 yds in blue for trim 3 yds in green for collar Hooks and Notions: US Size F-5 (3.75 mm) crochet hook 2 buttons, 20 mm diameter, for eyes Stitch marker, fiberfill stuffing, tapestry needle Trunk With white, make a magic circle (page 61). Rnd 1: Work 4 sc in ring. Rnd 2: *Sc 2 in next sc; rep from * around 8 sts. Rnd 3: (Sc in next st, 2 sc in following st) 4 times 12 sts. Rnd 4: (Sc in each of next 2 sts, 2 sc in following st) 4 times 16 sts. Rnd 5: Through back loops only, sc around. Rnds 6 8: Sc around. Rnd 9: (Sc in each of next 2 sts, sc2tog) 4 times 12 sts. Rnds 10 14: Sc around. Rnds 15 and 16: Sl st 6 times, sc in each of rem 6 sts 12 sts. Rnd 17: (Sc in next st, 2 sc in following st) 6 times 18 sts. Inner Ears Make 2.
20 With blue, ch 13. Rnd 1: Sc in 2nd st from hook and in each ch across. Turn foundation ch. On opposite side of foundation ch, sc in each ch 24 sts. Rnd 2: (Sc in each of next 3 sts, 2 sc in following st) 6 times 30 sts. Rnd 3: (Sc in each of next 5 sts, 2 sc in following st) 5 times 35 sts. Rnd 4: Sc in each of next 15 sts, 2 sc in each of next 5 sts, sc in each of rem 15 sts 40 sts. Outer Ears Make 2. With white, ch 17. Rnd 1: Sc in 2nd st from hook and in each ch to end. Turn foundation ch. On opposite side of foundation ch, sc in each ch 32 sts. Rnd 2: (Sc in each of next 3 sts, 2 sc in following st) 8 times 40 sts. Rnd 3: (Sc in each of next 7 sts, 2 sc in following st) 5 times 45 sts. Rnd 4: (Sc in each of next 8 sts, 2 sc in following st) 5 times 50 sts. Rnd 5: Sc in each of next 20 sts, 2 sc in each of next 10 sts, sc in each of rem 20 sts 60 sts. Using yarn tail of inner ear, sew inner ear to outer ear. Collar With green, ch 32. Row 1: Hdc in 3rd ch from hook and in each ch to end, turn 30 sts. Row 2: Ch 3 (counts as dc), 2 dc in same st, sl st in next st, (3 dc in next st, sl st in next st) 13 times 2 sts rem unworked. Fasten off.
 6 times 18 sts. Rnd 4: (Sc in each of next 2 sts, 2 sc in following st) 6 times 24 sts. Rnds 5 8: Sc around. Rnd 9: With white, sc around.")
21 The collar is crocheted separately and attached during finishing. Arms Make 2. With blue, make a magic circle. Rnd 1: Work 6 sc in ring. Rnd 2: *Sc 2 in next sc; rep from * around 12 sts. Rnd 3: (Sc in next st, 2 sc in following st) 6 times 18 sts. Rnd 4: (Sc in each of next 2 sts, 2 sc in following st) 6 times 24 sts. Rnds 5 8: Sc around. Rnd 9: With white, sc around. Rnd 10: (Sc in each of next 2 sts, sc2tog) 6 times 18 sts. Rnds 11 15: Sc around. Rnd 16: (Sc in next st, sc2tog) 6 times 12 sts. Rnds 17 21: Sc around. Head and Body With white, make a magic circle.
22 Rnd 1: Work 7 sc in ring. Rnd 2: *Sc 2 in next sc; rep from * around 14 sts. Rnd 3: (Sc in next st, 2 sc in following st) 7 times 21 sts. Rnd 4: (Sc in each of next 2 sts, 2 sc in following st) 7 times 28 sts. Rnd 5: (Sc in each of next 3 sts, 2 sc in following st) 7 times 35 sts. Rnd 6: (Sc in each of next 4 sts, 2 sc in following st) 7 times 42 sts. Rnd 7: (Sc in each of next 5 sts, 2 sc in following st) 7 times 49 sts. Rnds 8 18: Sc around. Rnd 19: (Sc in each of next 6 sts, 2 sc in following st) 7 times 56 sts. Rnd 20: Sc around. Rnd 21: (Sc in each of next 6 sts, sc2tog) 7 times 49 sts. Rnd 22: (Sc in each of next 5 sts, sc2tog) 7 times 42 sts. Rnd 23: (Sc in each of next 4 sts, sc2tog) 7 times 35 sts. Rnd 24: (Sc in each of next 3 sts, sc2tog) 7 times 28 sts. Rnd 25: (Sc in each of next 2 sts, sc2tog) 7 times 21 sts. Stuff trunk and sew to head. Sew eyes in place 3 or 4 sts away from trunk on each side. Sew ears to head using tail of outer ear. Rnds 26 and 27: Sc around. Rnd 28: (Sc in each of next 2 sts, 2 sc in following st) 7 times 28 sts. Rnd 29: Sc around. Rnd 30: (Sc in each of next 3 sts, 2 sc in following st) 7 times 35 sts. Rnds 31 and 32: Sc around. Rnd 33: (Sc in each of next 4 sts, 2 sc in following st) 7 times 42 sts. Rnds 34 39: Sc around. Rnd 40: (Sc in each of next 5 sts, 2 sc in following st) 7 times 49 sts. Rnds 41 43: Sc around. Rnd 44: (Sc in each of next 5 sts, sc2tog) 7 times 42 sts. Rnd 45: (Sc in each of next 4 sts, sc2tog) 7 times 35 sts. Rnd 46: (Sc in each of next 3 sts, sc2tog) 7 times 28 sts. Rnd 47: (Sc in each of next 2 sts, sc2tog) 7 times 21 sts. Rnd 48: (Sc in each of next 5 sts, sc2tog) 3 times 18 sts. Rnd 49: (Sc in each of next 4 sts, sc2tog) 3 times 15 sts. Rnd 50: (Sc in next st, sc2tog) 5 times 10 sts. Rnd 51: Sc in every other st 5 sts.
23 Toes Make 6. With blue, make a magic circle. Rnd 1: Work 5 sc in ring. Rnd 2: *Sc 2 in next sc; rep from * around 10 sts. Legs Make 2. With white, make a magic circle. Rnd 1: Work 6 sc in ring. Rnd 2: *Sc 2 in next sc; rep from * around 12 sts. Rnd 3: (Sc in next st, 2 sc in following st) 6 times 18 sts. Rnd 4: (Sc in each of next 2 sts, 2 sc in following st) 6 times 24 sts. Rnd 5: (Sc in each of next 3 sts, 2 sc in following st) 6 times 30 sts. Rnds 6 9: Sc around. Sew 3 toes to the bottom of each leg. Rnd 10: (Sc in each of next 3 sts, sc2tog) 6 times 24 sts. Rnds 11 15: Sc around. Rnd 16: (Sc in each of next 4 sts, sc2tog) 4 times 20 sts. Rnds 17 21: Sc around. Rnd 22: (Sc in each of next 3 sts, sc2tog) 4 times 16 sts. Rnds 23 25: Sc around. Assembly Wrap collar around neck, overlapping by 2 sts and sew tog. Sew arms in place. Sew legs in place. Weave in ends. For tail, cut 3 pieces of white yarn, each 5" long. With tapestry needle, thread each through body and tie tog with an overhand knot.

24 Sofie Swan Swans are elegant and regal, and what better way to capture that than with a delicate purple cygnet topped with a crown! With little Sofie, you don t need to worry about sewing together a lot of different parts. Skill Level: Easy
25 Finished Size: 9½" tall Materials See page 60 for more about yarns. Yarn: Light worsted- or DK-weight 4-ply acrylic yarn 180 yds in purple for head and body 45 yds in cream for wings 25 yds in yellow gold for crown and beak Hooks and Notions: US Size F-5 (3.75 mm) crochet hook 2 safety eyes, 15 mm diameter Stitch marker, fiberfill stuffing, tapestry needle Crown With yellow gold, ch 55, join in a ring. Rnd 1: Hdc in each ch around 55 sts. Rnd 2: Hdc around. Row 3: Sc in each of next 24 sts, hdc in next st, 2 dc in next st, 3 dc in next st, ch 3, sl st in base of ch-3 (picot made), sk next st, 3 dc in next st, 2 dc in next st, hdc in next st, sc in each of rem 24 sts 60 sts. Fasten off.
 5 times 15 sts. Rnd 4: Sc around. Rnd 5: (Sc in each of next 2 sts, 2 sc in following st) 5 times 20 sts. Rnd 6: Sc around. Wings Make 2.")
26 Sofie s face and golden crown. Beak With yellow gold, make a magic circle (page 61). Rnd 1: Work 5 sc in ring. Rnd 2: *Sc 2 in next sc; rep from * around 10 sts. Rnd 3: (Sc in next st, 2 sc in following st) 5 times 15 sts. Rnd 4: Sc around. Rnd 5: (Sc in each of next 2 sts, 2 sc in following st) 5 times 20 sts. Rnd 6: Sc around. Wings Make 2. With cream, make a magic circle. Rnd 1: Work 6 sc in ring. Rnd 2: *Sc 2 in next sc; rep from * around 12 sts. Rnd 3: (Sc in next st, 2 sc in following st) 6 times 18 sts. Rnd 4: (Sc in each of next 2 sts, 2 sc in following st) 6 times 24 sts.
 6 times, sc in each of rem 6 sts 36 sts.")
27 Rnd 5: Sc in each of next 6 sts, (sc in next st, 2 sc in following st) 6 times, sc in each of rem 6 sts 30 sts. Rnd 6: Sc in each of next 6 sts, (hdc in each of next 2 sts, 2 hdc in next st) 6 times, sc in each of rem 6 sts 36 sts. Rnd 7: Sc in each of next 16 sts, hdc in next st, 2 dc in next st, ch 3, sl st in base of ch-3 (picot made), 2 dc in next st, hdc in next st, sc in each of rem 16 sts 38 sts. Wing view. Head and Body With purple, make a magic circle. Rnd 1: Work 7 sc in ring. Rnd 2: *Sc 2 in next sc; rep from * around 14 sts. Rnd 3: (Sc in next st, 2 sc in following st) 7 times 21 sts. Rnd 4: (Sc in each of next 2 sts, 2 sc in following st) 7 times 28 sts. Rnd 5: (Sc in each of next 3 sts, 2 sc in following st) 7 times 35 sts. Rnd 6: (Sc in each of next 4 sts, 2 sc in following st) 7 times 42 sts. Rnd 7: (Sc in each of next 5 sts, 2 sc in following st) 7 times 49 sts. Rnds 8 22: Sc around.
28 Rnd 23: Sc in each of next 5 sc, (sc in each of next 3 sts, sc2tog) 7 times, sc in each of rem 9 sts 42 sts. Rnd 24: Sc in each of next 5 sc, (sc in each of next 2 sts, sc2tog) 7 times, sc in each of rem 9 sts 35 sts. Rnd 25: Sc in each of next 6 sc, (sc in each of next 2 sts, sc2tog) 5 times, sc in each of rem 9 sts 30 sts. Rnd 26: Sc in each of next 6 sc, (sc in next st, sc2tog) 6 times, sc in each of rem 6 sts 24 sts. Rnd 27: Sc in each of next 3 sc, (sc in next st, sc2tog) 6 times, sc in each of rem 3 sts 18 sts. Sew beak in place on head using yellow gold yarn and referring to photo below for placement. Attach safety eyes on either side of beak. Stuff as work progresses. Rnds 28 40: Sc around. Rnd 41: Sc 2 in each of next 2 sts, sc in next st, sc2tog 5 times, sc in each of next 2 sts, 2 sc in each of next 3 sts 18 sts. Rnds 42 44: Sc around. Rnd 45: Sc 2 in each of next 3 sts, sc in each of next 12 sts, 2 sc in each of next 3 sts 24 sts. Rnd 46: (Sc in next st, 2 sc in following st) 3 times, sc in each of next 12 sts, (sc in next st, 2 sc in following st) 3 times 30 sts. Rnd 47: (Sc in each of next 2 sts, 2 sc in following st) 3 times, sc in each of next 12 sts, (sc in each of next 2 sts, 2 sc in following st) 3 times 36 sts. Rnd 48: (Sc in each of next 3 sts, 2 sc in following st) 3 times, sc in each of next 12 sts, (sc in each of next 3 sts, 2 sc in following st) 3 times 42 sts. Rnd 49: Sc around. Rnd 50: (Sc in each of next 6 sts, 2 sc in following st) 6 times 48 sts. Rnd 51: (Sc in each of next 11 sts, 2 sc in following st) 4 times 52 sts. Rnd 52: (Sc in each of next 12 sts, 2 sc in following st) 4 times 56 sts. Rnd 53: (Sc in next st, 2 sc in following st) 3 times, sc in each of next 49 sts, 2 sc in last st 60 sts. Rnds 54 59: Sc around. Rnd 60: Sc in each of next 25 sts, sc2tog 5 times, sc in each of rem 25 sts 55 sts. Rnd 61: Sc in each of next 20 sts, (sc in next st, sc2tog) 5 times, sc in each of rem 20 sts 50 sts. Rnd 62: Sc 2 in next 2 sts, sc in each of next 15 sts, (sc in next st, sc2tog) 5 times, sc in each of next 15 sts, 2 sc in each of next 3 sts 50 sts. Rnd 63: Sc2tog 2 times, sc in each of next 40 sts, sc2tog 3 times 45 sts. Rnd 64: Sc in each of next 15 sts, (sc in next st, sc2tog) 5 times, sc in each of rem
 6 times 24 sts. Rnd 68: (Sc in each of next 2 sts, sc2tog) 6 times 18 sts. Rnd 69: (Sc in next st, sc2tog) 6 times 12 sts.")
29 15 sts 40 sts. Rnd 65: Sc in each of next 10 sts, (sc in each of next 2 sts, sc2tog) 5 times, sc in each of rem 10 sts 35 sts. Rnd 66: (Sc in each of next 5 sts, sc2tog) 5 times 30 sts. Rnd 67: (Sc in each of next 3 sts, sc2tog) 6 times 24 sts. Rnd 68: (Sc in each of next 2 sts, sc2tog) 6 times 18 sts. Rnd 69: (Sc in next st, sc2tog) 6 times 12 sts. Rnd 70: Sc in every other st 6 sts. Assembly Finish stuffing body. Sew wings to sides of body. Sew crown in place on head. Weave in ends. Sew the beak in place, starting above the decrease section.


30 Lila, Littlun s Lamb This lamb may use a more complicated stitch the puff stitch but take one look at this cuddly lamb and you ll be eager to start crocheting. Using a neutral palette with pink blush on the ears for subtle color makes Lila as sweet as can be.
31 Skill Level: Intermediate Finished Size: 10" tall Materials See page 60 for more about yarns. Yarn: Light worsted- or DK-weight 4-ply acrylic yarn 140 yds in white for body and wool 100 yds in cream for head, ears, arms, and legs 30 yds in tan for hooves Hooks and Notions: US Size F-5 (3.75 mm) crochet hook 2 safety eyes, 15 mm diameter Stitch marker, fiberfill stuffing, tapestry needle Cotton swab Pink powdered blush (cosmetic) Black embroidery floss Head With cream, make a magic circle (page 61). Rnd 1: Work 7 sc in ring. Rnd 2: *Sc 2 in next sc; rep from * around 14 sts. Rnd 3: (Sc in next st, 2 sc in following st) 7 times 21 sts. Rnd 4: (Sc in each of next 2 sts, 2 sc in following st) 7 times 28 sts. Rnd 5: (Sc in each of next 3 sts, 2 sc in following st) 7 times 35 sts. Rnd 6: (Sc in each of next 4 sts, 2 sc in following st) 7 times 42 sts. Rnd 7: Sc around. Rnd 8: (Sc in each of next 5 sts, 2 sc in following st) 7 times 49 sts. Rnds 9 20: Sc around. Rnd 21: (Sc in each of next 6 sts, 2 sc in following st) 7 times 56 sts. Rnd 22: Sc around. Rnd 23: (Sc in each of next 6 sts, sc2tog) 7 times 49 sts.
32 Rnd 24: (Sc in each of next 5 sts, sc2tog) 7 times 42 sts. Rnd 25: (Sc in each of next 4 sts, sc2tog) 7 times 35 sts. Rnd 26: (Sc in each of next 3 sts, sc2tog) 7 times 28 sts. Rnd 27: (Sc in each of next 5 sts, sc2tog) 4 times 24 sts. Top Head Wool Count puff (page 62) as 1 st, and ch 1 at end of puff as a second st throughout. On subsequent rnds, work sts into the top of each puff and in each ch 1. With white, make a magic circle. Rnd 1: Work 5 sc in ring. Rnd 2: Puff (page 62) 5 times 10 sts. Rnd 3: Sc around. Rnd 4: Puff 10 times 20 sts. Rnd 5: (Sc in next st, 2 sc in following st) 10 times 30 sts. Rnd 6: (Puff, sc in next st) 15 times 45 sts. Head Wool With white, make a magic circle. Rnd 1: Work 6 sc in ring. Rnd 2: *Sc 2 in next sc; rep from * around 12 sts. Rnd 3: (Sc in next st, 2 sc in following st) 6 times 18 sts. Rnd 4: Sc 2 in each of next 2 sts, sc in each of next 5 sts, 2 sc in each of next 3 sts, sc in each of next 7 sts, 2 sc in last st 24 sts. Rnd 5: (Sc in next st, 2 sc in following st) 2 times, sc in each of next 5 sts, (sc in next st, 2 sc in following st) 3 times, sc in each of next 8 sts, 2 sc in last st 30 sts. Rnd 6: (Sc in each of next 4 sts, 2 sc in following st) 6 times 36 sts. Rnd 7: (Sc in each of next 5 sts, 2 sc in following st) 6 times 42 sts. Rnd 8: (Sc in each of next 5 sts, 2 sc in following st) 7 times 49 sts. Rnd 9: (Sc in each of next 6 sts, 2 sc in following st) 7 times 56 sts. Rnds 10 22: Sc around. Rnd 23: Through front loops only, sc in each of next 4 sts, ([2 dc in next st] twice, dc, [2 dc in next st] twice, sl st) 7 times, sc in each of rem 10 sts 84 sts.
 6 times 18 sts. Rnds 4 6: Sc around. Rnd 7: (Sc in each of next 4 sts, sc2tog) 3 times 15 sts. Rnd 8: Sc around.")
33 Wool at the top of Lila s head. Ears Make 2. With cream, make a magic circle. Rnd 1: Work 6 sc in ring. Rnd 2: *Sc 2 in next sc; rep from * around 12 sts. Rnd 3: (Sc in next st, 2 sc in following st) 6 times 18 sts. Rnds 4 6: Sc around. Rnd 7: (Sc in each of next 4 sts, sc2tog) 3 times 15 sts. Rnd 8: Sc around. Rnd 9: (Sc in each of next 3 sts, sc2tog) 3 times 12 sts. Rnd 10: Sc around. Rnd 11: (Sc in each of next 2 sts, sc2tog) 3 times 9 sts. Rnd 12: Sc around. Arms Make 2. With cream, make a magic circle.
34 Rnd 1: Work 6 sc in ring. Rnd 2: *Sc 2 in next sc; rep from * around 12 sts. Rnd 3: (Sc in each of next 3 sts, 2 sc in following st) 3 times 15 sts. Rnds 4 6: Sc around. Rnd 7: (Sc in each of next 3 sts, sc2tog) 3 times 12 sts. Rnds 8 11: Sc around. Rnd 12: (Sc in each of next 2 sts, sc2tog) 3 times 9 sts. Rnds 13 15: Sc around. Stuff. Rnd 16: With white, (puff, sc in next st) 4 times, sl st in last st. Legs Make 2. With tan, make a magic circle. Rnd 1: Work 6 sc in ring. Rnd 2: *Sc 2 in next sc; rep from * around 12 sts. Rnd 3: (Sc in next st, 2 sc in following st) 6 times 18 sts. Rnd 4: (Sc in each of next 2 sts, 2 sc in following st) 6 times 24 sts. Rnd 5: Sc in each of next 9 sts, sc2tog 3 times, sc in each of rem 9 sts 21 sts. Rnd 6: Sc in each of next 6 sts, sc2tog 5 times, sc in each of rem 5 sts 16 sts. Rnd 7: Sc around. Rnd 8: With cream, sc around. Stuff firmly up to this round only. Rnd 9: (Sc in each of next 2 sts, sc2tog) 4 times 12 sts. Rnds 10 and 11: Sc around. Rnd 12: (Sc in each of next 2 sts, sc2tog) 3 times 9 sts. Rnds 13 16: Sc around. Body With white, make a magic circle. Count puff as one st, and ch 1 at end of puff as a second st throughout. On subsequent rnds, work sts into the top of each puff and in each ch 1. Rnd 1: Work 6 sc in ring.
35 Rnd 2: Puff 6 times 12 sts. Rnd 3: (Sc in next st, 2 sc in following st) 6 times 18 sts. Rnd 4: Puff 18 times 36 sts. Rnd 5: (Sc in each of next 8 sts, 2 sc in following st) 4 times 40 sts. Rnd 6: (Puff, sc in next st) 20 times 60 sts. Rnd 7: (Sc in next st, sc2tog) 20 times 40 sts. Rnd 8: (Puff, sc in next st, puff, sc2tog) 8 times 48 sts. Rnd 9: (Sc in next st, sc2tog) 16 times 32 sts. Rnd 10: (Puff, sc in next st) 16 times 48 sts. Rnd 11: (Sc, sc2tog) 16 times 32 sts. Rnd 12: (Puff, sc2tog) 10 times, puff, sc in last st 33 sts. Rnd 13: (Sc in next st, sc2tog) 11 times 22 sts. Rnd 14: Puff, sc in next st, (puff, sc2tog) 6 times, puff, sc in last st 24 sts. Rnd 15: (Puff, sc2tog) 8 times 24 sts. Rnd 16: (Sc in each of next 2 sts, sc2tog) 6 times 18 sts. Assembly Sew top head wool to head wool. Fold end of ears in half, and add a bit of blush to inside of ear using a cotton swab. Sew ears in place on top head wool. Attach safety eyes between rnds 19 and 20 with approx 12 sts in between. With embroidery floss, embroider a Y shape between eyes as shown. Stuff head firmly. Sew head wool to head. Sew feet to body. Stuff arms firmly and sew to body. Stuff body firmly. Sew head in place. Weave in ends.

36 Mia Bunny A few years back, I learned about a game called Chubby Bunny, and that phrase inspired the shape of little Mia. Her simple egg-shaped figure is given a personality through her lively green ears, scarf, and cute little tush.

37 Skill Level: Easy Finished Size: 9¼" tall Materials See page 60 for more about yarns. Yarn: Light worsted- or DK-weight 4-ply acrylic yarn 160 yds in white for arms, legs, head, and body 60 yds in green for ears, tail, and scarf Hooks and Notions: US Size F-5 (3.75 mm) crochet hook
 6 times 18 sts. Rnd 4: (Sc in each of next 2 sts, 2 sc in following st) 6 times 24 sts.")
38 2 buttons, 20 mm diameter, for eyes Stitch marker, fiberfill stuffing, tapestry needle Ears Make 2. With green, make a magic circle (page 61). Rnd 1: Work 6 sc in ring. Rnd 2: *Sc 2 in next sc; rep from * around 12 sts. Rnd 3: (Sc in next st, 2 sc in following st) 6 times 18 sts. Rnd 4: (Sc in each of next 2 sts, 2 sc in following st) 6 times 24 sts. Rnd 5: (Sc in each of next 3 sts, 2 sc in following st) 6 times 30 sts. Rnds 6 12: Sc around. Rnd 13: (Sc in each of next 3 sts, sc2tog) 6 times 24 sts. Rnds 14 18: Sc around. Rnd 19: (Sc in each of next 2 sts, sc2tog) 6 times 18 sts. Rnds 20 22: Sc around. Leave the ears unstuffed so they ll be flexible. Arms
39 Make 2. With white, make a magic circle. Rnd 1: Work 6 sc in ring. Rnd 2: *Sc 2 in next sc; rep from * around 12 sts. Rnd 3: (Sc in next st, 2 sc in following st) 6 times 18 sts. Rnds 4 9: Sc around. Legs Make 2. With white, make a magic circle. Rnd 1: Work 5 sc in ring. Rnd 2: *Sc 2 in next sc; rep from * around 10 sts. Rnd 3: (Sc in next st, 2 sc in following st) 5 times 15 sts. Rnd 4: (Sc in each of next 2 sts, 2 sc in following st) 5 times 20 sts. Rnd 5: (Sc in each of next 3 sts, 2 sc in following st) 5 times 25 sts. Rnd 6: (Sc in each of next 4 sts, 2 sc in following st) 5 times 30 sts. Rnd 7: Sc around. Rnd 8: Sc in each of next 12 sts, sc2tog 3 times, sc in each of rem 12 sts 27 sts. Rnd 9: Sc in each of next 10 sts, sc2tog 3 times, sc in each of rem 11 sts 24 sts. Rnd 10: Sc in each of next 9 sts, sc2tog 3 times, sc in each of rem 9 sts 21 sts. Rnd 11: Sc in each of next 5 sts, sc2tog 6 times, sc in each of rem 4 sts 15 sts. Rnds 12 15: Sc around. Tail With green, make a magic circle. Rnd 1: Work 6 sc in ring. Rnd 2: *Sc 2 in next sc; rep from * around 12 sts. Rnd 3: (Sc in next st, 2 sc in following st) 6 times 18 sts. Rnd 4: (Sc in each of next 2 sts, 2 sc in following st) 6 times 24 sts. Rnds 5 7: Sc around. Rnd 8: (Sc in each of next 2 sts, sc2tog) 6 times 18 sts. Rnd 9: (Sc in next st, sc2tog) 6 times 12 sts.
 6 times 18 sts. Rnd 4: (Sc in each of next 2 sts, 2 sc in following st) 6 times 24 sts.")
40 Stuff the tail before attaching. Scarf With green, ch 88. Row 1: Hdc in 3rd ch from hook and each ch across. Fasten off. Head and Body With white, make a magic circle. Rnd 1: Work 6 sc in ring. Rnd 2: *Sc 2 in next sc; rep from * around 12 sts. Rnd 3: (Sc in next st, 2 sc in following st) 6 times 18 sts. Rnd 4: (Sc in each of next 2 sts, 2 sc in following st) 6 times 24 sts. Rnd 5: (Sc in each of next 3 sts, 2 sc in following st) 6 times 30 sts. Rnd 6: (Sc in each of next 4 sts, 2 sc in following st) 6 times 36 sts. Rnd 7: Sc around. Rnd 8: (Sc in each of next 5 sts, 2 sc in following st) 6 times 42 sts. Rnd 9: (Sc in each of next 6 sts, 2 sc in following st) 6 times 48 sts. Rnd 10: (Sc in each of next 7 sts, 2 sc in following st) 6 times 54 sts. Rnd 11: (Sc in each of next 8 sts, 2 sc in following st) 6 times 60 sts.
41 Rnd 12: (Sc in each of next 9 sts, 2 sc in following st) 6 times 66 sts. Sew ears to top of head, starting at rnd 3. Rnds 13 32: Sc around. Sew eyes between rnds 16 and 20, leaving 9 sts in between. With green, embroider a small X, 2 sts tall and 2 sts wide, between them. Rnd 33: (Sc in each of next 10 sts, 2 sc in following st) 6 times 72 sts. Rnds 34 36: Sc around. Rnd 37: (Sc in each of next 4 sts, sc2tog) 12 times 60 sts. Rnd 38: (Sc in each of next 8 sts, sc2tog) 6 times 54 sts. Rnd 39: (Sc in each of next 7 sts, sc2tog) 6 times 48 sts. Rnd 40: (Sc in each of next 6 sts, sc2tog) 6 times 42 sts. Rnd 41: (Sc in each of next 5 sts, sc2tog) 6 times 36 sts. Rnd 42: (Sc in each of next 4 sts, sc2tog) 6 times 30 sts. Rnd 43: (Sc in each of next 3 sts, sc2tog) 6 times 24 sts. Stuff firmly. Rnd 44: (Sc in each of next 2 sts, sc2tog) 6 times 18 sts. Rnd 45: (Sc in next st, sc2tog) 6 times 12 sts. Rnd 46: Sc in every other st 6 sts. Assembly Stuff tail, arms, and legs firmly. Sew arms to body, 3 rnds below eyes. Sew tail in place. Sew legs in place as shown. Wrap scarf around neck and sew in place. Weave in ends.

42 Wrap the scarf around Mia s neck.

43 Connor Frog Jazzy Connor s pattern is all about bright colors and unconventional shapes. Made with simple techniques, the different parts combine to create a perfect little frog for playtime. Sparks of color in his accessories add extra pizzazz.

44 Skill Level: Easy Finished Size: 9½" tall Materials See page 60 for more about yarns. Yarn: Light worsted- or DK-weight 4-ply acrylic yarn 120 yds in apple green for head, body, arms, and legs 30 yds in yellow for hat and bow 2 yds in white for eyes 1 yd in brown for trim Hooks and Notions:
 6 times 18 sts. Rnd 4: Through back loops only, sc around. Rnds 5 8: Sc around.")
45 US Size F-5 (3.75 mm) crochet hook Stitch marker, fiberfill stuffing, tapestry needle Hat With yellow, make a magic circle (page 61). Rnd 1: Work 6 sc in ring. Rnd 2: *Sc 2 in next sc; rep from * around 12 sts. Rnd 3: (Sc in next st, 2 sc in following st) 6 times 18 sts. Rnd 4: Through back loops only, sc around. Rnds 5 8: Sc around. Rnd 9: Through front loops only, (hdc in next st, 2 hdc in next st) 9 times 27 sts. Rnd 10: (Sc in each of next 2 sts, 2 sc in following st) 9 times 36 sts. Connor s dapper hat. Front of Eyes Make 2. With brown, make a magic circle. Rnd 1: Work 5 sc in ring. Rnd 2: With white, *2 sc in next sc; rep from * around 10 sts.
46 Rnd 3: (Sc in next st, 2 sc in following st) 5 times 15 sts. Rnd 4: (Sc in each of next 2 sts, 2 sc in following st) 5 times 20 sts. Fasten off. Back of Eyes Make 2. With white, make a magic circle. Rnd 1: Work 5 sc in ring. Rnd 2: *Sc 2 in next sc; rep from * around 10 sts. Rnd 3: (Sc in next st, 2 sc in following st) 5 times 15 sts. Rnd 4: (Sc in each of next 2 sts, 2 sc in following st) 5 times 20 sts. Head With apple green, make a magic circle. Rnd 1: Work 7 sc in ring. Rnd 2: *Sc 2 in next sc; rep from * around 14 sts. Rnd 3: (Sc in next st, 2 sc in following st) 7 times 21 sts. Rnd 4: (Sc in each of next 2 sts, 2 sc in following st) 7 times 28 sts. Rnd 5: (Sc in each of next 3 sts, 2 sc in following st) 7 times 35 sts. Rnds 6 8: Sc around. Rnd 9: (Sc in each of next 4 sts, 2 sc in following st) 7 times 42 sts. Rnd 10: (Sc in each of next 5 sts, 2 sc in following st) 7 times 49 sts. Rnd 11: (Sc in each of next 6 sts, 2 sc in following st) 7 times 56 sts. Rnds 12 21: Sc around. Rnd 22: (Sc in each of next 6 sts, sc2tog) 7 times 49 sts. Rnd 23: (Sc in each of next 5 sts, sc2tog) 7 times 42 sts. Rnd 24: (Sc in each of next 4 sts, sc2tog) 7 times 35 sts. Rnd 25: (Sc in each of next 3 sts, sc2tog) 7 times 28 sts. Rnd 26: (Sc in each of next 2 sts, sc2tog) 7 times 21 sts. Rnd 27: (Sc in next st, sc2tog) 7 times 14 sts. Fasten off.
47 Bow Tie With yellow, ch 15. Row 1: Hdc in 3rd ch from hook and in each ch across, turn 13 sts. Rows 2 and 3: Ch 2, hdc across, turn 13 sts. Row 4: Ch 2, hdc across. Fasten off. Body With apple green, make a magic circle. Rnd 1: Work 6 sc in ring. Rnd 2: *Sc 2 in next sc; rep from * around 12 sts. Rnd 3: (Sc in next st, 2 sc in following st) 6 times 18 sts. Rnd 4: (Sc in each of next 2 sts, 2 sc in following st) 6 times 24 sts. Rnd 5: (Sc in each of next 3 sts, 2 sc in following st) 6 times 30 sts. Rnd 6: (Sc in each of next 4 sts, 2 sc in following st) 6 times 36 sts. Rnd 7: (Sc in each of next 5 sts, 2 sc in following st) 6 times 42 sts. Rnd 8: (Sc in each of next 6 sts, 2 sc in following st) 6 times 48 sts. Rnd 9: (Sc in each of next 7 sts, 2 sc in following st) 6 times 54 sts. Rnds 10 14: Sc around. Rnd 15: (Sc in each of next 7 sts, sc2tog) 6 times 48 sts. Rnds 16 18: Sc around. Rnd 19: (Sc in each of next 6 sts, sc2tog) 6 times 42 sts. Rnds 20 22: Sc around. Rnd 23: (Sc in each of next 5 sts, sc2tog) 6 times 36 sts. Rnds 24 26: Sc around. Rnd 27: (Sc in each of next 4 sts, sc2tog) 6 times 30 sts. Rnds 28 and 29: Sc around. Rnd 30: (Sc in each of next 3 sts, sc2tog) 6 times 24 sts. Rnd 31: Sc around. Rnd 32: (Sc in each of next 2 sts, sc2tog) 6 times 18 sts. Rnd 33: Sc around.
48 Arms Make 2. With apple green, make a magic circle. Rnd 1: Work 6 sc in ring. Rnd 2: *Sc 2 in next sc; rep from * around 12 sts. Rnd 3: (Sc in next st, 2 sc in following st) 6 times 18 sts. Rnds 4 11: Sc around. Rnd 12: (Sc in next st, sc2tog) 6 times 12 sts. Rnds 13 32: Sc around. Legs Make 2. With apple green, make a magic circle. Rnd 1: Work 6 sc in ring. Rnd 2: *Sc 2 in next sc; rep from * around 12 sts. Rnd 3: (Sc in next st, 2 sc in following st) 6 times 18 sts. Rnd 4: (Sc in each of next 2 sts, 2 sc in following st) 6 times 24 sts. Rnd 5: (Sc in each of next 3 sts, 2 sc in following st) 6 times 30 sts. Rnd 6: Sc in each of first 9 sts, sc2tog 6 times, sc in each of rem 9 sts 24 sts. Rnd 7: Sc in each of next 6 sts, sc2tog 6 times, sc in each of rem 6 sts 18 sts. Rnd 8: Sc in each of next 6 sts, sc2tog 3 times, sc in each of rem 6 sts 15 sts. Rnds 9 13: Sc around. Rnd 14: (Sc in each of next 3 sts, sc2tog) 3 times 12 sts. Rnds 15 and 16: Sc around. Rnd 17: (Sc in each of next 2 sts, sc2tog) 3 times 9 sts. Rnd 18: Sc around. Assembly Sew hat to head. Sew backs of eyes to fronts, lightly stuffing if desired. Sew eyes directly beside hat on each side of head. With brown, embroider a wide V in center of head for smile. Stuff head firmly. Wrap white yarn tightly around center of bow tie to shape it. Sew in place. Stuff arms lightly; do not stuff legs. Sew arms

49 and legs to body. Stuff body firmly. Sew head in place on body. Weave in ends. Side view of limb alignment.


50 Brian Turtle What a cute little turtle! Brian s bright-blue shell gives him a very beachy feel, or you might try dark green or brown for a woodland look. His pattern is easy to learn, so you ll want to make more than one!
51 Skill Level: Beginner Finished Size: 9½" long Materials See page 60 for more about yarns. Yarn: Light worsted- or DK-weight 4-ply acrylic yarn 90 yds in apple green for head, arms, and legs 90 yds in blue for shell Hooks and Notions: US Size F-5 (3.75 mm) crochet hook 2 buttons, 20 mm diameter, for eyes Stitch marker, fiberfill stuffing, tapestry needle Head With apple green, make a magic circle (page 61). Rnd 1: Work 6 sc in ring. Rnd 2: *Sc 2 in next sc; rep from * around 12 sts. Rnd 3: (Sc in next st, 2 sc in following st) 6 times 18 sts. Rnd 4: (Sc in each of next 2 sts, 2 sc in following st) 6 times 24 sts. Rnd 5: (Sc in each of next 3 sts, 2 sc in following st) 6 times 30 sts. Rnd 6: (Sc in each of next 4 sts, 2 sc in following st) 6 times 36 sts. Rnd 7: (Sc in each of next 5 sts, 2 sc in following st) 6 times 42 sts. Rnd 8: (Sc in each of next 6 sts, 2 sc in following st) 6 times 48 sts. Rnds 9 21: Sc around. Rnd 22: Sc in each of next 22 sts, 2 sc in each of next 4 sts (nose made), sc in each of rem 22 sts 52 sts. Rnd 23: Sc in each of next 22 sts, sc2tog 4 times, sc in each of rem 22 sts 48 sts. Rnd 24: (Sc in each of next 6 sts, sc2tog) 6 times 42 sts. Rnd 25: (Sc in each of next 5 sts, sc2tog) 6 times 36 sts. Sew eyes in place on head. Stuff firmly.
 6 times 12 sts. Rnd 30: Sc in every other st 6 sts. Fasten off. Stuff head. Weave in ends, pulling yarn tail through back of head and leaving it long for sewing.")
52 Rnd 26: (Sc in each of next 4 sts, sc2tog) 6 times 30 sts. Rnd 27: (Sc in each of next 3 sts, sc2tog) 6 times 24 sts. Rnd 28: (Sc in each of next 2 sts, sc2tog) 6 times 18 sts. Rnd 29: (Sc in next st, sc2tog) 6 times 12 sts. Rnd 30: Sc in every other st 6 sts. Fasten off. Stuff head. Weave in ends, pulling yarn tail through back of head and leaving it long for sewing. Eye placement. Shell With blue, ch 7. Rnd 1: Sc in 2nd ch from hook and in each of next 4 sts, 2 sc in following st. Turn foundation ch, sc in each of first 5 ch, 2 sc in last ch 14 sts. Rnd 2: (Sc in next st, 2 sc in following st) 7 times 21 sts. Rnd 3: (Sc in each of next 2 sts, 2 sc in following st) 7 times 28 sts. Rnd 4: (Sc in each of next 3 sts, 2 sc in following st) 7 times 35 sts.
53 Rnd 5: (Sc in each of next 4 sts, 2 sc in following st) 7 times 42 sts. Rnd 6: (Sc in each of next 5 sts, 2 sc in following st) 7 times 49 sts. Rnd 7: (Sc in each of next 6 sts, 2 sc in following st) 7 times 56 sts. Rnd 8: (Sc in each of next 7 sts, 2 sc in following st) 7 times 63 sts. Rnd 9: Hdc around. Rnd 10: (Sc in each of next 8 sts, 2 sc in following st) 7 times 70 sts. Rnds 11 16: Sc around. Rnd 17: Through front loops only, (hdc in each of next 4 sts, 2 hdc in following st) 14 times 84 sts. Through back loops only of same rnd, (sc in each of next 2 sts, sc2tog) 21 times 63 sts. Rnd 18: (Sc in each of next 7 sts, sc2tog) 7 times 56 sts. Rnd 19: (Sc in each of next 6 sts, sc2tog) 7 times 49 sts. Rnd 20: (Sc in each of next 5 sts, sc2tog) 7 times 42 sts. Rnd 21: (Sc in each of next 4 sts, sc2tog) 7 times 35 sts. Rnd 22: (Sc in each of next 3 sts, sc2tog) 7 times 28 sts. Rnd 23: (Sc in each of next 2 sts, sc2tog) 7 times 21 sts. Rnd 24: (Sc in next st, sc2tog) 7 times 14 sts. Rnd 25: Sc in every other st 7 sts. Fasten off. Stuff firmly. Weave in ends.
 3 times 15 sts.")
54 Top-down view of Brian s shell. Arms Make 2. With apple green, make a magic circle. Rnd 1: Work 6 sc in ring. Rnd 2: *Sc 2 in next sc; rep from * around 12 sts. Rnd 3: (Sc in each of next 3 sts, 2 sc in following st) 3 times 15 sts. Rnds 4 12: Sc around. Legs Make 2.
55 With apple green, make a magic circle. Rnd 1: Work 6 sc in ring. Rnd 2: *Sc 2 in next sc; rep from * around 12 sts. Rnd 3: Sc in each of next 3 sts, 2 sc in each of next 6 sts, sc in each of rem 3 sts 18 sts. Rnd 4: Sc in each of next 3 sts, (sc in next st, 2 sc in following st) 6 times, sc in each of rem 3 sts 24 sts. Rnd 5: Sc around. Rnd 6: Sc in each of next 3 sts, (sc in next st, sc2tog) 6 times, sc in each of rem 3 sts 18 sts. Rnd 7: Sc in each of next 3 sts, sc2tog 6 times, sc in each of rem 3 sts 12 sts. Rnds 8 15: Sc around. Assembly Sew arms and legs to bottom of shell. Sew head to shell using yarn tail on head.

56 Leg and arm placement.


57 Elliott Giraffe Elliott is one of the thinner amigurumi in this book, but that doesn t mean he s not as fun to hug and play with! With his bright-blue spots, cream muzzle, and yellow body, he s one little giraffe ready for fun.
58 Skill Level: Easy Finished Size: 10" tall Materials See page 60 for more about yarns. Yarn: Light worsted- or DK-weight 4-ply acrylic yarn 90 yds in yellow for ears, head, body, and legs 45 yds in blue for spots, mane, horns, and tail 5 yds in cream for muzzle 3 yds in chocolate brown for trim Hooks and Notions: US Size F-5 (3.75 mm) crochet hook 2 safety eyes, 15 mm diameter Stitch marker, fiberfill stuffing, tapestry needle Horns Make 2. With blue, make a magic circle (page 61). Rnd 1: Work 4 sc in ring. Rnd 2: *Sc 2 in next sc; rep from * around 8 sts. Rnds 3 5: Sc around. Ears Make 2. With yellow, make a magic circle. Rnd 1: Work 4 sc in ring. Rnd 2: *Sc 2 in next sc; rep from * around 8 sts. Rnd 3: (Sc in next st, 2 sc in following st) 4 times 12 sts. Rnd 4: (Sc in each of next 2 sts, 2 sc in following st) 4 times 16 sts. Rnds 5 and 6: Sc around.
59 Rnd 7: (Sc in each of next 2 sts, sc2tog) 4 times 12 sts. Rnd 8: Sc around. Rnd 9: (Sc in next st, sc2tog) 4 times 8 sts. Spots Make 5 or number desired. With blue, make a magic circle. Rnd 1: Work 5 sc in ring. Rnd 2: *Sc 2 in next sc; rep from * around 10 sts. Mane With blue, ch 40. Make 4 hdc in 3rd ch from hook, sl st in next st, *ch 3, sc in 2nd and 3rd ch from hook, sl st in next ch of foundation ch; rep from * to end. Fasten off, leaving a long tail for sewing
 6 times 18 sts. Rnd 4: (Sc in each of next 2 sts, 2 sc in following st) 6 times 24 sts.")
60 Head Elliott s mane is crocheted separately and attached during finishing. With yellow, make a magic circle. Rnd 1: Work 6 sc in ring. Rnd 2: *Sc 2 in next sc; rep from * around 12 sts. Rnd 3: (Sc in next st, 2 sc in following st) 6 times 18 sts. Rnd 4: (Sc in each of next 2 sts, 2 sc in following st) 6 times 24 sts. Rnd 5: (Sc in each of next 3 sts, 2 sc in following st) 6 times 30 sts. Rnd 6: (Sc in each of next 5 sts, 2 sc in following st) 5 times 35 sts. Rnd 7: (Sc in each of next 6 sts, 2 sc in following st) 5 times 40 sts. Rnds 8 16: Sc around. Rnd 17: With cream, (sc in each of next 7 sts, 2 sc in following st) 5 times 45 sts. Rnd 18: Sc around.
61 Rnd 19: (Sc in each of next 7 sts, sc2tog) 5 times 40 sts. Rnd 20: (Sc in each of next 3 sts, sc2tog) 8 times 32 sts. Rnd 21: (Sc in each of next 2 sts, sc2tog) 8 times 24 sts. Rnd 22: (Sc in each of next 2 sts, sc2tog) 6 times 18 sts. Rnd 23: (Sc in next st, sc2tog) 6 times 12 sts. Rnds 24 32: With yellow, sc around. Body With yellow, make a magic circle. Rnd 1: Work 6 sc in ring. Rnd 2: *Sc 2 in next sc; rep from * around 12 sts. Rnd 3: Sc in each of next 2 sts, 2 sc in each of next 6 sts, sc in each of rem 4 sts 18 sts. Rnd 4: Sc in each of next 2 sts, (sc in next st, 2 sc in following st) 6 times, sc in each of rem 4 sts 24 sts. Rnd 5: Sc in each of next 2 sts, (sc in each of next 2 sts, 2 sc in following st) 6 times, sc in each of rem 4 sts 30 sts. Rnd 6: Sc in each of next 12 sts, 2 sc in each of next 6 sts, sc in each of rem 12 sts 36 sts. Rnd 7: Sc in each of next 15 sts, 2 sc in each of next 6 sts, sc in each of rem 15 sts 42 sts. Rnds 8 and 9: Sc around. Rnd 10: (Sc in each of next 5 sts, sc2tog) 6 times 36 sts. Rnds 11 13: Sc around. Rnd 14: (Sc in each of next 4 sts, sc2tog) 6 times 30 sts. Rnd 15: (Sc in each of next 3 sts, sc2tog) 6 times 24 sts. Rnd 16: (Sc in each of next 2 sts, sc2tog) 6 times 18 sts. Rnd 17: (Sc in next st, sc2tog) 6 times 12 sts. Rnd 18: (Sc in next st, sc2tog) 4 times 8 sts. Rnd 19: (Sc in next 2 sts, sc2tog) 2 times 6 sts. Legs Make 4. With chocolate brown, make a magic circle.

62 Rnd 1: Work 4 sc in ring. Rnd 2: *Sc 2 in next sc; rep from * around 8 sts. Rnds 3 and 4: Sc around. Rnds 5 14: With yellow, sc around. Rnd 15: Sc 2 in each of next 2 sts, sc in each of next 6 sts 10 sts. Tail With blue, ch 10. Sc 3 in 2nd ch from hook and sl st in every other st across. Assembly Attach safety eyes just above color change, leaving 10 sts between eyes. With chocolate brown, embroider small Y for nose. Sew ears to head. Sew horns to top of head, leaving room for mane. Sew mane in place, starting with rnd 5 on front of head. Sew spots in place as desired. Sew tail to body. Firmly stuff head, body, and legs. Sew neck to body. Sew legs in place. Weave in ends. Embroidered nose.

63 Horn and mane placement.


64 Moby Whale For little Moby, color and simplicity are what it s all about. A simple shaping technique and double-stranded variegated yarn create that gorgeous mix of blues, yellow, and white you can find in the ocean. Double stranding adds extra cushion too! Shiny beads act as water droplets to top off the look with extra glitter and glam.
65 Skill Level: Easy Finished Size: 11" long Materials See page 60 for more about yarns. Yarn: Light worsted- or DK-weight 4-ply acrylic yarn 500 yds in yellow-and-blue variegated for body 10 yds in blue for water spout and fins Hooks and Notions: US Size 7 (4.5 mm) crochet hook US Size E-4 (3.5 mm) crochet hook 2 buttons, 20 mm diameter, for eyes Stitch marker, fiberfill stuffing, tapestry needle Round glass beads, in number desired Embroidery floss, in color to match beads Water Spout With blue and smaller hook, make a magic circle (page 61). Rnd 1: Work 6 sc in ring. Rnd 2: *Sc 2 in next sc; rep from * around 12 sts. Rnd 3: Sc around. Rnd 4: (Ch 5, sc in 2nd ch from hook and in each of next 3 ch, sl st through front loop only of next st) 12 times. Through back loops only of same rnd, (sc in each of next 2 sts, sc2tog) 3 times 9 sts. Rnds 5 9: Sc around.
 6 times 18 sts. Rnd 4: (Sc in each of next 2 sts, 2 sc in following st) 6 times 24 sts.")
66 Top view of water spout. Fins Make 2. With blue and smaller hook, make a magic circle. Rnd 1: Work 6 sc in ring. Rnd 2: *Sc 2 in next sc; rep from * around 12 sts. Rnd 3: (Sc in next st, 2 sc in following st) 6 times 18 sts. Rnd 4: (Sc in each of next 2 sts, 2 sc in following st) 6 times 24 sts. Rnd 5: Sc in each of next 11 sts, hdc in next st, ch 1, hdc in next st, sc in each of rem 11 sts 24 sts.
 6 times 18 sts. Rnd 4: (Sc in each of next 2 sts, 2 sc in following st) 6 times 24 sts.")
67 Fin stitched to Moby s side. Body With 2 strands of yellow-and-blue variegated and larger hook, make a magic circle. Rnd 1: Work 6 sc in ring. Rnd 2: *Sc 2 in next sc; rep from * around 12 sts. Rnd 3: (Sc in next st, 2 sc in following st) 6 times 18 sts. Rnd 4: (Sc in each of next 2 sts, 2 sc in following st) 6 times 24 sts. Rnd 5: (Sc in each of next 3 sts, 2 sc in following st) 6 times 30 sts. Rnd 6: (Sc in each of next 4 sts, 2 sc in following st) 6 times 36 sts. Rnd 7: (Sc in each of next 5 sts, 2 sc in following st) 6 times 42 sts. Rnd 8: (Sc in each of next 6 sts, 2 sc in following st) 6 times 48 sts. Rnd 9: (Sc in each of next 7 sts, 2 sc in following st) 6 times 54 sts. Rnd 10: (Sc in each of next 8 sts, 2 sc in following st) 6 times 60 sts. Rnd 11: (Sc in each of next 9 sts, 2 sc in following st) 6 times 66 sts. Rnds 12 23: Sc around. Rnd 24: Sc in each of next 27 sts, sc2tog 6 times, sc in each of rem 27 sts 60 sts. Rnds 25 27: Sc around. Rnd 28: Sc in each of next 21 sts, (sc in next st, sc2tog in next st) 6 times, sc in each of rem 21 sts 54 sts.
68 Rnds 29 31: Sc around. Rnd 32: Sc in each of next 18 sts, (sc in next st, sc2tog in next st) 6 times, sc in each of rem 18 sts 48 sts. Begin stuffing. Rnd 33: Sc around. Rnd 34: Sc in each of next 6 sts, (sc in next st, sc2tog in next st) 12 times, sc in each of rem 6 sts 36 sts. Rnds 35 and 36: Sc around. Rnd 37: (Sc in next st, sc2tog) 3 times, sc in each of next 18 sts, (sc in next st, sc2tog) 3 times 30 sts. Rnds 38 and 39: Sc around. Rnd 40: (Sc in next st, sc2tog) 3 times, (sc in next st, 2 sc in following st) 6 times, (sc in next st, sc2tog) 3 times 30 sts. Rnds 41 and 42: Sc around. Rnd 43: Rep rnd 40. Rnds 44 and 45: Sc around. Rnd 46: Rep rnd 40. Rnds 47 and 48: Sc around. Rnd 49: Sc in each of next 7 sts, (sc in each of next 2 sts, 2 sc in following st) 5 times, sc in each of remaining 8 sts 35 sts. Rnds 50 and 51: Sc around. Rnd 52: (Sc in each of next 5 sts, sc2tog) 5 times 30 sts. Rnd 53: (Sc in each of next 3 sts, sc2tog) 6 times 24 sts. Rnd 54: (Sl st, sc, 2 hdc, hdc, dc, 2 dc, 2 dc, dc, hdc, 2 hdc, sc, sl st) 2 times 32 sts. Rnds 55 and 56: (Sl st, sc, hdc in each of next 3 sts, dc in each of next 6 sts, hdc in each of next 3 st, sc, sl st) 2 times 32 sts. Assembly Sew beads to lower edge of water spout. Stuff spout firmly. Sew eyes, fins, and water spout in place. Stuff rest of body firmly. Flatten tail and sew tog.


69 Beads sewn to the spout add the look of water droplets. TIPS AND TRICKS Over my past few years of making amigurumi, I ve stumbled onto some cool tips and tricks that will immediately make your amigurumi stand out! If you want your stitches to look like Xs (like mine), wrap the yarn around the hook from the bottom up (opposite of the usual way) after inserting your hook through the stitch. Complete as normal. Hate overstuffed amigurumi? Shape your amigurumi as you would a clay figure and remove any excess stuffing. This neat and dandy trick makes for perfectly stuffed amigurumi every time! Want your amigurumi to double as a rattle? Fill a small plastic case halfway with little beads. Tape it securely and stuff it together with the fiberfill stuffing.
70 If you want to give your amigurumi a little extra pizzazz, use a cotton swab to brush powdered blush (even shavings from a pink/red colored pencil will do) onto your ami. Want your toys to be bendable? Cut lengths of coated wire or pipe cleaners to fit and insert into legs, tail any part you d like then stuff.


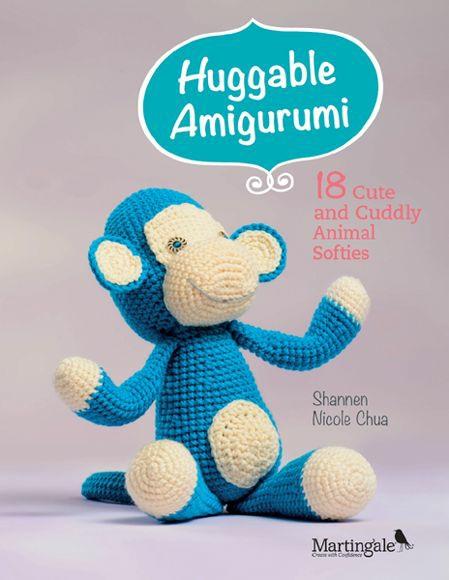
71 Monty Monkey Monty s vibrant personality is matched perfectly by his bright blue fur! Although some assembly is required with Monty, the simplicity of the pattern makes up for it. From his cute muzzle to unique button eyes, Monty s the perfect monkey to hug at night.
72 Skill Level: Easy Finished Size: 13½" tall Materials See page 60 for more about yarns. Yarn: Light worsted- or DK-weight 4-ply acrylic yarn 200 yds in blue for head, ears, body, arms, legs, and tail 65 yds in cream for face, tummy, and trim 1 yd in gray for smile Hooks and Notions: US Size F-5 (3.75 mm) crochet hook 2 buttons, 15 mm diameter, for eyes Stitch marker, fiberfill stuffing, tapestry needle Face With cream, ch 7. Rnd 1: Sc in 2nd ch from hook and in each of next 4 ch, 2 sc in last st. Turn foundation ch. On opposite side of foundation ch, sc in each of next 5 ch, 2 sc in last ch 14 sts. Rnd 2: (Sc in next st, 2 sc in following st) 7 times 21 sts. Rnd 3: (Sc in each of next 2 sts, 2 sc in following st) 7 times 28 sts. Rnd 4: (Sc in each of next 3 sts, 2 sc in following st) 7 times 35 sts. Rnd 5: (Sc in each of next 4 sts, 2 sc in following st) 7 times 42 sts. Rnds 6 9: Sc around. Rnd 10: (Sc in each of next 5 sts, sc2tog) 6 times 36 sts. Begin working back and forth in rows. Row 1: Through front loops only, sc in each of next 14 sts, ch 1, turn 14 sts. Rows 2 6: Sc in each st across, ch 1, turn. Row 7: Sc2tog, sc in each of next 10 sts, sc2tog, ch 1, turn 12 sts. Row 8: Sc in each of next 2 sts, hdc in each of next 2 sts, dc in next st, (2 dc in next st) 2 times, dc in next st, hdc in each of next 2 sts, sc in each of rem 2 sts 14 sts.
73 Head With blue, make a magic circle (page 61). Rnd 1: Work 6 sc in ring. Rnd 2: *Sc 2 in next sc; rep from * around 12 sts. Rnd 3: (Sc in next st, 2 sc in following st) 6 times 18 sts. Rnd 4: (Sc in each of next 2 sts, 2 sc in following st) 6 times 24 sts. Rnd 5: (Sc in each of next 3 sts, 2 sc in following st) 6 times 30 sts. Rnd 6: (Sc in each of next 4 sts, 2 sc in following st) 6 times 36 sts. Rnd 7: (Sc in each of next 5 sts, 2 sc in following st) 6 times 42 sts. Rnd 8: (Sc in each of next 6 sts, 2 sc in following st) 6 times 48 sts. Rnds 9 23: Sc around. Rnd 24: (Sc in each of next 6 sts, sc2tog) 6 times 42 sts. Rnd 25: (Sc in each of next 5 sts, sc2tog) 6 times 36 sts. Rnd 26: (Sc in each of next 4 sts, sc2tog) 6 times 30 sts. Rnd 27: (Sc in each of next 3 sts, sc2tog) 6 times 24 sts. Rnd 28: (Sc in each of next 2 sts, sc2tog) 6 times 18 sts. Fasten off. Inner Ears Make 2. With cream, make a magic circle. Rnd 1: Work 7 sc in ring. Rnd 2: *Sc 2 in next sc; rep from * around 14 sts. Rnd 3: (Sc in next st, 2 sc in following st) 7 times 21 sts. Outer Ears Make 2. With blue, make a magic circle. Rnd 1: Work 8 sc in ring. Rnd 2: *Sc 2 in next sc; rep from * around 16 sts. Rnd 3: (Sc in next st, 2 sc in following st) 8 times 24 sts.
74 Rnd 4: Sc around. Body With blue, make a magic circle. Rnd 1: Work 7 sc in ring. Rnd 2: *Sc 2 in next sc; rep from * around 14 sts. Rnd 3: (Sc in next st, 2 sc in following st) 7 times 21 sts. Rnd 4: (Sc in each of next 2 sts, 2 sc in following st) 7 times 28 sts. Rnd 5: (Sc in each of next 3 sts, 2 sc in following st) 7 times 35 sts. Rnd 6: (Sc in each of next 4 sts, 2 sc in following st) 7 times 42 sts. Rnd 7: (Sc in each of next 5 sts, 2 sc in following st) 7 times 49 sts. Rnds 8 12: Sc around. Rnd 13: (Sc in each of next 5 sts, sc2tog) 7 times 42 sts. Rnds 14 16: Sc around. Rnd 17: (Sc in each of next 4 sts, sc2tog) 7 times 35 sts. Rnds 18 21: Sc around. Rnd 22: (Sc in each of next 5 sts, sc2tog) 5 times 30 sts. Rnds 23 and 24: Sc around. Rnd 25: (Sc in each of next 4 sts, sc2tog) 5 times 25 sts. Rnds 26 28: Sc around. Rnd 29: (Sc in each of next 3 sts, sc2tog) 5 times 20 sts. Rnds 30 and 31: Sc around. Tummy With cream, make a magic circle. Rnd 1: Work 6 sc in ring. Rnd 2: *Hdc 2 in next sc; rep from * around 12 sts. Rnd 3: (Hdc in next st, 2 hdc in next st) 6 times 18 sts. Rnd 4: (Hdc in each of next 2 sts, 2 hdc in next st) 6 times 24 sts. Rnd 5: Sc in each of next 9 sts, 2 hdc in each of next 6 sts, sc in each of rem 9 sts 30 sts.
75 Arms Make 2. With cream, make a magic circle. Rnd 1: Work 6 sc in ring. Rnd 2: *Sc 2 in next sc; rep from * around 12 sts. Rnd 3: (Sc in next st, 2 sc in following st) 6 times 18 sts. Rnds 4 7: Sc around. Rnds 8 and 9: With blue, sc around. Rnd 10: (Sc in each of next 4 sts, sc2tog) 3 times 15 sts. Rnds 11 20: Sc around. Rnd 21: (Sc in next st, sc2tog) 5 times 10 sts. Rnds 22 28: Sc around. Legs Make 2. With cream, make a magic circle. Rnd 1: Work 6 sc in ring. Rnd 2: *Sc 2 in next sc; rep from * around 12 sts. Rnd 3: (Sc in next st, 2 sc in following st) 6 times 18 sts. Rnd 4: (Sc in each of next 2 sts, 2 sc in following st) 6 times 24 sts. Rnd 5: (Sc in each of next 3 sts, 2 sc in following st) 6 times 30 sts. Rnds 6 9: Sc around. Rnd 10: With blue, sc around. Rnd 11: (Sc in each of next 3 sts, sc2tog) 6 times 24 sts. Rnds 12 16: Sc around. Rnd 17: (Sc in each of next 2 sts, sc2tog) 6 times 18 sts. Rnds 18 26: Sc around. Rnd 27: (Sc in next st, sc2tog) 6 times 12 sts. Rnds 28 and 29: Sc around. Tail With blue, make a magic circle.

76 Rnd 1: Work 5 sc in ring. Rnd 2: *Sc 2 in next sc; rep from * around 10 sts. Rnds 3 30: Sc around. Leave the tail unstuffed. Assembly Sew eyes to face, just above where work changes to rows from rounds. With gray and running stitch, embroider mouth as shown. Sew face to head. Sew inner and outer ears together. Sew tummy to body. Stuff head, arms, and legs. Sew arms, legs, and tail (unstuffed) in place on body. Sew head to body. Weave in ends.

77 Embroider Monty s mouth.

78 Tommy Turkey Tommy s quirky personality and trademark black hat make him everybody s beloved turkey friend. His pattern is quick and easy to work up, with fun customizable tail feathers too.
79 Skill Level: Easy Finished Size: 9½" tall Materials See page 60 for more about yarns. Yarn: Light worsted- or DK-weight 4-ply acrylic yarn 60 yds in brown for head and hat band 45 yds in tan for body 40 yds in yellow gold for legs, beak, and feathers 30 yds in red for feathers and snood 25 yds in black for hat 10 yds in orange for feathers 5 yds in moss green for feathers Hooks and Notions: US Size F-5 (3.75 mm) crochet hook 2 safety eyes, 14 mm diameter Stitch marker, fiberfill stuffing, tapestry needle Beak With yellow gold, make a magic circle (page 61). Rnd 1: Work 5 sc in ring. Rnd 2: *Sc 2 in next sc; rep from * around 10 sts. Rnd 3: Sc around. Rnd 4: (Sc in next st, 2 sc in following st) 5 times 15 sts. Rnd 5: (Sc in each of next 2 sts, 2 sc in following st) 5 times 20 sts. Snood With red, ch 17. Make 3 hdc in 3rd ch from hook, sl st in next ch, hdc in each of next 4 ch, sc in
 5 times 15 sts. Rnd 4: (Sc in each of next 2 sts, 2 sc in following st) 5 times 20 sts.")
80 each of next 5 ch, (dc in next ch, ch 1) 2 times, dc in next ch, sl st in last ch. Sew the snood around one side of the beak. Hat With black, make a magic circle. Rnd 1: Work 5 sc in ring. Rnd 2: *Sc 2 in next sc; rep from * around 10 sts. Rnd 3: (Sc in next st, 2 sc in following st) 5 times 15 sts. Rnd 4: (Sc in each of next 2 sts, 2 sc in following st) 5 times 20 sts. Rnds 5 8: Sc around. Rnd 9: With brown, (sc in each of next 3 sts, 2 sc in following st) 5 times 25 sts. Rnd 10: Sc around. Rnd 11: With black, through front loops only, (sc in each of next 4 sts, 2 sc in following st) 5 times 30 sts. Rnd 12: (Sc in each of next 4 sts, 2 sc in following st) 6 times 36 sts.
 6 times 18 sts. Rnd 4: (Sc in each of next 2 sts, 2 sc in following st) 6 times 24 sts.")
81 Embroider the buckle on the front of the hat. Head and Body With brown, make a magic circle. Rnd 1: Work 6 sc in ring. Rnd 2: *Sc 2 in next sc; rep from * around 12 sts. Rnd 3: (Sc in next st, 2 sc in following st) 6 times 18 sts. Rnd 4: (Sc in each of next 2 sts, 2 sc in following st) 6 times 24 sts. Rnd 5: (Sc in each of next 3 sts, 2 sc in following st) 6 times 30 sts. Rnd 6: (Sc in each of next 4 sts, 2 sc in following st) 6 times 36 sts. Rnd 7: (Sc in each of next 8 sts, 2 sc in following st) 4 times 40 sts. Rnds 8 15: Sc around. Rnd 16: (Sc in each of next 3 sts, sc2tog) 8 times 32 sts. Attach safety eyes, leaving room for beak in between. Rnd 17: (Sc in each of next 2 sts, sc2tog) 8 times 24 sts. Rnd 18: (Sc in each of next 2 sts, sc2tog) 6 times 18 sts. Rnd 19: (Sc in next st, sc2tog) 6 times 12 sts. Rnds 20 23: Sc around. Rnd 24: Through front loops only, (3 dc in next st, sl st in next st) 6 times. With tan, through back loops only of same rnd, sc around 12 sts.
82 Rnd 25: Sc around. Rnd 26: Hdc 2 in each of next 4 sts, dc in each of rem 8 sts 16 sts. Rnd 27: Sc in next st, 2 hdc in each of next 6 sts, sc in each of rem 9 sts 22 sts. Rnd 28: Sc in each of next 3 sts, 2 hdc in each of next 8 sts, sc in each of rem 11 sts 30 sts. Rnd 29: (Sc in each of next 4 sts, 2 sc in following st) 6 times 36 sts. Rnd 30: (Sc in each of next 5 sts, 2 sc in following st) 6 times 42 sts. Rnd 31: (Sc in each of next 6 sts, 2 sc in following st) 6 times 48 sts. Rnds 32 34: Sc around. Rnd 35: (Sc in each of next 6 sts, sc2tog) 6 times 42 sts. Rnd 36: (Sc in each of next 5 sts, sc2tog) 6 times 36 sts. Rnd 37: (Sc in each of next 4 sts, sc2tog) 6 times 30 sts. Rnd 38: (Sc in each of next 3 sts, sc2tog) 6 times 24 sts. Rnd 39: (Sc in each of next 2 sts, sc2tog) 6 times 18 sts. Rnd 40: (Sc in next st, sc2tog) 6 times 12 sts. Rnd 41: Sc in every other st 6 sts. Legs Make 2. With yellow gold, make a magic circle. Rnd 1: Work 4 sc in ring. Rnd 2: *Sc 2 in next sc; rep from * around 8 sts. Rnd 3: (Sc in next st, 2 sc in following st) 4 times 12 sts. Rnd 4: Sc in next st, (3 hdc in next st, sl st in next st) 2 times; 3 dc in next st, sc in each of rem 6 sts 18 sts. Rnd 5: Through back loops only and skipping sl sts, (sc in each of next 2 sts, sc2tog) 4 times 12 sts. Rnd 6: (Sc in each of next 2 sts, sc2tog) 3 times 9 sts. Rnd 7: Sc in each of next 3 sts, sc2tog 2 times, sc in each of rem 2 sts 7 sts. Rnds 8 14: Sc around. Tail Feathers

83 Go as crazy with colors as you want, as long as you make 7 tail feathers! I made 1 in moss green and 2 each in red, orange, and yellow gold. With appropriate color, ch 17. Hdc in 3rd ch from hook and in each of next 13 ch, 2 hdc in last ch. Turn foundation ch. On opposite side of foundation ch, 2 hdc in first ch, hdc in each of next 14 ch, sl st to first hdc. Sew the tail feathers, overlapping them at the bottom to make a fan shape. Assembly Sew snood to beak, making sure end dangles at bottom. With yellow gold, embroider buckle on hat. Lightly stuff hat and sew to head. Sew beak and snood to head between eyes. Stuff head, neck, and body. Arrange tail feathers in a fan and sew together. Sew tail to body. Stuff legs firmly. Sew legs to body. Weave in ends.


84 Snowie Owl Snowie the owl stands tall and proud. His simple pattern and shape are given personality with a cute heart-shaped appliqué. Although his colors are just blue and cream, he remains one of the most gorgeous and regal snow owls there is.
85 Skill Level: Easy Finished Size: 9½" tall Materials See page 60 for more about yarns. Yarn: Light worsted- or DK-weight 4-ply acrylic yarn 160 yds in cream for head and body 70 yds in blue for wings, ears, beak, and heart birthmark 10 yds in white for eyes 5 yds in brown for pupils Hooks and Notions: US Size F-5 (3.75 mm) crochet hook Stitch marker, fiberfill stuffing, tapestry needle Ears Make 2. With blue, make a magic circle (page 61). Rnd 1: Work 7 sc in ring. Rnd 2: *Sc 2 in next sc; rep from * around 14 sts. Rnd 3: Hdc in each of next 4 sts, 2 hdc in same st 7 times, hdc in each of rem 3 sts 21 sts.
 4 times 12 sts. Rnd 4: (Sc in each of next 2 sts, 2 sc in following st) 4 times 16 sts.")
86 Top view of ear. Eyes Make 2. With brown, make a magic circle. Rnd 1: Work 4 sc in ring. Rnd 2: *Sc 2 in next sc; rep from * around 8 sts. Rnd 3: With white, (sc in next st, 2 sc in following st) 4 times 12 sts. Rnd 4: (Sc in each of next 2 sts, 2 sc in following st) 4 times 16 sts. Rnd 5: (Sc in each of next 3 sts, 2 sc in following st) 4 times 20 sts. Beak With blue, make a magic circle. Rnd 1: Work 6 sc in ring. Rnd 2: *Sc 2 in next sc; rep from * around 12 sts. Rnd 3: Sc around. Wings
87 Make 2. With blue, make a magic circle. Rnd 1: Work 7 sc in ring. Rnd 2: *Sc 2 in next sc; rep from * around 14 sts. Rnd 3: Sc 2 in each of next 2 sts, sc in each of next 4 sts, 2 sc in each of next 3 sts, sc in each of next 3 sts, 2 sc in each of next 2 sts 21 sts. Rnd 4: (Hdc in next st, 2 hdc in next st) 2 times, hdc in each of next 4 sts, (hdc in next st, 2 hdc in next st) 3 times, hdc in each of next 3 sts, (hdc in next st, 2 hdc in next st) 2 times 28 sts. Rnd 5: (Hdc in each of next 2 sts, 2 hdc in next st) 2 times, hdc in each of next 4 sts, (hdc in each of next 2 sts, 2 hdc in next st) 3 times, hdc in each of next 3 sts, (hdc in each of next 2 sts, 2 hdc in next st) 2 times 35 sts. Rnd 6: (Hdc in each of next 3 sts, 2 hdc in next st) 2 times, hdc in each of next 4 sts, (hdc in each of next 3 sts, 2 hdc in next st) 3 times, hdc in each of next 3 sts, (hdc in each of next 3 sts, 2 hdc in next st) 2 times 42 sts. Rnd 7: (Hdc in each of next 4 sts, 2 hdc in next st) 2 times, hdc in each of next 4 sts, (hdc in each of next 4 sts, 2 hdc in next st) 3 times, hdc in each of next 3 sts, (hdc in each of next 4 sts, 2 hdc in next st) 2 times 49 sts. Rnd 8: (Hdc in each of next 5 sts, 2 hdc in next st) 2 times, hdc in each of next 3 sts, sc in each of next 7 sts, 2 dc in next st, (dc, ch, dc) in next st, 2 dc in next st, sc in each of next 8 sts, hdc in each of next 4 sts, (hdc in each of next 5 sts, 2 hdc in next st) 2 times 57 sts.
 6 times 18 sts. Rnd 4: (Sc in each of next 2 sts, 2 sc in following st) 6 times 24 sts.")
88 Wing stitched to Snowie s side. Head and Body With cream, make a magic circle. Rnd 1: Work 6 sc in ring. Rnd 2: *Sc 2 in next sc; rep from * around 12 sts. Rnd 3: (Sc in next st, 2 sc in following st) 6 times 18 sts. Rnd 4: (Sc in each of next 2 sts, 2 sc in following st) 6 times 24 sts. Rnd 5: (Sc in each of next 3 sts, 2 sc in following st) 6 times 30 sts. Rnd 6: (Sc in each of next 4 sts, 2 sc in following st) 6 times 36 sts. Rnd 7: (Sc in each of next 5 sts, 2 sc in following st) 6 times 42 sts. Rnd 8: (Sc in each of next 6 sts, 2 sc in following st) 6 times 48 sts. Rnds 9 20: Sc around. Rnd 21: (Sc in each of next 6 sts, sc2tog) 6 times 42 sts. Rnd 22: (Sc in each of next 5 sts, sc2tog) 6 times 36 sts. Rnd 23: Through front loops only, (sc in each of next 5 sts, 2 sc in following st) 6 times 42 sts. Rnd 24: (Sc in each of next 6 sts, 2 sc in following st) 6 times 48 sts.
89 Rnd 25: (Sc in each of next 7 sts, 2 sc in following st) 6 times 54 sts. Rnd 26: (Sc in each of next 8 sts, 2 sc in following st) 6 times 60 sts. Rnds 27 49: Sc around. Rnd 50: Dc 2 in same st twice, sc in each of next 56 sts, 2 dc in each of rem 2 sts 64 sts. Rnd 51: Sc2tog 2 times, sc in each of next 56 sts, sc2tog 2 times 60 sts. Rnd 52: (Sc in each of next 8 sts, sc2tog) 6 times 54 sts. Rnd 53: (Sc in each of next 7 sts, sc2tog) 6 times 48 sts. Rnd 54: (Sc in each of next 6 sts, sc2tog) 6 times 42 sts. Rnd 55: (Sc in each of next 5 sts, sc2tog) 6 times 36 sts. Rnd 56: (Sc in each of next 4 sts, sc2tog) 6 times 30 sts. Rnd 57: (Sc in each of next 3 sts, sc2tog) 6 times 24 sts. Rnd 58: (Sc in each of next 2 sts, sc2tog) 6 times 18 sts. Rnd 59: (Sc in next st, sc2tog) 6 times 12 sts. Rnd 60: (Sc in next st, sc2tog) 4 times 8 sts. Heart Appliqué With blue, make a magic circle. Rnd 1: Work 6 sc in ring. Rnd 2: *Sc 2 in next sc; rep from * around 12 sts. Rnd 3: (Sc in next st, 2 sc in following st) 6 times 18 sts. Rnd 4: (Sc in each of next 2 sts, 2 sc in following st) 6 times 24 sts. Rnd 5: Sc in each of first 5 sts, hdc in next st, dc in next st, 2 dc in next st, ch 2, 2 dc in next st, dc in next st, hdc in next st, sl st, hdc in next st, dc in next st, 2 dc in next st, ch 2, 2 dc in next st, dc in next st, hdc in next st, sc in each of rem 6 sts 32 sts. Assembly Sew ears to head. Sew eyes in place, leaving space for beak. Lightly stuff beak and attach it to head between eyes. Sew heart and wings to body. Stuff. Weave in ends.

90 Stitch the heart in place on Snowie s chest.

91 George Lion Roar, says George! Be not afraid, since his roar is not meant to scare, but to welcome you to his magical kingdom. His moss-green mane and perfectly tan body make him the most handsome lion out there. His pattern is fairly easy, with only the mane to challenge your skills.

92 Skill Level: Easy Finished Size: 10½" tall Materials See page 60 for more about yarns. Yarn: Light worsted- or DK-weight 4-ply acrylic yarn 170 yds in tan for head, ears, body, arms, legs, and tail 50 yds in chocolate brown for trim 30 yds in moss green for mane and tail Hooks and Notions:
 6 times 18 sts. Rnds 4 and 5: Sc around.")
93 US Size F-5 (3.75 mm) crochet hook 2 buttons, 20 mm diameter, for eyes Stitch marker, fiberfill stuffing, tapestry needle Ears Make 2. With tan, make a magic circle (page 61). Rnd 1: Work 6 sc in ring. Rnd 2: *Sc 2 in next sc; rep from * around 12 sts. Rnd 3: (Sc in next st, 2 sc in following st) 6 times 18 sts. Rnds 4 and 5: Sc around. Rnd 6: (Sc in next st, sc2tog) 6 times 12 sts. Mane With moss green, ch 62, join in a ring. Rnd 1: Through back loops only, dc in each ch around 62 sts. Rnd 2: Through front loops only of foundation ch, (4 dc in next st, sl st in following st) 31 times 155 sts.

 6 times 24 sts. Rnd 5: (Sc in each of next 3 sts, 2 sc in following st) 6 times 30 sts.")
94 Rnd 3: Working in 62 dc of rnd 1, [2 sc in next st, hdc in next st, 2 dc in next st, ch 3, sl st in base of ch-3 (picot made), 2 dc in next st, hdc in next st, 2 sc in next st] 10 times, sl st in last 2 sts 102 sts. Head With tan, make a magic circle. Rnd 1: Work 6 sc in ring. Rnd 2: *Sc 2 in next sc; rep from * around 12 sts. Rnd 3: (Sc in next st, 2 sc in following st) 6 times 18 sts. Rnd 4: (Sc in each of next 2 sts, 2 sc in following st) 6 times 24 sts. Rnd 5: (Sc in each of next 3 sts, 2 sc in following st) 6 times 30 sts. Rnd 6: (Sc in each of next 4 sts, 2 sc in following st) 6 times 36 sts.
95 Rnd 7: (Sc in each of next 5 sts, 2 sc in following st) 6 times 42 sts. Rnd 8: (Sc in each of next 6 sts, 2 sc in following st) 6 times 48 sts. Rnd 9: (Sc in each of next 7 sts, 2 sc in following st) 6 times 54 sts. Rnds 10 20: Sc around. Rnd 21: (Sc in each of next 8 sts, 2 sc in following st) 6 times 60 sts. Rnd 22: Sc around. Rnd 23: (Sc in each of next 8 sts, sc2tog) 6 times 54 sts. Rnd 24: (Sc in each of next 7 sts, sc2tog) 6 times 48 sts. Rnd 25: (Sc in each of next 6 sts, sc2tog) 6 times 42 sts. Rnd 26: (Sc in each of next 5 sts, sc2tog) 6 times 36 sts. Rnd 27: (Sc in each of next 4 sts, sc2tog) 6 times 30 sts. Rnd 28: (Sc in each of next 3 sts, sc2tog) 6 times 24 sts. Rnd 29: (Sc in each of next 2 sts, sc2tog) 6 times 18 sts. Fasten off. Body With tan, make a magic circle. Rnd 1: Work 6 sc in ring. Rnd 2: *Sc 2 in next sc; rep from * around 12 sts. Rnd 3: (Sc in next st, 2 sc in following st) 6 times 18 sts. Rnd 4: (Sc in each of next 2 sts, 2 sc in following st) 6 times 24 sts. Rnd 5: (Sc in each of next 3 sts, 2 sc in following st) 6 times 30 sts. Rnd 6: (Sc in each of next 4 sts, 2 sc in following st) 6 times 36 sts. Rnd 7: (Sc in each of next 5 sts, 2 sc in following st) 6 times 42 sts. Rnd 8: (Sc in each of next 6 sts, 2 sc in following st) 6 times 48 sts. Rnd 9: (Sc in each of next 7 sts, 2 sc in following st) 6 times 54 sts. Rnds 10 13: Sc around. Rnd 14: (Sc in each of next 7 sts, sc2tog) 6 times 48 sts. Rnds 15 17: Sc around. Rnd 18: (Sc in each of next 6 sts, sc2tog) 6 times 42 sts. Rnds 19 and 20: Sc around. Rnd 21: (Sc in each of next 5 sts, sc2tog) 6 times 36 sts. Rnds 22 24: Sc around. Rnd 25: (Sc in each of next 4 sts, sc2tog) 6 times 30 sts.
96 Rnds 26 28: Sc around. Rnd 29: (Sc in each of next 3 sts, sc2tog) 6 times 24 sts. Rnds 30 and 31: Sc around. Rnd 32: (Sc in each of next 2 sts, sc2tog) 6 times 18 sts. Arms Make 2. With chocolate brown, make a magic circle. Rnd 1: Work 6 sc in ring. Rnd 2: *Sc 2 in next sc; rep from * around 12 sts. Rnd 3: (Sc in next st, 2 sc in following st) 6 times 18 sts. Rnds 4 6: Sc around. Rnds 7 14: With tan, sc around. Rnd 15: (Sc in next st, sc2tog) 6 times 12 sts. Rnds 16 26: Sc around. Legs Make 2. With chocolate brown, make a magic circle. Rnd 1: Work 6 sc in ring. Rnd 2: *Sc 2 in next sc; rep from * around 12 sts. Rnd 3: (Sc in next st, 2 sc in following st) 6 times 18 sts. Rnd 4: (Sc in each of next 2 sts, 2 sc in following st) 6 times 24 sts. Rnd 5: (Sc in each of next 3 sts, 2 sc in following st) 6 times 30 sts. Rnd 6: (Sc in each of next 4 sts, 2 sc in following st) 6 times 36 sts. Rnd 7: Through back loops only, sc in each of next 14 sts, sc2tog 4 times, sc in each of rem 14 sts 32 sts. Rnd 8: Sc in each of next 12 sts, sc2tog 4 times, sc in each of rem 12 sts 28 sts. Rnd 9: Sc in each of next 10 sts, sc2tog 4 times, sc in each of rem 10 sts 24 sts. Rnd 10: Sc in each of next 6 sts, sc2tog 6 times, sc in each of rem 6 sts 18 sts. Rnd 11: Sc around. Rnds 12 21: With tan, sc around 18 sts.

97 Rnd 22: Sc in each of next 6 sts, 2 sc in each of next 6 sts, sc in each of rem 6 sts 24 sts. Rnd 23: Sc in each of next 6 sts, sc2tog 6 times, sc in each of rem 6 sts 18 sts. Tail With tan and moss green held tog, ch 40 loosely. George s tail is a simple crochet chain made with 2 yarns held together. Assembly Sew ears to mane, and then sew mane to head. Sew eyes in place. With chocolate brown, embroider a triangular nose as shown. Stuff head firmly. Stuff arms and legs. Sew tail (unstuffed), arms, and legs in place on body. Stuff body firmly. Sew head to body. Weave in ends.


98 Stella Squirrel Her jeweled eyes shine, but it s her uniquely shaped tail that truly makes Stella stand out. Made with simple shaping techniques, little Stella is a one-of-a-kind amigurumi squirrel.
99 Skill Level: Easy Finished Size: 12" tall Materials See page 60 for more about yarns. Yarn: Light worsted- or DK-weight 4-ply acrylic yarn 180 yds in brown for ears, head, body, arms, and legs 80 yds in olive green for tail 45 yds in white for tummy Hooks and Notions: US Size F-5 (3.75 mm) crochet hook 2 jeweled buttons, 20 mm diameter, for eyes Stitch marker, fiberfill stuffing, tapestry needle Ears Make 2. With brown, make a magic circle (page 61). Rnd 1: Work 5 sc in ring. Rnd 2: *Sc 2 in next sc; rep from * around 10 sts. Rnd 3: (Sc in next st, 2 sc in following st) 5 times 15 sts. Rnd 4: Sc around. Rnd 5: (Sc in each of next 2 sts, 2 sc in following st) 5 times 20 sts. Rnds 6 10: Sc around. Head With brown, make a magic circle. Rnd 1: Work 6 sc in ring. Rnd 2: *Sc 2 in next sc; rep from * around 12 sts. Rnd 3: (Sc in next st, 2 sc in following st) 6 times 18 sts. Rnd 4: (Sc in each of next 2 sts, 2 sc in following st) 6 times 24 sts.
100 Rnds 5 and 6: Sc around. Rnd 7: (Sc in each of next 3 sts, 2 sc in following st) 6 times 30 sts. Rnd 8: (Sc in each of next 4 sts, 2 sc in following st) 6 times 36 sts. Rnd 9: Sc around. Rnd 10: (Sc in each of next 5 sts, 2 sc in following st) 6 times 42 sts. Rnd 11: (Sc in each of next 6 sts, 2 sc in following st) 6 times 48 sts. Rnd 12: Sc around. Rnd 13: (Sc in each of next 7 sts, 2 sc in following st) 6 times 54 sts. Rnd 14: (Sc in each of next 8 sts, 2 sc in following st) 6 times 60 sts. Rnds 15 22: Sc around. Rnd 23: (Sc in each of next 8 sts, sc2tog) 6 times 54 sts. Rnd 24: (Sc in each of next 7 sts, sc2tog) 6 times 48 sts. Rnd 25: (Sc in each of next 6 sts, sc2tog) 6 times 42 sts. Rnd 26: (Sc in each of next 5 sts, sc2tog) 6 times 36 sts. Rnd 27: (Sc in each of next 4 sts, sc2tog) 6 times 30 sts. Rnd 28: (Sc in each of next 3 sts, sc2tog) 6 times 24 sts. Stuff firmly. Rnd 29: (Sc in each of next 2 sts, sc2tog) 6 times 18 sts. Rnd 30: (Sc in next st, sc2tog) 6 times 12 sts. Rnd 31: Sc in every other st 6 sts. Tummy With white, ch 13. Row 1: Dc in 4th ch from hook and in each ch across, turn 11 sts. Rows 2 13: Ch 3 (counts as dc), dc across.
 5 times 15 sts. Rnd 4: (Sc in each of next 2 sts, 2 sc in following st) 5 times 20 sts. Rnds 5 13: Sc around.")
101 White tummy is crocheted separately and sewn on during assembly. Arms Make 2. With brown, make a magic circle. Rnd 1: Work 5 sc in ring. Rnd 2: *Sc 2 in next sc; rep from * around 10 sts. Rnd 3: (Sc in next st, 2 sc in following st) 5 times 15 sts. Rnd 4: (Sc in each of next 2 sts, 2 sc in following st) 5 times 20 sts. Rnds 5 13: Sc around. Rnd 14: (Sc in each of next 2 sts, sc2tog) 5 times 15 sts. Rnds 15 19: Sc around. Rnd 20: (Sc in next st, sc2tog) 5 times 10 sts. Rnds 21 23: Sc around. Body With brown, make a magic circle. Rnd 1: Work 6 sc in ring. Rnd 2: *Sc 2 in next sc; rep from * around 12 sts. Rnd 3: (Sc in next st, 2 sc in following st) 6 times 18 sts. Rnd 4: (Sc in each of next 2 sts, 2 sc in following st) 6 times 24 sts. Rnd 5: (Sc in each of next 3 sts, 2 sc in following st) 6 times 30 sts.
102 Rnd 6: (Sc in each of next 4 sts, 2 sc in following st) 6 times 36 sts. Rnd 7: (Sc in each of next 5 sts, 2 sc in following st) 6 times 42 sts. Rnd 8: (Sc in each of next 6 sts, 2 sc in following st) 6 times 48 sts. Rnd 9: (Sc in each of next 7 sts, 2 sc in following st) 6 times 54 sts. Rnds 10 12: Sc around. Rnd 13: (Sc in each of next 7 sts, sc2tog) 6 times 48 sts. Rnds 14 16: Sc around. Rnd 17: (Sc in each of next 6 sts, sc2tog) 6 times 42 sts. Rnds 18 20: Sc around. Rnd 21: (Sc in each of next 5 sts, sc2tog) 6 times 36 sts. Rnds 22 24: Sc around. Rnd 25: (Sc in each of next 4 sts, sc2tog) 6 times 30 sts. Rnds 26 and 27: Sc around. Rnd 28: (Sc in each of next 3 sts, sc2tog) 6 times 24 sts. Rnds 29 31: Sc around. Rnd 32: (Sc in each of next 2 sts, sc2tog) 6 times 18 sts. Legs Make 2. With brown, make a magic circle. Rnd 1: Work 6 sc in ring. Rnd 2: *Sc 2 in next sc; rep from * around 12 sts. Rnd 3: (Sc in next st, 2 sc in following st) 6 times 18 sts. Rnd 4: (Sc in each of next 2 sts, 2 sc in following st) 6 times 24 sts. Rnds 5 12: Sc around. Rnd 13: (Sc in each of next 2 sts, sc2tog) 6 times 18 sts. Rnds 14 18: Sc around. Tail With olive green, make a magic circle. Rnd 1: Work 6 sc in ring. Rnd 2: *Sc 2 in next sc; rep from * around 12 sts.
103 Rnd 3: (Sc in next st, 2 sc in following st) 6 times 18 sts. Rnd 4: (Sc in each of next 2 sts, 2 sc in following st) 6 times 24 sts. Rnd 5: (Sc in each of next 3 sts, 2 sc in following st) 6 times 30 sts. Rnd 6: (Sc in each of next 4 sts, 2 sc in following st) 6 times 36 sts. Rnd 7: (Sc in each of next 5 sts, 2 sc in following st) 6 times 42 sts. Rnds 8 12: Sc around. Rnd 13: Sc in each of next 15 sts, sc2tog 6 times, sc in each of rem 15 sts 36 sts. Rnd 14: Sc in each of next 12 sts, sc2tog 6 times, sc in each of rem 12 sts 30 sts. Rnd 15: Sc around. Rnd 16: Sc in each of next 12 sts, 2 sc in next 6 sts, sc in each of rem 12 sts 36 sts. Rnds 17 21: Sc around. Rnd 22: Sc in each of next 12 sts, sc2tog 6 times, sc in each of rem 12 sts 30 sts. Rnd 23: Sc in each of next 9 sts, sc2tog 6 times, sc in each of rem 9 sts 24 sts. Rnd 24: Sc around. Rnd 25: Sc in each of next 9 sts, 2 sc in next 6 sts, sc in each of rem 9 sts 30 sts. Rnds 26 31: Sc around. Rnd 32: (Sc in each of next 3 sts, sc2tog) 6 times 24 sts. Rnd 33: (Sc in each of next 2 sts, sc2tog) 6 times 18 sts. Rnd 34: (Sc in each of next 4 sts, sc2tog) 3 times 15 sts. Rnd 35: (Sc in each of next 3 sts, sc2tog) 3 times 12 sts. Rnd 36: (Sc in each of next 2 sts, sc2tog) 3 times 9 sts. Assembly With white, embroider a triangular nose with a line extending downward as shown on head. Sew eyes in place. Sew ears to head, folding slightly at base to shape. Sew tummy to body. Stuff arms, legs, and tail, and sew in place on body. Stuff body. Sew head to body. Weave in ends.

104 Sammie Seal Sammie s quirky colors will make you smile on a gloomy day. Her fun blue skin and pink flippers make her a darling that will brighten your mood. Skill Level: Easy
105 Finished Size: 9½" tall Materials See page 60 for more about yarns. Yarn: Light worsted- or DK-weight 4-ply acrylic yarn 90 yds in powder blue for head and body 40 yds in pastel pink for flippers 30 yds in tan for muzzle 5 yds in black for embroidery Hooks and Notions: US Size F-5 (3.75 mm) crochet hook 2 buttons, 20 mm diameter, for eyes Stitch marker, fiberfill stuffing, tapestry needle Head With powder blue, make a magic circle (page 61). Rnd 1: Work 6 sc in ring. Rnd 2: *Sc 2 sc in next sc; rep from * around 12 sts. Rnd 3: (Sc in next st, 2 sc in following st) 6 times 18 sts. Rnd 4: (Sc in each of next 2 sts, 2 sc in following st) 6 times 24 sts. Rnd 5: (Sc in each of next 3 sts, 2 sc in following st) 6 times 30 sts. Rnd 6: (Sc in each of next 4 sts, 2 sc in following st) 6 times 36 sts. Rnd 7: (Sc in each of next 5 sts, 2 sc in following st) 6 times 42 sts. Rnd 8: Sc around. Rnd 9: (Sc in each of next 6 sts, 2 sc in following st) 6 times 48 sts. Rnd 10: (Sc in each of next 7 sts, 2 sc in following st) 6 times 54 sts. Rnd 11: (Sc in each of next 8 sts, 2 sc in following st) 6 times 60 sts. Rnd 12: (Sc in each of next 9 sts, 2 sc in following st) 6 times 66 sts. Rnds 13 24: Sc around. Rnd 25: (Sc in each of next 10 sts, 2 sc in following st) 6 times 72 sts. Rnd 26: (Sc in each of next 11 sts, 2 sc in following st) 6 times 78 sts.
106 Rnds 27 and 28: Sc around. Rnd 29: (Sc in each of next 11 sts, sc2tog) 6 times 72 sts. Rnd 30: (Sc in each of next 4 sts, sc2tog) 12 times 60 sts. Rnd 31: (Sc in each of next 3 sts, sc2tog) 12 times 48 sts. Rnd 32: (Sc in each of next 2 sts, sc2tog) 12 times 36 sts. Rnd 33: (Sc in each of next 4 sts, sc2tog) 6 times 30 sts. Rnd 34: (Sc in each of next 3 sts, sc2tog) 6 times 24 sts. Rnd 35: (Sc in each of next 2 sts, sc2tog) 6 times 18 sts. Rnd 36: (Sc in next st, sc2tog) 6 times 12 sts. Muzzle With tan, ch 12. Rnd 1: Sc in 2nd ch from hook and each of next 9 ch, 2 sc in last ch. Turn foundation ch. On opposite side of foundation ch, sc in each of next 10 ch, 2 sc in last ch 24 sts. Rnd 2: Sc 2 in each of next 2 sts, sc in each of next 8 sts, 2 sc in each of next 4 sts, sc in each of next 8 sts, 2 sc in each of next 2 sts 32 sts. Rnd 3: (Sc in next st, 2 sc in following st) 2 times, sc in each of next 8 sts, (sc in next st, 2 sc in following st) 4 times, sc in each of next 8 sts, (sc in next st, 2 sc in following st) 2 times 40 sts. Rnd 4: (Sc in each of next 2 sts, 2 sc in following st) 2 times, sc in each of next 8 sts, (sc in each of next 2 sts, 2 sc in following st) 4 times, sc in each of next 8 sts, (sc in each of next 2 sts, 2 sc in following st) 2 times 48 sts. Rnds 5 10: Sc around. Rnd 11: (Sc in each of next 4 sts, sc2tog) 8 times 40 sts. Body With powder blue, make a magic circle. Rnd 1: Work 6 sc in ring. Rnd 2: *Sc 2 in next sc; rep from * around 12 sts. Rnd 3: (Sc in next st, 2 sc in following st) 6 times 18 sts. Rnd 4: (Sc in each of next 2 sts, 2 sc in following st) 6 times 24 sts. Rnd 5: (Sc in each of next 3 sts, 2 sc in following st) 6 times 30 sts.
107 Rnd 6: (Sc in each of next 4 sts, 2 sc in following st) 6 times 36 sts. Rnd 7: (Sc in each of next 5 sts, 2 sc in following st) 6 times 42 sts. Rnds 8 12: Sc around. Rnd 13: (Sc in each of next 5 sts, sc2tog) 6 times 36 sts. Rnds 14 16: Sc around. Rnd 17: (Sc in each of next 4 sts, sc2tog) 6 times 30 sts. Rnds 18 22: Sc around. Rnd 23: (Sc in each of next 3 sts, sc2tog) 6 times 24 sts. Rnds 24 26: Sc around. Front Flippers Make 2. With pastel pink, make a magic circle. Rnd 1: Work 5 sc in ring. Rnd 2: *Sc 2 in next sc; rep from * around 10 sts. Rnd 3: (Sc in next st, 2 sc in following st) 5 times 15 sts. Rnds 4 and 5: Sc around. Rnd 6: Sc2tog 3 times, sc in each of next 9 sts 12 sts. Rnd 7: Sc2tog 2 times, sc in each of next 8 sts 10 sts. Rnds 8 15: Sc around.
 5 times 15 sts. Rnd 5: (Sc in each of next 2 sts, 2 sc in following st) 5 times 20 sts. Rnds 6 9: Sc around.")
108 Front flippers. Tail Flippers Make 2. With pastel pink, make a magic circle. Rnd 1: Work 5 sc in ring. Rnd 2: *Sc 2 in next sc; rep from * around 10 sts. Rnd 3: Sc around. Rnd 4: (Sc in next st, 2 sc in following st) 5 times 15 sts. Rnd 5: (Sc in each of next 2 sts, 2 sc in following st) 5 times 20 sts. Rnds 6 9: Sc around. Rnd 10: (Sc in each of next 2 sts, sc2tog) 5 times 15 sts. Rnd 11: Sc around. Rnd 12: (Sc in next st, sc2tog) 5 times 10 sts.

109 Tail flippers. Assembly Embroider muzzle with black using a running stitch, making straight lines and small cross-stitches as shown. Stuff muzzle firmly and sew to head. Sew eyes in place. Sew tail flippers to bottom of body. Sew front flippers to front of body at lower edge. Stuff head and body firmly. Sew head to body. Weave in ends.

110 The embroidery stitches on Sammie s muzzle.

111 Ellie Penguin Ellie has always been one of my favorite girl names, and what better way to honor the name than by combining my loves: pink, penguins, and crochet! Although she s different from her other penguin friends, she fully embraces her naturally pink body. Her pattern requires little sewing and is as simple as can be.

112 Skill Level: Easy Finished Size: 9½" tall Materials See page 60 for more about yarns. Yarn: Light worsted- or DK-weight 4-ply acrylic yarn 90 yds in pink for body 50 yds in gray for head and wings 30 yds in yellow gold for feet and beak Hooks and Notions: US Size F-5 (3.75 mm) crochet hook
113 2 safety eyes, 16.5 mm diameter Stitch marker, fiberfill stuffing, tapestry needle Beak With yellow gold, ch 5. Rnd 1: Sc in 2nd ch from hook and in each of next 2 ch, 2 sc in last ch. Turn foundation ch. On opposite side of ch, sc in each of first 3 ch, 2 sc in last ch 10 sts. Rnd 2: (Sc in next st, 2 sc in following st) 5 times 15 sts. Rnd 3: Sc around. Rnd 4: (Sc in each of next 2 sts, 2 sc in following st) 5 times 20 sts. Wings Make 2. With gray, make a magic circle (page 61). Rnd 1: Work 6 sc in ring. Rnd 2: *Sc 2 in next sc; rep from * around 12 sts. Rnd 3: Sc 2 in each of next 2 sts, sc in each of next 3 sts, 2 sc in each of next 3 sts, sc in each of next 3 sts, 2 sc in last st 18 sts. Rnd 4: (Sc in next st, 2 sc in following st) 2 times, sc in each of next 3 sts, (sc in next st, 2 sc in following st) 3 times, sc in each of next 4 sts, 2 sc in last st 24 sts. Rnd 5: (Sc in each of next 2 sts, 2 sc in following st) 2 times, sc in each of next 3 sts, (sc in each of next 2 sts, 2 sc in following st) 3 times, sc in each of next 5 sts, 2 sc in last st 30 sts. Rnd 6: Sc in each of first 9 sts, (hdc in next st, 2 hdc in next st) 6 times, sc in each of next 9 sts 36 sts. Rnd 7: Sc in each of first 12 sts, (hdc in next st, 2 hdc in next st) 6 times, sc in each of next 12 sts 42 sts.
 7 times 21 sts. Rnd 4: (Sc in each of next 2 sts, 2 sc in following st) 7 times 28 sts.")
114 Head and Body Sew the wings around the top curve, leaving the bottom free. With gray, make a magic circle. Rnd 1: Work 7 sc in ring. Rnd 2: *Sc 2 in next sc; rep from * around 14 sts. Rnd 3: (Sc in next st, 2 sc in following st) 7 times 21 sts. Rnd 4: (Sc in each of next 2 sts, 2 sc in following st) 7 times 28 sts. Rnd 5: (Sc in each of next 3 sts, 2 sc in following st) 7 times 35 sts. Rnd 6: (Sc in each of next 4 sts, 2 sc in following st) 7 times 42 sts. Rnd 7: (Sc in each of next 5 sts, 2 sc in following st) 7 times 49 sts. Rnd 8: (Sc in each of next 6 sts, 2 sc in following st) 7 times 56 sts. Rnds 9 24: Sc around. Rnd 25: (Sc in each of next 7 sts, 2 sc in following st) 7 times 63 sts. Rnd 26: Sc around. Rnd 27: (Sc in each of next 7 sts, sc2tog) 7 times 56 sts. Rnd 28: (Sc in each of next 6 sts, sc2tog) 7 times 49 sts. Rnd 29: (Sc in each of next 5 sts, sc2tog) 7 times 42 sts. Rnd 30: (Sc in each of next 4 sts, sc2tog) 7 times 35 sts. Rnd 31: (Sc in each of next 3 sts, sc2tog) 7 times 28 sts.
115 Rnd 32: (Sc in each of next 2 sts, sc2tog) 7 times 21 sts. Stuff beak firmly. Sew to head. Attach safety eyes approx ¾" from beak. Start stuffing head. Rnd 33: With pink, (sc in next st, sc2tog) 7 times 14 sts. Rnd 34: Sc around. Rnd 35: (Sc in next st, 2 sc in following st) 7 times 21 sts. Rnd 36: (Sc in each of next 2 sts, 2 sc in following st) 7 times 28 sts. Rnd 37: (Sc in each of next 3 sts, 2 sc in following st) 7 times 35 sts. Rnd 38: (Sc in each of next 4 sts, 2 sc in following st) 7 times 42 sts. Rnds 39 42: Sc around. Rnd 43: (Sc in each of next 5 sts, 2 sc in following st) 7 times 49 sts. Sew wings to body, with ends aligned with rnd 35. Rnds 44 46: Sc around. Rnd 47: (Sc in each of next 6 sts, 2 sc in following st) 7 times 56 sts. Rnds 48 51: Sc around. Rnd 52: (Sc in each of next 7 sts, 2 sc in following st) 7 times 63 sts. Rnds 53 56: Sc around. Rnd 57: (Sc in each of next 7 sts, sc2tog) 7 times 56 sts. Rnd 58: (Sc in each of next 6 sts, sc2tog) 7 times 49 sts. Rnd 59: (Sc in each of next 5 sts, sc2tog) 7 times 42 sts. Rnd 60: (Sc in each of next 4 sts, sc2tog) 7 times 35 sts. Rnd 61: (Sc in each of next 3 sts, sc2tog) 7 times 28 sts. Rnd 62: (Sc in each of next 2 sts, sc2tog) 7 times 21 sts. Rnd 63: (Sc in next st, sc2tog) 7 times 14 sts. Rnd 64: Sc in every other st 7 sts. Feet Make 2. With yellow gold, make a magic circle. Rnd 1: Work 6 sc in ring. Rnd 2: *Sc 2 in next sc; rep from * around 12 sts. Rnd 3: (Sc in next st, 2 sc in following st) 6 times 18 sts. Rnd 4: (Sc in each of next 2 sts, 2 sc in following st) 6 times 24 sts. Rnd 5: Sc in each of next 6 sts, hdc in next st, 2 hdc in next st, dc in next st, 2 dc


116 in next st, sl st in next st, 2 dc in next st, dc in next st, 2 hdc in next st, hdc in next st, sc in each of rem 9 sts 28 sts. Top view of foot. Bottom view.

117 Assembly Stuff rest of body firmly. Sew feet to bottom of body. Weave in ends. Sew the beak to the head between the eyes.


118 Rocco Raccoon Little Rocco s color scheme makes him a stylish raccoon. Using simple shaping techniques and decorative long single crochet stitches, Rocco s pattern is easy to follow and quick to work up.
119 Skill Level: Easy Finished Size: 9½" tall Materials See page 60 for more about yarns. Yarn: Light worsted- or DK-weight 4-ply acrylic yarn 80 yds in gray for head, ears, arms, legs, tail, and body 45 yds in white for tummy, eyes, and muzzle 35 yds in black for trim 5 yds in light gray for eyes Hooks and Notions: US Size F-5 (3.75 mm) crochet hook 2 safety eyes, 14 mm diameter Stitch marker, fiberfill stuffing, tapestry needle Ears Make 2. With black, make a magic circle (page 61). Rnd 1: Work 4 sc in ring. Rnd 2: *Sc 2 in next sc; rep from * around 8 sts. Rnd 3: (Sc in next st, 2 sc in following st) 4 times 12 sts. Rnd 4: With gray, (sc in next st, 2 sc in following st) 6 times 18 sts. Rnd 5: Sc around. Rnd 6: (Sc in each of next 2 sts, 2 sc in following st) 6 times 24 sts. Rnd 7: Sc around. Head With gray, make a magic circle. Rnd 1: Work 6 sc in ring.
120 Rnd 2: *Sc 2 in next sc; rep from * around 12 sts. Rnd 3: (Sc in next st, 2 sc in following st) 6 times 18 sts. Rnd 4: (Sc in each of next 2 sts, 2 sc in following st) 6 times 24 sts. Rnd 5: (Sc in each of next 3 sts, 2 sc in following st) 6 times 30 sts. Rnd 6: (Sc in each of next 4 sts, 2 sc in following st) 6 times 36 sts. Rnd 7: (Sc in each of next 5 sts, 2 sc in following st) 6 times 42 sts. Rnd 8: (Sc in each of next 6 sts, 2 sc in following st) 6 times 48 sts. Rnds 9 18: Sc around. Rnd 19: With white, through front loops only, (sc in each of next 5 sts, 2 sc in following st) 8 times 56 sts. Rnd 20: Sc around. Rnd 21: (Sc in each of next 5 sts, sc2tog) 8 times 48 sts. Rnd 22: (Sc in each of next 4 sts, sc2tog) 8 times 40 sts. Rnd 23: (Sc in each of next 3 sts, sc2tog) 8 times 32 sts. Rnd 24: (Sc in each of next 2 sts, sc2tog) 8 times 24 sts. Rnd 25: (Sc in next st, sc2tog) 8 times 16 sts. Fasten off. Muzzle With black, make a magic circle. Rnd 1: Work 4 sc in ring. Rnd 2: Sc in each of next 2 sts, 2 sc in each of next 2 sts 6 sts. Rnd 3: With white, sc around. Rnd 4: *Sc 2 in next sc; rep from * around 12 sts. Rnd 5: (Sc in next st, 2 sc in following st) 6 times 18 sts. Eyes Make 2. With light gray, make a magic circle. Rnd 1: Work 5 sc in ring. Rnd 2: *Sc 2 in next sc; rep from * around 10 sts. Rnd 3: Sc in next st, 2 hdc in next st, (hdc in next st, 2 hdc in next st) 3 times, sc in next st, 2 sc in last st 15 sts.
121 Rnd 4: With black, (sc in each of next 2 sts, 2 sc in following st) 5 times 20 sts. Rnd 5: With white, (3 dc in next st, sl st in next st) 2 times, sc in each of rem 16 sts 24 sts. Arms Make 2. With black, make a magic circle. Rnd 1: Work 5 sc in ring. Rnd 2: *Sc 2 in next sc; rep from * around 10 sts. Rnds 3 and 4: Sc around. Rnd 5: (Sc in each of next 3 sts, sc2tog) 2 times 8 sts. Rnds 6 11: With gray, sc around. Tummy With white, make a magic circle. Rnd 1: Work 5 sc in ring. Rnd 2: *Sc 2 in next sc; rep from * around 10 sts. Rnd 3: (Sc in next st, 2 sc in following st) 5 times 15 sts. Rnd 4: (Sc in each of next 2 sts, 2 sc in following st) 5 times 20 sts. Rnd 5: (Sc in each of next 3 sts, 2 sc in following st) 5 times 25 sts. Body With gray, make a magic circle. Rnd 1: Work 6 sc in ring. Rnd 2: *Sc 2 in next sc; rep from * around 12 sts. Rnd 3: (Sc in next st, 2 sc in following st) 6 times 18 sts. Rnd 4: (Sc in each of next 2 sts, 2 sc in following st) 6 times 24 sts. Rnd 5: (Sc in each of next 3 sts, 2 sc in following st) 6 times 30 sts. Rnd 6: (Sc in each of next 4 sts, 2 sc in following st) 6 times 36 sts. Rnds 7 12: Sc around.
122 Rnd 13: (Sc in each of next 4 sts, sc2tog) 6 times 30 sts. Rnds 14 and 15: Sc around. Rnd 16: (Sc in each of next 3 sts, sc2tog) 6 times 24 sts. Rnds 17 and 18: Sc around. Legs Make 2. With black, make a magic circle. Rnd 1: Work 6 sc in ring. Rnd 2: *Sc 2 in next sc; rep from * around 12 sts. Rnd 3: (Sc in next st, 2 sc in following st) 6 times 18 sts. Rnd 4: Through back loops only, sc in each of next 6 sts, sc2tog 3 times, sc in each of rem 6 sts 15 sts. Rnd 5: Sc in each of next 4 sts, sc2tog 3 times, sc in each of rem 5 sts 12 sts. Rnds 6 8: Sc around. Rnd 9: With gray, (sc in next st, long sc in next st) 6 times 12 sts. Rnd 10: Sc around. Rnd 11: (Sc in each of next 2 sts, sc2tog) 3 times 9 sts. Rnds 12 and 13: Sc around. Tail With black, make a magic circle. Rnd 1: Work 5 sc in ring. Rnd 2: *Sc 2 in next sc; rep from * around 10 sts. Rnd 3: (Sc in each of next 4 sts, 2 sc in following st) 2 times 12 sts. Rnd 4: (Sc in each of next 2 sts, 2 sc in following st) 4 times 16 sts. Rnd 5: With gray, (sc in next st, long sc in next st) 8 times 16 sts. Rnd 6: (Sc in each of next 3 sts, 2 sc in following st) 4 times 20 sts. Rnd 7: (Sc in each of next 4 sts, 2 sc in following st) 4 times 24 sts. Rnd 8: With black, (sc in next st, long sc in next st) 12 times 24 sts. Rnd 9: (Sc in each of next 3 sts, 2 sc in following st) 6 times 30 sts. Rnd 10: Sc around.
 4 times 20 sts. Rnd 15: With black, (sc in next st, long sc in next st) 10 times 20 sts.")
123 Rnd 11: With gray, (sc in next st, long sc in next st) 15 times 30 sts. Rnd 12: (Sc in each of next 3 sts, sc2tog) 6 times 24 sts. Rnd 13: Sc around. Rnd 14: (Sc in each of next 4 sts, sc2tog) 4 times 20 sts. Rnd 15: With black, (sc in next st, long sc in next st) 10 times 20 sts. Rnd 16: Sl st in each of next 4 sts, sc2tog 2 times, sc in each of next 4 sts, sc2tog 2 times, sl st in each of rem 4 sts 16 sts. Stuff the tail before attaching. Assembly Sew ears to head. Lightly stuff muzzle. Sew to head. Attach safety eyes to center of eye patches and sew in place. Stuff head. Stuff body, tail, arms, and legs. Sew arms, legs, and tail to body. Sew head and tummy to body. Weave in ends.

124 Gunny Bear Gunny Bear is ready for his winter expedition across the Atlantic! His pattern may seem long, but its simplicity will make up for the length. His huggable size makes him the perfect cuddly companion.

125 Skill Level: Easy Finished Size: 10½" tall Materials See page 60 for more about yarns. Yarn: Light worsted- or DK-weight 4-ply acrylic yarn 250 yds in off-white for arms and head 170 yds in white for hat, ears, muzzle, and trim 150 yds in navy for overalls and trim 2 yds in pink for trim Hooks and Notions:
126 US Size F-5 (3.75 mm) crochet hook 2 buttons, 36 mm diameter, for eyes Stitch marker, fiberfill stuffing, tapestry needle 2 wooden buttons, for overalls Sailor s Hat With white, make a magic circle (page 61). Rnd 1: Work 7 sc in ring. Rnd 2: *Hdc 2 in next sc; rep from * around 14 sts. Rnd 3: (Hdc in next st, 2 hdc in next st) 7 times 21 sts. Rnd 4: (Hdc in each of next 2 sts, 2 hdc in next st) 7 times 28 sts. Rnd 5: (Hdc in each of next 3 sts, 2 hdc in next st) 7 times 35 sts. Rnd 6: (Hdc in each of next 4 sts, 2 hdc in next st) 7 times 42 sts. Rnd 7: (Hdc in each of next 5 sts, 2 hdc in next st) 7 times 49 sts. Rnd 8: (Hdc in each of next 6 sts, 2 hdc in next st) 7 times 56 sts. Rnd 9: (Hdc in each of next 7 sts, 2 hdc in next st) 7 times 63 sts. Rnds 10 13: Sc around. Rnd 14: (Sc in each of next 7 sts, sc2tog) 7 times 56 sts. Rnds 15 18: Sc around. Rnd 19: Through front loops only, (sc in each of next 7 sts, 2 sc in following st) 7 times 63 sts. Rnd 20: Sc around. Rnd 21: With navy, (sc in each of next 8 sts, 2 sc in following st) 7 times 70 sts. Rnd 22: Sc around. Rnd 23: With white, (sc in each of next 9 sts, 2 sc in following st) 7 times 77 sts. Rnd 24: Sc around. Rnd 25: With navy, (sc in each of next 10 sts, 2 sc in following st) 7 times 84 sts. Rnd 26: Sc around. Rnd 27: With white, (sc in each of next 11 sts, 2 sc in following st) 7 times 91 sts. Rnd 28: Sl st around. Ears Make 2.
 6 times 24 sts. Rnd 5: (Sc in each of next 3 sts, 2 sc in following st) 6 times 30 sts.")
127 With white, make a magic circle. Rnd 1: Work 6 sc in ring. Rnd 2: *Sc 2 in next sc; rep from * around 12 sts. Rnd 3: (Sc in next st, 2 sc in following st) 6 times 18 sts. Rnd 4: (Sc in each of next 2 sts, 2 sc in following st) 6 times 24 sts. Rnd 5: (Sc in each of next 3 sts, 2 sc in following st) 6 times 30 sts. Rnd 6: (Sc in each of next 4 sts, 2 sc in following st) 6 times 36 sts. Rnds 7 10: Sc around. Rnd 11: (Sc in each of next 4 sts, sc2tog) 6 times 30 sts. Rnd 12: (Sc in each of next 3 sts, sc2tog) 6 times 24 sts. Sew the hat to the head over one ear. Muzzle With white, make a magic circle. Rnd 1: Work 6 sc in ring. Rnd 2: *Sc 2 in next sc; rep from * around 12 sts. Rnd 3: (Sc in next st, 2 sc in following st) 6 times 18 sts. Rnd 4: (Sc in each of next 2 sts, 2 sc in following st) 6 times 24 sts. Rnd 5: (Sc in each of next 3 sts, 2 sc in following st) 6 times 30 sts. Rnd 6: (Sc in each of next 4 sts, 2 sc in following st) 6 times 36 sts.
128 Rnd 7: (Sc in each of next 5 sts, 2 sc in following st) 6 times 42 sts. Rnd 8: Sc around. Head With off-white, make a magic circle. Rnd 1: Work 6 sc in ring. Rnd 2: *Sc 2 in next sc; rep from * around 12 sts. Rnd 3: (Sc in next st, 2 sc in following st) 6 times 18 sts. Rnd 4: (Sc in each of next 2 sts, 2 sc in following st) 6 times 24 sts. Rnd 5: (Sc in each of next 3 sts, 2 sc in following st) 6 times 30 sts. Rnd 6: (Sc in each of next 4 sts, 2 sc in following st) 6 times 36 sts. Rnd 7: (Sc in each of next 5 sts, 2 sc in following st) 6 times 42 sts. Rnd 8: (Sc in each of next 6 sts, 2 sc in following st) 6 times 48 sts. Rnd 9: (Sc in each of next 7 sts, 2 sc in following st) 6 times 54 sts. Rnd 10: (Sc in each of next 8 sts, 2 sc in following st) 6 times 60 sts. Rnd 11: (Sc in each of next 9 sts, 2 sc in following st) 6 times 66 sts. Rnd 12: (Sc in each of next 10 sts, 2 sc in following st) 6 times 72 sts. Rnd 13: (Sc in each of next 11 sts, 2 sc in following st) 6 times 78 sts. Rnd 14: (Sc in each of next 12 sts, 2 sc in following st) 6 times 84 sts. Rnd 15: (Sc in each of next 13 sts, 2 sc in following st) 6 times 90 sts. Rnd 16: (Sc in each of next 14 sts, 2 sc in following st) 6 times 96 sts. Rnds 17 28: Sc around. Rnd 29: (Sc in each of next 15 sts, 2 sc in following st) 6 times 102 sts. Rnd 30: Sc around. Rnd 31: (Sc in each of next 15 sts, sc2tog) 6 times 96 sts. Rnd 32: (Sc in each of next 14 sts, sc2tog) 6 times 90 sts. Rnd 33: (Sc in each of next 13 sts, sc2tog) 6 times 84 sts. Rnd 34: (Sc in each of next 12 sts, sc2tog) 6 times 78 sts. Rnd 35: (Sc in each of next 11 sts, sc2tog) 6 times 72 sts. Rnd 36: (Sc in each of next 10 sts, sc2tog) 6 times 66 sts. Rnd 37: (Sc in each of next 9 sts, sc2tog) 6 times 60 sts. Rnd 38: (Sc in each of next 8 sts, sc2tog) 6 times 54 sts. Rnd 39: (Sc in each of next 7 sts, sc2tog) 6 times 48 sts.
129 Rnd 40: (Sc in each of next 6 sts, sc2tog) 6 times 42 sts. Rnd 41: (Sc in each of next 5 sts, sc2tog) 6 times 36 sts. Fasten off. Body With navy, make a magic circle. Rnd 1: Work 6 sc in ring. Rnd 2: (Sc in each of next 2 sts, 2 sc in following st) 2 times 8 sts. Rnd 3: *Sc 2 in next sc; rep from * around 16 sts. Rnd 4: (Sc in next st, 2 sc in following st) 8 times 24 sts. Rnd 5: (Sc in each of next 2 sts, 2 sc in following st) 8 times 32 sts. Rnd 6: (Sc in each of next 3 sts, 2 sc in following st) 8 times 40 sts. Rnd 7: (Sc in each of next 4 sts, 2 sc in following st) 8 times 48 sts. Rnd 8: (Sc in each of next 5 sts, 2 sc in following st) 8 times 56 sts. Rnd 9: (Sc in each of next 6 sts, 2 sc in following st) 8 times 64 sts. Rnd 10: (Sc in each of next 7 sts, 2 sc in following st) 8 times 72 sts. Rnd 11: (Sc in each of next 8 sts, 2 sc in following st) 8 times 80 sts. Rnds 12 16: Sc around. Rnd 17: (Sc in each of next 8 sts, sc2tog) 8 times 72 sts. Rnds 18 and 19: Sc around. Rnd 20: (Sc in each of next 7 sts, sc2tog) 8 times 64 sts. Rnd 21: Sc around. Rnd 22: With white, through back loops only, sc around. Rnds 23 and 24: Sc around. Rnd 25: (Sc in each of next 6 sts, sc2tog) 8 times 56 sts. Rnds 26 30: Sc around. Rnd 31: (Sc in each of next 5 sts, sc2tog) 8 times 48 sts. Rnds 32 34: Sc around. Rnd 35: (Sc in each of next 4 sts, sc2tog) 8 times 40 sts. Arms Make 2. With off-white, make a magic circle.
130 Rnd 1: Work 5 sc in ring. Rnd 2: *Sc 2 in next sc; rep from * around 10 sts. Rnd 3: (Sc in next st, 2 sc in following st) 5 times 15 sts. Rnd 4: (Sc in each of next 2 sts, 2 sc in following st) 5 times 20 sts. Rnd 5: (Sc in each of next 3 sts, 2 sc in following st) 5 times 25 sts. Rnd 6: (Sc in each of next 4 sts, 2 sc in following st) 5 times 30 sts. Rnd 7: Sc around. Rnd 8: With white, through front loops only, sc around. Through back loops only of same rnd, (sc in each of next 4 sts, sc2tog) 5 times 25 sts. Rnd 9: Sc around. Rnd 10: With navy, sc around. Rnd 11: With white, sc around. Rnd 12: With navy, (sc in each of next 3 sts, sc2tog) 5 times 20 sts. Rnds 13 15: With white, sc around. Rnd 16: (Sc in each of next 2 sts, sc2tog) 5 times 15 sts. Rnds 17 21: Sc around. Legs Make 2. With white, ch 8. Rnd 1: Sc in 2nd ch from hook and in each of next 2 ch, hdc in each of next 4 ch. Turn foundation ch. On opposite side of foundation ch, hdc in each of next 4 ch, sc in each of rem 3 ch 14 sts. Rnd 2: Sc in each of next 4 sts, hdc in next st, 2 hdc in each of next 6 sts, sc in each of rem 3 sts 20 sts. Rnd 3: Sc in each of next 3 sts, 2 sc in next st, hdc in each of next 3 sts, 2 hdc in next st, dc in each of next 3 sts, 2 dc in next st, hdc in each of next 3 sts, 2 hdc in next st, sc in each of next 3 sts, 2 sc in last st 25 sts. Rnd 4: Sc in each of next 10 sts, 2 sc in each of next 5 sts, sc in each of next 10 sts 30 sts. Rnd 5: Through back loops only, sc around. Rnd 6: Sc in each of next 10 sts, sc2tog 5 times, sc in each of rem 10 sts 25 sts. Rnd 7: Sc in each of next 7 sts, sc2tog 5 times, sc in each of next 8 sts 20 sts. Rnd 8: Sc in each of next 8 sts, sc2tog 2 times, sc in each of next 8 sts 18 sts. Rnd 9: With off-white, through back loops only, sc around.
 5 times 25 sts. Rnds 15 and 16: Sc around. Overall Straps Make 2. With navy, ch 53.")
131 Rnds 10 and 11: Sc around. Rnd 12: With navy, through front loops only, (sc in each of next 8 sts, 2 sc in following st) 2 times 20 sts. Rnd 13: Sc around. Rnd 14: (Sc in each of next 3 sts, 2 sc in following st) 5 times 25 sts. Rnds 15 and 16: Sc around. Overall Straps Make 2. With navy, ch 53. Row 1: Hdc in 3rd ch from hook and in each ch across 51 sts. Assembly Fold brim of hat up along rnd 19. Stuff. Sew hat and ears to head. With pink, embroider a T on muzzle for a nose. Stuff muzzle and sew to head. Sew eyes in place. Stuff arms and legs. Sew arms and legs to body. Sew a wooden button to each overall strap. Sew straps to body, crossing in back with buttons in front. Stuff head and body. Sew head to body. Weave in ends.

132 Side view. Cross the straps in the back before sewing the ends in place.
133 Crochet Basics Following is some basic information for making the toys in this book. If you need more details, go to ShopMartingale.com/HowtoCrochet for free, downloadable instructions. For more tips, see Tips and Tricks on page 31. SAFETY FIRST Small parts, like beads, plastic eyes, and buttons, aren t suitable for toys intended for small children since they re a choking hazard. If the amigurumi is a gift for a young child, you can substitute embroidered eyes instead. Tools When making amigurumi, I find it more comfortable to use a hook with a soft grip around the handle to lessen the pressure on my fingers. I usually use the Hamanaka brand size 6/0 or regular F-5 (3.75 mm) crochet hooks, but I sometimes like to change to a larger or smaller size hook to change the size of the finished project. To keep track of the start of each round, I use a stitch marker. If you don t have a stitch marker handy, don t worry, just grab a safety pin and you re good to go! Place the stitch marker on the very first stitch of the round and just move it after each round is completed. Also make sure to have a tapestry needle and pins (if desired) these will be your best friends in sewing your amigurumi just right. When making amigurumi, a popular choice is to use safety eyes, but it is not always so easy to find them. A fun alternative is to use buttons or flat-bottomed jewels. Unlike safety eyes, buttons and jewels give added character and an extra pop of color to your amigurumi. Buttons are sewn in place, while a tacky glue can be used to secure jewels. And of course, what would amigurumi be without stuffing? Go to your local yarn or craft shop to purchase fiberfill; however, if you don t have any on hand, simply make use of any old pillows that you don t use. Yarns Most of the amigurumi were made using a high-bulk 4-ply acrylic yarn brand not available outside the Philippines. Don t worry about finding the exact yarn since the patterns are still workable using different yarns. Select any smooth, DK-

134 weight acrylic yarn for the projects in this book. This type of yarn tends to come in a rainbow of colors, so finding what you need should be a snap! Of course, worsted or other weights of yarn can be used as well, just be certain to adjust the hook size to achieve a firm fabric (and remember that changing the yarn and hook will affect the finished size of the project). Gauge and Tension All of the finished sizes in this book are based solely on how I crochet and my gauge. Yours may come out bigger or smaller, but don t fret. The beauty of amigurumi is that you don t really need to follow a gauge so long as your tension remains consistent throughout. Aim for a firm but not-too-dense fabric, that will hold its shape without being floppy or allowing the stuffing to show between the stitches. Working in Rounds Each amigurumi here is worked in the round unless otherwise stated. Unless otherwise noted, rounds are worked continuously in a spiral, never joined with a slip stitch. Closing Up Ends When working with amigurumi, one important question is how do I close the
135 amigurumi on the final round so that the stuffing won t fall out? First, take a tapestry needle and thread the yarn tail. Then, insert the needle in the next stitch from the outside in and continue around, weaving in and out through each stitch on the last round. Pull the tail firmly and the stitches will close in, like tightening a drawstring. Secure the end and trim, allowing the end of the tail to hide in the stuffing. Sewing Pieces Together Whenever possible, use tails left at the end of a row or round to sew pieces together; this saves time and energy. If the tail is not long enough, cut a new length of yarn and thread it on a tapestry needle. If desired, pin the pieces to be joined to align them perfectly, then sew together neatly using whipstitch. Stitches and Techniques Another awesome thing about making amigurumi is that it makes use of basic stitches and techniques, so these projects are great for newer crocheters! Single crochet is used most often, though taller stitches are used for shaping. Most pieces begin with a magic circle, explained here. MAGIC CIRCLE The magic circle technique (also known as an adjustable loop) is a simple way to begin crocheting in rounds. Loop the yarn around your index finger and pinch to form a loop, leaving a 4" tail. With hook, draw the working yarn through the loop and ch 1, removing your finger. Next, follow the pattern instructions to work the required number of stitches around the ring for the next round, then pull the tail snugly to close. You can use your finger to keep the loop open while making your first stitch.
![CHAIN [CH] Wrap the yarn around the hook and then](/docs-images/94/121656805/images/136-0.jpg "pull the hook through the loop to create a chain")
136 CHAIN [CH] Wrap the yarn around the hook and then pull the hook through the loop to create a chain stitch.
![SLIP STITCH [SL ST] Insert the hook in the indicated chain or stitch.](/docs-images/94/121656805/images/137-0.jpg "Wrap the yarn around the hook, draw through both loops on the hook.")
![SINGLE CROCHET [SC] Insert the hook in the indicated chain or stitch.](/docs-images/94/121656805/images/137-1.jpg "Wrap the yarn around the hook, draw up a loop; wrap the yarn around the hook,")
137 SLIP STITCH [SL ST] Insert the hook in the indicated chain or stitch. Wrap the yarn around the hook, draw through both loops on the hook. SINGLE CROCHET [SC] Insert the hook in the indicated chain or stitch. Wrap the yarn around the hook, draw up a loop; wrap the yarn around the hook, draw through both loops on the hook.
![LONG SINGLE CROCHET [LONG SC] Work as for single](/docs-images/94/121656805/images/138-0.jpg "crochet, inserting the hook in the stitch of the row")
138 LONG SINGLE CROCHET [LONG SC] Work as for single crochet, inserting the hook in the stitch of the row below.
![HALF DOUBLE CROCHET [HDC] Yarn over the hook, then insert the hook in the indicated chain or stitch.](/docs-images/94/121656805/images/139-0.jpg "Wrap the yarn around the hook, draw up a loop; wrap the yarn around the hook, draw through all loops on")
139 HALF DOUBLE CROCHET [HDC] Yarn over the hook, then insert the hook in the indicated chain or stitch. Wrap the yarn around the hook, draw up a loop; wrap the yarn around the hook, draw through all loops on the hook.
![DOUBLE CROCHET [DC] Yarn over the hook, then insert](/docs-images/94/121656805/images/140-0.jpg "the hook in the indicated chain or stitch.")

140 DOUBLE CROCHET [DC] Yarn over the hook, then insert the hook in the indicated chain or stitch. Wrap the yarn around the hook, draw up a loop; (wrap the yarn around the hook, draw through two loops on the hook) twice.


141 PUFF STITCH Working in the same stitch, (yarn over the hook, then insert the hook in the indicated chain or stitch. Wrap the yarn around the hook, draw up a loop) four times so there are nine loops on the hook. Yarn over and draw through all loops on the hook, ch1.
.")
.")
142 CROCHETING TWO STITCHES TOGETHER When crocheting two stitches together, regardless of whether they are single, double, or any other type of crochet stitch, the process is the same. Work the first stitch until two loops remain on the hook, then work the second stitch to the same point (in other words, do not make the last yarn over, draw through two loops of each stitch). Once both stitches are worked to this point, yarn over and draw through the remaining loops of both stitches, joining them into a single stitch. INCREASE To increase, simply work two stitches in the same stitch or space. DECREASE [SC2TOG] Throughout this book, decreases are worked as single crochet two together (sc2tog). To make the decrease less visible, work through the front loops only. LOOPS Most amigurumi here is worked using both loops of the crochet stitch. However, there are exceptions. When indicated, you will work stitches through the front or back loops only.


143 COLOR CHANGE There are many ways to change yarn colors, but the neatest way I ve seen is to work the last stitch before the color change until two loops remain on the hook, then join the new yarn to complete the stitch.
144 Abbreviations ( ) Work instructions within parentheses as many times as directed. approx beg ch cont dc dec(s) hdc inc(s) long sc mm prev rem rep(s) rnd(s) sc sc2tog sk approximately begin(ning) chain(s) or chain stitch(es) continue(ing)(s) double crochet(s) decrease(ing)(s) half double crochet(s) increase(ing)(s) long single crochet(s) millimeter(s) previous remain(ing) repeat(s) round(s) single crochet(s) single crochet 2 stitches together 1 stitch decreased skip
145 sl st(s) slip stitch(es) sp(s) st(s) tog space(s) stitch(es) together

146 About the Author Shannen is a college student and amigurumi designer who lives in the Philippines. She started crocheting as a school requirement in the sixth grade and fell in love with the craft. By the time she was in her second year of high school, she learned about amigurumi, which made her love crocheting even more. Her love of animals contributes to her amigurumi designs, as she tries to make all her dream animals come to life well, in plushie form. Since 2011, she has been posting all her amigurumi creations to her various social networking sites and selling patterns online. You can follow Shannen through social media at the following addresses.
Free Crochet Pattern Lion Brand Vanna's Choice Amigurumi Holiday Penguin Pattern Number: 70703AD
 Free Crochet Pattern Lion Brand Vanna's Choice Amigurumi Holiday Penguin Pattern Number: 70703AD One of our menagerie of amigurumi animals, this cheery holiday bird with a Christmasstriped hat is sure
8 free amigurumi patterns for beginners and intermediate crocheters.
 8 free amigurumi patterns for beginners and intermediate crocheters. CROCHET PATTERNs BY Table of contents Abbreviations in US terms Abbreviations...2 General instructions...2 Tutorial : the invisible
Free Crochet Pattern Lion Brand Vanna's Choice Amigurumi Reindeer Pattern Number: 70707AD
 Free Crochet Pattern Lion Brand Vanna's Choice Amigurumi Reindeer Pattern Number: 70707AD One of our menagerie of amigurumi animals, this reindeer is sure to be a favorite. Brighten your holiday with this
Free Crochet Pattern Lion Brand Wool-Ease Amigurumi Holiday Santa Pattern Number: 70705AD
 Page 1 of 5 Free Crochet Pattern Lion Brand Wool-Ease Amigurumi Holiday Santa Pattern Number: 70705AD A fun Christmas holiday decoration or tree ornament! Page 2 of 5 Free Crochet Pattern from Lion Brand
Mister Sock Monkey By Premier Yarns Design Team Level: Intermediate
 Mister Sock Monkey By Premier Yarns Design Team Level: Intermediate FINISHED MEASUREMENTS Small (Large) Height: 15 (20) MATERIALS Premier Yarn Premier Home Cotton Marls (85% cotton, 15% polyester; 60 gm/105
Bengali Babees. Ganesh
 Bengali Babees Ganesh When crocheted with yarn and hook specified, Ganesh measures 14 inches L, 13 inches around the belly, and a sitting height of 10 inches. Crown is 14 inches in diameter and 2 ¼ inches
Bear & Blanket. Ch, sl st, sc, hdc, dc
 Bear & Blanket EC00026 BEAR FINISHED SIZE 16" tall in a sitting position MATERIALS 6 oz. Cafe Au Lait #9334 (tan) Red Heart Light & Lofty Art. E708 by Coats & Clark or bulky yarn Small amount Coffee #365
Free Crochet Pattern Lion Brand. Bonbons Holiday Stacking Toy Pattern Number: L20612
 Free Crochet Pattern Lion Brand Bonbons Holiday Stacking Toy Pattern Number: L20612 Free Crochet Pattern from Lion Brand Yarn Lion Brand Bonbons Holiday Stacking Toy Pattern Number: L20612 SKILL LEVEL:
Elephant. Pattern set includes patterns for elephant, bib and rattle.
 Pot Belly Babies Elephant Pattern set includes patterns for elephant, bib and rattle. When made with the specified yarns and hook sizes, elephant measures 14 inches L and 14 ½ inches around belly, with
Pioneer Becky Doll. Pioneer-era Becky would look charming perched on a bed or dresser. Her pinafore is removable.
 Pioneer Becky Doll By Sheila Leslie DIRECTIONS Beginner SIZE 17 inches tall MATERIALS Worsted weight yarn (8 oz per skein): 1 skein each white, light plum, off-white and rust, small amount of brown, scraps
Little Uns. T. Rex. When crocheted with yarns and hook specified, T. Rex measures 16 inches L with a standing height of 11 inches.
 Little Uns T. Rex When crocheted with yarns and hook specified, T. Rex measures 16 inches L with a standing height of 11 inches. This pattern is crocheted in the amigurumi style of continuous rounds beginning
Scissors, tapestry needle to weave in ends (I prefer crochet hook for weaving in).
.") And here is a tutorial for Block 6! I hope you will like it :) You will need: Yarn in 6 colors. I used yarn Cotton Light by DROPS (50g/1.76 oz., 105 m/115 yds.) Yarn weight: DK. Texture: 8 ply (11 wpi)
And here is a tutorial for Block 6! I hope you will like it :) You will need: Yarn in 6 colors. I used yarn Cotton Light by DROPS (50g/1.76 oz., 105 m/115 yds.) Yarn weight: DK. Texture: 8 ply (11 wpi)
Scissors, tapestry needle to weave in ends (I prefer crochet hook for weaving in).
.") 7 You will need: Yarn in 6 colors. I used yarn Cotton Light by DROPS (50g/1.76 oz., 105 m/115 yds.) Yarn weight: DK. Texture: 8 ply (11 wpi) Crochet hook 3,25 mm (D) or size needed to obtain acceptable
7 You will need: Yarn in 6 colors. I used yarn Cotton Light by DROPS (50g/1.76 oz., 105 m/115 yds.) Yarn weight: DK. Texture: 8 ply (11 wpi) Crochet hook 3,25 mm (D) or size needed to obtain acceptable
Bonnie W/ Ladybug Costume Pattern By: Havva Ünlü (Havva Designs)
") Bonnie W/ Ladybug Costume Pattern By: Havva Ünlü (Havva Designs) Page 1 Copyrights Statement This design is the intellectual property of Havva Ünlü and protected by international copyright laws and is
Bonnie W/ Ladybug Costume Pattern By: Havva Ünlü (Havva Designs) Page 1 Copyrights Statement This design is the intellectual property of Havva Ünlü and protected by international copyright laws and is
P a g e 1. Crocheted Elephant Pattern. By Tracy Coldwell Design at. Button Beautiful
 P a g e 1 Crocheted Elephant Pattern By Tracy Coldwell Design at Button Beautiful P a g e 2 Crocheted Elephant Pattern By Tracy Coldwell Designs Materials When using Three Bears Yarn Affection 100% Aran
2 15 CUTE AMIGURUMI PATTERNS BY 12 GREAT DESIGNERS
 2 15 CUTE AMIGURUMI PATTERNS BY 12 GREAT DESIGNERS INCLUDES BASIC CROCHET INSTRUCTIONS COMPILED WITH CARE BY Zoomigurumi 2 15 cute amigurumi patterns by 12 great designers First published 2013 by Amigurumipatterns.net
Scissors, tapestry needle to weave in ends (I prefer crochet hook for weaving in).
.") Cal 8 You will need: Yarn in 6 colors. I used yarn Cotton Light by DROPS (50g/1.76 oz., 105 m/115 yds.) Yarn weight: DK. Texture: 8 ply (11 wpi) Crochet hook 3,25 mm (D) or size needed to obtain acceptable
Cal 8 You will need: Yarn in 6 colors. I used yarn Cotton Light by DROPS (50g/1.76 oz., 105 m/115 yds.) Yarn weight: DK. Texture: 8 ply (11 wpi) Crochet hook 3,25 mm (D) or size needed to obtain acceptable
Crochet and Sewing Pattern. Mary the Elephant. LittleOwlsHut. Materials and tools. About this pattern
 LittleOwlsHut Crochet and Sewing Pattern By Galina Astashova Skill level: Experienced Mary the Elephant About this pattern The toy is crocheted in continuous spirals without joining the rounds. You will
Stitch Guide Ch chain Sc single crochet Inc increase Dec - decrease
 Giant Squid Pattern designed and created by Patricia Castillo. Pattern may not be copied, sold, or distributed on any publication without permission from owner. Size: Approx 40 length Materials: -Worsted
Luna the African Flower Cat
 Luna the African Flower Cat By: JO s Crocheteria You will need: Crochet hook 2mm and 3mm Yarn needle Cotton filling Yarn: Catania 26 x 36= 4 70 g black 20 g grey 220 g white 150 g brown Pattern In total
Feathers McGraw presented by Speckerna
 Feathers McGraw presented by Speckerna Feathers McGraw is a creation by Aardman Animations Ltd. Do not sell this pattern or the finished product! Abbreviations & Material sc = single crochet * = repeat
Tony Stark might actually be on the cover of a magazine, so it doesn t seem
 Tony Stark might actually be on the cover of a magazine, so it doesn t seem as ridiculous and over-the-top this time, right? Hello and welcome to my Iron Man pattern! If you have any questions, notice
Chamonix Crochet Hat
 Chamonix Crochet Hat Materials for the child & adult are the same : The child's size will fit most 3-8 years olds & anyone older will want the Adult. *3 skeins bulky weight yarn for hat *1 skein yarn for
pompom ANIMALS MAKE Instructions for making birds, butterflies, ladybugs, and hedgehogs. Pompoms
 pompom MAKE ANIMALS Instructions for making birds, butterflies, ladybugs, and hedgehogs. Pompoms Contents 02 H ow to Make Pompoms Using Pompom Makers 06 H ow to Make Semicircular Pompoms Using Pompom Makers
Inclination Wrap NURTURING FIBRES. Designed by Julme Conradie for Nurturing Fibres. Colours used: Cornflower, Mist, Paris
 Inclination Wrap Colours used: Cornflower, Mist, Paris Designed by Julme Conradie for Nurturing Fibres 1 P a g e I n c l i n a t i o n W r a p ( U S T e r m s ) w w w. n u r t u r i n g f i b r e s. c
Samurai Armor Set: Step by Step
 Samurai Armor Set: Step by Step Pack 6 Stages -5 Contents Stage Pages 7-76 The tasset plates and shoulder pad Stage Pages 77-8 The tassets, helmet and helmet lining Stage Pages 8-86 The tasset plates and
Adding Sculpted Toes to a Cloth Doll Foot
 Adding Sculpted Toes to a Cloth Doll Foot by Sherralyn St. Clair, www.sherralynsdolls.com Many cloth doll patterns leave the doll's foot as a simple rounded shape. I have found that adding sculpted toes
Tess the Butterfly Pillow
 Tess the Butterfly Pillow By: JO s Crocheteria You ll need Yarn: Catania (x 50g) Tilda - 2 white 0105-2 fuchsia 0128 - Magneta 0251 - Violett 0113 - Orchid 0222-1 baby light blue 572 Crochet Hook nr 3
*Heart* Pom-pom rug. 1, 2, 3... go! Zweigart & Sawitzki GmbH & Co. KG Fronäckerstraße Sindelfingen. - more than 3 hours -
 Pom-pom rug *Heart* - more than 3 hours - 1, 2, 3... go! Zweigart & Sawitzki GmbH & Co. KG Fronäckerstraße 50 71063 Sindelfingen Preparation: Arrange the material you need. The Zweigart Twist canvas (Item
W640. Cascade 220. Celtic Cable and Rib Beanie & Mittens. Designed by Linda Medina
 W640 Cascade 220 Celtic Cable and Rib Beanie & Mittens Designed by Linda Medina Cascade 220 Celtic Cable and Rib Beanie & Mittens Designed By Linda Medina Skill Level: Intermediate Sizes: Hat: S/M-18"
Humpty Dumpty Crochet Puzzle Doll
 .3 Humpty Dumpty Crochet Puzzle Doll I'M A PUZZLE! Table of Contents Materials and Project Notes.2 Humpty Dumpty Pattern.3 6 Humpty Dumpty Printable Pattern......7 8 Additional Photos..9 10 Abbreviation
Warm, woolen, winter blanket
 *This free pattern is available for unlimited personal use. You may print a copy of a pattern or keep a digital copy for personal use only. Do not reproduce or sell any of these patterns, either digitally
Shiel e d Kite t By B y Sam & Ca C rir King Ore r g e o g n o Kite t m e aker e rs s Retr t e r a e t t2013
 Shield Kite By Sam & Cari King Oregon Kitemaker s Retreat 2013 SAIL ASSEMBLY Your pre-cut sail pieces include half-inch seam allowances. This provides enough material to complete a 1/4 inch double rolled
Samurai Armor Set: Step by Step
 Samurai Armor Set: Step by Step Pack 3 Stages 9-12 1 Contents Stage 9 Pages 29-31 The cuirass side and tassets Stage 10 Pages 32-37 The shoulder plate and tassets Stage 11 Pages 39-41 The shoulder plate
Sunseeker Multis Skylark Shawl
 DK375 Sunseeker Multis Skylark Shawl Designed by Shannon Dunbabin Sunseeker Multis Skylark Shawl Designed by Shannon Dunbabin Skill Level: Materials: Gauge: Intermediate Cascade Yarns Sunseeker Multis
McKenna Ryan's Chrissy Down Under Fabric List
 FABRIC NUMBER AND COLOR LOCATION AMOUNT Chrissy Down Under Complete 839 Dawn (112) Block 8 Block 1, 2, 3, 4, 5, 7, 8, 9 and border pelicans 3/8 yard 1384 Glacier (183) Block 1, 2 1895 Augusta (579) Block
Married Wing Purple/Claret
 Married Wing Purple/Claret I received some new winging material in the mail the other day and thought I'd give it a workout. It was kind of fun putting this fly together because I had no real plan as to
Project. Important notes that apply to all the Freestanding Lace Easter Baskets: Skill Level: Beginner
 Project Freestanding Lace Easter Baskets Embroidered baskets that will impress everyone including the Easter Bunny! Designs are digitized so that each stitch supports the next so that you may stitch on
Featuring Coats Dual Duty XP. Supplies
 Halloween Black Cat Basket Technique: Designed By: Skill Level: Crafting Time: Finished size: Sewing, Fabric Crafting Linda Turner Griepentrog Intermediate An evening 6" (15.24cm) (at base) x 3 1 2" x
Sewing. muffins. bagels. bread. rolls. Simply FRESH IDEAS WITH FABRIC. laid-back dining. slippers. denim upcycle KEYRINGS. dress up KEY.
 left foot Simply Sewing FRESH IDEAS WITH FABRIC HOW TO PRINT THIS PATTERN Print out this 30-page PDF on to A4 paper. Trim away the shaded border from each page and position the pages as below to assemble
Macrame. Knots and Projects
 BCA160 Macrame Knots and Projects Prepared by the North Dakota 4-H Clothing Committee: Peggy Anderson Merry Green Rachel Vettern Gayle Gette Cindy Swenson Sue Wold Macrame is a creative art that can inspire
THE AMERICAN BARN DOOR KITE
 THE AMERICAN BARN DOOR KITE Oregon Kitemaker s Retreat January 2007 Rod Beamguard 4104 NW 112 th Way Vancouver, WA 98685-3578 (360) 574-8050 home (360) 750-9833 office kytfevr@wa-net.com PLANFORM BARN
Sewing. Simply. wild & free FRESH IDEAS WITH FABRIC. boy s shirt KEY. fast fat quarter LUGGAGE TAG. Lazy daisy stitch
 grainline Simply Sewing FRESH IDEAS WITH FABRIC HOW TO PRINT THIS PATTERN Print out this 30-page PDF on to A4 paper. Trim away the shaded border from each page and position the pages as below to assemble
Step-By-Step Tying Procedure
 Magic Skwala I spend quite a bit of time tying flies. I tie everything from the old standby s to innovative patterns I have found from other tiers on the web and in literature, to my own creations. I have
Delta Painting Challenge:Tropical Winning Entry
 Page 1 of 5 Join the Delta Creative Community. It's FREE! Email: Go 2004 Delta Painting Challenge HOMEspirations back issues "Tropics Go Black-tie" (Parrot Drapery Tie Backs) [ click here to view detail
Easter Bunny Pompoms
 Easter Bunny Pompoms When I was younger I remember it taking ages to make pompoms because of constantly passing a ball of yarn through the middle of two cardboard circles. Well this method makes it a lot
Week 1 Balance. Practicing balance can be incorporated into daily activities. TIPS
 Week 1 Balance Agility, balance, and coordination are valuable in almost all sports. Developing these ABCs, is an important part of physical literacy, and can be achieved through involvement in a variety
Bright Light Feather Wing
 Bright Light Feather Wing I am still finding little time at the vise, but the new fly tying room is coming along great. My wife just finished painting the trim around the window and door, next comes flooring.
August Sign up 24 Hrs in advance for classes. See Reverse Side for Complete Event Listing.
 Sign up 24 Hrs in advance for classes. See Reverse Side for Complete Event Listing. Sunday Monday Tuesday Wednesday Thursday Friday Saturday Ages 3 & up Camp Creavtivity Friends For 10- Ages 6 & up Camp
Zach King Digital Magician Naomi Davis ON SCREEN TEXT: Lifestyle Influencer. Naomi: Hey Zach. Zach: Hey, good to see you again.
 In the center of the screen there is an Easter basket containing a white bunny with green ears, a yellow polka dot Easter egg and a red Target logo envelope on a large red ball in front of a Target store.
Bat Mobile: Happy Halloween
 Published on Sew4Home Bat Mobile: Happy Halloween Editor: Liz Johnson Thursday, 20 October 2016 1:00 We were inspired to bring back this classic Halloween project not just because it's a fast and fun decorating
2017 Fall Product Program Rally Guide
 2017 Fall Product Program Rally Guide 2017 Fall Product Program Rally Overview QSP and Ashdon Farms are excited to offer Councils, service units and troops the opportunity to host Fall Product Program
How to Make a Unique Industrial-Looking PVC Lamp
 How to Make a Unique Industrial-Looking PVC Lamp copyright 2014 by Brooks Owen Owen Publications Battle Ground, WA 98604-0305 USA ALL RIGHTS RESERVED No part of this publication may be reproduced or transmitted
Read & Download (PDF Kindle) Adventures In Pompom Land: 25 Cute Projects Made From Handmade Pompoms
 Adventures In Pompom Land: 25 Cute Projects Made From Handmade Pompoms") Read & Download (PDF Kindle) Adventures In Pompom Land: 25 Cute Projects Made From Handmade Pompoms Enter the wonderful land of pompoms, where cute critters and creative adventures await you. All the projects
Read & Download (PDF Kindle) Adventures In Pompom Land: 25 Cute Projects Made From Handmade Pompoms Enter the wonderful land of pompoms, where cute critters and creative adventures await you. All the projects
Ben Bangham Grayling Flies Feb15 Page 1 of 6 KVFDG
 Ben Bangham Grayling Flies Feb15 Page 1 of 6 KVFDG Grayling Patterns demonstrated by Ben Bangham at KVFDG 17Feb15 Featuring: Top tips: Dubbing methods o split thread loops o dubbing loops o dubbing onto
Homes and Habitats Grades 3-5
 Homes and Habitats Grades 3-5 PROGRAM OVERVIEW Welcome to Cosley Zoo! This program focuses on habitats and adaptations as we discuss the different aspects of a habitat and the qualities animals have that
Rigging it Right. Presented by Ron Barwick Service Manager for Half Hitch Hosted by: Bob Fowler
 Rigging it Right Presented by Ron Barwick Service Manager for Half Hitch ron@halfhitch.com Hosted by: Bob Fowler bob.fowler@marinemax.com (850) 708-1317 marinemax.com www.halfhitch.com 1 The Uni-Knot Strong,
Apple Basket with Swing Handle
 Apple Basket with Swing Handle GH PRODUCTIONS, INC. The Basket Maker's Catalog www.basketmakerscatalog.com Materials are available from your basketry supply store, or contact: Copyright 2000 GH Productions,
Cuddly Pony Lilly 2014 Marina Bachran
 Cuddly Pony Lilly For a cuddly pony you will need: a fatquarter (50x70cm) terry cloth for the back, the mane and the tail a fatquarter (50x70cm) cotton fabric for the body half a fatquarter (50x35cm) cotton
JOLLY JOEL SNOWMAN. by Sharon Cook
 JOLLY JOEL SNOWMAN by Sharon Cook EXCLUSIVE Jolly Joel Snowman by Sharon Cook In memory of my brother, Joel, who was always a jolly, happy soul just like this snowman! PALETTE DecoArt Americana: Antique
Home Tweet Home 9 Blocks Fabric Location 1 Kit
 Home Tweet Home 9 Blocks Fabric Location 1 Kit 1384 Cream (33) 1, 2, 4, 6, 7, 8 1/8 yard 1895 Blacklight (537) 1, 2, 3, 4, 5, 6, 7, 8, 9 1/8 yard 1895 Blonde Ale (199) 1895 Chameleon (315) 8 1/8 yard 1895
Name The Teddy Bear Competition Template
 Name The Competition Template Free PDF ebook Download: Name The Competition Template Download or Read Online ebook name the teddy bear competition template in PDF Format From The Best User Guide Database
Butcher (full dress fishing fly)
") Butcher (full dress fishing fly) On the final day on a early November trip last year we decided to fish one last run before calling it quits. As I was getting out of the truck I noticed a full dress Butcher
Butcher (full dress fishing fly) On the final day on a early November trip last year we decided to fish one last run before calling it quits. As I was getting out of the truck I noticed a full dress Butcher
Beginners Fly-Tying Notes
 Beginners Fly-Tying Notes SESSION 1 Tools Bobbin holder Threader (for dental floss!) Bodkin/ Dubbing needle (hat pins!) Vice 1 Check that: the jaws hold the sizes of hooks you want to tie on; and the stem
ACTIVITY KIT. Young children will love boisterous, exuberant Elwood and this charming tale of friendship.
 ACTIVITY KIT ELWOOD BIGFOOT WANTED: Birdie Friends! By 978-1-4549-08 Jill Esbaum Illustrated by 79-1 Nate Wragg ELWOOD BIGFOOT is lonely. Literally the world s biggest birdwatcher, Elwood would love nothing
National Child Safety Council Costume
 National Child Safety Council Costume Care & Use Guide Your NEW Safetypup Costume Your new Safetypup Costume is one of the finest costumes available to help law enforcement educate children & parents about
More Wild Animals. Lesson Plan
 Lesson at a Glance More Wild Lesson Objectives The children will identify wild animals. The children will state that God made animals. The children will thank God for making wild animals. Bible Story Text
SOME ASSEMBLY REQUIRED. Brian Lynch Illustrated by Edwardian Taylor SCHOLASTIC PRESS NEW YORK
 SOME ASSEMBLY REQUIRED Brian Lynch Illustrated by Edwardian Taylor SCHOLASTIC PRESS NEW YORK For Henry, my best buddy, my greatest (co)creation B.L. To Jamey and my mini wolf pack: Samurai, Hansel, and
Swing Your Partner. by Beth Hester. GH Productions, Inc. The Basket Maker's Catalog
 Swing Your Partner by Beth Hester GH Productions, Inc. The Basket Maker's Catalog Materials are available from your basketry supply store or contact: The Basket Maker's Catalog GH Productions, Inc. 521
overview 60s inspired top
 overview 60s inspired top www.sewdifferent.co.uk (1,1) -1-60's inspired top pattern.indd 27/03/2015 19:39 1cm 6cm Copyright Sew Different www.sewdifferent.co.uk 31cm 21.5cm While this pattern and tutorial
Ten fingers can do many things! They can touch and clap and wave. They can dress in fancy rings. 1
 do many things! They can touch and clap and wave. They can dress in fancy rings. 1 2 catch a giant ball. hug a favorite doll. 3 4 button, snap, and zip. launch a sailing ship. 5 6 put on puppet shows.
BMW Motorrad. Installation Instructions. BMW Motorrad Communications System for Schuberth C3
 BMW Motorrad Installation Instructions BMW Motorrad Communications System for Schuberth C3 Order No. 01 29 2 219 831 BMW Motorrad 05/2011 Be sure to read these instructions carefully and completely before
Melon-Shaped Egg Basket
 Melon-Shaped Egg Basket GH PRODUCTIONS, INC. The Basket Maker's Catalog Materials are available from your basketry supply store, or contact: GH Productions, Inc. The Basket Maker's Catalog 521 E. Walnut
Love Struck pg.v20. Luvums pg.v12. Loveable Louie pg.v7. Love is in the air this Holiday at First & Main! Lovers Lane
 Love Struck pg.v20 Luvums pg.v12 Loveable Louie pg.v7 Love is in the air this Holiday at First & Main! Lovers Lane V1 Day Dreamin No. V6004 shaggy monkey w/embroidered closed eyes and heart patterned bow.
The charge is 20 per head for the season to cover rent and minor expenses. Students pay 10, under-18s go free.
 The Galway Fly Tying Guild has been meeting and tying flies in Galway since the 1970s. It consists of a group of people who meet once a week during the closed trout season to tie flies. The meetings are
Three Jelly Fish Felt Board Pattern
 Three Jelly Fish Felt Board Pattern Designed and Created by Kate McKnight Three jelly Fish is a wonderful set for learning about three counting down from three to zero and counting back up to three again.
Recital 2015 Under the Big Top
 Recital 2015 Under the Big Top Hair, Make- up, Accessories, Tights, and Shoes Everything you need is listed here!! All tights and shoes can be purchased at On Your Toes, 194 Newbury St, Rt. 1 South, Peabody
Fly Tying Tips from Hermann Fisher, Kamloops, Canada As Submitted by Lee Ann Ross
 Fly Tying Tips from Hermann Fisher, Kamloops, Canada As Submitted by Lee Ann Ross How to deal with a crowded head when tying flies: Use a piece of a bicycle inner tube and punch small holes in it. Slip
Fun Indoor Activities!
 Fun Indoor Activities! The following is a list of fun indoor activities for you to enjoy with your family during the wintertime! Divided by age, they are simple activities that make it easy to get an hour
Terry Andrews HD Dragon
 Terry Andrews HD Dragon Material list 1. Hook Mustad size 2, 4 or 6 R75-795080 2hx/5XL Streamer hook. 2. Large plastic bead chain eye. 3. 20kg or similar mono to be used to brace the tail. 4. Olive green
Animals Objectives: Name various animals and describe an animal s characteristics.
 Animals Objectives: Name various animals and describe an animal s characteristics. Materials: vocabulary words, picture of your pet/pets, Noah s Ark storybook, ball, animal crackers, animal maze game Vocabulary:
EASTER PIT E ERY GIRL AND BOY TOY. ftesarti -
 EASTER PIT 1962 ftesarti - TOY E ERY GIRL AND BOY, 79002 CUDDLY BUNNY-12"x53/4" Perky little flirt of soft, cotton stuffed plush with satin lined ears; felt nose, eyes and tongue; pert whiskers and ribbon
Sails. Sails: extract from 'Super-detailing the Cutter Sherbourne' page 1 George Bandurek
 Sails There are many arguments for adding or omitting the sails on a model ship. There is no right answer and I decided to have a combination of set and furled sails on my model of HM cutter Sherbourne
Plans and Instructions to build a folding reflector oven
 Plans and Instructions to build a folding reflector oven Kayak2go.com also has folding kayak plans available for purchase. The low cost and ease of construction make the folding kayaks a great youth group
CORN HUSK DOLLS. BUZZ SAWS Materials String Button or wooden disk with two holes drilled
 BUZZ SAWS Materials String Button or wooden disk with two holes drilled Procedure. If using a wooden disk, pre- nail the holes in the disk. Cut a length of twine/string approx 24 long. Thread the string
3 SIZE NAGASAKI HATA
 3 SIZE NAGASAKI HATA MADE FROM MODERN MATERIALS By Peter (P-air) Stauffer June 2000 The kite and resulting plans and instructions, I have made because of a request by Uli Wahl and Rico Argent, as Rico
Splicing Instructions. Standard Double Braid Eye Splice Type 1 Double Braid Ropes
 Splicing Instructions Standard Double Braid Eye Splice Type 1 Double Braid Ropes Introduction Double Braid Eye Splice This document describes the steps required to perform a Double Braid Eye Splice in
Nicole. the Beach. Fairy
 Nicole the Beach Fairy Special thanks to Narinder Dhami If you purchased this book without a cover, you should be aware that this book is stolen property. It was reported as unsold and destroyed to the
STEP 1 A. Lay the two Motor Mount Tubes on a flat surface with ends even and Glue them together with White Glue. Allow Glue to set before moving on.
 Prod. No. A51003 Skill Level Three QUEST AEROSPACE, INC PO Box 2409 Pagosa Springs, CO 81147 800-858-7302 Things You ll Need To Assemble this Kit: Pencil and Hobby Knife: White Glue: Aliphatic Resin glue,
Beginners/Basic Fly Tying Course
 ` Beginners/Basic Fly Tying Course Basic Tools Vise Scissors Hackle Pliers Bobbins Bodkin/Dubbing Pick Hair Stacker Dubbing Wax Head Cement Dispenser Whip Finish Tool Wing Burning Tools Tweezers Half Hitch
NAVIGATOR Product demonstration prop building instructions
 NAVIGATOR Product demonstration prop building instructions Regional competitions may build product demonstration props out of materials other than PVC pipe. Your regional coordinator will inform you of
Gemstone. Quilt 1. A Free Project Sheet NOT FOR RESALE. Skill Level: Intermediate A Free Project Sheet From. Quilt Design by Heidi Pridemore
 A Free Project Sheet NOT FOR RESALE Gemstone Quilt Design by Heidi Pridemore Skill Level: Intermediate A Free Project Sheet From Finished Quilt Size: 70 x 76 49 West 37th Street, New York, NY 10018 tel:
Classes. Jan. - Apr Where Customers are the Heart of our Business!
 Where Customers are the Heart of our Business! 3833 Washington Road Martinez, Georgia 30907 7063-0090 Classes Jan. - Apr. 2018 www.jeffssewingandvac.com Staff and Teachers Jeff, Cathy, David, Vicki, Nicole,
The Survival Bracelet
 The Survival Bracelet (Free Tutorial PDF) Wildlife Success Stories www.fouroakscrafts.com 1 What is a survival bracelet? It s a decorative and functional bracelet for all ages and genders. The material
How Scott Builds a Fighter Kite, May 2011 Updated Sept 2018
 How Scott Builds a Fighter Kite, May 2011 Updated Sept 2018 MAKE A TEMPLATE 1. Draw half sail plan on 17x22 pad with 4x4 (1/4 inch) grid. Add ¼ inch extra on nose (for reinforcement) and plenty of extra
Aliphatic Resin Wood Glue. 18" Fabric Parachute Part #PNC50 Part # Part #11700 Part #J0016. Launch Lug
 ADANCED * What you will need to build the Quest High-Q Hobby Knife * Straight Edge Pencil Aliphatic Resin Wood Sanding Sealer & Brush Spray Paint Parts and exploded view of the Quest High-Q Nose Cone 18"
 How to? - Constructing a twin walled leader loop You ll need: - Spool of braid - Darning needle - Veniards Ultra Lace tubing Fly tiers use it for nymph bodies - Superglue Make sure it s not water soluble
TEES PLEASE GOLF RELATED CUSTOM PRINTED PROMOTIONAL ITEMS
 TEES PLEASE 1-520-888-0899 Tucson, AZ GOLF RELATED CUSTOM PRINTED PROMOTIONAL ITEMS WOOD GOLF TEES 1000 2000 5000 20,000 50,000 100,000 na na na 73.00 66.00 52.00 47.00 42.00 40.00 39.00 83.00 76.00 62.00
Brushbot Kit Instructions: Parts
 Brushbot Kit Instructions: Parts or AG13 Googly eyes Additional Tools Needed: Scissors or snips, hot glue gun or some type of glue suitable for plastic (epoxy or super glue should be fine). Brushbot Kit
HANDMADE GOLF HEADCOVERS + ACCESSORIES 2019 CATALOG
 HANDMADE GOLF HEADCOVERS + ACCESSORIES 2019 CATALOG PHONE: 888.550.3025 EMAIL: Orders@sunfishsales.com 1 WHY CHOOSE SUNFISH? I ve enjoyed working with the team at Sunfish in creating unique, high quality