A climber s Guide to the ORGAN PIPES. Mt. Wellington, Hobart. produced January Climbers Club of Tasmania.
|
|
|
- Roderick McCarthy
- 5 years ago
- Views:
Transcription
1 A climber s Guide to the ORGAN PIPES Mt. Wellington, Hobart. produced January Climbers Club of Tasmania.
2 CONTENTS Page 1) 2) 1) 2) 3) 4) 5) 6) 7) 8) 9) 10) 11) 12) General Description 1 Access Reaching the Organ Pipes 1 Finding the climbs 2 The Rock 3 Grading 4 Climb Descriptions 4 Northern Buttress 5 The Columns 15 Flange Buttress 23 Central Buttress 24 Great Tier 29 Step Tier 30 Bulging Buttress 32 University Buttress 35 Broken Buttress 36 Southern Rampants 37 Van Diemen Buttress 37 Frustration Buttress 37 Note on Rescue 38 Compilation 38
3 - 1 - THE ORGAN PIPES GENERAL DESCRIPTION The Organ Pipes are composed of dolerite and lie just beneath the summit of Mt. Wellington (4166 ft). They form a continuous chain of buttresses some three quarters of a mile in length and have an easterly aspects. A typical buttress consists of an abrupt forecliff about 200 ft. in height crowned by a long broken crest - giving an overall vertical height range of from 300 to 400 ft. Being only 10 miles by sealed road from Hobart these cliffs provide an excellent practice ground for cragsmen. From the scenic viewpoint the once superb situation has deteriorated due to the ravages of the fires of Feb. 67 and the desecration of the summit by television towers. 1) 2) 3) 4) 5) 6) 7) 8) 9) 10) 11) 12) The main features of the Organ Pipes are listed below: Northern Buttress (including Johnstone s Knob) The Columns - an amphitheatre like wall Flange Buttress Central Buttress Great Tier Step Tier Bulging Buttress University Buttress Broken Buttress Southern Rampants Van Diemen Buttress - the southern boundary of the pipes Frustration Buttress Frustration Buttress is an isolated feature which lies a mile to the south of the Organ pipes proper. A description of it is included in this account. The numbers listed above are used to refer to the various features in the route key which is set out further on in this guide. Little climbing is carried on during the winter as conditions, then, are rather unpleasant and light snow falls are common. ACCESS 1. Reaching the Organ Pipes (a) From Hobart by private transport: This is straightforward. Locate Davey St. It is one block towards the docks (river) from the G.P.O; or one block in the same

4
5 - 2 - direction (south) from the Tourist Bureau. Head west up Davey St., i.e., towards the mountain. Davey St. soon becomes Huon Road and then the Huon Highway. Approx. 5 miles from the city centre along this road, turn right at a signposted junction, i.e. onto the Pinnacle Road which leads to the summit of Mt. Wellington.* (Refer to Fig. 1) Continue on Pinnacle Road for approx. 4 miles when a geological sign board on the left hand side of the road should be seen. Park there (small parking space available). Scramble up the dolerite talus slope above to gain the Panorama Track which skirts the Organ Pipes. There is a faint trail up the talus, starting at the left (southern) end of the parking area. (b) From Hobart by bus and foot: (Refer to Fig. 1) Take a bus from Hobart to Ferntree. Ferntree buses depart from Franklin Square, Macquarie St. (diagonally opposite G.P.O.) During weekends there are 2 buses only each morning; and on week days 2 only after 8.00 a.m. Get off at stop No. 27 (Ferntree Bower). Go across the road to the picnic area (obvious) and take the track labelled Springs Hotel. It starts just above and to the right of the picnic shelter. A walk of 15 to 30 minutes brings one to the former site of the Springs Hotel (destroyed in 67 fires) - now a grassy shelf. Locate the start of the Zig-Zag Track (signposted). This leads from the Springs to the summit of the mountain. About 1¼ miles from the Springs there is a track junction. The left branch zig zags steeply to the summit; and the right branch is the Panorama Track which skirts the base of the Organ Pipes. *First section of Mt. Road is called Pillinger s Drive. 2. Finding the Climbs The Panorama Track skirts the Organ Pipes. There are 5 trails running from this path to the very foot of the cliffs. The start of each trail is marked by a small, wooden, white and red arrow. Inscribed on each arrow is the number of the buttress to which that trail leads. Trails and their numbers are as follows (listed from north to south; i.e. right to left when facing cliff): (1) Northern Buttress - branches at foot of buttress. Right branch to Johnstone s Knob. Left branch to the Columns. (3) Flange Buttress
6 - 3 - (4) Central Buttress - branches at foot. Right branch continues around Buttress. Left branch to Great Tier. (6) Step Tier - branches at foot. Right branch to Great Tier and Central Buttress. Left branch to Bulging Buttress, Avalanche Couloir, University Buttress and Broken Buttress. (11) Van Deimen Buttress - Some of the climbs have been labelled according to a numerical route key. The labels are small white figures painted at the base of each route. The first number of a label always refers to the buttress (or other feature). e.g. 7-2 means route 2 on buttress No. 7. The route key number of each climb is given with the climb description - later in the guide. THE ROCK Dolerite is a medium grained, dark coloured igneous rock and is widespread throughout Tasmania; occurring as massive sills capping many of the ranges - the overlying sediments having been denuded. Dolerite weathers by splitting and breaking into large blocks - especially along vertical lines of weakness - these eventually fall away, making extensive talus slopes on the mountainsides. Thus the Organ Pipes consist of holdless columns and buttresses rent by numerous cracks and chimneys with scattered rectangular ledges, platforms and steps where blocks have tumbled away. Due to the preponderance of cracks and chimneys the emphasis is on interior climbing as opposed to exterior climbing. To quote Rebuffat (on Snow and Rock P. 78): Interior climbing comes less naturally than exterior climbing. Mountaineers who are ill-acquainted with it expend a great deal of effort to no purpose --- Interior climbing is almost always a combination of pressure and resistance --- as in artificial climbing, even the mountaineer with good strong muscle will tire very quickly if he does not employ a proper technique. Most routes on the Pipes call for chimneying, jamming, thrutching, bridging and laybacking. Happily, the frictional qualities of dolerite are first class. There is much sound rock on the Pipes to be en joyed - but care is needed with blocks and bollards, which can be treacherously insecure. A helmet is likely to be more useful on the Pipes than
7 - 4 - on many of the bigger Tasmanian cliffs, especially for seconds, as even the most careful climbers dislodge plenty of stones. For the same reason climbers should be wary when walking at the foot of the cliffs. Natural belays in the form of bollards and chockstones are plentiful and prolific use can be made of alloy chocks (jamming devices). Pitons hold well and suitable cracks are abundant. Because of the great variety of sound belays available no bolts have yet been inserted on the Pipes. GRADING The conventional 6 grade system Easy very severe; is used in this guide. The various grades as applied to the Organ Pipes routes do not necessarily correspond to nominally identical grades on mainland cliffs, or even on other Tasmanian crags. There is a fair amount of inconsistency on the Pipes themselves due largely to the grading of various new climbs by people from different climbing backgrounds. (Hobart, Melb., Sydney, Brisbane, England). Nevertheless there is enough of a trend through the grades of the Pipes routes to allow the climber to obtain a rough indication of difficulty from a quoted grade - provided a few sample routes are done for orientation beforehand. A few in the C.C.T. have argued for the adoption of the Ewbank System. Others claim that no advance is made by arbitrarily increasing the no. of divisions to 20 odd and that progress can only come from a 2 factor system (technical difficulty and seriousness ).* There is also a feeling amongst many Tasmanian climbers that the importance of grading has become magnified out of all proportion to its basic purpose. All that is required, they say, is an approximate indication as to whether a climb is easy, hard or damned hard in relation to their abilities - and that there is no point in trying to apply a micrometer to the cliffs, even if that was possible. CLIMB DESCRIPTIONS In most cases the descriptions and grades are due to the perpetrators of the routes - names of perpetrators are given, after each route description, in alphabetical order. The terms right and left are to be applied when facing the cliff. Except for a few routes on the Northern Buttress the climbs on each feature are listed in order from south to north. *The Ewbank system has a seriousness factor for some climbs.
8
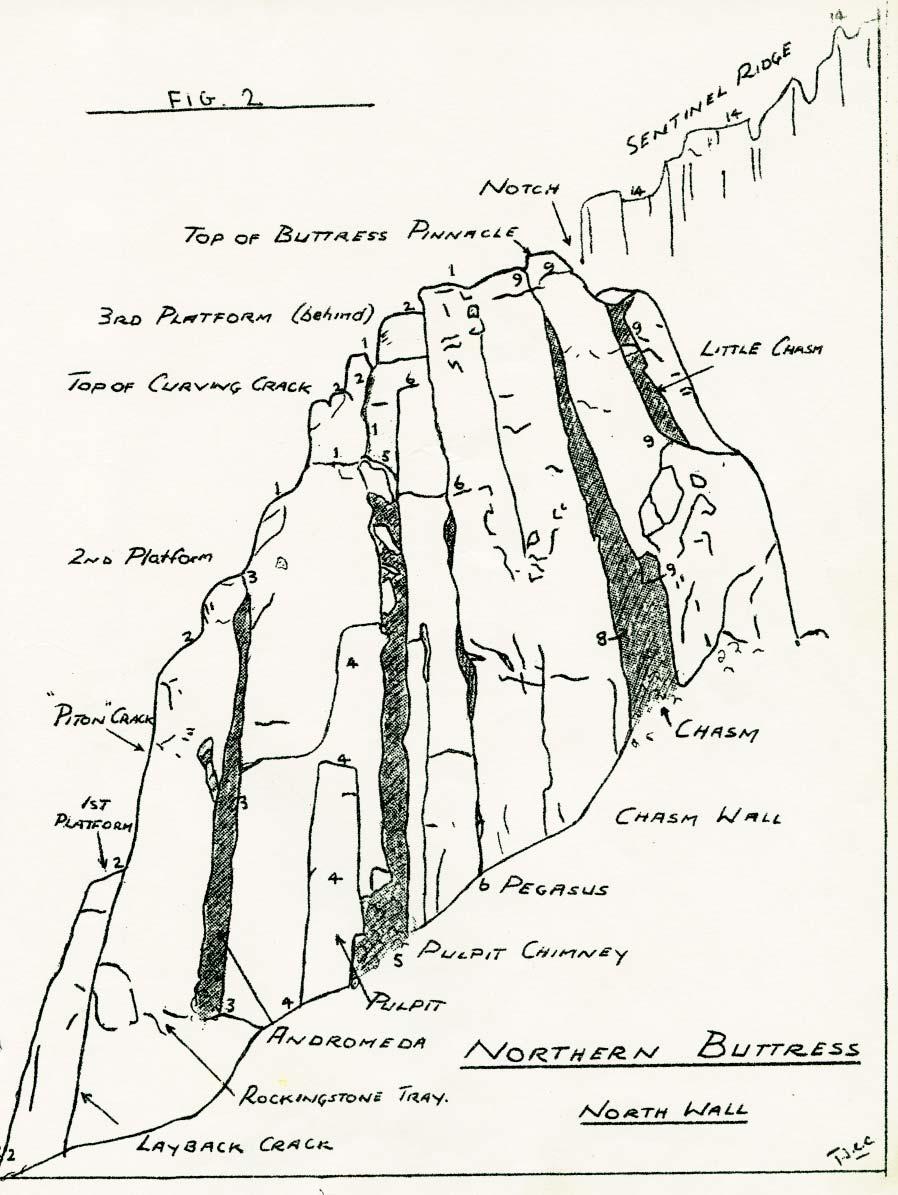
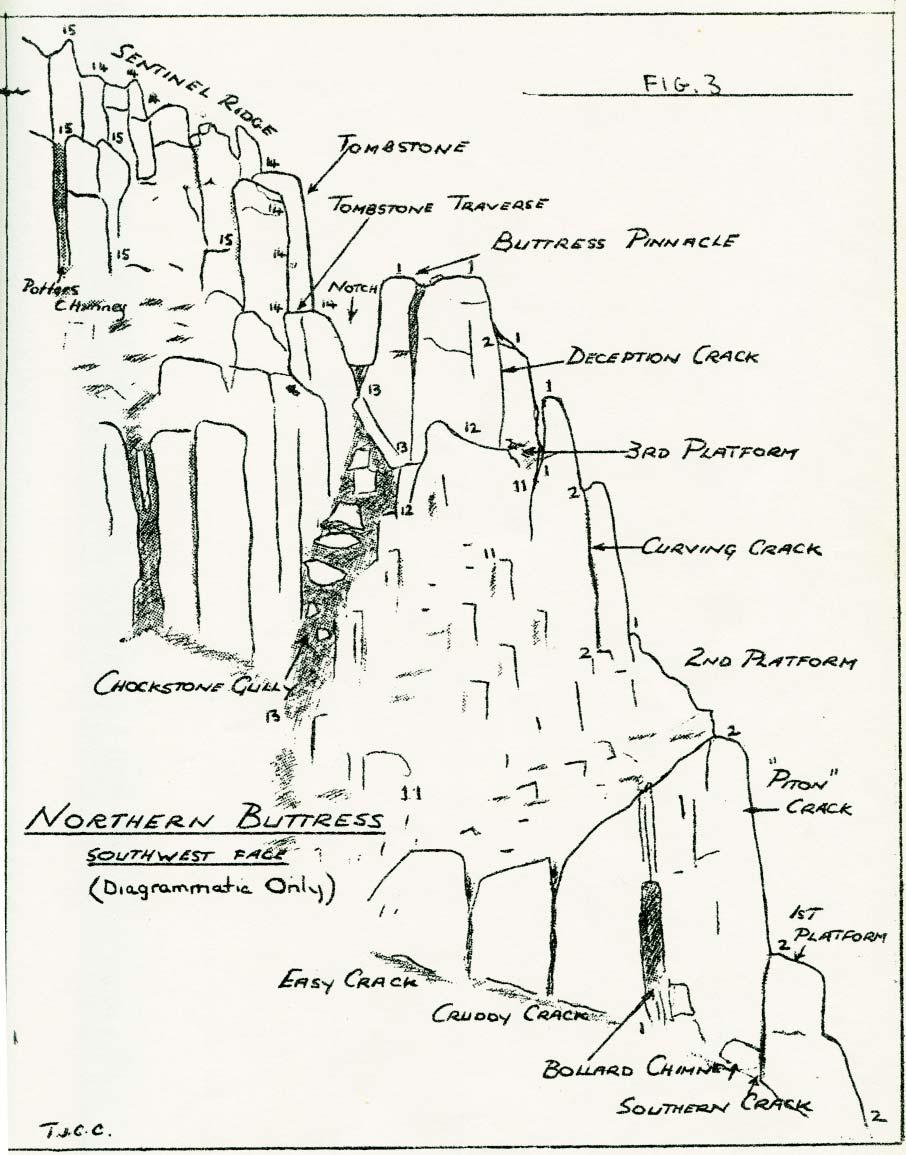
9 NORTHERN BUTTRESS (Refer FIG 2 and FIG 3). The Northern Buttress is the conspicuous spur of the Organ Pipes which can be seen from the Pinnacle Road, from the vicinity of the old Springs Hotel site. As its name suggests it is the most northerly of the buttresses. It is generally less steep than the more southerly buttresses, and being sheltered from the prevailing wind and catching the sun late into the afternoon it has become a popular climbing ground for aspiring cragsmen. The buttress itself is divided into two sections, the Lower Buttress and the Upper Cliffs which are separated by a prominent gap in the ridge which is called the Notch. The Lower Buttress is about 150 ft. in height and culminates in the square tower called Buttress Pinnacle which can clearly be seen from the road. Its north face is comprised of a wall of steep, clean rock riven with the three major chimneys of Andromeda, Pulpit and Chasm. The southern and western sides of the Lower Buttress are more broken, and bounded on the left by the couloir called Chockstone Gully which leads towards the Notch. The Upper Cliffs rise up to the summit screes as a series of gendarmes collectively called Sentinel Ridge. The climbs in general are shorter than on the main part of the Organ Pipes, and many of them are entwined with each other. The Skyline - Sentinel Ridge combination, however provides a long through route (approx. 450 ft.) of intermediate standard along the crest of the buttress to the top of the cliffs, and almost any of the routes can be used in some combination to give a similar length climb. Route 1-1 SKYLINE MINOR Diff. - V. Diff. An interesting climb more or less following the crest of the ridge to the summit of Buttress Pinnacle. start At the first major chimney on the south face of the buttress. It can be recognised by a group of prominent rock spikes at its foot. This is Bollard Chimney. pitch 1 Bollard Chimney. Up the chimney and exit to the left of the overhang. (See also variation A and B). pitch 2 Scramble easily up to the right and join the skyline proper at the 2nd Platform. pitch 3 Skyline Traverse Pitch. Continue easily up the crest of the buttress to the foot of the next prominent crack (Curving Crack). Here the ridge steepens. Climb up diagonally right and cross over the crest of the ridge onto the steep north face. An exposed traverse on good holds leads to a stance on top of the large overhanging chockstone, in Pulpit Chimney, which is hereafter referred to as the Canopy Chockstone. pitch 4 Bottleneck Chimney; the chimney directly above. It is
10
11 - 6 - actually the continuation of Pulpit Chimney, and is rather narrow. Belay above the constriction at the level of the 3rd Platform which is out to the left. (See also variations C, D and E). pitch 5 Bottleneck Chimney continued. Continue on straight up the chimney which is easier now. At the top cross over to a large spike on the upper wall. A few exhilarating moves on good holds take one over the difficulties, and the summit of Buttress Pinnacle is a few yards away. pitch 6 Abseil down the far side of the pinnacle to the Notch. The C.C.T. has erected an abseil anchor (bolted) on the pinnacle. (Climbers use this at their own risk). Ideal ly this climb should be followed by the Sentinel Ridge Climb. (route 1-14) which leads along the skyline of the upper cliffs to the top of the Pipes. Variant 1-1A Cruddy Chimney (V. Diff). The chimney left of Bollard Chimney. Provides an alternative to pitch 1. Often referred to as the hardest Diff. in the world hence the upgrading above. Variant 1-1B Easy Chimney (Mod.). Another chimney further to the left. Not very interesting. Variant 1-1C Bottleneck Passage (Easy). Variation to pitch 4. Instead of climbing Bottleneck Chimney pass through the narrow cave to the south side of the ridge and climb up to the 3rd Platform. Less energetic than the chimney, but unhappily no wider. Variant 1-1D Window Crack. Alternative to pitch 4. From the Canopy Chockstone the lower section of Bottleneck Chimney can be avoided by chimneying up Window Crack - i.e. crack leading up from the chockstone on the left hand side of Bottleneck. It is actually the other side of Curving Crack (see route 1-2, pitch 3). V. Diff. Variant 1-1E Window Wall. Alternative to pitch 4. The open face on left of Window Crack. One awkward mantel shelf. V. Diff, but more exposed than 1-1D. Origin The history of this route is unknown. A route to the Buttress Pinnacle via upper Bottleneck Chimney goes back to J. Peterson and D. Webber, the forerunners of the now defunct Van Diemen Alpine Club. Route 1-2 SKYLINE MAJOR Severe This route is intertwined with the last, but it is a distinct climb none the less. As a skyline route it is a far more satisfying way to the 2nd Platform than the previous climb. It is a less inescapable climb than most routes of this standard. start Right at the lowest point of the buttress. pitch 1 Straight up the nose to the 1st Platform. (see also variants 2A, 2B, 2C, 2D below). pitch 2 Piton Crack (Sev.). The prominent vertical crack in the corner above the 1st Platform. Despite the name, the crack is climbed free. There is an old peg at the base which can be used as
12 - 7 - a toehold to get started in the crack - but it is not essential. Near the top the crack widens into a chimney, and the difficulties ease. pitch 3 Curving Crack. (Actually it is a chimney). Mild. sev. Where the ridge next steepens there is a con spicuous chimney lying to the left of the crest. One can look through it out to the north. The oblique walls of the chimney call for a studied technique and near the top the difficulties increase. pitch 4 From of the top of Curving Crack traverse round to the right of the small tower above and pass through Bottleneck Chimney to the 3rd platform on the southern side of the buttress. As an alternative to pitch 5 (below) one could continue up Bottleneck Chimney to the Buttress Pinnacle. pitch 5 Deception Crack. (about sev.) Straight up crack above 3rd Platform, then to summit of Buttress Pinnacle. pitch 6 Abseil down to the Notch. Ideally this climb should be followed the Sentinel Ridge climb (route 1-14) on the Upper Cliffs. Variant 1-2A Southern Crack (v. diff.) The lower continuation of Piton Crack on the south side of the Buttress. Leads to 1st. Platform. Variant 1-2B Right Hook (diff). Starts from the foot of Southern Crack but traverses around to the right. Variant 1-2C Layback Crack (diff.) A straight crack leading to the 1st Platform on the northern side of the buttress. Variant 1-2D Rockingstone Traverse (diff.) Start at the foot of the Andromeda Chimney and traverse left over a loose flake to the 1st Platform. Origin Climbed by M. Douglas, T. Terry (March 67). This included the initial climbs of Curving Crack and Deception Crack. Piton Crack is thought to have been first ascended by R. Cox and R. Lidstone in Route 1-3 ANDROMEDA Severe This is the first major chimney on the north face of the buttress. It leads straight from ground level to the 2nd Platform. The chimney has to be climbed in one eighty foot pitch. It is a serious climb with less security than chimney climbs usually have. Start At the foot of the chimney. pitch 1 Straight up the chimney. The difficulties are sustained. Face right at the overhang but change direction nearer the top when a flake on the left face can be reached. Pitch 2 Continue on either of the Skyline Routes. Origin Top roped by T. Christie, G. Wayatt (Feb. 65) and first led by R. Williams (March 67.) Route 1-4 THE PULPIT The next major chimney to the right of Andromeda is Pulpit
13 - 8 - Chimney. On the left of this is a rectangular flake forming the Pulpit which gives its name to the climb. The route described is a less natural but more interesting method of starting the Pulpit Chimney climb than the direct start. Start The crack on the left of Pulpit Flake. pitch 1 The Pulpit Pitch (v. diff.) Up the crack on the left, then traverse across the face of the pulpit and into the crack on the right. Continue to the belay on top of the pulpit. pitch 2 Wall pitch. Above the pulpit the route follows a doglegged crack onto a ledge which leads into the chimney at the top of pitch 1 of the next climb (route 1-5). pitch 3 Continue as for Pulpit Chimney Route (route 1-5). Origin The route was climbed at least 5 years ago. Obscure. Route 1-5 PULPIT CHIMNEY Very difficult A good route following the obvious line of the chimney from bottom to top. It is nowhere as serious as Andromeda. Start At the foot of the chimney. pitch 1 Straight up the chimney to the belay where the Pulpit Route converges. pitch 2 Chimney continued. Continue up the chimney facing right. The detached chockstones are firm, but they should be treated with respect. Belay under the Canopy Chockstone. pitch 3 The Canopy Chockstone. From the belay move out onto the right (northern) face and mantleshelf onto a small ledge. From here the chockstone can be surmounted. pitch 4 Continue as for Skyline Minor (Route 1-1, pitches 4 and 5). Origin T. Christie, G. Wayatt Route 1-6 PEGASUS Very difficult One of the best routes on the buttress. It seems a serious climb even though the difficulties are not very great. The rock is steep with pleasant exposure and the climbing appears more open than elsewhere on the buttress. The direct finish (severe) is interesting, i.e. Variant 1-6A. Start About 12 feet to the right of Pulpit Chimney there is a prominent crack with two chockstones in it. The climb starts here. pitch 1 Climb the crack and belay above the second chockstone. pitch 2 Continue up the crack which has now widened into a chimney. The exit from the chimney is rather airy. There is an exposed stance and belay just to the right. pitch 3 The Great Flake Pitch. Above and to the left is a huge detached flake. The pitch is up the right hand side of this flake. Belay behind the flake. pitch 4 Traverse. From the top of the Great Flake a traverse has to be made to the Canopy Chockstone close over on the left. A difficult move is made out from the flake into a small recess after
14 - 9 - which the traverse can be continued on good holds. pitch 5 The climb now continues as for Skyline Minor (Route 1-1, pitches 4 and 5). Variant 1-6A The direct finish (severe). An alternative finish directly following the crack from the right hand side of the Great Flake. Origin Probably first climbed in 1961, and now one of the most popular climbs on the Pipes. Direct Finish first led by T. Terry, Nov. 65. Route 1-7 CHASM WALL Mild Severe Start Between Pegasus and the Chasm, or by traversing on from above the second chockstone on Pegasus. pitch 1 Commence 6 ft. to the right of Pegasus and climb up 15 ft. on good holds to foot of an open crack. Then either: (a) climb this crack and belay on the obvious ledge, or (b) make a delicate traverse to the right and gain the small sloping ledge. A piton may be necessary to gain this ledge. Continue up the series of ledges until further progress becomes impractical - traverse 5 ft. to the left to the natural belay point. pitch 2 Climb up a short distance then traverse left onto a sloping ledge. Continue diagonally upwards to the left to the belay point at the top of pitch 2 of Pegasus (route 1-6). Then as for Pegasus. Variant 1-7A Chasm Wall direct (Hard Severe) A sustained, steep climb. A good line. pitch 1 (80 ft.) As for route 1-7. pitch 2 (80 ft.) Straight up thin crack above. Origin The initial route (1-7) was by A. Cross, R. Lawson, T. Terry and G. Wayatt, Nov. 65. Direct Route by J. Ewbank, V. Kennedy, March 68. Route 1-8 THE CHASM H. V. Diff. This is the cavernous shaft which splits the right hand side of the north face of the Lower Buttress. The terminating point of the Chasm is Chockstone slab, where it merges with its more open southern face counter part, Chockstone Gully. A popular route, and a good climb for a rainy day as it is nearly all under cover. Start At the back of the Chasm - the chimney on the left. pitch 1 Chasm Chimney. A fine 90 ft. chimney climb. The crux is in the lower half but the interest is sustained throughout, and the final moves are quite spectacular. pitch 2 Pass through to the other side of the buttress. The route lies up the southern face of Chockstone Gully above the large sloping rectangular chockstone (Chockstone Slab). Some loose
15 debris still remains on this pitch which finishes on the summit of Buttress Pinnacle. (See also Variant A). Variant 1-8A Chockstone Crack. Alternative to Pitch 2. Under Chockstone Slab on the north wall of the gully overlooking the Chasm a steep crack leads up towards the Notch. Climb this and continue to the top of the Buttress Pinnacle by pitches 5 and 6 of Labyrinth (route 1-9) or from the Notch continue up the Upper Cliffs by routes 1-14 and Origin P. Sands and J. Spinks, late Route 1-9 THE LABYRINTH Diff. An amusing and varied climb to the top of Buttress Pinnacle which keeps the climber guessing where he is and where he goes to next. Start At the very back of the Chasm, the dark chimney on the right. pitch 1 The Stripper. (Diff. - V. Diff. according to size.) An energetic chimney climb not well suited to the portly. After climbing in darkness for about 50 ft. a narrow exit leads out onto the northern face at the foot of the Little Chasm. pitch 2 The Little Chasm (Mod.) Up the chimney to the next cave. (See also Variant 1-9D). pitch 3 Chockstone pitc. An interesting pitch up onto the suspended chockstone on its south eastern side. pitch 4 Climb easily up to the Notch. (See also Variant 9B). pitch 5 Balcony Traverse, A short problematical trav erse on handjams and small footholds across the north west face of the summit block of Buttress Pinnacle. The pitch finishes on the The Balcony, a ledge on the main north face some 15 ft. below the top. pitch 6 Balcony Crack. From the Balcony a stiff crack leads straight to the Skyline a few feet from the summit of the Pinnacle making an exposed finish to the climb. (See also Variation 9B). Variant 1-9A The notorious Stripper Chimney (pitch 1) may be avoided by any of the routes on Little Chasm Buttress (route 1-10). Variant 1-9B Killer Crack (V. diff.) Alternative to pitch 4. This variant is for the climber who likes all his pitches to be strenuous. The crack lies above the suspended chockstone on the right. Above the crack a short wall leads to the Notch. Variant 1-9C The Chicken Run (Moderate). Alternative to pitch 6. Traverse along the Balcony and back along the Skyline. Variant 1-9D Stripper Direct. (Diff.) Continue on from pitch 1 onto a chockstone up the chimney and then back to a stance in the Little Chasm. This is the cavern at the start of pitch 3 and is called Godiva s Cavern. Then a diagonal chimneying traverse takes one to the base of Chockstone Slab while one is suspended above the floor of the Chasm, 90 ft. below. The pitch is not hard
16 and there are big jugholds towards the end. Finally follow Variant 1-8A. Origin Various stages due to T. Christie, R. Cox, R. Lawson, B. Potter, B. Proudlock, T. Terry, G. Wayatt; Stripper Direct by T. Christie, A. Keller Feb. 66. Route 1-10 LITTLE CHASM BUTTRESS Diff. - V. Diff. This is the buttress below the Little Chasm, just on the right of the entrance to the main Chasm. pitch 1 Opossum Crack. Makes a good direct start to the Little Chasm climb at a standard not much harder than the rest of the climb. At the foot of the wall below the entrance to the Little Chasm are two large semi-detached boulders. Start to the right of these and climb up beside the scrub filled crack. Higher up a detached flake is encountered. Attempts to move this have failed, nevertheless care is necessary. The flake can be turned on the left and the remainder is straightforward. pitch 2 As for route 1-9; pitch 2 onwards. Variant 1-10A Little Chasm Wall. (V. diff. and A1). Climb starts at the left of 2 boulders mentioned above. Ascend the boulders and then continue more or less directly up the face. Several pitons were used on the first ascent although two would have been enough. The hard section is less than 15 ft. in length and the final pitch straightforward. Variant 1-10B Little Chasm Crack. Just inside the main Chasm there is a chimney on the right hand wall. This is the route. There is one V. Diff. move getting into the chimney proper about 15 ft. up. Remainder is straightforward. Origin Opossum Crack by T. Christie, F. Morley (May 66). Little Chasm Wall by R. Bennett, T. Christie (Oct. 65). Little Chasm Crack by T. Christie, M. Hinchey (Dec. 65). Route 1-11 NOVICE ROUTE Mod. to Diff. This is the easiest way to the top of the Buttress Pinnacle. Start Middle Southern side of buttress; i.e. S. W. corner. pitch 1 Scramble up to the 3rd Platform. pitch 2 The cleft on the right is the top of Bottleneck Chimney. (see route 1-1). Climb it to the top of Buttress Pinnacle. Origin J. Peterson, D. Webber. Early Route 1-12 SOUTHWEST TRAVERSE Moderate Not a particularly noteworthy climb, but it has been found useful. Start At the 3rd Platform. pitch 1 Climb up to the ledge on the left and traverse the S. W.
17 face of Buttress Pinnacle descending into Chockstone Gully. Route 1-13 CHOCKSTONE GULLY Easy - Diff. Start Traverse around the south side of the base of the cliffs until a deep gully containing huge chockstones can be seen leading towards the Notch. This is Chockstone Gully. The large rectangular chockstone half bridging the top of the gully is Chockstone Slab. pitch 1 The Gully. Mainly a scramble. pitch 2 Chockstone Slab. Climb under the right hand aide of the slab and mantleshelf progressively up to the top and onto the Notch. (See also Variant 1-8A) THE UPPER CLIFFS The Upper Cliffs are separated from the Lower Buttress by the Notch. Almost any of the routes already described can be used as an approach to the Upper Cliffs, but climbers usually use the routes through the Little Chasm (routes 1-9 and 1-10) or Chockstone Gully (route 1-13) as a quick way to the Notch. Route 1-14 SENTINEL RIDGE V. Diff. This is the crestline of the Upper Cliffs, a fine climb which threads its way up the crest of the buttress. It has some good situations and on occasions seems almost alpine in character. Start At the Notch. Scramble onto the ledges above. A traverse line can be seen leading away to the left. This is the route. pitch 1 Tombstone Traverse. A classic little traverse which ends with an awkward move into an open chimney and a drop onto the ledge below (Scoparia Ledge). The Tombstone is the first gendarme of the ridge. pitch 2 Tombstone Chimney. Return into the chimney and climb straight up. Quite a hard pitch but there are good jughandle holds when they are needed. pitch 3 The Cleft (Mod.) From the top of the last pitch the route turns right through a deep trough and crosses the skyline again to the north side at the top of the Tombstone. pitch 4 Cross the chockstones on the skyline and climb up onto the next broad ledge keeping to the right hand side of the ridge. pitch 5 The Arch. It is now possible to regain the south side of the ridge through an arch formed by a chock-stone between the next two pinnacles. Climb up between the sides of the Arch and over the chockstone. (See also Variant 14A). pitch 6 Another broad shelf leads to a gap in the ridge between 2 blade like pinnacles. Climb the left hand pinnacle and cross the gap to a piton on the skyline. Surmount the final pinnacle. pitch 7 Descend into the next gap; or leap across gap to ledge. pitch 8 Traverse a short way along a ledge on the north face and
18 finish up the obvious chimney. (See also Variation 14C). Variant 1-14A Zig Zag Crack. A fascinating crack next to the Arch. Two pitons were used to gain the ledge at the start of the crack. Begin the crack with a layback move. Variant 1-14B From the terrace above the Arch it is possible to reach Muddy Cracks. Variant 1-14C Exit Crack (Severe) Alternative to pitch 8 and a hard finish to the climb. From the last gap climb up to the left of the skyline to a platform some 15 ft. below the top of the cliffs. The Exit Crack is on the right. Origin Various stages carried out between 1962 and The Zig Zag Crack was climbed by A. Keller, K. Sparreboom, May 68. Route 1-15 ORIGINAL ROUTE V. Diff. In the earlier stages this route takes a similar line to Sentinel Ridge following the easier alternatives. Subsequently it traverses off into the wide gully on the left of the ridge. Start As for sentinel ridge. pitch 1 Tombstone Traverse. As for Sentinel Ridge. pitch 2 Left Flanker. From Scoparia Ledge move left round the corner and up through scrubby terrain until the stance above Traverse Chimney can be gained. pitch 3 The Cleft (Mod.) As for Sentinel Ridge. pitch 4 Cross the chockstones on the skyline and traverse to the Arch on the left side of the ridge. pitch 5 (Easy) Here the route leaves the Sentinel Ridge climb for good and traverses off to the left across the gully - a rather unsatisfactory operation. pitch 6 Muddy Cracks In the middle of the gully below the level of the Arch a crack leads back towards the ridge and then turns up underneath it to the Final Terrace. This is conventional, but it is almost as unsatisfactory as the previous pitch. Potters Chimney (Variant 15A) is harder but much more worth while. pitch 7 Final Chimneys. Towards the left of the Final Terrace 3 interlinked Chimneys lead to the top of the cliff. They are all much the same standard. Variant 1-15A Potter s Chimney (V. Diff.) Alternative to pitch 6. This starts at the same level as Muddy Cracks but further to the left. It is a deep chimney and the move out over the chockstone at the top, though well protected is quite exacting. This pitch finishes on the Final Terrace. Origin Obscure. Route 1-16 DRUNKS DILEMMA Severe A climb on the northern side of the Upper Cliffs. The description given below is rather vague as the original route details are unavailable. However, the start of this climb and its line on the cliff have recently been definitely re-identified and
19 more precise route details will eventuate when the route is reclimbed. Just past the Chasm, the towers of Sentinel Ridge fall away and merge to form a vertical face, i.e., the north east face of the Upper Cliffs. The route starts with a crack which is towards the right hand edge of this face. Then, up the face, which involves some contortionist manoeuv res, in a line trending somewhat to the left. This line leads to the base of a wide open sided chimney which is immediately behind the second gendarme of Sentinel Ridge. There are two conspicuous chockstones in this chimney. Move through the base of the chimney onto the southern side of the Upper Cliffs; then climb to top of ridge. The line of this route is best observed from a point over towards Johnstone s Knob. Origin R. Lidstone, S. Penny, J. Peterson. March 62. Route 1-17 JOHNSTONE S KNOB An isolated 40 ft. tower to the north of the Northern Buttress. A faint trail heads right from near the Chasm (route 1-8) and runs to the Knob. (25 yards on from the chasm the trail turns sharply leftwards up a mud floored couloir.) There are 2 or 3 ways to the top. Descent by abseil. First climbed Sept. 61. Route 1-18 ALBERT S TOMB - The Great Leap Forward. Left of Chockstone Gully there is a southerly subsidiary spur of the Northern Buttress. Albert s Tomb is a headstone like gendarme towards the top of this spur. It still bears an improvised white flag erected on the occasion of the first ascent. Scramble up to the base of the Tomb on the left face of the spur, and then onto the platform which overlooks the Tomb. To gain the top of Albert s Tomb involves a spectacular leap across the abyss between it and the platform. The width of the gap is considerable. However, the leap is downhill and looks more forbidding than the actuality. The top of the gendarme is narrow, so an overestimate would be embarrassing. Not for the faint hearted. Descend by abseil. Variant 1-18A The Mangle. A bent, cave like, narrow gutted crack below Albert s Tomb, right hand side. An unnecessary exercise best suited for a pygmy or a masochist. Origin First leap by R. Williams, April 67. The Mangle was first experienced shortly before.
20 THE COLUMNS An amphitheatre like wall varying in height from a little under 200ft. to over 300 ft. This impressive array of columns is bordered by the Northern Buttress at the north and Flange Buttress at the south. The climbs are very steep and often airy, the problems are full of interest and the setting is inspiring. The reader will quickly become familiar with the geography of the Columns if he will learn to recognise the 5 most prominent columns, all of which have unmistakable identifying features (listed north to south):- Cossack Column - The only prominent column on the northern part of the wall. It is a twin column, closely joined, and approximately 200 ft. in height. It is capped by 2 large wedge shaped blocks shaped like Cossack caps. Double Column - This and the following 2 columns are on the middle part of the wall. It consists of 2 tall (300 ft.) columns juxtaposed to give an overall lath like appearance. A conspicuous crack runs up the centre of the Double Column. Split Column - Immediately south (left) of Double Column and separated from it by a shallow gully. The upper 100 ft. of this column looks as if it had been split with an axe. On the very top there are 2 ear shaped rocks. Upper Battlement Column - The next main column south of Split Column and separated from it by a nondescript band of rock. When viewed from direct on or from the north it resembles a castle battlement with 3 turret like rocks on the top. When viewed from the south a large chockstone behind the summit tower can be seen framed against the sky. Cairn Column - The most prominent column on the southern part of the wall. It stands on a ramp of broken rock which forms the base of the southern Columns. There is a pile of rocks on the summit of this column which resembles a cairn. Unfortunately the base of the Columns is still a proper mess of burnt dead scrub, loose soil and exfoliated rock following the fires of Feb. 67. Prior to the fires a pleasant narrow band of rainforest composed mostly of myrtle (Nothofagus sp.) and sassafras (Atherosperma sp.) grew close under the Organ Pipes - a shady and often mist pervaded zone. Myrtle coppice is now appearing from old stem bases. The harsher areas around the cliffs (mostly with northerly aspect) carried tough, needle bushes (Hakea spp.) Be wary of falling rock in the Columns area.
21 Route 2-1 PICCOLO Severe This is the most southerly route on the Columns; in fact it might almost be said to be on the north face of Flange Buttress. In general line it leads up to the prominent little tower on top of the Flange (the top of Bert s Fear, route 3-1, in fact). The major part of the climb is the typical dolerite chimney that lies directly below the tower on the northern side. Start The start is as for Cymbal (route 2-2) and therefore lies well to the right of the main climb, but more direct starts could easily be made - (mainly scrambling in volved anyway). The best way to reach the area is via the trail to Flange Buttress (No. 3). Pitch 1 and 2 As for Cymbal (route 2-2). Ascend about 60 ft. on moderate rocks until an obvious easy traverse to the left can be made. This is rather scrubby and leads to a terrace at the foot of two chimneys called Pizzicato and Castinette. Pitch 3 Piccolo wall. Left of the 2 chimneys is an unlikely looking pitch which overhangs in places and appears to be rather thin on top. This however is the route, which proves to be surprisingly entertaining. Another short scrub bush leads to the main chimney. Pitch 4, 5 and 6 Piccolo chimney. Ascend the chimney. Half way it narrows uncomfortably. Quote No. 1 Dang me! It makes the Stripper look as wide as the Chasm! Quote No. 2 Dang me! After this I could climb Bert s Fear without touching the walls! At the crux there is room for one shoulder only in the chimney and a peg and sling are useful. The climbing above the crux is straightforward but one should keep directly up the chimney. 90 ft. of climbing brings one onto the crest of Flange Buttress. Pitch 7 The Tower of Piccolo. This is the tower at the top of the chimney described earlier. Ascend on the south side where a mantleshelf followed by a Harrisons Move leads onto the western side of the tower. Then climb up tower using a loose block on the way. Vacate the tower by a spectacular, though easy leap. Origin T. Christie, A. Keller. Jan. 66. Route 2-13 PIZZICATO Hard Severe. Given the name Firebird by its perpetrators; however Pizzicato is the original name of this line. A very obvious and direct line. It is marred somewhat by loose rock and vegetation in places. Difficulty slowly increases pitch by pitch. Start The narrow chimney right of Piccolo and immediately left of another chimney, Castinette (route 2-14). Scramble pitch of about 100 ft. to reach this point.
22 Pitch 1 (80 ft.) Straight up crack-chimney taking great care with loose rocks at about 50 ft.; to claustrophobic stance in chimney. Pitch 2 (70 ft.) Straight up chimney above. Then up crack corner to good stance below final corner. Pitch 3 (70 ft). Crux. Straight up corner above to ledge, then up nasty, dirty corner above. Origin J. Ewbank, V. Kennedy. March 68. Route 2-14 CASTINETTE Severe - H. Severe. Given the name Pooh Corner by its perpetrators. However, Castinette is the original name of this line. A rather dirty route, but nevertheless still interesting. Start Left of Cymbal (route 2-2) and just right of Pizzicato. Scramble for 100 ft. to reach the initial chim ney in the corner of a small, square amphitheatre. Pitch 1 (40 ft.) Straight up to a small stance. Pitch 2 (90 ft.) Crux. Continue straight up to large stance. Pitch 3 (100 ft.) Straight up awkward chimney corner to top. Origin J. Ewbank, V. Kennedy. March 68. Route 2-2 CYMBAL H. V. Diff A route of about 300 ft. just south of the Cairn Column. Start Difficult to describe satisfactorily, so look for the painted route number. The initial easy climbing lies up the sloping broken area forming the base of the southern Columns. Description Two or three easy pitches up a diagonal left trending line on the broken base rocks lead to the foot of a blocked chimney which is just to the left of another long dark chimney which has a large chockstone in it. (2-2A). Climb the lefthand chimney the continuation above until a large platform and broken ledge are reached. Drop off (not literally) the lefthand edge of this platform onto a pineapple grass ledge in a corner. Climb the corner and continue up a difficult crack above. ( peg for aid used.) Exit behind a large chockstone roof. From this point either continue up the chockstone crack above to the top; or traverse left into a chimney, surmount the chockstones, and on to the top. Variant 2-2A Deep chimney (H. V. Diff) This is up the right hand line mentioned above. The base is a crack - this opens out to a deep chimney with a prominent chockstone in it. A stance behind a pillar is reached after 70 ft.; then after some more chimneying, rejoin Cymbal on a large platform on the left.
23 Variant 2-2B The Vice. As for 2-2A. Continue up chimney above pillar stance for 60ft. and onto ledge on the right. Finish up a corner with twin cracks (100 ft., Hard Severe). Origin D. McKelvey, T. Terry, Jan. 66. Variant 2-2A by M. Douglas, J. Morley, Jan. 66. Variant 2-2B by J. Ewbank, V. Kennedy, March 68. Route 2-3 FIREBRAND Severe and AI The route lies up the very conspicuous black chimney running straight up the righthand (north) side of the Cairn Column. Some isolated, large chockstones can be seen in this chimney. Start Scramble/climb for a couple of ropelengths to the foot of the chimney. Pitch 1 (110 ft.) Straight up the corner to belay above numerous dead bushes. Pitch 2 (90 ft.) Up the narrow chimney to belay above large pile of chockstones. Pitch 3 (60 ft.) Up the corner in the left back of the chimney for 20 ft., then step into righthand corner. Up this to roof then step into righthand corner. Using 2 pegs reach the roof, then continue up crack above using 2 jams and a peg. Step right into chimney then up 20 ft. to the top. Origin Climbed to within 30 ft. of the top by J. Moore, P. Jackson, R. Williams. March 67. Artificial finish to complete route by C. Dewhirst, J. Moore. Feb. 68. Route 2-15 F SHARP Hard Severe and AI A good climb. The route runs up a kind of double crack line just right of Firebrand (route 2-3). Start More or less the same as for Firebrand. Pitch 1 (110 ft.) Up small gully a little, then up the cracks and corners to the right, which leads straight up to a large stance. Pitch 2 (100 ft.) Crux. Up the fine corner crack above to obvious bulge. Two pegs were used for aid here. Then climb freely again to a large stance with block anchor. Pitch 3 (120 ft.) Straight up crack and chimney above to the top. Origin J. Ewbank, V. Kennedy. March 68. Route 2-4 CLARET CORNER Mild Severe The route lies up the corner immediately left of the Upper Battlement Column. The corner is well broken up. Start To reach the foot Of the corner involves about 150 ft. of steep scrambling/climbing up short walls and over broken ledges.
24 Care is necessary due to loose rock (the cause of a recent accident at this place.) Pitch 1 (115 ft.) Climb initial crack and continue up to large ledge at foot of main corner. Pitch 2 (110 ft.) A pitch of some variety with plenty of jugholds. Well protected. Belay in the grotto. Pitch 3 (110 ft.) Crux. Thrutch up chimney and step onto left face and bridge up to ledge. Then climb 10 ft.; then chimney past a small overhang. Past loose rock and thrutch to top of chimney; then mantleshelf onto a ledge. Origin D. Groom, A. Keller, J. Moore. Dec. 67. Route 2-5 ICARUS Mild V. S. Sustained climbing up a very impressive line. It is the sky-rocketing crack on the south (left) face of Upper Battlement Column; ie. just to the right of Claret Corner. It is the highest graded route in this guide. The climb has not been repeated so we cannot yet compare it in difficulty with other hard routes on the Pipes. Start Just right of Claret Corner. Pitch 1 (120 ft.) Broken climbing leads straight up to below corner. Pitch 2 (100 ft.) Crux. Straight up chimney, over roof and up crack to small stance. (Bong runners). Pitch 3 (120 ft.) Continue up the crack, which becomes easier. Then up wide crack, behind the pillar, to the top. Origin C. Dewhirst, J. Ewbank, Feb. 68. Route 2-6 BATTLEMENTS Mild Severe A popular route starting at the foot of the Double Column and trending southwards to finish on the Upper Battlement. The climb offers a great variety of situations. Start At the very foot of the central cleft of the Double Column. Pitch 1 (60 ft.) Straight up cleft to a long ledge which has been extensively gardened. Pitch 2 (30 ft.) Up the wide crack running up from the lefthand edge of the long ledge. Exit from the crack onto a large scrubby platform known as the Lower Battlement. Pitch 3 (120 ft.) From the extreme lefthand edge of the platform descend for approximately 15 ft. Then follow an easy line diagonally upwards to the left and negotiate a short obstacle known as Mad Dog Chimney. Pitch 4 Then follow an obvious interior line and emerge on an airy platform called the Middle Battlement, which is approx. two thirds of the way up the wall.
25 Pitch 5 (30-40 ft.) Crux. From the ledge above the platform layback up a vertical corner crack (the layback is straight out of the textbook) and complete the pitch by a delicate and interesting step to the right around a corner. Alternatively continue up crack above layback - more strenuous but also more straight forward. Pitch 6 (100 ft.) Straight up crack-chimney line to an airy platform on rear face of final tower. Finish up obvious straight forward line. Origin M, Douglas, J. Fairhall. April Variant 2-6A MIDDLE BATTLEMENT DIRECT Mild Severe and A2 Also called Bismark. An audacious route which runs directly up the nose of Upper Battlement Column as far as the Middle Battlement. It is said to be not technically hard but psychologically demanding. A classic. Start At the bottom of the Column; near the middle. Pitch 1 (70 ft.) Climb the crack to ledge at 15 ft. Traverse out onto loose blocks. Peg for 40 ft. starting in the short bottomless groove. Belay on first ledge encountered. Pitch 2 (90 ft.) Use the belay pegs and a jam chock to reach the next small ledge. Free climb for 15 ft. to 2 pegs, then comes an awkward step onto a loose block. A piton, a jam chock, then a peg behind the ledge eases the mantleshelf. Free climb for a few feet, then 3 pegs and a jam bring the belay ledge. Pitch 3 (35 ft.) From the loose block on the ledge step left into an arm jam crack. A sling around a chockstone, then 2 small pegs bring a chimney which finishes after 15 ft. behind the Middle Battlement. Finish as for Battlements. Origin D. Groom, J. Moore. Jan. 68. Variant 2-6B Lower Battlement Direct. There are some cracks to the left of pitch 1 of the Battlements. Some of these may have been climbed. Route 2-7 COLE SLOE Severe and AI The shallow gully between the Split Column and the Double Column. Start As for Battlements (route 2-6). Pitches 1 and 2 As for 2-6. Pitch 3 (100 ft.) Straight up from belay to large ledge. Pitch 4 (100 ft.) Straight up on the right for 10 ft., then traverse left onto small buttress in middle of gully. Where buttress finishes use 3 pegs to continue up wall. Step right into a crack from the last peg and go up this for 10 ft. Then right into corner.
26 Pitch 5 (70 ft.) Continue up until behind Double Column, then up easy crack to the top. Origin V. Kennedy, J. Moore. Nov. 67. Route 2-8 DOUBLE COLUMN CENTRAL Severe and AI The climb runs straight up the centre of the 300 ft. high, slightly overhanging Double Column. Although it is a route of Formidable appearance the difficulties, in actuality, are not pronounced. It is a route of noble character and one of the finest on the Organ Pipes. Start As for Battlements. (2-6) Pitch 1 (65 ft.) As for Battlements, ie. up the central cleft of the Double Column. Ignore ledge on left at 60 ft. and continue to ledge below a bulge in the cleftline. Alternatively, take a less direct, easier line anywhere right of the cleft. Pitch 2 (65 ft.) Mantleshelf Pitch. Emerge on platform above the recess and bulge by means of a strenuous mantleshelf. Continue straight up chimney to a stance in a recess. Pitch 3 (25 ft.) Climb up the crack for a few feet, then use a peg for aid to move around the lefthand corner to a small stance ( Elephant Ledge ). Pitch 4 (55 ft.) From Elephant Ledge, straight on, generally following the chimney, up to a small recessed stance. Then use 2 pegs for aid to ascend the slightly overhanging 15 ft. wall above. Belay in cramped cavelike recess. Pitch 5 (30 ft.) Up wide main crack for a few feet, then climb the narrow piton crack to the right. After 3 artificial moves in this crack, traverse leftwards to regain the main crack. Belay at an enclosed stance in this crack. (From a few feet above this stance it is possible to crawl through a hole and escape the final pitch by scrambling up a wall at the back of the column). Pitch 6 (45 ft.) Straight up tight final chimney, to exit right at the summit of the Double Column. Origin M. Douglas, T. Terry. April 67. Route 2-9 THE CORDOBAN Hard Severe. An entertaining climb up steep rock and well protected. Start 40 yards to the right of Double Column Central, in the corner on the left of the small amphitheatre. Pitch 1 (25 ft.) Scramble up to the foot of the corner. Pitch 2 (80 ft.) Climb the steep, black corner to the overhang at 60 ft. Fist jam up the righthand crack and mantleshelf onto a ledge. Pitch 3 (35 ft.) Climb the corner to the overhangs at 30ft. Traverse right to the arete, thence into the next corner. Pitch 4 (60 ft.) Climb the corner using the crack in the left wall. Climb the overhang (crux) and belay on the second big ledge
27 to the left, back in the original corner. Pitch 5 (30 ft.) Chimney up the smooth narrow crack, stepping onto the right wall at 25 ft. Belay on a ledge above to the right. Pitch 6 (60 ft.) Continue up the main corner. Chimney and bridge up among the columns. Pitch 7 (60 ft.) Scramble up the gully to the right. Origin J. Moore, P. Stranger. Feb. 67. Route 2-10 LOST ARROW Severe. A fine direct line, good rock and protection. Start About 100 yards up the hill from Double Column Central; 30 ft. right of a black wet chimney with a large chockstone in it at about 50 ft. Scramble up 50 ft. to start. Pitch 1 (40 ft.) Straight up corner to small stance. Pitch 2 (110 ft.) Crux. Up crack then narrow chimney to belay below final chocks. Pitch 3 (40 ft.) Crawl through hole, then easier climbing to the top. Origin J. Ewbank, V. Kennedy. March 68. Route 2 11 THE SHIELD Hard Severe. A fine, classical climb in all respects. Good line, good rock, good position, good protection. Start The 30 ft. high, narrow vee chimney 15 ft. right of start of Lost Arrow. Pitch 1 (70 ft.) Straight up chimney, then up the obvious cracks behind to belay below where crack becomes more serious. Pitch 2 (70 ft.) Crux. Up overhanging crack above. Continue up the great shield to ledge. Pitch 3 (30 ft.) Up corner above, to top. Origin J. Ewbank, A. Keller. March 68. Route 2-12 THE SWORD Mild Severe. A direct climb which is dirty in parts. Start 15 ft. right of the shield is a dark corner. Start there. Pitch 1 (75 ft.) Straight up corner and up other corners above to small ledge and rock sliver. Pitch 2 (70 ft.) Crux. Straight up corner, then chimney to ledge. Pitch 3 (30 ft.) Up crack above to top. Origin J. Ewbank, A. Keller. March 68.
Bankhead Buttress (incomplete)
") Bankhead Buttress (incomplete) This section of cliff is the most extensive of all the buttresses in the long line of cliffs that runs along the base of Cascade Mountain. It reaches a height of ---m and
Bankhead Buttress (incomplete) This section of cliff is the most extensive of all the buttresses in the long line of cliffs that runs along the base of Cascade Mountain. It reaches a height of ---m and
New Routes and description to re-bolted (ENP) routes on the Puig Campana.
 routes on the Puig Campana.") New Routes and description to re-bolted (ENP) routes on the Puig Campana. This magnificent mountain dominates most of the coast of the Costa Blanca with its twin peaks and distinctive notch. Seen from
New Routes and description to re-bolted (ENP) routes on the Puig Campana. This magnificent mountain dominates most of the coast of the Costa Blanca with its twin peaks and distinctive notch. Seen from
McGILLIVRAY SLABS. Approach. Descent. Gollywog 240 m, 5.7 R. Howe & C. Smith, McGillivray Slabs - 277
 McGILLIVRAY SLABS The Palliser Formation outcrops on Mount McGillivray in a long line of cliffs punctuated by several buttresses. All the climbs described here lie on McGillivray Slabs, the portion of
Approach. Via Stewart Creek Three Sisters
 three sisters The Three Sisters are a signature landmark for the Bow Valley and the town of Canmore. They may even compete with Mount Rundle above Banff as the most photographed and painted mountain scene
SHIP S PROW. Access. Approach #1 from Peaks of Grassi. Approach #2 via Three Sisters Creek. Ship s Prow - 309
 SHIP S PROW Ship s Prow is the very prominent, sharp buttress between The Three Sisters and Ha Ling Peak. It has a large, steep face on its northwest side and is about 450 m high. To date, only two routes
Gooseberry Area. Gooseberry 250 m, 5.8 Ken Baker and Lloyd MacKay, May 1967 Joe Mackay, alt. pitch 5.
 Gooseberry Area Gooseberry 250 m, 5.8 Ken Baker and Lloyd MacKay, May 1967 Joe Mackay, alt. pitch 5. This classic route is superbly situated on the east side of Tunnel Mountain with excellent views of
NANNY GOAT. Approach. Kid Goat Approach. Meadows Approach. 52 Goat Mountain
 NANNY GOAT Nanny Goat is steeper and less broken than Kid Goat and generally the climbs are more difficult. The quality of the rock is quite variable and the routes, which consist primarily of face climbing,
Black Crag. Francis Haden and Rich Cuncliffe
 Black Crag Overview Black Crag is an easily accessible south-facing cliff of enjoyable HK island broken-slab climbing with a fantastic view out over the south of the island. It is two hundred metres below
Climbing is a sport which can result in serious injury or death. Read the advice below before you climb using this guide.
 Scorpion Buttress Wadi Maih Climbing Guide Ray Corbett, December 2008 1 WARNING ABOUT ROCK CLIMBING Climbing is a sport which can result in serious injury or death. Read the advice below before you climb
BORDER Lodges Quarry
 Page 1 of 5 Back to Eden Valley Guide Index Last Updated: 20/5/07 O.S.Sheet 86 G.R. NY 591 632 This crag will be included in the next FRCC Eastern Crags guide (due 2008) BORDER Lodges Quarry by Stewart
Ionian Islands. David Hillebrandt. Edited by Tony Scott. Contributions by:
 Ionian Islands David Hillebrandt Edited by Tony Scott Contributions by: Bob Peters, Dave Viggers, Bob Watson, Iain Peters, David Medcalf, Peter Nugent, Colin Struthers, Harold Walmsley, Roger Benton and
Godrevy Bouldering. 1 St. Ives wall 2 The Gullies 3 The Cave 4 The Bowling Alley
 Godrevy Bouldering Access and environmental considerations There is an important colony of seals close to the bouldering area monitored by an active research group throughout the year (see www.suesseals.eclipse.co.uk
The Seven Pillars of Wisdom Storm Tower Wind and Flurry * 5.8, 28 m, fixed gear Snowflakes of August **5.11b, 28 m, fixed gear
 The Seven Pillars of Wisdom A collection of shattered pillars which lie in front of the Grey Ghost Wall towards the left end between the climbs Helmet Crack and Zephyr and are separated from the main face
Tremadog Cwm Silyn Cwm Silyn Cloggy Llanberis Lliw edd O gw en Carneddau Betws y C oed W elsh W in ter
 Tremadog Cwm Silyn Cloggy Llanberis Lliwedd Ogwen Carneddau Betws y Coed Welsh Winter Cwm Silyn 48 This fine mountain-crag features a wonderful slab of rock and offers a good set of routes across the grade
Segaria. Barranco Buttresses. Character. Aspect. Approach
 Segaria Barranco Buttresses Character At the foot of the far western end of the Segaria ridge lies a valley with a group of smaller crags, these make up the Segaria Barranco Buttresses. So far only parts
EAST END OF RUNDLE (EEOR)
") EAST END OF RUNDLE (EEOR) EEOR is a long cliff, nearly 500 m high, situated on the opposite side of Whiteman Gap from Ha Ling Peak. Three huge, right-slanting, ramp-like corners are the most easily recognized
EAST END OF RUNDLE (EEOR) EEOR is a long cliff, nearly 500 m high, situated on the opposite side of Whiteman Gap from Ha Ling Peak. Three huge, right-slanting, ramp-like corners are the most easily recognized
Kid Goat. Approach. 28 Goat Mountain
 Kid Goat Kid Goat is the smallest and most developed of the Goat Mountain climbing areas and is about 150 m high. It consists of predominantly low-angled rock with a steeper band at just over half height
WILGEPOORT Sport Crag
 WILGEPOORT Sport Crag General Wilgepoort has been a firm favorite with a small but enthusiastic number of traditional climbers from the Pretoria/Johannesburg area since its discovery in 1966. The main
General. Approach. Main Wall. North Cliff. Rubble Zawn. Shek O Village. Gaping Zawn
 General Approach Shek O SHEK O Tai Tau Chau. Photo: Stuart Millis Once one of Hong Kongs foremost climbing areas but now somewhat of a backwater, the crags of Shek O offer some enjoyable trad and sport
Lundy. The Knight Templar Rocks. Supplement Climbers Club Guides
 Lundy Supplement 2009 The Knight Templar Rocks Climbers Club Guides The Knight Templar (Lundy) Supplement 2009 Paul Harrison Map and photodiagrams by Simon Cardy Typeset and prepared for web publication
Craig Cywarch Mini Guide. Introduction
 Craig Cywarch Mini Guide Introduction Craig Cywarch encapsulates everything that is good about climbing in Mid Wales. It s wild, it s rugged, it takes place in beautiful surroundings and best of all, it
Dave Jenkins on the Ninth of January (19), Frenchmans Cap. Photo: Peter Steane FRENCHMANS CAP
, Frenchmans Cap. Photo: Peter Steane FRENCHMANS CAP") Dave Jenkins on the Ninth of January (19),. Photo: Peter Steane FRENCHMANS CAP 82 83 INTRODUCTION has one of the biggest cliffs in Australia, with its magnificent wall of overhanging quartzite almost 400m
Dave Jenkins on the Ninth of January (19),. Photo: Peter Steane FRENCHMANS CAP 82 83 INTRODUCTION has one of the biggest cliffs in Australia, with its magnificent wall of overhanging quartzite almost 400m
The Tuross River plunges 40m into the gorge
 is a new area in terms of climbing and just 2 hours drive from Canberra. The falls are located in the Wadbilliga State Forest. Free camping with fireplaces and picnic tables make weekend expeditions a
RockTopos. Rock Climbing Guide Costa Blanca Rincon de Bonanza. RockTopos. Rincon de Bonanza
 climbing guides are intended to provide documented information, directions and route descriptions for the rock climbing at the cliff or area covered by the guide. The guides are intended to supplement
Dove Crag. ...Dove Crag. Also visit
 ...Dove Crag Dove Crag 200 Dave Birkett demonstrating a Fear of Failure E 6c North Buttress, Dove Crag. Photo: Steve Crowe Dove Crag... A Dovedale Groove E1 B Extol E2 10 13 3 12 11 B 1 4 2 1 A Dove Crag
212 Great Zawn and Bosigran Ridge
 Avon Somerset North Devon Culm Coast Inland Cornwall Atlantic Coast West Penwith The Lizard Inland Devon Torbay Dorset 212 Great Zawn and Bosigran Ridge The alpine-like jagged arete of Bosigran Ridge,
Haunted Walls. Approach to Pleasure Domes, Haunted Walls and Ajuga Pilar ( Cynical Pinnacle).
.") Haunted Walls. This dramatic area has several powerful lines on Perfect rock. As its name implies it does have a haunted and magical feel to it, so silent and peaceful. On first sight it is jaw dropping.
Haunted Walls. This dramatic area has several powerful lines on Perfect rock. As its name implies it does have a haunted and magical feel to it, so silent and peaceful. On first sight it is jaw dropping.
Monkey Buttress december 2015
 Monkey Buttress december 2015 Alberto Cipriani Gianfranco Bigazzi Introduction A small crag offering single pitch sport routes at an easily accessible location on Hong Kong Island. The rock here seems
La Madre Wilderness Area
 La Madre Wilderness Area Rock Climbing Inventory Statistics: Area: Walls La Madre North 3 24 136 22 Kraft Mt./Gateway Canyon White Rock Springs Willow Springs East The Promised Land 18 4 3 3 12 23 11 24
Darrington Rock Climbing Sampler. Page 1. a mini-guide to some routes in Clear and Copper Creeks
 a mini-guide to some routes in Clear and Copper Creeks Joe near the top of Exfoliation Dome. Near Darrington, Washington, there are several granite domes in scenic mountain valleys. This is not sport climbing:
This area receives morning and mid-day sun and nice shade by early afternoon.
 Quartzite Wasteland The name, Quartzite Wasteland, is a playful jab at the the Wasteland of Rifle. While not a destination area like Rifle, locals and visiting climbers will find an enjoyable half-day
Mount Cory South Peak, West Face
 Mount Cory South Peak, West Face These climbs are adjacent to the climb Cory Crack and combine a relatively short approach (~1 hr.) through forest and meadows with long multi-pitch routes on generally
Some routes on Mt Banks
 Friends don t let friends place Friends 24 Weakened worriers 23 Some routes on Mt Banks Zanahoria Pestosterone Tricycle To Bell s line of road Gate Cliffs Summit of Mt Banks About 60 minutes walk or 15
Rock Climbing Guide Costa Blanca La Boveda
 climbing guides are intended to provide documented information, directions and route descriptions for the rock climbing at the cliff or area covered by the guide. The guides are intended to supplement
A climbers guide to. Lough Belshade. Iain Miller.
 1 A climbers guide to Lough Belshade By Iain Miller 2 Lough Belshade Directions: The crags surrounding Lough Belshade in the centre of the Blue Stack Mountains provide excellent climbing in beautiful surroundings.
RockTopos Climbing Guide Costa Blanca. Segaria-Autopista
 RockTopo climbing guides are intended to provide documented information, directions and routes descriptions for the rock climbing at the cliff or area covered by the guide. The guides are intended to supplement
RockTopos Climbing Guide Costa Blanca. Moraira. A free climbing guide provided by RockTopos Published 2006
 RockTopo climbing guides are intended to provide documented information, directions and routes descriptions for the rock climbing at the cliff or area covered by the guide. The guides are intended to supplement
TOKOPAH DOMES. SEKIclimbing.com
 TOKOPAH DOMES Intro Tokopah Domes are the orphaned offspring of a dome from Tuolumne and a mischievous peak from Shuteye Ridge. They are covered in knobs, chicken heads, and runnels with a few cracks and
Gallow s Edge. Miniguide
 Gallows Edge Miniguide 1 Gallow s Edge Miniguide The majority of this downloadable miniguide was copied from Walt Wehners excellent website at: http://www.geocities.com/yosemite/trails/9507/gallowsedge.htm.
You are responsible for you own safety. You climb at your own risk!!!
 Paradise Topo v1.1 May 8, 2018 Warning You are responsible for you own safety. You climb at your own risk!!! This is also a new climbing area; while great effort has been made to clean any loose rock through
The French Pillar of Jebel Misht
 Rock climbing in the UAE Oman Misht The French Pillar of and Jebel a climbing guide The French Pillar of Jebel Misht v1.0, February 2007 1 Toby Foord-Kelcey, February 2007 Disclaimer Climbing is a sport
RockTopos Climbing Guide Costa Blanca. L Ocaive. A free climbing guide provided by RockTopos Published 2006
 RockTopo climbing guides are intended to provide documented information, directions and routes descriptions for the rock climbing at the cliff or area covered by the guide. The guides are intended to supplement
Rock Climbing in Kowloon, Qing Yuan County, Guangdong, PRC
 Rock Climbing in Kowloon, Qing Yuan County, Guangdong, PRC The following notes, maps and topos form a rough guide to most of the established climbing in the Kowloon (Nine Dragons) area of Qing Yuan County,
PENTADAKTYLOS (THE FIVE FINGERS)
") SECTION 7 PENTADAKTYLOS (THE FIVE FINGERS) History Dhighenis, renowned for his heroic escapades and feats of might is said to be responsible for the formation of the pentadakylos peaks. (Five Fingers).
SECTION 7 PENTADAKTYLOS (THE FIVE FINGERS) History Dhighenis, renowned for his heroic escapades and feats of might is said to be responsible for the formation of the pentadakylos peaks. (Five Fingers).
Wildhorse Classics. Pat McGrane November 20, 2014
 Wildhorse Classics Pat McGrane November 20, 2014 This document describes some of the classic technical rock climbs in the eastern Pioneer Range of Idaho. It includes routes in Wildhorse Basin as well as
Mt Lindesay Climbing Guide Ross Weiter, Dec 2003
 Mt Lindesay Climbing Guide Ross Weiter, Dec 2003 Mt Lindesay Guide, Dec 2003 Page 1 of 6 Cover: Jon Gregg on the first ascent of the route of the crag, Cardiac Arete (22) Publisher: Climbers Association
You are responsible for you own safety. You climb at your own risk!!!
 Warning You are responsible for you own safety. You climb at your own risk!!! This is also a new climbing area; while great effort has been made to clean any loose rock through pry bar and pressure washing,
P r o v i s i o n a l C l i m b e r s G u i d e
 P r o v i s i o n a l C l i m b e r s G u i d e photo: Keith Bosak revised 20100521 Introduction hose who have climbed or put up new routes in the Bitterroot know that a word or two about T rock fall is
Eagle Crag march 2015
 Eagle Crag march 2015 Alberto Cipriani Gianfranco Bigazzi Introduction Situated on the same headland to the south of Pui O as Temple Crag, Eagle Crag offers climbs similar in nature to those found at the
A Guide to Unicorn Canyon Peter Nelson, Craig Doram Zak McGurk cruising the second ascent of Money Jane
 A Guide to Unicorn Canyon Peter Nelson, Craig Doram Zak McGurk cruising the second ascent of Money Jane P a g e 2 Table of Contents Introduction... 2 Getting There... 2 Climbing Area Descriptions... 5
RockTopos Climbing Guide Costa Blanca. El Bovedón. A free climbing guide provided by RockTopos Published 2006
 RockTopo climbing guides are intended to provide documented information, directions and routes for the rock climbing at the cliff or area covered by the guide. The guides are intended to supplement the
NORTH CUMBRIA LIMESTONE Head End Quarry
 Page 1 of 5 Back to Eden Valley Guide Index Last Updated: 27/12/2005 O.S.Sheet 85 G.R. NY 249408 This crag will be included in the next FRCC Eastern Crags guide (due 2008) NORTH CUMBRIA LIMESTONE Head
Creag Rodha Mor aka Super Crag NC
 Creag Rodha Mor aka Super Crag NC056 236 Gogarth meets Sheigra. The crag consists of a very steep west facing 40m wall and a couple of south facing stepped walls (aka The Burnished Walls). Despite some
RAS AL KHAIMAH EMIRATE
 RAS AL KHAIMAH EMIRATE WADI GHALILAH This spectacular wadi, in the extreme north of the UAE, is arguably the most impressive area described in the guide. Lying close to the coast, it is less extensive
They have cabins and camping with a large camp kitchen equipped with stoves, fridge, microwave and BBQ. Why go anywhere else?
 ABOUT Mt Trio is situated in the Stirling Ranges which is typically known for multi pitch adventures. This crag offers quality bolted climbing with most routes being steep and long, whilst being in a stunning
Rainbows and Unicorns
 Rainbows and Unicorns Rainbows and Unicorns is a new cliff accessible from Murrin Park, approximately 20 25 min hike from the parking lot and 10 minutes past Pet Wall. This west facing cliff gets filtered
A Climbers Guide to Crohy Head South Iain miller
 1 A Climbers Guide to Crohy Head South By Iain miller 2 Crohy Head South These granite sea cliffs are found on the lonely stretch of coast running down the west coast of the Mullaghmullan peninsula approx
Fedw Fawr. Photo: Andy Godber on Lurcher Direct 6B+ Si Panton
 Fedw Fawr At the western end of the Fedw Fawr sport crag there are two bays at the base of the sea cliff which offer a suite of excellent burly boulder problems on perfect limestone with unspoilt horizon-searching
West Face of Mount Brussels
 West Face of Mount Brussels A r t h u r G r a n N E W L IM E ST O N E T E C H N IQ U E S A c l i m b e r s composure is his most valuable asset on steep limestone walls of the Canadian Rockies. This calmness
Scab Creek Buttress. Bring a 60 meter rope and extra webbing for replacing old slings at rappel stations.
 Scab Creek Buttress Elevation:,00 feet Approach Time: minutes to hour Primary Aspect: West & South West Number of Routes: 0 Routes by Rating & Type: Top Rope - Traditional - Sport -..0.. Scab Creek Buttress.
SPORT CLIMBS HORI BAY. OCTOBER 2014 EDITION Climbing near Nelson, New Zealand
 SPORT CLIMBS HORI BAY OCTOBER 2014 EDITION Climbing near Nelson, New Zealand Another day at Hori Bay Hori Bay, New Zealand Sectors 1 The Arena The Sideshow 2 3 5 6 8 WARNING! Climbing is a potentially
Follow this until immediately beyond the rock step that is below Central Park and 25m before the Strand
 Main Cliff General Approach: The walk-in starts from either of the two small car parks that lie 180m and 220m beyond the café; either take the dirt path (SH 20670 82175) that leads off right (ENE) from
Plan C Southwest Ridge of Cloudy Peak Peter Laurenson
 Plan C Southwest Ridge of Cloudy Peak Peter Laurenson Despite the record breaking sunshine hours in the first part of 2016, our third nominated weekend to make an attempt on Sefton from Welcome Pass again
History. Approach. Or from the A7. Take the Benidorm junction onto the N332 South, take the first exit onto the CV70.
 1 History There has been climbing in Echo Valley for a very long time. Echos Playa and 1 being equipped by Spanish teams in the late 80 s and early 90 s. When some English climbers started new routing
South-west facing crag, exclusively with naturally protected lines. The rock quality is good and the lines dry quickly.
 The Lutsi cliff South-west facing crag, exclusively with naturally protected lines. The rock quality is good and the lines dry quickly. So far there are 24 recorded routes with grades ranging from 5 to
1 of 5. Crow Stones, Derwent Valley by Paul Durkin
 Crow Stones, Derwent Valley by Paul Durkin OS ref SK170970 alt. 500m The edge comprises good quality moorland grit that has probably never been seriously assessed before the work undertaken for this guide
3/8/2016 Oregon Wallowa Mountains Published by Michael Hatch (Wallowa Avalanche Center) and Scott Savage (on behalf of USFS National Avalanche Center)
 and Scott Savage (on behalf of USFS National Avalanche Center)") Location: Place Chief Joseph Peak, Wallowa Mountains State Oregon Date 3/8/2016 Time 1630 hrs Summary 1 skier partially buried and killed Number: Caught 1 Fully Buried 0 Injured 0 Killed 1 Avalanche Details:
Location: Place Chief Joseph Peak, Wallowa Mountains State Oregon Date 3/8/2016 Time 1630 hrs Summary 1 skier partially buried and killed Number: Caught 1 Fully Buried 0 Injured 0 Killed 1 Avalanche Details:
Cold Moor 71. Cold Moor. 70 North York Moors
 70 orth York Moors Cold Moor 71 Cleveland Way A67 Cold Moor Crags 1 Km 1 mile A19 Crathorne A172 Cold Moor Hutton Rudby Beacon Scar Stokesley Carlton Bank Swainby Garfit Gap Wainstones Broughton Bank Great
A Guide to Rock Climbs at Bon Echo
 61. Jacob s Ladder 5.0 62. Formication & Mac s Book 5.6 63. French Form 5.4 64. Darlington County 5.10 65. Moonday 5.7 66. Boris Route 5.5 36 61. Jacob s Ladder 5.0 Start: at the base of the first slab
Domain Specific Vocabulary
 Name PEAK A Domain Specific Vocabulary AMS: Acute Mountain Sickness. A cluster of symptoms brought on by lower blood levels of oxygen at higher altitudes. Symptoms include headache, loss of appetite, nausea,
Abbey Hotel Golf Course. Hole by Hole Description & Golf Pro s Tips. 1st Hole
 Abbey Hotel Golf Course Hole by Hole Description & Golf s 1st Hole Par 4 Stroke Index 12 Red Tees 306yards Yellow Tees 313yards White Tees 317yards A short, sharp dogleg-right par four. The two fairway
A climbers guide to The Poisoned Glen Iain Miller
 1 A climbers guide to The Poisoned Glen By Iain Miller 2 The Poisoned Glen Access: The best approach into the Poisoned Glen is from the Dunlewey side, from the R251 at the base of the south face of Errigal
Overview Ozone is probably the most popular climbing area in the Portland metro. A mix of trad and partially bolted climbs ranging from 50' to
 Overview Ozone is probably the most popular climbing area in the Portland metro. A mix of trad and partially bolted climbs ranging from 50' to two-pitch 160' classics gives this area both the feel of a
EDEN VALLEY Scratchmere Scar
 Page 1 of 9 Back to Eden Valley Guide Index Last Updated:31/12/2005 O.S.Sheet 90 G.R. 516379 This crag will be included in the next FRCC Eastern Crags guide (due 2008) EDEN VALLEY Scratchmere Scar by Stewart
9. APPENDICES Disciplines of Mountain Biking
 9. APPENDICES 9.1. Disciplines of Mountain Biking Cross-country Cross-country mountain biking is the oldest discipline within the sport and is analogous to cross-country running or skiing. It involves
Cwm Cneifion. Cwm of the Flocks or Clippings
 Sub-Cneifion Rib (VD) climber unknown SIMON CARDY Cwm Cneifion Cwm of the Flocks or Clippings High above Cwm Idwal, contained by the West Face of Y Gribin and the eastern flank of Senior s Ridge, is the
Hong EKong Bouldering AGLE CRAG
 Hong EKong Bouldering AGLE CRAG General Situated on the same headland to the south of Pui O as Temple Crag, Eagle Crag offers climbs similar in nature to those found at the more popular Beacon Hill, except
General Coastal Notes + Landforms! 1
 General Coastal Notes + Landforms! 1 Types of Coastlines: Type Description Primary Coast which is essentially in the same condition when sea level stabilized Coastline after the last ice age, younger.
Capt. Cook s crags. Captain Cook's Area North York Moors. CAPTAIN COOK S AREA, EASBY MOOR OS Landranger Sheet 93 Cockshaw Hill Potter s Quarry
 50 North York Moors Great Ayton crags Station Station Road A175 Middlesbrough A171 P 1 Km 1 mile Farm A174 Cockshaw Hill Monument Potter s Quarry Easby View Crags B1269 P Wall A173 CAPTAIN COOK S AREA,
New Routes at Mount Frankland, 2 nd ed.
 New Routes at Mount Frankland, 2 nd ed. Ross Weiter, October 2012 Cover: Hamish Carrad just below the crux of Free Willy (18). All rights reserved. No part of this publication may be reproduced, stored
FROG ROCK EAST FACE PAGE 1
 FROG ROCK EAST FACE Anchors for crux notch traverse on Frogback Jabba s Jingus Joyride 5.9 (no anchor yet) Start of Frogback Traverse Approach Do)ed line indicates gully behind forma,on in foreground Alternate
Eardley Canyon, Straight Wash San Rafael Swell, Central Swell
 Eardley Canyon, Straight Wash San Rafael Swell, Central Swell Rating: Best Season: Time: Access: Permit: Equipment: Map: Cold Protection: Drinking Water: Flash Flood Risk: Skills Required: Technical Note:
Putting it all together
 Putting it all together Lead with your head not your arms In the previous two articles I examined how to stay warm, what axes and crampons to buy and how to avoid getting caught in an avalanche. Here I
SubUpperHeadings - MOUNT WHITNEY
 SubUpperHeadings - MOUNT WHITNEY MOUNT WHITNEY By S arker and Todd Vogel of MOUNT WHITNEY - Introduction Logistics - MOUNT WHITNEY elevation. Three days makes for the best trip for most people with day
Wyoming, Grand Teton National Park (2 ) Fred Ford (2 5 ), John Austin (26) and Robert Bartholomew (20) spent the night of June 27 in high camp in the
 Fred Ford (2 5 ), John Austin (26) and Robert Bartholomew (20) spent the night of June 27 in high camp in the") Wyoming, Grand Teton National Park (2 ) Fred Ford (2 5 ), John Austin (26) and Robert Bartholomew (20) spent the night of June 27 in high camp in the lower saddle between the Grand and M iddle Teton. In
Wyoming, Grand Teton National Park (2 ) Fred Ford (2 5 ), John Austin (26) and Robert Bartholomew (20) spent the night of June 27 in high camp in the lower saddle between the Grand and M iddle Teton. In
Switzerland s Bregaglia in 1951
 Switzerland s Bregaglia in 1951 DON M. WOODS O n e o f Switzerland s finest granite climbing areas is Val Bregaglia or, as it is known in German, the Bergell. There are three climbing huts on the north
SAREA TOP ROPE INSTRUCTOR PERSONAL CLIMBING ASSESSMENT
 Candidates name:... Location:... Assessor/s name/s:... Date:...... /..... /....... Time started:... Time finished:... Weather conditions:... Note: There are 3 components of the SAREA Top Rope Instructor
WATERFALL ROCK. Page 110. Hong Kong Climbing- The Columnar Jointing that makes Waterfall Rocks so special Photo: Stuart Millis HongKongClimbing.
 Hong Kong Climbing- WATERFALL ROCK The Columnar Jointing that makes Waterfall Rocks so special Photo: Stuart Millis Page 110 General Waterfall Rock The crag is formed by columnar jointing of volcanic tuff,
Approach GPS Conditions
 3 7 Presten p.60 The West The West Henningsvær Up to + The spectacular section of coast between Henningsvær 7 - to N6and Kalle is one with huge potential - the small set of routes described here is just
A Climbers' Guide to the El Rito Sport Crags
 A Climbers' Guide to the El Rito Sport Crags New Mexico By Gary Clark - Version 06/05/05 HOW TO GET THERE The village of El Rito is located about 50 miles north of Santa Fe. There is a detailed map of
ARISAIG CAVE. Natalie Berry on The Original 7B. Pic: Chris Prescott
 ARISAIG CAVE Natalie Berry on The Original 7B. Pic: Chris Prescott The cave offers a weatherproof medium-hard bouldering venue that is in good condition for at least 6 months of the year. In the dark Lochaber
Scab Creek Buttress Boulder, Wyoming
 II TITLE PAGE & CREDITS VISIT CLIMBINGWYOMING.COM FOR UPDATES & RESOURCES III Scab Creek Buttress Boulder, Wyoming WARNING Climbing is an inherently dangerous sport! There are risks involved with climbing
MINIMAL ENVIRONMENTAL IMPACT PRACTICES
 Candidate Name: Date: MINIMAL ENVIRONMENTAL IMPACT PRACTICES EXAM ANSWERS This exam is designed to meet the knowledge requirements of the following units of competency: SROOPS001B Implement minimal environmental
CROSS COURSE INSTRUCTION DOCUMENT
 CROSS COURSE INSTRUCTION DOCUMENT Table of Contents CROSS COURSE DESCRIPTION... 3! CRITERIA FOR SBX/SX RUN SELECTION... 4! Gradients / Slope inclinations... 4! Run Width... 4! Level of Courses... 8! Beginner
Las Conchas Climbing Guide for Cattle Call Wall and Gateway Rock. Jemez Mountains, New Mexico
 Las Conchas Climbing Guide for Cattle Call Wall and Gateway Rock Jemez Mountains, New Mexico Jason Halladay halladay@gmail.com Last updated 30 August 2007 Cattle Call Wall With its thirty-second approach
Fitz R o y s Southeast Buttress
 Fitz R o y s Southeast Buttress P e t e r F r ie d r ic h, C entro A ndino Buenos A ires E F W OF THE world s great mountains impress one with their majesty and beauty as much as Fitz Roy. Its magic caught
SECTION 12 ROAD MARKINGS AND DELINEATION
 SECTION 12 20 June 2009 Part 3: Motorways and Expressways CONTENTS Reference Page Page Number Date SECTION 12: MARKINGS AND DELINEATION 12.1 GENERAL... 12-1 June 2009 12.1.1 INTRODUCTION... 12-1 June 2009
6 day trek from Cathedral Peak to Champagne Castle, Central Drakensberg, South Africa
 6 day trek from Cathedral Peak to Champagne Castle, Central Drakensberg, South Africa Vultures retreat near Champagne Castle, looking north to Cathedral Peak and the Devil s tooth This 6-day trek crosses
Multi-pitch Rock Climbing BOEALPS BRC Jean Ruggiero 30 July 2018
 Multi-pitch Rock Climbing BOEALPS BRC Jean Ruggiero 30 July 2018 Some fun multipitch climbs... Sun Ribbon Arête, Temple Crag, Palisades, CA 22 pitches (5 were simul-pitches), 3 Approach pitches, 2 rappels,
Climbing on the Gunflint Trail
 Climbing on the Gunflint Trail Grand Marais, MN Version 0.5 Copyright 2016 Carter Stritch The Gunflint Trail and the surrounding area is a fantastic and beautiful place. The abundance of lakes, swamps,