ASSEMBLY INSTRUCTIONS. Kiddi o GoNana s See Saw. Model #
|
|
|
- Stephany Davis
- 5 years ago
- Views:
Transcription


1 ASSEMBLY INSTRUCTIONS Kiddi o GoNana s See Saw Model # PICTURE SIMILAR KETTLER Int l Inc London Bridge Road Virginia Beach, VA USA / parts@kettlerusa.com / 1
2 KETTLER LIMITED WARRANTY THERE ARE NO WARRANTIES, EXPRESSED OR IMPLIED, MADE BY EITHER THE DISTRIBUTOR OR THE MANUFACTURER ON KETTLER PRODUCTS, EXCEPT THE MANUFACTURER S LIMITED WARRANTY AGAINST DEFECTS IN MATERIAL SET OUT BELOW: This KETTLER Limited Warranty applies to products sold through the KETTLER Authorized Dealer Network to the original retail purchaser and authenticated by proof of purchase. This KETTLER Limited Warranty is a manufacturer s warranty and is not changed or modified by additional warranties extended by individual retailers at the point of sale. Manufacturer warrants this product to be free from defects in material at the time of the product s tender of delivery for a period of 3 years for residential use. This Limited Warranty is not transferable and does not cover normal wear and tear (including, but not limited to, damage and wear to tires, power shocks, drive belts and other non durable parts). The liability of the manufacturer under this Limited Warranty shall not include any liability for direct, indirect, or consequential damages resulting from the defect. This Limited Warranty is void if the product is damaged by accident, unreasonable use, improper service, failure to follow instructions provided, modification from its original state, or other causes determined not arising out of defects in material. This warranty gives you specific legal rights. Should this product become defective due to material within the warranty period, contact KETTLER Parts & Service Dept. by phone at , fax at , or e mail at parts@kettlerusa.com. THIS LIMITED WARRANTY IS EXPRESSLY IN LIEU OF ANY OTHER WARRANTIES, EXPRESSED OR IMPLIED, INCLUDING ANY IMPLIED WARRANTY OF MERCHANTABILITY OR FITNESS FOR A PARTICULAR PURPOSE, AND OF ANY OTHER OBLIGATIONS OR LIABILITY ON THE PART OF THE MANUFACTURER. KETTLER NEITHER ASSUMES NOR AUTHORIZES ANY OTHER PERSON TO ASSUME FOR IT ANY OTHER LIABILITY IN CONNECTION WITH SUCH PRODUCTS. 2

3 WARNING *TO AVOID SERIOUS INJURY* Adult supervision required. Never use near steps, slopes, driveways, hills, roadways, alleys, or swimming pool areas. Always wear proper clothing, examples include the use of well fitting shoes, avoidance of ponchos, scarf s and other loose fitting clothing that is potentially hazardous while using equipment. Never use near motor vehicles. Never allow more than one rider per seat. Adult assembly required. Caution! Adult Assembly Required. This package contains small parts. Keep away from children until assembled. This product has been designed in accordance with the latest standards of safety and subjected to constant quality monitoring. The data gained from this quality process is then incorporated in the development of our products. For this reason, we reserve the right to make changes in design and technology in order to offer our customers products of the highest standards of quality at all times. For your safety: This See Saw is to be used for its intended purpose only, this is: as a child s play apparatus, for use by a maximum of one child per seating place or per individual play See Saw. All other use is inadmissible and potential dangerous. The manufacturer may not be held responsible for any damages caused as a result of any use other than as directed. Mounting the See Saw is permitted only in a private household environment. Any use in public or semi public playgrounds or kindergartens is inadmissible. In choosing the location of the See Saw, must be placed on level ground and ensure a sufficient safety distance of not less than 6 ft. (1.8m) from any structure or obstacle (walls, fences, trees, overhanging branches, laundry lines). The See Saw must not be mounted in the immediate vicinity of main passageways (paths, doorways, corridors), or between moving items. Please bear in mind that there is always a danger of children injuring themselves while using swings, climbing frames, toy vehicles or similar equipment. Be sure to instruct children not to walk close to, in front of, behind or between the item while in motion. Be sure to instruct children not to get off the See Saw while it is in motion. It must be at a complete and full stop before dismounting. Be sure to instruct children not to climb on See Saw when it is wet. Advise children not to attach items to the See Saw that is not specifically designed for use with the equipment, such as, but not limited to, jump ropes, clotheslines, pet leashes, cables and chain, etc. as they may cause strangulation hazards. Be sure that children remove their bike or other sports helmets before playing on the product. 3
4 The ground in the play and safety area should consist of unbound, shock absorbing ground material. The See Saw must stand firmly, safe from tilting or tipping. Pay particular attention: the See Saw must be set in concrete using the screws included, strictly according to our illustration. Damaged components can endanger children and reduce the product life. Control all components in regular intervals of 1 3 months, depending on use, against possible damages and loose connections. At the beginning of each play season be sure to: a) Always check that all screws and plug in connections and respective safety devices fit correctly and tighten hardware as needed. b) Lubricate all metallic moving parts per manufacturer s instructions. c) Check all protective coverings on bolts, pipes, edges and corners. Replace if they are loose, cracked or missing. d) Check all moving parts for wear, rust, or other deterioration. Replace as needed. e) Check metal parts for rust. If found, sand and repaint using a nonlead based paint meeting the requirements of 16 CFR f) Reinstall any plastic parts, such as seats, or any other items that were removed for the cold season. g) Rake and check depth of loose filled protection surfacing materials to prevent compaction and to maintain appropriate depth. Replace as necessary. Damaged or worn parts must be replaced immediately and the See Saw is not to be used until restored. In case of need, exclusively Original Kiddi o replacement parts should be used. Twice a month during play season: a) Tighten all hardware b) Check all protective coverings on bolts, pipes, edges, and corners. Replace if they are loose, cracked, or missing. c) Rake and check depth of loose fill protective surfacing materials to prevent compaction and to maintain appropriate depth. Replace as necessary. Once a month during play season: a) Lubricate all metallic moving parts per manufacturer s instructions. b) Check all moving parts for wear, rust, or other deterioration. Replace as needed. c) At the end of each play season or when the temperature drops below 32 F remove plastic seats and take indoors or do not use. d) Rake and check depth of loose fill protective surfacing materials to prevent compaction and to maintain appropriate depth. Replace as necessary. Improper repair or constructional changes (disassembly of original parts, attachment of unapproved parts, etc.) can result in danger to the user. Modifications to the See Saw, in particular to the suspension arrangement, are prohibited. Use of the See Saw is permitted for children up to 75 lbs per side (12 years of age). Small children are permitted to use the See Saw only when aided by an adult, since small children are not strong enough to keep their own body weight balanced during play. Please note that the high turning velocities or jerky changes or velocity with a simultaneous swinging may cause children to lose their balance and fall off. For this reason, there is a stop with regard to turning motion. Children up to an age of 6 years should use the See Saw with this turning lock and under supervision of an adult only. 4
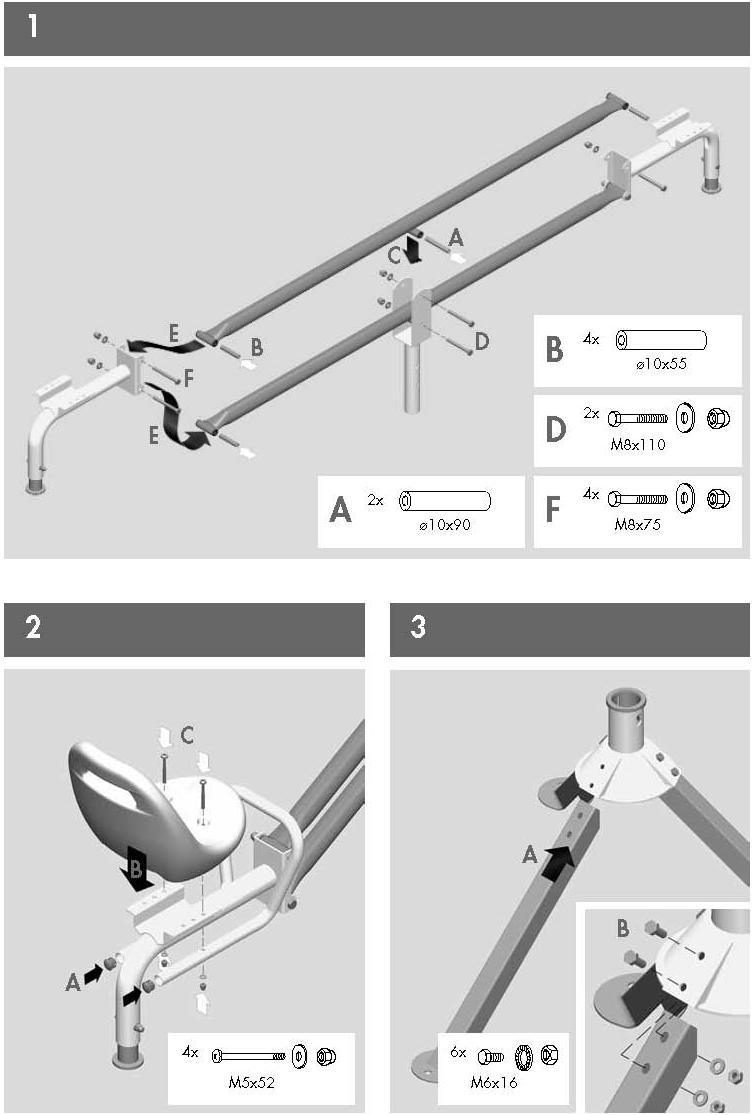
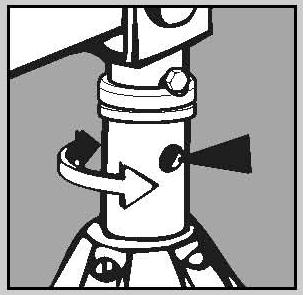
5 How to handle: Make sure that usage does not commence until the See Saw has been properly assembled and subsequently controlled by an adult. Instruct children on the proper handling of the See Saw and advise them of possible dangers. Remember that the children s natural play instincts and temper may lead to unforeseeable situations excluding a responsibility of the manufacturers. Although dangers to children during proper use of the See Saw are highly unlikely, all play on the See Saw should be monitored by an adult. For cleaning and caring the See Saw only use environmentally friendly and no aggressive or corroding agents. Regularly grease the moving parts with some drops of oil. Instructions for Assembly: Ensure that you have received all the parts required (see check list) and that they are undamaged. Should you have any cause for complaint, please contact your KETTLER Dealer. Before assembling the equipment, study the drawings carefully and carry out the operations in the order shown by the diagram. The correct sequence is given in capital letters. The fastening material required for each assembly step is shown in the diagram inset. Use the fastening material exactly as instructed. The equipment must be assembled with due care by an adult person. If in doubt call upon the help of a second person, if possible technically talented. Please note that there is always a danger of injury when working with tools or doing manual work. Therefore please be careful when assembling this apparatus. Ensure that your working area is free of possible sources of danger, for example don t leave tools lying around. Always dispose packaging material in such a way that it may not cause any danger. There is always a risk of suffocation if children play with plastic bags! Bolt all the parts together loosely at first, and check that they have been assembled correctly. Tighten the lock nuts by hand until resistance is felt, then use spanner to tighten nuts completely against resistance (locking device). Then check that all screw connections have been tightened firmly. Attention: once locknuts have been unscrewed they no longer function correctly (the locking device is destroyed), and must be replaced. For technical reasons, we reserve the right to carry out preliminary assembly work (e.g. addition of tubing plugs). Waste Disposal: KETTLER products are recyclable. At the end of its useful life please disassemble and dispose of this apparatus correctly and safely (call local refuse sites for pick up). Select Protective Surfacing: One of the most important things you can do to reduce the likelihood of serious head injuries is to install shock absorbing protective surfacing under and around your play equipment. The protective surfacing should be applied to a depth that is suitable for the equipment height in accordance with ASTM F1292. There are different types of surfacing to choose from; whichever product you select, follow these guidelines: NOTE: Do not install home playground equipment over concrete, asphalt, or any other hard surface. A fall onto a hard surface can result in serious injury to the equipment user. Grass and dirt are not considered protective surfacing because wear and environmental factors can reduce their shock absorbing effectiveness. Carpeting and thin mats are generally not adequate protective surfacing. Ground level equipment such as a sandbox, activity wall, playhouse or other equipment that has no elevated play surface does not need any protective surfacing. 5
6 Loose Fill Materials: Maintain a minimum depth of 9 inches of loose fill materials such as wood mulch/chips, engineered wood fiber (EWF), or shredded/recycled rubber mulch for equipment up to 8 feet high; and 9 inches of sand or pea gravel for equipment up to 5 feet high. NOTE: An initial fill level of 12 inches will compress to about a 9 inch depth of surfacing over time. The surfacing will also compact, displace, and settle, and should be periodically refilled to maintain at least a 9 inch depth. Use a minimum of 6 inches of protective surfacing for play equipment less than 4 feet in height. If maintained properly, this should be adequate. (At depths less than 6 inches, the protective material is too easily displaced or compacted.) Use containment, such as digging out around the perimeter and/or lining the perimeter with landscape edging. Don t forget to account for water drainage. Check and maintain the depth of the loose fill surfacing material. To maintain the right amount of loose fill materials, mark the correct level on play equipment support posts. That way you can easily see when to replenish and/or redistribute the surfacing. Do not install loose fill surfacing over hard surfaces such as concrete or asphalt. Poured In Place Surfaces or Pre Manufactured Rubber Tiles You may be interested in using surfacing other than loose fill materials like rubber tiles or poured inplace surfaces. Installations of these surfaces generally require a professional and are not do it yourself projects. Review surface specifications before purchasing this type of surfacing. Ask the installer/ manufacturer for a report showing that the product has been tested to the following safety standard: ASTM F1292 Standard Specification for Impact Attenuation of Surfacing Materials within the Use Zone of Playground Equipment. This report should show the specific height for which the surface is intended to protect against serious head injury. This height should be equal to or greater than the fall height vertical distance between a designated play surface (elevated surface for standing, sitting, or climbing) and the protective surfacing below of your play equipment. Check the protective surfacing frequently for wear. List of spare parts: When ordering spare parts, always state the spare part position number and the quantity required of the product (see spare parts drawing on Page 11). Example order: Art. No # / Position No. 1 / 1 piece Important: spare part pieces do not include the fastening material; if fastening material (bolts, nuts, washers, etc.) is required, this should be clearly stated on the order by adding the words, with fastening material. Please keep original packaging of this See Saw, so that it may be used for transport at a later date, if necessary. Goods may only be returned after prior arrangements and in internal packaging, which is safe for transportation, in the original box is possible. It is important to provide a detailed defect description / damage report! 6

7 PARTS CHECK LIST M8x42 M8x70 3x 3x 7
8 M8x70 8


9 M8x Rotating Remove bolt M8x42 9

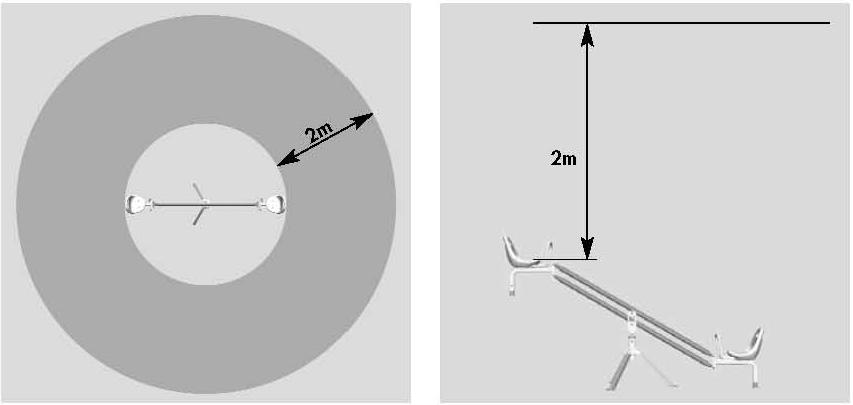
10 SAFETY ZONE 10

11 Spare Parts List for Kiddi o Go Nana s See Saw Model # Pos. Description QTY 1 Beam 2 2 Bushing 10.5mm 12 3 Spacer Sleeve M10x90mm 2 4 Handlebar 2 5 Plug 18mm 4 6 Leg 3 7 Seat 2 8 Seat Frame 2 9 Spring 2 10 Foot Stop 2 11 Yoke 1 12 Base 1 13 Bushing 2 14 O Ring 1 15 Spacer Sleeve M10x55mm 4 16 Hardware Bag (not shown) 1 docu KETTLER All rights reserved. No part of this manual may be reproduced, stored in a retrieval system, or transmitted in any form, or by any means, such as electronic, mechanical, photocopying or otherwise, without the prior written permission of KETTLER. 11
Gym Dandy TEETER TOTTER TT-320. Model TT-320. Retain This Manual for Reference OWNER'S MANUAL
 NOTE: Please read all instructions carefully before using this product Gym Dandy Table of Contents Safety Notice Hardware Pack TEETER TOTTER TT-320 Assembly Instruction Parts List Operation Tips Warranty
KIDS SWIVEL SEE SAW MODEL# 9307SS PRODUCT MANUAL - VERSION
 KIDS SWIVEL SEE SAW PRODUCT MANUAL - VERSION 03.16.04 FOR AGES: 4-10 WEIGHT LIMIT: 150 Lbs 68 Kgs ADULT(S) NEEDED: TOOLS NEEDED: WARNING/ADVERTENCIA CUSTOMER SERVICE Please read all the instructions before
GEODOME (2) Lifetime playgrounds are designed to be strong and durable. We strive to make assembly as easy as possible without compromising quality.
 Lifetime playgrounds are designed to be strong and durable. We strive to make assembly as easy as possible without compromising quality.") GEODOME Lifetime playgrounds are designed to be strong and durable. We strive to make assembly as easy as possible without compromising quality. Prepare the Area Before you start, prepare a level surface
GEODOME Lifetime playgrounds are designed to be strong and durable. We strive to make assembly as easy as possible without compromising quality. Prepare the Area Before you start, prepare a level surface
Swing Set. Sheffield Model 22-PS320
 Swing Set Sheffield Model 22-PS320 Important! The owner s manual contains safety, assembly, use and maintenance instructions. The Playsafe Swing Set must be assembled by an adult who has read and understands
Gym Dandy TEETER TOTTER TT-360. Model TT-360. Retain This Manual for Reference OWNER'S MANUAL
 NOTE: Please read all instructions carefully before using this product Table of Contents Safety Notice Gym Dandy TEETER TOTTER TT-360 Important Assembly Information Care and Maintenance Parts List Warranty
Assembly, Maintenance, and User Manual
 Assembly, Maintenance, and User Manual Skywalker Sports Classic Teeter Totter Model #STT00 WARNING Read all precautions and instructions in this manual before using this equipment. Save this manual for
(+44) Assembly Tips: It will take around 30 minutes to assemble. 2 Adults required
 Assembly Tips: It will take around 30 minutes to assemble. 2 Adults required") Assembly Tips: t will take around 0 minutes to assemble. Adults required Age: -8 years Maximum user weight: 5kg(Single swing) Age: +months Maximum user weight: 5kg(Baby swing) (+) 070 087 WARNNG. OR DOMSTC
Assembly Tips: t will take around 0 minutes to assemble. Adults required Age: -8 years Maximum user weight: 5kg(Single swing) Age: +months Maximum user weight: 5kg(Baby swing) (+) 070 087 WARNNG. OR DOMSTC
TR5000 THE TOUGHEST TRAINING SYSTEM ON THE PLANET. MODEL NO. STRIKER TRAINER 2L Escalade Sports
 MODEL NO. TR5000 THE TOUGHEST TRAINING SYSTEM ON THE PLANET. STRIKER TRAINER TM 2L-7250-00 R Escalade Sport products may be manufactured and/or licensed under the following patents. 6419596, 6179733, 5919102,
DISASSEMBLING & REASSEMBLING CARTRIDGE INSTALLING SEATPOST ON BIKE
 INTRODUCTION BILL OF MATERIALS SPECIFICATIONS & TOOLS PROCEDURES DISASSEMBLING & REASSEMBLING CARTRIDGE INSTALLING SEATPOST ON BIKE OPERATION OF SEATPOST GIANT LIMITED WARRANTY 1 INTRODUCTION Congratulations
INTRODUCTION BILL OF MATERIALS SPECIFICATIONS & TOOLS PROCEDURES OPERATION OF SEATPOST GIANT LIMITED WARRANTY
 INTRODUCTION BILL OF MATERIALS SPECIFICATIONS & TOOLS PROCEDURES OPERATION OF SEATPOST GIANT LIMITED WARRANTY 1 INTRODUCTION Congratulations on the purchase of your new GIANT CONTACT SWITCH seatpost. This
Infant Swing ( )
") Infant Swing (04-0017) 1. Insert the yellow T-bar into the hole at the front of the swing. If you need to disengage the T-bar you can squeeze the 2 tabs together under the seat while pulling the T-bar
Infant Swing (04-0017) 1. Insert the yellow T-bar into the hole at the front of the swing. If you need to disengage the T-bar you can squeeze the 2 tabs together under the seat while pulling the T-bar
HELMETS SAVE LIVES!!! ALWAYS WEAR A PROPERLY FITTED HELMET WHEN YOU RIDE YOUR SCOOTER. DO NOT RIDE AT NIGHT. AVOID RIDING IN WET CONDITIONS.
 HELMETS SAVE CORRECT FITTING - MAKE SURE YOUR HELMET COVERS YOUR FOREHEAD. LIVES!!! ALWAYS WEAR A PROPERLY FITTED HELMET WHEN YOU RIDE YOUR SCOOTER. DO NOT RIDE AT NIGHT. AVOID RIDING IN WET CONDITIONS.
ZL90-90 includes all all parts && hardware for easy assembly. Installation Instructions. With Patented FingerSafe Trolley System. ziplinefun.
 With Patented FingerSafe Trolley System ZL90-90 includes all all parts && hardware for easy assembly ziplinefun.com Ages 8+ weighing up up to to 250lbs Made in in the USA for for over over 35 35 years.
Quattrocycle BV. Quattrocycle. User Manual. Last update February Quattrocycle BV Bremkant EJ Middelbeers. User Manual Quattrocycle 1
 Quattrocycle User Manual Last update February 2010 Quattrocycle BV Bremkant 6 5091 EJ Middelbeers User Manual Quattrocycle 1 Table of Contents Page Chapter 1: Introduction 3 Chapter 2: Instructions for
InstallatIon and owner s InstrUCtIons
 InstallatIon and owner s InstrUCtIons Wall Mount Series Adjustable and Fixed Height Goal Systems table of Contents Safety Instructions... 2 Goal Specifications... 3 Frame Attachment... 4 Frame Assembly
40 MINI TRAMPOLINE WITH HANDRAIL
 40 MINI TRAMPOLINE WITH HANDRAIL PRODUCT MANUAL - VERSION 04.18.07LR FOR AGES: WEIGHT LIMIT: 250 Lbs 114 Kgs TO BUILD: 13+ 1 X TOOLS NEEDED: CUSTOMER SERVICE GQBrands.com CustomerService@GQBrands.com 1-866-498-5269
TECHNICAL SUPPORT DOCUMENT FULL SUSPENSION MODELS C7 C9 WARRANTY SMALL PARTS FRAME SPEC/SERVICING
 2016-2018 FULL SUSPENSION MODELS C7 C9 WARRANTY SMALL PARTS FRAME SPEC/SERVICING 2016-2018 FULL SUSPENSION MODELS C7 C9 PG.i WARRANTY INFORMATION COMPLETE BIKES ONE YEAR LIMITED WARRANTY NORCO Bicycles
COMPACT METAL bender 99826
 COMPACT METAL bender 99826 Set up And Operating Instructions Distributed exclusively by Harbor Freight Tools. 3491 Mission Oaks Blvd., Camarillo, CA 93011 Visit our website at: http://www.harborfreight.com
Instructions for Assembly and Operation
 Instructions for Assembly and Operation Congratulations on the purchase of your new bike! With proper assembly and maintenance it will offer you years of enjoyable riding! IMPORTANT: Carefully read and
Parts and Owners Manual
 Parts and Owners Manual MOWER MODEL: SERIAL: ENGINE MODEL & HP: DATE PURCHASED: PURCHASED FROM: You must receive special training from the dealer before operating this mower. 9/30/2005 Commercial Mower
Please Do Not Return This Product To The Store!
 MODEL NUMBER: GM000W - GAMEMAKER TORCH O W N E R ' S M A N U A L PLEASE READ AND FOLLOW THIS MANUAL IN ITS ENTIRETY BEFORE USE. DOING SO WILL PROVIDE HELPFUL HINTS THAT WILL AID IN GETTING MAXIMUM USE
MAVERICK FOOSBALL TABLE
 MAVERICK FOOSBALL TABLE Replacement Parts Order direct at or call our Customer Service department at (800) 225-7593 8 am to 5 pm Central Standard Time July 2010 UPC Code 7-19265-53446-4 Staple your receipt
Sunset Swings By Health in Motion, LLC
 Sunset Swings By Health in Motion, LLC Model 421 Lounge Swing Assembly and Operation Manual Record Serial Number Here www.sunsetswings.com by Health In Motion, LLC. 1/30/2013 Caution: READ! VERY IMPORTANT
KAYAK ERGOMETER. Operating Instructions (Rev 3.0)
") KAYAK ERGOMETER Operating Instructions (Rev 3.0) Weba Sport und Med.- Artikel GmbH Liesneckgasse 6/1 1210 Vienna Austria Tel.: ++43 1 2723550 Fax: ++43 1 27235504 office@webasport.at www.weba-sport.com
KAYAK ERGOMETER Operating Instructions (Rev 3.0) Weba Sport und Med.- Artikel GmbH Liesneckgasse 6/1 1210 Vienna Austria Tel.: ++43 1 2723550 Fax: ++43 1 27235504 office@webasport.at www.weba-sport.com
SAMSON SERIES SPORTS CENTER SILVER
 SAMSON SERIES SPORTS CENTER SILVER ASSEMBLY INSTRUCTIONS No. 8019 Ages: 3-10 CUSTOMER SUPPORT USA and Canada: 1-888-GNU-9898 Email: service@grow-n-up.com Other countries: support@grow-n-up.com WARNING!
2000 lb manual winch
 2000 lb manual winch Model 41694 Operation Instructions Due to continuing improvements, actual product may differ slightly from the product described herein. 3491 Mission Oaks Blvd., Camarillo, CA 93011
Traditional Basketball Set. Assembly & Installation Instructions
 Traditional & Pro Style Basketball Set Assembly & Installation Instructions Traditional Basketball Set Pro Style Basketball Set 3 0 5 0 S. A L V E R N O N W A Y T U C S O N, A Z 8 5 7 1 3 5 2 0. 7 9 0.
VOLLEYBALL SPIKE TRAINER. Assembly Instructions. Owner s Manual. Model # VST-100. Club Volleyball Gear WARNING
 VOLLEYBALL SPIKE TRAINER Model # VST-100 Assembly Instructions Owner s Manual WARNING To ensure safety, do not attempt to assemble this system without following all instructions carefully. Check entire
YEARS SKIBOCK CONSTRUCTION MANUAL cm / inch 90kg / 198 lbs 1.5 hours. Length Max weight Time to build
 SKIOCK CONSTRUCTION MNUL 8 YERS Length Max weight Time to build 130-190 cm / 51-75 inch 90kg / 198 lbs 1.5 hours WRNING - IMPORTNT NOTICE TO PRENTS efore you start constructing and use our product, please
VOLLEYBALL SPIKE TRAINER. Assembly Instructions. Owner s Manual. Model # VST-300. Club Volleyball Gear. For fixed-height Basketball Hoop Systems
 VOLLEYBALL SPIKE TRAINER Model # VST-300 For fixed-height Basketball Hoop Systems Assembly Instructions Basketball Hoop System Not Included Owner s Manual Club Volleyball Gear 18434 Technology Drive, Morgan
INDOOR CYCLING BIKE SF-B1110 USER MANUAL
 INDOOR CYCLING BIKE SF-B1110 USER MANUAL IMPORTANT! Read all instructions carefully before using this product. Retain owner s manual for future reference. For customer service, please contact: support@sunnyhealthfitness.com
60 farm jack. Distributed exclusively by Harbor Freight Tools Mission Oaks Blvd., Camarillo, CA 93011
 60 farm jack 66183 Set up And Operating Instructions Distributed exclusively by Harbor Freight Tools. 3491 Mission Oaks Blvd., Camarillo, CA 93011 Visit our website at: http://www.harborfreight.com Read
Assembly Instructions & Manual. Configuration subject to change
 Assembly Instructions & Manual Configuration subject to change O R Y X II A S S E M B L Y I N S T R U C T I O N S & M A N U A L IMPORTANT PRECAUTIONS WARNING: To reduce the risk of serious injury, read
FOLD AND ROLL PLAYBACK TABLE TENNIS TABLE
 OWNER'S MANUAL FOLD AND ROLL PLAYBACK TABLE TENNIS TABLE MODEL NOs. T8268 T8168 Thank you for buying our product. We try hard to ensure that our products are of high quality and free of problems, such
DO NOT use any Alien Flier Zip Line Products or Accessories until you read and understand these SAFETY WARNINGS!
 ! WARNING DO NOT use any Alien Flier Zip Line Products or Accessories until you read and understand these SAFETY WARNINGS! A zip line can be very dangerous. Do not use this kit if you do not understand
FOLD AND ROLL PLAYBACK TABLE TENNIS TABLE
 OWNER'S MANUAL FOLD AND ROLL PLAYBACK TABLE TENNIS TABLE MODEL NOs. T8269 T8169 Thank you for buying our product. We try hard to ensure that our products are of high quality and free of problems, such
Congratulations on your purchase of a JC Series Performer trike! The Performer JC Series is designed for everything from touring to commuting and
 Congratulations on your purchase of a JC Series Performer trike! The Performer JC Series is designed for everything from touring to commuting and shopping in the city. The JC Series frames are made of
USER GUIDE ROLLING WALKERS INSTRUCTIONS FOR USE JANUARY, Maximum User Weight: 170kg (Do not exceed this weight)
") USER GUIDE ROLLING WALKERS INSTRUCTIONS FOR USE JANUARY, 2013 Model Nos: BE07889T Maximum User Weight: 170kg (Do not exceed this weight) Model Nos: BE07890TB Maximum User Weight: 227kg (Do not exceed this
USER GUIDE ROLLING WALKERS INSTRUCTIONS FOR USE JANUARY, 2013 Model Nos: BE07889T Maximum User Weight: 170kg (Do not exceed this weight) Model Nos: BE07890TB Maximum User Weight: 227kg (Do not exceed this
AQQWALKING TREAD MILL
 aqquatixusa.com INSTRUCTION MANUAL AQQWALKING TREAD MILL THIS MANUAL WAS WRITTEN BY: AQQUATIX USA. ALL RIGHTS RESERVED. AQQWALKING TREAD MILL aqquatixusa.com INDEX 1. Introduction page 2 2. Important safety
BELT DRIVE INDOOR CYCLING BIKE SF-B1712
 BELT DRIVE INDOOR CYCLING BIKE SF-B1712 USER MANUAL IMPORTANT! Read all instructions carefully before using this product. Retain owner s manual for future reference. For customer service, please contact:
RADROVER REAR RACK INSTALLATION MANUAL
 RADROVER REAR RACK INSTALLATION MANUAL WWW.RADPOWERBIKES.COM We are here to help! Please contact us at SUPPORT@RADPOWERBIKES.COM or 1-800-939-0310 if you have questions. REV022216 Welcome Thanks you for
To avoid injury during assembly, disassembly, use, adjustment and/or location of the Hockey Backstop, please observe the following WARNINGS:
 To avoid injury during assembly, disassembly, use, adjustment and/or location of the Hockey Backstop, please observe the following WARNINGS: Two competent adults are required to assemble, disassemble,
OPERATOR S MANUAL. Fabric Grass Catcher PART NO PRINTED 1/2011 PRINTED IN USA
 OPERATOR S MANUAL Fabric Grass Catcher Models: GC-F4 Congratulations on owning a Scag mower! This manual contains the operating instructions and safety information for your Scag mower accessory. Reading
BIKE TO GO - USER MANUAL - MODEL#: JBTG24
 BIKE TO GO 24 - USER MANUAL - MODEL#: JBTG24 GET ACQUAINTED WITH YOUR 24 BIKE TO GO Congratulations on your new Jetson 24 folding bicycle! The Jetson 24 Bike to Go is an innovative and fun personal transportation
Cocoa Patio Pond with Lit Spillway
 Cocoa Patio Pond with Lit Spillway REMINDER CALL 1-888-755-5641 BEFORE RETURNING TO STORE. PACKAGE CONTENTS ITEM # GQSPPB/GQSPPW Questions, problems, missing parts? Before returning to your retailer, call
OPERATOR'S MANUAL. MODEL GC-F4 Fabric Grass Catcher P/N 9055 GRASS CATCHER GC-F4. PART Rev.2 SC301G
 OPERATOR'S MANUAL MODEL GC-F4 Fabric Grass Catcher P/N 9055 GRASS CATCHER GC-F4 1 2 8 11 10 9 5 6 7 4 3 SC301G PART 03213 Rev.2 SAFETY INSTRUCTIONS Your mower is only as safe as the operator! As with any
ALTERNATOR RACKS 135, 170 & 190 INSTRUCTIONS
 Figure A Item # Description Quantity 1 Alternator Rack 1 1 3 4 11 5 10 8 2 Lower Mount Kit (see detail) 2 3 16mm M5 Swivel-Mount Bolt 2 4 M7 Washer 2 5 M6 Lock Nut 2 6 Lock Washer 2 7 Swivel Mount 2 8
GRAVITY BIKE RACK ASSEMBLY & OPERATING INSTRUCTIONS
 GRAVITY BIKE RACK 94479 ASSEMBLY & OPERATING INSTRUCTIONS Due to continuing improvement, actual product may differ slightly from the product described herein. 3491 Mission Oaks Blvd., Camarillo, CA 93011
VOLLEYBALL SPIKE TRAINER. Assembly Instructions. Owner s Manual. Model # VST-200. Club Volleyball Gear. For height-adjustable Basketball Hoop Systems
 VOLLEYBALL SPIKE TRAINER Model # VST-200 Basketball Hoop System Not Included For height-adjustable Basketball Hoop Systems Assembly Instructions Owner s Manual Club Volleyball Gear 18434 Technology Drive,
MAGNETIC INDOOR CYCLING BIKE
 MAGNETIC INDOOR CYCLING BIKE SF-B1805 USER MANUAL IMPORTANT! Please retain owner s manual for maintenance and adjustment instructions. Your satisfaction is very important to us, PLEASE DO NOT RETURN UNTIL
Operating and maintenance manual Filter and reducing station Series / 1.0
 Operating and maintenance manual Filter and reducing station Series 961 04.2017 / 1.0 Original instructions ARCA Regler GmbH. All rights reserved. Cover picture background: Freepik.com ARCA Regler GmbH
OPERATOR'S MANUAL GRASS CATCHER GC-4D
 OPERATOR'S MANUAL MODEL GC-4D Metal Grass Catcher P/N 9054 GRASS CATCHER GC-4D 5 1 7 10 11 13 14 6 8 9 3 2 7 4 SC300G PART 032 Rev.1 SAFETY INSTRUCTIONS Your mower is only as safe as the operator! As with
BELT DRIVE INDOOR CYCLING BIKE SF-B1712 USER MANUAL
 BELT DRIVE INDOOR CYCLING BIKE SF-B1712 USER MANUAL IMPORTANT! Please retain owner s manual for maintenance and adjustment instructions. Your satisfaction is very important to us, PLEASE DO NOT RETURN
VOLLEYBALL SPIKE TRAINER. Assembly Instructions. Owner s Manual. Model # VST-400. Club Volleyball Gear
 VOLLEYBALL SPIKE TRAINER Model # VST-400 Wall-mount Volleyball Spike Trainer with 28 height adjustment range Assembly Instructions Owner s Manual Club Volleyball Gear 18434 Technology Drive, Morgan Hill,
OWNERS MANUAL. Model Shown with optional Primary Mooring Cleats. Portable Mooring System SAFETY OPERATION MAINTENANCE PARTS
 OWNERS MANUAL Model 2400 Shown with optional Primary Mooring Cleats. Portable Mooring System SAFETY OPERATION MAINTENANCE PARTS CAUTION: Before using your new Pier Tender, read rules for Safety, Operation,
T-016 ASSEMBLY MANUAL MODEL ROCK AND ROLL Main Street NE Minneapolis, MN
 MODEL T-016 ASSEMBLY MANUAL ROCK AND ROLL 5280 Main Street NE Minneapolis, MN 55421 1.877.226.7824 www.kurtkinetic.com COMPONENTS Tools Required for Assembly: 17mm Wrench or Adjustable Wrench When unpacking,
FLANGED TWO-PIECE BALL VALVES
 INTRODUCTION This instruction manual includes installation, operation, and maintenance information for FNW flanged split-body ball valves. This manual addresses lever operated ball valves only. Please
KMX Kompact Sports Trike
 KMX Kompact Sports Trike Assembly Instructions 1.0 Introduction Thank you for choosing KMX! When properly assembled and set up your KMX will provide many years of enjoyment. KMX Karts Ltd does its utmost
INSTALLATION AND OWNER S INSTRUCTIONS
 INSTALLATION AND OWNER S INSTRUCTIONS Select Series Adjustable and Fixed Height Goal Systems Momentum 60" Momentum 72" TABLE OF CONTENTS www.ballhog.com Safety Instructions... 2 Goal Specifications...
Owner s. product. Failure injury
 100-Ft. Hose Reel Cart Owner s Manual WARNING: Read and understand all instructions, warnings, and cautions before using this product. Failure to follow the instructions, warnings, and cautions may result
Model ASSEMBLY and OPERATING INSTRUCTIONS
 QUICK CHANGE AIR BRUSH KIT Model 93506 ASSEMBLY and OPERATING INSTRUCTIONS Due to continuing improvements, actual product may differ slightly from the product described herein. 3491 Mission Oaks Blvd.,
FLANGED TWO-PIECE BALL VALVES
 INTRODUCTION This instruction manual includes installation, operation, and maintenance information for FNW flanged split-body ball valves. This manual addresses lever operated ball valves only. Please
2018 ACCESSORY ATTACHMENTS OWNER S MANUAL
 2018 ACCESSORY ATTACHMENTS OWNER S MANUAL WWW.RADPOWERBIKES.COM We are here to help! Please contact us at SUPPORT@RADPOWERBIKES.COM or 1-800-939-0310 if you have questions. REV031418 Welcome Thanks you
Remington 700. Disclaimer Limited Warranty Satisfaction Guarantee Installation Instructions
 Remington 700 Disclaimer Limited Warranty Satisfaction Guarantee Installation Instructions WARNING: Failure to properly install your trigger and ensure proper safety functionality could result in an unsafe
222 Schwinn Recumbent Exercise Bike Parts List Full Size Hardware Chart Product Illustration Assembly Instructions
 222 Schwinn Recumbent Exercise Bike Parts List Full Size Hardware Chart Product Illustration Assembly Instructions FITNESS SAFEGUARDS AND WARNINGS Before starting any exercise program, consult with your
Dual Release Walkers 6291 Series. 1 General. 1.1 Symbols WARNING
 User Manual DEALER: This manual MUST be given to the user of the product. USER: BEFORE using this product, read this manual and save for future reference. Dual Release Walkers 6291 Series EN User Manual...page
IMPACT WRENCH ASSEMBLY AND OPERATING INSTRUCTIONS
 1 / 2 COMPACT AIR TWIN HAMMER IMPACT WRENCH 94802 ASSEMBLY AND OPERATING INSTRUCTIONS Due to continuing improvements, actual product may differ slightly from the product described herein. 3491 Mission
USER GUIDE TO POWER ASSISTED BIKES
 USER GUIDE TO POWER ASSISTED BIKES 1 PAGE CONTENTS Page. 3 Unpacking Page. 3-4 Easy steps to get started Page. 5 General Assembly Instructions Page. 6 Aligning H/Bars, Page. 7 Tightening pedals onto Crank
Item # in1 Rotating Table. Inch BILLIARDS AIR HOCKEY TABLE TENNIS
 Item # 45-6066 3-in1 Rotating Table 3 BILLIARDS AIR HOCKEY TABLE TENNIS 84 Inch ! WARNING: Rotating game should be done under adult supervision. Rotating table may cause a pinching hazard for young children
PILOT PEDAL DRIVE INSTRUCTIONS
 PILOT PEDAL DRIVE INSTRUCTIONS TABLE OF CONTENTS 1. INTRODUCTION 2. IMPORTANT SAFETY AND OPERATING INFORMATION 3. EQUIPMENT 3.1 Items Supplied 3.2 Tools Required 4. ASSEMBLY OF THE PEDAL DRIVE 4.1 Installing
PHOENIX MMXI 7 FOOT 3 IN 1 BILLIARD TABLE
 Phoenix MMXI 3 in 1 Billiard Table PHOENIX MMXI 7 FOOT 3 IN 1 BILLIARD TABLE Replacement Parts Order direct at or call our Customer Service department at (800) 5-7593 ext. 113 8 am to 4:30 pm Central Standard
FAILURE TO COMPLY WITH THE MANUFACTURER S INSTRUCTIONS CAN LEAD TO SERIOUS INJURY OR DEATH OF THE PASSENGER/RIDER!
 FAILURE TO COMPLY WITH THE MANUFACTURER S INSTRUCTIONS CAN LEAD TO SERIOUS INJURY OR DEATH OF THE PASSGER/RIDER! Installation instructions for the Yepp Mini The Yepp Mini is suitable for carrying children
CATERPILLAR XL G2 YEARS CONSTRUCTION MANUAL
 6-14 CTERPILLR XL G2 YERS CONSTRUCTION MNUL Length Max weight Time to build 120-168 cm / 47-66 inch 70 kg / 153 lbs 2 hours WRNING - IMPORTNT NOTICE TO PRENTS efore you start constructing and use our product,
Minnesota Park and Sports Turf Managers Association. November 16, 2016
 Minnesota Park and Sports Turf Managers Association November 16, 2016 Playground Injury Trends and Safety Bob Clarin, CPSI Playground Injury Trends Over 200,000 playground related injuries are treated
Please have your date code when inquiring about parts.
 We strive to ensure that our products are of the highest quality and free of manufacturing defects or missing parts. However, if you have any problems with your new product, D O NOT RETURN IT TO THE STORE,
6 digital caliper with case
 6 digital caliper with case Model 98563 Set up And Operating Instructions Diagrams within this manual may not be drawn proportionally. Due to continuing improvements, actual product may differ slightly
Installation Instructions
 Owner s Manual Installation Instructions It is extremely important that your ROCK SHOX fork is installed correctly by a qualified technician with proper tools. Improperly installed forks are extremely
1/2 Twin Hammer Composite. Air Impact Wrench ASSEMBLY AND OPERATING INSTRUCTIONS
 1/2 Twin Hammer Composite Air Impact Wrench 95098 ASSEMBLY AND OPERATING INSTRUCTIONS Due to continuing improvements, actual product may differ slightly from the product described herein. 3491 Mission
DAKOTA 2006 DUMP BOX ILLUSTRATED PARTS MANUAL
 DAKOTA 00 DUMP BOX ILLUSTRATED PARTS MANUAL Copyright 00 Dakota Peat and Equipment, Inc. p/n 0 INTRODUCTION To ensure optimum performance and safety, always purchase genuine DAKOTA replacement parts and
#59114 Rola 2-Bike Rack Carrier (Shown Assembled) (A) (C) (B)
 (A) (C) (B)") Use for Parts: #59114 Rola -Bike Rack System #59115 Rola 1-Bike Add-On TOOLS REQUIRED 10mm or 13/3 Socket & Wrench #59114 Rola -Bike Rack Carrier (Shown Assembled) Tray Attachment Hardware: (3) Plastic
Use for Parts: #59114 Rola -Bike Rack System #59115 Rola 1-Bike Add-On TOOLS REQUIRED 10mm or 13/3 Socket & Wrench #59114 Rola -Bike Rack Carrier (Shown Assembled) Tray Attachment Hardware: (3) Plastic
453 Series Steam Heated Vaporizing Regulator
 ADI 0453A Certified ISO 9001:2000 453 Series Steam Heated Vaporizing Regulator INSTALLATION AND OPERATION INSTRUCTIONS Before Installing or Operating, Read and Comply with These Instructions Controls Corporation
V O L L E Y B A L L S E T
 S E T Assembly & Installation Instructions 3 0 5 0 S. A L V E R N O N W A Y T U C S O N, A Z 8 5 7 1 3 5 2 0. 7 9 0. 7 0 4 0 8 0 0. 7 3 7. 5 3 8 6 F A X 5 2 0. 7 9 0. 7 1 2 7 i n t e r - f a b. c o m TABLE
Challenge Friends, Get Ranked and Earn Points with the FUTCHI_App Players
 The Ultimate Soccer Lawn Game Ultra Fun and Fast Way to Develop Ball Skills Challenge Friends, Get Ranked and Earn Points with the FUTCHI_App 1-12+ Players Age 10+ 1 FUTCHI_rebounder is the revolutionary
STYRIGGER PRODUCT MANUAL
 STYRIGGER PRODUCT MANUAL Thank you for choosing the Styrigger kayak and canoe stabilizer. A kayak or canoe equipped with a Styrigger (safety outrigger) is an excellent choice for a beginner or someone
CAUTION: WEIGHT ON THIS PRODUCT SHOULD NOT EXCEED 136KG / 300LBS
 OWNER S MANUAL Thank you for choosing the Sit N Cycle. We take great pride in producing this quality product and hope it will provide many hours of quality exercise to make you feel better, look better
OPERATIONS MANUAL IMPORTANT SAFETY INFORMATION
 OPERATIONS MANUAL IMPORTANT SAFETY INFORMATION Please read, understand and follow all safety information contained in these instructions prior to the use of this tool. Retain these instructions for further
COPY. **For U.S. and Canada Customers ONLY:** IF ASSISTANCE IS NEEDED,
 MODEL #73729 WARNING Failure to comply with any of the warnings in these instructions may result in serious personal injuries such as cuts, broken bones, nerve damage, paralysis, brain injury, or death.
PARK AVENUE 7' POOL TABLE WITH TABLE TENNIS & BENCHES ASSEMBLY INSTRUCTIONS
 PARK AVENUE 7' POOL TABLE WITH TABLE TENNIS & BENCHES ASSEMBLY INSTRUCTIONS NG2530PR THANK YOU! Thank you for purchasing this product. We work around the clock and around the globe to ensure that our products
Your IntroductIon to. Exceeding Your Expectations. Enhancing Your Earnings.
 Your IntroductIon to Exceeding Your Expectations. Enhancing Your Earnings. IntroductIon Each year, more than 200,000 kids are treated in hospital ERs for playground-related injuries. When it comes to a
OPERATING and MAINTENANCE INSTRUCTIONS MAXIS 6K Puller (M6K-M)
") OPERATING and MAINTENANCE INSTRUCTIONS MAXIS 6K Puller (M6K-M) READ AND UNDERSTAND ALL OF THE INSTRUCTIONS AND SAFETY INFORMATION IN THIS MANUAL BEFORE OPERATING OR 04/17 (M6K-M) SERVICING THIS TOOL TABLE
OPERATING and MAINTENANCE INSTRUCTIONS MAXIS 6K Puller (M6K-M) READ AND UNDERSTAND ALL OF THE INSTRUCTIONS AND SAFETY INFORMATION IN THIS MANUAL BEFORE OPERATING OR 04/17 (M6K-M) SERVICING THIS TOOL TABLE
Copyright Trek Bicycle Corporation 2005 All rights reserved
 i ii iii Aero Brake Levers Owner s Manual Table of contents Read this manual before you ride... 1 Introduction... 2 Inspect your brake levers regularly... 2 Adjusting aero brake levers... 2 Lubricating
Angled Sign Light with Shade
 Angled Sign Light with Shade Owner s Manual WARNING: Read carefully and understand all ASSEMBLY AND OPERATION INSTRUCTIONS before operating. Failure to follow the safety rules and other basic safety precautions
3M Liqui-Cel EXF-14x28 and 14x40 Series Membrane Contactor
 Membrane Contactors 3M Liqui-Cel EXF-14x28 and 14x40 Series Membrane Contactor Assembly and Disassembly Instructions 3M.com/Liqui-Cel TABLE OF CONTENTS I. Safety Information 3 II. Required Materials 4
Instruction Manual LIMITED 1 YEAR WARRANTY. Hydraulic Punch Driver Read this material before using this product.
 Instruction Manual Hydraulic Punch Driver 902-483 LIMITED 1 YEAR WARRANTY We make every effort to assure that its products meet high quality and durability standards, and warrant to the original purchaser
SASK-A-POLE OWNERS AND USERS MANUAL
 SASK-A-POLE OWNERS AND USERS MANUAL GENERAL INFORMATION The Saskatchewan Abilities Council s Sask-a-Pole accessibility and transfer aid is designed to help provide safe and easy access to chairs, beds,
SNOWDRIFTER G1 CONSTRUCTION MANUAL
 ch 7-14 SNOWDRIFTER G1 CONSTRUCTION MNUL YERS Length Max weight Time to build 98-125 cm / 39-49 inch 80kg / 176 lbs 2 hours WRNING - IMPORTNT NOTICE TO PRENTS efore you start constructing and use our product,
Pressure Relief Valve Instruction Manual
 CVR3-M0_062017 Pressure Relief Valve Instruction Manual MODEL: CVR3 SFA Companies 10939 N. Pomona Ave. Kansas City, MO 64153 Tel: 888-332-6419 * Fax: 816-448-2142 E-mail: sales@bvahydraulics.com Website:
AIR INLINE METAL SHEAR
 AIR INLINE METAL SHEAR ASSEMBLY and OPERATING INSTRUCTIONS 3491 Mission Oaks Blvd. / Camarillo, CA 93011 Copyright 1997 by Harbor Freight Tools. All rights reserved. No portion of this manual or any artwork
38 inches Fitness Trampoline
 38 inches Fitness Trampoline Assembly & User Instructions Visit Facebook Page @PlenyFit Online Assembly Video Important - Please read these instructions fully before assembly or using These instructions
S&S. Installation Instructions: S&S Stealth Air Cleaner Kit for Harley-Davidison Models With Stock Cable Operated Delphi EFI
 Instruction 510-0388 01-11-16 Version 1 Copyright 2016 by S&S Cycle, Inc. All rights reserved. Printed in the U.S.A. S&S Cycle, Inc. 14025 Cty Hwy G PO Box 215 Viola, Wisconsin 54664 Phone: 608-627-1497