Geometric Design of Junctions (priority junctions, direct accesses, roundabouts, grade separated and compact grade separated junctions)
|
|
|
- Claude Cox
- 5 years ago
- Views:
Transcription
 June")
1 Geometric Design of Junctions (priority junctions, direct accesses, roundabouts, grade separated and compact grade separated junctions) June 2017
2 TRANSPORT INFRASTRUCTURE IRELAND (TII) PUBLICATIONS About TII Transport Infrastructure Ireland (TII) is responsible for managing and improving the country s national road and light rail networks. About TII Publications TII maintains an online suite of technical publications, which is managed through the TII Publications website. The contents of TII Publications is clearly split into Standards and Technical documentation. All documentation for implementation on TII schemes is collectively referred to as TII Publications (Standards), and all other documentation within the system is collectively referred to as TII Publications (Technical). Document Attributes Each document within TII Publications has a range of attributes associated with it, which allows for efficient access and retrieval of the document from the website. These attributes are also contained on the inside cover of each current document, for reference. TII Publication Title TII Publication Number Geometric Design of Junctions (priority junctions, direct accesses, roundabouts, grade separated and compact grade separated junctions) Activity Design (DN) Document Set Standards Stream Geometry (GEO) Publication Date June 2017 Document Number Historical Reference N/A TII Publications Website This document is part of the TII publications system all of which is available free of charge at For more information on the TII Publications system or to access further TII Publications documentation, please refer to the TII Publications website. TII Authorisation and Contact Details This document has been authorised by the Director of Professional Services, Transport Infrastructure Ireland. For any further guidance on the TII Publications system, please contact the following: Contact: Standards and Research Section, Transport Infrastructure Ireland Postal Address: Parkgate Business Centre, Parkgate Street, Dublin 8, D08 DK10 Telephone: infopubs@tii.ie
 Publication Date: June 2017 Set: Standards Contents 1. Introduction... 1 2. Junction Types.")
3 TRANSPORT INFRASTRUCTURE IRELAND (TII) PUBLICATIONS TII Publications Activity: Stream: TII Publication Title: TII Publication Number: Design (DN) Geometry (GEO) Geometric Design of Junctions (priority junctions, direct accesses, roundabouts, grade separated and compact grade separated junctions) Publication Date: June 2017 Set: Standards Contents 1. Introduction Junction Types Road Safety Selection of Junction Type Geometric Design of Priority Junctions & Vehicular Access to National roads Geometric Design of Roundabouts Layout of Grade Separated Junctions Layout of Compact Grade Separated Junctions References Page i
4 Updates to TII Publications resulting in changes to roundabouts, grade separated and compact grade separated junctions) Date: June 2017 Amendment Details: This Standard supersedes: a) DN-GEO (TD 41-42) Geometric Design of Priority Junctions and Vehicular Access to National roads. b) DN-GEO (TD 16) Geometric Design of Roundabouts. c) DN-GEO (TD 22) Layout of Grade Separated Junctions. d) DN-GEO (TD 40) Layout of Compact Grade Separated Junctions. e) DN-GEO (TD 51) Segregated Left Turn Lanes and Subsidiary Deflection Islands at Roundabouts. f) DN-GEO (TD 10) Road Link Design for Type 2 and Type 3 Dual Carriageways. The details in relation to junctions on Type 2 and Type 3 Dual Carriageways have been incorporated. This standard combines the requirements of the above superseded standards into one consolidated standard for the geometric design of junctions. This version of the Standard supersedes the April 2017 Publication of. The principal changes from the April 2017 version of this Standard are as follows: Chapter 1 Definitions a) The definition of a near straight that is required downstream and upstream of diverge and merge noses as per Section 7.5 & 7.6 has been corrected to specify the Desirable Minimum Radius for the mainline design speed. Chapter 2 Junction Types a) Figure 2.4 updated with photograph showing channelising island in the minor road approach. b) Section d) updated to clarify that priority junctions incorporating traffic signals shall generally not be provided on national roads in rural areas. c) Section 2.4 a) has been updated to clarify that diamond junctions are not permitted on national roads in rural areas, however diamond junctions incorporating traffic signals at the connector road junction with the minor road are permitted in urban locations. Chapter 4 Selection of Junction Type a) Section has been revised to clarify that remedial measures at junctions on existing roads are required to be submitted as part of the Preliminary Design Report in accordance with DN-GEO Page ii
5 Chapter 5 Geometric Design of Priority Junctions and Vehicular Access to National Roads a) Figure 5.4 updated to reference Table 5.10: Direct Taper Length. b) Table 5.5: y Visibility distances from the minor road has been updated to include parameters for lower design speeds of 60km/h, 50km/h and 42km/h. c) The minimum circular corner radii in Section for left in-left out priority junctions on Type 2 Dual Carriageways and left in-left out junctions forming part of a compact grade separated junction have been revised. d) Section has been updated to clarify that channelising islands at left in-left out junctions shall be set back 0.6m from the lane markings. e) Figure 5.20 has been updated to apply to priority left in-left out junctions only with reference made to Chapter 8 for left in-left out priority junctions forming part of a compact grade separated junction. f) Section wording and Figure 5.27 updated to confirm ghost island turning lanes should normally be developed symmetrically about the centreline of the major road to and from the turning lane width at the tapers shown in Table 5.9. g) Additional wording added to Section and new Figure 5.25 added to clarify the required details where a right turn lane off the major road is provided at both junctions within a right/left staggered junction. h) Section 5.7 updated in relation to Merge and diverge auxiliary lanes and tapers on single carriageway roads. i) Section updated to clarify the hard shoulder opposite a ghost island junction shall be tapered to form a 1.5m hard strip over the length of the ghost island taper, figure 5.27 updated accordingly. j) Section updated to provide clarity in relation to the provision of diverge auxiliary lanes on Type 2 Single Carriageway roads. Chapter 6 Geometric Design of Roundabouts a) Section 6.2 has been updated to include a minimum distance between two roundabouts on a national road of 90m b) The requirements for the ICD of roundabouts contained in Section have been updated. c) A maximum entry path radius for roundabouts on rural national roads has been added to Section d) Section has been updated to allow for a relaxation of 50m on the provision of new priority junctions or direct accesses on Regional and Local roads as per Section Chapter 7 Layout of Grade Separated Junctions a) Urban Motorway details included in Tables 7.1, 7.2 and 7.6. b) Weaving calculation details for Urban Motorways included in Section 7.9. Page iii
6 c) Table 7.7 has been updated to relate the minimum radii for loops to the design speed of the mainline. d) Section 7.14 in relation to transitioning between a hard shoulder and hard strip at merges and diverges has been updated, figures and have been updated accordingly. Chapter 8 Layout of Compact Grade Separated Junctions a) New figure added for left in-left out junction forming part of a compact grade separated junction has been included. b) Corner radii for left in-left out junctions forming part of a compact grade separated junction have been updated and design details for compact grade separated junctions with diverge auxiliary lanes have been added to Section Date: September 2017 Amendment Details: The following minor amendments have been incorporated into the June 2017 version of this Standard: Chapter 4 Selection of Junction Type a) Section has been updated to state that low cost remedial measures at existing priority junctions require a Departure from Standards. Chapter 5 Geometric Design of Priority Junctions and Vehicular Access to National Roads b) Table 5.5: y Visibility distances from the minor road has been updated to include parameters for a design speed of 42km/h. Date: December 2017 Amendment Details: The following minor amendment has been incorporated into the June 2017 version of this Standard: Chapter 5 Geometric Design of Priority Junctions and Vehicular Access to National Roads a) Note 1 in Figure 5.13 Direct Access Bend In Crossing and Figure 5.14 Direct Access Bend Out Crossing have been updated to clarify the required x distance = 2.0m from the cycle facility as per b) The title of Figure 5.18 has been revised to Visibility envelopes for cycle route junctions with roads for clarity. Page iv
7 Contents Table 1. Introduction General Scope Implementation Relaxations and Departures Definitions Junction Types General Priority Junctions Roundabouts Grade Separated Junctions Compact Grade Separated Junctions Major Interchanges Road Safety General Road User s Limitations Visibility Road Marking and Signing Lighting Landscaping Enhancing road layouts at existing priority junctions to improve safety Safety Barriers Detailing of Severed Roads Selection of Junction Type General Selection of Junction Type Design Vehicle Improvement of Existing Junctions Geometric Design of Priority Junctions & Vehicular Access to National roads General Siting of priority junctions and direct access to national roads Priority Junction Layouts Provision for Non-Motorised Users Direct Accesses Page v
8 5.6 Geometric Design of Priority Junctions on Single and Dual Carriageway Roads Diverging/Merging Tapers and Lanes at Junctions Priority Junctions on climbing lanes Drainage and Crossfall Roads with Hard Shoulders Specific Geometric Design Layouts for Dual Carriageways Geometric Design of Roundabouts General Siting Landscaping within a Roundabout Selection of Roundabout Type Provision for Non-Motorised Users (NMUs) Geometric Design of Roundabouts Visibility Crossfall Road Marking and Signing Kerbing and Verge Width Heavy Goods Vehicles Segregated Left Turn Lanes at Roundabouts Layout of Grade Separated Junctions General Principles Design Process Layout Options Design Principles Merges General Principles Diverges General Principles Geometric Design Parameters Successive Merges or Diverges Within Interchanges Designing Weaving Sections Traffic Flows Geometric Standards Loops Sight Distances Hardstrip and Hardshoulder Page vi
9 7.15 Lane Drop/Lane Gain and Through Carriageway Interchanges General Safety Layout of Compact Grade Separated Junctions Design Procedure Geometric Standards Layout Options Safety Specific Road User Requirements References TII Publications (Standards) Transport Infrastructure Ireland Publications Traffic Sign Regulations UK, Design Manual for Roads and Bridges Standards Design Vehicles Design of Channelising Islands Design of a Compound Curve Junction Analysis Procedure Worked Example Page vii
10 1. Introduction 1.1 General This Standard sets out the standards and advice for the geometric design of junctions. The design principles and geometric parameters which shall be considered by Designers when developing safe, traffic efficient junction layouts and vehicular accesses onto new and improved National roads are outlined. This standard does not cover the design requirements and methodology for the geometric layout of major interchanges (including the expansion and improvement of existing interchanges and junctions). This is set out in DN-GEO-03041: The Design of Major Interchanges. 1.2 Scope This standard sets out the design requirements and methodology which shall be followed when developing junction and access layouts for Motorways and all-purpose national roads, both dual and single carriageways, taking into consideration traffic operation, physical elements, economic and safety factors and the requirements of non-motorised users (NMUs). This standard also provides guidance on junction and access layouts on regional and local roads which form part of a national road scheme. This standard provides recommendations on the siting of junctions with respect to topography and driver expectations and limitations. This standard shall not be used for the design of road markings and signage at junctions. Road markings and signage for junctions on national roads shall be designed in accordance with the requirements of the Traffic Signs Manual (TSM) issued by the Department of Transport. 1.3 Implementation This Standard shall be used for the design of junction layouts on all new or improved national roads. The design of national, regional and local roads which are constructed or improved as part of a national road scheme shall also be developed in accordance with this standard. 1.4 Relaxations and Departures The standards contained in this document represent the maximum/minimum levels of provision whose incorporation in the junction design would achieve a desirable level of performance in average conditions in terms of traffic safety, operation, economic and environmental effects and sustainability. In most cases, with care, designs can be achieved which do not utilise the lowest levels of design parameters given. At some locations on new roads or major improvements, however, it may not be possible to justify even the lowest levels of design parameters in economic or environmental terms, due to high costs, low traffic levels, and environmental damage, etc. In such cases, sufficient advantages might justify either a Relaxation within the standards or, in more constrained locations, a Departure from the standards. Relaxations and Departures should be assessed in terms of their effects on the economic worth of the scheme, the environment, and the safety of the road user. Further details on the use of Relaxations and Departures are as follows. Page 1
11 1.4.1 Relaxations within Standard In difficult circumstances, the Designer may relax a standard set out in this document, where specifically provided for within the text (refer to DN-GEO for all combinations of allowable relaxations from standard). The Designer shall record the fact that a Relaxation has been used in the design and the corresponding reasons for its use. The record shall be endorsed by the Designer responsible for the scheme. The Designer shall report all Relaxations incorporated into the design as part of the project report at the end of each project management phase (refer to the national roads Project Management Guidelines) Departures from Standards In exceptional situations, Transport Infrastructure Ireland (TII) may be prepared to agree to a Departure from Standards where the standard, including permitted Relaxations, is not realistically achievable. Designers faced by such situations and wishing to consider pursuing this course shall discuss any such option at an early stage in design with TII. Proposals to adopt Departures from Standard must be submitted by the Designer to TII and formal approval received BEFORE incorporation into a design layout. Further information can be found in GE-GEN Departures from Standards and Specification. 1.5 Definitions The terminology used in this Standard are defined as follows: a) Auxiliary Lane: An additional lane at the side of the mainline carriageway to provide increased merge or diverge opportunity or additional space for weaving traffic. b) Central reserve: The area which separates the carriageways of a dual carriageway or Motorway. Note that this includes any offside hard strips. c) Channelising Island: A raised kerbed island constructed (a) within the bellmouth of a priority junction to guide traffic movements into and out of the minor road (b) at a roundabout junction entry/exit to direct traffic onto or from a roundabout circulatory carriageway or (c) at a segregated left turn lane, located between an entry and exit on the same roundabout arm and shaped so as to direct and also separate opposing traffic movements onto and from a roundabout circulatory carriageway. d) Compact Connector Road: In the context of compact grade separated junctions a two way connector road between the major and minor roads. e) Compact Grade Separated Junction: A grade separated junction designed in accordance with Chapter 8 of this standard. f) Connector Road: A collective term for slip roads, link roads, interchange links and loop roads. Page 2
12 g) Cycle Facilities: Refers to all types of measures which improve conditions for cyclists and include: i. Cycleways: a public road or proposed public road reserved for the exclusive use of cyclists or cyclists and pedestrians. ii. iii. iv. Cycle Track: Part of a road, including part of a footway or part of a roadway, which is reserved for the use of pedal cycles and from which all mechanically propelled vehicles, other than mechanically propelled wheelchairs, are prohibited from entering except for the purpose of access. Cycle Lane: part of the carriageway of a road reserved primarily for use by cyclists. The cycle lane forms part of the road and it is located within the contiguous road surface. A cycle lane can also be referred to as an on-road cycle track. Shared Use Cycle and Pedestrian Facilities: A Cycle Track or Cycleway that is provided for both cycle and pedestrian use. v. Shared roads with Motor Vehicles: A road under low speed/low vehicular traffic flow conditions that is also provided for both cycle and pedestrian use. vi. vii. Greenway: a Cycleway that caters for pedestrian and cyclists in a recreational environment Cycle Network: is a defined collection of routes which connect key origins and destinations in a specified area for cyclists. h) Downstream: That part of the carriageway(s) where the traffic is flowing away from the section under consideration. i) Dual Carriageway: A divided road with one or more (generally two) lanes in each direction with carriageway widths of up to 7.5m (for two lanes in each direction i.e m lanes). j) Dumb-bell Link Road: A short link road connecting two roundabouts either side of a dual carriageway or motorway at a grade separated junction (Refer to Chapter 7). k) Designer: The organisation responsible for undertaking and/or certifying the design. l) Direct Access: An access that connects directly to a national road including field accesses and accesses serving one or more properties as described in Chapter 5 national road. m) Fork: At an at-grade junction, usually on a link road within a grade separated interchange, where the road splits into two. Usually both diverging roads have equal status and diverge from the single approach at similar angles. n) Ghost Island Junction: A junction within which an area is marked on the carriageway, shaped and located so as to direct traffic movement. o) Ghost Island on Merges/Diverges: An area of the carriageway suitably marked to separate lanes of traffic travelling in the same direction on both merge and diverge layouts. The purpose of the ghost island at a merge is to separate the points of entry of two slip road traffic lanes. p) Heavy Goods Vehicle (HGV): Vehicles designed and constructed for the carriage of goods. Heavy Goods Vehicle refers to vehicle categories N2 (maximum mass between 3.5 tonnes and 12 tonnes) and N3 (maximum mass exceeding 12 tonne). Page 3
13 q) Interchange: A grade separated junction that provides free flow of traffic from one mainline carriageway to another. Refer to. r) Interchange Link: A connector road, one or two way, carrying free flowing traffic within an interchange. s) Lane Gain: A layout where a merging connector road becomes a lane or lanes of the downstream carriageway. t) Lane Drop: A layout where a lane or lanes of the upstream carriageway becomes the diverging connector road. u) Link Road: A connector road separate from the mainline carriageway, which is used to connect the mainline carriageway to the local road network. v) Loop: A connector road, one or two way, which is made up of the elements of the loops shown in Chapter 7 and which passes through an angle in the range of approximately 180 to 270 degrees. The loop is considered to extend to the end of the near straight length of road contiguous with the back of the diverge or merge nose. w) Low Radius: A radius between the minimum loop radius in Table 8.2 and the Two Steps below Desirable Minimum Radius with Superelevation of 7% as required by DN-GEO for the slip road, link road or interchange link design speed. x) Mainline/Major Road: The carriageway carrying the main flow of traffic (generally traffic passing through a junction or interchange). y) Major Interchanges: Interchanges provided at the intersection of motorways, dual carriageways and national roads to provide free flow for all movements accommodated. The free flow arrangement removes the conflict points, however they are generally larger and more complex than the type of junction described in this standard and must be designed in accordance with DN-GEO (see Section 2.6) national road. z) Minor road: A minor road is a road which has to give priority to the major road. aa) bb) cc) dd) ee) ff) Near Straight: A length of road with a radius no less than the Desirable Minimum Radius with Superelevation of 5% as required by DN-GEO for the mainline design speed. Nose: A paved area, approximately triangular in shape, between a connector road and the mainline at a merge or diverge. Non-motorised Users (NMUs): Pedestrians, cyclists and equestrians, including people with disabilities (see definition of People with Disabilities ) and other mobility impaired users (e.g. people with luggage, with children, or pregnant women). Non-physical Segregated Left Turn Lane: A left turn lane from adjacent roundabout entry and exit, shaped to direct and separate the traffic movement from the roundabout circulatory carriageway by means of an island delineated using road markings only. Parallel Merge/Diverge: A layout where an auxiliary lane is provided alongside the mainline carriageway. This term incorporates the auxiliary lane, the nose and the taper. Physical Segregated Left Turn Lane: A left turn lane from a roundabout entry to the first exit, separated from the roundabout entry, circulatory carriageway and exit by means of Channelised islands (See definition of Channelised Islands). Page 4
14 gg) hh) ii) jj) kk) ll) Priority Junction: An at grade junction between a major road and a minor road whereby the traffic on the minor road must yield to the traffic on the major road. Reserved Lane: A lane carrying traffic that is segregated from weaving traffic. Road Authority: The authority responsible for the road construction or improvement scheme. Rural Road: A road outside of built-up areas including: i. Single Carriageway roads; ii. iii. All-purpose Dual Carriageway roads; or Motorways. Single Carriageway: Two-lane single carriageway road with lane widths of up to 3.65m. Skew or Y-Junction: An at-grade junction of two roads, at which the minor road approaches the major road at an oblique angle and terminates at the junction. mm) Slip Road: A connector road within a junction between a mainline carriageway and the local road network, or vice versa, which meets the local road network at-grade. Traffic using a slip road usually has to yield to traffic already on the mainline or on the local road network. nn) oo) pp) qq) rr) ss) tt) uu) vv) Taper Merge/Diverge: A layout where merging or diverging traffic joins or leaves the mainline carriageway through an area forming a funnel to or flare from the mainline carriageway. Type 1 Dual Carriageway: A divided all-purpose road with a minimum of two lanes and hard shoulder in each direction constructed to the geometric standards of DN-GEO and CC-SCD Type 1 Single Carriageway: An all-purpose road with a 3.65m lane in each direction constructed to the geometric standards of DN-GEO and CC-SCD Type 2 Dual Carriageway: A divided all-purpose road with two lanes and hard strip in each direction constructed to the geometric standards of DN-GEO and CC-SCD Type 2 Single Carriageway: An all-purpose road with a 3.50m lane in each direction constructed to the geometric standards of DN-GEO and CC-SCD Type 3 Dual Carriageway: A divided all-purpose road with two lanes in one direction of travel and one lane in the other direction, constructed to the geometric standards of DN-GEO and Standard Construction Details CC-SCD The two-lane section alternates with a one-lane section at intervals of 2km approximately. Type 3 Single Carriageway: An all-purpose road with a 3.00m lane in each direction constructed to the geometric standards of DN-GEO and CC-SCD Upstream: That part of the carriageway(s) where traffic is flowing towards the section in question. Urban All-Purpose Road: An all-purpose road within a built up area which can be either a single carriageway or a dual carriageway. ww) Urban Motorway: A motorway with a speed limit of 100kph or less within a built up area. Page 5
15 xx) yy) zz) Urban Relief Road: An urban road where the primary purpose of the road is to facilitate the movement of traffic and avoid congestion or other obstacles to movement. Urban Street: A road within a built-up area where the primary purpose of the road is to provide direct access to premises. Weaving Section: The length of the carriageway between a successive merge or lane gain and diverge or lane drop, where vehicles leaving the mainline at the diverge or lane drop have to cross the paths of vehicles that have joined the mainline at the merge or lane gain. Page 6
16 2. Junction Types 2.1 General This section describes the various junction types permitted for use on new national road schemes. Photographs and/or figures are used to portray the general layouts for each junction type. All road marking and signing details in photos and figures are diagrammatic only and shall not be relied upon for road marking and signing layout design. A junction is formed whenever two or more roads cross or meet. Junction types are characterised by their basic geometric configuration. There are two main categories of junction which can be further subdivided as follows: a) At Grade Junctions i. Priority Junctions ii. Roundabouts b) Grade Separated Junctions i. Full Grade Separated Junctions ii. Compact Grade Separated Junctions Junction types can vary greatly in arrangement, shape, and degree of channelisation. Junctions are often categorised based on the number of roads intersecting and their angle of intersection, the way in which right-turning and left-turning movements are accommodated, the way in which Non-Motorised Users (NMUs) are catered for, and the presence and shape of channelising islands. This Standard provides advice and requirements for each junction type. Table 2.1 outlines some advantages and disadvantages or limitations for the different junction types discussed in this document. Designers should always consider whether the layout they are designing could be upgraded to provide more capacity, or if this could prove necessary in the future. Page 7
17 Table 2.1: Advantages and disadvantages by junction type Junction Type Advantages Disadvantages/ Limitations Priority Junction Through traffic on the major road is not delayed. All turning movements have potential to create conflict. Land take and construction cost reduced relative to more complex junction layouts. Right turn movements onto and off the major road can lead to serious collisions. Not suitable for high flows and turning movements. Major road through traffic speeds need to be controlled. Roundabout Grade Separated Junctions Compact Grade Separated Junction Simplifies conflicts and provides a clear indication of priority. Facilitates right turning flows and U-turns. Can facilitate a change in road standard/cross section. Turning vehicles are removed from the major road. Major road through traffic is not delayed. Can facilitate large turning flows. Minimises land take. Design enforces low traffic speeds through the junction. Suitable for use where high major road and minor road through traffic. Can be used on single carriageway roads and Type 2 and Type 3 Dual Carriageways. Major road traffic must yield to traffic from the right which may cause delays. Dominant flows on one approach may lead to excessive delays on other approaches. Land take and construction costs high relative to less complex junction layouts. Not suitable for single carriageway roads, Type 2 and Type 3 Dual Carriageways. Not suitable for Motorways or Type 1 Dual Carriageways. Page 8

18 2.2 Priority Junctions Priority junctions are the most common form of junction control, with the traffic on the minor road giving way to the traffic on the major road. The advantage of priority junctions is that through traffic on the major road is not delayed. However, high speeds and/or overtaking traffic manoeuvres on the major road should be discouraged at priority junctions. For more heavily used junctions, more complex forms of junction layout are required. Priority junctions can be categorised by the configuration of the minor road(s) in relation to the major road as described below. Priority junction types are described in further detail in Chapter T-Junction An at-grade junction of two roads, at which the minor road joins the major road approximately at right angles as shown in Figure 2.1. Figure 2.1: Simple T-Junction Staggered Junction An at-grade junction of three roads, at which the major road is continuous through the junction, and the minor roads connect with the major road so as to form two opposing T-junctions at a minimum distance apart (Figure 2.2). Page 9
. Crossroads are not permitted on national roads. Figure 2.3: Crossroads Page 10")
19 Figure 2.2: Simple Right/Left Stagger Crossroads An at-grade junction of two roads that cross approximately at right angles (Figure 2.3). Crossroads are not permitted on national roads. Figure 2.3: Crossroads Page 10
 Simple Junction A T- or staggered junction without a ghost island in the major road. Channelising islands can be provided in the minor road approach (Figure 2.1).")
20 2.2.4 Traffic Control at Priority Junctions Priority junctions can be further distinguished by the type of traffic control used at the junction. These traffic controls include: a) Simple Junction A T- or staggered junction without a ghost island in the major road. Channelising islands can be provided in the minor road approach (Figure 2.1). b) Ghost Island Junction An at-grade junction, usually a T- or staggered junction, within which an area is marked on the carriageway, shaped and located so as to direct traffic movement by providing means of a right turning lane. A channelising island shall be provided in the minor road approach (Figure 2.4). Figure 2.4: Ghost Island Junction c) Left-In/Left-Out Junction An at-grade junction where left turn movements only are permitted onto and off the minor road. Sign posting and physical lane segregation are used to prevent any right turning movements. Figure 2.5 shows an indicative layout for a left in/left out junction at a direct access. d) Signalised Priority Junctions Priority junctions incorporating traffic signals shall generally not be provided on national roads in rural areas and require a Departure from Standards where they are proposed for incorporation into a national road scheme. Page 11

21 Figure 2.5: Left-In/Left-Out Junction Skew Junctions Priority junctions where the minor road approaches and intersects the major road at an oblique angle are not permitted on national roads. The design criteria outlined in Chapter 5 requiring suitable curvature to be applied to the minor road approach so as it connects to the major road at 90 in order to eliminate any driver confusion as to which route has priority must be applied at such junctions. 2.3 Roundabouts Roundabouts are junctions with a one-way circulatory carriageway around a central island. Vehicles on the circulatory carriageway have priority over those approaching the roundabout. The principal objective of roundabout design is to minimise delay for vehicles whilst maintaining the safe passage of all road users through the junction by simplifying conflicts and providing a clear indication of priority. This is achieved by a combination of geometric layout features that, ideally, are matched to the flows and speeds in the traffic streams and to any local topographical or other constraints that apply. Roundabouts are most suitable when traffic flows from all legs are balanced and there is a high density of right turn movements. Dominant flows on one approach may lead to excessive delays on the subsequent approach. Roundabouts can be Single Lane Roundabouts or Multi-lane Roundabouts. Each roundabout type is described in further detail in Chapter Single Lane Roundabouts A Single Lane Roundabout (Figure 2.6) has single lane entries and exits on each arm. The width of the circulatory carriageway shall be designed such that it is not possible for two cars to pass one another. Page 12

22 Figure 2.6: Single Lane Roundabout NOTES: Entries can be more perpendicular on single lane roundabouts to promote lower speeds Central overrun area may be required Road markings to be designed in accordance with the TSM Page 13

23 2.3.2 Multi-lane Roundabouts Multi-lane Roundabouts (Figure 2.7) require designers to achieve multi-lane entries and exits on each arm and allow two cars to travel on the circulatory carriageway. Figure 2.7: Multi-lane Roundabout NOTES: Lane markings on circulatory carriageway may or may not be required depending on roundabout size Road markings to be designed in accordance with the TSM 2.4 Grade Separated Junctions A grade separated junction is a separation of the levels at which major and minor roads cross each other in order to reduce traffic conflicts. A grade separated junction involves the use of an at-grade junction at the commencement or termination of slip roads. There are two main types of grade separated junction; Dumb-bell roundabout and Half-Cloverleaf. These junction types are mandatory on Motorways and Type 1 Dual Carriageways and are described in the following sections. Diamond junctions as described previously in DN-GEO are not permitted on national roads in rural areas, however diamond junctions incorporating traffic signals at the connector road junction with the minor road are permitted in urban locations. Grade Separated Junction types are described in further detail in Chapter 7. Page 14

24 2.4.1 Dumb-Bell Roundabout The dumb-bell roundabout junction comprises two roundabouts situated either side of the major road. The minor road crosses over or under the major road at one location using a bridge see Figure 2.8. A Departure from Standards shall be required for a half diamond dumb-bell junction where access onto and off of the major road is provided in one direction only. Figure 2.8: Dumb-bell Grade Separated Junctions Half-Cloverleaf A half-cloverleaf is used where site conditions are such that a dumb-bell roundabout junction cannot be provided and the use of all four quadrants is not possible for the provision of a full interchange in accordance with DN-GEO (see Figure 2.9). The at-grade junction element should normally utilise two roundabouts. The half-cloverleaf requires the use of only 2 quadrants, which if possible should be chosen so as to minimise any right turn movements where priority junctions are provided. Consideration should be given to future improvement when considering this layout. Page 15
25 Figure 2.9: Half Cloverleaf Grade Separated Junctions Page 16
26 2.5 Compact Grade Separated Junctions An alternative to at-grade junctions are Compact Grade Separated Junctions. This provides a junction to a standard intended to enforce low traffic speeds and minimise land take. See Figures 2.10 and Compact grade separated junctions are suitable for use on Type 2 dual carriageways where mainline flows are high but turning traffic may be relatively low. They are also suitable for use on Type 3 dual carriageways and on single carriageway roads where there is a high level of through traffic to reduce the conflict points for turning traffic. The objectives of compact grade separated junctions are to:- a) reduce the environmental impact by providing a compact junction layout with less landtake; b) extend the use of grade separation on the national road network; The benefits that a compact grade separated junction is intended to provide when compared to an atgrade junction are:- a) improvement of safety by reducing the number and severity of collisions; b) separation of high through traffic from minor road off the major road. c) a safer means of crossing high speed routes for all road users, including NMUs; d) regulation and continuity of vehicle speed for minor route traffic through the junction at a level appropriate to the layout standards; e) removal of right turn manoeuvres from high speed roads; The layout of the compact grade separated junction will in many cases be dictated by the constraints imposed by the existing junction to be modified, or site topography in the case of new routes. Page 17
27 Figure 2.10: Compact Grade Separated Junction with roundabouts Figure 2.11: Compact Grade Separated Junction with Priority Junctions Compact Grade Separated Junction types are discussed in further detail in chapter 8. Page 18
28 2.6 Major Interchanges Major interchanges will generally be required at the intersection of motorways and dual carriageway national primary roads to provide free flow for all turning movements accommodated. The free flow arrangement removes the conflict points however they are generally larger and more complex than the types of junction described in this standard and must be designed in accordance with DN-GEO Page 19
29 3. Road Safety 3.1 General TII is responsible for securing a safe and efficient national road network. The performance and safety of roads are strongly influenced by the layout and frequency of junctions and accesses. A junction layout should give road users (including NMUs) a clear understanding of what is required of them. Poor layouts lead to road user confusion, indecisiveness and rash decisions that could contribute to collisions. The design should provide: a) advance notification of the layout on the approach to a junction; b) conspicuous junction locations and layouts; c) an understanding of permitted changes to the direction of travel; d) an understanding of other traffic movements; e) avoidance of potential hazards. Thus, in considering the design components, designers should ensure that as road users approach a junction they are able to easily understand the junction form and layout so that they can select their path through the junction accordingly. Ease of use should be checked in night-time conditions. Road safety should be considered at the earliest stage of design to ensure the satisfactory operation of a junction for all users, including cyclists and pedestrians, and to ensure that allowances are included for physical elements, such as signing, lighting equipment, columns, feeder pillars, buried cables, cable ducts, draw pits, etc. 3.2 Road User s Limitations An appreciation of road users performance is essential to proper road design and operation. The suitability of a design rests as much on how safely and efficiently road users are able to use the road as on any other criterion. Motorist s perception and reaction time set the standards for sight distance and length of transitions. The driver s ability to understand and interpret the movements and crossing times of the other vehicles, drivers and NMU s using the junction and their associated reactions is equally important when making decisions. The designer needs to keep in mind the user s limitations and therefore design junctions so that they meet user expectation. Sequences of junctions should not involve many different layout types. Safe road schemes are usually straightforward, containing no surprises for the road users. A length of route or bypass containing roundabouts, ghost islands, simple priority junctions, grade separation and different provision of NMU facilities would inevitably create confusion and uncertainty for drivers and may result in collisions. The sun can detrimentally affect a road user s vision. Designers should attempt to avoid the need for drivers to approach a manoeuvre or a decision point looking into the rising or setting sun. The designer should consider the potential for dazzle and silhouetting of signs when the sun is low in the sky. Page 20
30 3.3 Visibility For safety, road users shall be able to see any potential hazard in time to slow down or stop comfortably before reaching it. It is necessary therefore to consider the driver's line of vision in both the vertical and horizontal planes and the stopping sight distance for the vehicle or NMU at the relevant design speed. Visibility requirements for the different junction types are included in the relevant chapters of this standard. 3.4 Road Marking and Signing Signs and road markings are provided at junctions to warn, regulate and guide traffic. The provision and layout of traffic signs and road markings is an integral part of the junction design process and must be considered at an early stage and it may affect the junction geometric design. Traffic signs and road markings can significantly affect the safety and the capacity of a junction. All road markings and signage for national roads shall be designed in accordance with the requirements of the Traffic Signs Manual (TSM) issued by the Department of Transport, which includes guidance on the appropriate use and requirements of road markings at various types of junctions. Positioning of signs within the junction and on the mainline approach to junctions must be carefully considered so that they do not interfere with road user s visibility. It is essential that there is no overprovision of signing leading to sign clutter. Road markings are used to channelise traffic and, where required, to indicate a dedicated lane. Lane direction signs complementing the advance direction signs at entries can be beneficial where heavy flows occur in a particular direction. Where cycle facilities are provided road markings and signs must be adequately provided at the entry and at suitable distances along the cycle route. Yield signs and road markings shall be provided to indicate vehicle priority at junctions. 3.5 Lighting Road lighting at junctions shall be provided in accordance with DN-LHT and IS EN It is a requirement on all rural motorways and dual carriageways to light the conflict points at grade separated junctions i.e. the roundabouts at the end of the slip roads. The lighting shall extend 60m from the roundabout along each entry or exit slip road without lighting the mainline carriageway. In general, the lighting layout should provide the highest levels of illumination at traffic conflict areas and NMU crossing areas including the immediate traffic approach where illegal movements are most likely. 3.6 Landscaping The design of landscaping and street furniture within the road boundaries shall be carried out in consultation with appropriate specialists. The Designer shall consider the maintenance implications and where the responsibility for maintenance is passed to a third party, maintenance standards must be agreed. If third parties wish to enhance the standard of planting or landscaping at a junction, this shall be with the agreement of TII, and shall not compromise visibility sightlines or safety. Page 21
31 Apart from the amenity benefits, the landscape treatment of junctions can have practical advantages from a traffic engineering point of view. These can be: a) To make the layout of a junction more obvious to approaching traffic. b) To provide reference points or features for road users waiting to enter the junction, aiding them in judging the speed of drivers approaching or in the junction. This can be useful where a junction is located in an open landscape, where there is a lack of natural reference points. c) To provide a positive background to the road signs around the junction. It is essential that visibility within the required envelopes remains unobstructed by vegetation and street furniture. The areas required for visibility envelopes should be either hard surface or planted with grass or species having a low mature height and low maintenance characteristics. Too much visibility can be as problematic as too little and this can also be addressed by careful landscape treatment. 3.7 Enhancing road layouts at existing priority junctions to improve safety Various methods which have been shown to enhance safety at junctions include: a) Where there is a history of collisions involving right turning vehicles, the installation of a ghost island on single carriageway roads to shelter right turning traffic and discourage overtaking. b) The replacement of a rural crossroads by a staggered junction. This has been shown to reduce collisions by 60%. c) The installation of channelising islands on the minor road approaches at existing rural crossroads. This has been shown to reduce collisions (mainly minor road overrun) by about 50%. 3.8 Safety Barriers Safety Barriers shall be provided at junctions in accordance with DN-REQ where required. Designers must consider the position of such barriers and their potential for obstructing visibility when assessing the visibility requirements at a junction as outlined in this standard. 3.9 Detailing of Severed Roads Where an existing road is severed by a new road scheme, resulting in the creation of a cul-de-sac, the approach to the cul-de-sac should be detailed so as to direct through traffic on to the through road. The access to the cul-de-sac therefore, shall be detailed so as to require a deliberate turning manoeuvre to prevent drivers assuming the previous road layout still applies. A typical well designed cut-off should include the following: a) The character of the road on the approach to the cut-off point shall be changed by narrowing to between 3 and 4m for the last 100m (depending on the volume of traffic on the cut-off road). b) All lining shall be removed within 100m of the cut-off point. Page 22


32 c) All old signage relevant to the existing road shall be removed. d) New signage shall be put in place to inform a driver that the road they are entering is now a cul-de-sac. The signage should be placed such that it is conspicuous to a driver approaching the junction that leads to the cul-de-sac. e) The possibility of see-through between old road and new road must be assessed both by day and by night. If a see-through issue exists then a screening fence of suitable height needs to be erected, possibly supplemented by planting of mature scrubs, to remove the problem. f) At some locations creation of a turning circle at the end of the road may be the best treatment; in other cases, just narrowing the road, removing the lining and treating the area in front of the cut-off point may suffice. Figure 3.1 illustrates both good and bad practice examples for the detailing of severed roads. Figure 3.1: Detailing of severed road arrangements Page 23
33 4. Selection of Junction Type 4.1 General As an overarching principle TII supports a junction strategy which seeks to prevent a proliferation of side road junctions along national roads with speed limits of greater than 60 km/h. The application of this strategy will maintain the capacity, efficiency and safety of the national road network. Recommendations are given in this Standard on the geometric design of the important elements of any junction or access onto the national road network, and how the individual elements can be brought together to produce an overall scheme. Among the aspects of design critical to junction selection which should be taken into consideration and included in the decision framework are: a) traffic flows (operational efficiency); b) safety; c) collision history; d) sight distances; e) consistency; f) location; g) maintenance; h) environmental effects; i) land take; j) capital cost; k) economic assessment; l) provision for NMUs. The operation of junctions on the national road network must be readily understood by all road users and therefore sequences of junctions should ensure a consistency of junction type application and not involve many different layout types. It is therefore essential that designers prepare a junction strategy when introducing or modifying a junction(s) on a road scheme and evaluate their effect upon the safety and operational performance of the network as a whole. The siting of a junction will require careful consideration of the local demand taking into account the existing road network so as to ensure an adequate degree of access is provided to the national road. 4.2 Selection of Junction Type The flow chart shown in Figure 4.1 illustrates the typical stages involved in the selection of a suitable junction on a national roads scheme. As these stages are being completed the Designer shall complete the junction analysis procedure form included in Figure 4.3. If, at any point in the design procedure, the junction design is unsatisfactory, then the designer should return to the previous stage in the procedure to refine the design. In certain cases, this process could result in a change in junction type or form. Page 24

34 Figure 4.1: Flow Chart Outlining Junction Selection Procedure (Paragraphs to 4.2.5) Page 25
35 4.2.1 Stage 1 Initial Choice of Appropriate Junction Form The most appropriate type of junction to be used depends on a number of factors but primarily safety and operational performance, and will be subject to the evaluation of design year traffic movements at the junction, the nature and proportions of large vehicles and a road safety audit. The following section presents the most appropriate junction types based on projected traffic flows on both the major road and minor road. These values can be used for an initial assessment of the most appropriate junction type; however, the final junction type will be subject to traffic analysis by the designer to assess the capacity based on the projected turning movements at the junction Priority Junctions Simple priority junctions are the most appropriate junction type for all local accesses on single carriageway roads. On dual carriageways simple junctions must be restricted to left in/left out only with the exception of single lane sections of Type 3 Dual Carriageways where right turns off the major road are permitted. Further guidance in relation to simple junctions on Type 3 Dual Carriageways is given in Chapter 5. For junctions with a lightly trafficked minor road the provision of a simple priority junction is the most appropriate junction type where the projected traffic flows (2-way Annual Average Daily Traffic - AADT) are less than those presented in Table 4.1 for both the major road and the minor road. Where traffic flows fall within the ranges outlined in Table 4.1, the provision of a ghost island junction is the most appropriate junction type. The final junction type will be subject to traffic analysis by the designer to assess the capacity based on the projected turning movements at the junction. Table 4.1: Flow Ranges Ghost Island junctions Major road AADT Minor road AADT < 5,000 > 600 < 5,000 5,000-10,000 > 450 < 3,000 > 10,000 > 300 < 1,500 Note: AADT values provided should only be used as an initial assessment of the most appropriate junction type, the final junction arrangement shall be informed by a detailed analysis of peak hour flows (see Appendix D). On Type 2 and Type 3 Single Carriageway schemes, nearside passing bays shall be provided at all simple priority junctions that do not warrant a ghost island right turn lane. At traffic flows greater than those noted in Table 4.1, the provision of an alternative junction design such as a roundabout, compact grade or full grade separated junction should be considered Roundabouts Roundabouts work most efficiently when vehicular flows are reasonably balanced between the arms, but they may also be the optimum choice in other cases subject to traffic analysis by the designer based on the projected turning movements at the junction. Roundabouts should be designed to match forecast peak hourly flows. The capacity of roundabouts is determined by a number of factors such as their geometric design and whether they are single or multi-lane roundabouts. Entry width and sharpness of flare as described in Chapter 6 are the most important geometric parameters that determine capacity. Page 26
36 Grade Separated Junctions Grade separation to the standards contained in Chapter 7 of this document can be economically justified at design flows above 30,000 AADT on the major road, depending on turning traffic. It is possible to justify grade separation to lower design flows of 20,000 AADT on the major road, but again this is dependent on an analysis of turning traffic at the junction Compact Grade Separated Junctions Compact grade separation, as discussed in Chapter 8, may be considered for lower traffic flow situations on the major road and effectively extends downwards the range of flows and conditions over which grade separation could be justified economically to around 12,500 AADT on the major road. They appear to be suitable for use for mainline flows between approximately 12,500 AADT and 30,000 AADT. They are normally associated with very low flows (generally below 10% of mainline flow) on the minor road with the majority of traffic on both the major road and minor road being through traffic. Compact grade separated junctions can provide a suitable solution over a roundabout where through traffic on both the major and minor road is relatively high and turning traffic is relatively low Stage 2 Consider Layout/Size of Junction Type Ordinarily, the 2-way AADT design year flows are used to consider junction layout to be provided. However, if there is evidence in the area of the junction of high seasonal variations, or if short, intense peaks in the traffic flows are likely, then the designer shall consider using the appropriate seasonal or peak hour flows in the initial capacity assessment to select a junction layout. A traffic study may be required to confirm that the selected junction type is appropriate at the discretion of TII. Traffic studies shall be conducted as per the guidance in the TII Project Appraisal Guidelines. Computerised methods shall be used by the designer to assess capacity and demonstrate that the particular junction layout chosen is appropriate for the traffic flows and turning movements. It is not realistic to calculate queue lengths and delays manually, reference should be made to PE-PAG Project Appraisal Guidelines for National Roads Unit 5.1. The range of reference flows developed should be used to produce trial designs for assessment. A flow to capacity ratio (RFC) of not greater than 75% is generally required when considering carriageways with design speeds of greater than 60 km/h. The selection of the junction type should be based on a consideration of the particular site characteristics and should be consistent with adjacent junctions upstream and downstream. Consideration needs to be given to the type of NMU facility incorporated into the junction. The type of crossing will depend primarily on the AADT on the road to be crossed. On a road carrying less than 12,000 AADT, an at grade crossing is acceptable while on roads with greater than 12,000 AADT, the provision of a grade separated crossing should be considered, taking into account the projected number of NMU s and the availability of land. The design of any grade separated NMU facility should be in accordance with DN-STR (Design Criteria for Footbridges) and DN-GEO (Subways for Pedestrians and Pedal Cyclists Layout and Dimensions) Stage 3 Assess and Refine Preliminary Design Stage 3 involves addressing all of the relevant safety issues to ensure as safe a design as possible including consideration of the following: Road users' specific requirements. A preliminary signing, street furniture, vehicle restraint system, and landscape design within the junction. Page 27
37 At this point, the key geometric parameters of the junction design should be assessed and a geometric layout developed in accordance with this standard. The swept path of vehicles likely to use the junction shall then be checked using a computer based programme to ensure safe movements through the intersection Stage 4 Assemble and Model/Check Proposed Design Having established the various components of the junction design, the Designer shall check that the capacity of the junction is still adequate. This includes examining if the junction is located on a route with a wide variation in flow and turning movements, particularly those having prolonged daily peak periods. The check should be undertaken prior to assembling the component parts to form a complete junction. At this stage a Swept Path analysis shall be undertaken to confirm driveability using an appropriate software programme. The swept path of vehicles likely to use the junction shall be checked using a computer based swept path analysis programme by the Designer to ensure that all vehicle movements can be accommodated. The swept path analysis shall be appropriate for the vehicle using the junction. See Appendix A for details of approved Design Vehicles. Heavy Goods Vehicles (HGVs) may be selected as the Design Vehicle, in which case they should enter and depart from the junction in the correct lane(s). However, where these vehicles and other vehicles operating under restricted access conditions only use the junction occasionally, it may be acceptable for the design to be based on them encroaching into other traffic lanes. This may cause some inconvenience to other road users, but may be acceptable where there is a low frequency of occurrence. Both the tracking width and swept path width shall be considered in the design of the road for use by the Design Vehicles. Tracking width lines delineate the path of the vehicle tires as the vehicle moves through the turn. Swept path width lines delineate the path of the vehicle body as the vehicle moves through the turn and will therefore always exceed the tracking width. Refer to Figure 4.2. Before proceeding to final design, a driveability check should be performed, to assess firstly the smooth assembly of the components of the junction design. This should include a computer generated visual assessment of the junction on all approaches from the road user s eye view. Secondly, the junction should be considered within the context of its adjacent links and those adjacent junctions on the particular route. As a whole, the layout should be designed to suit the anticipated traffic pattern, with the principal movements following smooth vehicular paths Stage 5 Final Design A design shall be developed for the junction layout in accordance with the relevant sections of this standard. 4.3 Design Vehicle The use of computer software to predict the swept path of large vehicles is mandatory in the design of all junction types. The vehicle type used shall be appropriate to the predicted use of the junction or direct access. The vehicle tracking software should be capable of allowing vehicle speed to be measured. The Designer shall ensure that the junction design can accommodate a driver negotiating the junction at a minimum speed of 5km/hr for direct accesses and 15km/hr for priority junctions. At all other junctions, Designers shall demonstrate using tracking software that the design vehicles included in Appendix A can travel at the design speed set out in this standard. Page 28
38 All of the geometric parameters outlined in this standard for the design of priority junctions have been developed to cater for a 16.5m long articulated vehicle, whose turning width is greater than the vehicle dimensions permitted in the existing Road Traffic (Construction, Equipment and Use of Vehicles) Regulations, or likely to be permitted in the near future. In cases where hard strips are present, the design vehicle may encroach on these while turning, and at some simple junctions with local roads, the design vehicle may encroach into opposing traffic lanes. Figure 4.2: Tracking Width and Swept Path of Vehicle 4.4 Improvement of Existing Junctions Junctions are improved to increase traffic flow or to provide safety improvements. For junctions where traffic flow patterns have changed since design, a traffic assessment of the existing and anticipated traffic flows should be conducted as per the current TII Project Appraisal Guidelines. Improvements could include additional lanes, change in traffic control. For junctions where flow patterns have changed since design but geometric improvements are not justified based on the traffic assessment, additional road markings may be appropriate. Road markings may help to: a) improve throughput at high levels of traffic flow; b) cater for particularly high turning movements; c) smooth the flow at junctions with irregular geometry; Page 29
39 d) improve safety; e) improve junction efficiency; f) increase clarity to road users of the junction layout Existing Priority Junctions At existing rural priority junctions, the cost of upgrading a simple junction to provide a right turning facility will vary from site to site. However, upgrading should always be considered where the right turning flow into the minor road exceeds 120 vehicles per day, a right turning collision problem is evident, or where vehicles waiting on the major road to turn right inhibit the through flow and create a hazard. For existing roads where the flow levels are not great enough to justify the provision of a ghost island or roundabout and a right turning problem remains, consideration may be given to the use of other low cost measures such as a nearside passing bay where the road width allows through vehicles to pass drivers waiting in the centre of the major road to turn right, albeit at a reduced speed. Where there is not enough road width for a passing bay, then warning arrow markings may be used, with two directional arrows on one stalk. Such measures shall require a Departure from Standards Existing Grade Separated Junctions At existing grade separate junctions where significant delay is incurred during peak periods as a result of high exit or entry flows, it may be appropriate to convert the layouts to non-standard layouts such as a ghost island diverge layout based on the results of traffic modelling. Use of such layouts require a Departure from Standards. Page 30
 ( )")
40 Figure 4.3: Junction Analysis Procedure Form Major road Data Collection Intersecting Road Junction Analysis Procedure Classification and Name Date: Project: Location: AADT Current Year Design Year ( ) ( ) Design Speed (Km/h) Junction Type New Existing Site Visit Yes: No: Date of Site Visit (if applicable): Functional Characteristics Part 1 (General Information for all Intersections) Collision Analysis Access Requirements (Including NMU Requirements and Level of Usage) Access Control Future Development Vehicle Design Type (Include any Special Design Vehicle Details) % HGV s Part 2 (Specific Information for More Detailed Analysis) Posted Speed (Km/h) Junction Layout & Turning Movement Diagram Include Layout with all approaches clearly labelled. Direction of flow and flow ratios to be clearly identified. Worked example included in Appendix D to this document. Notable Constraints due to Upstream/Downstream Junction Yes: No: Notes: Proposed Improvements to Other Roads (that would impact the traffic movement at this location) Geometric Characteristics Road Geometry on all approaches To be attached in an appendix to this document. Is design compliant with the standards Desirable Stopping Sight Distances Yes: Achievable Stopping Sight Distances Mainline Horizontal Curvature Profile gradient on mainline % Intersecting Roadway % Other Characteristics Traffic Management Measures Impact on Utilities Impact on Right of Way Recommendation of Type of Junction Treatment based on Functional, Geometric and Other Characteristics Scope of Modelling Required Local Junction Modelling Micro-simulation Modelling Designer: Date: Approved: Date: Worked example included in Appendix D. Page 31
41 5. Geometric Design of Priority Junctions & Vehicular Access to National roads 5.1 General This Chapter describes the geometric design of priority junctions and direct accesses for application to new and improved junctions on national roads both dual and single carriageway roads. 5.2 Siting of priority junctions and direct access to national roads General A saving in collisions may be achieved, and an improvement made in operational performance, by reducing the number of lightly trafficked minor road connections onto major roads. The cost effectiveness of connecting such routes together with a link road before they join a new major road should always be investigated Horizontal Alignment Ideally, priority junctions and direct accesses onto national roads shall not be sited where the major road is on a sharp curve (below Desirable Minimum R in accordance with DN-GEO-03031). However, where the siting of a priority junction or access on a curve is unavoidable, T-junctions should be sited with the minor road on the outside of the curve and desirable minimum Stopping Sight Distance (SSD) in accordance with DN-GEO can be achieved for a vehicle on the major road approaching the junction. Figure 5.1: Junction located on the inside of a sharp curve New or altered direct accesses or priority junctions shall not be sited at any location where the desirable minimum SSD envelope of the national road falls outside the paved surface of the road. The paved surface includes hard strips if present. It also includes the hard shoulder at accesses where the stop line is positioned at the back of the hard shoulder. Direct accesses shall also not be sited within overtaking sections of new single carriageway roads as defined in DN-GEO Page 32
42 Problems have been experienced with priority junctions where the major road is on a curve and the minor road is at an acute angle, which can be misleading to drivers who perceive that the minor road retains priority. In such circumstances, the minor road approach should be re-aligned to connect to the major road at 90 in order to eliminate any driver confusion as to which route has priority. Figure 5.2: Examples of minor road alignment at junctions The provision of new priority junctions or direct accesses on minor roads shall not be permitted within 90m of a roundabout or priority junction on national roads; this may be reduced to 50m as a relaxation on Regional and Local roads. See figure 5.3. Figure 5.3: Clearance to minor road/junction at roundabout or priority junction Page 33
43 5.2.3 Vertical Alignment New or altered junctions and accesses at or near crests should be avoided where the shape of the junction or access would not be immediately apparent to the driver on the national road, or where there is restricted forward visibility. Care should be taken not to provide visibility on minor roads much in excess of the desirable minimum as this can divert the driver's attention away from road users on the major road in the immediate vicinity towards those approaching in the far distance. It is also essential that other road users can equally see oncoming vehicles; particularly where vehicles cross the raised footway in front of pedestrians/cyclists Visibility At driver's eye level, there shall be a clear view from the junction or access over the immediate area of the junction or access and its connection to the national road. Direct accesses shall only be sited where they do not encroach on the visibility requirements of adjoining direct accesses or junctions in regular use. This will determine the minimum spacing of new accesses. However, a minimum staggered distance of 20m shall be provided at all times. Signs, street furniture and planting should be located and designed so as not to obstruct visibility Junctions and Direct Accesses on Climbing Lanes Priority junctions and direct accesses to national roads shall not be located on climbing lane sections. 5.3 Priority Junction Layouts Table 5.1 shows the priority junction forms considered suitable for various major road carriageway types in rural situations. This table should be used as a starting point in choosing the most appropriate type of priority junction to use at a particular site. Table 5.1: Possible junction types for different major road carriageway types Junction/Direct Access Type Carriageway Type Simple (Fig. 2/1) Ghost Island (Fig. 2/4) Standard Single Carriageway Yes Yes No Yes Yes No Type 1 Dual Yes No No No No No Type 2 Dual Yes No No No No No Type 3 Dual Yes No No Yes No No Motorway No No No No No No T-Junction Staggered Junction Crossroads Left in/left out junctions and direct accesses only (see DN-GEO for more details by road type) Simple junctions (such as the simple T-Junctions) are appropriate for most minor junctions on single carriageway roads but left in/left out junctions are the preferred option as they reduce conflicts on the national road network. On dual carriageways, simple junctions shall be restricted to left in/left out only, except at single lane sections of Type 3 Dual Carriageways where a right turning facility off the major road (see Figure 5.28) may be provided as a Departure from Standards. Right turn manoeuvres onto the major road from the minor road shall not be permitted. Page 34
44 The decision to provide a right turning facility shall be made in accordance with the guidance contained in Chapter 4. The choice of type of right turn facility to be used, however, will depend on the particular site characteristics and results of traffic modelling of the turning movements at the junction Simple Priority Junction Where a simple priority junction is provided on a single carriageway road with no hard shoulders, a nearside passing bay as detailed in Figure 5.4 shall be provided to allow through traffic on the major road pass a vehicle waiting to turn right. The total length of the nearside passing may need to be increased where it is anticipated that HGVs will be turning off the major road. Figure 5.4: Priority Junction with Nearside Passing Bay for Roads without Hard Shoulders Ghost Island Ghost island junctions may be used on new single carriageway roads, or in the upgrading of existing junctions to provide right turning vehicles with a degree of shelter from the through flow. They are highly effective in improving safety for turning traffic on the major road. The use of ghost island junctions on rural single carriageway roads can, in certain circumstances, pose safety problems. In situations where overtaking opportunity on the major road on either side of the junction is restricted, the presence of a widened carriageway, albeit with hatch markings, could result in overtaking manoeuvres which may conflict with right turning movements into and out of the minor road. On single carriageway roads where overtaking opportunity is limited, ghost island junctions should be sited on non-overtaking sections, as defined in DN-GEO Page 35
45 5.3.3 Left Diverge Loops For right turning movements of low volume where signing is not required, an alternative measure is a left hand diverging lane loop as shown in Figure 5.5. This type of junction should only be used where the minor road is providing local access only i.e. very low turning movements with users who are familiar with the layout and where the road layout may lead to overtaking through a simple priority junction if provided. Figure 5.5: Priority Junction with Left Hand Diverging Lane Loop for Right Turning movements Crossroads The use of a crossroads is not allowed on rural national roads and shall be regarded as a Departure from Standard Staggered Junctions A staggered junction with a right/left stagger, where minor road traffic crossing the major road first turns right, proceeds along the major road and then turns left, is preferred to left/right staggers because traffic turning between the minor roads is less likely to have to wait in the centre of the major road. The use of left/right staggered junctions is a Departure from Standard. Figure 5.6: Staggered junctions The stagger distance is the distance along the major road between the centrelines of the two minor roads. Page 36
46 For all staggered priority junctions, the minimum stagger distance between the centreline of the junctions shall be 50m. It shall be provided on all new staggered junctions, including the upgrade of rural crossroads. The maximum stagger distance between centreline of the priority junctions (excluding residential and agricultural accesses) is listed in Table 5.2 below. Junctions with distances exceeding these values shall be treated as two separate junctions. Table 5.2: Maximum Stagger Distances for Junctions per Road Speed Limit Maximum Distance Between Speed (km/h) Centres of Staggered Junctions (m) Provision for Non-Motorised Users Provision must be made for the specific requirements of non-motorised road users in the design of priority junctions providing access to National roads Priority Junctions with minor road AADT <4,000 At priority junctions, where the AADT of the side road is less than 4,000 vehicles, crossing facilities shall be a bend out crossing as demonstrated in Figure 5.7. The priority at these junctions should lie with vehicular traffic. Signs should be provided on the road warning motorists of the upcoming crossing facility. The bend out crossing junction increases the space between the cycle track crossing point and the main carriageway. This allows space for motorised vehicles turning off the major road before they encounter the cycle crossing facility. The distance between the edge of the main carriageway and the crossing facility shall be between 10 and 15 metres. The bend out junction treatment includes a straight approach for cyclists to ensure that cyclists are provided with full visibility on entry to the junction treatment. The horizontal radii of 10 metres on the cycle facility shall be introduced to encourage lower cycle speeds on approach to the junction. A colour contrast treatment should be provided along the cycle route warning cyclists of the upcoming conflict with motorised traffic as illustrated in Figure 5.7. Page 37
 For one-way off road cycle tracks crossing roads with AADT <4,000 it is possible to provide a bend in junction treatment as a Departure from Standard")
47 Figure 5.7: Bend Out Crossing (minor road AADT <4,000) For one-way off road cycle tracks crossing roads with AADT <4,000 it is possible to provide a bend in junction treatment as a Departure from Standard where the off-road cycle facility is directed on road at a minimum distance of 30 metres or greater before the junction. The cycle facility continues through the junction with the same priority as the mainline traffic. A bend-in junction treatment is not acceptable for two-way cycle facilities as exiting vehicular traffic may not expect cyclists arriving from the opposite side of the road. Figure 5.8: Bend in minor road junction (one way cycle track) Page 38

48 5.4.2 Priority Junctions with minor road AADT > 4000 At priority junctions, where the AADT of the side road is greater than 4,000 vehicles, crossing facilities shall be a bend out crossing with a central island. This type of facility can be used for both one-way and two way off road cycle facilities. The priority at these junctions is with vehicular traffic. The provision of a central island will allow cyclists to cross the side road in two stages improving safety and convenience for cyclists. The central island shall be a minimum of 3.5 metres in width to accommodate a waiting cyclist safely. Road markings and signs should be provided on the road warning motorists of the upcoming crossing facility. The distance between the edge of the main carriageway and the crossing facility for a bend out junction shall be between 10 and 15 metres. The bend out junction treatment shall include a straight approach to cyclists to ensure that cyclists are provided with full visibility on entry to the junction treatment. The horizontal radii of 10 metres on the cycle facility shall be introduced to encourage lower cycle traffic speeds on approach to the junction treatment. A colour contrast treatment should be provided along the cycle route warning cyclists of the upcoming conflict with motorised traffic. Figure 5.9 demonstrates a bend out crossing with a central island. Figure 5.9: Bend Out Crossing with a Central Island Page 39
49 5.5 Direct Accesses The overriding principle is that direct vehicular access onto national roads shall be avoided as far as practicable. Where direct vehicular access onto national roads cannot be avoided, it shall be provided such that the visibility envelope from the access does not overlap with the visibility envelope from any other access/junction. Should an overlap occur, a local road connecting both accesses shall be provided with a single direct access onto the national road Existing Direct Access Where an existing national road is to be improved on-line, there are likely to be existing accesses. Where possible these accesses should be relocated to connect to an existing regional or local road and accesses combined as described above. Where this is not practicable, the layout of the access onto the new road should be designed in accordance with the geometric standards for a new or altered access described in the following sections. Any such layout which does not achieve the geometric standards for a new or altered access shall require a Departure from Standard. Any application which results in a material increase in the volume of traffic or a material change in the type of traffic entering or leaving a national road shall be carefully considered. Generally, a material increase is considered to be if the turning traffic flows would increase by 5% or more, although there may be cases when it is important to consider smaller increases Geometric Layouts of Small Direct Accesses Table 5.3 gives a number of basic direct access layout types and their associated approximate levels of use. Three layouts are proposed for the following circumstances on single carriageway roads. a) Layout 1: Field access b) Layout 2: Access to dwellings c) Layout 3: Left in/left out These are illustrated in Figures 5.10, 5.11 and All other direct accesses shall be designed as a priority junction in accordance with this Standard. Field accesses and accesses to dwellings are regarded as a Departure from Standard on Dual Carriageway Roads. Table 5.3: Recommended Standard Access layouts Field Access Access to Dwellings Left in/left Out Direct Access Layout Traffic using the access AADT Less than 10 movements a week Less than 150 movements a week Less than 150 movements a week Layout suitable for carriageway configuration Single 1 Single Single & Dual 1 May be used on Dual Carriageways where maintenance access to attenuation ponds and pollution control areas are taken directly off the mainline. Note: These figures are recommendations and indicate the approximate level at which alternatives for connections should be considered. Designers should look carefully at the safety implications involved in providing the alternative connection. Page 40
50 Figure 5.10: Direct Access Layout 1 Field Access Figure 5.11: Direct Access Layout 2 Access to Dwellings Page 41
51 Figure 5.12: Direct Access Layout 3 Left In/Left Out Entrance Gates Across Direct Access Entrance gates across a direct access shall be set back to accommodate one vehicle in the access, clear of the main running lane and preferably clear of the footway/cycle facility. The vehicle to be accommodated should be of the largest type to use the access on a regular basis, (which in the case of agricultural vehicles may include a trailer). Wherever possible, gates should open away from the road and where this is not possible; the set-back should be increased to allow for the gates to open unimpeded Non-Motorised Users at Direct Accesses In rural situations, a cycle facility will need to cross direct accesses such as farm and house entrances. As a general objective, the priority at these crossings should lie with the cyclists and it is preferable that the alignment of the cycle facility is retained through and past the access. Visibility requirements for motorised vehicles at direct accesses shall be in accordance with requirements set out in this document and the x distance shall be measured from the nearside edge of the carriageway without the need to accommodate the cycle facility. Additionally, the access will require a visibility envelope setback of 2.0 m ( x distance) from the cycle facility with a stopping sight distance based on the design speed of the cycle facility as set out in Table 5.7. There will be situations where the cycle facility may need to bend in or bend out to accommodate the private entrance. The provision of a bend in cycle facility at a private entrance is best suited to oneway cycle tracks, however it can be applied to a two-way cycle tracks subject to the provision of an absolute minimum 0.5 m carriageway separation distance Figure 5.13 demonstrates a bend in crossing associated with a direct access on the public road. The provision of a bend out cycle facility requires sufficient set back to allow a single vehicle to wait between the main carriageway and the cycle crossing point. This distance will be based on the maximum size of the vehicle using the direct entrance and shall be 5.0 metres if the direct entrance serves a private house and 15.0 metres if serving a farm entrance. Figure 5.14 demonstrates a bend out crossing associated with a direct entrance on the public road. Page 42


52 Figure 5.13: Direct Access Bend In Crossing Figure 5.14: Direct Access Bend Out Crossing The cycle track pavement construction must be carried across the private entrance to clearly indicate priority to cycle traffic and the road entrance should be at the same level as the cycle facility. Cycle symbol road markings should be provided at the crossing to reinforce the arrangement and a colour contrast treatment should be provided along the cycle route warning cyclists of the upcoming conflict with motorised traffic. Page 43
53 5.6 Geometric Design of Priority Junctions on Single and Dual Carriageway Roads General This section outlines the geometric design properties and features to be considered in the design of priority junctions and accesses associated with single and dual carriageway roads Design Speed Geometric standards for junctions are related to the traffic speed of the major road, and for new roads this is the design speed as defined in DN-GEO Visibility General Traffic from either a minor road or direct access has to join or cross the major road when there are gaps in the major road traffic streams. It is therefore essential that drivers emerging from a minor road or direct access shall have adequate visibility in each direction to see the oncoming major road traffic in sufficient time to permit them to make their manoeuvres safely. The visibility requirement for drivers emerging from a minor road or direct access is to the high object (1.05m) on the major road as defined in DN-GEO This concept also applies to major road traffic turning right into the minor road or direct access. For Dual Carriageways, egress out of left in/left out junctions and accesses only requires visibility to the right Minor road/direct access The required visibility parameters to be determined by the designer for drivers approaching a junction with a single or dual carriageway road from a minor road or direct access are outlined in Figure 5.15a and b. Figure 5.15a: Visibility Standards (single carriageway) Page 44
54 Figure 5.15b: Visibility Standards (dual carriageway) The designer shall ensure drivers approaching the junction from the minor road or direct access shall have unobstructed visibility of the junction from a distance corresponding to the desirable minimum SSD for the design speed of the minor road, as described in DN-GEO This corresponds to the z distance as shown on Figures 5.15a and b. This allows drivers time to slow down safely and stop. The visibility envelope shall be widened to include any Yield or Stop sign. From a point measured 15m along the centreline of the minor road or direct access from the continuation of the line of the nearside edge of the paved surface (including hard strip or hard shoulder) of the major road, the designer shall ensure an approaching driver shall be able to see clearly the junction form, and those peripheral elements of the junction layout as shown in Figures 5.15a and b. This provides the driver with an idea of the junction form, possible movements and conflicts, and possible required action before reaching the major road. The distance back along the minor road or direct access from which the full visibility is measured is known as the x distance. It is measured back along the centreline of the minor road or direct access from the continuation of the line of the nearside edge of the paved surface (including hard strip or hard shoulder) of the major road. The x distances on the minor road for visibility measurements shall be as defined in Table 5.4. In difficult circumstances the x distance may be taken as a Relaxation as provided in Table 5.4. Page 45
55 Table 5.4: x Distances on the minor road for visibility measurements Major road use Minor road use Standard x Distance(m) All roads All junctions and accesses, Stop control Desirable Minimum 3.0 All roads Cycleway Desirable Minimum 4.0 All roads Cycleway Absolute Minimum 2.0 National roads Simple Junctions, Stop control Relaxation 2.4* Regional & Local Roads All junctions and accesses, Yield control (where there are no relaxations associated with the junction layout) Desirable Minimum Max. 9.0 Regional & Local Roads Accesses, Lightly trafficked Relaxation 2.0 All roads All junctions and accesses Desirable Maximum 9.0 From the point x metres back from the major road a driver approaching the junction along the minor road shall be able to see clearly points to the left and right on the nearer edge of the major road running carriageway at a distance given in Table 5.5, measured from its intersection with the centreline of the minor road. This is called the y distance and is defined in Figure 5.15a and b. Table 5.5: y Visibility distances from the minor road Design Speed of major road(km/h) y Distance(m) On national roads the full y distance must be achieved to the high object 1.05m Visibility standards with a curved major road If the line of vision from the approach road lies partially within the major road paved area, it shall be made tangential to the nearer edge of the major road paved carriageway (including hard shoulder or hard strip), as shown in Figure 5.16a and b. Page 46
56 Figure 5.16a: Visibility standards with a curved single carriageway major road Figure 5.16b: Visibility standards with a curved dual carriageway major road Page 47
57 Maximum Visibility Envelope Although the y distance shall always be provided, there is little advantage in increasing it, as this too can induce high approach speeds and take the attention of the minor road or direct access driver away from the immediate junction conditions. Increased visibility should not be provided to increase the capacities of various turning movements One-way major road If the major road is one way, a single visibility envelope in the direction of approaching traffic will suffice. If the minor road serves as a one way exit from the major road, no visibility envelopes will be required, provided that forward visibility for turning vehicles is adequate Parking Dangerous conditions arise if vehicles obstruct visibility by parking within visibility envelopes. Where necessary, parking and access shall be controlled to prevent this. The Designer shall ensure that the positioning of lay-bys, bus stops, traffic signs, environmental barriers, vehicle restraint systems, and other street furniture does not interfere with the drivers' visibility requirements It is important to ensure that developments serviced by a new direct access do not lead to parking on the major road in the vicinity of the access, to the detriment of the safe passage of vehicles on both the access and the national road. On developments where this is likely to be an issue should be installed to prevent such parking Direct Access Crossing a Footway Where an emerging vehicle crosses a footway at a lightly used direct access - for example from the driveway of a single dwelling pedestrians may not have sufficient warning of its approach where there is no clearly formed differentiation in the level between the footway and the vehicle crossing point. Under these conditions, the designer shall provide visibility envelopes to the back of the footway, 2m on either side of the centre of the access, from 2m back from the back edge of the footway along the centreline of the access as shown in Figure The driver's eye height shall be taken as 1.05m and the object height at the back of footway shall be taken as 0.6m to make clear the presence of a small child. Figure 5.17: Visibility at Back of Footway Crossing Page 48
58 Visibility at Cycle Route Junctions Where the minor road is a cycle route, the required x distance on the cycle facility on the approach to a road shall be as set out in Table 5.6 and Figure The appropriate y distance depends on the design speed of the major road, as set out in Table 5.5. Figure 5.18: Visibility envelopes for cycle route junctions with roads Table 5.6: Values used as set back distances (X) from edge of carriageway X distance (m) Description of Use Cycle route approach to a road Desirable Minimum Cycle route approach to a road Absolute Minimum Where a cycleway or track intersects with another cycle facility the required visibility envelope is dependent on the design speed of the cycle facility and the Y distance is that presented under in Table 5.7 for Minimum Stopping Sight Distance. Table 5.7: Stopping Sight Distances Design Speed (km/h) 50 km/h 30 km/h 10 km/h Minimum Stopping Sight Distance (m) Page 49
59 5.6.4 Approach Gradients Gradients on minor roads shall be in accordance with DN-GEO On direct accesses, gradients greater than 10% approaching the major road are a Departure from Standard. The gradient on the minor road immediately next to the major road should be considerably less, and a "dwell" area of at least 15m shall be provided immediately adjacent to the major road carriageway. Where site conditions are particularly difficult this area may be reduced to 10m as a Relaxation. In the case of a direct access to dwellings, it may be reduced to 3m as a Relaxation. A combined relaxation in dwell area and approach gradient is not regarded as a departure. The gradient for the dwell area shall lie between plus and minus 2.5%. In difficult situations, this may be increased to between plus and minus 4% as a Relaxation Corner Radii It is recommended that the minimum circular corner radius at simple junctions in rural areas where no provision is made for HGVs should be 10m. Where there is frequent use by large commercial vehicles (e.g. near a quarry or industry frequently accessed by large vehicles), the minimum circular corner radius shall be as follows: a) For vehicles entering the minor road, the corner radii shall be 13m followed by a 1:10 taper for a distance of 25m measured along the line of the minor road from the nearside edge of the major road. b) For vehicles entering the major road from the minor road, the corner radii shall be 13m followed by a 1:10 taper for 25m measured along the line of the major road from the corner line of the minor road. This is shown in Figure c) 13m at ghost island junctions and Type 3 Dual Carriageway priority junctions, with tapers of 1:6 over a distance of 30m. d) 13m at simple staggered junctions, with tapers of 1:8 over a distance of 32m. e) 20m radius for left-in/left-out priority junctions, except on Type 2 Dual Carriageways where the minimum exit radius off the mainline shall be 40m. f) 40m exit radius off the mainline and 20m entry radius onto the mainline for left inleft out priority junctions forming part of a compact grade separated junction. Refer to Chapter 8 for details. The values in a) to d) above are minimum values and a swept path analysis shall be carried out in accordance with Chapter 4 at all at-grade junction locations to establish circular corner radii for the junction appropriate for its use. In addition, the above minimum radii only apply where there are no nearside diverge lanes. Where HGVs comprise a significant proportion of the turning movements (e.g. where a quarry or industry is located on the side road), use of the compound curve is recommended. Details of the design of a compound curve are included in Appendix C of this document. Page 50
60 Figure 5.19: Design of Corner Radii for Rural Simple Junctions, Ghost Island Junctions & Simple Staggered Junctions Carriageway Widths A minimum 0.5 metre hard strip shall be provided throughout all junction layouts, corner radii and associated tapers Through Lanes At ghost island junctions on single carriageways, the through lane in each direction shall not be greater than 3.65m wide, exclusive of hard strips, but shall not be less than 3.0m wide on rural roads Layout at Left In/ Left out Priority Junctions For Left In / Left out priority junctions, the layout shall be as shown in Figure The left turn only channelising island should be set back 0.6m from the back of the hard shoulder or hard strip. Channelising islands shall be set back 0.6m from the junction lane marking. Page 51
61 Figure 5.20: Major/minor road Junction for Left Turn Only Manoeuvres Channelising Islands at priority junctions On a minor road approach of nominal width 7.0m or less, where a channelising island is provided on a single carriageway in accordance with , both lanes shall be 4.0m wide at the point where the hatched markings begin. Channelising islands shall be set back 0.6m from the lane marking. At the point where the channelising island commences, the widths on either side of each lane shall be as follows: a) 4.0m on the approach to the major road, exclusive of hard strips and 0.6m set back. b) 4.5m on the exit from the major road, exclusive of hard strips and 0.6m set back. c) These dimensions are shown on Figure Page 52
62 Figure 5.21: Minor road approaches for right and left turning movements If there are no channelising islands in the minor road, the nominal approach width should continue up until the tangent point of the corner radii to join the edge of the major road running carriageway. At skew junctions the centreline of the minor road shall have a minimum radius of 50m that meets the major road nearside channel at right angles. Prior to the 50m radius, the minor road centreline shall be designed in full accordance with DN-GEO and shall be at an angle of between 50 and 130 degrees to the major road channel. See Figure Page 53
63 Figure 5.22: Skew Junctions Carriageway Widths around Curves Around tight radius curves or corners, additional carriageway width shall be provided to cater for the swept area of large vehicles and the "cut in" of trailer units in accordance with Table 5.8. Inside Corner Radius or Curve Radius (m) Table 5.8: Minimum Corner and Curve Radii and Carriageway Widths Single Lane Width (excluding hard strip provision) (m) Two Lane Width for One Way or Two Way Traffic (excluding hard strip provision) (m) Inside Lane Outside Lane Total Page 54
64 Design of Ghost Island Junctions Turning Length The turning length is provided to allow long vehicles to position themselves correctly for the right turn off the major road. The turning length shall be 10m long irrespective of the design speed or gradient, measured from the centreline of the minor road. It is shown on Figure Where capacity calculations indicate that for significant periods of time there will be vehicles queuing to turn right from the major road, the turning length shall have a queuing length added to it as a reservoir to accommodate queuing vehicles. Figure 5.23: Priority Junction with a Ghost Island Taper Length Central islands, for ghost islands (Figure 5.24) should normally be developed symmetrically about the centreline of the major road to and from the turning lane width at the tapers shown in Table 5.9. The maximum island width should continue through the junction to the tangent point of the corner radius and the edge of the major road carriageway, downstream of the direction of the right hand turn as shown in Figure In difficult circumstances, the Designer may relax the taper value by one design speed step as a relaxation. Where right turn lanes off the major road are provided at both junctions in a right/left staggered junction, the maximum island width should continue through both junctions as detailed in Figure Page 55
65 Figure 5.24: Ghost Island Development and Taper The direct taper length is the length over which the width of a right turning lane is developed. For ghost island junctions, right turning lanes shall be introduced by means of a direct taper whose length is part of the deceleration length, and whole length depends on the design speed. This taper length is given in Table In difficult circumstances, the Designer may relax the taper value by one design speed step as a Relaxation. Table 5.9: Tapers for Ghost Islands Design Speed (km/h) Taper for Ghost Island 50 1: : : : :30 Note: In difficult circumstances, the Designer may relax the taper value by one design speed step as a Relaxation. Table 5.10: Direct Taper Length Design Speed (km/h) Direct Taper Length (m) Note: In difficult circumstances, the Designer may relax the taper value by one design speed step as a Relaxation. Page 56
66 Figure 5.25: Ghost Island arrangement at Right/Left Staggered Junction Turning lane width The width of a ghost island turning lane shall be 3.5m, but a Relaxation to 3.0m is permissible Turning Lanes The overall length of a turning lane provided at ghost island junctions depends on the major road design speed and the gradient. It consists of the turning length and the deceleration length, and shall be provided in accordance with Table The gradient is the average for the 500m length before the minor road. In difficult circumstances, the Designer may relax the deceleration length by one design speed step as a relaxation. Note: Table 5.11: Deceleration Length (m) for Ghost Island Design Speed Up Gradient Down Gradient (km/h) 0-4% Above 4% 0-4% Above 4% In difficult circumstances, the Designer may relax the deceleration length by one design speed step as a relaxation. Page 57
67 Ghost Island Junction located on a curve Where junctions are located on curves, ghost islands should be introduced asymmetrically on the outside of the curve to suit the circumstances (as indicated in Figure 5.26). Where a Departure from Standard has been granted for a junction on a climbing lane, the same principles would apply. It is also appropriate to introduce islands asymmetrically in other circumstances. This can have the benefit of avoiding expense (for example Statutory Undertakers' works). If the widening is developed to the minor road side, through traffic will be deflected where crossing movements at the minor road take place, which may be a benefit. It should be noted that with asymmetrical ghost islands that the taper ratio will be the same as for a symmetrical island but the taper length will be considerably greater. Designers shall ensure that with any design whether, with symmetrical or asymmetrical ghost islands; a smooth flowing alignment is achieved. Figure 5.26: Ghost Island Junction with Curve on major road Channelising islands and Refuges Merging and diverging movements can usefully be separated by channelising islands so that the number of traffic conflicts at any point is reduced (as indicated in Figure 5.20, 5.21 and 5.22). Channelising islands shall be provided in the mouth of the minor road at ghost island junctions, and may be similarly provided at simple junctions, to:- a) Give guidance to long vehicles carrying out turning movements. b) Channelise intersecting or merging traffic streams. c) Warn drivers on the minor road that a junction is ahead. d) Provide shelter for vehicles / cyclists waiting to carry out manoeuvres such as waiting to turn right. At rural ghost island junctions channelising islands shall be used in the mouth of the minor road. The recommended layout of channelising islands is shown in Appendix B. This layout shall be designed in accordance with the step by step approach also provided within Appendix B. Page 58
68 Rural channelising islands shall be raised and kerbed and constructed in accordance with Standard Construction Detail CC-SCD Channelising islands shall have a width of at least 2.5 metres, and shall be conspicuous in poor lighting conditions. Smaller islands may be defined by road markings. The risk of overriding the islands can be reduced by offsetting the approach nose from the edge of the vehicle paths. Rural crossroads are regarded as a Departure from Standards however, details are also included in Appendix B for use if considering upgrading existing rural cross-roads. 5.7 Diverging/Merging Tapers and Lanes at Junctions Merge and diverge auxiliary lanes and tapers shall not be provided on single carriageway roads. 5.8 Priority Junctions on climbing lanes The provision of a priority junction on a climbing lane is a Departure from Standards. 5.9 Drainage and Crossfall From considerations of surface water drainage and road user comfort, the road camber on the major road shall be retained through the junction and the minor road graded into the channel line of the major road. Checks shall be made for flat areas at all changes of gradient, superelevation or crossfall in accordance with DN-GEO Roads with Hard Shoulders Where hard shoulders are provided on roads with priority junctions, particular care should be taken to ensure safe designs for the junctions. The layouts should be in accordance with the geometric requirements described in the preceding paragraphs of this Chapter, together with the following additional requirements Major road requirements opposite a junction On the side of the major road opposite a simple T- junction, the hard shoulder shall be maintained through the junction. On the side of the major road opposite a ghost island junction the hard shoulder shall be tapered to form a 1.5m hard strip over the length of the ghost island taper as illustrated in Figure On the departure side, the hard shoulder may be reintroduced over the length of the ghost island taper also. The running lane should be a constant width through the junction. Where the required paved width is less than the full paved width away from the junction, the full paved width should be continued through the junction, with any excess area hatched. When considering upgrading an existing simple priority junction to provide a ghost island right turn lane, the hard shoulder may be reduced to 0.5m if the existing pavement is to be used to facilitate widening through the junction or there are issues with the required visibility splays from the minor road. If a 1.5m hard strip can be achieved however, this shall be provided. Page 59
69 Figure 5.27: Treatment of Hard Shoulders at a Ghost Island Junction Hard Shoulders on the Minor Road Where the minor road has a hard shoulder, the hard shoulder approaching the major road should be terminated by tapering to a width of 0.5m to form a hard strip. The taper angle should be 1:30 and the taper should terminate not less than 15m before the start of the entry widening. The hard shoulder exiting the major road should not start before the end of the exit widening. Hard Shoulders crossing minor roads shall be terminated at the intersection of the hard shoulder and the hardstrip/hard shoulder of the minor road corner radii or taper as appropriate Stop Line In accordance with the Traffic Signs Manual, the edge of the stop line nearest to the major road shall not be closer than 0.6m to the line of the back of the paved area of the major road including any hard shoulder or hard strip (see Figures 5.28). Page 60
70 Figure 5.28: Priority Junction Stop Line with and without Hard Shoulder or Hard Strips 5.11 Specific Geometric Design Layouts for Dual Carriageways General This section outlines additional geometric design properties and features to be considered in the design of priority junctions and accesses associated with dual carriageways Auxiliary Merge and Diverge Lanes On Type 1 dual carriageways and motorways the merge and diverge auxiliary lanes, where appropriate, shall be detailed in accordance with Chapter 7. Merge and diverge auxiliary lanes and tapers are not permitted on Type 3 dual Carriageway Roads. Merge auxiliary lanes and tapers are not permitted on Type 2 Dual Carriageways. However diverge auxiliary lanes shall be provided at left-in/left-out priority junctions and compact grade separated junctions on Type 2 Dual Carriageways. Diverge auxiliary lanes or tapers shall not be provided at direct accesses. Where auxiliary lanes are provided at left-in/left-out priority junctions for Type 2 Dual Carriageways, the layout shall be in accordance with the layout as shown in Figure with an auxiliary taper length of 55m and an auxiliary lane length of 150m which shall terminate at the tangent point of the 40m exit radii Dual Carriageway Junctions Left-in left-out priority junctions may be used on Type 1, 2 and 3 Dual Carriageways. The upper limit for minor road flows should be taken as 3,000 vehicles AADT 2-way when considering providing a priority junction on Type 1, 2 or 3 Dual Carriageway roads in rural areas. The provision of short lengths of full dualling just to incorporate a junction on an otherwise single carriageway road is prohibited. Where there is a change in road type from a motorway or Type 1 Dual Carriageway with full grade separation to a Type 2 or 3 Dual Carriageway with at-grade priority junctions, a roundabout should always be used at the first major junction in order to emphasise to drivers the changed character of the road. Page 61
71 Permanent Crossings On Dual Carriageways no permanent crossings of the central reserve are allowed with the exception of single lane sections of Type 3 Dual Carriageways where a right turn off the major road may be provided when applied for through a Departure from Standards. Right turns onto the major road are prohibited. On Type 3 Dual Carriageways, the use of a roundabout or compact grade separated junction close to left in/left out priority junctions for the purpose of U-turns by the diverted traffic significantly reduces collisions Direct Vehicular Access Direct Vehicular access from private property or developments onto Dual Carriageways should be avoided as far as practicable. Where accesses are to be provided, their number should be severely limited. Accesses for Dual Carriageways shall be Left-in/Left-out. For Type 3 Dual Carriageways, Left- In / Left-Out accesses shall not be permitted within the length of a critical changeover nor within 150m on the approach to a critical changeover as defined in DN-GEO Junctions at changeover locations on Type 3 Dual Carriageways Where junctions are provided on either the one-lane or two-lane side on a Type 3 Dual Carriageway, they shall be restricted to left-in and left-out turning movements only, with no crossing of the central reserve. This junction type is only suitable for lightly trafficked minor roads or private accesses. Such junctions shall not be provided within 100m of a critical changeover as defined in DN-GEO Where junctions of this type are required on opposite sides of the road, the side roads shall be staggered by a nominal 10m to avoid the appearance of a through road. Where it is necessary or desirable to provide a U-turn facility, and a roundabout is not justified, a mainline U-turn loop can be provided at a minor road as a Departure from Standards, as illustrated in Figure Similar U-turn loops can be provided where there is no minor road or private access, but it is preferable to combine a loop with a side road or access. The preferred location for such layouts is at a changeover as defined in DN-GEO These U- turn facilities permit right turns into the side road or access but not out and they also only allow U- turns in one direction. Where it is assessed that minor road traffic at such a junction is likely to want to turn right onto the major road, a similar junction shall be provided within 2km on the opposite side of the carriageway to facilitate U-turns in the opposite direction. Where a U-turn loop is provided at a passing lane length, the loop shall not be provided on the twolane side, so as to avoid the need for turning traffic to cross two through lanes. Careful signing will be required on the approaches to all U-turn facilities (except roundabouts) to alert drivers to the U-turn loop. Page 62
72 Figure 5.29: Mainline turning loop at minor road (requires a Departure from Standards) Page 63
73 6. Geometric Design of Roundabouts 6.1 General This Chapter describes the geometric design of roundabouts for application to new and improved junctions on national roads. The cut-off point between roundabout and link design shall be 50m measured from the yield line which corresponds to the point at which the entry path radius assessment commences. Geometric design in accordance with this chapter shall be undertaken from this point. However, full SSD in accordance with DN-GEO shall be provided to the yield line on the approach roads to the roundabout. Figure 6.1: Cut-Off Point between Link Design and Roundabout Design The layout of a roundabout shall be considered by a designer at an early stage in the design process. Items that should be considered that may affect the final geometric layout of a roundabout include: The number of approach arms to be incorporated and the number of lanes on the approach arms; The angle of approach arms, sharp angles between arms should be avoided by balancing approach arms evenly around the circulatory carriageway edge; and Consideration of splitter island requirements at an early stage (including pedestrian movements and space for required signage). 6.2 Siting A project appraisal should be carried out in accordance with TII current practices when considering the provision of roundabouts. Where several roundabouts are to be installed on the same route, they should be of similar design in the interests of route consistency and safety to the extent that this is possible with the traffic volumes concerned. Page 64
74 In addition to its natural function as a junction, a roundabout may usefully: a) facilitate a significant change in road standard, for example, from dual to single carriageway or from grade separated junction road to at-grade junction road; b) facilitate U-turns; c) facilitate right turning flows. The majority of collisions at priority junctions are associated with right turns. The inconvenience of banning right turns and using left in left out junctions can be mitigated by providing a roundabout nearby. For Type 3 Dual Carriageways, roundabouts will be appropriate as major junctions. Two-lane sections shall start directly at the exit from the roundabout. Similarly, a two-lane section may terminate at a roundabout with the overtaking lane becoming the right-hand entry lane into the roundabout. On single carriageway roads where overtaking opportunity is limited, roundabouts may be sited so as to optimise the length of straight overtaking sections along the route (see DN-GEO-03031). Where a proposed roundabout may affect the operation of an adjacent junction, or vice versa, the interactive effects should be examined. Where appropriate, traffic management measures such as prohibited turns or one-way traffic orders at the adjacent junction may be considered. The effects of queuing at the roundabout should be examined to check that additional risk is not generated. The minimum distance between two roundabouts on a national road shall be 90m measured from the closest points on the inscribed circle diameters. Where it is proposed to add an arm to an existing roundabout, the effects shall be examined. If the proposed arm will adversely affect the roundabouts operation and safety, measures shall be considered to mitigate and minimise these effects. Adverse effects include the introduction of unequal flow distribution, roundabout capacity problems and increased risk of collision of vehicular conflicts. 6.3 Landscaping within a Roundabout Passively safe landscaping is allowable within a national road roundabout and shall only be provided with TII approval. Non-passively safe landscaping and any artwork features constructed on a national road Roundabout shall not be provided in the direct line of a potential errant vehicle that overruns the roundabout. Figure 6.2 illustrates this principal for a typical single lane roundabout; non-passively safe landscaping or artwork must not be positioned outside the green shaded area within the roundabout. Designers must assess the potential path an errant vehicle is most likely to take based on the specific design parameters of the roundabout. Sight lines shall also be considered when landscaping and artwork features are being designed. Page 65
 whether the approach roads are single or dual carriageway (or grade separated); b)")
75 Figure 6.2: Permitted location for non-passively safe landscaping and artwork within a single lane roundabout 6.4 Selection of Roundabout Type The choice of roundabout type is governed by a combination of factors including: a) whether the approach roads are single or dual carriageway (or grade separated); b) the speed limit on the approach roads; c) the level of traffic flow; d) other constraints such as land-take. Page 66
76 6.5 Provision for Non-Motorised Users (NMUs) Provision must be made for the specific requirements of NMUs in the design of roundabouts. Roundabouts are one of the safest forms of at grade junctions for general motorised traffic, however they pose safety concerns for cyclists due to high vehicular speeds, particularly leaving the roundabout. The preferred crossing facility at a roundabout is a bend out crossing located between 10 and 15 metres from the circulatory carriageway of the roundabout. Where the cycle facility crosses roads with flows of greater than 4,000 AADT, the crossing should include a central island. The central island should be a minimum of 3.5 metres in width, however it is possible to reduce the width of the central island to 2.5 metres should the cycle facility not form part of a greenway and where the number of cyclists using tandem bikes, recumbents or trailers will be very low. Figure 6.3 demonstrates the design requirement associated with the provision of off road cycle facilities at a roundabout. The indicative layout shown is for a two-way cycle facility provided on one side of the road along the major road. Figure 6.3: Roundabout Junction Page 67

77 6.6 Geometric Design of Roundabouts Inscribed Circle Diameter The inscribed circle diameter D of the roundabout is the diameter of the largest circle that can be fitted into the junction outline. Figures 6.4 illustrates this for a circular roundabout. The inscribed circle diameter for all roundabouts must be large enough to accommodate the design vehicle while allowing other requirements in this chapter to be met, however excessively large ICDs can induce high circulatory speeds which can adversely affect operational safety. Figure 6.4: Inscribed Circle Diameter of a Roundabout with a Symmetric AL Outline Where the outline is asymmetric, the value in the region of the entry should be used. A Single Lane Roundabout shall have an Inscribed Circle Diameter between 28m and 36m. The ICD of a Single Lane Roundabout may be increased to accommodate the geometric requirements of this Chapter should all other of the requirements for the provision of, and geometrical design of, a single Lane Roundabout be satisfied. The minimum value of 28m is the smallest roundabout that can accommodate the swept path of the Design Vehicle (see Figure 6.6). An Inscribed Circle Diameter between 37m and 100m should be appropriate for a Multi-lane Roundabout dependent on the type of carriageway approaching the roundabout. Inscribed circle diameters between 37m and 50m are unlikely to facilitate the introduction of channelising islands accommodating a 3.5m refuge for NMUs on all approaches. Page 68
78 The Inscribed Circle Diameter of a Multi-lane Roundabout catering solely for single carriageway approaches shall not exceed 70m. The inscribed circle diameter of a Multi-lane Roundabout catering for single carriageway and dual carriageway approaches shall not exceed 100m. The provision of a five or more arm roundabout is not recommended on national roads and if provided must be applied for as a Departure from Standard. Where consideration is being given to adding a fifth-arm to a four-arm roundabout it must be shown that the introduction of the fifth arm; a) shall not have a negative impact on the operation of the roundabout as a whole; b) shall not reduce the ultimate capacity of the roundabout; c) shall be designed to ensure that vehicular flows are reasonably balanced between the arms; d) shall not result in high circulatory speeds on the roundabout itself; e) shall not result in such close spacing of arms that there can be confusion about a driver s intended exit. Traffic modelling shall be undertaken by the designer to demonstrate this using TII s Project Appraisal Guidelines Circulatory Carriageway The circulatory carriageway of roundabouts shall generally be circular and of constant width. However, at complex roundabouts, for example where spiral markings are used, the width should be in line with traffic demand. Tight bends should be avoided as they can increase the likelihood of load shedding by HGVs. They can also cause loss of control collisions, particularly for powered two wheelers. The width of the circulatory carriageway as represented by c in Figure 6.6 must be between 1.0 and 1.2 times the maximum entry width, excluding any overrun area. At Multi-lane Roundabouts, the width of the circulatory carriageway should not exceed 15m. At Single Lane Roundabouts, it should not exceed 6m, although an additional overrun area may be required for small values of inscribed circle diameter, depending on the types of vehicles using the roundabout (see Figure 6.6). Short lengths of reverse curve of the inscribed circle, where two consecutive tangential circular arcs curve in opposite directions, shall be avoided between entry and adjacent exits. This shall be eliminated where possible by reducing the size of the inscribed circle diameter to the minimum allowable by the geometric constraints. Where this does not eliminate the reverse curve the entry and exits may be linked with a short straight section. Where there is a considerable distance between the entry and the next exit, such as at three-arm roundabouts, reverse curvature is acceptable (see Figure 6.5). Page 69

79 Figure 6.5: Three-arm Roundabout Illustrating Reverse Curvature There may be situations where the turning proportions are such that one section of the circulatory carriageway has a relatively low flow, resulting in an unused area of carriageway, usually adjacent to a channelising island: a) For larger roundabouts, the circulatory carriageway can be reduced in width by extending the channelising island. This method of reducing circulatory width may also be adopted as an interim measure in the early years of a scheme. At the same time, the offside entry lane may be taken out of use, for example, by the use of coloured or textured surfacing or hatched markings. b) For smaller roundabouts, increasing the size of the central island is a more appropriate method of interim circulatory carriageway reduction, preferably by physical means but alternatively using coloured surfacing or hatched markings. Hatching should not be used to reduce the entry width in areas adjacent to pedestrian facilities Central Island The central island should be circular and at least 4 metres in diameter. The inscribed circle diameter, the width of the circulatory carriageway and the central island diameter are interdependent: once any two of these are established, the remaining measurement is determined automatically. It should be noted that the swept path for the Design Vehicle may impinge slightly (by up to 0.3m) into either the inner or outer 1m clearance allowance. Given the anticipated frequency of this type of vehicle, this is not considered to be particularly significant and the dimensions in Figure 6.6 should not be increased accordingly. Page 70
. It should be capable of being mounted by the trailers of HGVs, but be unattractive to cars e.g. by having a slope and/or a textured surface.")
80 In order to ensure that light vehicles encounter sufficient entry deflection at Single Lane Roundabouts, an overrun area (i.e. a raised low profile area around the central island) may be necessary (Figure 6.6). It should be capable of being mounted by the trailers of HGVs, but be unattractive to cars e.g. by having a slope and/or a textured surface. The profile dimensions of the overrun area are shown in Figures 6.7a and 6.7b. It should be noted that these diagrams are not intended to dictate the actual cross sectional shape of an overrun area, but only to illustrate the dimensions that must not be exceeded. The overrun area does not need to incorporate any step like projections. Figure 6.6: Turning Widths Required for Single Lane Roundabouts (a) = Main central island (b) = Central overrun area, where provided (c) = Remaining circulatory carriageway width = x maximum entry width (d) = Vehicle (e) = 1m clearance minimum (f) = Inscribed Circle Diameter Central Island Diameter (m) R1(m) R2(m) Minimum ICD (m) In these cases no channelising islands should protrude within the inscribed circle diameter. Page 71


81 Figure 6.7a: Profile of overrun area Figure 6.7b: Detail of overrun area It should be noted that these diagrams show an indicative cross sectional shape of an overrun area, developed to illustrate the dimensions that must not be exceeded Channelising Islands Channelising islands shall be used on each arm, located and shaped so as to separate and direct traffic entering and leaving the roundabout. They shall be raised and kerbed. Markings may also be used to extend a channelising island on the approach, the exit or the circulatory carriageway. Kerbed channelising islands can act as pedestrian or cyclist refuges provided that they are large enough to give adequate safe standing space for accompanied wheelchair users, and pedestrians with pushchairs or cyclists. Signs and other street furniture can be sited on kerbed islands provided that there is sufficient room to maintain the required clearances. The provision of directional signage shall be considered when designing the size of channelising islands. Page 72
82 6.6.5 Entries A number of variables need to be considered in selecting an entry design which is safe and has adequate capacity. These variables are: a) approach half width (v); b) entry width (e); c) entry flaring (F); d) entry angle (ϕ); e) entry kerb radius (r): f) entry path radius (EPR). These are described below and shown in Figures 6.8 to Approach Half Width The approach half width, v, is the width of the approach carriageway, excluding any hatching, in advance of any entry flare (see Figure 6.8). It is the shortest distance between the median line, or the edge of the central reserve on dual carriageway roads, and the nearside edge of the road. Where there is white edge lining or hatching, the measurement should be taken between markings rather than kerb to kerb Entry Width The entry width, e, is the width of the carriageway at the point of entry. It is measured from the point A at the right hand end of the yield line along the normal to the nearside kerb (see Figure 6.8). For capacity assessment, the measurement should be taken as the total width of the lanes which drivers are likely to use i.e. the effective width, which is normally between any white edge lining or hatching. Where the alignment of the entry lanes is as described in Section 6.6.8, the entry width and the effective entry width are the same. Entry width is a key factor affecting capacity, in conjunction with length and sharpness of flare. One or two extra lanes may be added to the approach at a roundabout. However, as a general rule not more than two lanes should be added and no entry should be more than four lanes wide. Page 73

83 Figure 6.8: Approach Half Width and Entry Width Lane widths at the yield line (measured along the normal to the nearside kerb, as for entry width) must be not less than 3m or greater than 4.5m, with the 4.5m value appropriate at single lane entries and values of 3 to 3.5m appropriate at Multi-lane entries. On a single carriageway approach to a roundabout, the entry width, e, must not exceed 10.5m. On a dual carriageway approach to a Multi-lane roundabout, the entry width must not exceed 15m. If flaring is provided, tapered lanes should have a minimum width of 2.5m. On a single carriageway road, where predicted flows are low and increased lane width is not operationally necessary, a Single Lane Roundabout with single lane entries shall be used. The entry may need to be closed to carry out any form of maintenance so the design of traffic management for maintenance should be discussed at an early stage in the design process with the Maintaining Organisation. The development of entry lanes must account for the anticipated turning proportions and possible lane bias, since drivers often have a tendency to use the nearside lane. The use of lane bifurcation where one lane widens into two should maximise use of the entry width. The use of very short offside lanes is not recommended as they tend to be used infrequently in practice with the result that debris collects on the road surface and forms a safety hazard, particularly for two-wheeled vehicles. For road improvement schemes on national roads, forecast design year flows sometime after opening will be considered. This can result in roundabout entries with too many lanes for initial flows, subsequently leading to operational problems. A layout based on projected flows will determine the eventual land requirements for the roundabout, but for the early years of operation it may be necessary for the designer to consider an interim layout. This approach can result in reduced entry widths and entry lanes. Page 74
 should lie on an arc which, when projected forward, meets the central island tangentially (see Figure 6.")
84 6.6.8 Alignment of Entry Lanes The alignment of entry lanes is critical. The kerb line of the channelising island (or central reserve in the case of a dual carriageway) should lie on an arc which, when projected forward, meets the central island tangentially (see Figure 6.9). Figure 6.9: Arc Projected Forwards from the Channelising Island and Tangential to the Central Island Design of Multi-lane Entries On Multi-lane entries, it is important to ensure that entries are configured in order to avoid the situation where some lanes exceed capacity and others are underused. On flared entries, the queue from an overused lane may back up and block access to other lanes Entry Flaring Entry flaring is localised widening at the point of entry. Roundabouts usually have flared entries with the addition of one or two lanes at the yield line to increase capacity. Single lane entries should be slightly flared to accommodate HGVs. Even a small increase in entry width may increase capacity. The average effective flare length, l', is the average length over which the entry widens. It is the length of the curve CF', shown in Figure Page 75
.")
85 Figure 6.10: Average Effective Flare Length Notes: AB = e (entry width). GH = v (approach half width at point G which is the best estimate of the start of the flare). GD is parallel to AH and distance v from AH (v is measured along a line perpendicular to both AH and GD and, therefore, the length of AD is only equal to v if AB is perpendicular to the median at A). CF' is parallel to BG and distance ½ BD from the BG. To determine the average effective flare length, l': a) construct curve GD parallel to the median HA (centre line or edge of central reserve or channelising island) and distance v from it; b) construct curve CF' parallel to curve BG (the nearside kerb) and at a constant distance of ½ BD from it, with F' the point where CF' intersects line DG; c) the length of curve CF' is the average effective flare length l'. In cases where the line AB is not perpendicular to the median, the length AD will differ slightly from v. The total length of the entry widening (BG) will be about twice the average effective flare length. The capacity of an entry can be improved by increasing the average effective flare length. Similar levels of capacity can be obtained with a variety of flare lengths and entry widths. A minimum average effective flare length of 25m in rural areas is desirable, but capacity will be the determining factor. Effective flare lengths greater than 25m may improve the geometric layout but have little effect in increasing capacity. If the effective flare length exceeds 100m, the design becomes one of link widening. Where the design speed is high, entry widening should be developed gradually with no sudden changes in direction. Page 76
86 The sharpness of flare, S, is defined by the relationship: S = 1.6 [e-v] / l' It is a measure of the rate at which extra width is developed in the entry flare. The value of S depends on the available land-take and the capacity required. Values of S greater than unity correspond to sharp flares and smaller values (0 S 1) to gradual flares. Long gradual flares are most efficient as they make better use of the extra width but sharp flares have a smaller potential of land take. Sharp flares can still give significant increases in capacity and may be appropriate where there is cyclist / pedestrian crossing demand. The entry width and the average effective flare length are related. The capacity of a wide entry combined with a short flare can be similar to that of a narrow entry combined with a long flare. There are many intermediate combinations of e and l' that will have the same capacity. Although entry width and sharpness of flare (which is a function of flare length and widening) have the largest effect on capacity, other variables such as entry angle and entry radius are also important. When capacity is at a premium, small changes in these variables can sometimes provide a bigger increase in capacity than making a large change in a single variable Entry Angle The entry angle, ϕ, serves as a geometric proxy for the conflict angle between entering and circulating traffic streams. There are two different methods for its measurement, depending on the size of the roundabout. For a large roundabout where the arms are well separated, the angle measured is in effect that between the projected path of an entering vehicle and the path of a circulating vehicle (see Figure 6.11). To determine the entry angle: a) construct the curve EF as the locus of the mid- point between the nearside kerb and the median line (or the edge of any channelising island or central reserve); b) construct BC as the tangent to EF at the yield line; c) construct the curve AD as the locus of the mid- point of (the used section of) the circulatory carriageway (a proxy for the average direction of travel for traffic circulating past the arm); d) the entry angle, ϕ, is the acute angle between BC and the tangent to AD. Page 77

87 Figure 6.11: Entry Angle at a Larger Roundabout For Single Lane Roundabouts, the entry angle is measured as shown in Figure This construction is also used when there is insufficient separation between entry and adjacent exit to be able to define the path of the circulating vehicle clearly. In this case, circulating traffic which leaves at the following exit will be influenced by the angle at which that arm joins the roundabout. The angle between the projected entry and exit paths is measured and then halved to find ϕ: ϕ = [angle HLB]/2 a) construct line BC as in Figure 6.11; b) construct the curve JK in the next exit as the locus of points midway between the nearside kerb and the median line (or the edge of any channelising island or central reserve); c) construct the line GH as the equivalent of line BC i.e. the tangent to the curve JK at the point where JK intersects the border of the inscribed circle; d) the lines BC and GH intersect at L. The entry angle, ϕ, is half of angle HLB. Note that if angle GLB exceeds 180 degrees, ϕ is defined as zero. Page 78
 should be constructed, and the entry and exit paths projected towards the roundabout centre.")
88 Figure 6.12: Entry Angle at a Smaller Roundabout If it is not clear which of the two methods should be used, the following procedure should be implemented. All three vehicle paths (entry, exit and circulatory carriageway medians) should be constructed, and the entry and exit paths projected towards the roundabout centre. The choice of construction for ϕ depends on where these projections meet: if the meeting point is closer to the centre of the roundabout than the arc of the circulatory carriageway median, then the construction shown in Figure 6.11 should be used; if they meet outside that area, then the construction illustrated in Figure 6.12 should be used. In the limiting case where all three medians intersect at a point, the circulatory carriageway median approximately bisects the angle between the other two medians, so that the two methods become equivalent. The entry angle, ϕ, shall lie between 20 and 60 degrees. Low entry angles force drivers to look over their shoulders or use their mirrors to merge with circulating traffic. Large entry angles tend to have lower capacity and may produce excessive entry deflection which can lead to sharp braking at entries, accompanied by shunt collisions, especially when approach speeds are high Entry Kerb Radius The entry kerb radius, r, is the radius of curvature of the nearside kerb line over the distance from 25m ahead of the yield line to 10m downstream of it (see Figure 6.13). It is the radius of the best fit circular curve over a length of 25m. The entry kerb radius should be not less than 10m. (Except at Single Lane Roundabouts), If the approach is intended for regular use by HGVs, the value should be not less than 20m. However, entry kerb radii of 100m or more will tend to result in inadequate entry deflection and should not be used. Although entry capacity can be increased by increasing the entry kerb radius, once its value reaches 20m, further increases only result in very small capacity improvements. Reducing the entry kerb radius below 15m reduces capacity. Page 79

89 Figure 6.13: Entry Kerb Radius Entry Path Radius The entry path radius is a measure of the deflection to the left imposed on vehicles entering a roundabout. It is the most important determinant of safety at roundabouts because it governs the speed of vehicles through the junction and whether drivers are likely to yield to circulating vehicles. To determine the entry path radius, the shortest path allowed by the geometry is drawn. This is the smoothest, flattest path that a vehicle can take through the entry, round the central island and through the exit (in the absence of other traffic) (see Figures 6.14 to 6.17). This path represents the actual vehicle path and must not include instantaneous transitions between circular curves of different radii, including straights. The path is assumed to be 2m wide so that the vehicle following it would maintain a distance of at least one metre between its centreline and any kerb or edge marking. The path starts 50m in advance of the yield line. The smallest radius of this path on entry that occurs as it bends to the left before joining the circulatory carriageway is called the entry path radius. Note that this is different to, and should not be confused with, the entry kerb radius as described earlier. The entry path radius can be measured by applying suitable templates to the curve in the vicinity of the yield line (see Figures 6.14 to 6.17). It is the radius of the best fit circular curve over a length of 25m. The entry path radius must be checked for all turning movements. It must not exceed 100m at all roundabout types on rural national roads. Page 80

90 Figure 6.14: Determination of Entry Path Radius for Ahead Movement at a 4-arm Roundabout a b Entry Path Radius Commencement Point Figure 6.15: Determination of Entry Path Radius for the Left Turn where the Approach Curves to the Left a b Entry Path Radius Commencement Point Page 81


91 Figure 6.16: Determination of Entry Path Radius for the Left Turn where the Approach Curves to the Right a b Entry Path Radius Commencement Point Figure 6.17: Determination of Entry Path Radius for the Left Turn at a Roundabout at a Y-junction a b Entry Path Radius Commencement Point Page 82
92 A method for creating entry deflection at a roundabout is to stagger the arms as shown in Figure This will: a) reduce the size of the roundabout; b) minimise land acquisition; c) help to provide a clear exit route with sufficient width to avoid conflicts. Sharp curves on the link road design should not be introduced to increase entry deflection, although a gentle curve to the right preceding left hand entry deflection may be used. The design of Single Lane Roundabouts is similar to that for Multi-lane Roundabouts, but the singlelane entries, circulatory carriageway and exits are retained Exits Exit Width The exit width is the width of the carriageway on the exit and is measured in a similar manner to the entry width. It is the distance between the nearside kerb and the exit median (or the edge of any channelising island or central reserve) where it intersects with the outer edge of the circulatory carriageway. As with entry width, it is measured normal to the nearside kerb. Values are typically similar to or slightly less than entry widths. Where the downstream link is a single carriageway road with a long channelising island, the exit width of the roundabout should be between 7m and 7.5m and the exit should taper down to a minimum of 6m (see Figure 6.19), allowing traffic to pass a broken down vehicle. Where the link is an all-purpose two-lane dual carriageway, the exit width should be between 10m and 11m and the exit should taper down to two lanes wide. The width should be reduced in such a way as to avoid exiting vehicles encroaching onto the opposing lane at the end of the channelising island. The width should reduce at a taper of 1:15 to 1:20. Where the exit is on an up gradient, the exit width may be maintained for a short distance before tapering in. This helps reduce intermittent congestion caused by slowly accelerating HGVs by giving other drivers an opportunity to overtake them. If the exit road is on an up gradient combined with an alignment which bends to the left, it may be necessary to maintain the exit width over a longer distance to help ensure that overtaking manoeuvres can be completed before the merge is encountered. Page 83


93 Figure 6.18: Staggering of Arms to Increase Deflection Figure 6.19: Typical Single Carriageway Exit at a roundabout with a Long Channelising Island Page 84
94 At a Single Lane Roundabout, the exit width should be similar to the entry width. On exits, the edge line should continue along the projected line of the kerbing once this is terminated (see Figures 6.29 and 6.30). Exit Kerb Radius The exit kerb radius (a) is shown in Figure Values for the exit kerb radius should exceed the largest entry radius (except at Single Lane Roundabouts, where they should be equal). At a Single Lane Roundabout, the value of the exit kerb radius should be between 15m and 20m. At other roundabouts, the exit kerb radius should not be less than 20m or greater than 100m. A value of 40m is desirable, but for larger roundabouts on high speed roads, a higher value may suit the overall junction geometry. A compound curve starting with a 40m radius and developing to a larger radius, of up to 100m, will usually offer the best solution. Larger values of exit radii may lead to high exit speed, which will not be appropriate if there are significant numbers of cyclists using the junction or where pedestrian/cyclist crossing facilities are located immediately downstream. The shortest distance possible between an entry arm and the next exit is governed by the minimum entry radius (10m) and the minimum exit radius for the type of roundabout in question (15m at a Single Lane Roundabout, otherwise 20m). If a roundabout is to be modified to include an additional arm, care should be taken to ensure that this does not affect safety at the preceding entry and following exit. It may be necessary to redesign the whole junction if adequate spacing and deflection between entries and adjacent exits cannot be achieved. Exits should be checked to ensure that vehicle paths are smooth and vehicles are not directed towards channelising islands. Channelising islands should end at a tangent (or, at least, parallel) to the centre line and be long enough to prevent an exiting vehicle from crossing the centre line into oncoming traffic. If the peak exit volume approaches the capacity of the downstream link, tapers longer than 1:20 may be needed to merge the traffic as the traffic density in each lane will be high. If circulatory speeds are high sharp turns into exits can increase the likelihood of load shedding by HGVs and decrease the traffic capacity of the junction. Page 85
95 6.7 Visibility General Except for visibility to the right at entry and across the central island as set out in this Chapter, the envelope of visibility for the measurement of stopping sight distance on the approaches to the roundabout shall be in accordance with DN-GEO Where signs are to be erected on a central reserve, verge or channelising island within the envelope of visibility, including to the right, the mounting height must not be less than 2m above the carriageway surface Forward Visibility on Approach (Stopping Sight Distance) Visibility on the approach (Desirable Minimum Stopping Sight Distance for the design speed of the road) must be measured to an object at the yield line as indicated in Figure Visibility shall be measured and meet the requirement stated in DN-GEO Chevron signs on the central island must also be visible to approaching drivers in all lanes from a distance equal to the Desirable Minimum Stopping Sight Distance. Chevron signs should not be stacked. If conspicuity of the signs is a problem, grey backing boards or larger signs should be used. If the approach to the roundabout is over a crest, a higher mounting height may be necessary. Refer to the Traffic Signs Manual. Page 86

96 Figure 6.20: Measurement of Stopping Sight Distance on Curved Approach Page 87
97 6.7.3 Forward Visibility at Entry Drivers of all vehicles approaching the yield line must be able to see objects on the roadway for the full width of the circulatory carriageway for the Visibility Distance given in Table 6.1 (measured along the centre of the circulatory carriageway as shown in Figure 6.21). The height of objects shall be consistent with those used for measurement of stopping sight distance as outlined in DN-GEO The visibility must be checked from the centre of the nearside lane at a distance of 15m back from the yield line, as shown in Figure Visibility to the Right Drivers of all vehicles approaching the yield line must be able to see the full width of the circulatory carriageway to their right, from the centre of the offside lane at the yield line, for the Visibility Distance given in Table 6.1 (measured along the centre of the circulatory carriageway), as shown in Figure Table 6.1: Roundabout Minimum Visibility Requirement Inscribed Circle Diameter (m) Visibility Distance (m) ( a in Figures) <40 Whole junction >100* 70 *ICD >100m shall require a Departure from Standards. Visibility to the right must also be provided from the centre of the offside lane at a distance of 15m back from the yield line, as shown in Figure The envelope of visibility to the right must be obtainable from a driver s eye height of between 1.05m and 2m to an object height of between 1.05m and 2m. Object height is adjusted for this visibility check and is expected to be for oncoming traffic and not objects on the roadway. Excessive visibility to the right can result in high entry speeds, potentially leading to collisions. On dual carriageway approaches where the speed limit is greater than 60km/h, limiting visibility to the right by screening until the vehicle is within 15m of the yield line can be helpful in reducing excessive approach speeds. The screening should be at least 2m high, in order to block the view of all road users. Screening can also be used on flared approaches on high speed single carriageway roads where there is a long channelising island. Page 88

98 Figure 6.21: Forward Visibility Required at Entry Figure 6.22: Visibility to Right along Circulatory Carriageway Required at Entry (from Yield Line) Page 89


99 Figure 6.23: Visibility to Right along Circulatory Carriageway in Advance of Yield Line Circulatory Visibility Drivers on the circulatory carriageway shall be able to see the full width of the circulatory carriageway ahead of them for the Visibility Distance given in Table 6.1. This visibility must be provided at a distance of 2m in from the central island, as shown in Figure The envelope of visibility must be obtainable from a driver s eye height of between 1.05m and 2m to an object height of between 1.05m and 2m. The circulatory visibility needs to be checked to ensure it is not obstructed by landscaping or other features. Normally, at least the outer 2m of the central island should be hard standing or planted with grass or similar low level vegetation. Figure 6.24: Circulatory Visibility Required Page 90
100 6.7.6 Pedestrian/Cyclist Crossing Visibility Drivers approaching a roundabout with a pedestrian/cyclist crossing across the entry shall be able to see the full width of the crossing so that they can see whether there are pedestrians/cyclists wishing to cross. The visibility required is the Desirable Minimum Stopping Sight Distance for the design speed of the link included in DN-GEO Pedestrians must be able to see and be seen by the approaching traffic. The visibility should not be obscured or restricted by parked vehicles, trees or street furniture etc. This is particularly relevant at roundabouts with two lane entries, where there are stationary vehicles in lane 1; these can obstruct the visibility of pedestrians and cyclists. At the yield line, drivers must be able to see the full width of a pedestrian/cyclist crossing across the next exit if it is within 15m of the yield line on that arm Exit Visibility On the circulatory carriageway, the exit visibility shall conform to Table 6.1. Once a vehicle has crossed the inscribed circle at the exit from the roundabout, the Stopping Sight Distance shall conform to DN-GEO The provision of new priority junctions or direct accesses on national roads shall not be permitted within 90m of the exit from a roundabout. This may be reduced to 50m as a relaxation on Regional and Local roads as per Section Visual Intrusion Signs and street furniture should be located and designed so as not to obstruct road users visibility. However, isolated objects less than 550mm wide such as lamp columns, sign supports or bridge columns within the visibility envelopes are acceptable Visibility at Grade Separated Junctions At roundabouts on grade separated junctions in particular, care is needed to ensure that the yield line is clearly visible to approaching drivers. This shall be achieved by the provision of a section of level approach road, with a maximum longitudinal gradient of 2%, from 25m prior to the yield line (subject to the requirements for minimum crossfall and longitudinal gradient for drainage set out in DN-GEO and as outlined in the following paragraphs). Visibility can also be impacted by the position of safety barriers and parapets. Designers shall ensure that the design of safety barriers and parapets does not reduce the visibility requirements outlined in this Chapter. 6.8 Crossfall Crossfall and Longitudinal Gradient Steep gradients should be avoided at roundabout approaches or flattened to a maximum of 2% for a minimum distance of 25m before entry. Crossfall and longitudinal gradient combine to provide the necessary slope to drain surface water from the carriageway. The minimum resultant gradient of any part of the road surface within 50m of the roundabout shall be 1% in accordance with DN-GEO This may be reduced locally to 0.5% at the direct interface between the approaching road and the circulatory carriageway in difficult circumstances. On the approaches and exits, superelevation can assist drivers in negotiating the associated curves. It s value, when used, should be appropriate to the speed of vehicles, and equal to or greater than those necessary for surface drainage, but should not exceed 5% (1 in 20). Superelevation should be reduced to 2% at 20m from the yield line, since with adequate advance signing and entry deflection, Page 91
. It should not exceed 2.5% (1 in 40).")
101 speeds on approaches should be reducing. The minimum longitudinal gradient of the circulatory carriageway shall be 0.5%. The maximum longitudinal gradient shall be 2.5%. Gradients outside these limits will require a Departure from Standard Crossfall on the Circulatory Carriageway Crossfall is required to drain surface water on circulatory carriageways. The normal value is 2% (1 in 50). It should not exceed 2.5% (1 in 40). To avoid ponding, longitudinal edge profiles should be graded at not less than 0.67% (1 in 150), with 0.5% (1 in 200) considered the minimum. The design gradients do not in themselves ensure satisfactory drainage, and, therefore, the correct siting and spacing of gullies is critical. Gullies shall not be located at any pedestrian crossing location. At roundabouts on high speed roads, shall be arranged for crossfall to assist vehicles. To do this, a crown line is formed. This line can either join the ends of the channelising islands as shown in Figure 6.25, or divide the circulatory carriageway in the proportion 2:1 internal to external (Figure 6.26). In some cases, a subsidiary crown line may assist in achieving appropriate values of crossfall without giving excessive changes at the main crown line (Figure 6.27). Figure 6.25: Using One Crown Line to Join Channelising Islands Page 92

102 Figure 6.26: Using One Crown Line to Divide the Carriageway in the Ratio 2:1 Figure 6.27: Using Two Crown Lines Page 93
103 The conflicting crossfalls at the crown lines have a direct effect on driver comfort and may also be a contributory factor in load shedding and HGV roll-over collisions. Over a given section, the maximum recommended arithmetic difference in crossfall is 5%. Lower values are desirable, particularly for roundabouts with a small inscribed circle diameter. There should be no sharp changes in crossfall and a smooth crown is essential. At Single Lane Roundabouts, it is more appropriate to apply constant crossfall in one direction across the full width of the circulatory carriageway where the design speed within 100m from the yield line does not exceed 60km/h on any approach. This crossfall should slope outwards to ease drainage and help keep speeds down. It also makes the central island more conspicuous Crossfall at Exits At exits, superelevation should be provided where necessary to allow vehicles to accelerate safely away from the roundabout. However, as with entries, crossfall adjacent to the roundabout should not exceed 2%. If the exit leads into a right hand curve, superelevation should be introduced in accordance with DN-GEO Road Marking and Signing A well-designed roundabout with balanced traffic movements will operate effectively under the marking shown in the Traffic Signs Manual. However, roundabouts with high flows and inscribed circle diameters close to the recommended maximum will need additional markings and signs on the approaches and circulatory carriageway. The use of right pointing arrows on lane dedication signs or as markings on the road is not permitted on roundabout approaches. This is to avoid confusing drivers, particularly those from overseas, over which way to proceed around the roundabout. Where a right hand lane is dedicated to a specific destination, it should be associated with an ahead arrow on the approach. Turn Left signs should only be used with caution on the circulatory carriageway, to avoid drivers mistakenly turning into roundabout entries. They should be used only on the central island of the roundabout in conjunction with the Chevron board as per Chapter 6 of the TSM. The Traffic Signs Manual provides guidance on the signs to be used at roundabouts. Where additional road markings are used to designate lanes on the approaches and circulatory carriageways, complementary signs are used. On wide approaches and circulatory carriageways where tall vehicles could obscure post mounted signs, gantry mounted signs are recommended. Chevron signs can impinge on circulatory visibility but the effects can be minimised by positioning the signs 2m back from the central island kerb line. Page 94
104 6.10 Kerbing and Verge Width Roundabout entries and exits should be kerbed, and hard strips or hard shoulders on each approach should terminate where entry widening begins. Where kerbs are not present on approach links, the kerbs shall start on the approach at the back of the hardstrip and then terminate the hard strip edge line in a short smooth curve or taper (see Figures 6.28 and 6.29). On the exit, the kerbing should terminate where the hard strip starts. The verge width should be at least 2.5m and should generally be consistent around the roundabout. Further advice is given in DN-GEO Factors that should be taken into account in determining verge width include: a) visibility requirements; b) space required to accommodate buried services, road signs and other street furniture; c) maintenance access; d) any likely future traffic increases that could require an increase in carriageway width. Page 95


105 Figure 6.28: Method of Terminating Edge Strips on a Single Carriageway Approach to a Roundabout Figure 6.29: Method of Terminating Edge Strips on a Dual Carriageway Approach to a Roundabout Page 96
106 6.11 Heavy Goods Vehicles The problem of HGVs overturning or shedding their loads at roundabouts has no obvious solution in relation to layout geometry. Whilst this type of collision may infrequently cause personal injury, there are considerably more damage only incidents. Load shedding often results in congestion and delay, and is expensive to clear, especially if occurring at major junctions. Experience suggests that roundabouts where these problems persist usually exhibit one or more of the following features: a) Inadequate entry deflection leading to high entry speeds; b) Long straight sections leading into deceptively tight bends; c) Excessive visibility to the right; d) Low circulating flow past the entry; e) Tightening of the line on circulation; f) Sharp turns into exits; g) Excessive crossfall changes; h) Excessive adverse crossfall on circulatory sections; i) Double or reverse curvature. A problem for some vehicles may be present even if speeds are not high. Research has shown that an articulated HGV with a centre of gravity height of 2.5m above the ground can overturn on a 20m radius bend at speeds as low as 25 km/h. Layouts designed in accordance with the recommendations in this standard should avoid the problems listed above. However, designers should recognise that each site will be different and designs should be specifically checked to ensure that such problems are avoided. During construction, particular attention should be paid to ensure that pavement surface tolerances are complied with and that abrupt changes in crossfall are avoided Segregated Left Turn Lanes at Roundabouts General This section outlines the criteria for the provision of segregated left turn lanes at roundabouts and the geometric features to be considered in their design. Segregated left turn lanes should only be considered where there is a significant left turn movement at a particular entry. Segregated left turn lanes shall not be used at single lane exits unless they form the introduction of a lane gain arrangement. Segregation shall be provided by physical separation as shown in Figure Vehicles are channelled into the left hand lane by road markings, supplemented by advance direction signs. They proceed to the first exit without having to yield to other vehicles at the entry onto the roundabout. All traffic signs and road markings shall be designed and applied in accordance with the Road Traffic Acts, the Road Traffic (Signs) Regulations, the Road Traffic (Traffic and Parking) Regulations and the Traffic Signs Manual. Page 97
107 Figure 6.30: Generic Physical Left Turn Lane (No provisions made for cyclists) Traffic Flows and Capacity of Segregated Left Turn Lanes When considering the use of segregated left turn lanes, vehicle composition and the total inflow at the roundabout entry, the proportion of left turning vehicles and the number of entry lanes should all be examined. The following procedure can be used as an initial assessment to determine whether the provision of a segregated left turn lane merits further consideration. The inclusion of a segregated left turn lane should be considered if: Where: L is the flow of left turning vehicles; F is the total entry arm inflow in vehicles per hour; L F E E is the number of proposed entry lanes onto the roundabout including the segregated left turn lane. The following examples illustrate the use of this initial assessment process. In Example 1, a segregated left turn lane is being considered at an existing roundabout and in Example 2, as an addition to a new roundabout layout. Example 1 An existing roundabout currently has a 3-lane entry, a left turn flow of 500 vehicles per hour and a total entry inflow of 1200 vehicles per hour. The provision of a left turn lane will result in the loss of one entry lane onto the circulatory carriageway. L is 500, which is greater than F/E (1200/3 = 400), indicating that further examination is worthwhile. Page 98
108 Example 2 A new roundabout is proposed, the left turn flow is 250 vehicles per hour, the total inflow is 1000 vehicles per hour and the left turn lane can be provided in addition to two entry lanes. L is 250, which is less than F/E (1000/3 = 333), indicating that a segregated left turn lane may not improve the capacity of the roundabout entry. Designers should therefore consider alternative measures such as additional entry width (i.e. a three lane entry) or a longer flare length. For marginal cases where the value of F/E is close to L, the provision of a segregated left turn lane may merit further consideration where other factors such as safety need to be considered. The composition of the turning proportions at the entry, the number of exit lanes and the capacity of the approach road should also be examined when considering the provision of a segregated left turn lane. The capacity of a segregated left turn lane is dependent on the entry and exit treatments and lane width. To ensure maximum capacity a dedicated lane on the approach and exit shall be provided with a minimum lane width of 3.5m. The impact of introducing a segregated left turn lane should be assessed taking into account the entry and exit treatments. A traffic micro-simulation program shall be used by the designer to assess the impact of introducing a segregation. The relevant peak periods for the junction being analysed should be used, and should include forecast commuter, development usage and other peak periods. The effect of the lane on traffic flows at different periods of the day should also be considered. The results of any assessment should be carefully examined to ensure that the provision of a segregated left turn lane is the most appropriate form of improvement, compared with alternatives such as modifications to flare lengths or entry widths. The use of segregated left turn lanes on roundabouts forming part of grade separated junctions shall be considered where queuing at roundabout entries becomes a problem Geometric Design Standards of Segregated Left Turn Lanes Segregated left turn lanes should not be designed to induce high speeds. Any desirable speed reduction should be achieved on the approach to the lane rather than within it. Where the segregated left turn lane follows a tight radius relative to the approach speed, the use of slow road markings to TSM Chapter 7 is recommended in conjunction with associated Bend Ahead warning signs (W 051), plated with a Max Speed (RUS 041, RUS 042, RUS 043 or RUS 044) per Chapter 5 of the TSM. Care should be taken to ensure that these signs are located to avoid sign clutter or confusion to drivers not using the segregated left turn lane. Countdown markers to TSM Chapter 4 should only be provided on the approach to the roundabout when there is no risk of confusion between the distance to the commencement of the segregated left turn lane and the distance to the roundabout yield line. The curve radius used for the segregated left turn lane will be dependent on both the design speed of the approach road and site constraints. The driver s perception of the approach and segregated left turn lane radii will be a determining factor in their approach speed. The designer should therefore consider the need for speed reduction measures on the approach depending on the minimum curve radii used. Inside curve radii of less than 10m are not recommended. The exit radius used should be greater than, or equal to, the entry radius. Page 99
109 Where segregated left turn lanes are considered on grade separated junctions, designers shall provide a 3.75V m distance between the mainline and the segregated lane diverge noses, where V is the design speed in km/h. Distances that are less than 3.75V m will require a Departure from Standards. Refer to Chapter 7 for further information. Superelevation along the segregated left turn lane shall be applied in accordance with Table 1.3 of DN-GEO subject to a maximum value of 5%. The Desirable Minimum Stopping Sight Distance (SSD) on the segregated left turn lane shall be the lesser of (a) the SSD obtained from DN-GEO Table 1.3 for the design speed of the approach or (b) the SSD given in Table 6.2 in this standard appropriate to the maximum nearside curve radius. The D6/3esirable Minimum SSD shall be applied to the section of segregated left turning lane between the end of the entry taper and the start of exit taper. The maximum curve radius used to determine the SSD from Table 6.2, shall be the greater of either the entry or exit radius of the segregated left turn lane, these being defined as the radius that occurs immediately after the entry taper and immediately before the exit taper in the direction of travel. See Figure 6.31 for definition of entry and exit tapers. Figure 6.31: Dedicated approach and exit for segregated left turn lane introducing a lane gain Page 100
110 The carriageway widths specified in column 2 of Table 6.3 shall be used to accommodate the swept path of a HGV and hatch markings provided on the inside of the curve to reduce the marked lane width to a minimum of 3.5m. As physical segregation is to be provided, this shall permit a left turn at the roundabout in the normal way from the non-segregated part of the approach as shown on Figure Where a channelising island in excess of 50m in length is proposed, the lane widths specified in Column 3 of Table 6.3 shall be used. For roundabouts 50m inscribed circle diameter, the segregated left turn lane width used shall be based on the minimum curve radius on the entry or exit. For roundabouts with an inscribed circle diameter > 50m, the designer shall have discretion to reduce the segregated left turn lane width on the section of segregated left turn lane between the entry and exit, depending on the radius used on that section. The widths specified in Table 6.3 shall be used. The use of two-lane segregated left turn lanes is not permitted, as these can result in high vehicle speeds and potential conflict at the exit or merge point. Where left turn flows are very high, alternative junction forms or methods of junction control shall be considered. 1m hardstrips shall not be provided on segregated left turn lanes. They shall be terminated at the start of the entry taper and recommenced at the end of the exit taper. Table 6.2: Desirable Minimum Stopping Sight Distances Maximum Curve Radius (m) Desirable Minimum Stopping Sight Distance (m) less than or equal to to to to Greater than Minimum Inside Corner Radius or Curve Radius (m) (1) Table 6.3: Minimum Corner and Curve Radii and Carriageway Widths Segregated Left Turn Lane Carriageway Width (for channelising island lengths 50m) (m) (2) Segregated Left Turn Lane Carriageway Width (for channelising island lengths > 50m) (m) (3) > Page 101
111 Channelising islands shall be a minimum width of 4 m, to facilitate the safe crossing of NMU and the requirements for bollards and signs. Channelising islands shall extend a minimum of 1.5m and 6m into the entry and exit roads respectively where no pedestrians are expected, as shown on Figure Figure 6.32: Generic Physical Left Turn Lane with no provisions made for cyclists Segregated left turn lanes shall not be used at the end of steep downhill gradient approaches, this being defined as a longitudinal gradient in excess of 4% within the immediate approach to the junction as defined in DN-GEO-03031, applicable to the design speed of the approach measured back from the start of the entry taper. The longitudinal gradient along the segregated left turn lane shall not exceed 4%. Traffic signs and street furniture may be placed on channelising islands. Their number should be limited however, as proliferation can create confusion, distract, reduce visibility, add to sign clutter and have significant maintenance implications. Reference should be made to DN-REQ for vehicle restraint system details for protection from roadside hazards. The use of physical segregated left turn lanes at unlit junctions is not permitted. Where a channelising island is to be provided, a retroreflective or transilluminated bollard shall be installed at the start of the island. A minimum clearance of 0.6m between the edge of the sign or bollard and edge of the island shall be provided Approach Layout of Segregated Left Turn Lanes The approach arrangements shall consist of a dedicated lane. Dedicated lanes on approach, see Figure 6.31, provide the highest capacity entry to a segregated left turn lane. They require careful design of signing and road markings such as the use of lane destination signs and Bifurcation Arrow markings in accordance with TSM chapter 4 on the approach, to avoid driver confusion that may result in lane changing manoeuvres occurring adjacent to the segregated left turn lane entry. The entry arrangements consist of an entry taper as shown on Figure Page 102
112 The entry taper length for the segregated left turn lane shall be provided in accordance with Table 6.4. The segregated left turn lane width shall be a minimum of 3.5m at the start of the entry taper, as shown on Figure Any widening required to accommodate the swept paths of HGVs shall be developed along the length of the entry taper. The length of the entry taper shall be calculated using the following method: The length of the entry taper shall be dependent on the widening required to accommodate either the segregated left turn lane island width, subject to a minimum width of 1.0m for a non-physical and 2.1m (1.5m island width plus 0.3m marking offset on each side) for a channelising island, or the widening required to accommodate the swept path of a HCV (Table 6.3). The larger of the two values shall be used to calculate the entry taper length using the factors contained in Table 6.4. Figure 6.34 shows an example of how to calculate the entry taper length for a 1.5m wide physical island less than 50m in length, for a 70km/h single carriageway approach. The taper for the hatching shall be developed asymmetrically on the segregated left turn lane side of the entry taper as shown on Figure 6.34 and shall terminate in a position offset 0.3m from the edge of a channelising island as shown on Figure The 0.3m offset may be reduced to 0.15m where the speed limit is 70 km/h or less. Figure 6.33: Termination of Taper Hatching at Physical Island Page 103
113 Figure 6.34: Calculation of Entry/Exit Taper Lengths Page 104
114 Table 6.4: Desirable Minimum Entry/Exit Taper Length Factors Design Speed (km/h) Entry/Exit Taper Length Factor Exit Layout of Segregated Left Turn Lanes The exit layout from a segregated left turn lane shall be a dedicated lane consisting of an exit taper as shown on Figure The dedicated exit lane (see Figure 6.31), provides a free running exit for traffic from the segregated left turn lane. The exit taper for the segregated left turn lane shall be provided in accordance with Table 6.4. The segregated left turn lane width shall be a minimum of 3.5m at the end of the exit taper, as shown on Figure Any widening required to accommodate the swept paths of HGVs through the segregated left turn lane shall be removed along the length of the exit taper. As with the entry taper, the length of the exit taper shall be calculated by using the larger value when comparing the width of the segregated left turn lane island with the width reduction required between the start and end of the exit taper, as shown on Figure The taper for the hatching shall be developed asymmetrically on the segregated left turn lane side of the exit taper as shown on Figure 6.34 and shall terminate in a position offset from the edge of a channelising island in accordance with the details provided in the previous section of this Chapter. The Entry Flaring section of this Chapter recommends that at the beginning of a roundabout exit, its width should allow for an extra traffic lane over and above that of the link downstream. This extra width should be reduced on the nearside, normally at a taper of 1:15 to 1:20. Where a segregated left turn lane is present, the exit width reduction must be completed upstream of the end of the segregated left turn lane exit taper. This may require extending the segregated left turn lane exit taper to accommodate the roundabout exit width reduction. The end taper will be dependent on site constraints and the use of the minimum taper values contained in Table 6.5 is recommended. Table 6.5: Minimum End Tapers Design Speed 60 km/h > 60 km/h Minimum Taper 1:10 1:15 Where signs and street furniture are placed on the channelising island in the vicinity of the exit, they should be located so as not to obstruct intervisibility between the segregated left turn lane exit and adjacent roundabout exit lane. Page 105
115 Signage of Segregated Left Turn Lanes The presence of a segregated left turn lane shall be signed on the approach using an advance direction sign. The use of road markings to supplement Advance Direction Signs may also be considered Kerbing of Segregated Left Turn Lanes The kerb height above the carriageway for raised and kerbed channelising islands should be 125mm Traffic Signs and Road Markings of Segregated Left Turn Lanes The layout of the approaches to physical segregated left turn lane islands shall be marked using Chevron markings detailed for the particular road type in Chapter 7 of the TSM but with 100mm line widths for entry taper road markings. Reflecting road studs shall comply with Chapter 7 of the TSM but with 100mm solid line width in conjunction with Chevron markings to Chapter 7 but with 100mm lines, 800 min parallel width and shall be used only when laid on the nearside. Guidance on the use of reflecting road studs is contained in Chapter 7 of the TSM. Designers should ensure that where the segregated left turn lane has been widened to accommodate the swept paths of HGVs, the widened lane does not encourage high vehicular speeds or two vehicles to attempt to use the lane side by side. The operational lane width shall be narrowed down on the nearside to a minimum of 3.5m width through the use of suitable hatching to Chapter 7 of the TSM but with 100mm solid line width. Hatching shall be a minimum width of 1.0m Straight ahead movements Designers considering the use of a segregated lane for a straight ahead traffic movement should be aware that there are a number of issues that could result in unsafe layouts. They are: a) High entry speed; b) Higher speed of vehicles exiting the straight ahead lane compared with slower traffic leaving the roundabout, which can result in merging problems; c) The use of reverse curves both on the approach and through the roundabout and abrupt changes in crossfall; d) Difficulties in signing the layout; e) Difficulties presented to Non-Motorised Users. Designers should exercise particular caution in the design of segregated lanes for straight ahead traffic movements in order to avoid these problems, and if necessary consider alternative layouts. Page 106
116 7. Layout of Grade Separated Junctions 7.1 General Principles The main objective of grade separated junction design is to provide a junction which is safe for the forecast traffic flows. Certain layouts are not recommended for safety reasons and shall not be used. These are: a) grade separated junctions on single carriageways, Type 2 and 3 dual carriageways (see DN-GEO and Chapter 8 of this standard dealing with compact grade separated junctions); b) grade separation on dual carriageways within 0.5 km of a changeover to single carriageway standard, measured from the end of the merge taper to the beginning of the right hand lane hatching that removes the offside lane or lanes (see the Traffic Signs Manual and Chapter 5 of this standard); c) offside merges and diverges; d) priority junctions, particularly those with right turning movements, on an otherwise grade separated route. Full grade separation is not permitted on single carriageway roads and Type 2 and 3 dual carriageways due to driver perception and therefore reduced safety and shall be avoided in design. However, DN-GEO permits the introduction of compact grade separation on these road types. Refer to Table 6.1 of DN-GEO Junction and Interchange design is an iterative process which is a key part of the overall design process for schemes. Figure 7.1 is a flowchart for junction and interchange design. Figure 7.2 outlines the connector road design process Urban/Rural Grade Separated Junctions The design of grade separated junctions is based on the design hourly flow which usually varies according to road type and according to whether the road is motorway or a Type 1 Dual Carriageway National Road or rural or urban. Urban standards for most elements of road design are, however, lower than those applicable to rural design, since lower driver expectation accompanied by higher perception offsets the increased risks caused by reductions in standards. For example, lighting and speed limits would indicate the urban nature of a road. The lower urban standards are shown within the hierarchy of geometric standards, ranging from rural motorways down to urban all-purpose roads, related to Design Speed (see Table 7.1 and Table 7.2). Page 107

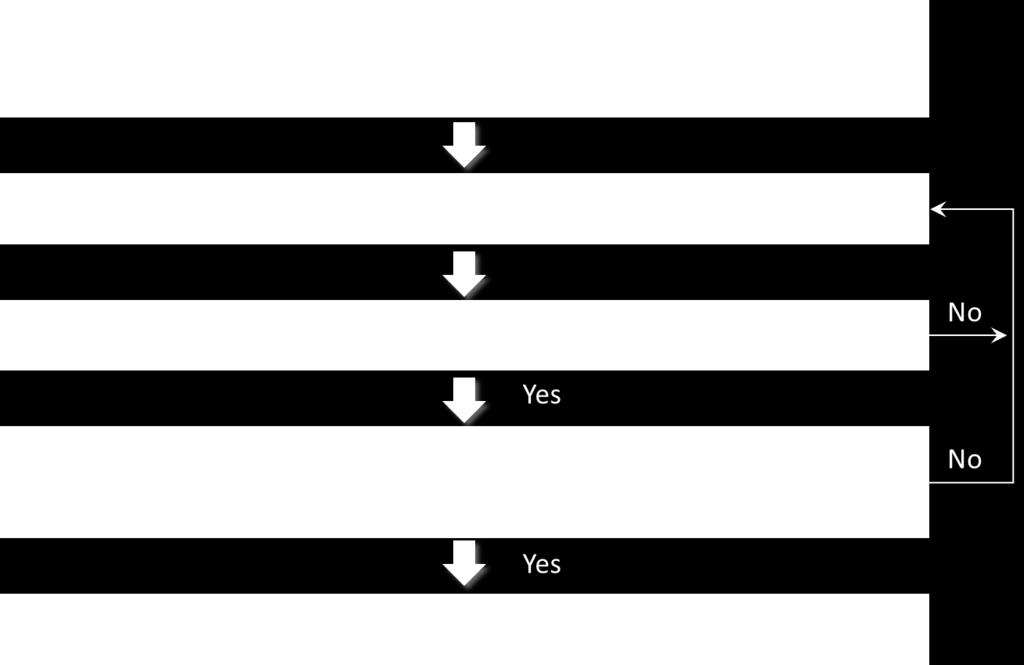


117 Figure 7.1: Flow Chart Showing the Junction/Interchange Design Process Figure 7.2: Flow Chart Showing the Connector Road Design Process Page 108
118 7.2 Design Process The first stage is to decide on an initial network strategy, fix a design year, and decide whether rural design standards apply or if urban standards should be used; for example, in the case of an urban motorway. A junction strategy shall also be determined, including the connections to be made, for example whether the junction should be omni-directional. Having made those starting decisions, it is possible to derive hourly flows to be used in the design process following the guidance in the TII Project Appraisal Guidelines. An examination of these flows, applied to the network strategy adopted, will enable a decision to be taken (or confirmed) that the route should be Motorway or All- Purpose national road. Reference to DN-GEO will give a starting point on the level of carriageway provision for the links on the network assumed. The next stage, and the first step that could lead to iteration, is to assess the likely lane provision on the mainline and the connector roads. If the basic scheme cannot be tailored to cope with demands, including those likely to arise when maintenance work needs to be undertaken, then network and junction strategy will need to be reviewed and alternatives investigated; for example reducing the number of junction accesses or using link roads. Link roads reduce the frequency of direct access points along the mainline in order to eliminate sub-standard weaving lengths thus promoting free flow to minimise the potential for collisions and to preserve the high capacity of the mainline. They can also be used where it is unsafe or not possible to make direct connections. Link roads can be useful for maintenance and diversions. The following stage may also lead to iteration. This is to determine the merge and diverge facilities and to check that weaving sections at or above the desirable minimum length can be provided. If these cannot be achieved, then the junction strategy should be reviewed. The next stage is to check that desirable geometric standards can be achieved with the junction spacing, and any lane gains or drops proposed, and that an effective and economic signing system can be provided. Again the strategy may have to be adjusted. Figure 7.2 is a flowchart showing the connector road design process. It refers to the particular paragraphs, figures and tables of this standard applicable to connector road design and to DN-GEO Interchanges may be also be justified and where required shall be designed in accordance with DN-GEO If the junction and interchange designs pass these stages, the scheme can then be taken to the next stage in its preparation which is likely to be a cost/benefit assessment. Analysis may not be sufficiently fine to evaluate the performance of individual junction elements. The best means of ensuring that a junction is effective is to carry out the operational check outlined above and in Figure 7.1. With the exception of the interchange these junctions have merge and diverge slip roads which, where absolutely necessary, may be signalised at their junction with the side road or roundabout. 7.3 Layout Options General The most efficient form of grade separation is that which presents the driver with the minimum number of clear unambiguous decision points as they drive through the junction and in merging and diverging. Additionally, on a Motorway or Type 1 Dual Carriageway national road that is generally grade separated, consistency of design for successive junctions is an important consideration involving the adoption of the same Design Speed. This need for consistency also applies to the signing and road markings to be adopted particularly at the boundary of responsibility between different road authorities. Page 109
119 7.3.2 Siting The siting of a grade separated junction on a hill top should be avoided if possible as approach gradients can cause operational problems in the diverge area, even when the percentage of HGVs is small. Hill top locations could be environmentally damaging to the skyline and might present difficulty to drivers in comprehending road signs which are silhouetted against the sky. There is also the risk of drivers being blinded when the sun is low in the sky Recommended Layouts for Grade Separated Junctions Recommended layouts for consideration in order of increasing traffic flow level are: a) dumb-bell roundabout junctions with the minor road are provided by two roundabouts which are connected by a central link road either under or over the mainline; b) half clover-leaf use of two quadrants and roundabout junctions with the minor road; c) interchange a junction between major roads with all movements catered for by free flowing connector roads (Refer to DN-GEO-03041) Dumb-Bell Roundabout The dumb-bell roundabout layout has the advantages of reduced cost (only one bridge required) and less land take than other grade separated junctions. For the dumb-bell layout, it is possible that the distance between the two roundabouts may be less than the desirable minimum SSD for the design speed of the connecting link road. In that case, a low (0.26m) object at the yield line of the next roundabout must be visible from a vehicle as it leaves the circulatory carriageway of the previous roundabout. Attention must be given to the needs of future maintenance of the connecting link road to avoid the need for closure of the road. One lane dual carriageways should, therefore, be avoided and single carriageways would often be preferable Half Cloverleaf A half-cloverleaf is used where site conditions are difficult and the use of all four quadrants is not possible (see Figures in Chapter 2). A roundabout junction shall be provided at the junctions with the minor road Variants Variants on the two basic types of grade separated junctions (half cloverleaf and dumb-bell roundabout) can be provided if: a) the junction is 3 way i.e. a T junction; b) not all movements need catering for c) traffic signals, either full-time or part time, are included to remove congestion on an existing grade separated junction. It is recommended that they should only normally be considered as an alternative to a priority junction; Provision for Non-Motorised Users Generally, non-motorised road users do not need to be catered for along the mainline of a grade separated interchange. However, should NMU facilities be required to cater for a particular demand, the NMU s are to be directed to the at grade junction and away from both the merge and the diverge lanes serving the grade separated interchange from the mainline. Page 110
120 7.4 Design Principles General Where lane drops and lane gains occur, the lane configurations ahead should be made clear to drivers by the consistent use of signs and road markings as outlined in the Traffic Signs Manual. These principles have been incorporated in the recommended layouts. The signing of junctions and interchanges should give clear and timely information to drivers. This is particularly important at lane gains and lane drops and at other decision type locations or in situations where the driver s view may be obstructed by high traffic volumes or tall vehicles. At these locations, consideration should be given to the provision of gantries to mount the signs. Where these are proposed the design of the junction should take the siting of the gantries into account. It may also be that the predicted turning flows are not realised in the proportions expected in the design year and the consequences of being wrong should be examined. Sensitivity testing of differing flow proportions should be undertaken. Correction factors to take account of gradients and proportion of HGVs, as detailed in Table 7.5, may need to be made to the flows to be entered in Tables 7.4, and Figures 7.3 and Merges General Principles It is important on safety grounds and to limit interference to mainline traffic that joining traffic is channelled into the merging area (i.e. from the tip of the nose to the end of the taper(s) and arrives there in an orderly fashion to perform a safe and comfortable merge with the mainline. If joining flows are greater than one lane capacity then an additional lane should normally be added to the mainline as a lane gain. The individual merging area for each joining lane within a merge should be separated from the previous one and there should be space between them for mainline traffic to adjust to the new traffic flow. Where design flows are close to capacity on both the connector road and on the mainline it is important to ensure that there is adequate provision for those merging. If the availability of merging opportunities is estimated to be low for long periods of the day, improved merging opportunities shall be provided by auxiliary lanes. By providing auxiliary lanes at merge locations, the conditions and opportunities for merging are improved. There may be occasions when the merge flow is greater than the mainline flow. The junction should nevertheless be set out so that mainline traffic has priority over traffic entering from the left, except at a lane gain. There are many sites throughout the network that have a two-lane taper merge layout; such layouts are not now recommended. When junctions that contain these features are to be improved, the layout must be altered to a standard layout as appropriate for the merge and mainline flow levels. Figure 7.4.3, Layout C which incorporates a lane gain is the preferred option Choosing a Merge Layout (Refer to Figure 7.3) Hourly flows for the merge and the mainline upstream must be inserted in Figure 7.3 to select a merge layout as shown in Figures to Where design flows lie close to, or on, a boundary between the flow regions, the probability of the particular flow actually occurring should be carefully reviewed. The provision of a layout that differs from that derived from the use of Figure 7.3 is a Departure from Standard, whether the proposed design is an under or over provision. Page 111
121 Figure 7.3 provides a number of layouts to cater for anticipated flows. Layout A (Figure 7.4.1) provides a basic parallel merge. Layout B (Figure 7.4.2), Layout C (Figure 7.4.3) and Layout D (Figure 7.4.4) are required where flows justify a lane gain arrangement. Layout E (Figure 7.4.5) may be considered as a Departure from Standard where it is not possible to use Layout C (see also Section 7.9). Ghost island road markings at merges should be designed in accordance with Chapter 7 of the Traffic Signs Manual. The minimum width of a ghost island at a merge lane is 2.0 m at its widest point and the minimum width of a chevron is 0.5m. If the ghost island marking is less than 1.2m wide it will be too narrow to mark with chevrons. The length of ghost island that is unmarked with a chevron could extend over a long distance. In order to prevent this problem, the minimum width of a ghost island must be 1.2m at a distance of 50m from the tip of the ghost island head or tail. It should be noted that ghost island layouts can require significant length to comply with the standard and this may be reflected in the land requirement especially where the layout is being provided within an existing road boundary. Gap finding is assisted when the merging traffic has the opportunity to match the speed of the mainline traffic. For all connector roads, a near straight at least equal in length to the nose length given in Table 7.1 column (3) for the appropriate Road Class must be provided upstream of the back of the merge nose. This requirement will enable merging traffic to achieve a matching speed. Platoons of traffic can enter a merge slip road if junctions upstream are signal-controlled. This traffic can have a significant effect on the mainline flow especially at peak times when available gaps in the mainline traffic flow are few. Turbulence and congestion are the result. Care should be taken to program such traffic signals with a view to reducing their impact on the mainline flow. In circumstances where traffic modelling shows significant delays incurred during peak periods as a result of high entry flows, it may be appropriate to use non-standard layouts that are not included in this Standard. Use of layouts not included in this Standard shall require a Departure from Standards. Page 112
122 Figure 7.3: Merging Diagram Page 113
 Figure 7.4.")
 Notes to Figures 7.4.1 and 7.4.2: 1.")
123 Figure 7.4.1: Merge Lane Layouts for use with Figure 7.3 (Layout A) Figure 7.4.2: Merge Lane Layouts for use with Figure 7.3 (Layout B) Notes to Figures and 7.4.2: 1. Figures in brackets refer to columns in Table 7.1. Page 114

124 Figure 7.4.3: Merge Lane Layouts for use with Figure 7.3 (Layout C) Notes to Figure 7.4.3: 1. Figures in brackets refer to columns in Table Option 1 is preferred due to the likely usage of Lane 1 of the connector road by the majority of large and/or slow vehicles and Lane 2 predominantly by light vehicles. Option 2 may be used in circumstances where traffic modelling indicates it is appropriate. Page 115
 Notes to Figure 7.4.4: 1.")
125 Figure 7.4.4: Merge Lane Layouts for use with Figure 7.3 (Layout D) Notes to Figure 7.4.4: 1. Figures in brackets refer to columns in Table 7.1. Page 116
126 Figure 7.4.5: Merge Lane Layouts for use with Figure 7.3 (Departure from Standard) Notes to Figure 7.4.5: 1. Figures in brackets refer to columns in Table This layout is for use where Layout C would be used but is not possible to implement because of site restraints. To use requires approval as a Departure from Standards. Page 117
127 7.6 Diverges General Principles Diverging traffic should be able to leave the mainline easily and without impeding the progress of through traffic. There is potential for collisions on diverge connector roads if the capacity of the connection to the local road network is insufficient and causes queuing on the connector road. Drivers leaving the mainline should have sufficient time to react and brake safely before the end of any queue. The designer must therefore ensure that the downstream cross-section (designed in accordance with DN-GEO-03036) and junctions do not cause queues that approach the back of the diverge nose. This will allow drivers to use the diverge area and length of nose to decelerate in reasonable comfort, as intended Choosing a Diverge Layout (Refer to Figure 7.5) Hourly flows, as determined from the traffic flows section of this Chapter, for the diverge and the mainline downstream of the back of the diverge nose must be inserted in Figure 7.5 to select a diverge layout as shown in Figures to Where design flows lie close to, or on, a boundary between the flow regions, the probability of the particular flow actually occurring should be carefully reviewed. The provision of a layout that differs from that derived from the use of Figure 7.5 is a Departure from Standard, whether the proposed design is an under or over provision. The minimum length of a diverge slip road to be provided will normally be dictated by the requirements in the preceding paragraphs in relation to capacity and the topographical layout of a junction. Where this is not the case, as for instance at the diverge slip road leading into a service area, then the minimum length diverge slip provided shall be equal to the Desirable Minimum Stopping Sight Distance (SSD) for the mainline from the tip of the diverge nose to the stop or yield line at the end of the connector road. For all connector roads, a near straight at least equal in length to the nose length given in Table 7.2 column (4) for the appropriate Road Class must be provided downstream of the back of the diverge nose. This requirement will enable drivers to comprehend the layout ahead and adjust their speed accordingly. The minimum length of a diverge slip road from a motorway shall be Desirable Minimum Stopping Sight Distance (SSD) for the mainline from the tip of the diverge nose to the stop or yield line at the end of the connector road. Where the required length of Near Straight cannot be achieved, it may be appropriate to provide an auxiliary lane instead or in combination. An application must be made for a Departure from Standard. For diverges, the layout of the edge line must incorporate the radii shown on Figures to In circumstances where traffic modelling shows significant delays incurred during peak periods as a result of high exit flows, it may be appropriate to use non-standard layouts that are not included in this Standard. Use of non-standard layouts shall require a Departure from Standards. Page 118
128 7.6.2 Single Lane Parallel Diverge The single lane parallel diverge is only applicable to diverging lane cross-sections of 1 x 4.0m or 2 x 3.0m lanes, as shown in Table 7.2. The layout of the single lane parallel diverge is shown in Figure (Layout A) and Figure (Layout B). This layout is a Taper Diverge incorporating a single auxiliary lane. Point A is the intersection between the single lane parallel diverge and the taper diverge. The method of construction for the single lane parallel diverge (as described above and shown in Figure 7.6.2) will be the same for all applicable Road Classes. Page 119
129 Figure 7.5: Diverging Diagram Page 120
 Notes to Figures 7.6.1 and 7.6.2 1. Figures in brackets refer to columns in Table 7.2. 2. Point A for the 1 x 4.")

130 Figure 7.6.1: Diverge Lane Layouts for use with Figure 7.5 (Layout A) Figure 7.6.2: Diverge Lane Layouts for use with Figure 7.5 (Layout B) Notes to Figures and Figures in brackets refer to columns in Table Point A for the 1 x 4.0m diverging lane is generally located close to the tip of the nose. 3. Point A for the 2 x 3.0m diverging lane generally occurs 2/3 of the way along the auxiliary lane. 4. The extent of the single lane parallel diverge carriageway will always encompass the full extent of a Taper Diverge. Page 121
 Figure 7.6.")
 Notes to Figures 7.6.3 and 7.6.4 1.")
131 Figure 7.6.3: Diverge Lane Layouts for use with Figure 7.5 (Layout C) Figure 7.6.4: Diverge Lane Layouts for use with Figure 7.5 (Layout D) Notes to Figures and Figures in brackets refer to columns in Table 7.2. Page 122
132 7.7 Geometric Design Parameters The geometric parameters applicable to merges and diverges must be those in Tables 7.1 and 7.2 respectively. Figures 7.4 and 7.6 illustrate their use in typical layouts. Lengths are measured along the left edge of the carriageway. For merges, the layout of the edge line shown on Figure 7.4 does not require the use of larger radii. For diverges, the layout of the edge line should incorporate the radii shown on Figure 7.6. Road Class Table 7.1: Geometric Design Parameters for Merging Lanes Length of entry taper (m) (1) 4m lane 3.65m lane Nose Ratio (see Note 1) (2) Nose Length (see Note 1) (3) Minimum auxiliary lane length (m) (4) Length of auxiliary lane taper (m) (5) Length of Ghost Island Tail (m) (6) Motorway Rural Motorway Mainline : Within Interchange : Urban Motorway Design Speed 100 km/h : Type 1 Dual Carriageway National roads 120 km/h : km/h : Urban 80 km/h speed limit : n/a Urban 60 km/h speed limit or less : n/a Note 1 Nose ratio is the ratio of nose back width to nose length for minimum angle at nose. The maximum angle will be limited by the ability of vehicles to negotiate the change in direction. Note 2 Table to be read in conjunction with Figures to Page 123
133 Table 7.2: Geometric Design Parameters for Diverging Lanes Road Class 4.00m lane (1) Length of exit taper (m) 2x3.65m lane (2) 2x3.00m lane (2) Nose Ratio (See Note 1) (3) Nose length (m) (4) Minimum auxiliary lane length (m) (5) Length of aux lane taper (m) (6) Motorways Rural Motorway Mainline : Within Interchange Design Speed 100 km/h : Urban Motorway : Type 1 Dual Carriageway National roads 120km/h : km/h : Urban 80 km/h speed limit Urban 60 km/h speed limit or less Note : : Nose ratio is the ratio of nose back width to nose length for minimum angle at nose. The maximum angle will be limited by the ability of vehicles to negotiate the change in direction. Note 2 Table to be read in conjunction with Figures to Page 124
134 Where, in a merge on a rural motorway, it is anticipated that the connector road and mainline will frequently be carrying traffic flows approaching their design capacities, it is desirable to extend the minimum auxiliary lane length of 230 m (Table 7.1) to 370 m. As a guide, this should be considered when connector road and mainline flows reach 85% of capacity, as defined in the Traffic Flows section later in this chapter, for more than 1,000 hours per year. Figure 7.7 shows an example for the layout of a ghost island merge with lane gain. Within larger interchanges, the length may be increased to 500 m. The auxiliary lane should be extended to the next diverge if this is close and the termination of the auxiliary lane is considered as a safety hazard. In order to allow merging drivers using an auxiliary lane to match their speed with those on the mainline where there is an uphill section of road, the auxiliary lane must be extended beyond the crest sufficiently to enable the end of the auxiliary lane to be clearly visible to drivers when: a) the uphill section of road would be sufficiently steep to require a climbing lane; or b) the proportion of HGVs is greater than 10% and the uphill mainline gradient is in excess of 2% and within 0.5 km of the crest. For extended auxiliary lanes in merges, of length greater than that given in column (4) of Table 7.1, a sign showing the number of lanes ahead, also that traffic in the slip road must merge into the mainline nearside lane with a distance plate 200m, should be placed 200m from the start of the taper. For very long auxiliary lanes in merges consideration should be given to additional signs with the appropriate distance plates, see Traffic Signs Manual. Emergency telephones and other equipment that requires vehicles to stop for assistance or road maintenance must be sited a minimum of 100m from the termination of merges where vehicles may overrun onto the hard shoulder or hard strip. Where a diverge connector road has a single lane, a single auxiliary lane is appropriate. 7.8 Successive Merges or Diverges Within Interchanges Where there are closely spaced successive merges or diverges on mainlines and connector roads within a junction or interchange (Figure 7.8), the minimum spacing between the tips of noses must be 3.75V m, where V is the design speed in km/h, subject to the minimum requirements for effective signing and motorway signalling. If the merges or diverges are on a connector road, the design speed must be that for the connector road. This paragraph applies to successive merges (merge followed by a merge) or successive diverges (diverge followed by a diverge). It also applies to a diverge followed by a merge but not to a merge followed by a diverge (the latter is a weaving section). At a fork within an interchange link, the taper must be developed as shown in Table 7.3 and Figure 7.9. Page 125

135 Figure 7.7: Extended Auxiliary Lanes for Rural Motorways Page 126

136 Figure 7.8: Example of Successive Merges/Diverges Page 127
 1 lane 2 lane Nose Ratio Nose Length (metres) 70/85km/h 75 90 1:12 40")
137 Figure 7.9: Development of Taper at Fork Table 7.3: Geometric Design Parameters for a Fork within an Interchange Link Interchange Link Design Speed Length of Taper, L (metres) 1 lane 2 lane Nose Ratio Nose Length (metres) 70/85km/h :12 40 Note: Nose Ratio is the ratio of nose back width to nose length for minimum angle at nose. The maximum angle will be limited by the ability of vehicles to negotiate the change in direction. Page 128
138 7.9 Designing Weaving Sections The principle of calculating weaving sections is that the length is fixed using Section and the width is calculated from the formula outlined later in this Section. This determines the total number of lanes within the weaving section and may indicate the addition of one or two lanes. The formula shows that the minor weaving flow has an impact on the traffic demand of up to 3 times its numerical value. An actual weaving length L act less than the desirable minimum must not be entered into the formula. Weaving lengths for taper layouts must be measured between the end of the merge and start of the diverge tapers, see Figure 7.11A. For auxiliary lane layouts, the auxiliary lane is ignored and the length between the end of the notional merge and the start of the notional diverge must be measured as illustrated in Figure 7.11B. In the case of lane gains and lane drops, the methods set out in Figures 7.12, 7.13 and 7.14 must be used. In the case of ghost island merges and diverges, the examples in Figure 7.15 show the two points which must be used for the two connector road lanes to provide the averaged weaving lengths between junctions. Similar techniques must be applied for diverges. In the case of wide (5 lane or more) carriageways, there should be no reduction below the desirable minimum weaving length. A vehicle on a 5-lane carriageway requires at least 1km to cross between Lanes 5 and 1 safely so as to leave at a diverge and the driver will need advance warning. For weaving sections on motorways and dual carriageway roads, design flows must be calculated as per this Chapter. In measuring L act it will be necessary to consider whether distance is available to adequately sign the second junction and allow adequate visibility to the sign from all lanes. To calculate the number of traffic lanes required for weaving the following equation must be used (see Figure 7.10): N = 1 D (Q nw + Q w1 + Q w2 (2 L min / L act + 1)) Where: N Q nw Q w1 Q w2 D L min L act = Total number of traffic lanes within the weaving section = Total non-weaving flow in vph = Major weaving flow in vph = Minor weaving flow in vph = Maximum mainline flow from Section 7.10 in vph per lane = Desirable Minimum weaving length for the road = Actual weaving length available Page 129

139 In calculating the number of traffic lanes required a fractional part will inevitably require a decision to round up or down. If it is possible to vary the position of the junctions and thus increase or decrease the weaving length, the fractional part will converge approximately to a whole number of lanes and the decision is simplified. However, if this is not possible the decision becomes more difficult. Where the fractional part is small and is combined with a low weaving flow rounding down is suggested, whereas a high fractional part with a high weaving volume suggests rounding up. For example, the addition of a fourth lane would have operational advantages in releasing the two middle lanes for weaving traffic. Other factors which may influence the decision are: a) the number of lanes required for merging and diverging (Sections 7.7 and 7.8); b) when the fractional part is about 0.5 the number of lanes shall be rounded up; c) on recreational routes there can be a high proportion of drivers who are not local and therefore behave less efficiently than commuters would at the same flow levels; d) the consequences of under provision should be borne in mind, as the acquisition of land at a later date could be costly or impossible; e) relevant environmental factors should be taken into account. Figure 7.10: Terms used in Weaving Weaving Lengths Weaving lengths must be measured as shown in Figures 7.11 to For Rural Motorways and Type 1 Dual Carriageway national roads, the Desirable Minimum weaving length shall be 2 kilometres. However, when the design flow on the main line is not greater than 50% of the capacity (AADT) for level of service D as given in DN-GEO for rural motorways, a weaving length of 1 kilometre can be provided as a Relaxation. The weaving formula must not be used for weaving lengths above 3 kilometres. The requirements for MSAs on rural motorways are as for rural motorway junctions. For urban motorways and urban all-purpose dual carriageways, the design flows must be inserted in Figure 7.16 to obtain a minimum weaving length (L min ). This must then be compared to the Design Speed related Absolute Minimum weaving length in Figure 7.16 and the greater of the two lengths taken as the minimum length of weaving section, provided that signing requirements can be met. Page 130

140 For Type 1 Dual Carriageway National Roads, the minimum length between a grade separated junction designed to this standard and an at-grade junction (including roundabouts), service area, lay-by or direct access must be the desirable minimum weaving length as derived for urban motorways and urban all-purpose dual carriageways. Figure 7.11: Definition of Terms used in Weaving and Measurement of Weaving Length for Taper and Auxiliary Lane Layouts Page 131

141 Figures 7.12 to 7.14: Definition of Terms used in Weaving and Measurement of Weaving Length for Lane Gain and Lane Drop Layouts. Figure 7.12: Lane Gain/ Lane Drop Figure 7.13: Lane Gain only Figure 7.14: Lane Drop Only Page 132

142 Figure 7.15: Measurement of Weaving Length for Ghost Island Layouts Total Weaving Length Lact is the distance to point 2 plus half the distance between 1 and 2. Figures in brackets refer to Table 7.1 Page 133
143 Figure 7.16: Weaving Length Diagram for Urban Roads D is the lane capacity in vehicles/hour/lane as per Section V is the Design Speed (km/hr) of the mainline upstream of the weaving section To determine the minimum length of weaving section (Lmin) for use with the formula for calculating weaving width Page 134
144 7.10 Traffic Flows Hourly Design Flow Hourly Design Flows shall be calculated using an appraisal method agreed with TII. For roads of the Main Urban Type, junction and weaving area design shall be based on the 30 th highest hourly flow. For Inter-Urban road types, the 50th and 200th highest hourly flows respectively shall be used. The highest value of the total design flow, corrected for HGVs and gradient as described later in this Section, projected to the 15th year after opening, shall be taken as the basis of design for merges, diverges, and weaving sections Mainline Traffic Capacity For the purpose of designing junctions and interchanges, the maximum lane capacity for Type 1 Dual Carriageway national roads should be taken as 1,600 vehicles per hour (vph) and for Motorways as 1,800 vph. These values have been used in Figures 7.3 and 7.5 in this Standard. If higher values have been used in the design of the mainline carriageways, then the equivalent number of lanes should be used, instead of design flows, for that part of Figures 7.3 and 7.5 that relate to the mainline Design Flows and Connector Road Cross Sections Connector road cross sections corresponding to design traffic flow ranges are given in Table 7.4. Further details of the cross sections are given in Section Peak Corrected Design Flow on Connector Road: Vehicles per hour Table 7.4: Connector Road Cross Sections for Design Flows For Mainline Road Type Type 1 Dual Motorway Carriageway National road Connector Road Cross Section for: Interchange Slip Road Link/Loop Merge Diverge Merge/Diverge Single Lane m Carriageway Single Lane m Carriageway Single Lane m Carriageway Two Lane - 7.3m carriageway Two Lane - 6m Carriageway Two Lane - 7.3m carriageway Notes: Cross-sectional details for Connector Road verges and hard strips are given in the relevant tables of DN-GEO Two Lane - 7.3m carriageway Flow Corrections for Uphill Gradients and for LCVs Corrections for uphill gradients and for the presence of HGVs as set out in Table 7.5 shall be made to the predicted hourly flows before corresponding values are read off from Table 7.4 and from Figures 7.3 and 7.5. To establish the mainline gradient a one kilometre section shall be used, 0.5 km either side of the merge or diverge nose tip, and the average gradient determined. The merge connector road gradient shall be based on the average of the 0.5 km before the nose tip. Page 135
145 Table 7.5: Percentage Correction Factors for Gradients and the presence of HGVs %HGV Mainline Gradient Merge Connector Gradient <2% >2% <2% 2%-4% >4% Geometric Standards Cross Sections For the purpose of designing grade separated junctions, Table 7.4 gives the required number of lanes and widths for the running carriageway for a range of design flows and road types. Details of other components such as hard shoulders, hard strips and verges that make up the cross section for slip roads and interchange links are detailed in DN-GEO Values for the appropriate widths of such components can be found in the relevant tables of DN-GEO Maximum Lengths of Slip Roads and Interchange Links A Slip Road longer than 0.75 km must be designed as an Interchange Link. Single Lane Interchange Links must only be provided: a) when their length does not exceed 1 km and they are on an average uphill grade of up to 3%, are level or on a downhill grade; or b) where their length does not exceed 0.5 km and they are on an average uphill grade of 3% or steeper. Where two lane interchange links are proposed, care will be needed to ensure that any subsequent merge can be designed in accordance with this standard. Layout A and Layout B merges are not permitted for two lane slip roads Design Speed Design speeds for the mainline must be determined from DN-GEO The design speeds of connector roads must be as given in Table 7.6. The design speed for link roads should normally be one design speed step below that of the mainline, as shown in Table 7.6 and this reduced design speed will need to be made clear to the vehicle driver. To help achieve this, link roads should be subject to an appropriate speed limit, either mandatory or advisory. Where the proposed link road design speed is one design speed step below that of the mainline and this cannot be made obvious to the driver, the higher design speed should be used. Where the link road is a connection to a motorway, motorway merge parameters apply, regardless of the design speed. Page 136
146 Table 7.6: Connector Road Design Speed Mainline Design Speed Rural Motorway 120km/h Urban Motorway 100km/h Rural Type 1 Dual Carriageway 120km/h Rural Type 1 Dual Carriageway 100km/h Urban Type 1 Dual Carriageway 85km/h Urban Type 1 Dual Carriageway 70km/h Connector Road Design Speed km/h Interchange Link Slip Road Link Road 120 or or or or or or 60 Dumb-bell Link Road Loops Any transition curves at locations where the design speed changes must be designed to the higher design speed value Horizontal and Vertical Alignment The geometric standards for horizontal and vertical alignment and stopping sight distance for the mainline through a grade separated junction and for the connector roads must be provided in accordance with DN-GEO The maximum gradient for connection roads shall be 6%. Low radius connector roads must be widened on curves in accordance with DN-GEO Vertical Alignment for Merges and Diverges Vertical design of merges and diverges (see Figure 7.17) shall provide: a) At the start of nose, a constant crossfall shall be maintained across the main carriageway, the tip of the nose and the slip road carriageway (Section A-A on Figure 7.17). b) At the back of the nose either: i. a constant crossfall across the main carriageway, the back of the nose and the slip road carriageway (Section B-B on Figure 7.17) or; ii. a separate crossfall for the mainline and the slip road with a single change in crossfall by a maximum of 3%, located on either edge of the nose or within the nose (Section B-B on Figure 7.17). c) From the back of the nose to the point where both slip road and mainline verge widths have been fully developed (shown as point V on Figure 7.17), the crossfall of the un-paved verge shall be a maximum of 5% (Section C-C on Figure 7.17). Page 137
147 Figure 7.17: Vertical Alignment for Merges and Diverges Page 138
148 7.12 Loops In the case of the horizontal curvature and superelevation for loops (as defined in Chapter 1), there is evidence to suggest that the radii of loops can safely be much less than for curves turning through lesser angles, provided that adequate warning is given to drivers and clear sight lines are maintained. For loops the minimum radii may therefore be those given in Table 7.7 appropriate to the mainline design speed. Within the loop, successive radii of the same hand must not reduce in radius. The standards for superelevation for loops are set out in DN-GEO Superelevation greater than 7% and up to 10% may be provided as shown in DN-GEO but superelevation greater than 7% should be used with caution where there is a risk of prolonged icy conditions. Where loops leave or join the mainline, crossfall alongside the nose must be the minimum required for drainage design as laid down in DN-GEO Widening on loops must be as set out in Chapter 5 of this document. Table 7.7: Minimum Loop Radii (m) Design Speed 120 km/h Design Speed 100 km/h or less On/Off Mainline On to Mainline Off Mainline Research into loops carried out from 1985 to 1994 did not reveal any systemic safety problems. Collision levels at sites surveyed were generally low with approximately a third of the sites having no personal injury collisions over the study period. The research looked at whether non-compliance with existing standards gave rise to safety problems and a variety of non-complying loops were examined. The study examined the following loops which are shown in Figure 7.18: Basic merge A loop that passes through approximately 270 o where traffic merges with the mainline flow. This Basic Merge, when combined with the Hook Diverge, forms the layout in Figure 7.19b. Basic diverge A loop that passes through approximately 270 o where traffic diverges from the mainline flow. This Basic Diverge, when combined with the Hook Merge, forms the layout in Figure 7.19a. D merge The loop commences at a T-junction or roundabout and merges with the mainline flow. The angle turned is typically approximately 180 o. D diverge The loop commences at a diverge from the mainline flow and ends at a T-junction or roundabout. The angle turned is typically approximately 180 o. Hook merge This layout is classified as a loop and the notional total angle is between 180 o and 270 o. This Hook merge, when combined with the Basic diverge, forms the layout in Figure 7.19a. Hook diverge This layout is classified as a loop and the notional total angle is between 180 o and 270 o. This Hook diverge, when combined with the Basic merge, forms the layout in Figure 7.19b. Page 139
149 Figure 7.18: Types of Loop Note: A near straight is required beyond the back of each nose (see Sections 7.7 and 7.8) Page 140
150 The average speed of approach to a loop may have an impact on its safety record. It is possible that the higher speeds on motorways on the approach to loops may be a contributory factor to collisions, particularly on diverge loops. Measures to maintain safety are necessary, and measures to consider include: a) provision and maintenance of clear visibility over the whole of the loop on the approaches, especially beyond an underbridge (see Paragraph ); b) advisory speed limits and/or bend signs and chevron warning signs; c) widening of lanes on the loops as appropriate for lower radii in accordance with Chapter 5 of this standard; d) the provision of vehicle restraint systems on the outside of the curve; e) physical separation of opposing traffic streams (see Section 7.17 Connector Roads for mandatory requirements); f) lighting; g) high skid resistant surfacing. The provisions for loops in this document must apply only to the layouts shown in Figure 7.18, which may be used in combination as shown in Figure Page 141
151 Figure 7.19: Examples of Combinations of Different Types of Loop Note: A near straight is required beyond the back of each nose (see Sections 7.7 and 7.8) Page 142
152 7.13 Sight Distances Merges The Stopping Sight Distance on the connector road must be that related to the design speed selected for that road (see Table 7.6). This will apply until the driver reaches the Stopping Sight Distance from the back of the merge nose. From that point forward, the Stopping Sight Distance must be that for the mainline design speed as illustrated in Figure 7.20A. There must be no obstruction to sight lines between the connector road and the mainline and vice versa for the length of the merge nose. There is a minimum approach angle at which drivers can merge on direct sight. Below this minimum approach angle drivers will be moving nearly parallel to the mainline carriageway and will have to merge using mirrors. It follows that there is a minimum width of merge nose and this can be derived from geometric parameters (Section 7.7). The width of the back of the nose must be sufficient to accommodate the mainline hardshoulder/hardstrip and the connector road off side hardstrip Diverges The Desirable Minimum Stopping Sight Distance for the mainline design speed shall be maintained until the driver reaches the tip of the diverge nose. The stopping sight distance can then be reduced to the Desirable Minimum for one design speed step below the mainline design speed (but not below 70km/h). When the driver reaches the back of the diverge nose, the stopping sight distance can then be reduced to the Desirable Minimum for the design speed of the connector road as illustrated in Figure 7.20B. On lengths where two sight distances overlap, the requirements of the longer Stopping Sight Distance shall be met. If the length of the connector road between the back of the nose and the stop or yield line of the at-grade junction at the end of the connector road is less than the mainline Stopping Sight Distance, then a 0.26m object at the stop or yield line must be visible from a distance equal to the mainline Stopping Sight Distance from either the connector road or the mainline carriageway. See Figure 7.20C Loops In addition to the general stopping sight distance requirements, there must also be no obstruction to sightlines across the full extent of loops of low radius. This includes where the loops connect to the main carriageway as shown in Figure This is to ensure that drivers are able to perceive the whole of the loop layout on their approach from upstream and adjust their speed and conduct accordingly. The only available relaxation to these requirements is when the necessary vehicle restraint systems obstruct the view to the 0.26m object height, in which case a clear sightline must be available above the vehicle restraint system to the 1.05m object height. At connections to the local road system and where at-grade junctions form part of the grade separated junction, the sight distance requirements for various junction types as outlined in this standard shall be adopted for roundabouts, traffic signals and priority junctions respectively. Approaching drivers shall have unobstructed visibility of the at-grade junction from a distance corresponding to the relevant Stopping Sight Distance on the approach road Hardstrip and Hardshoulder For merge configurations as shown in Figures to 7.4.5, the width of the connector road hard strip shall change to the width of the mainline hard shoulder or hard strip over the full length of the nose. For diverge configurations as shown in Figures to 7.6.4, the width of the mainline hard shoulder or hard strip shall be maintained to the tip of the diverge nose. The width of the mainline hard shoulder or hard strip shall change to the width of the connector road hard strip over the full length of the nose. Page 143
153 Figure 7.20A: Illustration of Stopping Sight Distance on Merge Slip Road Page 144

154 Figure 7.20B: Illustration of Stopping Sight Distance on Diverge Slip Road Page 145

155 Figure 7.20C: Illustration of Stopping Sight Distance on Slip Road For measurement of Stopping Sight Distance to the yield line of a roundabout, as described in this standard Notes: This figure shows the situation when the distance from the back of the nose to any stop or yield line is less than the Desirable Minimum Stopping Sight Distance for the mainline (SSD1). This figure does not apply to loop roads. Page 146

156 7.15 Lane Drop/Lane Gain and Through Carriageway Where a 3-lane carriageway is reduced to 2 lanes by means of a lane drop at a junction as shown in Figure 7.20, provision must be made on the link between the lane drop and a subsequent lane gain for maintenance activities, incident management and temporary traffic management systems. Therefore, the pavement must be constructed to a width of 3 lanes (plus hardshoulder if a motorway) and the pavement adjacent to the nearest paved edge must be hatched out to leave a normal width of hardstrip (or hardshoulder if a motorway) adjacent to the running lane as shown in Figure The diverge and merge areas must be designed to provide sufficient pavement to allow conversion of the junction from a lane drop/lane gain to a 3-lane link with taper diverge and merge. Advice on the signing of lane gains and lane drops is given in the Traffic Signs Manual. Figure 7.21: Lane Drop to Two Lanes and Subsequent Lane Gain Showing Hatched Pavement for Maintenance and Traffic Management Page 147
157 7.16 Interchanges An interchange does not involve the use of an at- grade junction and so provides uninterrupted movements for vehicles moving from one mainline to another, by the use of connector roads with a succession of diverging and merging manoeuvres. Good design minimises conflict points and ensures that the path between them is easily understood by drivers, by effective signing and road marking. This design objective should be assessed within the overall framework of the points below: a) efficiency; b) safety; c) consistency; d) location; e) maintenance; f) environmental effects; g) land take; h) capital cost; i) economic assessment; j) provision for non-motorised users (crossing the junction) Figure 7.22 shows three different 4 way interchanges. a) The 4 level interchange layout has the advantages of reduced land take, absence of loops and low structural content, but is visually highly intrusive, has the greater number of conflict points and has therefore been used infrequently. See Figure a. b) The 3 level interchange introduces two loops and reduces conflict points but increases both structural content and cost, whilst still being visually intrusive. A disadvantage is that it requires separate diverge points for left and right movements from one of the mainlines, which can be difficult to sign. See Figure b. A variant of Figure b is shown at Figure 7.23 and is an example of how environmental impact and structural content can be substantially reduced without a great increase in land take, by taking advantage of the skew of the intersecting mainlines. The three way trumpet interchange (Figure c) should be designed to enable future conversion to a four way. It has a 2 way slip road which requires careful design for safety. Figure d shows a three way interchange with restricted movement. This enables high vehicle speeds to be maintained with low land take, but it requires a skew structure and prohibits any future conversion. Page 148

158 Figure : Typical Layouts of Interchanges Page 149
159 Figure : Typical Layouts of Interchanges Figure 7.23: Variant of Figure b Restricted in Height to Reduce Environmental Impact Page 150
160 Merges with a flow imbalance, where the merging traffic flow is greater than the mainline traffic flow can occur within an interchange. Priority should still be given to traffic on the mainline. If the merging flow is over a lane capacity, there will need to be a lane gain. HGVs must be given an opportunity to join the mainline safely. Operational problems have occurred where the left hand link has been on a long downhill section and the right hand link uphill, with consequential disparity in vehicle speeds at the merge, and this particular layout is not recommended. Loops and certain links may require advisory speed limits (which should be discussed and agreed with TII) to warn the driver of the safe negotiating speed for reasons of alignment and visibility. This speed limit should be used in conjunction (where appropriate) with a bend warning sign and chevron warning signs to reinforce the hazard warning. Only one level of speed limit should be used within an interchange as steps down in speed limits may confuse the driver. Single lane interchange links can have advantages in cost over 2 lane interchange links for interchanges which contain structures of substantial length. However, where the predicted flows are near the top of the range (Table 7.4) the uncertainty of the prediction should be recognised, as it may be prohibitively expensive to convert later to a two-lane interchange link. A disadvantage is that single lane interchange links may require closure during certain maintenance activities. Consequently, a whole life cost assessment (including costs during maintenance) should be carried out to confirm the cost effectiveness of proposed single lane links General Maintenance Designers should allow within their designs for facilities to maintain areas within interchanges which are not readily accessible. Locations for access should be chosen having regard to visibility to and from the proposed access location and the need to maintain traffic flow through the works. Any lay-by should not be sited in an exposed position on the inside of connector roads on left hand curves with radii below Desirable Minimum. They should be located on straights or right hand curve sections with at least desirable minimum radius Connector Roads Two way slip roads must be dual carriageway with opposing traffic separated by a physical central reserve with vehicle restraint system. Two way single carriageway slip roads are not permitted. Two way slip roads only occur at half-cloverleaf and trumpet junctions. Studies into the safety of tight loops for 2 way slip roads, as compared to one way, indicated that a physical barrier will improve safety and reduce cross-over collisions. For motorway interchanges emergency telephones should not be sited in an exposed position on the inside of connector roads on left hand curves with radii below Desirable Minimum. They should be located on straights or right hand curve sections with at least desirable minimum radius. The collision risk for slip roads is similar whether the mainline is carried over or under. However, the preferred treatment is to design diverge slip roads uphill and merge slip roads downhill, with the side road over the mainline. This assists vehicles on the slip roads in matching their speeds to those of mainline vehicles on merging and reducing their speeds at the approach to the side road junction on diverging. Private means of access and junctions on connector roads are not permitted. Page 151
161 Merging and Diverging Lanes Mainline lane drops within a junction on a 3-lane mainline (3 lanes prior to the diverge, 2 lanes between diverge and merge and then back to 3 lanes) are not generally recommended on operational and safety grounds. They severely impair future maintenance, especially at interchanges where no reasonable diversion route is available. However, if such a layout becomes necessary the requirements of Section 7.15 should be followed. A lane drop at a junction diverge must be used when changing carriageway standards from 4 lanes to 3 or 3 lanes to 2. Similarly, a lane gain at a junction merge must be used when changing carriageway standards from 2 lanes to 3 or 3 lanes to 4. The layout of the diverge or merge should be selected corresponding to the leaving or joining flow but under light flow conditions could be Figure (Layout C) and Figure (Layout B). Removal of a lane (excluding climbing lanes) must not take place on the link between junctions On-line Service Areas On-line Service Areas should be provided in accordance with the guidance in DN-GEO-03028, The Location and Layout of Service Areas. Generally, all vehicle types are permitted to enter an On-line Service Area via a connector road directly from the mainline or as an integral part of a grade separated junction. On-line Service Areas shall be designed in accordance with the merge and diverge layout designs, including minimum length of diverge slips, and junction spacing parameters in this chapter. Measures must be taken to reduce any see-through effects when looking from a diverge slip to the merge such as slip or internal road system of the On-line Service Area Other Service Areas The merge and diverge layout design of all-purpose road service areas should be based on the geometric parameters within this standard as set out in this Chapter or Chapter 5 of this Standard, as appropriate for each site Emergency and Maintenance Accesses Where an emergency or maintenance access is required, a suitable layout must be chosen from Chapter 5 of this standard. The preferred layout is that shown as Direct Access Layout 1 but the designer must check that this would be adequate for its likely use. The access must be gated and locked to prevent unauthorised use. The entrance gate or gates must be set back to accommodate, behind the hardstrip or hardshoulder, one vehicle of the largest type expected to use the access. For a maintenance access, provision must be made for two vehicles of the largest type expected to use the access to pass in opposite directions in the vicinity of the access. The design of the emergency or maintenance access must comply with the requirements of Chapter 5 of this standard with respect to avoiding steep gradients on the access road in the immediate vicinity of its connection to the national road. Page 152
162 7.18 Safety The consequences of an incident can be severe if hazards are present within the verge area immediately downstream of the diverge nose at a junction. It is therefore desirable to provide a clear zone at the back of diverge noses such that the physical nose is free from all hazards, including safety barriers, to minimise the risk to errant vehicles. Creating a clear zone will normally require the vertical alignment for the connector road to follow that of the main carriageway for a short distance to allow the cross-section to be reasonably level. If creation of a clear zone is not achievable due to site constraints, the risk needs to be reduced to as low as is reasonably practical. For example, if a safety barrier is required to protect errant vehicles from any hazards, including height differences between adjacent carriageways, the use of full height terminals or crash cushions with appropriate performance levels is recommended as end treatments to barriers. Sufficient space should be allowed for any safety barriers and end treatments. Page 153
163 8. Layout of Compact Grade Separated Junctions 8.1 Design Procedure General Principles The introduction of design standards for compact grade separation is primarily aimed at improving safety for all road users. At all stages in the design and construction of the junction it is of paramount importance that safety aspects are fully investigated and considered. Compact grade separation can be used on single carriageways and Type 2 and 3 Dual Carriageways as defined in Table 6.1 of DN-GEO This Chapter sets out the level of provision to be considered for low traffic flow situations on the minor road and effectively extends downwards the range of flows and conditions over which grade separation could be justified economically to around 12,500 AADT on the major road. On existing dual carriageways the provision of compact grade separation may be applied to a route which consists of a number of grade separated junctions and roundabouts interspersed with priority at grade priority junctions. Introduction of compact grade separation on a route such as this is intended to remove all of the right turn manoeuvres associated with the mainline resulting in a fully grade separated route. Some left-in/left-out junctions may be retained or introduced. Where a compact grade separated junction or junctions are being considered the following shall be taken into account:- a) the closure of certain minor road junctions which have very low flows and for which there are alternative routes. The additional journey length, delay and inconvenience resulting from the closure of a route must be considered in the context of the improved safety which will be achieved by the removal of all the right turn manoeuvres; b) limiting remaining at grade junctions to left in left out only; c) where there is no alternative route it may be necessary to reconsider the location and number of junctions; d) improvements to the network to assist the closure of certain junctions; e) the provision of accommodation roads, and NMU facilities; f) the removal of agricultural accesses from the mainline; g) collecting a number of minor roads into a single compact grade separated junction; Page 154
164 8.1.2 Flow Standards On Type 3 Dual Carriageways with relatively high traffic flows, it may be appropriate to provide compact grade separated junctions. On a length of Type 3 Dual Carriageway with compact grade separated junctions there shall be no breaks in the central reserve. All major junctions shall be compact grade separated, or roundabout, while minor ones shall be left-in/left-out only. U-turns will only be possible at the compact grade separated junctions, or at roundabouts. Accesses should be severely limited or avoided altogether. Where practicable, layouts should be designed so that merging occurs on two-lane sections, thereby avoiding the problems of merging into a single lane. This can be achieved if the junction is at a noncritical changeover. Roundabouts may be provided at the most significant junctions on a length with compact grade separated junctions. Analysis indicates that for the improvement of an existing priority junction to compact grade separation standards an increase in capacity of 70% for some movements can be achieved at the mainline junctions. The layout of the compact grade separation should be chosen to suit the traffic movements. In certain conditions the redistribution of the turning traffic can result in significant turning flows at the minor road junction entry and exits. It is important therefore to assess the capacity of these junctions when considering the layout to be adopted Provision for Non-Motorised Users Provision must be made for the specific requirements of non-motorised users in the design of compact grade separated junctions. To assist cyclists, gradients would ideally be limited to 5%, however the objectives of compact grade separations will in many instances prevent this being achieved. Gradients should only be increased above this figure with careful consideration of all factors in accordance with Section At junctions, where the NMU facility along the mainline crosses a connector road, the geometric requirements as prescribed for major priority junctions should be provided for NMU s, including the provision of a 3.5 metre central island if traffic flows warrant it. 8.2 Geometric Standards General This standard provides a geometric standard for compact grade separation incorporating established design standards for priority junctions. The geometric standards for the mainline and for those minor roads which pass directly through a compact grade separation shall be provided in accordance with DN-GEO The standards for compact grade separation in this standard have been set in order to minimise the variation in designs to prevent confusion for the road user. Those items which do permit a degree of variation at the discretion of the designer are: a) Junction configurations; b) Horizontal radii on compact connector road (desirable minimum radius with a relaxation of one design speed step); Page 155
165 c) Vertical Curvature (desirable minimum radius with a relaxation of one design speed step); d) Carriageway Width (three options and a one step relaxation); e) Curve Widening (three options are permitted for each radius) Design Speed Design speeds for the mainline and the minor road shall be determined from DN-GEO As a general principle, it is intended that the speed of a vehicle through the compact connector road shall be limited by its speed through the entry and exit junctions with the mainline and the minor road. For this reason long straight sections within the compact connector road shall be avoided. The design standards for compact grade separated junctions relate to a single design speed of approximately 30km/h. Junctions shall only be designed to this design speed, higher or lower standards shall not be used. A range of standards would result in driver confusion and uncertainty and problems of perception of the junction with consequent safety implications. If speeds markedly in excess of this do occur or are anticipated, then speed limits within the junction may need to be considered Compact Connector Road Compact connector roads shall be designed in accordance with Table 8.1 except for the special conditions when the stopping sight distance may be relaxed further as outlined in Section The stopping sight distances in Table 8.1 are not related to the design speed but are based upon the requirements to provide adequate stopping sight distance through the compact connector road to show the shape of the junction clearly to the driver leaving the mainline. The design parameters provided in this section are for the compact connector road only, junctions either end of the connector road shall be designed in accordance with the relevant chapter of this standard and DN-GEO Table 8.1: Design Standards for Compact Connector Roads Stopping Sight Distances Desirable Minimum (m) 70 Relaxation of One Design Speed Step (m) 50 Horizontal Curvature Desirable Minimum Radius (m) with 5% Superelevation 40 Relaxation of One Design Speed Step(m) with 5% Superelevation 32 Vertical Curvature Desirable Minimum Crest K 3.3 Relaxation of One Design Speed Step Crest K 2.3 Absolute Minimum Sag K with lighting 2.3 Absolute Minimum Sag K without lighting Horizontal and Vertical Alignment Horizontal radii shall comply with Table 8.1. In normal circumstances the Desirable Minimum Radius should be used, however in difficult circumstances e.g. space constraints or environmental issues exist, a Relaxation of one design speed step may be used at the discretion of the Designer. Given the low design speed and the nature of the compact connector road, transition curves are not required within the compact grade separated junction. Page 156
166 In the design of vertical curves consideration is given to stopping sight distance and driver discomfort, which requires the vertical rate of change of grade to be kept within tolerable limits. For the low design speed adopted for compact connector roads the stopping sight distance criterion over the summit is not critical because larger changes of grade do not obstruct stopping sight distance and the comfort criterion overrides. Wherever possible, vertical curvature on bridge decks should be avoided Sight Distances For Compact Connector roads of low radii where it is necessary to provide for vehicle restraint systems, an obstruction in Stopping Sight Distance to the 0.26m object height may occur. In this case a relaxation to Stopping Sight Distance to the 0.26m object may be provided but SSD shall be maintained above the vehicle restraint system to the 1.05m object height. Guidance on sight distance and visibility standards are given in Chapter 5 of this standard for the connections to the major and minor roads. In the case of compact grade separation these shall be taken as mandatory. Where minor roads or accommodation roads are connected to the compact connector road then the visibility standards at the junction shall be in accordance with Chapter 5 and Table 8.1 of this standard Gradients The desirable maximum gradient for compact connector roads shall be 8%, although relaxation to 10% shall be permitted in difficult locations. In selecting the gradient, the needs of cyclists should be considered and the risk of occurrence of icy conditions Superelevation Normal standards for superelevation, set out in DN-GEO-03031, would require excessive superelevation for all compact grade separations. Icy conditions can cause slow moving vehicles to slide to the inside of the curves with excessive superelevation, this effect can be exacerbated by steep gradients. The geometric layout of the compact connector road will require successive application and removal of the superelevation between the connector road and the junction mouths. The need to maintain consistent steering requirements through the compact connector road is an important design consideration which shall be taken into account in the application of superelevation. Superelevation on compact connector roads shall be limited to 5%. Designers shall ensure that adverse camber is avoided at the entry to and exit from compact junctions. Accordingly, where practical, compact grade separated junctions should not be located on mainline transition curves, as this can result in difficulty in the avoidance of adverse camber Drainage All drainage within the compact grade separated junction should be of a positive nature via kerbs and gulleys to facilitate the removal of surface water. Factors to consider and which may influence the decision are:- a) the geometric standards for the junction are likely to result in steep gradients combined with successive application and removal of superelevation up to 5%; b) surface water from the compact connector road should be prevented from flowing onto or across the major and minor carriageways. Page 157
167 8.2.9 Cross Sections and Curve Widening For the purpose of designing junctions and interchanges, cross-sections for the mainline and typical connector roads are given in DN-GEO and Chapter 7 of this standard. Different lane marking details and widths of construction for connector roads are specified in this Standard. Compact connector roads may be widened on curves in accordance with Table 8.2, the widening shall be applied in the form of central hatched markings as illustrated in Figure 8.1. The width of curve widening shall be chosen to suit the anticipated level of usage by HGVs. Designers shall take into account the probability of HGVs regularly meeting on the curve. Where no curve widening is applied, HGVs will cut across into the oncoming lane, where the minimum curve widening is applied HGVs will cut across into the whole of the hatched area. Where the normal curve widening is provided there will be sufficient width for two large vehicles to pass in opposite directions. Regulatory signs shall be provided when appropriate in accordance with the requirements detailed later in this Chapter. Figure 8.1: Application of Curve Widening Inner Channel Radius (m) Table 8.2: Curve Widening on Compact Connector Roads Width WH of Hatching at Apex on Curve (m) No Curve Widening Minimum Curve Widening Normal Curve Widening Carriageway widths for the compact connector road shall be such that they provide a transitional change in standards from the major carriageway width to the minor carriageway width in accordance with Table 8.3. The minimum width of carriageway for a compact connector road shall be 6.6m and the maximum shall be 7.9m, excluding curve widening. Where the traffic volumes are particularly low and the proportion of HGVs is correspondingly low a relaxation to 6m may be permitted, by either reducing the carriageway width or omitting the central hatched markings. Page 158
168 Table 8.3: Compact Connector Road Widths Major Carriageway Compact Connector Road Minor Carriageway Lane Standard Lane Width Lane Width Width (W) Width of Central Hatch (m) (m) (excluding hatching) (m) Markings (m) per lane < 3.0 All Widths per lane 3.0 to per lane Hardstrips The use of hardstrips is associated with high speed roads, they shall not be used within the compact connector road. Where hardstrips are included on the mainline they shall be terminated within the junction Junctions Priority Junction entries and exits with the mainline shall be in accordance with Chapter 5 of this standard with the exception that diverge auxiliary lanes shall be provided at compact junctions on Type 2 dual carriageways. Where auxiliary lanes are provided, the layout shall be in accordance with the layout as shown in Figure with an auxiliary taper length of 55m and an auxiliary lane length of 150m which shall terminate at the tangent point of the 40m exit radii. No nose shall be provided in compact grade separated auxiliary lane diverges. At compact grade separated junctions the exit radius off the mainline as detailed in Chapter 5 shall be increased to 40m for left in-left out junctions. Further design details specific to left in-left out junctions forming part of compact grade separated junctions are provided in Figure 8.2. Channelising islands shall be set back 0.6m from the lane marking. Figure 8.2: Left in-left out Junction forming part of a Compact Grade Separated Junction Slip roads shall not be used at compact grade separation since compact connector roads are 2 way. Page 159
169 8.3 Layout Options General In some cases, underbridges could be considered as an alternative where they may prove practical and justifiable economically. There may be situations, where, due to local topography, this would be preferable in landscape terms. In level and treeless landscapes, overbridges can be visually intrusive and planting may be out of character. Environmental Design is addressed further in the TII Environmental Planning Guidelines. Detailed examples of alternative layouts for junctions are indicated in Figures 8.3 to 8.5 and an example of a layout for a 3 arm junction is indicated in Figure 8.4. Schematic representations of other layouts are indicated in Figures 8.6 to 8.8. Compact grade separation can be used effectively on a section of carriageway which has a series of priority junctions in close proximity to remove right turn manoeuvres. For example, where a compact junction is incorporated, the junctions adjacent to the compact grade separation can be restricted to left in left out requiring right turning traffic from these junctions to divert to the compact grade separation to complete their manoeuvre. Another option may be to close the adjacent priority junctions and divert these routes to connect into the compact grade separated junction. The preferred locations for the junction of the compact connector road to the mainline are in the 1st and 3rd quadrants as indicated in Figures 8.3 as this facilitates the provision of required visibilities without the need to widen under the structure Typical Sketch Layouts Figure 8.3: Detailed layout of 4 arm compact junction with compact connector roads in preferred location. Diverges and merges are to be designed in accordance with Chapter 5 for priority junctions. Layout suitable for junctions with substantial minor road through traffic. At grade junctions with a single carriageway mainline must be staggered to avoid see through issues. Figure 8.4: Detailed layout of 3 arm compact junction with compact connector roads in preferred location. Diverges and merges are to be designed in accordance with Chapter 5 for priority junctions. At grade junctions with a single carriageway mainline must be staggered to avoid see through issues. Figure 8.5: Detailed layout of a single quadrant link at single carriageway road with major road Ghost Island and roundabout (or simple priority junction) at minor road. Single quadrant links with a ghost island junction on the mainline can be considered for single carriageway roads with lower flow turning movements. The link should be located in the quadrant that will ensure the larger turning movements are left turns onto and right turns off the major road. Figure 8.6: A selection of schematic layouts indicating 4 arm compact grade separations on dual allpurpose carriageways. Figure 8.7: A schematic example layout indicating 4 arm compact grade separations on single allpurpose carriageways. Figure 8.8 A schematic example layout indicating 3 arm compact grade separations on dual allpurpose carriageways. Figure 8.9: A schematic example layout indicating 3 arm compact grade separations on single allpurpose carriageways. Page 160
170 Figure 8.3: Example of Compact Grade Separation for 4 Arm Junction Figure 8.4: Compact Grade Separation for 3 Arm Junction Page 161
171 Figure 8.5: Single quadrant link with a ghost island junction on the single carriageway mainline Figure 8.6: Schematic Examples of 4 Arm Compact Grade Separation on Dual Carriageway Page 162
172 Figure 8.7: Schematic Example of a 4 Arm Compact Grade Separation Single Carriageway Page 163
173 Figure 8.8: Schematic Example of 3 Arm Compact Grade Separation on Dual Carriageways Figure 8.9: Schematic Example of 3 Arm Compact Grade Separation on Single Carriageways Page 164
174 8.4 Safety General One of the principal objectives of compact grade separated junction design is to improve safety by the elimination of right turn manoeuvres between the mainline and the side road, by providing left in left out turn only priority junctions and the closure of central reserve gaps. It is intended that compact grade separation shall be used to provide a safe means of crossing high speed routes for all road users. The geometrical standards for the compact connector road have been established at a level of provision intended to maintain slow vehicular speeds through their length thereby improving safety for other road users. Other positive factors which improve safety as a result of compact grade separation are; a) removing the possibility of large vehicles which cross central reserve gaps protruding into the offside lane; b) removal of U turns on the mainline Collisions Collision statistics for 3 arm priority junctions indicate that the severity of collisions is dependent upon the classification of the mainline and the mainline speed limit and that generally collision severity decreases as speed decreases. Compact grade separation will transfer the right turn manoeuvres from the higher speed, higher classification road to the lower speed, lower classification road. The effect of this should be to reduce the number of fatal and serious collisions. There may be a corresponding increase in minor injury collisions at the minor road junction, however the use of roundabouts at the junctions between the minor road and compact connector road may reduce the number of collisions at these locations also Traffic Signs On the approach to the junction from the major road, the junction must be clearly defined by means of appropriate signing indicating the junction as a priority T junction and not as a slip road. On the approach to the junction from the minor road, the junction must be clearly defined as a roundabout or priority junction appropriate to the layout used, and not as a slip road. Where normal curve widening is not provided, as described earlier in this Chapter and in Table 8.2, then regulatory signs shall be provided on the compact connector road to advise motorists in one direction that they should give way to vehicles proceeding in the opposite direction. Statutory requirements for regulatory signs are contained in the Traffic Signs Manual. Within the compact connector road, it is recommended that signing be restricted to warning signs indicating the nature of the alignment, and the proximity of junctions Road Markings The application of special surface treatments may be provided as an additional means of highlighting the nature of the geometrical standards for the compact connector road. This can be achieved by the application of a contrasting surface colour (red) within the hatch markings to emphasise the nature of the curve, this should reinforce the meaning and presence of the markings to the driver. Page 165
175 8.5 Specific Road User Requirements Use by Drivers of Agricultural Vehicles It is intended that compact grade separations shall be used to accommodate the requirements for large, slow-moving agricultural vehicles. Careful consideration must be given to the combined effect of the gradient and superelevation to ensure that high loads are not subject to sudden shifts caused by rapid changes in crossfall. Where farm or field accesses on the mainline are situated close to the compact grade separated junction consideration should be given to joining them to the compact connector road Use for Farm Animals Where farms are adjacent to compact grade separated junctions, it may be necessary to provide cattle grids on the minor road approach or on the accommodation road approach to the junction Requirement for Hardened Verges Where there is expected usage by a combination of equestrians, agricultural vehicles and farm animals, hardened verges should be considered on the compact connector road to prevent damage to the verge and drainage and to encourage these users to travel more safely and comfortably off the main carriageway. Page 166
176 9. References 9.1 TII Publications (Standards) a) DN-STR-03005, Design Criteria for Footbridges b) DN-GE , Guidance on Minor Improvements to National Roads c) DN-GEO-03031, Rural Road Link Design d) DN-GEO-03040, Subways for Pedestrians and Pedal Cyclists Layout and Dimensions e) DN-GEO-03041, The Design of Major Interchanges f) DN-GEO-03044, The Geometric Layout of Signal-Controlled Junctions and Signalised Roundabouts g) DN-REQ Safety Barriers h) DN-GEO-03036, Cross Sections and Headroom i) DN-GEO-03046, L The Location and Layout of Lay-bys and Location Markers j) DN-GE , Rural Cycleway Design (Offline) k) DN-LHT-03038, Design of Lighting for the Strategic Motorway and All Purpose Trunk Road Network l) AM-PAV-06045, Management of Skid Resistance m) DN-PAV-03023, Surfacing Materials for New and Maintenance Construction, for Use in Ireland 9.2 Transport Infrastructure Ireland Publications a) Guidelines on Traffic Calming for Towns and Villages on National Routes; 1999 b) Road Collision Facts; Ireland; Traffic Sign Regulations a) Traffic Signs Manual. Department of Transport. 9.4 UK, Design Manual for Roads and Bridges Standards Volume 6 Road Geometry, Section 2 - Junctions a) TD 16/07 Geometric Design of Roundabouts b) TD 22/06 Layout of Grade Separated Junctions c) TD 40/94 Layout of Compact Grade Separated Junctions d) TD 42/95 Geometric Design of Major/Minor Priority Junctions e) TD 41/95 Vehicular Access to All-Purpose Trunk Roads Page 167
177 9.4.2 Volume 6 Road Geometry, Section 3 Highway Features a) TD 51/03- Segregated Left Turn Lanes and Subsidiary Deflection Islands at Roundabouts Miscellaneous a) Page 168
178 Design Vehicles Page 169
179 Page 170
180 Page 171
181 Design of Channelising Islands Page 172
182 Design of Channelising Islands This appendix outlines the methodology for deigning channelising islands at priority junctions and is subdivided into: T-Junctions or staggered junctions; Skew junctions; and Rural Crossroads. T-Junctions or Staggered Junctions The recommended layout for T-junctions or staggered junctions, where the minor road centreline is inclined to the major road at an angle of between 70 and 110, is shown in Figure B.1. This figure should be read in conjunction with Tables B.1 and B.2. Figure B.1: Design of Rural Channelising Island (Dimensions in Metres) Page 173
183 Table B.1: Channelising Island Offset Minor road inclination ( ) Offset d (m) Table B.2: Design of Radius R1 Width of major road carriageway at junction (m) Radius R1 (m) Note: Radius R2 is normally the same value as R1 but should be designed to ensure that the channelising island nose is positioned between 2m to 4m from the edge of the main carriageway and that the width of the island lies between 2m and 5m. The methodology for designing channelising islands of this type is described in the following sections and represented in Figures B.2a to B.2f. Page 174
184 Figure B.2a: Channelising Island Development Steps 1 to 4 1. Draw an offset, d, from the centreline of the minor road. Values for d are given in Table B Draw circular arc, R1, tangential to the offset d from the minor road centreline and tangential to the offside edge of the through traffic lane on the major road into which right turning traffic from the minor road will turn. Values for Radius R1 can be found in Table B By striking a circular arc of radius (R1 + 2) metres from the same centre point as arc R1 to intersect the edge of the major road carriageway, Point X is established. 4. Point Y is located where a straight line drawn from the centre point of arc R1 to Point X crosses arc R1. Page 175
185 Figure B.2b: Steps 5 and 6 5. Draw an arc, R2, through Point Y and tangential to the offside edge of the major road offside diverging lane and of an equal radius to R1. (Note: Radius R2 is typically the same size as R1 but should be designed to ensure that the channelising island nose is positioned between 2 to4m s from the edge of the main carriageway and that the overall width of the channelising island is between 2m to5m.) 6. Draw a point, Z, 40m from the edge of the major road on the centreline of the minor road. Page 176
186 Figure 9.1 Figure B.2c: Step 7 Figure Draw 2 lines, A-A & B-B, from this point, Z, which are tangential to the Arc s R1 and R2. Page 177
187 Figure 9.3 Figure B.2d: Steps 8 to Offset these lines A-A and B-B by 0.3m inwards creating A1-A1 and B1-B1. 9. R1s and R2t are then created tangential to these offset lines A1-A1 and B1-B1. a. Arc R1s is created with radius equal to R1 and is tangential to B1-B1 along the minor road and the through traffic lane on the major road into which right turning traffic from the minor road will turn b. Arc R2t is created with radius equal to R2 and is tangential to A1-A1 and the offside edge of the major road offside diverging lane. 10. Draw another line, C-C, which starts at a distance 25m up from the edge of the carriageway on the centre line of the minor road and is tangential to the Arc R1s. Page 178
188 Figure B.2e: Steps 11 to Draw a 0.75m radius, R3, where R1 s and R2 t intersect near the major carriageway. This is the bottom of the channelising island. R3 will be tangential to R1 s and R2 t. 12. Draw another 0.75m to1m radius, R4 between line A 1 -A 1 and line C-C. R4 will be tangential to the Line A 1 -A 1 and C-C. Page 179
189 Figure B.2f: Finalised design Page 180
190 Skew Junctions The design of channelising islands for skew junctions is similar to that outlined above, but the following points should be noted:- Crossroads a) The centreline of the minor road is turned with a radius of at least 50m to meet the edge of the major road at right angles. b) For left hand envelope junctions, the channelising island should be about 15m long. The right hand side of its tail (viewed from the minor road approach) should touch the curved minor road centreline and be rounded off at a radius of 0.75m to 1.00m. c) The offset, d, for left hand envelope junctions is 4.5m. d) For right hand envelope junctions, the circular arc R1 touches the curved minor road centreline and is tangential to the offside edge of the through traffic lane on the major road into which right turning traffic from the minor road will turn. e) The channelising island should be about 15m long. The tail is offset about 1m to the right of the curved minor road centreline (viewed from the minor road approach) and rounded off with a radius of 0.75m to 1.00m. The use of rural crossroads is regarded as a Departure from Standard. However for upgrading of rural cross-roads the following details may be used. The recommended layout of channelising islands at rural crossroads where long vehicles are predicted, and where the minor road centreline is inclined to the major road at an angle between 70 and 110, is shown in Figure B.3. There are similarities in the design to that outlined previously, but the following points should be noted:- a) The long axis of the channelising island is inclined at 5 to the minor road centreline and the island is always 3m wide. b) The circular arc R1 has a radius of 11m and is tangential to the left hand side of the channelising island (viewed from the minor road approach) and the centreline of the major road. (In some cases where the minor road is inclined to the major road at angles between 100 and 110, R1 will have to be reduced to 8m to create a suitable island.) c) The circular arc R2 has a radius of 11m and is tangential to the major road centreline and the minor road centreline. Where the minor road centreline is inclined to the major road at angles less than 70, R1 will normally be 12m and R2 8m. Where the minor road centreline is inclined to the major road at angles greater than 110, R1 will normally be 8m and R2 12m. Where two envelope minor roads meet at a crossroads, the minor road centrelines should be offset relative to one another by approximately the width of one channelising island. Page 181
191 Figure B.3: Design of Rural Crossroads Channelising Island (Dimensions in metres) Page 182
192 Design of a Compound Curve Page 183
193 Figure C.1: Design of a Compound Curve Page 184
194 Junction Analysis Procedure Worked Example Page 185

195 Table D.1: Junction Analysis Procedure Worked Example Data Collection Junction Analysis Procedure Classification and Name Date: 01/04/17 Project: N200 Junction Upgrade Location: N200 / R999 Junction AADT Design Posted Current Year Design Year Speed Speed (2016) (N/A) (Km/h) (Km/h) 4,000 6, Major Road National Secondary Road N200 Intersecting Road Regional Road R999 3,200 4, Junction Type New Existing Site Visit Yes: No: Date of Site Visit (if applicable): 01/10/2017 Functional Characteristics Part 1 (General Information for all Intersections) Collision Analysis Table 1 presents a summary of the accidents which have occurred at the N200/R999 Junction. This information is also shown graphically in Figure 1. Table 1: N200/R999 Junction Collision Data Number Accident date :30 Time Location Description Severity Saturday :35 Friday :05 Thursday :00 Tuesday :00 Saturday :30 Friday R99 (S) N200/R999 R999 (S) N200/R999 N200 (W) N200/R kph zone, Car, Rear end, straight, Dry 100 kph zone, Goods vehicle, Other circumstances, Dry 80 kph zone, Car, Single vehicle only, Dry 100 kph zone, Bus, Headon right turn, Wet 100 kph zone, Car, Single vehicle only, Dry 100 kph zone, Other vehicle, Angle, both straight, Dry Minor Minor Minor Minor Minor Serious Page 186
196 Figure 1: Accident statistics at the N200/R999 junction Access Requirements (Including No pedestrian or cycle facilities required at the junction. NMU Requirements and Level of Usage) Access Control Priority controlled junction Future Development No planned future development in the area. Surrounding lands are zoned agricultural. Vehicle Design Type (Include any Junction designed to accommodate a maximum vehicle size equating to a standard Special Design Vehicle Details) articulated vehicle. % HGV s 4% Part 2 (Specific Information for More Detailed Analysis) N R R N200 Junction Layout & Turning Movement Diagram Figure 2: Friday morning peak hour junction turning movements N R R N200 Figure 3: Friday evening peak hour junction turning movements Notable Constraints due to Upstream/Downstream Junction Yes: No: Notes: Proposed Improvements to Other Roads (that would impact the traffic movement at this location) None Geometric Characteristics Road Geometry on all approaches To be attached in an appendix to this document. Is design compliant with the standards Yes: Page 187

197 Desirable Stopping Sight Distances Achievable Stopping Sight 200m Distances 300m Mainline Horizontal Curvature Profile gradient on mainline 2% Intersecting Roadway 2% Other Characteristics Traffic Management Measures Impact on Utilities Impact on Right of Way Recommendation of Type of Junction Treatment based on Functional, Geometric and Other Characteristics n/a n/a n/a The option to introduce a roundabout at the N200/R999 junction is considered to be the emerging preferred option at this location. The assessment shows that this upgrade would operate well within capacity, and is appropriate considering the relatively balanced flows along each of the N200 and R999. In particular, this option allows for the safe movement of vehicles along the R999 travelling across the, which in the staggered arrangements would be required to undertake two movements to pass through the junction. A roundabout option would also provide safety improvements. Scope of Modelling Required Local Junction Modelling Micro-simulation Modelling Designer: Jane Smith Date: 01/04/17 Approved: Date: Page 188
198

199
GEOMETRIC DESIGN OF ROUNDABOUTS AND TRAFFIC S IGNAL SIGNAL CONTROLLED
 TD 16/07 and TD 50/04 GEOMETRIC DESIGN OF ROUNDABOUTS AND TRAFFIC SIGNAL CONTROLLED JUNCTIONS DMRB Vol 6 File 6 0 ROUNDABOUTS: INTRODUCTION Principles Roundabout Types Entry Deflection Capacity Visibility
NRA New Divided Road Types: Type 2 and Type 3 Dual - Carriageways
 NRA New Divided Road Types: Type 2 and Type 3 Dual - Carriageways DN-GEO-03059 December 2007 DN Design Technical TRANSPORT INFRASTRUCTURE IRELAND (TII) PUBLICATIONS About TII Transport Infrastructure Ireland
PART 5 TD 51/03 SEGREGATED LEFT TURN LANES AND SUBSIDIARY DEFLECTION ISLANDS AT ROUNDABOUTS SUMMARY
 DESIGN MANUAL FOR ROADS AND BRIDGES VOLUME 6 SECTION 3 ROAD GEOMETRY HIGHWAY FEATURES PART 5 TD 51/03 SEGREGATED LEFT TURN LANES AND SUBSIDIARY DEFLECTION ISLANDS AT ROUNDABOUTS SUMMARY This document sets
CHECKLIST 2: PRELIMINARY DESIGN STAGE AUDIT
 CHECKLIST 2: PRELIMINARY DESIGN STAGE AUDIT 2.1 General topics 2.1.1 Changes since previous audit Do the conditions for which the scheme was originally designed still apply? (for example, no changes to
NRA New Divided Road Types: Type 2 and Type 3 Dual-carriageways
 NRA New Divided Road Types: Type 2 and Type 3 Dual-carriageways BENEFITS of the TYPE 2 and TYPE 3 DUAL CARRIAGEWAY ROAD TYPE There are significant safety and economic benefits associated with the Type
Intersection Safety 6/7/2015 INTERSECTIONS. Five basic elements should be considered in intersection design. Intersection Safety (continued)
") Intersection Safety S. M. SOHEL MAHMUD Assistant Professor Accident Research Institute (ARI), Bangladesh University of Engineering and Technology (BUET) Dhaka-1000, Bangladesh 1 Outline of the Presentation
Intersection Safety S. M. SOHEL MAHMUD Assistant Professor Accident Research Institute (ARI), Bangladesh University of Engineering and Technology (BUET) Dhaka-1000, Bangladesh 1 Outline of the Presentation
PART 5 TD 51/17 SUMMARY
 DESIGN MANUAL FOR ROADS AND BRIDGES VOLUME 6 SECTION 3 ROAD GEOMETRY HIGHWAY FEATURES PART 5 TD 51/17 SEGREGATED LEFT TURN LANES AND SUBSIDIARY DEFLECTION ISLANDS AT ROUNDABOUTS SUMMARY This document sets
The Location and Layout of Lay-bys and Location Markers
 The Location and Layout of Lay-bys and Location Markers DN-GEO-03046 December 2010 DN Design Standards TRANSPORT INFRASTRUCTURE IRELAND (TII) PUBLICATIONS About TII Transport Infrastructure Ireland (TII)
INTERSECTIONS AT GRADE INTERSECTIONS
 INTERSECTIONS 1 AT GRADE INTERSECTIONS INTERSECTIONS INTERSECTIONS = INTERRUPTED FACILITIES Definitions and key elements An intersection is defined as an area where two or more roadways join or cross.
Design and Installation of Low Level Cycle Signals
 Transport for London Surface Transport Management System Document Guidance Note Design and Installation of Low Level Cycle Signals Document reference: SQA-0651 - Issue: Draft out of date information. 1
Footpath design. A guide to creating footpaths that are safe, comfortable, and easy to use
 Footpath design A guide to creating footpaths that are safe, comfortable, and easy to use November 2013 Contents Introduction / 1 Zoning system / 2 Width / 4 Height / 5 Surface / 5 Footpath elements /
INTERIM ADVICE NOTE 144/16 DIRECTIONAL SIGNS ON MOTORWAY AND ALL-PURPOSE TRUNK ROADS GRADE SEPARATED JUNCTIONS
 INTERIM ADVICE NOTE 144/16 DIRECTIONAL SIGNS ON MOTORWAY AND ALL-PURPOSE TRUNK ROADS GRADE SEPARATED JUNCTIONS Summary This document sets out guidance for the use of directional signs at motorway and allpurpose
Road Safety Audit training course. Motorways - safety issues of the motorway design
 Road Safety Audit training course Motorways - safety issues of the motorway design Jesper Mertner, Road safety auditor, COWI A/S 1 ROAD SAFETY AUDITING COURSE Content 1. Safety 2. Cross sections 3. Horizontal
INDEX. Geometric Design Guide for Canadian Roads INDEX
 Acceleration lane, see Lanes, Acceleration Access, 8.1 Access Management and Functional Classification 8.2 Access Management by Design Classification 8.3 Access Configuration 8.4 Building Set-Back Guidelines
Guidance on Minor Improvements to National Roads (Including Erratum No. 1)
") Volume 6 Section 1 Part 1 NRA TA 85/11 Guidance on Minor Improvements to National Roads November 2011 (Including Erratum No. 1, February 2012) St. Martin s House, Waterloo Road, Dublin 4. Tel:+353 1 660
Volume 6 Section 1 Part 1 NRA TA 85/11 Guidance on Minor Improvements to National Roads November 2011 (Including Erratum No. 1, February 2012) St. Martin s House, Waterloo Road, Dublin 4. Tel:+353 1 660
A465 Heads of the Valleys Dualling Sections 5 and 6 Dowlais Top to Hirwaun SUMMARY PROOF OF EVIDENCE. Highways Engineering Document WG 1.3.
 A465 Heads of the Valleys Dualling Sections 5 and 6 Dowlais Top to Hirwaun SUMMARY PROOF OF EVIDENCE Highways Engineering Document WG 1.3.2 by Jonathan Thirkettle MARCH 2018 1. Introduction 1.1 I am Jonathan
RAILWAY LEVEL CROSSING CHECKLIST Road Safety Review of Railway Crossings
 RAILWAY LEVEL CROSSING CHECKLIST Road Safety Review of Railway Crossings Location: Crossing No. Date of On-Site Inspection: (Day) / / (Night) / / Weather: CHECKLIST 5. - GENERAL TOPICS Level of control
SLOUGH Stage 3 Road Safety Audit of A4 London Road, M4 J5 to Sutton Lane
 SLOUGH Stage 3 Road Safety Audit of A4 London Road, M4 J5 to Sutton Lane Exception Report Client Officer Rudo Beremauro Date 20 January 2015 RSA /Project Sponsor s Contents Section 3 Project Sponsor's
Access Location, Spacing, Turn Lanes, and Medians
 Design Manual Chapter 5 - Roadway Design 5L - Access Management 5L-3 Access Location, Spacing, Turn Lanes, and Medians This section addresses access location, spacing, turn lane and median needs, including
Cross Sections and Headroom (including Amendment No. 1, dated December 2014)
") Cross Sections and Headroom (including Amendment No. 1, dated December 2014) DNGEO03036 April 2014 DN Design Standards TRANSPORT INFRASTRUCTURE IRELAND (TII) PUBLICATIONS About TII Transport Infrastructure
Cross Sections and Headroom (including Amendment No. 1, dated December 2014) DNGEO03036 April 2014 DN Design Standards TRANSPORT INFRASTRUCTURE IRELAND (TII) PUBLICATIONS About TII Transport Infrastructure
DESIGN CODE. Enterprise West Harlow London Road North Design Code 21
 DESIGN CODE Enterprise West Essex @ Harlow London Road North Design Code 21 4 MAXIMUM BUILDING HEIGHTS 4.1 Table 4A sets out maximum building height standards for each character area within the LDO boundary.
1 VicRoads Access Management Policies May 2006 Ver VicRoads Access Management Policies May 2006 Version 1.02
 1 VicRoads Access Management Policies May 2006 Ver 1.02 VicRoads Access Management Policies May 2006 Version 1.02 2 VicRoads Access Management Policies May 2006 Ver 1.02 FOREWORD FOR ACCESS MANAGEMENT
10.0 CURB EXTENSIONS GUIDELINE
 10.0 CURB EXTENSIONS GUIDELINE Road Engineering Design Guidelines Version 1.0 March 2017 City of Toronto, Transportation Services City of Toronto Page 0 Background In early 2014, Transportation Services
Figure 3B-1. Examples of Two-Lane, Two-Way Marking Applications
 Figure 3B-1. Examples of Two-Lane, Two-Way Marking Applications A - Typical two-lane, two-way marking with passing permitted in both directions B - Typical two-lane, two-way marking with no-passing zones
The major street is typically the intersecting street with greater traffic volume, larger cross-section, and higher functional class.
 INTERSECTIONS DESIGN Definitions and key elements An intersection is defined as an area where two or more roadways join or cross. Each roadway extending from the intersection is referred to as a leg. The
CHAPTER 2G. PREFERENTIAL AND MANAGED LANE SIGNS
 2011 Edition - Revision 2 Page 275 Section 2G.01 Scope CHAPTER 2G. PREFERENTIAL AND MANAGED LANE SIGNS 01 Preferential lanes are lanes designated for special traffic uses such as high-occupancy vehicles
Proposed: Temporary Traffic Management Design Guidance
 Current Temporary Traffic Management Guidance Structure: Chapter 8 Traffic Signs Manual First published in 1996, updated 2007 Addendum in 2010 Guidance for the Control and Management of Traffic at Road
Issues at T junctions:
 TheSlade_PublicConsulationPlans_March2017.pdf These comments relate to junction designs in this phase of the project on The Slade. Comments begin with the northernmost junction: Girdlestone Rd and continue
ROUNDABOUTS/TRAFFIC CIRCLES
 GENERAL 1. Description This standard identifies minimum requirements that shall be met for Roundabouts and Neighborhood Traffic Circles in the design and construction of elements for Arlington County Horizontal
MUTCD Part 6G: Type of Temporary Traffic Control Zone Activities
 MUTCD Part 6G: Type of Temporary Traffic Control Zone Activities 6G.01 Typical Applications Each temporary traffic control (TTC) zone is different. Many variables, such as location of work, highway type,
The Geometric Layout of Signal-Controlled Junctions and Signalised Roundabouts
 The Geometric Layout of Signal-Controlled Junctions and Signalised Roundabouts DN-GEO-03044 January 2005 DN Design Standards TRANSPORT INFRASTRUCTURE IRELAND (TII) PUBLICATIONS About TII Transport Infrastructure
Cycle traffic and the Strategic Road Network. Sandra Brown, Team Leader, Safer Roads- Design
 Cycle traffic and the Strategic Road Network Sandra Brown, Team Leader, Safer Roads- Design Highways England A Government owned Strategic Highways Company Department for Transport Road Investment Strategy
Frascati Road and Temple Hill Route Improvements. Outline Design Report to Accompany Public consultation
 Frascati Road and Temple Hill Route Improvements Outline Design Report to Accompany Public consultation September 2013 Background: Dún Laoghaire-Rathdown is committed to providing high quality pedestrian
Traffic calming regulations (Scotland)
") Traffic Advisory Leaflet 11/94 December 1994 Traffic calming regulations (Scotland) Introduction Traffic calming can help drivers to make their speeds appropriate to local conditions, through measures
Traffic Advisory Leaflet 11/94 December 1994 Traffic calming regulations (Scotland) Introduction Traffic calming can help drivers to make their speeds appropriate to local conditions, through measures
Resident s Toolkit Traffic Control Device Local Area Traffic Management
 Resident s Toolkit Traffic Control Device Local Area Traffic Management This booklet contains information on traffic control devices commonly used in South Australia. A traffic control device is a sign,
CHECKLIST 6: EXISTING ROADS: ROAD SAFETY AUDIT
 CHECKLIST 6: EXISTING ROADS: ROAD SAFETY AUDIT 6.1 Road alignment and cross-section 6.1.1 Visibility; sight distance Is sight distance adequate for the speed of traffic using the route? Is adequate sight
Appendix 12 Parking on footways and verges
 Appendix 12 Parking on footways and verges Legal position Parking on footways and verges whether wholly or partly is banned throughout London, unless signs are placed to allow parking. The ban requires
10 SHERFORD Town Code
 Key Fixes (Ref: Masterplan Book, section 4a. Land Use Budget and Key Fixes ) The Town Plan designs and allocates buildings, streets and spaces as accurately as possible in the understandable absence of
CITY OF WEST KELOWNA COUNCIL POLICY MANUAL
 CITY OF WEST KELOWNA COUNCIL POLICY MANUAL Page 1 of 7 DEPARTMENT: Engineering Services SUBJECT: Traffic Calming Policy (Revised June 6, 2017) Policy Statement: The provision of traffic calming measures
RIGHT TURNS AT INTERSECTIONS: ARE THERE ALTERNATIVES?
 RIGHT TURNS AT INTERSECTIONS: ARE THERE ALTERNATIVES? R.C. Pyke, J.D. Sampson and K.G. Schmid Stewart Scott International, P O Box 784506, Sandton, 2146 TTT Africa, P.O.Box 109, Sunninghill, G.D.P.T.R.W,
SECTION 12 ROAD MARKINGS AND DELINEATION
 SECTION 12 ROAD MARKINGS AND DELINEATION (Blank Page) MANUAL OF TRAFFIC SIGNS AND MARKINGS - Part III: Motorways and Expressways 12-1 12.1 GENERAL 12.1.1 INTRODUCTION The markings and delineation details
Chapter 7 Intersection Design
 hapter 7 Dr. Yahya Sarraj Faculty of Engineering The Islamic University of Gaza An intersection is an area, shared by two or more roads, whose main function is to provide for the change of route directions.
Alberta Infrastructure HIGHWAY GEOMETRIC DESIGN GUIDE AUGUST 1999
 Alberta Infrastructure HIGHWAY GEOMETRIC DESIGN GUIDE AUGUST 1999,1'(; A ACCELERATION Data on acceleration from stop D-29 Effects of grade D-35 Intersections D-97, D-99 Lanes D-97, F-5, F-7, F-15, F-21,
IMPLEMENTATION. PEDESTRIAN USERS (Continued /) Building Frontages: A: Stair Applications. Geometry (Accessed from the Sidewalk) Refer to A:
 Building Frontages: A: Stair Applications. Geometry (Accessed from the Sidewalk) Refer to A:") A: Stair Applications Building Frontages: Geometry (Accessed from the Sidewalk) Refer to A: Ramps should be provided for disabled users at 1:12 (8.3%) gradient. Ramp rises should be stepped at 400mm intervals.
A: Stair Applications Building Frontages: Geometry (Accessed from the Sidewalk) Refer to A: Ramps should be provided for disabled users at 1:12 (8.3%) gradient. Ramp rises should be stepped at 400mm intervals.
Grade Separated Intersection
 Grade Separated Intersection Lecture Notes in Transportation Systems Engineering Prof. Tom V. Mathew Contents 1 Overview 1 2 Classification of Intersection 2 2.1 Grade Separated Intersection...........................
SPEED CONTROL AT ROUNDABOUTS USE OF MAXIMUM ENTRY PATH RADII
 23 rd ARRB Conference Research Partnering with Practitioners, Adelaide Australia, 2008 SPEED CONTROL AT ROUNDABOUTS USE OF MAXIMUM ENTRY PATH RADII Dr Owen Arndt, Queensland Department of Main Roads, Australia
RIGHT-OF-WAY INTERSECTIONS
 Infrastructure Give Cycling a Push INFRASTRUCTURE/ INTERSECTSIONS AND CROSSINGS RIGHT-OF-WAY INTERSECTIONS Overview Right-of-way mixed traffic is the simplest, most agreeable approach for cyclists on quiet
DEFINITIONS Activity Area - Advance Warning Area Advance Warning Sign Spacing Advisory Speed Approach Sight Distance Attended Work Space
 DEFINITIONS Activity Area - that part of a TTC zone activity area where the work actually takes place. It consists of the work space, traffic space and one or more buffer spaces. Advance Warning Area -
FOR HISTORICAL REFERENCE ONLY
 To: From: Subject: Electronic Distribution Recipients MINNESOTA DEPARTMENT OF TRANSPORTATION Engineering Services Division Technical Memorandum No. 12-14-B-03 December 18, 2012 Jon M. Chiglo, P.E. Division
Speed Limit Policy Isle of Wight Council
 APPENDIX B Speed Limit Policy Isle of Wight Council 2009 Contents Section 1 Introduction 1.1 Links with the Local Transport Plan Section 2 Speed Limits on Urban Roads and Residential Areas 2.1 20mph Limits
11 CHECKLISTS Master Checklists All Stages CHECKLIST 1 FEASIBILITY STAGE AUDIT
 11 CHECKLISTS 11.1 Master Checklists All Stages CHECKLIST 1 FEASIBILITY STAGE AUDIT 1.1 General topics 1. Scope of project; function; traffic mix 2. Type and degree of access to property and developments
Road Markings. Lecture Notes in Transportation Systems Engineering. Prof. Tom V. Mathew
 Road Markings Lecture Notes in Transportation Systems Engineering Prof. Tom V. Mathew 1 Overview The essential purpose of road markings is to guide and control traffic on a highway. They supplement the
Traffic Calming Regulations
 Traffic Advisory Leaflet 7/93 August 1993 Traffic Calming Regulations Introduction Traffic calming can help drivers to make their speeds appropriate to local conditions, through measures which are self-enforcing.
Draft letter to Designers and Managing Agents INTERIM ADVICE NOTE 43/02: CANTILEVER AND PORTAL GANTRY VMS
 Draft letter to Designers and Managing Agents INTERIM ADVICE NOTE 43/02: CANTILEVER AND PORTAL GANTRY VMS This Interim Advice Note announces amendments to a series of guidelines related to cantilever and
Review of Guidelines for Cycleway Safety Fencing
 Review of Guidelines for Cycleway 1.0 PURPOSE 1.1 This document is meant to provide a review of available reference documents for determining appropriate fencing requirements for cycleway paths and shared
TGSI Tactile Ground Surface Indicators
 TGSI Tactile Ground Surface Indicators Introduction: This Design Note, No 11, provides guidelines and requirements for the use and installation of Tactile Ground Surface Indicators (TGSI s). References
Appendix T CCMP TRAIL TRAFFIC & TRANSPORTATION DESIGN STANDARD
 Appendix T CCMP 3.3.4 TRAIL TRAFFIC & TRANSPORTATION DESIGN STANDARD 3.3.4 Trail Traffic and Transportation Design Multi-use trails have certain design standards, which vary depending on the agency that
MANUAL OF TRAFFIC SIGNS AND MARKINGS SECTION 2
 MANUAL OF TRAFFIC SIGNS AND MARKINGS PART 1 SIGNS SECTION 2 September 2015 VERSION 1.0 - DRAFT FOR REVIEW Part 1 Signs REGULATORY SIGNS GENERAL CONTENTS SECTION 2: REGULATORY SIGNS GENERAL (DESIGN, POLICY
Recommended Roadway Plan Section 2 - Land Development and Roadway Access
 Recommended Roadway Plan Section 2 - Land Development and Roadway Access SECTION 2 Land Development and Roadway Access 2.1 Land Use and Access Management The Federal Highway Administration (FHWA) defines
A5.1 Permitted activities
 Section A5 Transportation A5.1 Permitted activities A5.1.1 Activities within roads Note: Refer to Section D for the definition of road (a) Any activity associated with the movement of traffic and the functioning
Active Transportation Facility Glossary
 Active Transportation Facility Glossary This document defines different active transportation facilities and suggests appropriate corridor types. Click on a facility type to jump to its definition. Bike
DESIGN BULLETIN #66/2010
 DESIGN BULLETIN #66/2010 Highway Geometric Design Guide Chapter B, Climbing Lane Warrants for Two Lane Undivided and Four Lane Divided Highways - Revised Summary This Design Bulletin is being issued as
Roundabout Design Principles
 des Carrefours Giratoires Roundabout Design Principles NCLUG Roundabout Luncheon Tuesday, March 4, 2014 Prepared by: des Carrefours Agenda Giratoires Roundabout design process: Planning and Policy Lane
National Committee on Uniform Traffic Control Devices RWSTC RECOMMENDATION FOLLOWING SPONSOR COMMENTS
 1 2 3 ATTACHMENT NO. 1 RW No. 1, Jan 2012 4 5 6 7 8 9 10 11 12 13 14 15 16 17 18 19 20 21 22 23 24 25 26 27 28 29 30 31 32 33 34 35 36 37 38 39 40 41 National Committee on Uniform Traffic Control Devices
SECTION 12 ROAD MARKINGS AND DELINEATION
 SECTION 12 20 June 2009 Part 3: Motorways and Expressways CONTENTS Reference Page Page Number Date SECTION 12: MARKINGS AND DELINEATION 12.1 GENERAL... 12-1 June 2009 12.1.1 INTRODUCTION... 12-1 June 2009
Withdrawn. Geometric Design of Roundabouts. Standards. DN-GEO January Design
 Geometric Design of Roundabouts DN-GEO-03033 January 2009 Withdrawn DN Design Standards TRANSPORT INFRASTRUCTURE IRELAND (TII) PUBLICATIONS About TII Transport Infrastructure Ireland (TII) is responsible
Chapter 33. Grade Separated Intersection Overview Classification of Intersection Grade Separated Intersection
 Chapter 33 Grade Separated Intersection 33.1 Overview An intersection is the area shared by the joining or crossing of two or more roads. Since the main function of an intersection is to enable the road
Developed by: The American Traffic Safety Services Association (ATSSA) 15 Riverside Parkway, Suite 100 Fredericksburg, VA
 15 Riverside Parkway, Suite 100 Fredericksburg, VA") Addendum Developed by: The American Traffic Safety Services Association (ATSSA) 15 Riverside Parkway, Suite 100 Fredericksburg, VA 22406-1022 800-272-8772 This material is based upon work supported by
Addendum Developed by: The American Traffic Safety Services Association (ATSSA) 15 Riverside Parkway, Suite 100 Fredericksburg, VA 22406-1022 800-272-8772 This material is based upon work supported by
Appendix A: Crosswalk Policy
 Appendix A: Crosswalk Policy Appendix A: Crosswalk Policy Introduction This citywide Crosswalk Policy is aimed at improving pedestrian safety and enhancing pedestrian mobility by providing a framework
Appendix D Stage 1 Road Safety Audit
 N2 Monaghan Town to Emyvale Road Improvements Part 8 Application Description of Proposed Development Appendi D N2 Monaghan Town to Emyvale, County Monaghan Proposed Pavement and Minor Improvement Scheme
CHECKLIST 4: PRE-OPENING STAGE AUDIT
 CHECKLIST 4: PRE-OPENING STAGE AUDIT 4.1 General topics 4.1.1 Changes since previous audit; translation of design into practice General check: have any matters that have changed since a previous audit
JCE 4600 Transportation Engineering. Traffic Control
 JCE 4600 Transportation Engineering Traffic Control Human Factors Primary Driving Tasks NAVIGATION GUIDANCE CONTROL What makes a Traffic Control Device Effective? Fulfill a need Command Attention Convey
IMPLEMENTATION. PEDESTRIAN USERS (Continued /) A: Class 2 Pedestrian / Cycle Ways. Pedestrian and Cycle Ways:
 A: Class 2 Pedestrian / Cycle Ways. Pedestrian and Cycle Ways:") A: Class 2 Pedestrian / Cycle Ways PLAN VIEW Pedestrian and Cycle Ways: Layout and Geometry (Refer to A): Walkways and cycle to be provided adjacent to all Class 2 Roads (these facilities should always
A: Class 2 Pedestrian / Cycle Ways PLAN VIEW Pedestrian and Cycle Ways: Layout and Geometry (Refer to A): Walkways and cycle to be provided adjacent to all Class 2 Roads (these facilities should always
(This page left intentionally blank)
") (This page left intentionally blank) 2011 Edition - Revision 1 Page 553 Section 5A.01 Function CHAPTER 5A. GENERAL 01 A low-volume road shall be defined for this Part of the Manual as follows: A. A low-volume
(This page left intentionally blank) 2011 Edition - Revision 1 Page 553 Section 5A.01 Function CHAPTER 5A. GENERAL 01 A low-volume road shall be defined for this Part of the Manual as follows: A. A low-volume
8 PROPOSED ROUNDABOUT DUFFERIN STREET AND KING VAUGHAN ROAD INTERSECTION CITY OF VAUGHAN
 8 PROPOSED ROUNDABOUT DUFFERIN STREET AND KING VAUGHAN ROAD INTERSECTION CITY OF VAUGHAN The Transportation Services Committee recommends the adoption of the recommendation contained in the following report
Road Markings. Lecture Notes in Transportation Systems Engineering. Prof. Tom V. Mathew. 1 Overview 1. 2 Classification 2
 Road Markings Lecture Notes in Transportation Systems Engineering Prof. Tom V. Mathew Contents 1 Overview 1 2 Classification 2 3 Longitudinal markings 2 3.1 Center line.....................................
Introduction Methodology Study area and data collection Results and recommendation Conclusion References
 Introduction Methodology Study area and data collection Results and recommendation Conclusion References It is formal procedure for assessing accident potential and safety performance in the provision
Road Link Design. Incorporating TA 43/03 (Guidance on Road Link Design) Volume 6 Section 1 Part 1 NRA TD 9/03. April Note:
 Volume 6 Section 1 Part 1 NRA TD 9/03. April Note:") Volume 6 Section 1 Part 1 NRA TD 9/03 Road Link Design Incorporating TA 43/03 (Guidance on Road Link Design) Note: NRA TD 9/04, NRA TD 9/05 and NRA TD 9/07 Also incorporates NRA TA 43/03 April 2003 St.
Volume 6 Section 1 Part 1 NRA TD 9/03 Road Link Design Incorporating TA 43/03 (Guidance on Road Link Design) Note: NRA TD 9/04, NRA TD 9/05 and NRA TD 9/07 Also incorporates NRA TA 43/03 April 2003 St.
Entry Treatments. Traffic Advisory Leaflet 2/94 August Introduction. Design. Vertical Deflections. Locations
 Traffic Advisory Leaflet 2/94 August 1994 Entry Treatments Introduction Entry treatments have been developed for use at side roads so that drivers leaving a major road are in no doubt that they are entering
Introduction to the NRA Design Manual for Roads and Bridges
 Volume 0 Section 0 Part A 0.0.A Introduction to the NRA Design Manual for Roads and Bridges July 2011 St. Martin s House, Waterloo Road, Dublin 4. Tel:+353 1 660 2511 Fax +353 1 668 0009 Email : info@nra.ie
A6 Manchester Airport Relief Road
 A6 Manchester Airport Relief Road Status Date Author Approved for Issue (AECOM) Approved for Issue (Grontmij) P0 18 July 2014 Adam Richardson Martin Houghton Martin Williamson P1 06 August 2014 Tony Hickman
4. Guided Bus Explained
 4. Guided Bus Explained Contents 1 INTRODUCTION... 2 Structure of this report... 2 2 KERB GUIDED BUS... 3 Overview... 3 Kerb guidance... 3 Figures Figure 2.1 Figure 2.2 Figure 2.3 Figure 2.4 Figure 2.5
List of Display Boards
 List of Display Boards Welcome Introduction Municipal Class Environmental Assessment (EA) Process Need and Justification for an Interchange Alternatives for Evaluation Vertical and Horizontal Alignments
Coquitlam Cross-town Bike Route Improving Bicycle Facilities in a Mature Suburban Environment
 Coquitlam Cross-town Bike Route Improving Bicycle Facilities in a Mature Suburban Environment Sarah Rocchi, Vice-President, Projects, Opus International Consultants (Main Presenter) Catherine Mohoruk,
Exhibit 1 PLANNING COMMISSION AGENDA ITEM
 Exhibit 1 PLANNING COMMISSION AGENDA ITEM Project Name: Grand Junction Circulation Plan Grand Junction Complete Streets Policy Applicant: City of Grand Junction Representative: David Thornton Address:
Document 2 - City of Ottawa Pedestrian Crossover (PXO) Program
 Program") 40 Document 2 - City of Ottawa Pedestrian Crossover (PXO) Program OVERVIEW The City of Ottawa Pedestrian Crossover (PXO) Program provides the basis for PXO implementation in Ottawa. The program s processes
40 Document 2 - City of Ottawa Pedestrian Crossover (PXO) Program OVERVIEW The City of Ottawa Pedestrian Crossover (PXO) Program provides the basis for PXO implementation in Ottawa. The program s processes
City of Wayzata Comprehensive Plan 2030 Transportation Chapter: Appendix A
 A1. Functional Classification Table A-1 illustrates the Metropolitan Council s detailed criteria established for the functional classification of roadways within the Twin Cities Metropolitan Area. Table
Interim Report on the Development of Road Safety Infrastructure Facility Design Standard for the Asian Highway Network
 Development of Road Infrastructure Safety Facility Standards Expert Group Meeting on Asian Highway United Nations Economic and Social Commission for Asia and the Pacific 3-4 October 2016 Interim Report
Amendments to Essex Highway Maintenance Strategy Maintenance Policy and Standards April 2008
 Amendments to Essex Highway Maintenance Strategy Maintenance Policy and Standards April 2008 The following amendments to the wording of the maintenance strategy apply following the revised maintenance
2.0 LANE WIDTHS GUIDELINE
 2.0 LANE WIDTHS GUIDELINE Road Engineering Design Guidelines Version 2.0.1 May 2018 City of Toronto, Transportation Services City of Toronto Page 0 Background In early 2014, Transportation Services initiated
Technical Memorandum. Subject: Interchange Ramp Terminal Configuration. Expiration. Implementation. Introduction
 Minnesota Department of Transportation Engineering Services Division Technical Memorandum To: Electronic Distribution Recipients From: Nancy T. Daubenberger, P.E. Assistant Commisioner, Engineering Services
Junction Design with Traffic Signals
 Junction Design with Traffic Signals Wednesday March 2 nd 2016 Overview Introduction Context Conventional Approach Sustainable Approach Analysis Design Summary Introduction What are Traffic Signals? Purpose
The Safe System Approach
 There are very few areas of public discussion and sentiment which generate as much consensus as road safety. Everyone wants safer roads for all users, and road safety is a key priority for governments,
Evaluation of Road Safety Audit Reports
 Evaluation of Road Safety Audit Reports Peter Monahan 5 th April 2016 Task Overview Review sample of RSA Reports in TII Database and: 1. Identify the most commonly recurring Problems or category of Problems
1.3.4 CHARACTERISTICS OF CLASSIFICATIONS
 Geometric Design Guide for Canadian Roads 1.3.4 CHARACTERISTICS OF CLASSIFICATIONS The principal characteristics of each of the six groups of road classifications are described by the following figure
Roadways. Roadways III.
 Introduction 97 Roadway Design Principles 98 Safe Speeds 99 Optimizing of Street Space 00 Minimum Lane Widths in the City of Boston 02 Design Features that Reduce Operating Speeds 05 Travel Lanes Transit
Modern Roundabouts: a guide for application
 Modern Roundabouts: a guide for application Kentucky Community Transportation Innovation Academy 2005 The contents of this booklet reflect the views of the authors who are responsible for the facts and
The Cabinet Member for Highways & Streetscene. Aurang Zeb - Head of Highways & Transport
 LONDON BOROUGH OF RICHMOND UPON THAMES Cabinet Member Decision DATE: January 2012 REPORT OF: LEAD OFFICER: SUBJECT: WARDS: The Cabinet Member for Highways & Streetscene Aurang Zeb - Head of Highways &
LIST OF TABLES LIST OF FIGURES
 TABLE OF CONTENTS 6 INTERSECTION DESIGN....................................................... 6-1 6.1 INTRODUCTION...................................................... 6-1 6.2 DESIGN PRINCIPLES..................................................
POLICY: TRAFFIC CALMING
 2006 MAY REFERENCE: COUNCIL APPROVED BY COUNCIL MAY 23, 2006 CITY OPERATIONS - NO. 608 POLICY: TRAFFIC CALMING A. All requests for traffic calming within the City shall be considered in accordance with