Free Standing CCR Pixel Strip Tree
|
|
|
- Dulcie Kelley
- 5 years ago
- Views:
Transcription
1 Free Standing CCR Pixel Strip Tree Jim Kurtz 1/23/2017

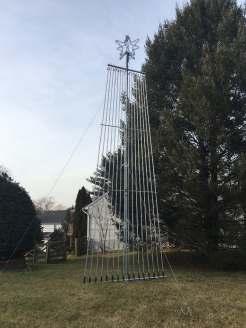
2 Hello everyone. There seems to be a shortage of DIY instructions out there for constructing a free standing CCR Pixel Strip tree. So I went trial and error on my own and finished up with a structure that worked very well for me during the 2016 Christmas season so thought I would document and share. BTW, I use the term CCR loosely as that is a LOR abbreviation for Cosmic Color Ribbon and I am actually using the equivalent technology from Holidaycoro ( The obvious challenge was to devise a structure that would keep the strips facing forward while still allowing flexibility under high winds and in such a way that the strips could always return to their original forward position after being blown around. I chose ½ PVC conduit as the device to hold the strips. They seem to have just the right amount of give for this application. I chose a fixed connection at the top of the conduit with ability to swivel front/back only and a rubber strap connection at the bottom to provide flexibility in the wind and allow for adjustment over time. This solution uses a 3G Mega Tree kit ( I have successfully used this kit for a traditional mega tree of string lights. It is high quality and stands up to strong winds which are common in my region (northern Maryland) during the month of December. You will use all of the parts in this kit except for: 2 quick links, 2 pulleys, 2 hoist ropes and the 24 peg crank up hook head. It is cheaper to buy the entire kit and not use those parts than to individually buy all of the parts that you will use. Below is a photo of my house for The free standing tree is in red on the right side of the photo. I incorporated it into my existing LOR sequences and added some new sequences that really exploited the animation that is possible with pixel strips. Here are a couple of examples: Star Wars: God Bless the USA: Page 2
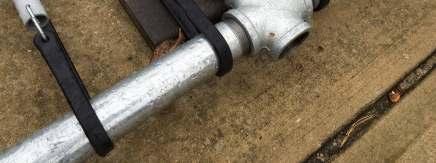
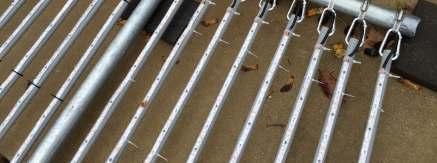
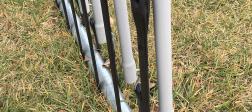
3 There are 4 steps to building this tree (detailed below): 1. Prepare the pixel strips 2. Prepare the main structure 3. Attach the strips to the main structure 4. Stand up main structure (with strips attached) IMO, this was a good first cut. There is a parts list on the last page. I was able to build this tree for around $600 (not including the pixel strips, controller and star on top). I put it up 1 st week of November and took it down 3 rd week of January. It withstood some very serious wind gusts up to 45mph. But I need to improve two items: The spacing of the conduits needs to be slighter tighter at the top and wider at the bottom to better resemble the shape of a tree. The method of attaching the conduit to the top horizontal needs improvement. It worked okay for one year but I need a method that will hold up over time. I m thinking of drilling holes into the horizontal and attaching hooks onto which I can attach the conduit. Challenge there is ensuring you attach them to the bottom of the horizontal after it has been completely tightened into the top cross fitting. 1. Prepare the pixel strips: Join/glue together 2 of the 10 x ½ PVC conduit to make a 20 length. Do this 16 times. Zip tie the pixel strips to the ½ PVC conduit. Leave about 3 space between the top end of the strip and the end of the conduit. My pixel strips are 16.5 long. This will leave a little over 3 of empty space at the bottom of the PVC. Do this 16 times. 2. Prepare the main structure: Using the supplied coupling, join the two 10 x 1.5 rigid conduit pipes to create a 20 length. This is the center pole. Attach 1.5 cross fitting to the top of the 20 length. Attach 1.5 cross fitting to the bottom of the 20 length. Attach 2 x 1.5 rigid conduit pipe to the left side of the top cross fitting. Attach 2 x 1.5 rigid conduit pipe to the right side of the top cross fitting. Attach guy wire adapter to top of the top cross fitting Attach star mount bushing to top of guy wire adapter (only necessary if you plan to put a 3G star on top) Attach 4 x 1.5 rigid conduit pipe to the left side of the bottom cross fitting. Attach 4 x 1.5 rigid conduit pipe to the right side of the bottom cross fitting. Page 3

 through both sides of each of each 20 ½ PVC conduit.")
4 3. Attach the strips to the main structure: About 1 from the top, drill a hole (left to right) through both sides of each 20 ½ PVC conduit. Pass a carabiner through the hole. Ensure the conduit can swing freely front to back. Using a 2 pipe clamp attach the carabiner to the top 2 rigid conduit. Do this 16 times 8 on each side of the 20 center pole. SPACING: I used 3 spacing but it could be closer. Just need to be consistent with the gap between the conduits that are immediately to the left and right of the center pole. About 1 from the bottom, drill a hole (front to back) through both sides of each of each 20 ½ PVC conduit. About 15 from the bottom, drill a hole (front to back) through both sides of each of each 20 ½ PVC conduit. Using S-hooks, attach one end of 21 rubber strap to lower hole on front of PVC, wrap around bottom 4 rigid conduit and attach other end to upper hole on back of PVC. SPACING: I used 6 spacing of the rubber straps. Using some scrap pieces of PVC, cut 4 horizontal cross members. This will help the vertical conduit keep its spacing as winds are blowing. Locate 2 cross members 6 from the top and 2 cross members 12 from the top. For the upper cross member, attach clips ( Lexan-Pipe-Mounting-Clip-p/770.htm) to the scrap PVC every 4. For the lower cross members, attach clips every 5. Snap the finished cross members onto the back of the already attached vertical conduit. Page 4


5 Page 5

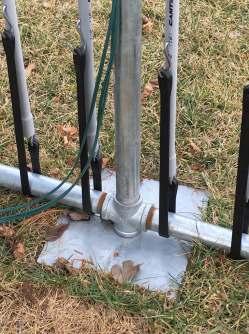
6 4. Stand up main structure (with strips attached): Install 3 ground anchors into ground at locations equidistant around desired center pole location Locate base plate at desired center pole location and push into ground Attach 3 quick links to guy wire adapter on top of center pole. Attach one end of 3 guy wires to 3 quick links. Align opening of bottom cross fitting over square nub on base plate Hoist center pole up onto base plate nub using 3 guy wires and a lot of people. The vertical conduits will sag dramatically as you are hoisting but do not be alarmed; it will hold its shape. Ensure tree is facing desired direction by turning structure while on the base plate nub. Attach a shackle to both ends of turnbuckle Attach other end of 3 guy wires to top shackle Attach bottom shackle to ground anchor Ensure plumb Tighten turnbuckle until guy wires are taught. OPTIONAL: Attach 3 more guy wires (I did this because of the high winds in my area): Install 3 more ground anchors into ground at locations equidistant around center pole location Using whatever method you desire, attach 3 more guy wires to center pole at height of approx. 10 (just above coupling) and secure to ground anchors. I used a combination of ring hangers, eye bolts, carabiners and plastic coated wire rope. Total cost about $90. Page 6


7 Page 7
8 Parts List VENDOR QTY ITEM UNIT TOTAL Arrow Elec (local) 2 10' x 1.5" rigid conduit Arrow Elec (local) 32 10' x.5" PVC conduit Pro Plumbing 2 2' x 1.5" rigid conduit Pro Plumbing 2 4' x 1.5" rigid conduit Pro Plumbing 2 1.5" cross fitting G 1 20' Mega Tree kit Holiday Coro 16 ½ Pipe Mounting Clip Harriscos 20 21" Straps Optional guy wires: Home Depot 16 3" carabiner Home Depot 16 2" pipe clamp Home Depot 60 feet 3/32" WIRE ROPE Home Depot 6 WIRE ROPE clips Home Depot 3 11" GROUND STAKES Home Depot 3 1.5" ring hanger Home Depot 3 3/8" x 2.5" eye bolt Home Depot 3 3" carabiner Page 8
BALL STOP INSTALLTION GUIDE
 BALL STOP INSTALLTION GUIDE GROUND SLEEVE INSTALLATION: 1. Locate the exact location of the ground sleeve. NOTE: Maximum recommended pole spacing is 20 feet on center. 2. Excavate the pole footing; refer
2010 International Snow Science Workshop
 HOW TO TURN A KIDS BIKE INTO A BOMB TRAM FOR AVALANCHE CONTROL WORK David Immeker* Heavenly Mountain Resort Professional Ski Patrol, South Lake Tahoe, California ABSTRACT: Bomb trams have been used for
DAS Dark Site Windscreens
 DAS Dark Site Windscreens Instructions for Installation, Use and Stowing Revised April 15, 2018 This publication is intended to assist DAS members using the windscreens at the Edmund G. Kline Dark Site
Installation Guide Wall Mounted Angled Flagpole
 Installation Guide 1.5m - 4m Angled Flagpole Dimensions Flagpole Dimensions Wall Bracket Dimensions 2m Aluminium 76mm Glassfibre 114.3mm angle from vertical 2000mm 250mm 300mm 1715mm Backplate thickness
Installation and Training Manual
 AirForce1 Tower Kit Installation and Training Manual FuturEnergy Limited Ettington Park Business Centre Stratford upon Avon CV37 8BT +44 (0)1789 451070 Table of Contents Safety Notes... 3 Parts Supplied
Page 1 of 1 04/19/13 SBR
 Office of Roadway Engineering - Plan Insert Sheets Number Title Date Number Title Date Number Title Date 201015 Extension of Anchor Bolts 07/20/12 207000 Bikeway Pavement Marking Details 01/18/13 202010
Tripod Setup Guide (M-TPx)
") Items needed: 1/2 inch wrench, mast level (M-MLA), medium size wire cutters, crescent wrench, all-purpose grease, tape measure, tie wraps, redi-mix cement (optional), shovel (optional), sledge hammer (for
Items needed: 1/2 inch wrench, mast level (M-MLA), medium size wire cutters, crescent wrench, all-purpose grease, tape measure, tie wraps, redi-mix cement (optional), shovel (optional), sledge hammer (for
Below are the instructions to build a roller-furling unit for under $10. Read the entire process before beginning the project.
 Greg Cowens' $10 PVC Roller Reefing for CP-16's by Greg Cowen Below are the instructions to build a roller-furling unit for under $10. Read the entire process before beginning the project. Materials: 2
Installation Instructions - Steel 4 Spring Arm Kits , , , ,
 Installation Instructions - Steel Spring Arm Kits 50-0709, 50-079, 50-0750, 50-075, 50-078 GR 8// 07-00 0 N. Marshall Ave. El Cajon CA. 900 For technical support call us at (800) 8-075 Step. Determining
First Team Sports, Inc. Stellar Recreational Volleyball System
 First Team Sports, Inc. Stellar Recreational Volleyball System BILL OF MATERIALS A 2 Volleyball Vertical Post K 1 ½ Centerlock Nut B 2 Height Labels L 2 Carabiner Clip C 3 Net Clamp M 1 ½ x 2 Hex Bolt
EUROBUNGY-TRAMPOLINE
 EUROBUNGY-TRAMPOLINE Set-up instructions of the new model 2004-2010 Photos are taken with the long and short Trailer WARNING for EUROBUNGIES without hydraulic rams There is a potential risk that a pole
HEAVY DUTY H.S. DISCUS CAGE NET POLE NET POLE INSTALLATION
 901020 - HEAVY DUTY H.S. DISCUS CAGE NET POLE NET POLE INSTALLATION www.gillathletics.com 800-637-3090 Install the pipe cap (PCAP00158002) at the top of the net pole. Install net pole pulley (73210042)
Deluxe Gourd Racks I D E G A. Parts List. Shown above are parts for the two-level, Deluxe Gourd Rack (DGR 12V)with 12 arms for vertically hung gourds.
with 12 arms for vertically hung gourds.") Deluxe Gourd Racks H F K I D E J C G A Shown above are parts for the two-level, Deluxe Gourd Rack (DGR V)with arms for vertically hung gourds. Parts List Code Quantity A B C D E F G H I J 6, or 4 6, or
Deluxe Gourd Racks H F K I D E J C G A Shown above are parts for the two-level, Deluxe Gourd Rack (DGR V)with arms for vertically hung gourds. Parts List Code Quantity A B C D E F G H I J 6, or 4 6, or
Installation, Operating, Inspection and Maintenance Instructions Ladder Climber s Safety System. Warning
 OWNER'S MANUAL Installation, Operating, Inspection and Maintenance Instructions Ladder Climber s Safety System Model # s: 6000, 6001, 6010 Warning You must read and fully understand all instructions, or
QUALITY ALUMINUM BOAT LIFTS, INC. INSTRUCTIONS. Dominator Lake Lift
 INSTRUCTIONS Dominator Lake Lift PHONE:251-986-3882 * FAX:251-986-3136 QABLDOMINATORINST.2014 P a g e 1 Quality Aluminum Boat Lifts, INC. Installation Instructions: Dominator Lake Lift Thank you for your
TOWER INSTALLATION MANUAL For A.R.E. Guyed Pipe Towers Short Towers 43, 64 and 85 feet tall
 TOWER INSTALLATION MANUAL For A.R.E. Guyed Pipe Towers Short Towers 43, 64 and 85 feet tall Contents 1) Introduction...2 2) Site Selection and Preparation...2 3) Tools List...3 4) Parts List...4 5) Tower
HANGERS & SUPPORTS CLIP-IT CLIP-IT STUD STRAPS BAR JOIST CLIP CONDUIT HANGERS CLIP-IT
 62 hangers & supports Innovation. It s what Madison is all about. Check out our Madison Strap, the product that started it all. Invented in 1929 by our founder Earl Adkinson, Madison has been on the cutting
BANKSMAN / SLINGER. 1. What is the smallest size diameter of synthetic rope allowed for use as a hand held tagline?
 BANKSMAN / SLINGER 1. What is the smallest size diameter of synthetic rope allowed for use as a hand held tagline? A. 16mm B. 10mm C. 12mm 2. What is the maximum temperature that a webbing sling can be
 www.allsportsystems.com Page 1 of 29 Page 2 of 29 Table of Contents Items You Supply: 4 MICROBAY Setup Instructions 5 Items Provided By AllSportSystems: 5 MEASURING AND CUTTING THE 1 EMT POLES FOR THE
THOR 10 HAMMER CAGE INSTRUCTIONS
 75 " 7m 78 4" m 6" 8.8m 45 ".70m 4.9deg 6 4" 6m 44 4".67m 75 " 7m 9 4" 0m 44".m 497 4".64m The 70, Thor Hammer Cage, consists of four heavy duty aluminum net poles. The unique pole structure reduces the
Soma Wind Generators
 Soma Wind Generators 13M WINH TOWER INSTALLATION MANUAL ERTIFIED to AS4100 Steel Structures ode AS3995 (1994) Design of Steel Lattice Towers and Masts AS1170.2 (1989) SAA Wind Loading Manufactured by SOMA
Security and confidence at height.
 A Security and confidence at height. Vertical Systems DISTRIBUTED BY M DBI-SALA Vertical Systems are designed to complement your ability to work while meeting all applicable OSHA and ANSI standards. Vertical
Kayak Trailer Project.doc
 Kayak Trailer Project.doc Note: the red trailer shown in some of the illustrations is no longer available from Northern Tools. However, may be able to adapt similar trailer, but measurements may not be
Installation Guide, MPower Echelon Console
 Installation Guide, MPower Echelon Console AC Performance, AC Sport and AC Performance Plus Schwinn Echelon Console (External Routing) 1. Install batteries to console. Mount the console to the bike. 2.
Hillbilly Golf. Included. Game Building Instructions. 2-foot Fence Building Instructions. Bolo making Instructions
 Hillbilly Golf Game Building Instructions Included 2-foot Fence Building Instructions Bolo making Instructions Minus Bar Building Instructions and Minus bar play rules Plus some Extras! Hillbilly Golf
Methods of installation of ADSS fiber optic cables
 Methods of installation of ADSS fiber optic cables Two main methods recommended by the cable manufacturers: A. Mobile Cable Reel method generally recommended for span < 50 m B. Static Cable Reel method
E. Test, and if needed, adjust tips of antenna. 1. Mark will test antennas with meter at ground end of feedline bundle. Will take 10 minutes.
 Project Steps Overview: A. Prepare: B. Raise up small antenna. C. Raise up large antenna. D. Connect to new bundle of 4-feedlines pulled up from ground. E. Test, and if needed, adjust tips of large antenna.
Caterpillar Tunnel. a s s e m b l y a n d i n s t r u c t i o n m a n u a l. Watch the video! Scan the code or visit: fflc.
 Caterpillar Tunnel a s s e m b l y a n d i n s t r u c t i o n m a n u a l Watch the video! Scan the code or visit: fflc.us/tunnel/s Tools needed: Assembling the Bows Tape measure (Preferably 100') Sledge
TOWER INSPECTION REPORT
 3010 S. Hwy 77, Suite 600 Waxahachie, Texas 75165 http://ctctower.com Office: 972/923-9504 Fax: 972/923-9619 TOWER INSPECTION REPORT PREPARED FOR MR. CUSTOMER 1,563 GUYED TOWER NEAR CITY, STATE JANUARY
Safety System Installation Guide for ARE Wind Poles
 Safety System Installation Guide for ARE Wind Poles V. 1 May 2011 ** Climbing pegs and ladder should be installed before the pole is erected.** A. Install climbing pegs Install climbing pegs (bolt set)
SHEET 2: VERTICAL INSTALLATION
 IMAGE OW1291 OW1293 OW1295 OW1297 AVATAR OW1301 OW1303 OW1305 OW1307 OW1311 OW1313 OW1315 OW1317 OW1331 OW1333 OW1335 OW1337 SHEET 2: VERTICAL INSTALLATION SHEET 3: HORIZONTAL INSTALLATION Drawing: 760883XX
Retractable Security Cover for a Swim Spa
 Parts List Retractable Security Cover Kit 3" PVC pipe Leading edge Cover Track (pre-attached to Swim Spa) Optional cover pump (for outdoor installations) Rocky Roller Kit 2 Roller A-Frame Brackets 1/2"
Ref Part Part # Qty Letter A Rudder Catcher B X 1/2 PH Bolts C Rudder Bracket
 Ref Part Part # Qty A Rudder Catcher 07.2694.0000 1 J B Q A B 10-32 X 1/2 PH Bolts 07.2136.0000 10 C Rudder Bracket 07.2689.0000 1 D Kayak Pad Eye 01.1315.0430 2 E Cherry Rivets 01.1315.0459 4 H T N P
2012-June-12 SECOND DRAFT Hobie Getaway Spinnaker Installation Instructions
 SECTION A: INTRODUCTION This unofficial set of installation instructions was written for a 2009 Hobie Getaway, using a 2012 Hobie Spinnaker Kit 20999020. Note from the Author: I had never seen this kit
Bladerider X8 Assembly Help Notes
 2.1 Remove All Parts & Have Some Tools Handy Remove all items from the box and identify each part as per the packing sheet and check that nothing is missing. If there is something missing, please email
Important Note: Tighten lock nuts so the support tubes still swing freely see figure 2. There must be 1 2 threads of bolt past end of lock nuts.
 Kit Contents: DESCRIPTION QTY. DESCRIPTION QTY. 2 Shank Assembly 1 Support Tube Assembly 1 Side Tube - Short 2 1-1/4 Shank 1 Center Tube - Long 1 3/8-16 x 2.0 Carriage Bolt 2 5/16-18 x 2.25 Carriage Bolt
Telescopic winch handle Speedfriend"
 Winch handles, jib furlers JIB FURLERS - WINCH HANDLES - SPREADER COVERS 57 Floating winch handles Floating universal size winch handles Fitted with "Lock In" winch system; universal size for any winch;
Installation Instructions MODEL VSTI-A020 Tank Indicator Installation Model: VSTI-A020, Stainless Reverse Read System Versa Steel Inc. Guide Cables No
 Tank Indicator Installation Model: VSTI-A020, Stainless Reverse Read System Guide Cables No Guide Cables 1 August 4, 2011 Assembly Instructions: (Shown with a 2 board, 12 ft kit) ITEM NO. PART NUMBER DESCRIPTION
Transfer Chain (SA-1002) & Adjustable I-Beam Clamp (SA-1039 or SA-1040) Operating Instructions
 & Adjustable I-Beam Clamp (SA-1039 or SA-1040) Operating Instructions") Transfer Chain (SA-1002) & Adjustable I-Beam Clamp (SA-1039 or SA-1040) Operating Instructions SPIDER Page 1 of 8 702127 Rev A Using Transfer Chain with Adjustable I-Beam Clamp Safety Notes Do not use
Transfer Chain (SA-1002) & Adjustable I-Beam Clamp (SA-1039 or SA-1040) Operating Instructions SPIDER Page 1 of 8 702127 Rev A Using Transfer Chain with Adjustable I-Beam Clamp Safety Notes Do not use
Methylethycetone (MEC) - PMS 60 polyurethane glue - Grease - White silicone
 - PMS 60 polyurethane glue - Grease - White silicone") CHAPTER PLAN page : 1/8 SAILING BOAT SUSPENDED WITHOUT DECK BEARING SAILING BOAT SUSPENDED WITH DECK BEARING SAILING BOAT SUSPENDED WITH AUTOMATIC BEARING ALIGNMENT RUDDER SYSTEM FOR ANTARES MOTOR BOAT
CHAPTER PLAN page : 1/8 SAILING BOAT SUSPENDED WITHOUT DECK BEARING SAILING BOAT SUSPENDED WITH DECK BEARING SAILING BOAT SUSPENDED WITH AUTOMATIC BEARING ALIGNMENT RUDDER SYSTEM FOR ANTARES MOTOR BOAT
GUARDIAN FALL PROTECTION
 2015 V2 GUARDIAN FALL PROTECTION Product Mini Catalog 2015 For more information, go to www.guardianfall.com or call 800.466.6385 OUR VISION TO ALWAYS BE THE MARKET S FIRST CHOICE FOR FALL PROTECTION AND
A Foundation Of Trust. Hanging By A Thread
 Hanging By A Thread PROPS: Rope maker (See video at DoingWorks.com/movies.) 1 spool of cord for each team [I like to use 10 lb (4 kg test, 525 feet (160 meters) sisal cord] 1 spool of cord to use for demonstration
MODEL SWH10 1,000 LB CAPACITY SWIVEL HOIST
 MODEL SWH10 1,000 LB CAPACITY SWIVEL HOIST PARTS BREAKDOWN AND OPERATING MANUAL Copyright 2007, Arcan Professional Tools Rev: 05/15/07 This operating manual contains important safety information. Read
Boat Boat Loader Fitting Instructions
 Aerodynamic & Heavy Duty Roof Rack Systems Australian Made - Australian Owned www.rhinorack.com Boat Boat Loader Fitting Instructions CONTROLLED Balance point 3 Front eye nuts position 3 Transom eye nut
Anchors that can be used for a lifeline in a grain bin. or Ladder do not make good anchors!
 Anchors that can be used for a lifeline in a grain bin. or Ladder do not make good anchors! Definitions: Carabiner 1 Webbing attachment hardware with double locking action rated at 4,000 pounds 8 mm Accessory
Assembly, Installation, Care, Maintenance and Use Instr uctions.
 UPPER BOUNCE Enclosure Set & Enclosure Net USER MANUAL Assembly, Installation, Care, Maintenance and Use Instr uctions. This Instructions manual is for Upper Bounce Enclosure Sets and Enclosure Nets which
Miller DuraHoist Safety Systems
 Portable Confined Space System designed for manhole and confined space entry/ retrieval and fall arrest applications. Portable Fall Arrest Post provides three independent swivel tie-off points for fall
SK101 : Transporting & Storing your Kayak
 SK101 : Transporting & Storing your Kayak How to start! Let s discuss : 1.Best ways to transport your kayak 2.Handling & loading tips 3. Storage solutions Let s start with Roof Rack Basics Roof Rails -
EZ-Mount 4 Spring Enclosed System to 22 (Low & High Mount Applications) Installation Instructions
 Installation Instructions") 501-1768 (With Wire) 501-1769 (No Wire) 501-1766 (With Wire) 501-1767 (No Wire) 607-015 WLH 06/20/18 TABLE OF CONTENTS ***Assembly*** ***Parts*** Pivot Points and Mounting Locations (Low Mount)... 1 High
501-1768 (With Wire) 501-1769 (No Wire) 501-1766 (With Wire) 501-1767 (No Wire) 607-015 WLH 06/20/18 TABLE OF CONTENTS ***Assembly*** ***Parts*** Pivot Points and Mounting Locations (Low Mount)... 1 High
Stand-N-Fish FULL DETAIL INSTALLATION INSTRUCTIONS
 1 Stand-N-Fish FULL DETAIL INSTALLATION INSTRUCTIONS Thank you for purchasing the incredible new Stand-N-Fish Kayak Fishing System. Once installed on your kayak the Stand-N-Fish will take your kayak fishing
You may order this publication from WCB Publications and Videos, Please quote ordering number BK60.
 The following material is the property of the Workers Compensation Board of British Columbia and may not be reproduced by those outside of B.C. For those within British Columbia, this material may only
Explain that this is how I did my tower, it does not necessarily represent the state of the art, nor even the right way to do any particular aspect
 Explain that this is how I did my tower, it does not necessarily represent the state of the art, nor even the right way to do any particular aspect of the tower. I invite those more experience to make
IS37 10 Metre Instrument Mast Handbook
 IS37 10 Metre Instrument Mast Handbook Version 10.1 6 th February 2014 Environdata Australia Pty Ltd 42-44 Percy Street Warwick Queensland 4370 Australia Phone: (07) 4661 4699 Fax: (07) 4661 2485 International
Instructions. Follow All Instructions Before Assembling Or Using This Product
 Instructions Follow All Instructions Before Assembling Or Using This Product IMPORTANT DO NOT RETURN THIS PRODUCT TO THE RETAIL STORE WHERE PURCHASED. CALL TOLL FREE: (800) 492-9334 WARNING: Improper use
Guyed 70 Foot Tower Kit for Skystream 3.7 Owner s Manual
 Guyed 70 Foot Tower Kit for Skystream 3.7 Owner s Manual 3-CMLT-1028-03 REV F Installation Operation 2013 XZERES Corp All Rights Reserved Please read this manual thoroughly before beginning assembly. If
GTR FlexPLI Manual. FlexPLI Preparation before Car Testing
 FlexPLI Manual FlexPLI Preparation before Car Testing 04.09.2013 A B current language Introduction Fitting Flesh Leg Preparation for Dynamic Inverse Test Fitting Flesh and Covers C Proposal Leg Preparation
Infant Swing ( )
") Infant Swing (04-0017) 1. Insert the yellow T-bar into the hole at the front of the swing. If you need to disengage the T-bar you can squeeze the 2 tabs together under the seat while pulling the T-bar
Infant Swing (04-0017) 1. Insert the yellow T-bar into the hole at the front of the swing. If you need to disengage the T-bar you can squeeze the 2 tabs together under the seat while pulling the T-bar
WHISPER 42 FOOT (13 Meter) TOWER KIT for SKYSTREAM 3.7 AND WHISPER 500 WIND TURBINE
 TOWER KIT for SKYSTREAM 3.7 AND WHISPER 500 WIND TURBINE") WHISPER 42 FOOT (13 Meter) TOWER KIT for SKYSTREAM 3.7 AND WHISPER 500 WIND TURBINE Made in the USA by: SOUTHWEST WINDPOWER, INC. 1801 Route 66 Flagstaff, AZ 86001 (928) 779-9463 SOUTHWEST WINDPOWER Page
WHISPER 42 FOOT (13 Meter) TOWER KIT for SKYSTREAM 3.7 AND WHISPER 500 WIND TURBINE Made in the USA by: SOUTHWEST WINDPOWER, INC. 1801 Route 66 Flagstaff, AZ 86001 (928) 779-9463 SOUTHWEST WINDPOWER Page
REVISIONS. Note: All revisions are highlighted in yellow within the document. 2/24/2017 TASK 2 Valve page 18
 REVISIONS Note: All revisions are highlighted in yellow within the document. 2/24/2017 TASK 2 Valve page 18 EXPLORER PROP BUILDING INSTRUCTIONS & PHOTOS Companies should be aware that tolerances in lengths
BEAMGUARD SAFETY POST TM INSTRUCTIONS
 BEAMGUARD SAFETY POST TM INSTRUCTIONS READ THESE WARNINGS BEFORE USING THE BEAMGUARD SAFETY POST! 1. Before use of this system, read and understand all instructions, warnings, cautions and notes marked
Index 1. Trampoline 2. Main Foils 3. Spinnaker Pole 4. Mast Setup 5. Mast Rigging 6. Rig Tension 7. Trapeze Lines 8. Rudders 9. Boom 10. Main Sheet an
 By User Manual Index 1. Trampoline 2. Main Foils 3. Spinnaker Pole 4. Mast Setup 5. Mast Rigging 6. Rig Tension 7. Trapeze Lines 8. Rudders 9. Boom 10. Main Sheet and Traveler 11. Main Sail 12. Downhaul
Try it! You ll like it!
 083016 1 Lashing is a method used to join together poles (or spars as they are often called) with rope to build camp projects like wash stands, tables, and even a camp shower! Knowing how to attach two
STATIONARY TRUCK INTERNAL HALYARD V-CLEAT FLAGPOLES FOR QUICK AND PROFESSIONAL INSTALLATION READ ALL INSTRUCTIONS BEFORE PROCEEDING
 9390 South 300 West, Sandy, Utah 84070 801-562-0123 800-782-0500 ColonialFlag.com STATIONARY TRUCK INTERNAL HALYARD V-CLEAT FLAGPOLES FOR QUICK AND PROFESSIONAL INSTALLATION READ ALL INSTRUCTIONS BEFORE
2016 Spring Fall Protection Construction Products
 2016 Spring Fall Protection Construction Products Anchorage 3-Man Swiveling Roof Anchor 2103690 Reusable 3-man swiveling roof anchor for sloped wood structures with fasteners. Concrete D-ring Anchor 2104560
REPLACING THE AFT RUDDER CABLES
 REPLACING THE AFT RUDDER CABLES Note: You must have the assistance of a qualified Aircraft Mechanic to perform this procedure. A logbook entry with the mechanics signature is required. Please read these
20', 15', AND 12' BALL STOPS ASSEMBLY INSTRUCTIONS
 20'-0" 15'-0" 1 739020 739020A 20' BALL STOP; STRAIGHT POLE 739015 739015A 15' BALL STOP; STRAIGHT POLE 739012 739012A 12' BALL STOP; STRAIGHT POLE Read all of the instructions before beginning. Make sure
MSA Confined Space Entry Equipment
 MSA Confined Space Entry Equipment Because every life has a purpose... MSA Confined Space Entry Equipment MSA XTIRPA Manhole Guard System Use for confined space vertical entry and fall protection when
WIND CLIPPER KTS ILLUM SCALE INC DEC CLIPPER WIND SYSTEM
 CLIPPER WIND KTS ILLUM SCALE DEC INC CLIPPER WIND SYSTEM TABLE OF CONTENTS INTRODUCTION PRE-TEST OF INSTRUMENT INSTALLING THE MASTHEAD SENSOR UNIT INSTALLING THE DISPLAY NORMAL OPERATION CHANGING THE
PUNE TECHTROL PVT LTD. Instruction and Maintenance Manual for Float and Tape Gauge FTG
 PUNE TECHTROL PVT LTD Instruction and Maintenance Manual for and Tape Gauge FTG INSTALLATION, OPERATION AND MAINTENANCE MANUAL FOR FLOAT AND TAPE GAUGE FTG 1 Introduction : It is used to measure and indicate
TRAVSMART permanent single-cable horizontal lifeline system
 The Travsmart single-line system provides a smooth travel. It allows the traveler to move freely over the intermediate anchors, minimizing wear and eliminating user assistance. The user s hands remain
LoneStar Fiberglass Pools. Do-It-Yourself. Installation Manual
 LoneStar Fiberglass Pools Do-It-Yourself Installation Manual Chris 1/3/2008 Do-It-Yourself The installation of a LoneStar Fiberglass pool is a much simpler task than most people think. What is important
830 SureFlo Soap Systems Installation Instructions. Foam Soap Cabinet... Pages 2-9 Liquid Soap Cabinet... Pages 10-19
 830 SureFlo Soap Systems Installation Instructions Foam Soap Cabinet... Pages 2-9 Liquid Soap Cabinet... Pages 10-19 INSTALLATION INSTRUCTIONS SureFlo SOAP DISPENSING SYSTEM FOAM VERSION ONLY B-830 Foam
ASSEMBLY MANUAL HOBIE CATSY
 ASSEMBLY MANUAL HOBIE CATSY HOBIE CAT EUROPE ZI Toulon Est, BP 50 8078 Toulon cedex 9, France Tel : + (0)9 08 78 78 - Fax : + (0)9 08 99 Email : hobiecat@hobie-cat.net - http://www.hobie-cat.net ASSEMBLY
OPERATIONS/PARTS MANUAL FOR PATTERSON'S MODEL # WWP40M-LPS-6 LOW-PROFILE BARGE CONNECTOR WINCH
 W. W. Patterson Company 3 Riversea Road Pittsburgh, PA 15233 Phone: 800-322-2018 FAX: 412-322-2785 OPERATIONS/PARTS MANUAL FOR PATTERSON'S MODEL # WWP40M-LPS-6 LOW-PROFILE BARGE CONNECTOR WINCH Please
ATOC Meteorological Tower (6 meter-4 level) Guide
 Guide") ATOC Meteorological Tower (6 meter-4 level) Guide SETUP Outline 1. Siting 2. Components 3. Transportation 4. The Tower 5. The Cables and Data Logger Siting Selecting an appropriate site for the weather
ATOC Meteorological Tower (6 meter-4 level) Guide SETUP Outline 1. Siting 2. Components 3. Transportation 4. The Tower 5. The Cables and Data Logger Siting Selecting an appropriate site for the weather
Cat Fence Installation Instructions for Regular and Snow Protection Kits with Extra Posts. List of items shown
 CF-INST-E, Rev., 0/7/ Cat Fence Installation Instructions for Regular and Protection s with Extra Posts Attachment Close-up Regular Regular Post with Post Attached A B F K J E C D I G, H L List of items
STORES FALL PROTECTION EQUIPMENT INVENTORY
 #1 Talon Self Retracting Lifeline #2 Cable Type Lifeline Serial No: 6791 Model No. 3101051 Length: 16 feet Serial No: 01029 Model No. AD115BC Length: 10 feet #3 Steel Twist-Lock Carabiner #4 Steel Twist-Lock
Figure 1 - Parts Identification
 Instructions for the following series products: Zorbit Energy Absorber Kits (See back page for specific model numbers.) User Instruction Manual Zorbit Energy Absorber Kits for Horizontal Lifeline Systems
Pro Climb Rigging Bollard USER MANUAL. Pro Climb Rigging Bollard
 Pro Climb Rigging Bollard USER MANUAL Pro Climb Rigging Bollard www.proclimb.co.nz Protection Rubber Wear Sleeve Picture 1 Rigging Loop Introduction The Pro Climb Rigging Bollard (PCRB) is a friction device
INSTALLING YOUR CLC RUDDER
 INSTALLING YOUR CLC RUDDER These instructions are written to help you install the CLC rudder kit on your wooden kayak. The rudder can be fitted to your boat during construction or after completion. Please
First Team Sports, Inc. Blast Recreational Volleyball System
 First Team Sports, Inc. Blast Recreational Volleyball System BILL OF MATERIALS A 2 Volleyball Vertical Post K 1 ½ Centerlock Nut B 3 Net Clamp L 2 Carabiner Clip C 1 Pulley Clamp M 1 ½ x 2 Hex Bolt D 4
Troyer s Gourd Rack 8 unit F R H O P
 B E A D I M-N L Vertical Parts F R H O P Horizontal Parts C G J Updated 11/16 Parts List A: Top of Pole B: Bottom of Pole C: 48 Ground Stake D: Top Perch rods 48 long E: Hub F: Rope Winder w/ attached
Revisions to the Regulations for Agility Trials
 Revisions to the Regulations for Agility Trials Effective January 2, 2018 Equipment changes may be done prior to January 2, 2018, but must be completed by January 2, 2018 This insert is issued as a supplement
Assembly Instructions. -Cantilever Boat Lifts
 Assembly Instructions -Cantilever Boat Lifts Winch Instruction Page Safety Information 1. The winch is built for the multipurpose of hauling and lifting operations. It is not to be used as a hoist for
SASK-A-POLE OWNERS AND USERS MANUAL
 SASK-A-POLE OWNERS AND USERS MANUAL GENERAL INFORMATION The Saskatchewan Abilities Council s Sask-a-Pole accessibility and transfer aid is designed to help provide safe and easy access to chairs, beds,
Figure 1 - Parts Identification. Copyright 2002, DB Industries, Inc.
 User Instruction Manual Zorbit Energy Absorber Kits for Horizontal Lifeline Systems This manual is provided as the Maunfacturer s Instructions, and should be used as part of an employee training program
FNFB-30 (30 FT FIELDPRO FOOTBALL BACKSTOP SYSTEM) Installation Instructions
 Installation Instructions") FNFB-30 (30 FT FIELDPRO FOOTBALL BACKSTOP SYSTEM) Installation Instructions Call Jaypro Sports Equipment at 1-800-243-0533 during regular business hours for technical support. www.jaypro.com Rev: - Page
FNFB-30 (30 FT FIELDPRO FOOTBALL BACKSTOP SYSTEM) Installation Instructions Call Jaypro Sports Equipment at 1-800-243-0533 during regular business hours for technical support. www.jaypro.com Rev: - Page
Installation Instructions - Electric Aluminum Drive Systems for Arm Sets to 22 Electric Arm Systems , ,
 Installation Instructions - Electric Aluminum Drive Systems for Arm Sets to 22 Electric Arm Systems - 204-025, 206-025, 22-025 NB /0/ 607-0020 404 N. Marshall Ave. El Cajon CA. 92020 For technical support
600 / 600FC OWNER'S MANUAL
 PROGRESSION 600 / 600FC OWNER'S MANUAL Issue 2 / Version E - Dec. 10, 1997 Copyright 1997 GAMMA Sports - All Rights Reserved PROGRESSION 600 / 600FC OWNER'S MANUAL TABLE OF CONTENTS PAGE 1... WARRANTY
STATIONARY TRUCK INTERNAL HALYARD CAM CLEAT FLAGPOLES FOR QUICK AND PROFESSIONAL COMMERCIAL INSTALLATION READ ALL INSTRUCTIONS BEFORE PROCEEDING
 9390 South 300 West, Sandy, Utah 84070 801-562-0123 800-782-0500 ColonialFlag.com STATIONARY TRUCK INTERNAL HALYARD CAM CLEAT FLAGPOLES FOR QUICK AND PROFESSIONAL COMMERCIAL INSTALLATION READ ALL INSTRUCTIONS
Chapter 2 Rigging. Cutting Wire Rope. Anchoring Wire Rope to Drum. Winding Wire Rope Onto Drum
 Chapter 2 Rigging Cutting Wire Rope The wire rope must be tightly seized on both sides of the point where the wire rope will be cut, as shown in Figure 2-1. Seize the wire rope with either seizing wire
Installation Instructions - Super Six Electric Arm Kits with Underbody Pivots , , ,
 Installation Instructions - Super Six Electric Arm Kits with Underbody Pivots 501-2112, 501-2113, 501-2114, 501-2115 GR 0/23/12 60-0135 1404 N. Marshall Ave. El Cajon CA. 92020 For technical support call
Rain Barrels. Did You Know?
 Rain Barrels Rain barrels are water storage units designed to collect water from impermeable surfaces like roofs. The most common type of rain barrel collects runoff from roofs by connecting to gutter
SCOUT PROP BUILDING INSTRUCTIONS & PHOTOS
 SCOUT PROP BUILDING INSTRUCTIONS & PHOTOS Companies should be aware that tolerances in lengths of pipe and length of pipe inserted into joints can change the overall dimensions of product demonstration
Installation Instructions - Electric Steel Drive Systems for Arm Sets to ,
 Installation Instructions - Electric Steel Drive Systems for Arm Sets to 22 208-025, 209-025 NB /0/ 607-0029 404 N. Marshall Ave. El Cajon CA. 92020 For technical support call us at (800) 368-3075 Step.
TENSOREX C+ TENSOREX C+
 Installation instruction TENSOREX C+ TENSOREX C+ is a new spring automatic tensioning device for tramway, light and heavy railways Overhead Contact Lines ( OCL ). TENSOREX Products are only by PFISTERER
MODEL / SINGLE and DUPLEX PULLEY SYSTEMS
 MODEL 922181/922182 SINGLE and DUPLEX PULLEY SYSTEMS MODEL 922181 SINGLE PULLEY SYSTEM MODEL 922182 DUPLEX PULLEY SYSTEM 1 PARTS LIST FOR SINGLE/DUPLEX COLUMN PULLEYS Note: Check with your architect or
I.H.S INSTALLATION INSTRUCTIONS
 I.H.S INSTALLATION INSTRUCTIONS TOOLS REQUIRED The following tools will be required for installation of your I.H.S. system. Item Qty Needed 9/16 Open End Wrench 2 3/4 Open End Wrench 1 1/2 Open End Wrench
INSTALLATION INSTRUCTIONS
 INSTALLATION INSTRUCTIONS SureFlo Soap Dispensing System Bobrick SureFlo Soap Dispensing System Soap Cabinets, Soap Dispensers and connections are available from all Bobrick Distributors. Bobrick SureFlo
2015 List Price Sheet
 2015 Terms & Conditions Terms: Net 30 days Prepaid Freight: All orders will receive prepaid freight at $1,500. Freight Terms: Transportation charges will be prepaid and billed via our most economical routing