Wheelchair Attachment
|
|
|
- Jody Gilmore
- 5 years ago
- Views:
Transcription

1 TM Wheelchair Attachment Set-Up Guide and Registration INDEX Page 1: Page 5: Page 6: Page 7: Page 9: Four Easy Steps to Set-Up your FreeWheel Clamp Plate Footrest Modifications Perch Set-Up Guide How to Adjust the Steering Mechanism FreeWheel Warranty and Registration Note: Tools you may need: 3/16 and 5/32 allen wrenches, small phillips-head screwdriver, hack saw, dremel or metal file.
2 How To Set-Up Your FreeWheel There are 4 easy steps to setting up your FreeWheel to fit your wheelchair: 1. Determine whether you need a cup shim? (page 1) 2. Does it need a straight shim and if yes, what thickness? (page 2) 3. Should you use a short or long rear end? (page 3) 4. Adjusting the angle based on how high your footrest is from the floor and whether it is angled. (page 4)
 Check which footrest type you have and decide whether or not it needs a cup shim.")

3 STEP 1: Cup Shim (FreeWheel comes with cup shim installed.) Check which footrest type you have and decide whether or not it needs a cup shim. Footrest Types 2 Tube: YES, you need a cup shim. Make no change and go to STEP 2. 2 Tube with Plate: YES, you need a cup shim. Make no changes and go to STEP 2. Clamp Plate: NO, you do not need a cup shim. REMOVE CUP SHIM using small phillips head screw driver to remove screws and GENTLY pry plastic cup shim out. Go to STEP 2. Page 1


4 STEP 2: Which Straight Shim? There are 3 separate straight shims with your FreeWheel package. Your foot rest type determines which shim to use, or whether you do NOT need a shim. Footrest Types Shim Types 2 Tube: Thick Straight Shim 2 Tube with Plate: Thinnest Straight Shim Clamp Plate: NO Straight Shim 1. Insert straight shim into dove-tail feature found in clamp base. 2. Rear end should be removed. Page 2


5 STEP 3: Which Rear End? (ALL footrest types need a rear end. ) 1. Measure from the front tube/plate to the back of the footrest to determine depth. Footrest Depths up to 5 : Use SHORT Rear End Short Footrest Depths from 5 to 6-7/8 : Use a LONG Rear End Long 2. Using a hack saw cut your straight shim the same length as the footrest depth. 3. Clamp FreeWheel on to footrest. 4. Using a 3/16 allen wrench (not included) adjust the rear end by tightening bolt so the rear end just touches the footrest tube/plate. Page 3


6 STEP 4: Angle Adjustment This adjustment is to make sure the FreeWheel properly lifts the front casters off the ground. The adjustment is based on the height of your wheelchair s footrest from the ground. Make sure you have completed the Set-up Guide STEPS 1 through 3, BEFORE you complete this step. 1. Find a flat/level floor. While holding the handle, arrange the FreeWheel in the tail dragger position (shown above). 2. Move your feet apart. The clamp requires 3/4 of space between your feet. 2. Lower the clamp over your footrest, hooking the rear end first, then setting it down with clamp cup just in front of the footrest tube. 3. Lock down by putting pressure on the handle. The locking action should feel very solid and secure. The FreeWheel tire should be touching the ground. If it is NOT touching the ground, you will need to adjust the Angle Bolt. 1. Loosen bolts A, B and C, both sides. Do NOT REMOVE, just loosen. 2. Tighten Angle Bolt if wheel is off the ground. Loosen the Angle Bolt if the tire is too low.. 3. Re-tighten BOTH SIDES of bolts A, B and C. Angle Bolt A C B Page 4


7 CLAMP PLATE Footrests: Special Instructions To insure that your footrest does not rotate you will need to add 2 screws to lock the footrest plate to your tube. Use TWO #8 3/8 Self Tappers with a 9/64 pilot hole. TiLite ANGLE-ADJUSTABLE FOOTREST ONLY: Special Instructions Use a dremel or file to modify your clamp so your FreeWheel clamps on securely. Please contact us at info@gofreewheel.com if you have any questions or difficulty with this step. Before After Use dremel or file to remove material as shown. Page 5


8 Perch Set-up Guide Now that you have your FreeWheel adjusted for your specific footrest type and chair, you ll want to install the Storage Perch on the crossbar on the back of your chair. Chose the perch post that matches your footrest set-up to make sure you pick the right combination so your FreeWheel securely clamps to your storage Perch. ROUND Perch Post Tube only footrest, with THICKEST straight shim and the cup shim has NOT been removed. SMALL D Perch Post Middle thickness straight shim and the cup shim has NOT been removed. MIDDLE D-Perch Post Thinnest straight shim and the cup shim has NOT been removed. BIG D-Perch Post NO straight shim and the cup shim has been REMOVED. Low Cross Bar Perch Lacey Heward 2x Paralympic Athlete With one hand cupping the clamp of the FreeWheel, hold the clamp to the perch while the other hand grips the handle and firmly close the clamp onto the perch. High Cross Bar Page 6

9 How to Adjust for Steering If your Freewheel is not tracking straight when coasting forward on level ground, the steering should be adjusted. To do this you need to adjust two separate fasteners: Front Set Screw, and; Main Steering Stem Bolt 1. The Front Set Screw holds the steering adjustment. 2. After loosening the Front Set Screw (3/32" allen or 2.5mm allen wrench) and Main Steering Stem Bolt, rotate the fork to adjust the steering straight.. 3. If the internal bushing is not rotating relative to the frame, then tighten the ball adjuster knob to lock the fork to the internal bushing. Work the bushing loose from the frame. I like to re-grease this joint to keep it from binding. 4. Set the steering and then tighten the Front Set Screw. 5. Finish by tightening the Main Steering Stem Bolt. 6. Test for straightness by coasting on a flat surface. Note: The front ball adjuster knob can be backed off for light steering action or screwed in for heavier steering action. Front Set Screw Ball Adjuster Knob Main Steering Stem Bolt Page 7
 I lay in the hospital wondering how I could be a Dad that actively participated in the lives of my young")
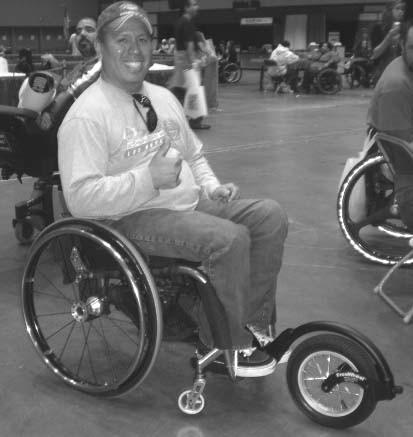
10 TM Wheelchair Attachment Thank you for choosing the FreeWheel Wheelchair Attachment. I am confident you will find it to be the one piece of adaptive equipment that you take everywhere you go. When I was first injured in a motocross accident (resulted in a C6/7 spinal cord injury) I lay in the hospital wondering how I could be a Dad that actively participated in the lives of my young children. After leaving the hospital I found my wheelchair more limiting than was acceptable. My front casters would catch on everything and either toss me out of my chair or force me to sit on the sidelines. As an engineer I knew their had to be an answer. As I started developing the FreeWheel I worked on how to get the smaller front casters off the ground and put a large wheel out front. At the same time I wanted my design to be lightweight and easy to use. After years of testing and input from other wheelchair users, I am happy to now be able to provide the FreeWheel to you. Whether you live in a rural or urban setting, or somewhere in between, the FreeWheel will allow you to live a more independent active live. I am now able to easily roll over curbs, down grassy or dirt slopes, and power through snowy parking lots. Today I go camping with my children and am out on the grass cheering them on during soccer games. My FreeWheel goes every where I go and my dream of actively participating in the lives of my children is a reality. Please feel free to send us your videos and pictures and let us know how the FreeWheel is working for you. Sincerely, Pat Dougherty Page 8


11 TM TM Wheelchair Attachment PNT LLC 4878 Lakeview Place Garden City, ID USA The FreeWheel Crew
Wheelchair Attachment
 Wheelchair Attachment Set-Up Guide and Registration INDEX Page 1: Page 5: Page 6: Page 7: Page 5: Page 9: Four Easy Steps to Set-Up your FreeWheel TiLite Angle-Adjustable Footrest Modifications Perch Set-Up
EZee Glider Manual. Tools needed for Assembly: Wrench (included) Philips Screwdriver (not included) Assembly Instructions
 Philips Screwdriver (not included) Assembly Instructions") EZee Glider Manual Congratulations on your purchase of the EZee Glider! Your glider is designed for years of nearly carefree use by your child. These instructions include how to set up your glider and
EZee Glider Manual Congratulations on your purchase of the EZee Glider! Your glider is designed for years of nearly carefree use by your child. These instructions include how to set up your glider and
BackCountry ebikes 2019 MULE Assembly
 BackCountry ebikes 2019 MULE Assembly Required Tools: Cutting Pliers (to cut box poly strapping and heavy bike banding) Scissors (to remove bubble wrap) Allen wrenches (3mm, 4mm, 5mm, 6mm) Wrenches (10mm,
VERSA BIKE RACK INSTRUCTIONS
 VERSA BIKE RACK INSTRUCTIONS Models #8, 8 Important This rack is designed for use with a or. receiver hitch. The rack is designed to hold a maximum of two bicycles. Do not use it for anything other than
Mini Glider Manual. Your Glider comes partially assembled. The front wheel and the handlebars require assembly.
 Mini Glider Manual Congratulations on your purchase of the Mini Glider! Your glider is designed for years of nearly carefree use by your child. These instructions include how to set up your glider and
Santa Fe Cycles Assembly Guide Introduction
 Santa Fe Cycles Assembly Guide Introduction Congratulations on your purchase of your new Santa Fe bicycle. You have purchased a bicycle that has many features and qualities. Please take a few minutes and
Ladies Shopper Bike Assembly Manual 28C03
 Ladies Shopper Bike Assembly Manual 28C03 Ecosmo Ltd 1 Know your bike 1. Wheel 2. Rear Derailleur 3. Chain 4. Crank Set 5. Pedal 6. Seat Quick Lock 7. Saddle and Post 8. Frame 9. Front Light 10. Front
Final Assembly Instructions Bikes with Quill Stems
 Final Assembly Instructions Bikes with Quill Stems Thank you for buying your new bicycle from L.L.Bean. Read these instructions carefully before beginning the final assembly. Prior to shipping, our expert
MODEL: FIXIE / TRACK
 STEP BY STEP BUILD GUIDE MODEL: FIXIE / TRACK TABLE O F CON TENTS TOOLS 1 LET S GET STARTED 2 INSTALLING THE HANDLEBAR 3 INSTALLING THE FRONT WHEEL 4 ALIGNING THE STEM 5 INSTALLING THE SEATPOST 6 OPTIMIZING
RS Important Notes. Contact. Bicycle Maintenance Stand instructions manual. Warranty Period : 1 year (from the date of your purchase)
") Warranty Period : 1 year (from the date of your purchase) RS-1700 Bicycle Maintenance Stand instructions manual (ver.1.2 2016/12) For more details, read the attached "Minoura Limited Warranty Policy" card.
Warranty Period : 1 year (from the date of your purchase) RS-1700 Bicycle Maintenance Stand instructions manual (ver.1.2 2016/12) For more details, read the attached "Minoura Limited Warranty Policy" card.
Trike-Bike Assembly Manual
 Be sure to check our website for more instruction details, videos and photographs as well as a complete listing of each Nut and Bolt for the Trike Bike. www.trike-bike.com.au Go to the page marked ASSEMBLY
SAVE THESE INSTRUCTIONS. NOTE: Check all parts for shipping damage. In case of damage, DO NOT use. Contact Carrier/Invacare for further instructions.
 Walking Tutor, Installation and Operating Instructions Model No. WT 200 SAVE THESE INSTRUCTIONS NOTE: Check all parts for shipping damage. In case of damage, DO NOT use. Contact Carrier/Invacare for further
INSTALLATION INSTRUCTIONS
 INSTALLATION INSTRUCTIONS KIT CONTENTS: PART NUMBER: DESCRIPTION: E361SXA300 ROOF MOUNT BICYCLE CARRIER B9 TRIBECA Short Carriage Bolt Long Carriage Bolt 3x Over-Molded Wrench Button Head Screw 2x Washer
Quattrocycle BV. Quattrocycle. User Manual. Last update February Quattrocycle BV Bremkant EJ Middelbeers. User Manual Quattrocycle 1
 Quattrocycle User Manual Last update February 2010 Quattrocycle BV Bremkant 6 5091 EJ Middelbeers User Manual Quattrocycle 1 Table of Contents Page Chapter 1: Introduction 3 Chapter 2: Instructions for
Final Assembly Instructions Bikes with 16 Wheel Size
 Final Assembly Instructions Bikes with 16 Wheel Size Thank you for buying your new bicycle from L.L.Bean. Read these instructions carefully before beginning the final assembly. Prior to shipping, our expert
INSTALLATION INSTRUCTIONS
 KIT CONTENTS: INSTALLATION INSTRUCTIONS PART NUMBER: DESCRIPTION: E361SXA302 roof MOUNT BICycle CARRIER SINGLE Short Carriage Bolt 1x Long Carriage Bolt 3x Over-Molded Wrench 1x Button Head Screw 2x Washer
Final Assembly Instructions Bikes with Threaded Headsets
 Final Assembly Instructions Bikes with Threaded Headsets Thank you for buying your new bicycle from L.L.Bean. Read these instructions carefully before beginning the final assembly. Prior to shipping, our
Read Instructions carefully before use. Rollator is designed for indoor & outdoor use. Do NOT use as a wheelchair or as a transport chair.
 Charcoal Red Seat Height 500-10191 500-10195 19 500-10211 500-10215 21 500-10241 500-10245 24 User Manual Read Instructions carefully before use. Rollator is designed for indoor & outdoor use. Do NOT use
INSTALLATION INSTRUCTIONS. Parts List. Tools Required. Before You Begin. Installation. Customer Information BICYCLE ATTACHMENT JUL.
 INSTALLATION INSTRUCTIONS JUL. 2006 Parts List Bicycle attachment Key plates (2) Tools Required Phillips screwdriver Flat-tip screwdriver Before You Begin Customer Information This Bicycle Attachment is
ASSEMBLY GUIDE AROUND THE BLOCK - 1, 3, 7, & 21 SPEED SIXTHREEZERO
 ASSEMBLY GUIDE AROUND THE BLOCK - 1, 3, 7, & 21 SPEED SIXTHREEZERO OUR COMMITMENT We want you to love your bike as much as we do. If you run into any issues, no matter how small, let us know and we ll
8MAY15 US RACK, Inc Falcon Drive, Madera, CA
 8MAY15 US RACK, Inc. - 2850 Falcon Drive, Madera, CA 93637-559-661-3050 INSTRUCTIONS for Bedrail-mounted MOTORCYCLE RACK, Model 2001-4TRA WARNING: Do NOT attempt to install or use this rack without following
INSTALLATION INSTRUCTIONS
 INSTALLATION INSTRUCTIONS Accessory P/N 08L07-E09-100 Application 2013 ODYSSEY Publications No. AII 13265 Issue Date AUG 2012 Put this information in the glove box with the vehicle owner s manual. PARTS
Thank you for purchasing a WIKE BOX BIKE!
 Thank you for purchasing a WIKE BOX BIKE! Contents Safety.....3 Front wheel.4 Kickstand..5 Handle Bar & Box 6 Seat post and Saddle 7 Final pre-ride check 8 Tools needed to assemble Bike: -High table or
HOME ASSEMBLY INSTRUCTIONS
 HOME ASSEMBLY INSTRUCTIONS This Papillionaire Bicycle now belongs to you. It will take you to work, wait patiently outside your local cafe, and carry your groceries home. This is the start of your long-term
Final Assembly Instructions Bikes with Threaded Headsets
 Final Assembly Instructions Bikes with Threaded Headsets Thank you for buying your new bicycle from L.L.Bean. Read these instructions carefully before beginning the final assembly. Prior to shipping, our
#59114 Rola 2-Bike Rack Carrier (Shown Assembled) (A) (C) (B)
 (A) (C) (B)") Use for Parts: #59114 Rola -Bike Rack System #59115 Rola 1-Bike Add-On TOOLS REQUIRED 10mm or 13/3 Socket & Wrench #59114 Rola -Bike Rack Carrier (Shown Assembled) Tray Attachment Hardware: (3) Plastic
Use for Parts: #59114 Rola -Bike Rack System #59115 Rola 1-Bike Add-On TOOLS REQUIRED 10mm or 13/3 Socket & Wrench #59114 Rola -Bike Rack Carrier (Shown Assembled) Tray Attachment Hardware: (3) Plastic
Instruction Manual. Confirm the package. 4 x 4 Discs M6 screws (countersunk screws)
") 6002761B Instruction Manual In order to ensure safe snowboarding, follow the instructions below and check for the correct settings. This Instruction Manual contains important information regarding correct
6002761B Instruction Manual In order to ensure safe snowboarding, follow the instructions below and check for the correct settings. This Instruction Manual contains important information regarding correct
INSTALLATION INSTRUCTIONS
 INSTALLATION INSTRUCTIONS Accessory (ROOF) P/N 08L07-E09-100 Application 6 PILOT Publications No. Issue Date JUN 5 PARTS LIST 6 Washers Bicycle attachment 2 Brackets Hex wrench 4 Knobs 2 Keys 1 Rear Bracket
TRAILMATE METEOR ASSEMBLY MANUAL
 TRAILMATE METEOR ASSEMBLY MANUAL (DISC BRAKE VERSION) The Trailmate Meteor recumbent has been designed for easy assembly. This means more time to enjoy the smooth ride with single speed, 3 speed coaster
M*CARBO Mosin Nagant 91/30 Trigger Spring Kit Download or Print Instructions Contact: Page 1
 Download or Print Instructions Contact: help@mcarbo.com Page 1 Step 1: Clear your Firearm - Check the chamber, the bolt face and magazine well. 1. 2. 3. 4. 5. 6. 7. 8. Step 2: Gather Parts and Tools Needed
To save this document, scroll up and select the download icon
 Thank you for purchasing a RustySpokes Softcruise. We know you are going to enjoy the bike, but if you had it shipped to you, there are a few things you need to do to assemble the bike. The seat, pedals
IMPORTANT SAFETY NOTICE
 OWNER S MANUAL NOTE: Any photos of the YBIKE or decals in the owner s manual are intended to be used as a reference only, and there may be some differences to the unit you purchased. IMPORTANT SAFETY NOTICE
comfort without compromising on performance and to fit your various needs on touring,
 Congratulations on your purchase of Goal-26X. Goal-26X is made to enhance comfort without compromising on performance and to fit your various needs on touring, shopping and communicating. Let s have fun
OWNER'S MANUAL. Copyright 2003 GAMMA - All Rights Reserved
 OWNER'S MANUAL AL Issue 1 - December 2003 Copyright 2003 GAMMA - All Rights Reserved OWNER'S MANUAL TABLE OF CONTENTS PAGE 1... WARRANTY PAGE 2... ASSEMBLY INSTRUCTIONS PAGE 4... MOUNTING THE RACQUET PAGE
SANTANA STOWAWAY TANDEM WITH AIRLINER SAFECASE AND FTS FOAM TRAY SYSTEM ASSEMBLY AND DISASSEMBLY
 SANTANA STOWAWAY TANDEM WITH AIRLINER SAFECASE AND FTS FOAM TRAY SYSTEM ASSEMBLY AND DISASSEMBLY Congratulations! You are now the proud owner of the world s most travel-ready, performance tandem. The following
Caliber Sled Wheels Assembly Instructions for PN and 13579
 Caliber Sled Wheels Assembly Instructions for PN 13576 and 13579 Caution: Read all instructions before assembling or using Sled Wheels. Follow the steps in order. Only use Sled Wheels as intended, following
MODEL: COMMUTER / ROAD BIKE
 STEP BY STEP BUILD GUIDE MODEL: COMMUTER / ROAD BIKE TABLE OF CONTENTS TOOLS 1 LET S GET STARTED 2 INSTALLING THE QUILL STEM 3 INSTALLING THE FRONT FENDER 4 INSTALLING THE QUICK RELEASE 5 INSTALLING THE
DM-MBST (English) Dealer's Manual. ROAD MTB Trekking. City Touring/ Comfort Bike. Shifting lever. EZ-FIRE Plus ST-EF500 ST-EF510
 Dealer's Manual. ROAD MTB Trekking. City Touring/ Comfort Bike. Shifting lever. EZ-FIRE Plus ST-EF500 ST-EF510") (English) DM-MBST001-00 Dealer's Manual ROAD MTB Trekking City Touring/ Comfort Bike URBAN SPORT E-BIKE Shifting lever EZ-FIRE Plus ST-EF500 ST-EF510 CONTENTS IMPORTANT NOTICE... 3 TO ENSURE SAFETY...
(English) DM-MBST001-00 Dealer's Manual ROAD MTB Trekking City Touring/ Comfort Bike URBAN SPORT E-BIKE Shifting lever EZ-FIRE Plus ST-EF500 ST-EF510 CONTENTS IMPORTANT NOTICE... 3 TO ENSURE SAFETY...
ASSEMBLY & FITTING GUIDE. Best Friend Mobility Dog Wheelchair Assembly Guide
 1 Best Friend Mobility Dog Wheelchair Assembly Guide No matter what the reason, an injury or an illness, it is difficult when your pet becomes paralyzed or lose its ability to walk or move on its own.
DIRECT DRIVE DIXIE DOUBLE SEAMER Model 25D
 OPERATOR'S MANUAL DIRECT DRIVE DIXIE DOUBLE SEAMER Model 25D LUBRICATE DAILY: A. Gears inside gear housing at chuck shaft (1) Oil B. Seam rolls and cam rolls (4) - Oil C. Seam roll levers through gear
Thank you for purchasing the Hollander II Bike from Made.com
 Thank you for purchasing the Hollander II Bike from Made.com Please take time to identify the hardware as well as the individual components of this product. As you unpack and prepare for assembly, place
U STAND INSTALLATION INSTRUCTIONS
 U STAND INSTALLATION INSTRUCTIONS Thank you for purchasing the incredible new U STAND by Stand N Fish. Once installed on your kayak the U STAND will enhance your kayak fishing enjoyment to a whole new
HoldUp Plus2. Safety Kit included: See additional instructions for installation. REAR WHEEL TRAY. BASE (1x) lock WASHER (1x) KEY (2x) SAFETY CLIP (1x)
 lock WASHER (1x) KEY (2x) SAFETY CLIP (1x)") HoldUp Plus2 InsTAll This product on 2" hitch version of the HoldUp Front WHEEL TRAY assembly (1x) REAR WHEEL TRAY assembly (1x) wrench (1x) BASE (1x) bolt (8X) Lock WASHER (8X) Washer (8x) KEY (2x) SAFETY
HoldUp Plus2 InsTAll This product on 2" hitch version of the HoldUp Front WHEEL TRAY assembly (1x) REAR WHEEL TRAY assembly (1x) wrench (1x) BASE (1x) bolt (8X) Lock WASHER (8X) Washer (8x) KEY (2x) SAFETY
Cantilever Brake. Dealer's Manual. ROAD MTB Trekking. City Touring/ Comfort Bike
 (English) DM-RCBR001-00 Dealer's Manual ROAD MTB Trekking City Touring/ Comfort Bike URBAN SPORT E-BIKE Cantilever Brake BR-CX70 BR-CX50 BL-4700 BL-4600 BL-R780 BL-R3000 ST-7900 ST-6700 ST-5700 ST-4600
 WALKING / K-WALKER 149K Strovolou Avenue, Strovolos, Nicosia, 2048, Cyprus T: +357 22250115, F: +357 22250116, M: +357 70008830 www.abletools.com.cy info@abletools.com.cy B SERIES KAYE POSTURE CONTROL
Invacare Top End Parts Catalog
 Invacare Top End Parts Catalog T Titanium Top End Frames / Standard Parts Pre- July 2009 20 22 0 2 Pre- July 2009 9 2 2 Pre- July 2009 9 2 Titanium Head Tube Assembly see Casters / Forks on pg. 4 4 4 see
T-016 ASSEMBLY MANUAL MODEL ROCK AND ROLL Main Street NE Minneapolis, MN
 MODEL T-016 ASSEMBLY MANUAL ROCK AND ROLL 5280 Main Street NE Minneapolis, MN 55421 1.877.226.7824 www.kurtkinetic.com COMPONENTS Tools Required for Assembly: 17mm Wrench or Adjustable Wrench When unpacking,
M&P Trigger Work. The S&W M&P may be one of the easiest guns ever to do trigger work on.
 M&P Trigger Work The S&W M&P may be one of the easiest guns ever to do trigger work on. M&P Trigger Job Make sure the gun is unloaded. Follow normal field striping procedures. What needs to be changed
DM-RAPD (English) Dealer's Manual. ROAD MTB Trekking. City Touring/ Comfort Bike. SPD-SL Pedal DURA-ACE PD-R9100 ULTEGRA PD-R8000 SM-PD63
 Dealer's Manual. ROAD MTB Trekking. City Touring/ Comfort Bike. SPD-SL Pedal DURA-ACE PD-R9100 ULTEGRA PD-R8000 SM-PD63") (English) DM-RAPD001-01 Dealer's Manual ROAD MTB Trekking City Touring/ Comfort Bike URBAN SPORT E-BIKE SPD-SL Pedal DURA-ACE PD-R9100 ULTEGRA PD-R8000 SM-PD63 CONTENTS IMPORTANT NOTICE... 3 TO ENSURE
(English) DM-RAPD001-01 Dealer's Manual ROAD MTB Trekking City Touring/ Comfort Bike URBAN SPORT E-BIKE SPD-SL Pedal DURA-ACE PD-R9100 ULTEGRA PD-R8000 SM-PD63 CONTENTS IMPORTANT NOTICE... 3 TO ENSURE
Duo/Trio Office Bike Owner s Manual
 Duo/Trio Office Bike Owner s Manual Welcome Congratulations on choosing to enhance your productivity and wellness with LifeSpan. You ve made a healthy decision, as the need for increased amounts of daily
Drive Belt Instructions
 Drive Belt Safety Do not roll, pry, twist, invert or bend the belt back on itself. Do not zip tie the belt. The acceptable temperature range for your belt drive is -53 C to 85 C. Do not lubricate the belt
L810. Owner s Operating and. Maintenance Manual. For Standard Wheelchairs
 L810 Owner s Operating and Maintenance Manual For Standard Wheelchairs Introduction Standard wheelchairs are the result of extensive engineering research, and rigid quality assurance testing. Every new
SETTING THE HANDLE HEIGHT ON THE ROLLATOR
 Model No: Maximum User Weight: 10910C (Lightweight) 10928C (Heavy duty) 125kg (20st) (Lightweight) 170kg (27st) (Heavy duty) Height of handles: 780-915mm (30.5-36 ) (Lightweight) 790-930mm (31-36.5 ) (Heavy
Magnetic Bike. Model No: AENERGISER BODY WORX. Retain this owner s manual for future reference Read and follow all instructions in this owner s manual
 BODY WORX Magnetic Bike Model No: AENERGISER Retain this owner s manual for future reference Read and follow all instructions in this owner s manual Version A 1 EXPLODE DRAWING -02- PARTS LIST AND TOOLS
Invacare Top End Parts Catalog
 Invacare Parts Catalog Aluminum Titanium Frame / Parts 32 31 35 34 33 30 28 25 Caster Assembly for Aluminum / Titanium frame before Dec 1, 2006 1 29 26 27 2 5 15 6 11 10 3 7 4 8 7 13 14 16 9 12 8 11 9
Invacare Top End Parts Catalog
 Invacare Parts Catalog Paul Schulte Aluminum BB Paul Schulte Titanium BB Frame / Parts 29 28 32 31 30 2 25 22 Caster Assembly for Aluminum / Titanium frame before Dec 1, 2006 1 26 23 24 2 4 5 3 13 9 8
LITERIDER 2&3 IMPORTANT WARNING. 2Bike (1x) Bolt (1x) Nut (1x) Small Hex Wrench (1x)
 Bolt (1x) Nut (1x) Small Hex Wrench (1x)") LITERIDER 2&3 3 Bike (1x) Bolt (1x) Flat Washer (2x) Nut (1x) Large Hex Wrench (1x) 2Bike (1x) wrench (1x) Small Hex Wrench (1x) keys (2x) Long Strap (1x) 2-Zip Strips (6x) 3-Zip Strips (9x) Wheel strap
LITERIDER 2&3 3 Bike (1x) Bolt (1x) Flat Washer (2x) Nut (1x) Large Hex Wrench (1x) 2Bike (1x) wrench (1x) Small Hex Wrench (1x) keys (2x) Long Strap (1x) 2-Zip Strips (6x) 3-Zip Strips (9x) Wheel strap
MUELLER GAS. No-Blo Operations Using D-5. Drilling Machine. Reliable Connections. General Information 2
 operating Instructions manual MUELLER GAS TAble of contents PAGE No-Blo Operations Using D-5 General Information 2 Installing No-Blo Service Tees, Service Stop Tees and Curb Stop Tees 3-8 Reconditioning
OWNER'S MANUAL. Copyright 1999 ATS - All Rights Reserved
 OWNER'S MANUAL AL Issue 2 - August 19, 1999 Copyright 1999 ATS - All Rights Reserved OWNER'S MANUAL TABLE OF CONTENTS PAGE 1... WARRANTY PAGE 2... ASSEMBLY INSTRUCTIONS PAGE 4... MOUNTING THE RACQUET PAGE
-- SGP (NOVA TEAM SQUARE)
") -- SGP-100 -- (NOVA TEAM SQUARE) Installation Instructions Call Jaypro Sports Equipment at 1-800-243-0533 during regular business hours for technical support. www.jaypro.com Rev-B Page 1 of 9 JAYPRO SPORTS
-- SGP-100 -- (NOVA TEAM SQUARE) Installation Instructions Call Jaypro Sports Equipment at 1-800-243-0533 during regular business hours for technical support. www.jaypro.com Rev-B Page 1 of 9 JAYPRO SPORTS
A A A
 Mossberg 0 GA Talon T Rear Pistol Grip with Scorpion Recoil System A.5.0.6 A.5.0.6 A.5.0.6 Extended Scorpion Material to Reduce and Discomfort to the Shooter's Hand and Thumb Sure-Grip Texture 70.0.0 Mossberg
Rudder Kit Assembly Instructions for Quest 13
 Rudder Kit Assembly Instructions for Quest 13 Revised 4/2/2015 78501 Rudder System The Hobie Quest is designed for the addition of an optional rudder system. Rudder systems in boats like this allow you
INSTALLING THE BOLT-IN-PLACE FOOTPLATE KIT (FIGURE 1)
") Bolt-In-Place/Spring Button Assembly and Installation Instructions Kits No. 1110266 and 1121271 SAVE THESE INSTRUCTIONS NOTE: Check ALL parts for shipping damage. In case of shipping damage, DO NOT use.
Bolt-In-Place/Spring Button Assembly and Installation Instructions Kits No. 1110266 and 1121271 SAVE THESE INSTRUCTIONS NOTE: Check ALL parts for shipping damage. In case of shipping damage, DO NOT use.
walk with independence
 walk with independence Lightweight www.novamedicalproducts.com WARNING Failure to follow any or all safety instructions may result in serious injury or death. adjustment and usage yourself or ambulate
RADROVER REAR RACK INSTALLATION MANUAL
 RADROVER REAR RACK INSTALLATION MANUAL WWW.RADPOWERBIKES.COM We are here to help! Please contact us at SUPPORT@RADPOWERBIKES.COM or 1-800-939-0310 if you have questions. REV022216 Welcome Thanks you for
Parts List. 7. Handlebars 8. Grips 9. Handlebar Stem 10. Front Brake 11. Front Wheel 12. Crank 13. Chain
 Woodworm Cruise Parts List 1. Free Wheel with Rear Hub 2. Fenders 3. Fender Stay 4. Quick Release 5. Saddle 6. Seat Post 7. Handlebars 8. Grips 9. Handlebar Stem 10. Front Brake 11. Front Wheel 12. Crank
RG1200 Service and Repair Manual
 Dive Rite RG 1200 Regulator Service and Repair Manual Page 1 Text and Photography by Pete Nawrocky Copyright ( ) 1999-2000, Lamartek, Inc., dba Dive Rite RG1200 Service and Repair Manual First Stage.........................................
600 / 600FC OWNER'S MANUAL
 PROGRESSION 600 / 600FC OWNER'S MANUAL Issue 2 / Version E - Dec. 10, 1997 Copyright 1997 GAMMA Sports - All Rights Reserved PROGRESSION 600 / 600FC OWNER'S MANUAL TABLE OF CONTENTS PAGE 1... WARRANTY
Assembly Instructions And User Guide
 EZ-1/EZ-CLASSIC QUADRIBENT By Blackbird Designs Inc. Mark 5.2 June 2011 Assembly Instructions And User Guide 1 The Quadribent is 2-seat, side-by-side, human powered vehicle that enables almost anyone to
Stand-N-Fish FULL DETAIL INSTALLATION INSTRUCTIONS
 1 Stand-N-Fish FULL DETAIL INSTALLATION INSTRUCTIONS Thank you for purchasing the incredible new Stand-N-Fish Kayak Fishing System. Once installed on your kayak the Stand-N-Fish will take your kayak fishing
Installation Instructions
 116-3027, 116-3017 X-Pando Adjustable Steel Protector Installation Instructions 1404 N. Marshall Ave. El Cajon CA. 92020 For technical support call us at (800) 368-3075 NB 6/28/10 607-0112 Step 1. Mounting
INSTALLATION INSTRUCTIONS
 INSTALLATION INSTRUCTIONS Accessory (ROOF) P/N 08L07-E09-100 Application 2013 CROSSTOUR Publications No. AII 13168 Issue Date NOV 2012 PARTS LIST 6 Washers Bicycle attachment 2 Brackets Hex wrench 4 Thumbwheel
UNPACKING AND ASSEMBLING YOUR DIAMONDBACK ROAD BIKE
 EMAIL SIGNUP BIKE REG SEARCH BIKES THE RIDE HEALTH FITNESS SKILLS SHOP MAINTENANCE CYCLING 101 RIDERS LIKE YOU TEAMS SUPPORT UNPACKING AND ASSEMBLING YOUR DIAMONDBACK ROAD BIKE 1. Begin by carefully cutting
Fairlane & Meteor Instruction Package RC-114K. Rear Coilover Suspension Kit NOTE...
 ROD & CUSTOM Motorsports INCORPORATED 1962-1965 Fairlane & Meteor Instruction Package RC-114K Rear Coilover Suspension Kit NOTE... PLEASE READ ALL INSTRUCTIONS INCLUDED WITHIN THIS PACKAGE. IF AFTER READING
2012 K9100 COMPACT Worldwide Cycling Solutions Through Creative Innovations.
 Home Instruction Sheet Step-1Please check for any missing parts. Model K9100 COMPACT (Basic AirCaddy) aircaddy web page 20 04/03/12 98% (1) T3230-00 METAL WHEEL TRUCK Model K8350 (Aircraft Kit) (Optional)
Instructions. Follow All Instructions Before Assembling Or Using This Product
 Instructions Follow All Instructions Before Assembling Or Using This Product IMPORTANT DO NOT RETURN THIS PRODUCT TO THE RETAIL STORE WHERE PURCHASED. CALL TOLL FREE: (800) 492-9334 WARNING: Improper use
Have questions? Chat with us live at raleighusa.com or call us at , 8am 5pm PST
 1 2 Have questions? Chat with us live at raleighusa.com or call us at 1-800-251-8435, 8am 5pm PST The bicycle you have purchased is a complex piece of equipment that must be properly assembled and maintained
Marine 6-Boat Free-Standing Racks SKU: Updated November 2011
 Marine 6-Boat Free-Standing Racks SKU: 30-061 Updated November 011 Contains: Marine -Boat Free-Standing Racks (SKU 1-003) Marine 3 rd Boat Expansion Racks (SKU 1-0303) Marine Back Legs (SKU -001) 3 Sets
PIVOT SHUTTLE Dropper Post Cable Housing Replacement Maintenance Procedure
 PIVOT SHUTTLE Maintenance Procedure This maintenance guide provides detailed instructions to replace the dropper post cable housing on the Pivot Shuttle should something malfuction or break. If these steps
3. Align ratchet drive with female insert on assembly, and raise ratchet handle until the ratchet drive is firmly seated into the assembly.
 Remote Bung Cap Removal Tool Assembly Instructions 1. Pull collar down on ratchet to fully extend. 2. Insert ratchet head and neck under spring. 3. Align ratchet drive with female insert on assembly, and
BICYCLE TO MOTORCYCLE BICYCLE RACK
 BICYCLE TO MOTORCYCLE BICYCLE RACK Install Manual Warning: You are responsible for securing the rack to your motorcycle., checking the attachments prior to use and periodically inspecting the products
MAVERICK FOOSBALL TABLE
 MAVERICK FOOSBALL TABLE Replacement Parts Order direct at or call our Customer Service department at (800) 225-7593 8 am to 5 pm Central Standard Time July 2010 UPC Code 7-19265-53446-4 Staple your receipt
Darling Downs Soaring Club Inc
 Darling Downs Soaring Club Inc Rigging and De-Rigging Instructions LS7 XOW Overview Page 2 Rigging page 3 De-Rigging page 19 Overview It is the pilot s responsibility to make sure that the trailer is fully
Rev J Terminator Parts Book Page 1 of 15 Top End
 1181387 Rev J.2016.03.22 Terminator Parts Book Page 1 of 15 Top End 1181387 Rev J.2016.03.22 Terminator Parts Book Page 2 of 15 Top End (800) 532-8677 (727) 522-8677 fax: (727) 522-1007 Terminator: Frame
Schaefer recognized this issue and they offer to replace the drum bearing assembly for $
 Schaefer 2100 roller furler drum replacement on Catalina 320 Danny Jensen, A BOA VIDA hull #972, Thanks to contributions Chris Burti, Jeff Hare and C320 group for comments Photos were taken and edited
Installing N-Strike Recon CS-6 Stage 1 and Stage 2 Performance Kits
 Installing N-Strike Recon CS-6 Stage 1 and Stage 2 Performance Kits The Nerf N-Strike Recon CS-6 is a currently available blaster that is relatively easy to modify. The guys at Orange Mod Works have produced
Instructions. Follow All Instructions Before Assembling Or Using This Product
 Instructions Follow All Instructions Before Assembling Or Using This Product IMPORTANT DO NOT RETURN THIS PRODUCT TO THE RETAIL STORE WHERE PURCHASED. CALL TOLL FREE: (800) 492-9334 WARNING: Improper use
200 STRINGING MACHINE
 200 STRINGING MACHINE OWNER S MANUAL Issue 1 - July 2010 Provided by www.gssalliance.com 200 OWNER S MANUAL TABLE OF CONTENTS WARRANTY...PAGE 2 FEATURES...PAGE 3 ASSEMBLY INSTRUCTIONS...PAGE 4 MOUNTING
USER GUIDE ROLLING WALKERS INSTRUCTIONS FOR USE JANUARY, Maximum User Weight: 170kg (Do not exceed this weight)
") USER GUIDE ROLLING WALKERS INSTRUCTIONS FOR USE JANUARY, 2013 Model Nos: BE07889T Maximum User Weight: 170kg (Do not exceed this weight) Model Nos: BE07890TB Maximum User Weight: 227kg (Do not exceed this
USER GUIDE ROLLING WALKERS INSTRUCTIONS FOR USE JANUARY, 2013 Model Nos: BE07889T Maximum User Weight: 170kg (Do not exceed this weight) Model Nos: BE07890TB Maximum User Weight: 227kg (Do not exceed this
Assembly Instructions. -Cantilever Boat Lifts
 Assembly Instructions -Cantilever Boat Lifts Winch Instruction Page Safety Information 1. The winch is built for the multipurpose of hauling and lifting operations. It is not to be used as a hoist for
Invacare Top End Parts Catalog
 40 6rd Circle North (800) 2-8677 (727) 22-8677 Fax: (727)22-007 Invacare Top End Parts Catalog Rev. A Jan, 200 Top End 40 6rd Circle North (800) 2-8677 (727) 22-8677 Fax: (727)22-007 Frame / Parts 27 28
BRONZE BUSHING REPLACEMENT PROCEDURE DN345 & NL450C
 1 BRONZE BUSHING REPLACEMENT PROCEDURE V.2 12/3/2014 DN345 & NL450C 2 Safety Instructions Removing Walking Beams 3 1. Position spreader on a flat concrete surface capable of supporting weight of spreader
A A A
 Winchester SXP Talon T Rear Pistol Grip with Scorpion Recoil Grip A.5.0.65 A.5.0.65 A.5.0.65 Extended Scorpion Material to Reduce and Discomfort to the Shooter's Hand and Thumb Sure-Grip Texture Triton
ELECTRON PRO 245A: ASSEMBLY GUIDE. Revision Valid for MY2017 Electron Pro
 ELECTRON PRO 245A: ASSEMBLY GUIDE Revision 2.0 04-19-2017 Valid for MY2017 Electron Pro ELECTRON PRO 245A: Table of Contents 1. Tools Needed and First Aid Kit...3 2. Specifications...4 3. Configurations...5
2018 ACCESSORY ATTACHMENTS OWNER S MANUAL
 2018 ACCESSORY ATTACHMENTS OWNER S MANUAL WWW.RADPOWERBIKES.COM We are here to help! Please contact us at SUPPORT@RADPOWERBIKES.COM or 1-800-939-0310 if you have questions. REV031418 Welcome Thanks you
User Manual. User Manual
 Thank you Thank you for buying RGK We hope the product and service you have received has met your expectations. Please take time to read the instructions contained within, to familiarise yourself with
Tern Rapid Transit Rack
 Tern Rapid Transit Rack Rapid Transit Rack Specifications Cargo load capacity: 25kg (55.1 lb) Compatibility Fits most Tern Link, Verge and Vektron models. Trolley Handle not compatible with certain models.
Rev S Terminator Parts Book Page 1 of 14 Top E nd
 1181387 Rev S.2017.01.17 Terminator Parts Book Page 1 of 14 Top E nd 1181387 Rev S.2017.01.17 Terminator Parts Book Page 2 of 14 Top E nd Terminator: Frame Assembly PER CHAIR Frame Only: Aluminum for Folding
REPLACING THE FRONT RIM OF CROSSMAX SLR DISC, CROSSMAX SL DISC 07 AND CROSSMAX ST DISC WHEELS
 022 TECHNICALMANUAL07 WHEEL BUILDING REPLACING THE FRONT RIM OF CROSSMAX SLR DISC, CROSSMAX SL DISC 07 AND CROSSMAX ST DISC WHEELS 1 spoke wrench M40652 1 spoke wrench for aerodynamic spokes M40567 (for
Assembly Tools. Assembly will take about an hour
 Assembly Guide Assembly Tools Included in your parts box: Pedals Toolkit (4+5mm combo Allen wrench, 13+15mm combo open-end wrench) Touch-up paint Spare fuses (for battery) Assembly will take about an hour