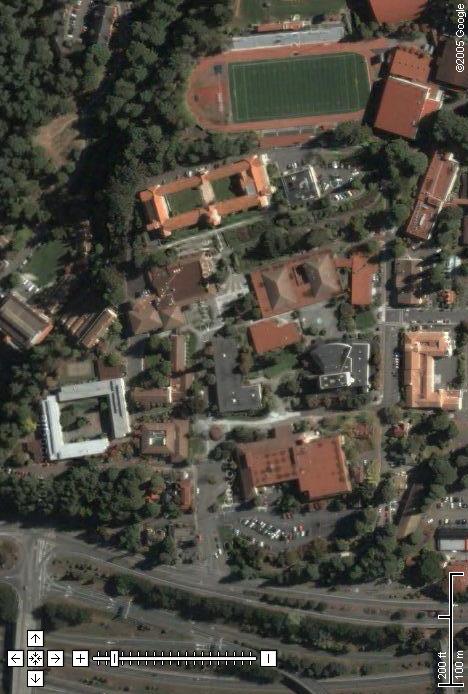
Location: HSU campus Founders Hall - Van Matre Hall vicinity and campus to west and south.
|
|
|
- Alexis Johnson
- 5 years ago
- Views:
Transcription
1 Objectives: GEOLOGY 470: FIELD EXERCISE 1 SPRING BASIC SURVEYING AND COMPASS USE 1. Determine pace, eye height, and height for use in rough surveying 2. Learn basic compass skills: reading, setting declination, taking bearings, determining vertical angles, use as a level 3. Learn how to use other simple surveying instruments: hand level, Suunto clinometer 4. Learn how to perform simple profile survey with hand level, tape and surveying rod 6. Learn basic techniques of measuring strike and dip 7. Develop field note-taking and data-collection skills Location: HSU campus Founders Hall - Van Matre Hall vicinity and campus to west and south. 1. Determination of eye height Method 1: Using carpenter s level and surveying rod -- you will need someone to assist you with this. a. Set the surveying rod upright -- hold it vertically 6 in to a foot in front of you, with the rod rotated so that the numbers are nearly parallel to your line of sight and facing outward. b. Stand up straight -- don t slouch. c. Have your assistant take the carpenter s level and hold its top surface next to the side of your face at eye-height. d. Have your assistant level the carpenter s level and read-- to the nearest 0.01 foot --where the top intersects the numbers on the surveying rod. e. Neatly record this as eye height inside the front cover of your notebook. Convert it to meters and enter that also. f. Use the level and surveying rod to determine your top-of-head height and record it inside your notebook front cover as height. Convert to meters and enter that also. Method 2: Using mark on wall and tape -- you will need someone to assist you with this. a. Stand sideways next to a wall. Have someone put a small pencil mark on the wall at your eye height. b. Measure the height of the mark with a tape to the nearest 0.01 ft. 2. Determination of your pace -- Founders Hall hallway Starting at 0 near the north basement door of Founders Hall, I have marked the hallway floor at 100, 200, 300, and 350 ft. You will use this to determine your pace, and to assess its variability. Your pace is not your ordinary walking or ambling-along step, nor is it some extreme, forced step. Instead, it is an attempt to smoothly step out a regular, consistent, comfortable distance with each step. My own surveying pace is slightly longer than my ordinary walking step. I consider it slightly forced -- but it is remarkably consistent. Practice in pacing improves your consistency. a. Set up your notebook for data collection. Starting on a fresh page, put the date at the top of the page. Then put in a header label, like Determination of pace in Founders Hall basement. Then lay out a table similar to that below: Determination of pace in Founders Hall basement distance, ft cumulative no of no of paces in distance in pace length, ft paces increment increment, ft total distance, ft total paces mean pace length, ft Note: when collecting numerical or semi-quantitative data, it is good practice to do it using a table. First, it makes it easy to collect and extract the data, because it s clearly organized. Second, and most important, it reminds you of what data needs to be collected at each site, and thus prevents you from making errors and omissions. The table should be laid out in your notebook before you begin collecting data. b. Starting at the 0 mark at the N end of the Founder Hall corridor, pace evenly and smoothly down the hallway; record the total (i.e., cumulative) number of paces you have taken as you cross the 100, 200, 300, and 350 ft tape marks;
2 when you reach 350, turn around and count your paces back to the far end. The table will remind you where you need to record your cumulative number of paces. c. Determine the number of paces in each increment by successively subtracting your cumulative values. Divide the number of paces into the increment distance to determine your pace length. Round it to the nearest 0.1 ft. Comparing these numbers will give you an idea of the variability in your pace over short distances. (If you feel there was too much variability in your pace, then do it all over again, until you are satisfied.) d. Determine your mean pace length by dividing the total distance paced (700 ft) by the total number of paces taken (last entry in cumulative no of paces column. Enter this in your table, and also inside the front cover of your notebook. Convert it to meters and enter that as well. 3. Introduction to reading, setting, and use of Brunton compass, hand level, and Suunto clinometer for surveying Return to classroom. We ll go through and briefly practice the following: a. reading of Brunton compass b. setting declination of Brunton compass c. taking bearings with Brunton compass d. taking vertical angles with Brunton compass e. using Brunton compass as a hand level f. adjusting and using a hand level, including reading surveying rod g. using Suunto clinometer to measure vertical angles 4. Field practice: measuring distances, bearings and vertical angles From here on, all the field measurements you make should be neatly and clearly recorded in your notebook. Everything must be labeled well enough that anyone looking at your notebook can figure it out. I suggest that you use table form wherever appropriate. Exercises in and adjacent to Founders Hall: a. Bearing of Founders Hall basement corridor 1. Stand in front of the midpoint of the Founders Hall south basement door. Determine the bearing to the midpoint of the Founders Hall north basement door. 2. Walk up the hallway to a point opposite the stairs. Stand above the middle line in the concrete that runs the length of the hall. Carefully align the compass so that its centerline lies along the floor line, pointing toward the N door. Record this bearing. How much does it differ from that you determined in step 1? Caution: there is metal rebar or pipe under the concrete floor which will affect the compass bearing if you hold the compass close to the floor or lay it on the floor. b. Founders Hall courtyard -- go upstairs to the courtyard door. 1. Vertical angle: Walk through the east courtyard door and stand on the first red concrete band running parallel to the long axis of Founders Hall. You can stand to either side of the door, but be sure you re on the red band. Look west and determine the vertical angle to the topmost point of Kerr Tower. Record this. 2. Bearing: Cross the courtyard to the west door., but don t go through it. Stand along center line of the west door take a bearing to the center line of the east door. Record this. 3. Distance: Pace the distance from the west door to the east door. Record your paces and convert it to feet. c. Length of the Redwood Bowl grandstand back -- pacing along Laurel Ave: Start at the north end of the concrete back of the grandstand where it abuts Laurel Ave (the road next to Founders Hall). Pace to the south end. Record the number of paces, and then convert it into the length in feet. We will later tape the distance and compare it with our estimates.
3 Exercises in and adjacent to Van Matre Hall: d. Bearings and vertical angles taken from the Van Matre loading dock: Near the northeast corner of the loading dock is a small brass benchmark. Stand over (or very near) to the benchmark. 1. Bearing: Determine the bearing to the stadium lightpole at the SW end of the grandstand (see sketch below). 2. Vertical angle: Determine the vertical angle (slope angle) to the platform just below the lights on this lightpole. 3. Bearing: Determine the bearing to the stadium lightpole at the NE end of the grandstand (see sketch below). 4. Vertical angle: Determine the vertical angle (slope angle) to the platform just below the lights on this lightpole. Redwood Bowl grandstand NE stadium lights VMH loading dock not to scale SW stadium lights e. Bearings and vertical angles taken from the top of the stairway west of Van Matre Hall. Stand next to the concrete post immediately south east of the top of the stairs that lead downhill just west of Van Matre Hall. concrete post stairs down Van Matre Hall not to scale 1. Bearing: Determine the bearing to the stack of the pulp mill on the Samoa Peninsula in the distance. 2. Bearing: Determine the bearing to the top center of the Student Services Building skylight. 3. Bearing: Determine the bearing to the campus flagpole near the Library. 4: Vertical angle: Determine the vertical angle down to the topmost point of the western new campus gateway
4 5. Field practice: surveying a slope profile above Redwood Bowl with tape, hand level, and surveying rod. Reference: surveying handout The field site is on the hillslope above Redwood Bowl, next to the lightpost opposite the east basement door of Founders Hall. Two tapes will be stretched from the top of the slope next to the street to the pavement at the slope base. This will allows two teams to work at a time. The northern tape is Tape 1, the southern one is Tape 2. Use as your reference benchmark (BM1) the top of the flagged nail I ve driven into the asphalt near the lightpost. Let its elevation be ft. a. You will need to divide into groups of two. Each group will have a hand level and a surveying rod. Choose one notebook in which to record the data. b. Start the survey notes on a fresh page. At the top of the page give it a title indicating where and along what tape you re running the survey (for example, Slope profile along Tape 1 above Redwood Bowl E of Founders Hall east door, or something similarly descriptive). Put down the names of both individuals involved in the survey, and indicate who is on the level, and who on the rod. When you change off, indicate that at the appropriate point. c. Before you start, lay out a table for the survey data. I would like you to take elevations every 5 ft along the tape, and wherever there is a major break in slope. Your table should look something like this: Tape BS, ft HI, ft FS, ft Elev, ft Notes distance, ft --- BS to BM1 (flagged nail); BM 1 elev is ft 0 d. Your first shot should be a backsight (BS) to the top of the nail (BM1) to establish your initial instrument height (HI), i.e., your eye elevation. The rod person will set the rod on the nail, and the instrument person will read it to the nearest 0.01 ft if possible. Once the instrument person has taken that shot, they can t move until it s time to move the instrument because you can t read the rod. Note: the instrument person must stand upright without slouching or stooping when they shoot the rod. If you bend or stoop, you change the instrument height! b. Your second shot should be a foresight to 0.00 on the tape. Enter this in the FS column. Then shoot foresights at 5-ft intervals on the tape until the rod gets too far away to read accurately (i.e., to the nearest 0.05 ft) or it becomes clear that the top of the rod will be below you. When this becomes the case, you will need to move your instrument position to a point lower on the slope. c. When you need to move the instrument (i.e., yourself), let the rod person know. Take a careful foresight on the rod, then tell the rod person to stay put. They must not shift the rod from its position. d. Move downslope to a position where you will be shooting on the lower part of the rod, preferably in the lowest foot or so. Now take a backsight on the rod to determine your new eye elevation. Be sure you enter this backsight in the BS column. e. The rod person can now move downslope and you can resume taking foresights until you reach the pavement. Your last shot should be on the pavement right at the bottom of the slope. Don t move the rod from this last point. f. I would like you to close the survey by surveying back up the tape to the top. In doing this, I want you to change off who s on the rod and instrument. g. The new instrument person must start by taking a backsight to the last rod position. Then start taking foresights uphill. You will more rapidly run out of rod, so you will probably have to do several instrument moves. Remember, each time you (instrument person) move your position, you must take a backsight to a point of known elevation. Be sure you enter these in the BS column. Your best strategy is to move as far uphill as you can while still being able to read the rod to sufficient accuracy. This will minimize the number of backsights and instrument moves. h. Your final shot must be a foresight back to BM1. i. Calculate your elevations. Ideally your final shot back to BM1 should yield an elevation very close to the BM elevation of The difference between that and your surveyed elevation is your error of closure. j. At home, use the strategy described in the handout to compute the horizontal (map) distances to each point, and plot up the slope profiles (down and back), using vertical and horizontal scales of 1 in = 10 ft.
5 6. Strike and dip measurement practice in Founders Hall Reference: read p in Compton. We will discuss strike & dip and trend & plunge in class and look at strategies for measuring them. For today s exercises, start on a fresh page in your notebook. Label it with the date at the top. I have arranged six planar pieces of Styrofoam, foam coreboard, or particle board in positions in the classroom or the hallway. Each has a number taped to it. In your notebook make a small table like the one below, and then determine the strike and dip of each numbered surface. Be sure you don t disturb the position and orientation of the pieces! surface number Founders Hall Strike and Dip Exercise strike dip (angle and general direction) 7. Field practice: measurement of strike & dip, trend & plunge, and heights a. For this exercise, you have been supplied with a base map of the campus. You will be locating all the outdoor items that you measure on it. Before you go out, 1) determine the N direction on the map, and place a north-arrow in the margin of the map; and 2) determine the scale of the map. You may have to measure distances to do this. b. In this exercise, you will take the strike and dip of various planar surfaces -- mostly roofs -- and the trend and plunge of some linear features on campus, and estimate the heights of several objects. Again, I would like you to arrange your data in the form of a table. I suggest a layout below. Any additional notes you take should be keyed to the feature number. c. Locate the positions of the measured outdoor features on the accompanying basemap of the campus as carefully as you can, and then indicate the position on the map with a dot or small cross, and put the feature number next to it. feature (give number and describe) 1. strike & dip of lower banister of center stair 2. trend & plunge of upper banister of center stair 3. trend & plunge of stair handrail W of Founders etc. 11. strike & dip of grandstand roof etc Measure the following things: Measurement of planes, lineations, and heights on campus planes lines heights strike dip (angle trend plunge (describe and (angle and estimation general general method in direction) direction) notes) 1. Founders Hall: strike and dip of the surface of the surface lower banister (flat surface) of the center stair. Caution -- if you lay compass on the wood, metal beneath may affect reading. 2. Go up the stairs one flight: measure trend & plunge of the upper banister (flat surface) of the center stair (consider it as a line, not a plane) Caution -- if you lay compass on the wood, metal beneath may affect reading. 3. Go across the courtyard and out the front door of Founders Hall. Walk to the stairs. Measure the trend and plunge of the center handrail of the stairs leading W from Founders Hall. Caution: rail will affect compass reading if compass is held close above it! 4. Go over to the handicap walkway in front of Founders. Determine the strike & dip of the walkway surface near lightpole Stand at the base of the entire flight of steps in front of Founders Hall. Mark this location on your map with an asterisk *. 6. Walk west from the quad down to the flagpole near Siemens Hall. Estimate the height of the flagpole. Use whatever method you like, but describe in your notebook how you did it and show your calculations. 7. Go to the information kiosk on the east side of the Library. Determine the slope angle of the roof of the kiosk. Enter it in your table under dip -- you only need to put the angle down. 8. Determine the strike and dip of the library porch roof. 9. Walk southward to the sign displaying the name Arthur S. Gist Hall. Determine the strike and dip of the northfacing roof.
6 Lithologic description 1: Walk south down B Street past the Student Services Building to Harry Griffith Hall. At the junction with 17th cross over to the east side of B and continue south along it until you reach the concrete stairway that leads up to the Campus Center for Appropriate Technology. (There is a prominent sign next to this stairway.) From this point walk south along B street approximately 100 ft. You will find a good exposure of the bedrock making up the hill in the cut along this stretch of sidewalk. Make a sketch of this outcrop, describe the rock, and try to identify it. Pages in Compton give you ideas about what you should be doing. 10. Walk back up Laurel Drive (the road that leads up to Founders Hall). Determine the maximum slope angle (i.e., steepest slope) of the road, using whatever technique you consider appropriate. Describe in your notebook how you did it and any necessary calculations. Enter the slope in your table under dip -- you only need to put the angle down. 11. Continue up the road until you come to the Redwood Bowl grandstand. Determine the strike and dip of the grandstand roof. Note: metal in the grandstand walls and the fence along the roof can strongly affect your compass readings if you re not careful. 12. Proceed to the southeast corner of Founders Hall. Determine the strike and dip of the east wall of Founders in this location. Do this by getting your eye into the plane of the wall. Don t put the compass against the wall; rebar in the wall will affect the compass direction. 13. Walk behind Founders Hall until you are next to the first parking space on the south. Estimate the height of the back wall (don t include roof) of Founders in the vicinity of the copper downspout. Use whatever method you like, but describe in your notebook how you did it and show your calculations. YOU RE DONE WITH THE FIELD EXERCISES! All that s left now is the office work. -- calculating elevations, plotting up the cross-sections, putting strikes and dips on the map.
7 WHAT YOU WILL NEED TO TURN IN TO ME Due date: no later than 5 PM, Monday, Feb. 5. Put in my mailbox in department office or slide under my door. Please be sure all materials are labeled with your name and firmly clipped together. A good strategy is to put them in a folder of a manila or plastic envelope. 1. A clear, readable (i.e., dark enough) photocopy of all your field notes and calculations 2. A neatly plotted and labeled profile of the hillslope you surveyed E of Founders Hall. Plot it on arithmetic graph paper using vertical and horizontal scales of 1 in = 10 ft. Horizontal and vertical axes should be shown on the plot and labeled with elevation or distance as appropriate. (Reference: surveying handout.) The map title should indicate a) which tape line you surveyed, b) who your partner was, and c) the location and date. On a separate piece of paper, include a neat table of your field measurements, and the calculated elevations and horizontal distances. Note: if you want to plot the graph using a computer, that s OK, but you must use a graphing application (such as KaleidaGraph or a GIS or drafting program) which allows you to control the scales so you can get 1 = 10 ft. Excel is NOT adequate for this. 3. Your annotated campus basemap, showing all measurement locations. At its proper location on your map plot the strike and dip or trend and plunge of each outdoor surface or lineation that you measured, using the proper geological symbol. 4. Please fill in the tables or blanks on the attached sheet. This will allow me to rapidly scan your measurements without having to dredge them individually out of your notebook, which can take a long time.
8 Geology 470 Field Exercise 1 -- Measurement Summary Name: Part 4 a1 a2 b1 b2 FH main corridor bearing FH corridor floor line bearing description FH courtyard vertical angle to Kerr Tower top FH courtyard bearing from W door to E door centerline measurement value b3 FH courtyard distance from W to E door feet c length of grandstand wall feet d1 d2 d3 d4 e1 e2 e3 e4 VMH dock bearing to S stadium lights VMH dock vertical angle to S stadium lights VMH dock bearing to N stadium lights VMH dock vertical angle to N stadium lights VMH stairs bearing to pulp mill stack VMH stairs bearing to center top SBS skylight VMH stairs bearing to campus flagpole VMH stairs vertical angle to top W campus gateway What is the angle between the long axis of Founders Hall (a1) and its cross-axis (b2)? Give the answers below to the nearest whole foot. Part 5 What is the height of the hillslope you surveyed? feet Compare your elevations at 0 on the tape from your downhill and uphill surveys. By how much do these elevations differ? Part 6 Elevation difference: feet (to nearest 0.05 ft) surface number Founders Hall Strike and Dip Exercise strike dip (angle and general direction)
9 Part 7 What is the scale of the basemap? 1 in = feet (round to nearest whole foot) feature (give number and describe) 1. strike & dip of lower banister of center stair 2. trend & plunge of upper banister of center stair 3. trend & plunge of stair handrail W of Founders 4. strike & dip of handicap walkway 6. height of flagpole 7. slope angle of kiosk roof 8. strike & dip of library porch roof 9. strike & dip of N-facing Gist Hall roof 10. Laurel Dr maximum slope angle 11. Strike & dip of grandstand roof 12. Strike & dip of Founders E wall at S end 13. Height of back wall of Founders Measurement of planes, lineations, and heights on campus planes lines heights strike dip (angle trend plunge (describe and (angle and estimation general general method in direction) direction) notes) Lithologic description of outcrop:

10 HSU Basemap for Part 7
11

12 Section of Arcata North Quad enlarged 4X
2 Field Practices & Measurements
 2 Field Practices & Measurements Objectives: 1. Become familiar with surveying equipment 2. Care of equipment 3. Student responsibilities 4. Field notes 5. Significant figures 6. Tolerances 1. Become familiar
Surveying Fundamentals and Practices, 5/e
 Online Instructor s Manual to accompany Surveying Fundamentals and Practices, 5/e Jerry Nathanson Michael T. Lanzafama Philip Kissam Upper Saddle River, New Jersey Columbus, Ohio Copyright 2010 by Pearson
Activity #1: The Dynamic Beach
 Activity #1: The Dynamic Beach Beach Profiling By Betsy Sheffield, COASTeam Program, College of Charleston, Charleston, SC Subjects: Science, Math Skills: Analysis, description, listing, research, small
FIELD EVENTS DIAGRAMS
 FIELD EVENTS DIAGRAMS Landing System Approach HIGH JUMP The declination in the high jump approach shall not exceed 1:100 (1%). The approach shall consist of a semicircle or rectangle of unvarying surface.
Walk - Run Activity --An S and P Wave Travel Time Simulation ( S minus P Earthquake Location Method)
") Walk - Run Activity --An S and P Wave Travel Time Simulation ( S minus P Earthquake Location Method) L. W. Braile and S. J. Braile (June, 2000) braile@purdue.edu http://web.ics.purdue.edu/~braile Walk
Walk - Run Activity --An S and P Wave Travel Time Simulation ( S minus P Earthquake Location Method) L. W. Braile and S. J. Braile (June, 2000) braile@purdue.edu http://web.ics.purdue.edu/~braile Walk
ADA Library Accessibility Checklist
 A. LIBRARIES Reading and Study Areas Do at least 5% (but not less than one) of fixed seating, tables, or study carrels have... Clear floor or ground spaces for wheelchairs? Clear space of 60" in diameter
Get Your Bearings.
 Get Your Bearings A compass tells you in what direction you are headed relative to magnetic north. You can combine use of a compass with pacing to find your way across country (where there may not be any
TO RECEIVE the most benefit from a
 Using Surveying Equipment TO RECEIVE the most benefit from a tool, it must be used properly. In addition, it must be well maintained. In most cases, the user will need some instruction and training regarding
Using Surveying Equipment
 Lesson A2 2: Using Surveying Equipment Agricultural Mechanics and Technology Cluster Illinois Agricultural Education Core Curriculum Unit A. Mechanical Systems and Technology Problem Area 2. Soil and Environmental
3. Answer the following questions with your group. How high do you think he was at the top of the stairs? How did you estimate that elevation?
 J Hart Interactive Algebra 1 Classwork Exploratory Challenge 1. Watch the first 1:08 minutes of the video below and describe in words the motion of the man. Elevation vs. Time #2 [http://www.mrmeyer.com/graphingstories1/graphingstories2.mov.
3. Answer the following questions with your group. How high do you think he was at the top of the stairs? How did you estimate that elevation?
 Classwork Exploratory Challenge 1. Watch the first 1:08 minutes of the video below and describe in words the motion of the man. Elevation vs. Time #2 [http://www.mrmeyer.com/graphingstories1/graphingstories2.mov.
GEOL 106: Earthquake Country Activity 08: Discharge Measurements. Name: Date:
 Name: Date: Discharge Calculation Discharge = Velocity X Area or Q = VA Calculate the Discharge for the measurements shown at the right. Q = Discharge Measurement Do not collect water samples in the area
The activity is designed to take about an hour start to finish.
 Troop 606 Orienteering Course Overview This Orienteering Course is designed to help Scouts satisfy requirements 4a and 4b for the First Class Rank. These requirements are as follows (as of 2017): 4a. Using
Scout Skills Compass INFORMATION SHEET
 Scout Skills Compass 0845 300 1818 INFORMATION SHEET A compass is an instrument with a magnetised needle which points to (magnetic) north and is therefore used for determining direction. They come in different
Land Navigation at Nevada Youth Range Camp
 Curriculum 15-03 Land Navigation at Nevada Youth Range Camp Stephen S. Foster, Pershing County Extension Educator Sherm Swanson, Riparian and Rangeland Specialist This curriculum is used at Nevada Youth
USING THE MILITARY LENSATIC COMPASS
 USING THE MILITARY LENSATIC COMPASS WARNING This presentation is intended as a quick summary, and not a comprehensive resource. If you want to learn Land Navigation in detail, either buy a book; or get
DQM Annual Hopper QA Checks
 DQM Annual Hopper QA Checks The following document is intended to be a guide for conducting annual Dredge Quality Management quality assurance checks on hopper dredges. The procedures should provide general
Homework Helpers Sampler
 Homework Helpers Sampler This sampler includes s for Algebra I, Lessons 1-3. To order a full-year set of s visit >>> http://eurmath.link/homework-helpers Published by the non-profit Great Minds. Copyright
A-B Triangulation Freeform Pools: Guide To Measuring Safety Covers
 A-B Triangulation Freeform Pools: Guide To Measuring Safety Covers To ensure accurate measurements, you need to position 2 stakes (one labeled A, one labeled B) at a distance of 10 ft. Depending on landscaping
Measurement of court speed and bounce. Rod Cross, Physics Department, Sydney University 2nd July 2006
 1 Measurement of court speed and bounce Rod Cross, Physics Department, Sydney University 2nd July 2006 The speed of a surface refers to the change in ball speed in a direction parallel to the surface.
TRAINING LAB BLOOD AS EVIDENCE BLOOD DROPS FALLING AT AN ANGLE NAME
 TRAINING LAB BLOOD AS EVIDENCE BLOOD DROPS FALLING AT AN ANGLE NAME Background: You just completed studying the behavior of passive blood drops that drip straight down from a wound, but not all blood drops
USING THE MILITARY LENSATIC COMPASS
 USING THE MILITARY LENSATIC COMPASS WARNING This presentation is intended as a quick summary, and not a comprehensive resource. If you want to learn Land Navigation in detail, either buy a book; or get
HOW TO DIG A TEST PIT
 HOW TO DIG A TEST PIT An archaeological test pit is a small 1m by 1m trench dug in a series of layers, or spits, to a depth of approximately 1m. The archaeological materials collected from these layers
Homework 2b: Bathymetric Profiles [based on the Chauffe & Jefferies (2007)]
![Homework 2b: Bathymetric Profiles [based on the Chauffe & Jefferies (2007)]](/thumbs/77/75183244.jpg "Homework 2b: Bathymetric Profiles [based on the Chauffe & Jefferies (2007)]") 14 August 2008 HW-2b: - Bathymetric Profiles 1 2-5. BATHYMETRIC PROFILES Homework 2b: Bathymetric Profiles [based on the Chauffe & Jefferies (2007)] A bathymetric profile provides a "skyline view" of the
14 August 2008 HW-2b: - Bathymetric Profiles 1 2-5. BATHYMETRIC PROFILES Homework 2b: Bathymetric Profiles [based on the Chauffe & Jefferies (2007)] A bathymetric profile provides a "skyline view" of the
Levelling A Practical Guide The process of Levelling explained
 2016 Levelling A Practical Guide The process of Levelling explained A practical guide aimed at land surveyors, engineers and archaeologists explaining the practice of levelling the process of determining
Instructions for using the PRECISION DIGITAL PITCH GAUGE 2008, Precision Analytical Instruments, Inc. Congratulations!
 10857 Millington Court Blue Ash, OH 45242 513-984-1600 (voice), 513-984-4090 (fax) email Doug@ToolsForAnalysis.com Instructions for using the PRECISION DIGITAL PITCH GAUGE 2008, Precision Analytical Instruments,
An exploration of how the height of a rebound is related to the height a ball is dropped from. An exploration of the elasticity of rubber balls.
 BOUNCE! (1 Hour) Addresses NGSS Level of Difficulty: 2 Grade Range: 3-5 OVERVIEW In this activity, students drop rubber balls in order to observe and measure the effects of elasticity. They use graphs
LESSON 5: THE BOUNCING BALL
 352 - LINEAR B EHAVIOR LESSON 5: THE BOUNCING BALL y Notes to the Instructor Time: This lesson should take one class session. Materials: Two meter sticks or one tape measure per group, masking tape, balls
SPOOLER INSTRUCTIONS. STEP 12 If you are going to paint your posts, that should be done at this time.
 STEP 4 Starting where you marked the end post location, move down your fence line 6 feet and make another mark. This mark is where your second upright post will be installed. Continuing down the fence
USING THE MILITARY LENSATIC COMPASS
 USING THE MILITARY LENSATIC COMPASS WARNING This presentation is intended as a quick summary, and not a comprehensive resource. If you want to learn Land Navigation in detail, either buy a book; or get
Trigonometry Problems
 GCSE MATHEMATICS Trigonometry Problems These questions have been taken or modified from previous AQA GCSE Mathematics Papers. Instructions Use black ink or black ball-point pen. Draw diagrams in pencil.
MOUNTED LAND NAVIGATION
 CHAPTER 12 MOUNTED LAND NAVIGATION A vehicle commander should be able to navigate from one point on the ground to another with or without a compass. If separated from his unit and given an azimuth and
Chapter 6 - The Compass Upon completion of this chapter, you will be able to:
 Chapter 6 - The Compass Upon completion of this chapter, you will be able to: Explain the use of the 360 degree system in defining direction. Identify the parts of a compass, i.e.: - base plate - magnetic
GO THERE THE TAKLAMAKAN DESERT BECAUSE YOU
 NAME 1 GO THERE THE TAKLAMAKAN DESERT BECAUSE YOU CAN T GET OUT!! Using the coordinates. 37 44 N, 81 49 E, FLY TO the Desert, the largest desert of its kind in the world (based on percentage area covered
STAKING TRAFFIC CONTROL SIGNAL SYSTEMS
 Locating the components of a traffic control signal is not an exact science; many factors influence the location of the components. These factors include: lane widths, radii, pedestrian curb ramp requirements,
REAL LIFE GRAPHS M.K. HOME TUITION. Mathematics Revision Guides Level: GCSE Higher Tier
 Mathematics Revision Guides Real Life Graphs Page 1 of 19 M.K. HOME TUITION Mathematics Revision Guides Level: GCSE Higher Tier REAL LIFE GRAPHS Version: 2.1 Date: 20-10-2015 Mathematics Revision Guides
Practice Test Unit 6B/11A/11B: Probability and Logic
 Note to CCSD Pre-Algebra Teachers: 3 rd quarter benchmarks begin with the last 2 sections of Chapter 6, and then address Chapter 11 benchmarks; logic concepts are also included. We have combined probability
Pool Plunge: Linear Relationship between Depth and Pressure
 Activity 3 Pool Plunge: Linear Relationship between Depth and Pressure If you dive to the bottom of a swimming pool you will feel an increasing pressure on your eardrums as you descend. The deeper you
Midtown Rail Station Accessibility Assessment N4
 Midtown Rail Station Accessibility Assessment N4 Joel Anders, Arnaud Huguet, and Alex Poznanski 15 August 2012 Table of Contents EXECUTIVE SUMMARY... 1 MISSION STATEMENT... 2 INTRODUCTION... 2 CROSSWALKS
METHODS EMPLOYED IN LOCATING SOUNDINGS
 METHODS EMPLOYED IN LOCATING SOUNDINGS The soundings are located with reference to the shore traverse by observations made (i) entirely from the boat, (ii) entirely from the shore or (iii) from both. The
Pace and Compass. Teacher Instructions. Overview: Objectives: Materials:
 Teacher Instructions and Overview: Scientists use maps to record and monitor many geologic features, including lava flows, calderas, and volcano vents. The boundaries of these features can be mapped with
Practice Test Unit 06B 11A: Probability, Permutations and Combinations. Practice Test Unit 11B: Data Analysis
 Note to CCSD HS Pre-Algebra Teachers: 3 rd quarter benchmarks begin with the last 2 sections of Chapter 6 (probability, which we will refer to as 6B), and then address Chapter 11 benchmarks (which will
Field guide for Accessible Public Rights-of-Way Edition
 Field guide for Accessible Public Rights-of-Way 2015 Edition BRIEFING MEMO SUBJECT: Department of Justice/Department of Transportation Joint Technical Assistance on Title II of the Americans with Disabilities
Pathways of a conservative contaminant: Infiltration, fracture conduits, and re-emergence of chloride in wells and streams
 Pathways of a conservative contaminant: Infiltration, fracture conduits, and re-emergence of chloride in wells and streams Mark Holden M.S., C.G. Environmental Specialist III John Hopeck, Ph.D. Environmental
Perilous Plunge. Activity Guide PITSCO. Ideas Solutions V0708
 Perilous Plunge PITSCO & Ideas Solutions S T E M Activity Guide 59779 V0708 Perilous Plunge Activity Guide Introduction... 3 Science Activity Give em the Hooke!... 4 Exploring Hooke s Law.... 5 Technology
The 19 th hole - 18 Card Micro Golf game. # Of Players: 1 or 2 players. Game time: min per game if a 2 player game.
 The 19 th hole - 18 Card Micro Golf game # Of Players: 1 or 2 players Game time: 30 45 min per game if a 2 player game. Components [4] - TEE BOXES [4] - PUTTING GREENS [6] - FAIRWAY [2] - Player golf ball
dpd Seattle Permits Tip Getting a Grip on Handrails PURPOSE OF HANDRAILS
 dpd Department of Planning and Development Tip 319 Seattle Permits part of a multi-departmental City of Seattle series on getting a permit Getting a Grip on Handrails Updated March 2, 2007 PURPOSE OF HANDRAILS
ROYAL CANADIAN AIR CADETS PROFICIENCY LEVEL FOUR INSTRUCTIONAL GUIDE SECTION 2 EO M DESCRIBE THE MAGNETIC COMPASS PREPARATION
 ROYAL CANADIAN AIR CADETS PROFICIENCY LEVEL FOUR INSTRUCTIONAL GUIDE SECTION 2 EO M437.02 DESCRIBE THE MAGNETIC COMPASS Total Time: 30 min PREPARATION PRE-LESSON INSTRUCTIONS Resources needed for the delivery
NEXT GENERATION FLEX FENCE
 NEXT GENERATION FLEX FENCE Area To Be Fenced.. With Next Generation Flex Fence any post that is not in a straight line with another post must be braced. Layout your fence installation. Determine all end
4-3 Rate of Change and Slope. Warm Up. 1. Find the x- and y-intercepts of 2x 5y = 20. Describe the correlation shown by the scatter plot. 2.
 Warm Up 1. Find the x- and y-intercepts of 2x 5y = 20. Describe the correlation shown by the scatter plot. 2. Objectives Find rates of change and slopes. Relate a constant rate of change to the slope of
Wade Reynolds 1 Frank Young 1,2 Peter Gibbings 1,2. University of Southern Queensland Toowoomba 4350 AUSTRALIA
 A Comparison of Methods for Mapping Golf Greens Wade Reynolds 1 Frank Young 1,2 Peter Gibbings 1,2 1 Faculty of Engineering and Surveying 2 Australian Centre for Sustainable Catchments University of Southern
COASTAL EROSION. 1 Getting Oriented
 COASTAL EROSION Many people dream of building their home on the California Coastline with its picturesque vistas of the setting sun and the gentle sounds of waves breaking. However, these waves are not
Basket for Janice. by Beth Hester. GH Productions, Inc. The Basket Maker s Catalog
 Basket for Janice by Beth Hester GH Productions, Inc. The Basket Maker s Catalog Materials are available from your basketry supply store or contact: The Basket Maker s Catalog GH Productions, Inc. 521
Kennedy Bridge - Summary of Pier 6 Movement Records
 KENNEDY BRIDGE - SUMMARY OF PIER 6 MOVEMENT RECORDS TECHNICAL MEMORANDUM Kennedy Bridge - Summary of Pier 6 Movement Records PREPARED FOR: COPY TO: MnDOT Dale Thomas / CH2M HILL File PREPARED BY: DATE:
MEASURING VOLUME & MASS
 MEASURING VOLUME & MASS In this laboratory you will have the opportunity to apply your measuring skills in gathering data, processing it, and interpreting the results. For this experiment you will: 1)
FISH 415 LIMNOLOGY UI Moscow
 FISH 415 LIMNOLOGY UI Moscow Sampling Equipment Purpose: - to familiarize you with limnological sampling equipment - to use some of the equipment to obtain profiles of temperature, dissolved oxygen, conductivity
ROADEO EVENTS LAYOUTS & DIAGRAMS. (January 8, 2018)
") ROADEO EVENTS LAYOUTS & DIAGRAMS (January 8, 2018) 1 The Roadeo Events Layout book was developed as a guide to assist in the set-up of Roadeo events for practice and/or competition. It is recommended that
ROADEO EVENTS LAYOUTS & DIAGRAMS (January 8, 2018) 1 The Roadeo Events Layout book was developed as a guide to assist in the set-up of Roadeo events for practice and/or competition. It is recommended that
Site Engineering Guide
 Site Engineering Guide INSTRUMENT & ACESSORIES CARE Updated: 07/01/13 Andrew Burgess B.Sc Hons www.ajb-settingout.co.uk This resource is protected by United Kingdom and International copyright laws and
Projectile Motion (8/24/11) (approx. completion time for just parts A & B: 1.5 h; for entire lab: 2.3 h)
 (approx. completion time for just parts A & B: 1.5 h; for entire lab: 2.3 h)") Projectile Motion (//) (approx. completion time for just parts A & B:. h; for entire lab:. h) EQUIPMENT NEEDED: Mini Launcher and steel ball plumb bob pushrod meter stick carbon paper white paper C-clamp
Projectile Motion (//) (approx. completion time for just parts A & B:. h; for entire lab:. h) EQUIPMENT NEEDED: Mini Launcher and steel ball plumb bob pushrod meter stick carbon paper white paper C-clamp
WHEELCHAIR SKILLS PROGRAM (WSP) 4.1 OBSTACLE COURSE GUIDELINES
 4.1 OBSTACLE COURSE GUIDELINES") WHEELCHAIR SKILLS PROGRAM (WSP) 4.1 OBSTACLE COURSE GUIDELINES WSP 4.1 assessment and training activities can take place in any environment, because the obstacles are based on common ones found in hospitals,
WHEELCHAIR SKILLS PROGRAM (WSP) 4.1 OBSTACLE COURSE GUIDELINES WSP 4.1 assessment and training activities can take place in any environment, because the obstacles are based on common ones found in hospitals,
Graphing Stories Writing Equations
 Exploratory Activity Consider the story: Maya and Earl live at opposite ends of the hallway in their apartment building. Their doors are 50 ft. apart. Each starts at his or her own door and walks at a
Experimental Procedure
 1 of 15 9/13/2018, 12:47 PM https://www.sciencebuddies.org/science-fair-projects/project-ideas/sports_p060/sports-science/physics-of-baseball-hit-charts (http://www.sciencebuddies.org/science-fairprojects/project-ideas/sports_p060/sports-science/physics-of-baseball-hit-charts)
Fall Protection Resource Guide P AGE 1
 Fall Protection Resource Guide P AGE 1 As a Home Builder, we do not self-perform any work. This section is a resource guide only and is not intended to put any requirements on the company. All subcontractors,
Surveying & Measurement. Distance Measurement
 Surveying & Measurement Distance Measurement Introduction One of the most fundamental surveying operations is the measurement of horizontal distance between two points on the surface of the earth. There
Lab 13: Hydrostatic Force Dam It
 Activity Overview: Students will use pressure probes to model the hydrostatic force on a dam and calculate the total force exerted on it. Materials TI-Nspire CAS handheld Vernier Gas Pressure Sensor 1.5
ATT-59, Part I. ATT-59/99, SMOOTHNESS OF PAVEMENTS Part I, Manual Profilograph. b) Determining the Profile Index from profilograms
 Determining the Profile Index from profilograms") ATT-59, Part I ATT-59/99, SMOOTHNESS OF PAVEMENTS Part I, Manual Profilograph 1.0 SCOPE This method describes the procedures for: a) Operating the profilograph. b) Determining the Profile Index from profilograms
ATT-59, Part I ATT-59/99, SMOOTHNESS OF PAVEMENTS Part I, Manual Profilograph 1.0 SCOPE This method describes the procedures for: a) Operating the profilograph. b) Determining the Profile Index from profilograms
Beach Profiles: Monitoring Sea Level Rise. Student Activity Sheet. Name Date Class
 Beach Profiles: Monitoring Sea Level Rise Student Activity Sheet Name Date Class A shoreline is the area where the water and land meet. This is where we find beach: areas where sediments (sand or other
Applying Trigonometry: Angles of Depression and Elevation
 Applying Trigonometry: Angles of Depression and Elevation An angle of elevation is the angle formed by a horizontal line and the line of sight to a point above. In the diagram, 1 is the angle of elevation.
Measurement Checklist for the Lido for the Championships
 This paper is intended to be a guide for rapid and easy measurement of the Lido 14 to assure painless application of the rules that, in general, govern one design performance and compliance. It is not
COMPASS DIRECTION AND BEARINGS
 Mathematics Revision Guides Compass Direction and Bearings Page 1 of 7 M.K. HOME TUITION Mathematics Revision Guides Level: GCSE Foundation Tier COMPASS DIRECTION AND BEARINGS Version: 1.1 Date: 06-02-2009
13. TIDES Tidal waters
 Water levels vary in tidal and non-tidal waters: sailors should be aware that the depths shown on the charts do not always represent the actual amount of water under the boat. 13.1 Tidal waters In tidal
UNDERGROUND SURVEY WITH MINEMODELLER
 UNDERGROUND SURVEY WITH MINEMODELLER A Tutorial Derek C. Diamond derek@primethought.biz CONTENTS Underground Survey with MineModeller... 2 Introduction... 2 Requirements... 2 Getting Started with MineModeller...
STUDY REPORT W&AR-03 RESERVOIR TEMPERATURE MODEL ATTACHMENT B DON PEDRO RESERVOIR BATHYMETRIC STUDY REPORT
 STUDY REPORT W&AR-03 RESERVOIR TEMPERATURE MODEL ATTACHMENT B DON PEDRO RESERVOIR BATHYMETRIC STUDY REPORT DON PEDRO RESERVOIR BATHYMETRIC STUDY REPORT Prepared for: TURLOCK IRRIGATION DISTRICT MODESTO
RESOLUTION A.1045(27) RECOMMENDATION ON PILOT TRANSFER ARRANGEMENTS
 RECOMMENDATION ON PILOT TRANSFER ARRANGEMENTS") RESOLUTION A.1045(27) RECOMMENDATION ON PILOT TRANSFER ARRANGEMENTS 1 GENERAL Ship designers are encouraged to consider all aspects of pilot transfer arrangements at an early stage in design. Equipment
RESOLUTION A.1045(27) RECOMMENDATION ON PILOT TRANSFER ARRANGEMENTS 1 GENERAL Ship designers are encouraged to consider all aspects of pilot transfer arrangements at an early stage in design. Equipment
TABLE OF CONTENTS INTRODUCTION 3 SAFETY PRECAUTIONS 3 PACKAGE CONTENTS 4 DEVICE OVERVIEW 4 BUTTON OPERATION SUMMARY 5 BASIC OPERATION 6
 TABLE OF CONTENTS INTRODUCTION 3 SAFETY PRECAUTIONS 3 PACKAGE CONTENTS 4 DEVICE OVERVIEW 4 BUTTON OPERATION SUMMARY 5 BASIC OPERATION 6 CURRENT TIME MODE 7 FUNCTIONAL DISPLAY 7 WEATHER FORECAST FEATURE
USING THE MILITARY LENSATIC COMPASS
 USING THE MILITARY LENSATIC COMPASS WARNING This presentation is intended as a quick summary, and not a comprehensive resource. If you want to learn Land Navigation in detail, either buy a book; or get
Figure 3B-1. Examples of Two-Lane, Two-Way Marking Applications
 Figure 3B-1. Examples of Two-Lane, Two-Way Marking Applications A - Typical two-lane, two-way marking with passing permitted in both directions B - Typical two-lane, two-way marking with no-passing zones
Table 1. Sequence of bubble and dredging tests with prevailing tide stage and number of bucket cycles recorded for each test.
 Table 1. Sequence of bubble and dredging tests with prevailing tide stage and number of bucket cycles recorded for each test. Test Tide Dredge Orientation 1 Date Time # Bucket Cycles Bubble 1 Flood North
Introduction to Roadway Design
 Chapter Introduction to Roadway Design 1 This chapter lays the foundation for the Roadway Design course. You examine the roadway design workflow and the completed drawing files and review the project scope,
Trade of Metal Fabrication. Module 1: Basic Fabrication Unit 3: Tools and Equipment Phase 2
 Trade of Metal Fabrication Module 1: Basic Fabrication Unit 3: Tools and Equipment Phase 2 Table of Contents List of Figures... 3 List of Tables... 4 Document Release History... 5 Module 1 Basic Fabrication...
Navigation Using Compass
 Navigation Using Compass Updated January 2015 Albi Sole 0 Outdoor Council of Canada / Conseil canadien de plein air Published by The Outdoor Council of Canada / Conseil canadien de plein air KNA-101, 2500
A Low Cost Digital Angle Gage, version 3
 A Low Cost Digital Angle Gage, version 3 By R. G. Sparber Copyleft protects this document. 1 Sometimes re-inventing the wheel has advantages. What you see here is just a variation on a sine bar. The accuracy
Section 4.2 Objectives
 Section 4. Objectives Determine whether the slope of a graphed line is positive, negative, 0, or undefined. Determine the slope of a line given its graph. Calculate the slope of a line given the ordered
Why Are Temperatures Different Near the Coasts and Inland?
 2.6 Investigate Why Are Temperatures Different Near the Coasts and Inland? Earlier in this Learning Set, you analyzed climate maps that indicated the effects of latitude on temperature. The maps are repeated
Wingin It. Students learn about the Bernoulli effect by building an airfoil (airplane wing) and making it fly.
 and making it fly.") Wingin It Students learn about the Bernoulli effect by building an airfoil (airplane wing) and making it fly. Grade Levels 5 8 Science Topics Aerodynamics of lift Bernoulli effect Force Velocity Pressure
Wingin It Students learn about the Bernoulli effect by building an airfoil (airplane wing) and making it fly. Grade Levels 5 8 Science Topics Aerodynamics of lift Bernoulli effect Force Velocity Pressure
FISH 415 LIMNOLOGY UI Moscow
 Sampling Equipment Lab FISH 415 LIMNOLOGY UI Moscow Purpose: - to familiarize you with limnological sampling equipment - to use some of the equipment to obtain profiles of temperature, dissolved oxygen,
Single Family Dwellings
 SINGLE FAMILY DWELLING STAIRWAYS, GUARDS HANDRAILS INFORMATION GUIDELINE 19 January 2017 CITY OF ESCONDIDO BUILDING DIVISION 201 N. BROADWAY, ESCONDIDO, CA 92025 (760) 839-4647 PLEASE NOTE: THIS GUIDELINE
1. A rabbit can cover a distance of 80 m in 5 s. What is the speed of the rabbit?
 Chapter Problems Motion at Constant Speed Class Work. A rabbit can cover a distance of 80 m in 5 s. What is the speed of the rabbit?. During the first 50 s a truck traveled at constant speed of 5 m/s.
Evaluation of the Wisconsin DOT Walking Profiler
 Final Report Evaluation of the Wisconsin DOT Walking Profiler March 2007 U.S. Department of Transportation Federal Highway Administration Notice This document is disseminated under the sponsorship of the
ORIENTEERING LESSON 1: ORIENTEERING
 ORIENTEERING LESSON 1: ORIENTEERING PURPOSE This lesson will introduce you to orienteering, its techniques and terminology, as well as the various types of orienteering courses. In addition, many of the
GATE INSTALLATION INSTRUCTIONS
 For Technical Support: 1-877-862-7049 GATE INSTALLATION INSTRUCTIONS What You Need: Posthole digger 4 long, 2 diameter galvanized pipe For Loose Soil 3 additional 3 long, 2 diameter galvanized pipe Level,
Viva TPS. TS11/15 Total Stations Check and Adjust Procedure. October Summary
 Viva TPS October 2010 TS11/15 Total Stations Summary Leica builds total stations to the highest quality and calibrates each instrument before it leaves the Factory. After the instrument is shipped or used
UNITED STATES MARINE CORPS WEAPONS TRAINING BATTALION MARINE CORPS COMBAT DEVELOPMENT COMMAND QUANTICO, VIRGINIA
 UNITED STATES MARINE CORPS WEAPONS TRAINING BATTALION MARINE CORPS COMBAT DEVELOPMENT COMMAND QUANTICO, VIRGINIA 22134-5040 DETAILED INSTRUCTOR GUIDE LESSON TITLE DATA BOOK COURSE TITLE ANNUAL RIFLE TRAINING
Basic Chartwork. Necessary Tools. Navigation is the one science in which no margin whatever is left for the faker. - Felix Riesenberg
 Page 1 of 14 www.bananawind.us Navigation is the one science in which no margin whatever is left for the faker. - Felix Riesenberg Basic Chartwork You wouldn't want to attempt open ocean sailing using
Tying Knots. Approximate time: 1-2 days depending on time spent on calculator instructions.
 Tying Knots Objective: Students will find a linear model to fit data. Students will compare and interpret different slopes and intercepts in a context. Students will discuss domain and range: as discrete
Gas Gathering System Modeling The Pipeline Pressure Loss Match
 PETROLEUM SOCIETY CANADIAN INSTITUTE OF MINING, METALLURGY & PETROLEUM PAPER 2005-230 Gas Gathering System Modeling The Pipeline Pressure Loss Match R.G. MCNEIL, P.ENG. Fekete Associates Inc. D.R. LILLICO,
CHAPTER 8 STAKING SIGNALS AND LIGHTING FIELD GUIDE. 8.1 Staking Traffic Control Signal Systems
 CHAPTER 8 STAKING STAKING Correct staking of traffic control signal or lighting systems is critical to the appropriate placement of system components. 8.1 Traffic Control Signal Systems Locating the components
USING THE MILITARY LENSATIC COMPASS
 USING THE MILITARY LENSATIC COMPASS WARNING This presentation is intended as a quick summary, and not a comprehensive resource. If you want to learn Land Navigation in detail, either buy a book; or get
A Hare-Lynx Simulation Model
 1 A Hare- Simulation Model What happens to the numbers of hares and lynx when the core of the system is like this? Hares O Balance? S H_Births Hares H_Fertility Area KillsPerHead Fertility Births Figure
RIPPLE TANK - with rippler & kit
 GENERAL DESCRIPTION: RIPPLE TANK - with rippler & kit Cat: SW3430-001 with illuminator, rippler & kit. The ripple tank is used to investigate wave motion in a shallow trough of water to understand how