Alaris GP Volumetric Pump. Directions For Use en
|
|
|
- Valentine Wheeler
- 6 years ago
- Views:
Transcription


1 laris GP Volumetric Pump s Directions For Use en
2 Contents Page Introduction...2 bout this Manual...2 Creating a Data Set...3 Features of the laris GP Volumetric Pump...4 Controls and Indicators...5 Symbol Definitions...6 Main Display Features...7 Operating Precautions...8 Getting Started...10 The laris Safety Clamp Loading an Infusion Set...13 Starting the Infusion...14 Basic Features...15 Secondary (Piggyback) Infusions...21 Service Configuration Mode...22 Pump Configuration available via the laris GP Editor Software...23 Drug List available via the laris GP Editor Software...24 larms...25 Warnings...26 Prompts...27 Restarting an Infusion following an ir-in-line larm...27 Flow Sensor Operation (Optional)...28 Infusion Sets...29 ssociated Products...32 Maintenance...33 Cleaning and Storage...34 Disposal...34 Specifications...35 IrD, RS232 and Nursecall Specification...36 Infusion Specifications...37 Trumpet and Flow Rate Curves...38 Products and Spare Parts...40 Service Contacts DF00459 Issue 3 1/42
3 Introduction The laris GP Volumetric Pump (hereinafter referred to as 'Pump') is a small lightweight volumetric infusion pump that provides accurate and reliable infusions over a range of rates. The laris GP Editor Software* is a medical device accessory, which allows the hospital to develop a best-practice data set of IV medication dosing guidelines for patient-specific care areas. Each data set contains a specific library of drugs, as well as a pump configuration appropriate for the care area. The hospital defined data set is developed and approved through pharmacy and clinical input, and then transferred into the laris GP Volumetric Pump by qualified technical personnel. Intended Purpose The laris GP Volumetric Pump is intended for use by medical staff for the purpose of controlling infusion rate and volume. Conditions for Use The laris GP Volumetric Pump should only be operated by medical staff competent in the use of automated volumetric pumps and in the management of infusion therapy. Medical staff should determine the suitability of the device in their care area for its intended purpose. Indications The laris GP Volumetric Pump is indicated for the infusion of fluids, medications, parenteral nutrition, blood and blood products through clinically acceptable routes of administration; such as intravenous (IV), subcutaneous or irrigation of fluid spaces. The laris GP Volumetric Pump is indicated for use on adults and paediatrics. Contraindications The laris GP Volumetric Pump is contraindicated for enteral or epidural therapies. * Only some parts of the laris GP Editor software are classified as a medical device accessory bout this Manual The user must be thoroughly familiar with the pump described in this manual prior to use. ll illustrations used in this manual show typical settings and values which may be used in setting up the functions of the pump. These settings and values are for illustrative use only. The complete range of settings and values are detailed in the specifications section. It is important to ensure that you only refer to the most recent version of the Directions for Use and Technical Service Manual for your CareFusion products. These documents are referenced on Copies can be obtained by contacting your local CareFusion representative. Conventions used in this manual BOLD 'Single quotes' Italics Used for Display names, software commands, controls and indicators referenced in this manual, for example, Battery Indicator, VOLUME, ON/OFF button. Used to indicate cross-references made to another section of this manual. Used to refer to other documents or manuals and also used for emphasis. Important Information: Wherever this symbol is shown an Important note is found. These notes highlight an aspect of use that is important for the user to be aware of when operating the pump. 1000DF00459 Issue 3 2/42
4 Creating a Data Set To create a data set for the laris GP Volumetric Pump, first the hospital will need to develop, review, approve, upload according to the following process. Refer to the laris GP Editor help file for further details and operating precautions. 1. Create Care rea data set (Using laris GP Editor) Drug List Drug names and concentrations for a data set with default value and maximum limits. Up to 100 unique drug names/drug protocol set-ups. Pump Configuration Pump configuration settings and units for dosing only. 2. Review, approve and export data set (Using laris GP Editor) Review and pprove Export Entire data set report to be printed, reviewed and signed as proof of approval by an authorised person, according to hospital protocol. Signed printout to be kept safe by hospital. Data set status to be set to pproved (Password is required). Export data set for use by the laris GP Transfer Tool, or to back up a data set, or to move the data set to another PC. 3. Upload data set to laris GP Volumetric Pump (Using laris GP Transfer Tool) Data set transfers should only be performed by qualified technical personnel. Drug parameters have to be in accordance with local regulation and prescribed information. 1000DF00459 Issue 3 3/42
5 Features of the laris GP Volumetric Pump larm indicator laris GP Door Display Softkeys Chevrons Run Bolus Hold Options C power indicator Mute Pressure Battery indicator On/Off Door Lever Handle Release lever for rotating cam Flow sensor connector RS232/Nursecall connector (cover removed for clarity) Rotating cam to lock onto horizontal rectangular bars. Folded pole clamp Mains fuses cover Mains inlet Medical device interface (MDI) IR communications port Potential Equalisation (PE) Connector 1000DF00459 Issue 3 4/42
6 Controls and Indicators Controls: Symbol a bh c i d e Description ON/OFF button - Press once to switch the pump ON. Press and hold down for approximately 3 seconds to switch the pump OFF. RUN button - Press to start the infusion. The green LED will flash during infusion. HOLD button - Press to put the infusion on hold. The amber LED will be lit while on hold. MUTE button - Press to silence alarm for (approximately) 2 minutes. The alarm will resound after this time. BOLUS button - Press to access BOLUS softkey. Press and hold down softkey to operate. BOLUS - fluid or drug delivered at an accelerated rate. Pump is infusing Infusion set is connected to patient. Volume infused (VI) is added to the total volume infused displayed. OPTION button - Press to access optional features. PRESSURE button - Use this button to display the pumping pressure and adjust the alarm limit. f CHEVRON keys - Double or single for faster / slower increase / decrease of values shown on display. g BLNK SOFTKEYS - Use in conjunction with the prompts shown on the display. Indicators: Symbol Sj Description C POWER indicator - When illuminated the pump is connected to an C power supply and the battery is being charged. BTTERY indicator - When illuminated the pump is running on the internal battery. When flashing the battery power is low with less than 30 minutes of use remaining. 1000DF00459 Issue 3 5/42
7 Symbol Definitions Labelling Symbols: Symbol wx ttention (Consult accompanying document) Potential Equalisation (PE) Connector Description RS232/Nursecall Connector. l IPX3 r s T t Defibrillation-proof type CF applied part. (Degree of protection against electrical shock) Protected against spraying water lternating Current Device complies with the requirements of Council Directive 93/42/EEC as amended by 2007/47/EC. Date of Manufacture Manufacturer Connector for Flow Sensor Important Information U W Not for Municipal Waste Fuse rating EC REP uthorised representative in the European Community 1000DF00459 Issue 3 6/42
8 Main Display Features Main Display - If VTBI has not been set (flow sensor must be used): Infusion Status/ Drug Name/Primary or Secondary (Only if secondary is enabled in the data set) Infusion Rate RTE ON HOLD 25.0 ml/h ON HOLD a) SET RTE WITH RTE If the rate has not been set and is ON showing HOLD at 0.0ml/h, then message a) will be displayed. Volume Infused VOLUME 50.0 ml Softkey Identifiers Softkeys VOLUME VTBI b) RTE ON HOLD RTE TOO LOW Main Display - If VTBI is set: Infusion Status/ Drug Name/Primary or Secondary (Only if secondary is enabled in the data set) Infusion Rate Dose Rate Volume to be Infused Volume Infused Time Remaining Softkey Identifiers Softkeys Clear Volume Infused Set VTBI Option DRENLINE* RTE VTBI 25.0 ml/h 16.7 µg/kg/24h 45.0 VOLUME h 48m 00s VOLUME VTBI ml ml c) If programmed rate is between ON 0.0ml/h HOLD and 1.0ml/h exclusive in drug protocol, message b) will be shown. RTE ON HOLD RTE TOO HIGH If programmed rate is greater than the Infusion Rate Max in drug protocol, message c) will be shown. Screen icon: Clear Volume Infused Set VTBI Option Time remaining display icon - Indicates time remaining before VTBI will be completed. If the time is greater than 24 hours then 24+ will be displayed. * Drug Protocol symbol - Indicates drug protocol is in use. Pressure information icon - Shows the pressure from level 0 being the first bar to level 8. larm limits: level 2, 5 or DF00459 Issue 3 7/42
9 laris GP Operating Precautions Infusion Sets To ensure correct and accurate operation, only use CareFusion single use infusion sets described in this Directions For Use. It is recommended that infusion sets are changed according to the instructions in the 'Changing the Infusion Set' section. Carefully read the Directions For Use supplied with the infusion set prior to use. Use of non-specified infusion sets may impair the operation of the pump and the accuracy of the infusion. When combining several apparatus and/or instruments with infusion sets and other tubing, for example via a 3-way tap or multiple infusion, the performance of the pump may be affected and should be monitored closely. Uncontrolled flow may result if the infusion set is not properly isolated from the patient i.e. closing a tap in the set or activating an in-line clamp / roller clamp. The infusion set may be fitted with an in-line clamp, which can be used to occlude tubing in case it is required to stop fluid flow. The laris GP Volumetric Pump is a positive pressure pump, which should use infusion sets fitted with Luer lock fittings or equivalent locking connectors. To infuse from a burette, close the roller clamp above the burette and open the clamp on the vent on top of the burette. Discard infusion set if the packaging is not intact or the protector cap is detached. Ensure sets are not kinked as this may occlude the tubing. Using Collapsible bags, Glass Bottles & Semi Rigid containers It is recommended that the air vent be opened on the laris GP Volumetric Pump set if using glass bottles or semi-rigid containers, to reduce the partial vacuum formed as the fluid is infused from the container. This action will ensure the pump can maintain volumetric accuracy whilst the container empties. The action of opening the air vent for semi-rigid containers should take place after the spiking of the container and priming of the drip chamber. Steps for the Collapsible bags Steps for Semi-rigid containers Follow steps 1 to 3 as shown for the semi-rigid containers, however do not open vent as in step 4, but prime the set as per step 5. Ensure the bag outlet is fully pierced before filling the drip chamber. 2. Spike the container 3. Fill drip chamber to fill line 4. Open the air vent to allow pressure equalisation - ready for infusion 1. Close the roller clamp 5. Prime the set by opening / closing the roller clamp Operating Environment When using any infusion pump in conjunction with other pumps or devices requiring vascular access, extra care is advised. dverse delivery of medication or fluids can be caused by the substantial variation in pressures created within the fluid channels of such pumps. Typical examples of those pumps are used during dialysis, bypass or cardiac assist applications. The pump is suitable for use in all establishments, including domestic establishments and those directly connected to the public low voltage power supply network that supplies buildings used for domestic purposes. This pump is not intended to be used in the presence of a flammable anaesthetic mixture with air or oxygen or nitrous oxide. Operating Pressure The pumping pressure alarm system is not designed to provide protection against, or detection of extravasation or tissuing, complications which can occur. larm Conditions Several alarm conditions detected by this pump will stop the infusion and generate visual and audible alarms. Users must perform regular checks to ensure that the infusion is progressing correctly and no alarms are operating. 1000DF00459 Issue 3 8/42
10 laris GP Operating Precautions (Continued) M Electromagnetic Compatibility and Interference This pump is protected against the effects of external interference, including high energy radio frequency emissions, magnetic fields and electrostatic discharge (for example, as generated by electrosurgical and cauterising equipment, large motors, portable radios, cellular telephones etc.) and is designed to remain safe when unreasonable levels of interference are encountered. Therapeutic Radiation Equipment: Do not use the pump in the vicinity of any Therapeutic Radiation Equipment. Levels of radiation generated by the radiation therapy equipment such as Linear ccelerator, may severely affect functioning of the pump. Please consult manufacturer s recommendations for safe distance and other precautionary requirements. For further information, please contact your local CareFusion representative. Magnetic Resonance Imaging (MRI): The pump contains ferromagnetic materials which are susceptible to interference with magnetic field generated by the MRI devices. Therefore, the pump is not considered an MRI compatible pump as such. If use of the pump within an MRI environment is unavoidable, then CareFusion highly recommends securing the pump at a safe distance from the magnetic field outside the identified Controlled ccess rea in order to evade any magnetic interference to the pump; or MRI image distortion. This safe distance should be established in accordance with the manufacturers recommendations regarding electromagnetic interference (EMI). For further information, please refer to the product technical service manual (TSM). lternatively, contact your local CareFusion representative for further guidance. ccessories: Do not use any non-recommended accessory with the pump. The pump is tested and compliant with the relevant EMC claims only with the recommended accessories. Use of any accessory, transducer or cable other than those specified by CareFusion may result in increased emissions or decreased pump immunity. In some circumstances the pump may be affected by an electrostatic discharge through air at levels close to or above 15kv; or by radio frequency radiation close to or above 10v/m. If the pump is affected by this external interference the pump will remain in a safe mode; the pump will duly stop the infusion and alert the user by generating a combination of visual and audible alarms. Should any encountered alarm condition persist even after user intervention, it is recommended to replace that particular pump and quarantine the pump for the attention of appropriately trained technical personnel. d m This pump is a CISPR 11 Group 1 Class B device and uses RF energy only for its internal function in the normal product offering. Therefore, its RF emissions are very low and are not likely to cause any interference with the nearby electronic equipment. However, this pump emits a certain level of electromagnetic radiation which is within the levels specified by IEC/EN and IEC/EN If the pump interacts with other equipment, measures should be taken to minimise the effects, for instance by repositioning or relocation. Earth Conductor The laris GP Volumetric Pump is a Class I device, therefore must be earthed when connected to an C power supply. This pump also has an internal power source. When connected to an external power source, a three-wire (Live, Neutral, Earth) supply must be used. If the integrity of the external protective conductor on the C power cable has been compromised, the pump should be disconnected from the C power source and operated utilising the internal battery. Hazards n explosion hazard exists if the pump is used in the presence of flammable anaesthetics. Exercise care to locate the pump away from any such hazardous sources. Dangerous Voltage: n electrical shock hazard exists if the pump s casing is opened or removed. Refer all servicing to qualified service personnel. V Do not open the RS232/Nurse Call protective covering when not in use. Electrostatic discharge (ESD) precautions are required when connecting RS232/Nurse Call. Touching the pins of the connectors may result in ESD protection failure. It is recommended that all actions must be taken by appropriately trained personnel. laris GP If this pump is dropped, subjected to excessive moisture, fluid spillage, humidity or high temperature, or otherwise suspected to have been damaged, remove it from service for inspection by a qualified service engineer. When transporting or storing the pump, use original packaging where possible, and adhere to temperature, humidity and pressure ranges stated in the Specifications section and on the outer packaging. If this pump behaves abnormally, remove from service and contact a qualified service engineer. Care should be taken to ensure power leads and RS232 cables do not present a trip hazard. Care should be taken in the placement of power leads and RS232 cables to prevent accidental tugging. 1000DF00459 Issue 3 9/42
11 Getting Started Before operating the pump read this Directions For Use (DFU) manual carefully. Initial Set Up 1. Check that the pump is complete, undamaged and that the voltage rating specified on the label is compatible with your C power supply. 2. Items supplied are : laris GP Volumetric Pump Directions For Use (CD) C Power Cable (as requested) Protective Packaging laris GP Editor Software (including the laris GP Transfer Tool) - per hospital 3. Connect the pump to the C power supply for at least 2½ hours to ensure that the internal battery is charged (verify that the S is lit). 4. On initial start-up the pump will display the Select Language screen. Select the required language from the list displayed using the f keys. 5. Press the OK softkey to confirm your selection. The laris GP Editor Software can be used to create an approved data set that can be uploaded into the pump. However, a default data set is already installed in the pump (See details below). The pump will automatically operate from its internal battery if the pump is switched on without being connected to the power supply. Should the pump fail to perform correctly, replace in its original protective packaging, where possible and contact a qualified service engineer for investigation. Factory Default Data Set The laris GP Volumetric Pump is supplied with the following factory default data set Parameter Factory Default Setting C Fail Warning Enabled larm Volume Medium Pressure Default L5 Pressure Max L8 Rate Titration Disabled Infusion Rate Max 1200ml/h Bolus Mode Enabled Bolus Rate Default 500ml/h Bolus Rate Max 1200ml/h Bolus Volume Max 5ml Weight Default 1kg IL Limit Max 100µl VTBI Max 9999ml Secondary Infusion Disabled Default Units Enabled for Dosing Only: µg/min µg/h mg/h g/h U/h mmol/h ng/kg/min µg/kg/min µg/kg/h mg/kg/min mg/kg/h U/kg/h mmol/kg/min mmol/kg/h 1000DF00459 Issue 3 10/42
12 Getting Started (Continued) Pole Clamp Installation pole clamp is fitted to the rear of the pump and will provide secure fixing to vertical I.V. poles of a diameter between 15 and 40 mm. Recessed area 1. Pull the folded pole clamp towards you and unscrew the clamp to leave enough room for the size of the pole. 2. Place pump around pole and tighten screw until the clamp is secured to the pole. * * Never mount the pump such that the infusion stand becomes top heavy or unstable. Ensure pole clamp is folded away and stored within recessed area at the rear of the pump before connecting to a Docking Station/Workstation* or when not in use. Docking Station/Workstation* or Equipment Rail Installation Rectangular bar Release lever (push to release) laris GP Rotating cam The rotating cam can be fitted to the rectangular bar on the Docking Station/Workstation* or equipment rails measuring 10mm by 25mm. 1. lign the rotating cam on the rear of the pump with the rectangular bar on the Docking Station/Workstation* or the equipment rail. 2. Push the pump firmly onto the rectangular bar or equipment rail. Ensure that the pump 'clicks' securely into position onto the rail or bar. 3. To release, push the release lever and pull the pump forwards. It is recommended that infusion bags be located on a hanger directly above the pump with which they are being used. This minimises the potential for confusion of infusion sets when multiple volumetric pumps are used. *laris DS Docking Station and laris Gateway Workstation. Pump can only be mounted on the horizontal section of the docking stations listed above. 1000DF00459 Issue 3 11/42
13 The laris Safety Clamp laris Safety Clamp**: SFETY CLMP IN NON OCCLUDED POSITION: When a new infusion set is removed from packaging the Safety Clamp will be in this position*: Safety Clamp Tab Safety Clamp Slider Safety Clamp Frame FLOW ENBLED Clamp in NON OCCLUDED POSITION * This is necessary to avoid tube damage during storage and to ensure correct sterilisation and allows immediate priming. SFETY CLMP IN OCCLUDED POSITION: fter infusion set is loaded into the pump, opening the door activates door hooks which will pull the Safety Clamp slider out, as shown: MNULLY OPERTING THE Safety Clamp To move the slider into the non occluded position manually, push up Safety Clamp Tab and push Safety Clamp Slider completely into Frame: NO FLOW Clamp is in OCCLUDED POSITION 1. Push up Ê 2. Push Æ Pushing on the Safety Clamp Slider enables full set flow to the patient. Therefore it is recommended to always close the roller clamp as well. However, if gravity infusion is required, push up Safety Clamp Tab and push orange Safety Clamp Slider completely into Frame to enable flow. The gravity infusion can be regulated using the roller clamp on the set. ** - Hereinafter referred to as to as 'Safety Clamp'. 1000DF00459 Issue 3 12/42
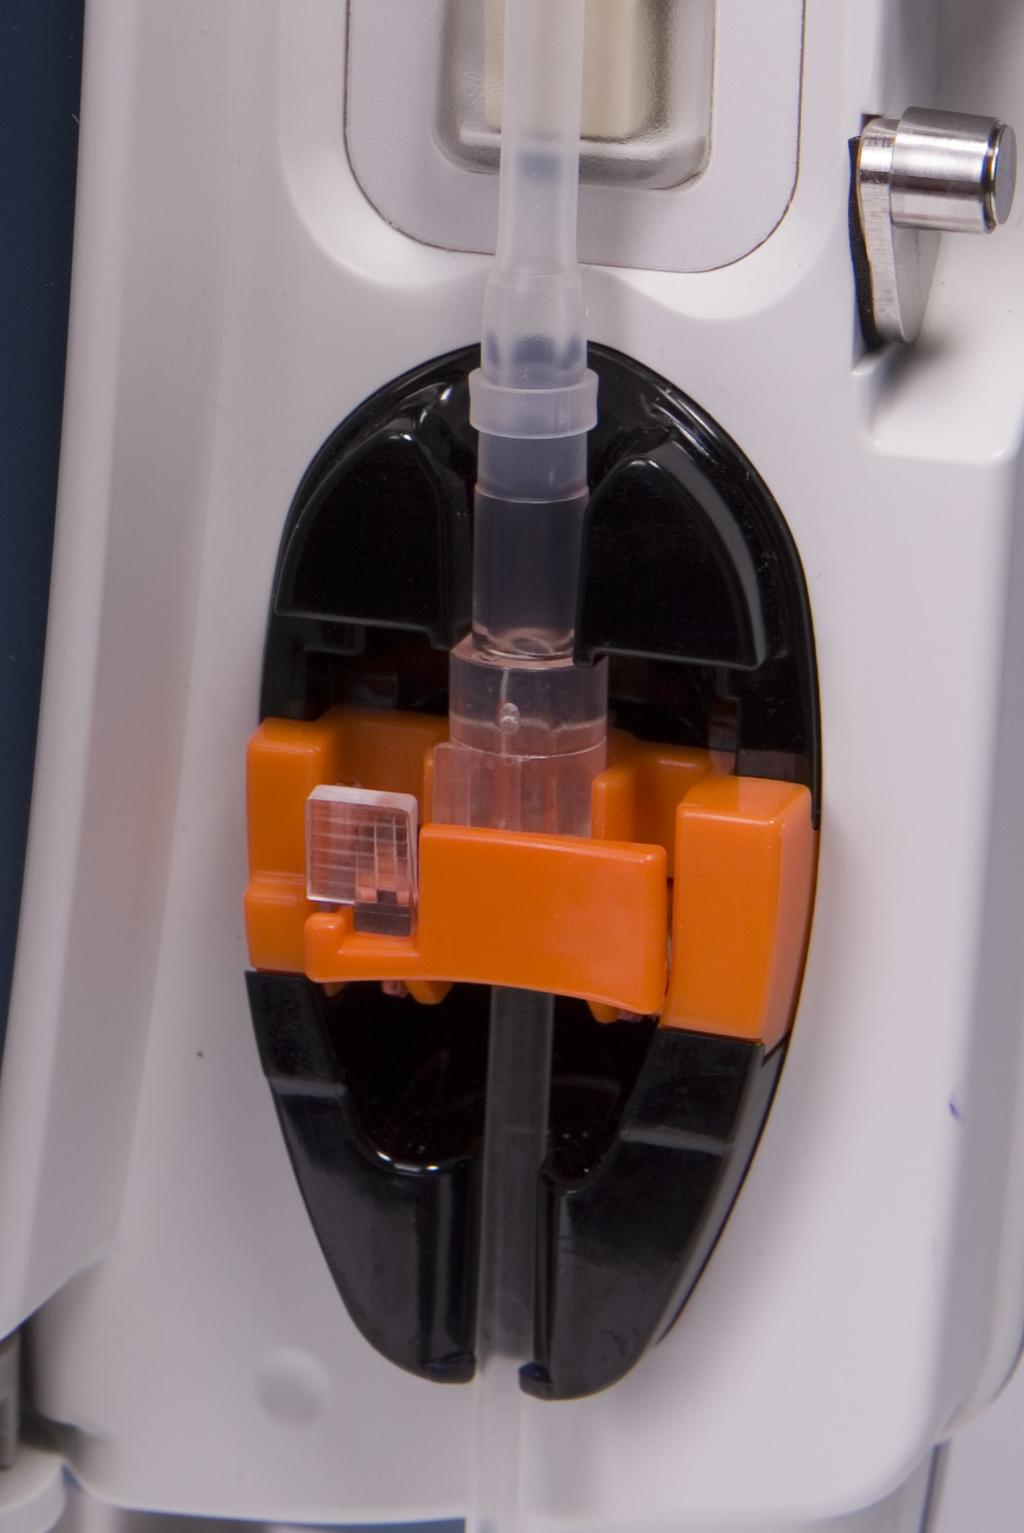
 Position the fluid container to avoid spillage onto the pump.")
 Top set retainer (Blue) Pressure sensor - UPSTREM Pumping mechanism Pressure")
14 Loading an Infusion Set Ensure the appropriate infusion set for the fluid/drug to be infused has been selected. Follow the instructions supplied with the individual infusion set. Only use laris GP Volumetric Pump infusion sets, (Refer to 'Infusion Sets' section of the DFU) Position the fluid container to avoid spillage onto the pump. Ensure that the tubing is inserted completely into the top set retainer through to the tubing guide avoiding any slack. Loading an Infusion Set: laris Safety Clamp in the NON OCCLUDED position - FLOW ENBLED daptor on infusion set (Blue) Top set retainer (Blue) Pressure sensor - UPSTREM Pumping mechanism Pressure sensor - DOWNSTREM laris Safety Clamp (Orange) Safety Clamp retainer (Orange) ir-in-line sensor Tubing guide 1. Remove infusion set from package and close roller clamp. 2. Insert the bag spike into the fluid container and hang appropriately. t a minimum height of 300 mm above the pump. 3. Fill the drip chamber to the fill line if shown. (pproximately half full) Refer to operating precaution section ' Using Collapsable bags, Glass Bottles & Semi-Rigid containers'. 4. Open roller clamp and prime set slowly (to prevent air bubbles) ensuring all air is removed. 5. Close roller clamp. 6. Switch the pump on. Open door and load infusion set as follows: Fit blue adaptor of infusion set into blue top set retainer. Insert orange safety clamp into orange retainer. 7. Ensure infusion set is fully inserted into tubing guide. 8. Close door and open roller clamp. Ensure no drops are falling in the drip chamber. 9. Ensure all air is removed from the set. Connect the infusion set to the patient access device. Loading an Infusion Set: laris Safety Clamp in the OCCLUDED position - NO FLOW 1. Follow steps 1 to 4 as above where necessary. 2. Ensure roller clamp is closed. laris Safety Clamp (Orange) in occluded position (See previous page) Tubing guide 3. Open door and load infusion set as follows: Fit blue adaptor on infusion set into blue top set retainer. Insert orange safety clamp (leaving slider extended) in the occluded position into orange retainer. Pushing on the Safety Clamp Slider may lead to uncontrolled flow to the patient. Therefore, always close the roller clamp before pushing on the safety clamp slider. 4. Ensure infusion set is fully inserted into tubing guide. 5. Close door and open roller clamp. Ensure no drops are falling in the drip chamber. 6. Ensure all air is removed from the set. Connect the infusion set to the patient access device. 1000DF00459 Issue 3 13/42
15 Starting the Infusion Prime ND LOD the set (Refer to 'Loading an Infusion Set') 1. Ensure the pump is connected to an C power supply (also operates from battery). 2. Connect flow sensor, if required. (See 'Flow Sensor Operation') 3. Press the a key. The pump will run a short self-test. Check two beeps are activated during this test. Check the displayed date and time are correct. Check display shows the data set name and version number. NOTE: The pump starts up and displays previous settings. No Drug Name ml/h Drug Name* CLER SETUP? RTE VTBI VOLUME CLER 300 ml/h 46.5 ml 3.5 ml KEEP Drug Protocol Dosing Only CLER SETUP? 150 ml/h 1.50 mg/h RTE CONC VOLUME CLER 0.01mg/ml 1.4 ml KEEP Primary/Secondary Drug Names* CLER SETUP? RTE VTBI VOLUME RTE VTBI CLER FentanYl SECONDRY 4. CLER SETUP? - Selecting KEEP will retain all previous rate and volume settings, go to step 6. Selecting CLER will automatically reset the rate and volume settings to zero and the SELECT screen will be displayed (if configured). 1.0 ml/h ml ml 1.0 ml/h ml KEEP SELECT ml/h DOSING ONLY DRUGS: B C D E F G H I J K L M N O P Q R S T U V W X Y Z SELECT WITH OK 5. If CLER was selected, choose from either ml/h, DOSING ONLY or DRUGS (-Z) and press OK to confirm. Then follow the prompts as required. (Refer to 'Basic Features -Drugs and Dosing' section) 6. Clear VOLUME infused, if required. (Refer to 'Clear Volume Infused' section, this is recommended for a new patient or when a new infusion is set-up.) 7. Enter VTBI (if required) by selecting VTBI softkey on main display. (Refer to 'Setting a VTBI' or 'Setting VTBI over Time' section) Set VTBI by using the BGS option and/or f keys and press OK to confirm. 8. Enter or adjust the RTE (if necessary) using the f keys. 9. Press b key to start the infusion. INFUSING will be displayed. NOTE: The green run LED will flash to show that the pump is infusing. If the infusion requires to be stopped immediately, the following actions may be applied: by pressing the h key (recommended action) by closing the roller clamp by opening the door * If a drug name is selected, then CLER SETUP? will alternate with the drug name. If secondary infusions have been enabled in the data set, then PRIMRY may also alternate. 1000DF00459 Issue 3 14/42
16 Basic Features Drugs and Dosing The following options enable the pump to be set-up for use with a specific drug name and/or drug protocol. Drugs are pre-configured in the laris GP Editor to enable rapid selection of the drug name, dosing units and default rate. For increased security using a configured drug, maximum and minimum safety limits are programmable for concentration and dose rates. (Using the laris GP Editor software) When adjusting an infusion using the dose rate, the display may not show any corresponding changes to the infusion rate in ml/h. This does not affect the accuracy of the infusion. Selecting the INFUSION SETUP 1. Press the d button to first access the options menu. 2. Drugs and dosing set-up options are available by selecting INFUSION SETUP from the list using the f keys. 3. Select from the list of the options (ml/h, DOSING ONLY or DRUGS) as detailed below and press the OK softkey to confirm the selection. SELECT ml/h DOSING ONLY DRUGS: B C D E F G H I J K L M N O P Q R S T U V W X Y Z ml/h 1. Select ml/h from the list using the f keys (if necessary). 2. Press OK to confirm. 3. Enter the ml/h rate as prompted on the display in the next screen. SELECT WITH OK QUIT SELECT WITH OK SELECT ml/h DOSING ONLY DRUGS: B C D E F G H I J K L M N O P Q R S T U V W X Y Z QUIT Dosing Only 1. Select DOSING ONLY from the list using the f keys. 2. Press OK to confirm. 3. Select the dosing units from the list using the fkeys, press OK to confirm. 4. Enter WEIGHT 1 using the fkeys, press OK to confirm. 5. Use the fkeys to select the TOTL VOLUME 2, press OK to confirm. 6. Enter DRUG MOUNT using the f keys and if units need to be changed, select UNITS which will scroll through the units available. Press OK to confirm selection. 7. summary of the DOSING ONLY information is displayed, to CONFIRM? all details shown press OK. The BCK softkey may be used at any time to return to the previous screen. 1 - Only displayed if weight based units are used. 2 - Total Volume = Drug Volume + Diluent Volume i.e. Total Volume of fluid in the fluid container after a drug is added. SELECT WITH OK SELECT ml/h DOSING ONLY DRUGS: B C D E F G H I J K L M N O P Q R S T U V W X Y Z QUIT Drugs 1. Select the required DRUGS alphabetical row from the list using the f keys. 2. Press OK to confirm. 3. Select the drug from the displayed list using the fkeys, press OK to confirm. 4. Enter WEIGHT 1 using the fkeys, press OK to confirm. 5. Use the fkeys to enter the TOTL VOLUME 2, press OK to confirm. 6. Enter DRUG MOUNT using the f keys, press OK to confirm selection. 7. summary of the DRUG information is displayed, to CONFIRM? all details shown press OK. The BCK softkey may be used at any time to return to the previous screen. 1 - Only displayed if weight based units are used. 2 - Total Volume = Drug Volume + Diluent Volume i.e. Total Volume of fluid in the fluid container after a drug is added. 1000DF00459 Issue 3 15/42
17 Basic Features (continued) VOLUME VOLUME INFUSED 374 ml CLER QUIT Clear Volume Infused This option enables the volume infused to be cleared. 1. Press the VOLUME softkey on main display to show the clear VOLUME INFUSED option. 2. Press the CLER softkey to clear the volume infused. Press the QUIT softkey to retain the volume. When a new drug or a new concentration has been setup and the previous volume infused has not been cleared, then the message DOSE INFUSED HS BEEN CLERED will be displayed. VTBI 1500ml 1000ml 500ml 250ml 200ml 100ml 50ml 0ml SELECT WITH OK (OFF) BCK Setting a VTBI 1. Using the f keys: a) Press the VTBI softkey on main display to enter the volume to be infused screen. b) Enter the volume to be infused using the f keys and press OK to confirm. OR 2. Using the BGS softkey: a) Press the VTBI softkey on main display to enter the volume to be infused screen. b) Select the BGS softkey, select the required bag volume using the f keys and press OK to confirm the selection. c) Press OK to confirm again, or adjust the VTBI using the fkeys. NOTE: On completion of VTBI pump will continue to infuse at KVO rate. VTBI DONE INFUSING KVO CNCEL RTE VTBI VOLUME VOLUME KVO 5.0 ml/h 0.0 ml 2.0 ml 0 h 00 m 00 s KVO (Keep Vein Open) Rate t the end of VTBI, the pump will first display VTBI DONE/INFUSING KVO. Press CNCEL to display KVO screen. The pump continues to infuse at a very low rate is used to keep the patients vein open, in order to prevent blood clots and catheter occlusions. NOTE: If the KVO rate (5ml/h) is greater than the set infusion parameters then the pump will continue to infuse at the set infusion rate. The KVO rate will flash on screen to indicate this is not the usual infusion rate. The pump will beep every 5 seconds while in KVO mode. PRESSURE PUMPING PRESSURE L1 LRM LIMIT L5 DJUST WITH OK Pressure To check and adjust the pressure level, press the ebutton. The display will change to show the current pumping pressure level and the pressure alarm limit. The pressure alarm limit can be set via the laris GP Editor. 1. Press the f keys to increase or decrease the alarm limit (L2,L5 or L8). The new limit will be indicated on the display. 2. Press OK to exit the screen. The pressure alarm limit is auto adjusted and is fixed at level 8 (L8) for rates above 200ml/h. The interpretation of pressure readings and occlusion alarms are the responsibility of the clinician depending on the specific application. Occlusion levels for the laris GP Volumetric Pump are configured in the Data Set Editor. 1000DF00459 Issue 3 16/42
18 Basic Features (continued) BOLUS RTE SET WITH 80 ml/h VOLUME 0.0 ml HOLD KEY BELOW BOLUS QUIT Bolus Infusions Bolus - dministering a controlled volume of fluid or drug at an increased rate for diagnostic or therapeutic purposes. The pump should always be infusing and always attached to the patient. (Drugs given by an IV bolus could achieve immediate and high drug concentration levels.) The bolus feature can be configured via the laris GP Editor to: a) BOLUS Disabled b) BOLUS Enabled BOLUS Disabled If configured to Disabled, pressing the i button will have no effect and the pump will continue to infuse at the set rate. Bolus cannot be administered if the feature is disabled for the selected data set or specific drug. During BOLUS the pressure limit alarm is temporarily increased to the maximum level (L8). BOLUS Enabled Press and hold the (flashing) Bolus softkey to deliver the required bolus. The bolus rate can be adjusted. The bolus volume is limited in the configuration via laris GP Editor. 1. During infusion press the i button once to display the bolus screen. 2. Use the f keys to adjust the bolus rate if required. 3. To deliver the bolus press and hold the BOLUS softkey. During the bolus, the volume being infused is displayed. When the desired bolus volume has been delivered or the bolus volume limit is reached, release the softkey. The bolus volume is added to the total volume infused displayed. NOTE: NOTE: If The bolus rate will be automatically set to the current infusion rate, when the default bolus rate is lower than the current infusion rate. bolus rate cannot be configured lower than the current infusion rate. When more than one bolus is programmed without clearing the infusion setup, the bolus rate will be set to the previous bolus rate for all subsequent bolus infusions. the volume to be infused (VTBI) is reached during a bolus, the VTBI complete alarm will sound. Press c to silence the alarm or CNCEL to acknowledge the alarm. See VTBI section for more details on VTBI operation. When using infusion set 63280NY the maximum infusion rate is 150ml/h. TITRTE PRESS TO CONFIRM RTE 25.0 ml/h 16.7 µg/kg/24h VTBI 45.0 ml VOLUME 50.0 ml 1 h 48 m 00 s QUIT Rate Titration If Rate Titration is enabled (via the laris GP Editor) the infusion rate or dose rate (if available) can be adjusted while infusing. 1. Select the new rate using the f keys. The message <TITRTE PRESS b TO CONFIRM > will flash on screen and the pump continues to infuse at the original rate. 2. Press the b button to confirm the new infusion rate and start infusing at the new rate. If Rate Titration is disabled the rate can only be adjusted whilst ON HOLD: 1. Press the h button to put the pump ON HOLD. 2. Select the new rate using the f keys. 3. Press the b button to start infusing at the new rate. 1000DF00459 Issue 3 17/42
19 Basic Features (continued) Rate Lock (If Enabled) (V1.7.X onwards) If Rate Lock is enabled, when the infusion rate has been set and the infusion started (or following a bolus infusion) the rate lock prompt will appear on the main display. To select the rate lock function press the YES softkey. Press the NO softkey if the rate lock is not required. When rate lock is enabled, the following are unavailable: Changing the infusion rate / titration Bolus Switching the pump off VTBI over time infusions. Secondary infusions (if enabled) To turn rate lock off: 1. Press the d button to access the options menu. 2. Select UNLOCK RTE and press the OK softkey. To turn rate lock on: 1. Press the d button to access the options menu. 2. Select RTE LOCK and press the OK softkey. djusting Existing Dosing or Protocol Infusions - Set By ml/h / Set By Doserate To set doserate or flowrate in precise increments it may be necessary to switch between the rate adjust options SET BY DOSERTE and SET BY ml/h. n arrow to the left of the rate display shows the rate changed when the f keys are used to increase/decrease the infusion rate. To set a doserate precisely the arrow must be pointing to the doserate (for example: mg/kg/h); the flowrate will be calculated from the doserate. To precisely set a flowrate the arrow must be pointing to flowrate (ml/h); the doserate will be calculated from the flowrate. Selecting the SET BY ml/h Option 1. Press the d button to access the options menu. 2. Select the SET BY ml/h option using the f keys and press the OK softkey indicated on the screen. This will select the set by flowrate option, the arrow on the display will automatically select the flowrate, the flowrate can be adjusted if necessary. Selecting the SET BY DOSERTE Option 1. Press the d button to access the options menu. 2. Select the SET BY DOSERTE option using the f keys and press the OK softkey indicated on the screen. This will select the set by doserate option, the arrow on the display will automatically select the doserate, the doserate can be adjusted if necessary. Dosing Summary To review currently selected dosing information: 1. Press the d button to first access the options menu. 2. Select DOSING SUMMRY. 3. Review the information and then press the QUIT softkey. Infusion Setup To change the Infusion Setup, refer to 'Basic Features - Drugs and Dosing, Selecting the INFUSION SETUP' section. Drug Name Only This feature adds a drug name to an existing infusion, when infusing using ml/h or dosing only options. 1. Press the d button to access the options menu. 2. Select DRUG NME ONLY. 3. Press the OK softkey to confirm the drug name or press the QUIT softkey to exit the option. 1000DF00459 Issue 3 18/42
20 Basic Features (continued) Clear Drug Name Clearing the drug name is only available if drug name only has been selected: 1. Press hto put the pump ON HOLD. 2. Press the d button to access the options menu. 3. Select DRUG NME ONLY using the f keys, press OK to confirm. 4. Select CLER DRUG NME (displayed if a name only is selected) using the f keys. Press the OK softkey to confirm the selection. Primary Setup If a secondary infusion has already been setup (see 'Secondary (Piggyback) Infusions' section), then access to the primary infusion setup is as follows: 1. Press hto put the pump ON HOLD. 2. Press the d button to access the options menu. 3. Select PRIMRY Setup and press the OK softkey to confirm. Make changes to the primary setup as necessary. Setting VTBI over Time (V1.7.X onwards) This option allows a specific VTBI and delivery time to be set. The rate necessary to deliver the required volume within the specified time is calculated and displayed. 1. Stop the infusion. Press d button to access the options menu. 2. Select the SET VTBI OVER TIME option using the fkeys and press the OK softkey. 3. djust the volume to be infused using the fkeys. (Or select BGS softkey to set the VTBI) When the desired volume has been reached press the OK softkey. 4. Enter the time over which the volume is to be infused using the fkeys. The infusion rate will automatically be calculated. 5. Press OK softkey to enter the value or BCK to return to the VTBI. djust larm Volume (V1.7.X onwards) This option allows adjustment of the volume. 1. Press the d button to access the options menu. 2. Select DJUST LRM VOLUME. 3. Select HIGH, MEDIUM or LOW using the fkeys. 4. Press OK softkey to confirm or QUIT to exit screen. Enable / Disable Rate Lock (V1.7.X onwards) This option allows configuration of the Rate Lock feature to be enabled or disabled. 1. Press the d button to access the options menu. 2. Select ENBLE RTE LOCK or DISBLE RTE LOCK using the fkeys (as required). 3. Press OK softkey to confirm or QUIT to exit screen. Pump Details To review pump information: 1. Press the d button to access the options menu. 2. Select PUMP DETILS. 3. Review the information and then press the QUIT softkey. 1000DF00459 Issue 3 19/42
21 Basic Features (continued) Changing the Infusion Set 1. Press h to put the pump ON HOLD. 2. Close in-line clamp and ensure the access to the patient is isolated. 3. Disconnect the infusion set from the patient. 4. Open pump door and remove infusion set from the pump and discard the set and fluid container according to hospital protocol. 5. Prepare the new infusion set, load infusion set into pump and close the door, see "Loading the Infusion Set". 6. Restart infusion, see "Getting Started". When changing the infusion set or the fluid container use aseptic technique according to hospital protocol. It is recommended that infusion sets are changed in accordance with the Directions For Use. Carefully read the Directions For Use supplied with the infusion set prior to use. The set change interval is up to 72 hours with the following exceptions; Transfusion (Blood) Sets laris GP Low Sorbing Infusion Set 60033E laris GP Low Sorbing Infusion Set 60950E laris GP Oncology Infusion Set Changing the Fluid Container 1. Press h to put the pump ON HOLD. 2. Remove bag spike on infusion set from empty / used container. Discard empty / used container according to hospital protocol. 3. Insert spike into new container. 4. Squeeze the drip chamber approximately half full or up to fill line (if the drip chamber is marked) with fluid. 5. Restart infusion, see "Getting Started". When changing the infusion set or the fluid container use aseptic technique according to hospital protocol. It is recommended that infusion sets are changed in accordance with the Directions For Use. Carefully read the Directions For Use supplied with the infusion set prior to use. SmartSite Needle-Free System Instructions SmartSite Needle-Free Valve is designed to permit safe gravity flow and automated flow, injection and aspiration of fluids without the use of needles by utilising Luer lock and luer slip connectors. Precautions: Discard if packaging is not intact or protector caps are unattached. If Needle-Free Valve is accessed by a needle in an emergency the valve will be damaged causing leakage. Replace Needle- Free Valve immediately. Needle-Free Valve contraindicated for blunt cannula system. DO NOT leave slip luer syringes unattended. DIRECTIONS - Use septic Technique 1. Prior to every access, swab top of Needle-Free Valve port with 70% Isopropyl alcohol (1-2 seconds) and allow to dry (approximately 30 seconds). NOTE: Dry time is dependent on temperature, humidity, ventilation of the area. 2. Prime valve port. If applicable, attach syringe to Needle-Free Valve port and aspirate minuscule air bubbles. 3. When used with administration sets always refer to individual set directions for use as change interval may vary according to clinical application (e.g. infusions of blood, blood products, and lipid emulsions). NOTE: During use of Needle-Free Valve port, fluid may be observed between the housing and blue piston. This fluid does not enter the fluid path and requires no action. NOTE: For product questions or needle-free valve educational materials, contact your CareFusion representative. Consult facility protocols. Consult other organizations that publish guidelines useful in developing facility protocols. 1000DF00459 Issue 3 20/42
22 Secondary (Piggyback) Infusions Secondary (or piggyback) Infusion mode is only available if it has been configured. The application of secondary infusions should be limited to the intermittent therapy of medications which are not sensitive to the total time required to complete an infusion. Typically antibiotics may be infused using a secondary infusion, where the primary infusion is limited to maintenance fluid. If intending to use the secondary infusion facility, the primary infusion should be a maintenance fluid only and is not indicated for drug therapy. The application of secondary infusions for delivery of critical drugs, particularly those with a short half life, is NOT indicated for use. These drugs should be administered through a dedicated pump channel. Dependent upon factors such as fluid viscosity, the secondary infusion rate, head height between the secondary and primary fluid containers and the use of clamps, flow may occur from the primary fluid container during a secondary infusion. This could result in drug remaining in the container at the end of the secondary infusion, delaying its delivery for a period of time which is dependent upon the primary infusion rate. For example, a secondary infusion of 250ml at 300ml/h could result in approximately 33ml remaining, requiring up to 25 minutes additional time to complete the delivery, assuming a primary infusion rate of 80ml/h (and the use of a 72213N-0006 secondary infusion set and its supplied extension hook). Therefore it is recommended that flow sensors (if used) are disconnected from the pump during secondary infusions. Regular monitoring for unexpected primary flow is recommended. If flow from the primary fluid container is not desired during secondary infusion and/or the patient is sensitive to fluid balance, the clamp on the primary infusion set should be closed. Check that no drops fall in the primary drip chamber. On completion of the primary infusion the pump will continue at Keep Vein Open rate (KVO) rate. Setting up a secondary infusion: 1. Ensure Primary infusion has been setup in ml/h (rate > 0ml/h). 2. Press h to put the pump ON HOLD. 3. Press d to access the OPTIONS screen. 4. Select SECONDRY SETUP, press OK to confirm. 5. Select either NO DRUG NME or DRUGS -Z. Press OK to confirm either selection. 6. Enter the secondary RTE using the f keys. 7. Press OK to confirm. 8. Set VTBI using the f keys. (Refer to 'Setting a VTBI' section) 9. Press OK to confirm. 10. Review PRIMRY/SECONDRY setup summary. 11. If correct, press OK to continue, or BCK to adjust VTBI or RTE of the SECONDRY mode. Typical Secondary infusions: IV Pole Extension Hook (approx.26cm) Normally included with the secondary Infusion set. Primary fluid container must hang lower to allow the secondary infusion to run and primary infusion to restart on completion of the secondary infusion. Primary Fluid Container Primary Infusion set e.g E with an upper Y-Site (SmartSite Needle-Free Valve). In-line Clamp Check Valve Prevents secondary infusions from flowing back up the primary Infusion set instead of to the patient. Ensure primary set has a backcheck valve upstream from the Y-site Press b to start the infusion in secondary mode. n DVISORY screen will be displayed - ENSURE SECONDRY INFUSION SET OPEN. 13. Press OK to start infusing at the displayed rate. Setting up a subsequent secondary infusion: On completion of the secondary VTBI, the pump will automatically transition to the primary infusion. (n audible 'BEEP' will be heard) 1. Press h to place the primary infusion ON HOLD. 2. Follow instructions 3 to 13 of 'Setting up a secondary infusion'. 2 Secondary Fluid Container Usually a smaller container e.g. 50ml, 100ml, 200ml or 250ml. Secondary Infusion Set e.g N Usually shorter tubing to reach the Y-site on the primary Infusion set. In-line Clamp e.g. roller clamp. Upper Y-Site (SmartSite Needle-Free Valve) on Primary Infusion Set. The secondary set connects to the upper Y-connection on the primary Infusion set. laris GP 1000DF00459 Issue 3 21/42
23 Service Configuration Mode This section comprises of a list of options which can be configured. Some can be entered via the pump SERVICE CONFIGURTION menu (available in Technician Mode) and others through the laris GP Editor Software. Enter the access code on laris GP Volumetric Pump for SERVICE mode, then select SERVICE CONFIGURTION, see the Technical Service Manual for details. Use laris GP Editor to configure the pump configuration, drug list and units enabled for each data set. ccess codes should only be entered by qualified technical personnel. Date & Time 1. Select DTE & TIME from the SERVICE CONFIGURTION menu using the f keys and press the OK softkey. 2. Press the OK softkey to confirm. 3. Use the f keys to adjust the date displayed, pressing the NEXT softkey to access the next field. 4. When the correct date and time are displayed press the OK softkey to return to the SERVICE CONFIGURTION menu. 5. Press the QUIT softkey to return to the SERVICE menu and press ato exit and power down. Pump Reference Text This option is used to add reference text to be shown on the pump start up display. 1. Select PUMP REFERENCE from the SERVICE CONFIGURTION menu using the f keys and press the OK softkey. 2. Use the f keys to enter the text and NEXT to move to the next character. 3. When the desired text has been selected press OK softkey to return to the SERVICE CONFIGURTION menu. 4. Press QUIT to exit back to the main SERVICE menu and press a to exit and power down. Language This option is used to set the language of messages shown on the pump display. 1. Select LNGUGE from the SERVICE CONFIGURTION menu using the f keys and press the OK softkey. 2. Use the f keys to select the language. 3. When the desired language has been selected press OK softkey to return to the SERVICE CONFIGURTION menu. 4. Press QUIT to exit back to the main SERVICE menu and press a to exit and power down. Backlight & Contrast This option is used to set the backlight and contrast on the pump display. 1. Select BCKLIGHT & CONTRST from the SERVICE CONFIGURTION menu using the f keys and press the OK softkey. 2. Use the f keys to adjust BCKLIGHT, CONTRST & DIMMING. The contrast of the display will change when scrolling through the numbers. (Use PRM to scroll between each option) 3. When the desired value has been reached press the OK softkey, then QUIT to get back to the SERVICE menu and press a to exit and power down. 1000DF00459 Issue 3 22/42
Alaris CC Syringe Pump
 Alaris CC Syringe Pump Models: 80033GBxx, 80033UNxx Directions For Use en s Contents Page Introduction...2 About This Manual...2 Quick Start Guide...2 Features of the Alaris CC Syringe Pump...3 Controls
Introduction. Medley TM Medication Safety System. Alaris Medical Systems
 Medley TM Medication Safety System Alaris Medical Systems Introduction The ALARIS Medley Medication Safety System is designed to help you provide the best possible patient care, by avoiding potential adverse
Alaris Pump module FAQs
 Alaris Pump module FAQs 1. What makes the Alaris Pump module unique? Unparalleled safety (Guardrails Suite MX software), modularity, common user interface, ease of use and versatility. 2. Where are pump
Alaris Syringe Pump (with Plus Software) MK3
 MK3") Alaris Syringe Pump (ith Plus Softare) MK3 Models: 8002MED01, 8002MED01-G, 8003MED01, 8003MED01-G Directions For Use en s Contents Alaris Syringe Pumps Introduction.... 2 About This Manual.... 3 Creating
Alaris Syringe Pump (ith Plus Softare) MK3 Models: 8002MED01, 8002MED01-G, 8003MED01, 8003MED01-G Directions For Use en s Contents Alaris Syringe Pumps Introduction.... 2 About This Manual.... 3 Creating
Alaris GH Guardrails Syringe Pump
 Alaris GH Guardrails Syringe Pump Models: 80023UNxx-G, 80023NWxx-G Directions For Use en s Contents Page Introduction...2 About This Manual...2 Creating a Data Set...3 Features of the Alaris GH Guardrails
IVAC PCAM Syringe Pump. Directions For Use en
 IVC PCM Syringe Pump Directions For Use en s Contents Page Introduction...2 bout This Manual...2 Features of the Pump...3 Controls & Indicators...4 Symbol Definitions....................................................................................................5
Alaris TIVA Syringe Pump
 Alaris TIVA Syringe Pump Model: 80043UNxx Directions For Use en s Contents Page Introduction...2 About This Manual...2 Quick Start Guide...2 Features of the Alaris TIVA Syringe Pump...3 Controls & Indicators...4
RUN POWER HOLD POWER RUN HOLD
 User Manual laris SE Pump Models 7100/7130 and 7200/7230, Rev2.X pril 2011 POWER RUN HOLD RUN HOLD POWER POWER RUN HOLD B ml/hr OPT PRI HLD SEC KVO PRI SEC ml/hr KVO OPT HLD PRI SEC PRI B ml/hr PRI SEC
BODYGUARD 2CH TWIN CHANNEL INFUSION PUMP
 BODYGUARD 2CH TWIN CHANNEL INFUSION PUMP The BodyGuard 2CH Twin Channel Infusion Pump is an ambulatory multi-therapy pump suitable for hospital and homecare environments with five infusion programs (continuous,
AQUADEX FLEXFLOW SYSTEM QUICK REFERENCE GUIDE
 AQUADEX FLEXFLOW SYSTEM QUICK REFERENCE GUIDE AQUADEX FLEXFLOW SYSTEM DISCLAIMER The quick reference guide is not intended to replace CHF Solutions, Inc. Aquadex FlexFlow Direction For Use (DFU). Always
Alaris GH Syringe Pump
 Alaris GH Syringe Pump Models: 80023xx01, 80023xx00 Directions For Use en s Contents Page Introduction...2 About This Manual...2 Quick Start Guide...2 Features of the Alaris GH Syringe Pump...3 Controls
Making Life Easier Easypump II
 Making Life Easier Easypump II The elastomeric pump system for short- and long-term infusion therapy Elastomeric Infusion Systems Technical Guide Easypump II Disposable Elastomeric Infusion Pump System
ASE SOLVENT CONTROLLER INSTALLATION INSTRUCTIONS Dionex Corporation
 ASE SOLVENT CONTROLLER INSTALLATION INSTRUCTIONS 2000 Dionex Corporation Document No. 031277 Revision 03 April 2000 2000 Dionex Corporation All rights reserved worldwide. Printed in the United States of
Volumat Agilia _Volumat_Presentation_customer.ppt
 Volumat Agilia Volumat Agilia What is Volumat Agilia? Volumat Agilia is the volumetric pump of the Agilia range, our new family of intuitive infusion devices Volumetric Pumps Syringe Pumps Disposable Products
Alaris PK Syringe Pump. Directions For Use EN
 laris PK Syringe Pump s Directions For Use EN Contents Page Introduction.............................................................................................. 2 bout This Manual........................................................................................
SomnoSuite FAQ. Setup. Calibration 4. What are the calibration requirements for the SomnoSuite? Settings
 SomnoSuite FAQ V1.3 January 2015 Setup 1. How do I connect the SomnoSuite to my oxygen source? 2. Is there a way to speed up the downward movement of the pusher block when setting the empty position? 3.
Nimbus II PainPRO Ambulatory Infusion Pump
 Nimbus II PainPRO Ambulatory Infusion Pump Patient Manual PCA Mode Infusions Read this entire manual prior to operating the Nimbus II PainPRO Ambulatory Infusion Table of Contents Section 1: General Description...
Peristaltic Infusion Pump AP 31P OPERATOR S MANUAL
 Peristaltic Infusion Pump AP 31P Version 4.5 Edition: 001 page 1 PERISTALTIC INFUSION PUMP AP 31P Dear Customer, Thank you very much for purchasing medical equipment from Ascor S.A. We can assure you that
Nimbus II PainPRO Ambulatory Infusion Pump
 Nimbus II PainPRO Ambulatory Infusion Pump Patient Manual PCA Mode Infusions Read this entire manual prior to operating the Nimbus II PainPRO Ambulatory Infusion Table of Contents Section 1: General Description...
Multi Channel Solutions
 Multi Channel Solutions Caesarea Medical Electronics BodyGuard 121 Twins Flexible 2 Channels Infusion Manage two regimens for your patient, bedside or on the go, using the BodyGuard 121 Twins dual-channel
Compatible Baxter IV Sets
 SIGMA Spectrum and Spectrum IQ Infusion System Compatible Baxter IV Sets (For use with SIGMA Spectrum and Spectrum IQ Infusion Pumps that have been calibrated for Baxter IV set tubing). NOTE: The superscript
HONG KONG COLLEGE OF ANAESTHESIOLOGISTS TECHNICAL GUIDINES RECOMMENDATIONS ON CHECKING ANAESTHESIA DELIVERY SYSTEMS
 RECOMMENDATIONS ON CHECKING ANAESTHESIA DELIVERY SYSTEMS 1. INTRODUCTION An anaesthesia delivery system includes any machine, equipment or apparatus which supplies gases, vapours, local anaesthesia and/or
HeartSine PAD 500P Trainer User Manual 1
 HeartSine HeartSine PAD 500P Trainer User Manual 1 HeartSine samaritan PAD 500P Trainer model TRN-500-1 User Manual HeartSine samaritan PAD with CPR Advisor model 500P Trainer This User Manual provides
Contents. 6. Infusion Mode...10
 Contents 1. General Description 2 1.1 Features and product purpose 2 2. Principle of Operation....2 3. Specification.2 4. Front View 5 5. Basic Setting.6 5.1 Installation.6 5.2 Power On 6 5.3 Time Setting...7
CONTENTS DESCRIPTION INTENDED USE. WARNINGS & NOTES. PRECAUTIONS. INSTALLATION & SET-UP (Including battery charging & powering up)
") NO CONTENTS DESCRIPTION PAGE 1.0 2.0 3.0 4.0 5.0 6.0 7.0 7.1 7.2 7.3 7.4 7.5 7.6 7.7 7.8 7.9 7.10 7.11 7.12 7.13 7.14 7.15 7.16 7.17 8.0 10.0 BODYGUARD PUMP OVERVIEW PUMP DESCRIPTION AND FUNCTIONS SYSTEM
NO CONTENTS DESCRIPTION PAGE 1.0 2.0 3.0 4.0 5.0 6.0 7.0 7.1 7.2 7.3 7.4 7.5 7.6 7.7 7.8 7.9 7.10 7.11 7.12 7.13 7.14 7.15 7.16 7.17 8.0 10.0 BODYGUARD PUMP OVERVIEW PUMP DESCRIPTION AND FUNCTIONS SYSTEM
Troubleshooting Guide Aquarius
 Low Access Pressure Access pressure has dropped below the lower alarm limit of 0 to - 250mmHg Blood pump is off Blood flow is too low Turn blood pump on Check blood flow rate. Consider increasing the blood
Recommendations on Checking Anaesthesia Delivery Systems
 Page 1 of 11 Recommendations on Checking Anaesthesia Delivery Version Effective Date 1 Oct 1992 (reviewed Feb 07, Feb 02) 2 2004 3 Nov 2011 4 Dec 2016 Document No. HKCA T1 v4 Prepared by College Guidelines
HeartSine samaritan PAD. SAM 450P Trainer model TRN User Manual
 HeartSine samaritan PAD SAM 450P Trainer model TRN-450-1 User Manual Contents Contents 2 Introduction 3 Preparing the HeartSine samaritan PAD 450P Trainer for use 4 Turning the HeartSine samaritan PAD
Roller AC Servo System
 Safely Instruction Roller AC Servo System HMI-15 User Manual Please read this manual carefully, also with related manual for the machinery before use the controller. For installing and operating the controller
MEDIANA HEARTON AED A15. Mediana Automated External Defibrillator A15
 AED A5 Mediana Automated External Defibrillator A5 AED A5 COVER Protected icon sheet, shock button, adult/paediatric mode switch. 7 BATTERY Disposable LiMnO2 Non-Rechargeable. 2yrs shelf life, 5yrs standby
Endo-Flush Order # ZUTR30004 OPERATION MANUAL. Zutron Medical, LLC W 98 th St #40-27 Lenexa, KS Phone Fax
 OPERATION MANUAL Zutron Medical, LLC 17501 W 98 th St #40-27 Lenexa, KS 66219 Phone 877-343-5873 Fax 913-967-5944 ZUT-Lab-004-30004 REV. 03312017 Table of Contents 2 Introduction 1. Intended Use 2. Labels,
6800 Maintenance Instruction System Flush Procedure
 Equipment Required FA74005 FA65318 FA900005 FA900003 Damper Drain Tube 6800 Cover Removal Tool Beaker 0.25 Litre Solvent Cleaning Bottle FA940021 Syringe Polypropylene 50 ml as required FA999045 Gloves
Instructions for Use
 Select-380 T-Auto T-Auto Contents Page Instructions for Use Ref: 3.0 IFU 380 T-Auto Mar 18 2 Schematic layout of the doser 3 Quick-fit instructions 4 Description/Installation/Operation Pump tubes & Water
Contacts. Quick Start Guide
 Contacts Clinical Support Specialist: Phone: Cell Phone: Email: Fresenius Renal Technologies A division of Fresenius Medical Care North America 920 Winter Street Waltham, MA 02451 Technical Service Customer
AutoChanger Installation & User Guide Issue 2
 1 INDEX Page 1. Introduction... 3 2. AutoChanger Components Guide 4 3. Installation. 5-11 a) Installation Guidelines.. 5 b) Installation Retrofit... 6-11 c) Installation New... 11 4. AutoChanger User Guide
Pegas 4000 MF Gas Mixer InstructionManual Columbus Instruments
 Pegas 4000 MF Gas Mixer InstructionManual Contents I Table of Contents Foreword Part I Introduction 1 2 1 System overview... 2 2 Specifications... 3 Part II Installation 4 1 Rear panel connections...
Instruction Manual for Configura Cushionair Portable Pump
 Instruction Manual for Configura Cushionair Portable Pump Fitted with battery powered pump, suitable for Configura Portable chairs V E R S I O N O N E M A Y 2 0 1 6 Contents Introduction 3 Set up of Cushionair
User Manual. Quantos Automated Dosing Liquid Module
 User Manual Liquid Module 1 Safety Information 1.1 Definition of warnings and symbols Signal Words WARNING for a hazardous situation with medium risk, possibly resulting in severe injuries or death if
OXY Integral. INTERCON ENTERPRISES INC Tel: Fax: Internet:
 OXY Integral INTERCON ENTERPRISES INC Tel: 800 665 6655 Fax: 604 946 5340 E-Mail: sales@intercononline.com Internet: www.intercononline.com Manual Integral 2006 1 INDEX 2-3 PREFACE 4 INTRODUCTION 5 Principle
Asena PK Syringe Pump. Directions for Use ENGLISH. 1000PB01489 Issue 4
 Asena PK Syringe Pump Directions for Use ENGLISH 1000PB01489 Issue 4 Contents Page Introduction 2 TCI Overview 3 Creating a Data Set 5 Features of the Asena PK Syringe Pump 6 Controls and Indicators 7
A4s Operation Manual
 A4s Operation Manual Safety Instruction Please read this manual carefully, also with related manual for the machinery before use the controller. For installing and operating the controller properly and
The Univentor 1250 Anaesthesia Unit
 THE UNIVENTOR 1200/1250 ANAESTHESIA UNIT The Univentor 1250 Anaesthesia Unit TABLE OF CONTENTS EDITION 1 Section 1 - WARRANTY & SERVICE 1.1. WARRANTY 2 1.2. DAMAGED SHIPMENTS 2 1.3. SERVICE 2 Section 2
Digital Melting Point Apparatus
 Digital Melting Point Apparatus Heating Plateau Ramping Start/Stop Plateau set Ramp stop Hold User Guide Version 1.1 Heating Viewing tube Sample Chamber IEC power inlet socket Power on/off Temperature
SC505 Sof Care Inflator. Operating Instructions and Service Manual
 SC505 Sof Care Inflator Gaymar Industries, Inc. 10 Centre Drive Orchard Park, NY 14127 Toll Free +1 800.828.7341 + 1 716.662.2551 Fax +1 800.993.7890 Outside USA +1 716.662.8636 Outside USA Fax +1 716.662.0730
A4 Operation Manual. Fig.1-1 Controller Socket Diagram
 A4 Operation Manual Safety Instruction Please read this manual carefully, also with related manual for the machinery before use the controller. For installing and operating the controller properly and
patient education program 4156 South 52 nd Street, Omaha, NE ChildrensOmaha.org/HomeHealthcare
 patient education program 4156 South 52 nd Street, Omaha, NE 68117 800-747-7334 402-734-6741 ChildrensOmaha.org/HomeHealthcare We know children CHILDREN S HOME HEALTHCARE Trilogy Ventilator Instructions
CADD-Micro. Model 5900 Operator s Manual. Note: Colors are Black and Cyan (as second color) Deltec. Ambulatory Infusion Pump
 Deltec. Ambulatory Infusion Pump") Note: Colors are Black and Cyan (as second color) CADD-Micro Ambulatory Infusion Pump Overview Programming Examples Model 5900 Operator s Manual Deltec SIMS Deltec, Inc., St. Paul, MN 55112 U.S.A. 87 Overview
Note: Colors are Black and Cyan (as second color) CADD-Micro Ambulatory Infusion Pump Overview Programming Examples Model 5900 Operator s Manual Deltec SIMS Deltec, Inc., St. Paul, MN 55112 U.S.A. 87 Overview
WELCOME TO THE REVOLUTION
 USER GUIDE WELCOME TO THE REVOLUTION THANK YOU FOR CHOOSING THE GCQUAD We listened to what you wanted - and created the most accurate, versatile and game-enhancing ball and club analysis solution available
ECHO MANUAL WARNING. L B A ltim e te rs. ECHO is a trademark of LB Altimeters, Denmark
 ECHO MANUAL L B A ltim e te rs ECHO is a trademark of LB Altimeters, Denmark LB Altimeters operates a policy of continuous development Therefore, we reserve the right to make changes and improvements to
BOC: Living healthcare. Manual. LIV IQ BOC Integrated Valve with digital display portable delivery system for Medical Oxygen. BOC: Living healthcare
 BOC: Living healthcare Manual LIV IQ BOC Integrated Valve with digital display portable delivery system for Medical Oxygen. BOC: Living healthcare 02 Manual LIV IQ Oxygen Manual LIV IQ Oxygen 03 Contents.
OPERATING INSTRUCTIONS MANUAL FOR QACV PNEUMATIC DOSING PUMP
 This operating instructions contains safety information that if ignored can endanger life or result in serious injury. They are indicated by this icon. Use of this pump with radioactive chemicals is forbidden!
BPS-2, Rev TABLE OF CONTENTS
 BPS-2, Rev. 050404 Bilayer Perfusion System Model BPS-2 125 Dixwell Avenue, Hamden, CT 06514 (800) 599-4203 / (203) 776-0664 (203) 776-1278 fax www.warneronline.com BPS-2, Rev. 050404 TABLE OF CONTENTS
MANITOBA RENAL PROGRAM
 MANITOBA RENAL PROGRAM SUBJECT Fresenius 5008 Preparation for Hemodialysis using the ONLINEplus System SECTION CODE 30.10.02 30.10 Hemodialysis: Equipment and Procedures AUTHORIZATION Professional Advisory
WATER CONTROL SYSTEM QUICK START
 SETTINGS MENU SYSTEM OPTIONS WATER LEVEL BAR GRAPH 3 DS SPRAY ON/OFF CS SPRAY ON/OFF BEACON WATER CONTROL SYSTEM QUICK START WWW.GFWORLDWIDE.COM +1 (208) 664-9291 SERVICE@GFWORLDWIDE.COM DISPLAY SCREEN
Calibration Gas Instrument INSTRUCTION MANUAL. Release I. Advanced Calibration Designs, Inc.
 Advanced Calibration Designs, Inc. Calibration Gas Instrument INSTRUCTION MANUAL Release I www.goacd.com Instruction Manual Gas Generator Release I TABLE OF CONTENTS I. General Description Page 2 II. Start-Up
D10S/D20S Wall/Post Mount Inflator Quick Start Manual
 PART NUMBER SERIAL NUMBER D10S/D20S Wall/Post Mount Inflator Quick Start Manual Please read and save these instructions. Read carefully before attempting to assemble, install, operate or maintain the product
MP15 Jockey Pump Controller
 Setup and Operating Instructions MP15 Jockey Pump Controller This manual provides general information, installation, operation, maintenance, and system setup information for Metron Model MP15 Jockey Pump
New. The high security connection
 L ON Cata C lo gu e O O G Y New The high security connection Preparation devices for medications/solutions Bag qimospike B 7218.01 qimospike B is an IV fluid bag access spike fitted with qimo. Aspiration
AQUARIUS Continuous Renal Replacement Therapy with Regional Citrate Anticoagulation (RCA) Competency
 Competency") Demonstrates an understanding of why RCA has been prescribed Explain the anticoagulation protocol Demonstrate an understanding of potential complications associated with CRRT. Explain potential indications
Demonstrates an understanding of why RCA has been prescribed Explain the anticoagulation protocol Demonstrate an understanding of potential complications associated with CRRT. Explain potential indications
EASYPUMP II THE FLEXIBLE SOLUTION FOR SHORT AND LONG TERM INFUSION THERAPIES
 THE FLEXIBLE SOLUTION FOR SHORT AND LONG TERM INFUSION THERAPIES CONTENT 4 PATIENT INFORMATION 5 Patient data 6 Treatment monitoring 7 Further notes 8 PRODUCT INFORMATION 9 Easypump II 9 Working principle
6900 Maintenance Instruction System Flush
 Equipment Required FA74005 Damper Drain Tube FA16005 Cover Removal Tool FA900005 Beaker 0.25 Litre FA900003 Solvent Cleaning Bottle FA940021 Syringe Polypropylene 50 ml as required FA999045 Gloves Latex
Spirax Compact FREME Flash Recovery Energy Management Equipment
 IM-UK-cFREME UK Issue 1 Spirax Compact FREME Flash Recovery Energy Management Equipment Installation and Maintenance Instructions 1. Safety information 2. General product information 3. Installation 4.
THE UNIVENTOR 400 ANAESTHESIA UNIT
 THE UNIVENTOR 400 ANAESTHESIA UNIT TABLE OF CONTENTS EDITION 3 Section 1 - WARRANTY & SERVICE 1.1. WARRANTY 2 1.2. DAMAGED SHIPMENTS 2 1.3. SERVICE 2 Section 2 - INTRODUCTION 2.1. INTRODUCTION 3 Section
Armfield Distillation Column Operation Guidelines
 Armfield Distillation Column Operation Guidelines 11-2016 R.Cox Safety SAFETY GLASSES ARE REQUIRED WHEN OPERATING THE DISTILLATION COLUMN Wear gloves when mixing alcohol feedstock The column will become
Patients Guide for Self Administering Intravenous Antibiotics General points
 Patients Guide for Self Administering Intravenous Antibiotics General points An intravenous line is an open route for infection therefore you need to prevent this by washing your hands before any procedure
Using the Akta Prime plus October 22, 2012
 Some starting precautions: 1. Vacuum filter all buffers. Removes any large particles/debris that may clog your column De-gases the buffers 2. Clarify lysates first by centrifugation and then filtration
CRONO S-PID 30 Ambulatory infusion pump
 CRONO S-PID 30 Ambulatory infusion pump USER GUIDE Canè S.p.A. Medical Technology Via Cuorgnè 42/a 10098 Rivoli (TO) Italy Tel.+39 011 9574872 - Fax +39 011 9598880 www.canespa.it - mailbox@canespa.it
Infusion. 1 evercare inline
 Infusion 1 evercare inline The evercare inline series of infusion therapy products is a result of years of product development with high quality materials and latest technology. Special attention has been
AHE58/59 AC Servo System
 AHE58/59 AC Servo System HMI-12 User Manual Safely INstruction Please read this manual carefully, also with related manual for the machine head before use. For perfect operation and safety, installing
Crono PAR. Ambulatory infusion pump NEW MODEL USER GUIDE
 Crono PAR Ambulatory infusion pump NEW MODEL USER GUIDE Canè S.p.A. Medical Technology Via Cuorgnè 42/a 10098 Rivoli (TO) Italy Tel.+39 011 9574872 - Fax +39 011 9598880 www.canespa.it - mailbox@canespa.it
Oxygen Dialflow Meter. Instructions for Use
 Oxygen Dialflow Meter Instructions for Use 702-0031.9 May 2014 1. Symbols Warning! Caution! Indicates a potentially hazardous situation which, if not avoided, could result in personal injury to the user
Quick Reference Guide
 HematologyAnalyzer Quick Reference Guide For Veterinary Use Only Running a Blank Blanks must be run every 12 hours, after a Soak Cleaning has been performed, after a reagent pack change, and after the
User Manual Article number: I
 www.fluidoirrigation.nl User Manual Fluido Irrigation Fluid Warmer Article number: 651230-I INT/R347-EN/0-01/11 Foreword...3 Disclaimer...3 1 Temperature Management...4 2 Fluid Warming...4 3 Fluido Irrigation
Hospira, Inc., Lake Forest, IL 60045, USA (Rev. 01/06)
") System Operating Manual Hospira, Inc., Lake Forest, IL 60045, USA (Rev. 01/06) Change History Title 430-04684-001 (Rev. 1/05) (Rev. 01/06) Description of Change Initial Release Second Release Pages Affected
System Operating Manual Hospira, Inc., Lake Forest, IL 60045, USA (Rev. 01/06) Change History Title 430-04684-001 (Rev. 1/05) (Rev. 01/06) Description of Change Initial Release Second Release Pages Affected
UNITY 2 TM. Air Server Series 2 Operators Manual. Version 1.0. February 2008
 UNITY 2 TM Air Server Series 2 Operators Manual Version 1.0 February 2008 1. Introduction to the Air Server Accessory for UNITY 2...2 1.1. Summary of Operation...2 2. Developing a UNITY 2-Air Server method
Read this first. Zetasizer nano series Self installation and Quick start guide MRK825-02
 ! Read this first Zetasizer nano series Self installation and Quick start guide I N S T R U M E N T S MRK825-02 Zetasizer Nano series Self installation and Quick start guide MAN0383 Issue 1.1 July 2007
SEMEM3-65 Servicing anaesthetic and ventilation equipment
 Overview This unit identifies the competences you need to carry out servicing activities on anaesthetic and ventilation equipment, in accordance with approved procedures. You will be required to service
Medical oxygen. LIV IQ Digital therapy device.
 Medical oxygen. LIV IQ Digital therapy device. BOC: Living healthcare 02 Cylinder instructions Cylinder instructions 03 Therapy device features. LIV IQ giving you safe guidance during patient treatment.
CONSOLE-320 ENGLISH. 230A: CONSOLE-320 with cable data output Item 230B: CONSOLE-320 with cable + wireless radio data output
 CONSOLE-320 Item 230A: CONSOLE-320 with cable data output Item 230B: CONSOLE-320 with cable + wireless radio data output Table of contents 1. INTRODUCTION...2 1.1 Power supply...2 1.2 Connections...2 1.3
Installing ASI Umbilical Delivery Systems
 Rev A 05 Nov 2015 Page 1 of 10 PURPOSE This guide provides an overview of tubing connections into an ASI wall-mounted Junction Box that has already been plumbed with a compressed air connection including
PROPORTIONING VALVE. Model 150 INSTRUCTION MANUAL. March 2017 IMS Company Stafford Road
 PROPORTIONING VALVE Model 150 INSTRUCTION MANUAL March 2017 IMS Company 10373 Stafford Road Telephone: (440) 543-1615 Fax: (440) 543-1069 Email: sales@imscompany.com 1 Introduction IMS Company reserves
Module 2: Aquarius Training
 Module 2: Aquarius Training Module 2: Aquarius Training 1 AQUARIUS TRAINING TABLE OF CONTENTS Lesson 1. Introduction to Aquarius Platinum Lesson 2. Preparing Aquarius Lesson 3. Treatment Mode Lesson 4.
Alfred ECMO Circuit Priming and Storage Guide
 Alfred ECMO Circuit Priming and Storage Guide 1 March 2012 Check List Page 2. Assembly, Priming and Storage Page 3. Prepare ECMO trolley and Circuit immediately before use Page 6. Connection to Patient
Med Aire Alternating Pressure Pump and Pad System
 User Manual Med Aire Alternating Pressure Pump and Pad System 14002E 14001E Symbols & Statements NOTE Indicates some tips or some information users should be aware of. CAUTION Indicates correct operating
OPERATOR S MANUAL HOTLINE 3 Blood and Fluid Warmer
 l OPERATOR S MANUAL - HOTLINE 3 Blood and Fluid Warmer < HL-390-38 6 s l HOTLINE 3 Blood and Fluid Warmer < HL-390-38 OPERATOR S MANUAL PN 4534013EN Rev. 002 s G e n e r a l I n f o r m a t i o n HOTLINE
Oxygen Dialflow Meter. Instructions for Use
 Oxygen Dialflow Meter Instructions for Use 702-0031.12 December 2017 1. Symbols Warning! Caution! Indicates a potentially hazardous situation which, if not avoided, could result in injury to the patient,
Instruction Manual Dräger MSI P7 and MSI P7 plus
 Dräger MSI GmbH Rohrstraße 32 58093 Hagen Tel.: +49-2331 / 9584-0 Fax: +49-2331 / 9584-29 e-mail: info@draeger-msi.de D 923; Edition 2011-01-01 Content 1. General Hints Page 4 2. The Instrument 2.1 Front
STANDARD OPERATING PROCEDURES DIVISION OF COMPARATIVE MEDICINE UNIVERSITY OF SOUTH FLORIDA
 STANDARD OPERATING PROCEDURES DIVISION OF COMPARATIVE MEDICINE UNIVERSITY OF SOUTH FLORIDA SOP#: 1157.1 Date Issued: 05/14 Date Revised: 5/15 Page 1 of 6 TITLE: SCOPE: RESPONSIBILITY: PURPOSE: SurgiVet
Troubleshooting Guide: 640 Pediatric Exam Table with Midmark Scale
 Troubleshooting Guide: 640 Pediatric Exam Table with Midmark Scale Contents Description Refer To: Scale Troubleshooting Chart Troubleshooting Error Codes Error Messages Adjustments / Repair Procedures
Micro Dial-Flowmeter. Instructions for Use
 Micro Dial-Flowmeter Instructions for Use 702-0082.8 May 2014 1. Symbols Warning! Caution! Indicates a potentially hazardous situation which, if not avoided, could result in personal injury to the user
INSTRUCTION MANUAL FOR POLYKEG DISPOSABLE KEG
 TABLE OF CONTENTS OF MANUAL Chapters 1.0 Product description 2.0 Safety rules for the utilisation of the keg 3.0 Instructions for manual filling 4.0 Instructions for automatic filling 5.0 Instructions
Blood Pressure Monitoring: Arterial Line
 Approved by: Blood Pressure Monitoring: Arterial Line Gail Cameron Senior Director, Operations, Maternal, Neonatal & Child Health Programs Dr. Ensenat Medical Director, Neonatology Neonatal Nursery Policy
Hi Flow Stroller H I F L O W S T R O L L E R
 Hi Flow PAT I E N T O P E R AT I N G I N S T R U C T I O N S Stroller H I F L O W S T R O L L E R Warning Information Read this page carefully before using your unit. The unit contains liquid oxygen which
UBEC 1AT. AUTO TANK Fill System Installation, Operation, & Setup Instructions
 Document Number: XE-ATA5PM-R1A UBEC 1AT AUTO TANK Fill System 08899155 Installation, Operation, & Setup Instructions Rev170906-EB-FRC PHYSICAL: 1302 WEST BEARDSLEY AVE ELKHART, IN 46514 WWW.ELKHARTBRASS.COM
DEH Instructions. Three-Phase, Platform-Mounted Distribution Transformers
 g DEH 40050 Instructions Three-Phase, Platform-Mounted Distribution Transformers Introduction The equipment covered by these instructions should be operated and serviced only by competent technicians familiar
TR Electronic Pressure Regulator. User s Manual
 TR Electronic Pressure Regulator Page 2 of 13 Table of Contents Warnings, Cautions & Notices... 3 Factory Default Setting... 4 Quick Start Procedure... 5 Configuration Tab... 8 Setup Tab... 9 Internal
Table of Contents. Sensor Calibration and Troubleshooting CDS4000 CO 2. Introduction 1. Handling Information. Calibration 2.
 FANs 216, 1628.3 Technical Bulletin CDS4000 Issue Date 0797 CDS4000 CO 2 Sensor Calibration and Troubleshooting Table of Contents Introduction 1 Handling Information 1 Calibration 2 Preparation 2 Cautions
Quiz for Module 2: Aquarius Training (Rev. 1) Lesson 1: Introduction to Aquarius
 Lesson 1: Introduction to Aquarius") Quiz for Module 2: Aquarius Training (Rev. 1) Lesson 1: Introduction to Aquarius page 1 of 2 Name: Date: Score: Instructor: Location: Please circle the correct answers: 1. Select the answer(s) that represent
Quiz for Module 2: Aquarius Training (Rev. 1) Lesson 1: Introduction to Aquarius page 1 of 2 Name: Date: Score: Instructor: Location: Please circle the correct answers: 1. Select the answer(s) that represent
MASK INTEGRITY TEST ACCESSORY (MITA) MODEL 8120
 MODEL 8120") MASK INTEGRITY TEST ACCESSORY (MITA) MODEL 8120 QUICK START GUIDE P/N 6006154, REVISION C MAY 2013 Model 8120 Mask Integrity Tester is patented under U.S. Patent No. 8,312,761. Additional patents are pending.
MASK INTEGRITY TEST ACCESSORY (MITA) MODEL 8120 QUICK START GUIDE P/N 6006154, REVISION C MAY 2013 Model 8120 Mask Integrity Tester is patented under U.S. Patent No. 8,312,761. Additional patents are pending.
PERFORM Operating Document
 PERFORM Operating Document Use and Maintenance of CO 2 Incubator PC-POD-CA-007-v03 Revision History Version Reason for Revision Date 01 New POD 30-Sep-13 02 Minor revisions for section 2.3, 3.1, 4.3. 14-April-16