User s Guide 2010 Sonostar Inc. V _E
|
|
|
- Alexina Nelson
- 5 years ago
- Views:
Transcription


1 User s Guide C 2010 Sonostar Inc. V _E
2 Welcome Congratulations on purchasing the Sonocaddie V350 Series. It is the easiest and most advanced golf GPS device available today with its intuitive and user-friendly design that includes many helpful functions and multiple ways of navigating. This User s Guide provides you with simple to understand instructions for operating your new golf GPS. Please read the entire User s Guide to fully understand exactly how each feature operates. To learn more about Sonocaddie, please visit The Sonocaddie V350 Series serves as your own personal golf caddie guiding you through each hole on the course to get the precise distance information for you to play your best. Using sophisticated GPS satellite technology, the V350 Series determine the distance from any point on the course to the green and other strategic targets, even without a clear line of sight like all golf laser range-finders require. Although most of the courses are preloaded into V350 Series, if you can not search the course you want, all you have to do to get this valuable information at your fingertips is download a particular golf course that you plan to play into the V350 Series from the Sonocaddie website using 1
3 your computer. Accessories: You should have received the following items with your Sonocaddie package: Sonocaddie V350/ V350 Plus, Mini USB Cable, Rechargeable Battery, User s Guide, Quick Guide, Belt Clip, AC Charger Wall Adaptor, and Carry Pouch. Important Notice: Please read and follow the guidelines below. Failure to do so may result in misuse of the equipment and may be dangerous or illegal. Should you experience any problems with your Sonocaddie (e.g. malfunction/damage), please contact Sonocaddie Customer Service at Do not attempt any repairs on your own as this may void the warranty. Warnings: Sonocaddie performs best under a clear sky and with six satellite signals. Environmental factors (such as rain, dense clouds, fog, solar flares, high voltage electricity, cellular phone towers, etc.) may adversely affect the GPS reception. If the device is indicating less than six satellite signals, the Sonocaddie performance may not be optimal until the conditions change for better reception. 2
4 Sonocaddie should not be used while driving any vehicle including golf carts. Always place Sonocaddie in a secure place to avoid any impact which could cause damage to it. The USB cable provided is solely for the use of Sonocaddie devices (see the accessory list). Do not connect any other cable for data transfer as this could damage the data port (I/O port) on the V350 Series. A full battery charge may take up to four hours, however, you should NOT charge device over 8 hours. If you do not plan to use the device for a long period of time, please remove the battery to avoid the battery leaking and corroding the battery case. Cautions: The Sonocaddie may take at least minutes to receive satellite signals after you turn it on. This may take longer if the device has been off for more than four hours, or if it is more than 100 miles away from where you last used the Sonocaddie. The Global Positioning System (GPS) is operated by the government of the United States, which is solely responsible for its 3
5 accuracy and maintenance. The system is subject to changes which could affect the accuracy and performance of all GPS equipment. Sonocaddie has a built-in GPS antenna at the top of the device. This antenna should face upward to gain the best signals and should not be covered with anything as this may affect the quality of reception and accuracy of the device. Trees and/or buildings may adversely affect coverage/reception levels and accuracy. Optimal performance will occur by staying in wide open areas. 4
6 Table of Contents Chapter 1 - Getting Started 8 Chapter 2 Introduction Sonocaddie Features Navigation Sonocaddie V350 Series Main Screen Menu Items (The applicable chapter sections are noted in parenthesis.) Screen Display Items 14 Chapter 3 - Before Starting a Game Adjust the Sonocaddie V350 Series Settings Install Sonocaddie V350 Series Software Register Your Membership & Unlock Unit Download Course Manage Data in V350 Series Software 22 Chapter 4 Starting a Game Start with Existing Courses Course Auto Search Search Courses from Course List Select the First Hole Understanding the Hole-Layout and Hole-Info Screens Carrying the Sonocaddie V350 Series 30 5
7 Chapter 5 Using the Sonocaddie V350 Series during a Round View the Green Close-Up Track Your Game Feature Shot Track Auto Track Measure your Shot Distance Use the Digital Scorecard 36 Chapter 6 Editing an Existing Course Understanding the Edit Screen Edit an Existing Target on a Hole Add a New Target to a Hole Delete a Target on a Hole 43 Chapter 7 Managing Course Information on the Sonocaddie V350 Series Delete a Course Rename a Course Create a New Course Name the New Course Map the Targets on the New Course 47 Chapter 8 Review Stored Information after the Round Use the Sonocaddie V350 Series to Review Information Review Prior Scorecards and Tracks Delete Prior Scorecards and Tracks 51 6
8 8.2 Use the V350 Series Software to Review Information Manage Course Information under the MyCourse Tab Manage Course Information under the MyFolder Tab 54 Appendices 56 Frequently Asked Questions (FAQs) 57 Regulatory Agency Compliance 62 7
9 Chapter 1 - Getting Started Before using the Sonocaddie V350 Series for the first time, charge the battery for at least 4 hours. Under normal conditions, a full battery charge may take up to 4 hours if the device is turned off, and longer if it is turned on for use. To charge the V350 Series, remove the back cover and insert the supplied rechargeable battery correctly as shown. Warning: We recommend that you never charge the device over 8 hours. Locate the charging/data port on the right side of the V350 Series, pull out the rubber cover, and carefully insert the mini-end of the supplied USB cable into the port. Connect the other end of the cable to the USB port on your computer. (Fig. 1, 2)The screen indicates that the device is charging and also when it has reached a full charge. You can also charge the device with the supplied AC Wall Charger Adapter or an optional 12V Car Adapter (Fig. 3). The battery should last approximately 8~12 hours under normal operation. Please note that using 8
 Scale of power (Fig.")
 Please register your membership once you received Sonocaddie V350.")
10 longer Backlight durations in the Settings will drain the battery quicker. You can confirm the remaining battery level with the V350 Series on-screen battery gauge. (Fig. 1, 2) Scale of power (Fig. 3) Conditions Full Empty Register Your Membership & Unlock Unit Important! (For V350 unit only) Please register your membership once you received Sonocaddie V350. The unit will be locked after turning on five times and remain its status until your registration completed. To unlock V350 you must login V350 software with 9
11 the unit connected. Sonocaddie V350 can be operated without registration for the first five times under Basic View (icon mode) only. For any other color course layout downloads, please register and upgrade your membership. Chapter 2 Introduction The Sonocaddie V350 Series has many unique and useful features to help you earn your best scores ever as shown below. The Course Layout is a patented color view of each hole that allows you to see your exact position on every hole in real time and the precise distances to critical targets. The Green View displays a full green image with distances to the front, middle and back of the green. The Edit and Map functions let you quickly customize or create a golf hole right on the spot. The Mark function provides an easy way to quickly measure the distance of any shot. The Track Shot function gives you the ability to record your shot locations from anywhere on the course for review later. And the Scorecard feature provides a digital scorecard for each course and the Pro Scorecard gives a full analysis of each round. The V350 has enough memory to store 100 different golf courses, 10

12 record 100 scorecards, and track the golf shot locations for up to 100 rounds. 2.1 Sonocaddie Features 1 Power button 2 Scorecard button 3 Left soft key 4 Right soft key 5 ESC/ back to the previous screen. 6 Mark button 7 5-way key: Left/Right/Up/Down/ Select & Save 8 Mini-USB Cable & Charging Port 9 GPS Antenna 10 Belt Clip Hook 11 Battery Cover 11
13 2.2 Navigation Navigating the Sonocaddie is simple. All functions are available from the main screen using the front panel soft keys. In addition, the left and right side buttons provide a quick way to access frequently used features. 5-Way Key use the 5-Way key (#7) to move the screen cursor and select menu items. Press the up/down or left/right arrows to scroll the cursor around the screen and press the center key to execute a highlighted selection. Front Panel Soft Keys use the right soft key (#4) or use the left soft key (#3) to select the action shown directly above those keys. Use the Escape key (#5) at any time to return to the previous screen, or hold it down for three seconds to return to the MAIN screen. Press the Mark button (#6) to measure your shot length. Side Buttons side buttons provide access to popular functions. Press the left Scorecard button (#2) to instantly bring up a digital scorecard. 2.3 Sonocaddie V350 Series Main Screen To turn on the Sonocaddie V350 Series, press the top left-side Power button (#1) for at least 3 seconds. After a few seconds, the MAIN screen below appears on the device. To turn off the Sonocaddie, 12

14 press the Power button again for 3 seconds, or select OFF from the MAIN screen. When the Shutdown Now? screen appears, press YES with the right soft key. Satellite Signal MAIN Battery Level GPS Status Record Settings My Course Auto Search Course List Off Mark Info Time Display Menu Text Left Soft Key Action Menu Items (The applicable chapter sections are noted in parenthesis.) GPS Status: Use this feature to get detailed information about satellite reception. Record: Use this feature to view all the shot locations by hole or scorecard records that you recorded during a game. (8.1) 13 Right Soft Key Action
15 Settings: Use this feature to customize the Sonocaddie settings to your individual preferences. (3.1) My Course: Use this feature to select a course to play from the list of courses you downloaded. (4.1) Auto Search: Use this feature to search the available courses in the specific distance. (4.1.1) Course List: Use this feature to search the courses by COUNTRY or HISTORY. (4.1.2) Off: Use this feature to turn off the Sonocaddie. (2.3) Mark: Use this feature to measure the distance of any shot. (5.3) Info: Use this feature to review the software version number for the Sonocaddie Screen Display Items Satellite Signal: Displays the current number of satellites the Sonocaddie is receiving. Battery Level: Displays the amount of battery life remaining. Time Display: Displays the current time on the Main Screen only. Soft Keys: Displays the action that is available by selecting the right or left soft key. 14
 Select SETTINGS from the MAIN screen. 2) Press the up/down buttons on the 5-way key to scroll down through each setting.")
 To exit the screen without changing the settings, press the ESCAPE key on the front key pad.")
16 Chapter 3 - Before Starting a Game 3.1 Adjust the Sonocaddie V350 Series Settings The Sonocaddie has ten settings to customize your device. Follow these steps to change the settings; 1) Select SETTINGS from the MAIN screen. 2) Press the up/down buttons on the 5-way key to scroll down through each setting. 3) Press the left/right buttons on the 5-way to scroll through the available options for that setting. 4) To exit the screen without changing the settings, press the ESCAPE key on the front key pad. 5) To save settings, press center key on the 5-way key, or select SAVE with the right soft key. 6) To return to the default factory settings, press RESET with the left soft key. 15
17 1. LANGUAGE: English/ French/ Deutsch/ Spanish / Japanese/ Traditional Chinese/ Simplified Chinese 2. TIME ZONE: Please choose your correct time zone 3. DISTANCE UNIT: YARD / METER/ MILE/ KILOMETER 4. THEMES: BLUE / PURPLE/ GREEN/ ORANGE 5. BRIGHTNESS: OFF/1/2/3/4/5 6. BACKLIGHT TIME: ALWAYS/ 15sec/ 30sec/ 60sec 7. AUTO TRACK: ON /OFF 8. TRACK INTERVAL: 10sec / 20sec/ 30sec 9. AUTO HOLE: ON/ OFF 10. SCORECARD: NORMAL / PRO 3.2 Install Sonocaddie V350 Series Software This application software is used for you to access and download course information and manage your V350 Series personalized course folder. Please install it from enclosed CD or from website at The software supports Microsoft Windows 7, XP and Vista. 16


18 Instructions: Step 1. Please shut down all other programs and insert Sonocaddie V350 Series software disk to install. Step 2. Follow the instructions on setup wizard to finish the installation. Step 3. Once the installation has finished, please go to the desktop and click on the Sonocaddie V350 icon. *Note: If your operating system is Windows Vista or Windows 7, please follow the instructions below for additional settings. 1. After your installation has completed, please enter C: / Program Files/ Sonocaddie V350 Series 2. Please right click on the V350 Series.exe icon and click on shield symbol Run as administrator to adjust the original setting. 17


19 3. Go back to the desktop and click on the Sonocaddie V350 Series icon to proceed the software. Step 4. The box below will appear if a newer software version has been released. Click YES to update to the latest version Register Your Membership & Unlock Unit 18

20 *Note: You may use your V350 five times before you must register your membership. After five uses the V350 unit will be locked and remain in locked status until your registration is completed. To register and unlock V350 please follow the instructions below. Step 1. After the software has been updated, please complete the Membership Registration form on screen. The address you entered will be your login ID. (Note: Product serial number underneath the battery is required for the registration.) Important! Serial Number (S/N) is required to join Sonocaddie V350 Series membership. Step 2. When Sonocaddie Login Screen appears, please power up the device and connect it to your computer with USB cable. 19


21 Step 3. Log into the software with your address & password, and the V350 Series Management Screen will soon appear. 20

22 Step 4. All registration and unit unlock process (for V350 unit only) will have been successfully completed when you see the bar running between the graphics of device and PC. 3.3 Download Course Step1. Log in membership to enter V350 Series Software. Important! Internet connection is required to log in V350 Series Software to access course data. It is required to fill in the account and password to run V350 Software. They are same with the account you registered your member account. 21

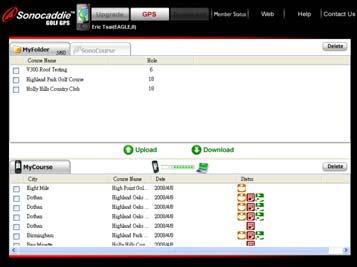
23 3.3.1 Manage Data in V350 Series Software A. Information bar: User s name/ Type of Membership Plan/ Membership Valid Period/ Registered Country B. SonoCourse Tab: Links to Sonocaddie database for downloading course data. Steps to download course data: Step 1.Please select the Country and State, enter the Course Name then press GO for the course you want. Step 2.Check one or more boxes beside each course 22
24 you wish to download, and press Download " button to transfer the course(s) to your Sonocaddie V350 Series. C. My Course: When linking with V350 Series device, the course data/ scorecard record(s) on the device is ready to be uploaded, deleted and reviewed (scorecard record only). Upload: You can upload the course GPS (up to 30 courses) and Scorecard (up to 100 records) data to My Folder tab. Delete: Tick one or more box of data, press Delete button to remove the data. Review: (scorecard only): Review scores and analysis of your round(s). Chapter 4 Starting a Game Before you leave for the course, make sure the Sonocaddie V350 Series is fully charged. When you arrive at the course, immediately turn the device on because acquiring satellites can take up to 15 minutes. The Sonocaddie V350 Series performs best under clear skies so the better the satellite reception, the better the device performs as the chart below shows. 23
25 Satellite signal Accuracy 0~2 None 3~5 Poor 5~6 Fair 6~8 Good 8~10 Very good >10 Optimal Tip: Selecting SATELLITE from the MAIN screen displays a screen with detailed satellite reception information. Refer to the Appendix at the end of this guide for an explanation of this screen. 4.1 Start with Existing Courses Course Auto Search Select AUTO SEARCH from the Main menu to enter the searching function. Select a range from 5 miles to 50 miles, and all courses within the area will be displayed. The nearest course will be on top of the list. (NOTE: If a course is not displayed, it is not in your Sonocaddie V350 Unit. See Section 3.3 to update your course list, or 7.3 to self map a course, or contact mappingv350@sonocaddie.com to have us to map this course for you.) Press More to select the course you want to play or 24


26 arrange the order of courses by distance or by course name. You must select a COURSE and a HOLE first. Then, SCORECARD function and REFERENCE POINT function can be used. (Note: This function can only be activated when there is GPS reception.) 25


27 4.1.2 Search Courses from Course List Select COURSE LIST from Main menu to enter the searching function. There are two methods for you to search your course from available courses preloaded in the device: 1. By Country: All the courses are listed by country. You can find your course by selecting Country, State and City. Press SEARCH button after every selection, then you will see all the available courses within the area. 2. By History: Previous play will automatically add to COURSE LIST sorted by history. This function can memorize the last 30 courses. Important! 26
28 For above two functions to search the course, if you want to edit the selected course, by pressing COPY, the selected course will be copied into MY COURSE for you to edit the reference points. 4.2 Select the First Hole First you must select the starting hole manually. The Auto-Hole feature then automatically advances the device to the next hole when you finish a hole and enter the next tee box. Note that Auto-Hole can be set to off from the Settings screen (see Chapter 3.1). 4.3 Understanding the Hole-Layout and Hole-Info Screens After selecting the first hole, the HOLE-LAYOUT screen below appears displaying distances to targets on a full-color, graphical view of the actual hole. The distances constantly change as you move and a Walking Golfer symbol also moves to show your actual location on the hole. In addition, a second HOLE-INFO screen is available with the same distance information except it shows the targets on the hole without the layout view. To access the Hole-Info screen, select MORE with the right soft key and INFO. There are 15 different icons (or targets) available for this screen. Note that the 27

29 green-side icons on the Hole-Info screen are visual markers only and provide no distance reading. To return to the Hole-Layout screen, select MORE and LAYOUT with the right soft key. Also selecting GREEN with the left soft key displays the full green. Important: If a Color Layout for a specific course is not yet available from Sonocaddie, the device displays the Hole-Info screen by default. 28
30 Status explanation Bunker Front/ Back Water Front/ Back (includes major water hazards) *2 nd Green Front/ 2 nd Green Back Creek (includes: river, ditch and stream) Trap Tree (includes: shrubbery and forest) Hills Symbol Lay-up area Out of Bounds (OB) Delete Dogleg Left/ Right Rock * Note: For some courses that have two greens on one hole these icons provide distance for the extra green. 29


.")
31 4.4 Carrying the Sonocaddie V350 Series Conveniently attach the belt clip to your belt or clothing. Slide the hook on the back of the Sonocaddie V350 Series into the clip until you hear a click sound. To remove the Sonocaddie, press the button on top of the clip down and slide Sonocaddie upward out of the clip. You can also attach the clip to different things, such as a golf bag. The Sonocaddie V350 Series may also be mounted to a golf cart with optional golf cart mounts (visit Sonocaddie website for product information). Important: Please make sure the belt clip or mount is securely fastened and the Sonocaddie is firmly attached for maximum security. Chapter 5 Using the Sonocaddie V350 Series during a Round Now that you have set up your device, and selected 30

32 a course to play, you are ready to start using all these features. When you are playing a hole and you need the distance to the green or other targets simply pull out your Sonocaddie V350 Series to see all the distances you need on its color screen. Tip: Hitting any key on the device turns on the screen backlight feature on for easier viewing. 5.1 View the Green Close-Up The Green Close-up view displays a full putting green and provides five distance readings for each green. It shows the distance to the front, center and back of the green. In addition, the center reading automatically changes to show an approximate distance to a short and long pin location. To access this screen, select GREEN with the left soft key. To return, press FULL with the left soft key or the Escape key. Tip: To stop the auto-scrolling feature, press the up or down button on the 5-way key. Then press either key again to scroll the ball manually to find your ideal spot. 31

33 Distance from back of the green Far landing zone Center landing zone Near landing zone Distance from front of the green Green Close-Up 5.2 Track Your Game Feature The Sonocaddie V350 Series has two features to track your game; Shot Track records your specific shot locations and Auto Track automatically tracks your route around the course. You can then go back at a later time and review your stored Tracks from your Sonocaddie V350 Series on the full-color graphical display of the hole as shown below (See Chapter 8 Reviewing Store Information after the Round) This way you can compare your performance from game to game at your favorite course, analyze your play like the pros, and learn your strengths and weaknesses so you can adjust your strategy for practicing and playing a course. 32

34 Important: Shot Track and Auto Track only work if the course has a Color Layout and you are located on a particular hole on that course with the Walking Golfer symbol visible on the screen. Shot Track Only Auto Track Only Auto Track & Shot Track Shot Track Shot Track remembers all the ball locations that you enter on each hole on the Hole-Layouts. Simply stand near the position of your shot and press SHOT TRACK with the right soft button of the Sonocaddie V350 Series. Shot Track internally records this exact ball location on the Hole-Layout screen for that hole so you can review at a later time. Each time you want to record a new shot location, press the SHOT TRACK button. The device stores the shots for up to 100 rounds, however, it can only store one round per day. 33
35 5.2.2 Auto Track When set on, Auto Track automatically records your actual route around on the course on the Hole-Layouts as you play. Auto Track can be very useful when used with Shot Track above. To turn Auto Track on, go to the SETTINGS screen, scroll down to AUTO TRACK, and choose ON with the left-right 5-way key. To set the interval period for recording your position, scroll down to TRACK INTERVAL, choose the desired interval, and then press SAVE with the right soft key to save these settings. Once you select a course to play and Sonocaddie begins to receive satellite signals, Auto Track immediately starts recording your route on the Hole-Layouts. The device stores up to 100 rounds, however, it can only store one round per day. Important: Selecting different intervals for Auto Track will affect the recording time for a round. TRACK INTERVAL Recording Period 10 SECONDS 5 hours 20 SECONDS 11 hours 30 SECONDS 16 hours 34
36 5.3 Measure your Shot Distance The Mark feature provides a simple way to quickly measure the length of any shot you make by measuring the distance between the start and end positions of the shot. It is available anytime, except when you are on the Green Close-up screen. There are two ways to access this feature. The quickest way is to press MARK with the bottom button on the front panel soft key of the Sonocaddie V350 Series, or select MARK from the MAIN screen. Important: To use Mark, you must be on the course and the Sonocaddie must have satellite reception. To measure your shot, stand near where you hit your ball and press the MARK button and the Mark screen below appears. Press START with the right soft key and proceed to your ball. The distance displays 0 and changes as you move. You do not have to travel in a straight line to the ball since the device always measures the distance from the starting position to your current location in straight line. When you reach the ball, press END to lock the number and see the actual distance of the shot. To measure another shot, press START again. Press the left soft key or the Escape key to return to the previous screen. 35
, back nine (in) and 18-hole round.")
 for whatever hole you are playing. The Normal scorecard is the default.")
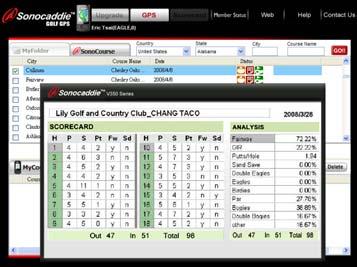
37 5.4 Use the Digital Scorecard 5.4 Use the Digital Scorecard The Sonocaddie V350 Series provides a digital scorecard to score your personal round and can display an analysis of your round. Two types of scorecards are available. The NORMAL scorecard records your strokes only by hole and provides a total for the front nine (out), back nine (in) and 18-hole round. The PRO scorecard records your strokes, putts, fairways hit, and sand saves by hole. The Pro Scorecard also gives you a full analysis of your round. Both scorecards automatically display the Par (P) for whatever hole you are playing. The Normal scorecard is the default. Press the SCORECARD button on the left side of the Sonocaddie V350 Series and the Normal scorecard below appears. Scroll across to the Strokes column (S) with the left-right 5-way key and use the 36
38 up/down key to enter your strokes. Press the Escape key to go back and Sonocaddie automatically saves your scores, even if you turn it off. To make the Pro scorecard your default, go to the MAIN screen, select SETTINGS, scroll down the list to SCORECARD, choose PRO with the left-right 5-way key, and press SAVE with the right soft key. To record your score on the Pro Scorecard, press the SCORECARD button on the left side of the Sonocaddie V350 Series and the Pro scorecard below appears. Scroll across each column one by one and use the up/down key to enter your Score (S), number of Putts (Pt), and either Yes (Y) or No (N) for both the Fairway Hit (Fw) and Sand Save (Sd) column. To view an analysis of your round, press ANALYSIS with the right soft key. Important: For the Sonocaddie to accurately calculate Greens in Regulation (GIR), you must enter the Strokes (S) and Putts (Pt) for every hole. Fairway and Sand Save percentages automatically calculate according to your scores and the Yes/No response you entered on each hole. 37
 Pro Scorecard Chapter 6 Editing an Existing Course With the")


39 Normal Scorecard Legend Hole (H) Par (P) Score (S) Putt (Pt) Fairway (Fw) Pro Scorecard Chapter 6 Editing an Existing Course With the Sonocaddie V350 Series, you can also make instant changes to the given course information right on the spot. Courses are constantly changing and sometimes a target may have moved since the GPS setting was recorded. Or maybe you have specific targets you like to use when you play 38
40 certain courses or you notice that a distance reading is slightly off. With the Sonocaddie V350 Series, you can change the course information on the go to suit your own preferences so you will always be playing with the most accurate and up-to-date distances. 6.1 Understanding the Edit Screen The information on each Hole-Layout screen or Hole-Info screen originates from an EDIT screen where specific GPS reference points (or targets) have been recorded for that hole. To view the Edit Screen, select MORE with the right soft key and EDIT. Each target shown on a hole was recorded on a blank Edit Screen. The Edit Screen has eight available rows to locate GPS targets for distance readings; six for on/off fairway targets and two for the front and back green targets. Each row has three GPS locations to record a target (left side, fairway, and right side) and there can only be one target per row. There is one GPS target location for the front of the green and one for the back. Note that the green center is actually calculated by Sonocaddie based on the recorded front and back points. Each green has two additional green-side targets to display a visual marker. These do not give a distance reading, nor do they appear on the 39


41 Hole-Layout screen since this view already provides a full-color, graphical view of the hole. Hole-Layout Screen Hole-Info Screen Edit Screen with Targets Blank Edit Screen 6.2 Edit an Existing Target on a Hole The Edit feature is available any time you are playing a hole from the Hole-Layout screen or Hole-Info screen. If you need to correct a distance reading or want to change a given target on the hole while playing, simply follow the edit process below. 40
42 Repeat the process anytime you need to change or update a target. Important: To use the Edit feature, you must be on the course and the Sonocaddie should have good satellite reception (six or more satellites). Step 1: Select MORE with the right soft key and then select EDIT to view the Edit Screen. Step 2: Stand at the target on the course that you want to correct or update. Using the 5-way key, scroll to and highlight the specific target icon on the Edit Screen that you are correcting or updating. Note the target distance reading may disappear when you are standing within 5 yards of the target. Step 3: Press SELECT with the right soft key to access the Target Icon screen. Scroll to the icon you want to record for that hole (refer back to Chapter 4.3 for icon definitions). If you are correcting a distance reading, select the same icon that you selected previously on the Edit Screen. If you are changing the target, select a new icon which is more appropriate. Important: Before pressing Record, be sure you stand still for five seconds at the target location so the Sonocaddie can pin-point that position. After 41


43 you select record, the distance reading changes to 0 to indicate an accurate location. Step 4: Press RECORD with the right soft key to insert the icon on the Edit Screen and update this position permanently in your Sonocaddie V350 Series. The distance immediately changes to a 0 reading. If it does not, stand still and press Record again from the same position. 42
44 6.3 Add a New Target to a Hole To add a new target, follow the editing steps above, except in Step 2 stand at the new target on the hole and scroll to one of the three available locations in an empty row. Then follow Steps 3 & 4 to select and record a new target on the hole. Tip: To make reading distances on Hole-Layout or Hole-Info screens easier, be sure to record targets on the Edit Screen in the same order they appear on the hole. Also if you add a new target to a row that already has one, the old target will disappear from the screen and the new one will appear instead. 6.4 Delete a Target on a Hole If you don t want a specific target that has been recorded on a hole, deleting it is simple and you don t have to be on the course. From any hole on the Sonocaddie V350 Series, select MORE with the right soft key and EDIT to view the Edit Screen. Scroll to and select the Target Icon you want to delete. When the Icon Screen appears, select the Delete icon and press the right soft key. The target disappears from the hole. 43


45 Chapter 7 Managing Course Information on the Sonocaddie V350 Series With the Sonocaddie V350 Series, you can easily rename or delete any course, or map targets for a new course. 7.1 Delete a Course From the MAIN screen, select MY COURSE to see the Course List screen. Select a course and press MORE with the right soft key to see the pop-up 44


46 list of options. Select either DELETE to delete the selected course or DELETE ALL to delete all courses in the course list. After the Delete Course? confirmation screen appears, select YES with the right soft key to confirm, or NO with the left soft key to go back. Selecting YES permanently deletes all the course information and targets for that course. Important: Deleting a course does not delete any Scorecards or Tracks stored in the Sonocaddie for the deleted course so you can still review these at any time (See Chapter 8 After the Game). 7.2 Rename a Course From the MAIN screen, select MY COURSE to see the Course List screen. Select a course, press MORE with the right soft key and select RENAME from the pop-up list. Use the 5-way 45


47 key with the screen keyboard to scroll back through the course name and edit it. After renaming the course, select RECORD with the right soft key to save the changes. 7.3 Create a New Course Creating a new course map works just like the edit process in Chapter 6.2, except the Edit Screen is blank when you start. By following the steps below, you can create your own custom layout for any hole on a new course. You can only view a new course using the Hole-Info screen and you must be on the course to map the targets Name the New Course To create a new course, select MY COURSE from the MAIN screen and press MORE with the right soft key and select NEW from the pop-up list to view the keyboard screen. Enter a new course name using the 5-way key to scroll the keyboard 46


48 and center key to enter a selection. The backspace key ( ) on the keyboard erases letters. When you are finished, press RECORD to save the name. After you save the new course name, the Select Hole screen immediately appears. The new course name also automatically appears on your course list Map the Targets on the New Course Mapping a new course with the Sonocaddie V350 Series is easy. Simply repeat the following steps each time you want to add a target to a hole for a new course. Step 1: Press SELECT with the right soft key for the hole you are mapping and then select EDIT. Step 2: Stand at the target you want to add on the hole. Use the 5-way key to scroll and highlight an empty location on the Edit Screen where you want to record the new target. You can record one target 47


49 per row on the eight on/off fairway rows, one front green location and one back location, and two separate green-side icons. Step 3: Press SELECT with the right soft key to view the Icon Screen for targets. Scroll to the icon you want to add for that hole and highlight it. (Refer to Chapter 4.3 for Icon definitions) Step 4: Press RECORD with the right soft key to insert the target icon on the Edit Screen and permanently add this GPS target position to the hole. The icon now appears on the Hole-Info screen and the distance to this location changes as you move around the course. Important: Before pressing Record, be sure you stand still for five seconds at the reference point location so the Sonocaddie can pin-point that position. After you select record, the distance reading immediately changes to 0 to accurately record this location. 48
50 Step 5 - Green Targets: To set the front green location, stand at the front of the green, select the front green location on the Edit Screen, press RECORD and a 0 reading appears. Move to the back of the green, select the back green position, and press RECORD again. The device automatically calculates the center location based on the front and back locations. To add a green-side icon (which does not provide distance information), scroll to either green-side location, press SELECT to view the Icon Screen, choose the icon you want to display and press RECORD to insert it. Green Front Green Back Green-Side 49
51 Chapter 8 Review Stored Information after the Round If you used the Scorecard or Track features during your round (see Chapter 5.2 & 5.4), you can review this information anytime from your Sonocaddie V350 Series device or upload it to your V350 Series Software for review later (For scorecard only). 8.1 Use the Sonocaddie V350 Series to Review Information Review Prior Scorecards and Tracks The Sonocaddie V350 Series stores scorecards/ tracks for up to 100 rounds and saves them until you clear the score or delete the scorecard from the device. The Sonocaddie stores scorecards by the course name and date you played it. To view a stored scorecard/ track, go to the MAIN screen, select RECORD for a list of stored scorecards/ tracks. Scroll down to the information you want to view and press the right soft key. You can even edit your scores from this screen after a round in exactly the same way you did during a round. If you used the Pro Scorecard, you can also view a full analysis of your round by selecting 50
52 ANALYSIS with the right soft key. Note below how the track views change depending on what feature you used. Press the Escape key at any time to return to the previous screen Delete Prior Scorecards and Tracks You may remove a saved Scorecard/ Track from the Sonocaddie anytime. From the Main screen select RECORD, scroll down the list to the one you want to delete, and press DELETE with the right soft key. When the pop-up screen appears, select DELETE to delete the selected item or DELETE ALL to delete the entire list. When the Delete both track and scorecard? confirmation screen appears, select YES with the right soft key to confirm, or NO with the left soft key to go back. Important: Selecting YES deletes both the scorecard(s) and track(s) from the Sonocaddie V350 Series. 8.2 Use the V350 Series Software to Review Information. With the V350 Software on your computer, you can view the same information that is stored in the device or upload the information to MyFolder to review anytime, even without your device. The GPS and Scorecard buttons at the top of the 51
53 display provide different types of personalized information and you can switch between these two views simply by pressing either one of the buttons. Tip: Anytime you click the GPS or Scorecard button, the MyCourse tab and MyFolder tab both automatically switch to that view at the same time no matter what tab you are working in. First access the V350 Software on your computer and log in (refer to Chapter 3.2.1, Step 3). Turn on your device and connect it to the computer with the supplied USB cable. When you see the link message on the V350 series ( USB cable connected - Enable USB link now? ), select YES with the right soft key to connect the device to your computer, which is indicated by an moving green bar on the V350 Software Display. Click the GPS button and look under the MyCourse tab to see the courses that are stored in the V350 Series. 52
54 53
55 8.2.1 Manage Course Information under the MyCourse Tab You can also use the software to manage the course information that is stored in your Sonocaddie. To delete a course, check the box beside the desired course listed under the MyCourse tab and press the DELETE button to the right of the tab. To review a Scorecard record, click the SCORECARD button at the top of the V350 Software screen. Check the box beside the desired record under the V350 tab and press the REVIEW button to the right of the MyCourse tab. Your scores and analysis pops up on the main screen for that round (as shown above). To delete a scorecard, check the box beside the desired scorecard under the V350 tab, and press the DELETE button to the right of the tab Manage Course Information under the MyFolder Tab MyFolder stores personalized course information that you transferred from your Sonocaddie V350 Series so you can review it anytime, even if your device is not connected. To upload information to MyFolder, select the GPS or SCORECARD button at the top of the display. Check the box 54
56 beside the item(s) you want to upload and click the UPLOAD button on the display. The information immediately appears in MyFolder after the transfer is complete. You can delete and review it in exactly the same way that you did for the MyCourse tab above. MyFolder can store 30 courses and 100 scorecards. Important: Do not disconnect the cable between V350 Series device and computer when uploading. Also, you cannot directly upload courses from the Sonocaddie database to MyFolder. You have to download them to the MyCourse tab then upload them to MyFolder. 55
57 Appendices A. Specifications Size H 116mm W 57.8mm T 20.9mm (H 4.6 W 2.3 T 0.8 ) Weight 119g ( 4.21 ounces) Screen 2.2 high-resolution color LCD w/ Backlight Operating Maximum 60 º C / 158 º F; Minimum -5 º Temperature C / 23 º F Storage My Course: 100 Courses Scorecard: 100 Track: 100 Battery Rechargeable o 8 to 12 hours in normal operation (may vary with backlight duration) o Charging Time: 8 hours in operation mode, 3-5 hours in off mode Acquisition Approx 5~10 minutes Rate Cold Start Accuracy 3 Meters CEP (80%), 7 Meters CEP (90%) horizontal, SA off GPS Built-in High Sensitivity GPS Antenna Receiver Durability Waterproof, IPX3 B. Membership For more detailed information, please refer to 56
58 C. System Requirement (Computer access not required when self-mapping or Pre-loaded Courses.) XP/Vista/Windows 7 CD-ROM 512 MB RAM (XP) 1 GB RAM (Vista) or higher 12 MB or more hard disk space D. Abbreviations B = Back C = Centre F = Front/Fairway GIR = Green in Regulation GPS = Global Positioning System Lat = Latitude Lon = Longitude P = Par Pt = Putt Sd = Sand trap S = Score H = Hole Frequently Asked Questions (FAQs) You can also find answers to FAQs at the Sonocaddie website: Q1. What do I do when my Sonocaddie is not detecting a signal? Answer: The GPS unit must be used in open-sky areas and away from buildings (such as club house), 57
59 deep forest, or cliff sides. Otherwise it won't receive GPS signals and will show nothing on the display. After power-up, a number/bar will appear on the upper-left corner of the screen, which is the number of satellites received. If showing "X", it means no signal. In addition, it takes several minutes to receive stable signal after power-up even under an open-sky. If there is still no signal, please check your battery life displayed on the screen. As a last resort, try restarting your Sonocaddie. If you are on the course, all distance numbers will automatically show on the screen. However the limit of displayed yardage is 999 yards. Therefore any distance beyond 999 yard will show 999 only. If the unit shows " " when the satellite is available, it means that the distance within 0~5 yards. Q2. How can I track my driving distance? Answer: Simply press a button to record the beginning coordinates of your shot and the end coordinates of your shot and Sonocaddie will accurately calculate the shot distance. This is the straight-line distance between the starting and end points and does not take the shape of the fairway or the shape of the shot into consideration. Please consult the user guide for more details. 58
60 Q3. Can I connect my Sonocaddie to other computer devices? Answer: Apart from the computer systems approved by Sonocaddie, we do not provide any assurances, and advise against attempting to connect it to any non-approved devices. Q4. Why is the distance of the course marker different from the distance measured by Sonocaddie? Answer: 1. First, please make sure that the distance unit either in Sonocaddie or the course is the same (i.e. YARDS vs. METERS ). If they are different, please go to Settings in main menu and select Yard or Meter as the right unit. 2. Some courses measure the distances by using laser equipment. If the Green and Tee box are not at the same horizontal level, the yardage numbers could be different from those of Sonocaddie. Most Golf GPS devices measure the distance only in horizontal level, which is more useful for golfers than straight-line of laser unit. 59


61 3. However, some courses measure the distance from tee box to the green along the middle line of fairway. For example, the distance on the tee mark or scorecard shows 410 yards, but Sonocaddie only shows 380 yards. Q5. Will I lose my data when the power goes off on my Sonocaddie? Answer: The data you store in your Sonocaddie will never be lost unless you edit or erase it on purpose. Q6. Why are the distances shown on Sonocaddie incorrect for each hole on this course? Answer. Please check the GPS reception on the GPS Status screen at the time to be sure you have at least 6 stable satellite signals. Also check the Settings menu (Wrench icon) to be sure the distance units 60
62 (yard or meter) are correct. In addition, the distance in GPS device is not related with the locations of tee boxes. The distance is calculated based on the difference between your position (the apparent position) and the known position. The apparent position is the moveable location of the GPS device which receives the signal. The known position is the position of the target or reference point. The known position is fixed and is the coordinates, such as bunker and green, downloaded from the database of the Sonocaddie website. Therefore when you stand by the tee box (apparent position of GPS device you carry), the unit will calculate the distance between you and the green or known position. Q7. Can I connect Sonocaddie to Mac OS? Answer. Sonocaddie is not compatible with Apple Mac OS systems including X Leopard and Windows XP under Virtual PC. 61
63 Regulatory Agency Compliance Federal Communications Commission (FCC) This device complies with part 15 of the FCC Rules. Operation is subject to the following two conditions: (1) this device may not cause harmful interference, and (2) this device must accept any interference received, including interference that may cause undesired operation. NOTICE The FCC warns that user modifications of this device without the express approval of Sonostar Inc. could void the user s authority to operate the device. 62
Sonocaddie AUTO PLAY
 Sonocaddie AUTO PLAY Golf GPS User s Guide V.3.0.0.1_E Sonostar Inc. This document is the property of Sonostar Inc. Any unauthorized reproduction is prohibited. Page 1 Contents Welcome...4 Warnings...4
User s Guide Sonostar Inc.
 Sonocaddie V300 Golf GPS User s Guide Sonostar Inc. V.3.A.0.2_E_UK This document is the property of Sonostar Inc. Any unauthorized reproduction is prohibited. Page 1 Contents Welcome...4 Warnings...4 Cautions...4
Sonocaddie XV2. User s Guide. Golf GPS. Sonostar Inc. User s Guide V 2.3 I
 Sonocaddie XV2 Golf GPS User s Guide Sonostar Inc. V 2.3 I This document is the property of Sonostar Inc. Any unauthorized reproduction is prohibited. 1 Contents Welcome...4 Warnings...4 Caution...5 Chapter
GolfLogix: Golf GPS. User Guide for: iphone 3G & 3GS. Version 1.0. Software Release 1.0
 GolfLogix: Golf GPS User Guide for: iphone 3G & 3GS Version 1.0 Software Release 1.0 1 Table of Contents Topic Page Topic Page Getting Started Statistics Downloading the GolfLogix Application 4 Statistic
GolfLogix: Golf GPS. User Guide for: BlackBerry Curve. Version 1.0. Software Release , 8330, 8350i, 8800, 8820, 8830, 8900
 GolfLogix: Golf GPS User Guide for: BlackBerry Curve 8310, 8330, 8350i, 8800, 8820, 8830, 8900 Version 1.0 Software Release 1.0 1 Table of Contents Topic Page Topic Page Getting Started Statistics Downloading
OWNER S MANUAL. GLF-125 Golf GPS. The Whistler Group, Inc. - Corporate Offices 3604 NW Frontage Road Bentonville, AR
 The Whistler Group, Inc. - Corporate Offices 3604 NW Frontage Road Bentonville, AR 72712 1-800-531-0004 OWNER S MANUAL GLF-125 Golf GPS The Whistler Group, Inc. - Customer Return Center 551 North 13th
Getting to know your Sureshotgps micro V3
 Getting to know your Sureshotgps micro V3 Battery State Symbol Satellite Signal Shows distance to front, centre and rear of each green Hole Number Real Time Power on and Enter Key Down (backward) Key 1
Callaway upro Golf GPS. User Guide (v1.3) 2009 Callaway Golf Company
 2009 Callaway Golf Company") Callaway upro Golf GPS User Guide (v1.3) 2009 Callaway Golf Company Table of Contents 1 GETTING STARTED WITH THE CALLAWAY UPRO...3 1.1 UPRO OVERVIEW...3 1.2 SYSTEM REQUIREMENTS...5 1.3 CHARGING THE UPRO...6
Callaway upro Golf GPS User Guide (v1.3) 2009 Callaway Golf Company Table of Contents 1 GETTING STARTED WITH THE CALLAWAY UPRO...3 1.1 UPRO OVERVIEW...3 1.2 SYSTEM REQUIREMENTS...5 1.3 CHARGING THE UPRO...6
Contents. Page. Page. System Settings 10. Components 3. Basic Operation 4. Brightness. Volume (for use with sat nav software only) Play Golf
 Play Golf") User manual Contents Page Page Components 3 Basic Operation 4 Play Golf Starting a new game and selectiing a golf course 5 Find a course using GPS Find a course by name Using Tour Pro Hole View 6 Display
User manual Contents Page Page Components 3 Basic Operation 4 Play Golf Starting a new game and selectiing a golf course 5 Find a course using GPS Find a course by name Using Tour Pro Hole View 6 Display
TABLE OF CONTENTS Thank You for Choosing Swami GT Warranty/Video 1. General Getting Started On the Golf Course 3.
 User Manual TABLE OF CONTENTS Thank You for Choosing Swami GT...2 Warranty/Video...2-3 1. General...4 1.1 Screen Display/Button Description...4 1.2 Basic Specifications...5 1.3 Accessories List...6 1.4
Golfshot: Golf GPS. ios VERSION 3.1+
 Golfshot: Golf GPS ios VERSION 3.1+ CONTENTS Home Screen Rounds Statistics Handicap Index Course Preview GolfNow Tee Times Apple Watch Golfplan Awards Settings Select Facility Round Setup Hole List GPS
Golfshot: Golf GPS. ios VERSION 3.0+
 Golfshot: Golf GPS ios VERSION 3.0+ CONTENTS Home Screen Rounds Statistics Handicap Index Course Preview GolfNow Tee Times Apple Watch Golfplan Awards Settings Select Facility Round Setup Hole List GPS
Getting to know your Sureshotgps
 1 Getting to know your Sureshotgps Navigating around your Sureshotgps Play Golf > Select Course Play Resume Map Course > Start Mapping > Edit Course > Delete Course Analyse Game > Select Game Score Statistics
A full user manual detailing the additional features of the Neo XS is available for downloading at
 Buttons and Functions Golf Menu 1 Lit #: 10-13 English See Page 8 for Language Setting Instructions Up 3 1. www.bushnell.igolf.com Select 4 2 Menu Down 5 1. Golf Menu Button: View Golf Menu 2. MENU Button:
Golfshot : Golf GPS Android User Guide
 Golfshot : Golf GPS Android User Guide Version 3.5 Scorecard Version 3.5 QUICK TIPS: New in 3.5: Track Menu Track Menu Press the Golf Ball icon in the upper left corner to slide down the Track Menu. Here
CONSUMER MODEL INSTALLATION GUIDE
 CONSUMER MODEL INSTALLATION GUIDE System requirements Windows System Requirements To use your TOMI and its software, your system should have: A Microsoft Windows compatible PC with a Pentium IV processor
Golfshot Plus. ios VERSION 5.1+
 Golfshot Plus ios VERSION 5.1+ CONTENTS Home Screen Rounds Statistics Handicap Index Course Preview GolfNow Tee Times Apple Watch Golfplan Awards Settings Select Facility Round Setup Hole List GPS Screen
BATTERY LEVEL GPS SIGNAL MARK SETTINGS OK RESET BACK DOWN LIGHT MENU PRESS HOLD SMART
 USER GUIDE GPS SIGNAL BATTERY LEVEL MARK SETTINGS UP BACK OK RESET DOWN LIGHT MENU 2 PRESS HOLD SMART 30-DAY COMPLIMENTARY COURSE MAP TRIAL Your SkyCaddie LX3 comes preloaded with front, center, and back
Technology. In the My Files [My Files] submenu you can store all the programs that you have made on the NXT or downloaded from your computer.
![Technology. In the My Files [My Files] submenu you can store all the programs that you have made on the NXT or downloaded from your computer.](/thumbs/74/70002303.jpg "Technology. In the My Files [My Files] submenu you can store all the programs that you have made on the NXT or downloaded from your computer.") NXT Main Menu My Files Files are automatically placed into the appropriate folders. When you download a program using a Sound file to the NXT, the program will be placed under Software files while the
NXT Main Menu My Files Files are automatically placed into the appropriate folders. When you download a program using a Sound file to the NXT, the program will be placed under Software files while the
FireHawk M7 Interface Module Software Instructions OPERATION AND INSTRUCTIONS
 FireHawk M7 Interface Module Software Instructions OPERATION AND INSTRUCTIONS WARNING THE WARRANTIES MADE BY MSA WITH RESPECT TO THE PRODUCT ARE VOIDED IF THE PRODUCT IS NOT USED AND MAINTAINED IN ACCORDANCE
GPS OWNERS MANUAL. All PowaKaddy electric trolleys have been awarded the Quiet Mark by the Noise Abatement Society
 OWNERS MANUAL GPS All PowaKaddy electric trolleys have been awarded the Quiet Mark by the Noise Abatement Society The PowaKaddy Update App Available to download from the Apple App store and Google Play
Approach. S3 Owner s Manual. May _0B Printed in Taiwan
 Approach S3 Owner s Manual May 2012 190-01467-00_0B Printed in Taiwan All rights reserved. Under the copyright laws, this manual may not be copied, in whole or in part, without the written consent of Garmin.
User Manual. ENGLISH Pages FRANÇAIS Pages ESPAÑOL Páginas DEUTSCH Seiten 53-69
 User Manual ENGLISH Pages 1-18 FRANÇAIS Pages 19-35 ESPAÑOL Páginas 36-52 DEUTSCH Seiten 53-69 LIT# LD2-160212 LD2-Full_Manual Rev18 Thank you for choosing the GolfBuddy LD2. The GolfBuddy LD2 is the first
USER GUIDE USER GUIDE
 1 TABLE OF CONTENTS GETTING STARTED 2 Included in the box 2 Compatible smartphones 2 Accessories: 2 Download Mobitee and PIQ application 2 GET STARTED WITH MOBITEE AND PIQ 3 Create your Account and Login
Menu 2 - APPLICATIONS Menu 3 - SETTINGS 7. Understanding GPS 8. Caring for your SS9000X V.20
 Instruction Manual Welcome to your SS9000X V2.0. Please read the following information in this booklet to ensure you gain the full benefit of all the features in your SS9000X V2.0. Table of Contents 1.
GOLF GPS Owner s Manual
 GOLF GPS Owner s Manual Model # 368100 Lit # 98-1182 / 5-08 YP GPS manual draft rev6.indd 1 5/22/08 2:25:46 AM Warnings & Notices GPS System & Map Data Accuracy Notice: The Global Positioning System (GPS)
BATTERY LEVEL GPS SIGNAL TAG READ AREA BACK OK RESET DOWN LIGHT MENU PRESS HOLD
 USER GUIDE GPS SIGNAL BATTERY LEVEL TAG READ AREA BACK UP OK RESET LIGHT MENU DOWN 2 PRESS HOLD 30-DAY COMPLIMENTARY COURSE MAP TRIAL Your SkyCaddie LINX GT comes preloaded with front, center, and back
Approach. owner s manual
 Approach owner s manual 2009 Garmin Ltd. or its subsidiaries Garmin International, Inc. 1200 East 151 st Street, Olathe, Kansas 66062, USA Tel. (913) 397.8200 or (800) 800.1020 Fax (913) 397.8282 Garmin
TAG READ AREA MARK SETTINGS UP OK RESET BACK DOWN LIGHT MENU PRESS HOLD
 USER GUIDE GPS SIGNAL BATTERY LEVEL TAG READ AREA MARK SETTINGS UP BACK OK RESET LIGHT MENU DOWN 2 PRESS HOLD 30-DAY COMPLIMENTARY COURSE MAP TRIAL Your SkyCaddie LINX GT comes preloaded with front, center,
ClubHub. User s Guide
 ClubHub User s Guide Table of Contents Setup... Initial Club Setup...7 Changing Clubs...5 Settings...8 My Clubs... Turn On/Off Sounds...9 Play Round Mode...0 List View...8 Social Sharing...0 Viewing D
GN21 Frequently Asked Questions For Golfers
 Customer Support We are dedicated to offering you the best customer support possible. Our goal is to respond to your requests within 24hrs. 1. On the www.ngn.com homepage there is link labeled Help which
OWNER S MANUAL. All PowaKaddy electric trolleys have been awarded the Quiet Mark by the Noise Abatement Society
 OWNER S MANUAL All PowaKaddy electric trolleys have been awarded the Quiet Mark by the Noise Abatement Society Thank you for purchasing the new PowaKaddy. We hope you enjoy your new FW7s GPS trolley and
Quick Start Guide. A. Hardware installation B. Software installation C. Start the software for the first time D. Do your first measurement
 Quick Start Guide This Quick Start Guide describes the hardware and software installation process and the Measurement feature in a simple way. Please follow the sequence of the steps to avoid problems
ARCCOS 360 NEW USER GUIDE
 ARCCOS 360 NEW USER GUIDE Table of Contents 1. Getting Started a. Download & Install.2 b. Create Account....3 c. Pair Clubs..4 2. Play a. Starting a Round..5 b. Shot Editing.6 c. Shot List.7 d. Flag &
For running only the scoresheet application without any video features only some very basic hardware / software requirements have to be fulfilled:
 Digital Scoresheet user manual Requirements For running only the scoresheet application without any video features only some very basic hardware / software requirements have to be fulfilled: Laptop, preferably
User Guide Addendum Course and Feature Expansion Package. Overview of Changes
 User Guide Addendum Course and Feature Expansion Package Version 3 of the SkyCaddie software (also known as the Course and Feature Expansion Package) includes the following features: IntelliGreen Pro (Beta)
Microsoft Windows Software Manual for FITstep Stream Version 4
 Thank you for purchasing this product from Gopher. If you are not satisfied with any Gopher purchase for any reason at any time, contact us and we will replace the product, credit your account, or refund
Mapping a course for Pocket Caddy
 Contents: 1. Mapping overview 2. Mapping your course o 2.1. Locating the course o 2.2. Mapping the holes o 2.3. Opening the template file and naming the course o 2.4. Mapping the greens o 2.5. Mapping
uemis CONNECT: Synchronisation of the SDA with myuemis
 uemis CONNECT: Synchronisation of the SDA with myuemis 1 What is myuemis? In myuemis, your private area on the Internet portal www.uemis.com, you can visualise your dives, manage your database and transfer
GN21 Frequently Asked Questions For Golfers
 Posting Scores (My Score Center) 1. Click on the Enter Score button to enter an adjusted gross score or click on the Enter Hole-By-Hole Score button to enter your score hole-by-hole. NOTE: to use the Game
ELIMINATOR COMPETITION DRAG RACE Program Manual Firm Ver 4.11
 ELIMINATOR COMPETITION DRAG RACE Program Manual Firm Ver 4.11 The Portatree Eliminator Super 2000 Competition Track Timer can be used with an IBM Compatible Personal Computer connected through Com Port
Club s Homepage Use this feature to return the club s website.
 The first time the golfer logs into the Internet Golf Reservation System, the member # is the club assigned golfer number, the default password is 1234. The golfer will automatically be transferred to
BUDDY Gorgeous and easy to use GPS Navigation Kit USER GUIDE. Love from Intempo Digital xx
 BUDDY Gorgeous and easy to use GPS Navigation Kit USER GUIDE Love from Intempo Digital xx Contents - What s in the box 1. Buddy with Styli touch screen pen 2. Buddy holder 3. USB cable 4. Car charger 5.
WELCOME TO THE REVOLUTION
 USER GUIDE WELCOME TO THE REVOLUTION THANK YOU FOR CHOOSING THE GCQUAD We listened to what you wanted - and created the most accurate, versatile and game-enhancing ball and club analysis solution available
PC Configuration software for Discovery MkVI v 1.03 User guide
 PC Configuration software for Discovery MkVI v 1.03 User guide This user guide describes the different features included in PC Config software, version 1.03, and how they are used. When referring to this
APPROACH S10. Owner s Manual
 APPROACH S10 Owner s Manual 2018 Garmin Ltd. or its subsidiaries All rights reserved. Under the copyright laws, this manual may not be copied, in whole or in part, without the written consent of Garmin.
SENSUS PRO MANAGER (for SENSUS or SENSUS PRO devices) User s Guide Palm OS. Version 2.0 Published October 17, ReefNet Inc.
 User s Guide Palm OS. Version 2.0 Published October 17, ReefNet Inc.") SENSUS PRO MANAGER (for SENSUS or SENSUS PRO devices) User s Guide Palm OS Version 2.0 Published October 17, 2002 2002 ReefNet Inc. 1.0 Introduction The SENSUS PRO data recorder captures the time, depth,
SENSUS PRO MANAGER (for SENSUS or SENSUS PRO devices) User s Guide Palm OS Version 2.0 Published October 17, 2002 2002 ReefNet Inc. 1.0 Introduction The SENSUS PRO data recorder captures the time, depth,
PRODUCT MANUAL The Caddie Chip
 PRODUCT MANUAL The Caddie Chip The next generation of golf GPS devices Voice GPS Shot Tracking Ball Marker www.golfscene.com.au Water Resistant Product Components Caddie Chip, Product Manual Product Features
Technology. Using Bluetooth
 Bluetooth is a communication technology that makes it possible to send and receive data without using wires. Using the Bluetooth features, you can set up a wireless connection between your NXT and other
Quintic Automatic Putting Report
 Quintic Automatic Putting Report Tutorial www.quintic.com Introduction The Quintic Automatic Putting Report is designed to work as an add on to our premier Quintic Biomechanics analysis software. Auto
IMGA PAIRINGS INSTRUCTIONS USING the ONLINE GOLF GENIUS SOFTWARE ROGRAM Revised as of 12/31/2017
 GENERAL INFORMATION: IMGA PAIRINGS INSTRUCTIONS USING the ONLINE GOLF GENIUS SOFTWARE ROGRAM Revised as of 12/31/2017 The cutoff time for tournament entry is 12:00PM (Noon) on the Friday before Tuesday
Race Screen: Figure 2: Race Screen. Figure 3: Race Screen with Top Bulb Lock
 Eliminator Competition Stand Alone Mode - Instruction Manual Main Menu: After startup, the Eliminator Competition will enter the Main Menu. Press the right/left arrow buttons to move through the menu.
Golfwith SMART CADDIE User Manual _ ENGLISH ver.
 Golfwith SMART CADDIE User Manual _ ENGLISH ver. Ver_1.2 Contents 1. Golfwith SMART CADDIE 2. SMART CADDIE Log-In & Golfwith Membership Registration 3. SMART CADDIE User Guide 1 : Golf Course Search &
The ICC Duckworth-Lewis-Stern calculator. DLS Edition 2016
 The ICC Duckworth-Lewis-Stern calculator DLS Edition 2016 (DLS2-2016) Installation and operating instructions Queries about program operation should be sent to: Steven.Stern@qut.edu.au 2016 International
The S10 provides the following functions to help you take your sail training program to the next level:
 Velocitek S10 Thank you for purchasing the Velocitek S10 GPS Sail Training Tool! The S10 provides the following functions to help you take your sail training program to the next level: Current speed display
ScoreKeeper tm. ~ Software for Golf ~ for Microsoft Windows 98 through Windows 7. User's Guide
 ScoreKeeper tm ~ Software for Golf ~ for Microsoft Windows 98 through Windows 7 User's Guide March, 2011 Copyright Mark II Systems. Long Valley, N.J., USA 908-850-5252 www.scorekeeper.com Installation
FAQ RCGA Network. The RCGA is dedicated to offering you the best customer support possible. Our goal is to respond to your requests within 24hrs.
 FAQ RCGA Network Customer Support The RCGA is dedicated to offering you the best customer support possible. Our goal is to respond to your requests within 24hrs. 1. On the RCGANetwork.org homepage there
Remote Control Bait Boat
 CARPIO 2.0 User Manual All pictures shown are for illustration purpose only. Actual product may vary due to product enhancement Remote Control Bait Boat (Smart Remote Control at 868 MHz) 1 Table of Contents
v2.3 USER MANUAL
 v2.3 USER MANUAL www.foresightsports.com Table of Contents 03 04 05 09 12 17 20 21 Activation Getting Started Play Compete Improve Settings Update Manager Glossary 04 11 05 12 03 Activation FSX Activation
Operating Manual. SUPREMA Calibration. Software for Fire and Gas Warning Units. Order No.: /01. MSAsafety.com
 Operating Manual Software for Fire and Gas Warning Units Order No.: 10154656/01 MSAsafety.com MSA Europe GmbH Schlüsselstrasse 12 8645 Rapperswil-Jona Switzerland info.ch@msasafety.com www.msasafety.com
USA Jump Rope Tournament Software User Guide 2014 Edition
 USA Jump Rope Tournament Software User Guide www.usajumprope.org Table of Contents Contents System Requirements... 3 System Conventions... 4 Phase 1 Tournament Pre registration Preparation... 5 Name Your
Introducing the SkyCaddie SGX W
 PLAYER S GUIDE Introducing the SkyCaddie SGX W The SkyCaddie SGX W Players Guide covers some of the powerful features of the SGX W so that you can start playing golf with the SkyCaddie right away. Your
MANUAL. P C - C E N T E R Version Copyright by Dinand van het Reve CONTENTS
 P C - C E N T E R Version 4.00 Copyright 1995-2004 by Dinand van het Reve CONTENTS 1. Introduction 2. Installing PC-CENTER 3. Licence 4. Using PC-CENTER 5. Description of 'Small Windows' 6. Main Menu Description
Table of Content IMPORTANT NOTE: Before using this guide, please make sure you have already set up your settings in
 Quick Start Guide Table of Content Introduction... 3 Prerequisites... 3 How to Open QQEvolution 2... 4 How to do Carrier Downloads... 5 Locating a Client in QQEvolution 2... 7 Adding a New Client... 8
Instruction Manual. BZ7002 Calibration Software BE
 Instruction Manual BZ7002 Calibration Software BE6034-12 Index _ Index Index... 2 Chapter 1 BZ7002 Calibration Software... 4 1. Introduction... 5 Chapter 2 Installation of the BZ7002... 6 2. Installation
TOMI PRO MODEL PERSONAL MODEL
 TOMI PRO MODEL PERSONAL MODEL System requirements Windows System Requirements To use your TOMI and its software, your system should have: A Microsoft Windows compatible PC with a Pentium IV processor (1.5
Club s Homepage Welcome Club Calendar Logout Add a Request Play Date Requested Time Hole Selection # of Tee Times Break Link
 The first time the golfer logs into the Internet Golf Reservation System, the member # is the club assigned golfer number plus 1 for male and 2 for female, the default password is 1234. The golfer will
Click on the menu icon in the left corner to open the menu. From the menu you can:
 The Golf Short Game Tracker App supports two types of measurements: meters and yards/feet. By default the measurements are shown in meters. If you like to use yards/feet go to Settings to change the Distance
Fencing Time Version 4.3
 Fencing Time Version 4.3 Upgrading your Fencing Time Server October 2017 Copyright 2017 by Fencing Time, LLC. All rights reserved. Overview Periodically, a new version of Fencing Time is released. In most
Swing Labs Training Guide
 Swing Labs Training Guide How to perform a fitting using FlightScope and Swing Labs Upload Manager 3 v0 20080116 ii Swing labs Table of Contents 1 Installing & Set-up of Upload Manager 3 (UM3) 1 Installation.................................
Online League Management lta.tournamentsoftware.com. User Manual. Further support is available online at
 Online League Management lta.tournamentsoftware.com User Manual Further support is available online at www.lta.org.uk/leagueplanner Contents Welcome... 3 Using this guide... 3 Further support?... 3 Publishing
Using the GHIN Handicap Allocation Utility with GHP Golfer
 Using the GHIN Handicap Allocation Utility with GHP Golfer In order to gather Hole by Hole (HBH) scores to be used with the GHIN Handicap Allocation Utility, the golf club must have individual tee information
HPICAL Operation & Data Logging Procedures. Click spacebar to advance through slides 1
 HPICAL-15000 Operation & Data Logging Procedures Click spacebar to advance through slides 1 WARNING Always wear proper safety equipment when using high pressure equipment. Do not exceed 125 psi air pressure.
PitchTracker User Guide. Model: DKPT01 User Guide
 PitchTracker User Guide Model: DKPT01 User Guide PACKAGE CONTENTS What Comes in the Box USING YOUR SMART BALL Turn On Your Smart Ball Pair your Smart Ball Turn Off Your Smart Ball Charge your Smart Ball
GOLF LIFE MANAGEMENT SYSTEM Member Manual
 GOLF LIFE MANAGEMENT SYSTEM Member Manual CONTENTS: 1.Activate your account 2.Add Courses to Your List 3.Post Scores 4.Edit Scores 5.Frequently Asked Questions HANDICAP ACCOUNT ACTIVATION Before using
PitchTracker Softball User Guide
 PitchTracker Softball User Guide Model: DKPTS01 User Guide PACKAGE CONTENTS What Comes in the Box USING YOUR SMART SOFTBALL Turn On Your Smart Softball Pair your Smart Softball Turn Off Your Smart Softball
Integrated Sports Systems (ISS) Inc. Meet Management Suite
 Inc. Meet Management Suite") November 2010 Integrated Sports Systems (ISS) Inc. Meet Management Suite User Guide and Technical Document Version 2.0 Table of Contents Table of Contents... 2 General Concepts... 3 Installation Meet Management
November 2010 Integrated Sports Systems (ISS) Inc. Meet Management Suite User Guide and Technical Document Version 2.0 Table of Contents Table of Contents... 2 General Concepts... 3 Installation Meet Management
szen Eighteen Full Manual 2010 szen Corp
 szen Eighteen Full Manual I Full Eighteen Manual Table of Contents Part I Introduction 1 Part II Tee Sheet Operation 1 1 Using the... Tee Sheet 1 Booking Reservations... 2 Booking Reservations... for Mem
SwimNumber App. Build Custom Smart Workouts Control the Wave Propulsion TM System Achieve Health and Fitness Goals INSTRUCTION MANUAL
 SwimNumber App Build Custom Smart Workouts Control the Wave Propulsion TM System Achieve Health and Fitness Goals INSTRUCTION MANUAL Table of Contents Warning...2 Connecting to Swim Spa...3-7 Swim Spa
WELCOME TO THE FUTURE OF TELEVISION. User Manual
 WELCOME TO THE FUTURE OF TELEVISION User Manual Welcome to BTV Each living room and family sharing our technology resonate our commitment to excellence. In our responsibility to offer the best products,
The Complete 100 Day Dash Guide Updated May 7, 2013
 The Complete 100 Day Dash Guide Updated May 7, 2013 This guide covers the following topics (click the links to read more): Official Rules Frequently Asked Questions (FAQs) How to Register for the Dash
OxyScan Graphic. Operating Instructions. UMS Micro-oxygen sensor 501. Microprocessor instrument
 OxyScan Graphic Operating Instructions UMS Micro-oxygen sensor 501 Microprocessor instrument Introduction Thank you for choosing the UMS Micro Oxygen Sensor 501 - a highly advanced product! Please read
Nokia 500 Auto Navigation User Guide
 Nokia 500 Auto Navigation User Guide 9206562 Issue 1 DECLARATION OF CONFORMITY Hereby, NOKIA CORPORATION declares that this PD-18 product is in compliance with the essential requirements and other relevant
Perfect Golf Quick Start Guide
 Quick Start Guide Perfect Golf Quick Start Guide To play Perfect Golf you must first have purchased the following: 1. A SkyTrak Launch Monitor 2. Have an active Play and Improve Package 3. Have purchased
WEST POINT GOLF CLUB USING THE GOLFSOFTWARE PROGRAM FOR THE DRAW AND SCORING
 USING THE GOLFSOFTWARE PROGRAM FOR THE DRAW AND SCORING The new software is made up of 3 modules - Handicap, Tournament and Player Portal. Note that the Handicap module and the Tournament module have separate
Kestrel HVK Gun Loader Sofware
 www.kestrelmeters.com.au Kestrel HVK Gun Loader Sofware The Most Relied-Upon Pocket Weather Instruments in the World Making Work & Play Easier & Safer 1 Kestrel Pocket Weather Meters Kestrel Ballistics
CUSTOMER SERVICE CONTACTS. Suunto USA Phone 1 (800) Canada Phone 1 (800) Suunto Website
 Canada Phone 1 (800) Suunto Website") CUSTOMER SERVICE CONTACTS EN Suunto USA Phone 1 (800) 543-9124 Canada Phone 1 (800) 776-7770 Suunto Website www.suunto.com 1 1. INTRODUCTION... 6 1.1 SUUNTO G3 FEATURES...6 2. GETTING STARTED... 8 2.1
CUSTOMER SERVICE CONTACTS EN Suunto USA Phone 1 (800) 543-9124 Canada Phone 1 (800) 776-7770 Suunto Website www.suunto.com 1 1. INTRODUCTION... 6 1.1 SUUNTO G3 FEATURES...6 2. GETTING STARTED... 8 2.1
XC2 Client/Server Installation & Configuration
 XC2 Client/Server Installation & Configuration File downloads Server Installation Backup Configuration Services Client Installation Backup Recovery Troubleshooting Aug 12 2014 XC2 Software, LLC Page 1
Oxygen Meter User Manual
 Oxygen Meter User Manual Monday, July 23, 2007 1. Outline...2 2. Program...3 2.1. Environment for program execution...3 2.2. Installation...3 2.3. Un installation...3 2.4. USB driver installation...3 2.5.
LAKEMASTER MAP CARDS. HELIX and Core Accessory Guide TABLE OF CONTENTS
 LAKEMASTER MAP CARDS HELIX and Core Accessory Guide 532358-1EN_A TABLE OF CONTENTS Overview............................................. 5 Set up the Control Head............................... 5 Set up
CONTENTS. Welcome to Season Setup in Play Football Setting Up Our Details Setting up Age Groups... 9
 SEASON SETUP 2018 CONTENTS Welcome to Season Setup in Play Football... 2 Setting Up Our Details... 5 Setting up Age Groups... 9 Setting up Fees and Registration Packages... 11 Create a Registration Package...
Boyle s Law: Pressure-Volume Relationship in Gases
 Boyle s Law: Pressure-Volume Relationship in Gases The primary objective of this experiment is to determine the relationship between the pressure and volume of a confined gas. The gas we will use is air,
USER MANUAL April 2016
 USER MANUAL April 2016 Introduction TIEBREAK is a program for real time volleyball game data entry and statistical analysis. Extremely easy to use, TIEBREAK makes it possible to reliably and quickly enter
Steltronic StelPad User Guide
 StelPad User Guide Steltronic StelPad User Guide Contents Contents... 1 About StelPad and its Features... 3 StelPad System Elements... 3 StelPad Computer Integration with Focus... 4 Enable Custom Graphic
Basic Information. Getting Started. Controls
 1 Important Information Basic Information 2 Information Sharing 3 Online Features 4 Parental Controls Getting Started 5 Introduction 6 Main Menu 7 Saving and Deleting Data Controls 8 Game Screen 1 9 Game
Golf Team Challenge. Product: EA SPORTS PGA TOUR Software Version: Release Date: 10/18/06. Revised 4/21/2009
 Product: EA SPORTS PGA TOUR Software Version: 4.0.0 Release Date: 10/18/06. Revised 4/21/2009 Golf Team Challenge This document describes the new play modes and Operator Menus in EA SPORTS PGA TOUR Golf
BVIS Beach Volleyball Information System
 BVIS Beach Volleyball Information System Developments in computer science over the past few years, together with technological innovation, has in turn stimulated the development of tailored software solutions
Version 3.1.0: New Features/Improvements: Improved Bluetooth connection on Windows 10
 Version 3.1.0: Improved Bluetooth connection on Windows 10 ***Important notice for Mac Users: Upgrading from Shearwater Desktop 3.0.8 to 3.1.0 will not cause issues. Upgrading from any 2.X.X to any 3.X.X
Software for electronic scorekeeping of volleyball matches, developed and distributed by:
 Software for electronic scorekeeping of volleyball matches, developed and distributed by: Developed for the rules of USports 2017-18 As adopted by Ontario University Athletics for Men s & Women s Volleyball
The ICC Duckworth-Lewis Calculator. Professional Edition 2008
 The ICC Duckworth-Lewis Calculator Professional Edition 2008 (Version 1.1) Installation and operating instructions Any queries about operating the program should be sent to steven.stern@anu.edu.au 2008