FM P r e f a c e
|
|
|
- Lillian Sullivan
- 5 years ago
- Views:
Transcription
1 *FM i
2 ii
3 iii
4 Preface This field manual contains information and guidance pertaining to rifle-bayonet fighting and hand-to-hand combat. The hand-to-hand combat portion of this manual is divided into basic and advanced training. The techniques are applied as intuitive patterns of natural movement but are initially studied according to range. Therefore, the basic principles for fighting in each range are discussed. However, for ease of learning they are studied in reverse order as they would be encountered in a combat engagement. This manual serves as a guide for instructors, trainers, and soldiers in the art of instinctive rifle-bayonet fighting. The proponent for this publication is the United States Army Infantry School. Comments and recommendations must be submitted on DA Form 2028 (Recommended Changes to Publications and Blank Forms) directly to Commandant, United States Army Infantry School, ATTN: ATSH-RB, Fort Benning, GA, Unless this publication states otherwise, masculine nouns and pronouns do not refer exclusively to men. iv
5 CHAPTER 3 CLOSE-RANGE COMBATIVES In close-range combatives, two opponents have closed the gap between them so they can grab one another in hand-to-hand combat. The principles of balance, leverage, timing, and body positioning are applied. Throws and takedown techniques are used to upset the opponent s balance and to gain control of the fight by forcing him to the ground. Chokes can be applied to quickly render an opponent unconscious. The soldier should also know counters to choking techniques to protect himself. Grappling involves skillful fighting against an opponent in close-range combat so that a soldier can win through superior body movement or grappling skills. Pain can be used to disable an opponent. A soldier can use painful eye gouges and strikes to soft, vital areas to gain an advantage over his opponent THROWS AND TAKEDOWNS Throws and takedowns enable a hand-to-hand fighter to take an opponent to the ground where he can be controlled or disabled with further techniques. Throws and takedowns make use of the principles involved in taking the opponent s balance. The fighter uses his momentum against the attacker; he also uses leverage or body position to gain an opportunity to throw the attacker. a. It is important for a fighter to control his opponent throughout a throw to the ground to keep the opponent from countering the throw or escaping after he is thrown to the ground. One way to do this is to control the opponent s fall so that he lands on his head. It is also imperative that a fighter maintain control of his own balance when executing throws and takedowns. b. After executing a throw or takedown and while the opponent is on the ground, the fighter must control the opponent by any means available. He can drop his weight onto exposed areas of the opponent s body, using his elbows and knees. He can control the downed opponent s limbs by stepping on them or by placing his knees and body weight on them. Joint locks, chokes, and kicks to vital areas are also good control measures. Without endangering 3-1
6 himself, the fighter must maintain the advantage and disable his opponent after throwing him (Figures 3-1 through 3-5). NOTE: Although the five techniques shown in Figures 3-1 through 3-5 may be done while wearing LCE for training purposes, it is safer to conduct all throws and takedowns without any equipment. (1) Hip throw. The opponent throws a right punch. The defender steps in with his left foot; at the same time, he blocks the punch with his left forearm and delivers a reverse punch to the face, throat, or other vulnerable area (Figure 3-1, Step 1). (For training, deliver punches to the solar plexus.) The defender pivots 180 degrees on the ball of his lead foot, wraps his right arm around his opponent s waist, and grasps his belt or pants (Figure 3-1, Step 2). (If opponent is wearing LCE, grasp by the pistol belt or webbing.) The defender thrusts his hips into his opponent and maintains a grip on his opponent s right elbow. He keeps his knees shoulder-width apart and slightly bent (Figure 3-1, Step 3). He locks his knees, pulls his opponent well over his right hip, and slams him to the ground. (For training, soldier being thrown should land in a good side fall.) By maintaining control of his opponent s arm, the defender now has the option of kicking or stomping him in the neck, face, or ribs (Figure 3-1, Step 4). 3-2
7 3-3
8 (2) Over-the-shoulder throw. The opponent lunges at the defender with a straight punch (Figure 3-2, Step 1). The defender blocks the punch with his left forearm, pivots 180 degrees on the ball of his lead foot (Figure 3-2, Step 2), and gets well inside his opponent s right armpit with his right shoulder. He reaches well back under his opponent s right armpit and grasps him by the collar or hair (Figure 3-2, Step 3). The defender maintains good back-to-chest, buttock-to-groin contact, keeping his knees slightly bent and shoulder-width apart. He maintains control of his opponent s right arm by grasping the wrist or sleeve (Figure 3-2, Step 4). The defender bends forward at the waist and holds his opponent tightly against his body. He locks his knees, thrusts his opponent over his shoulder, and slams him to the ground (Figure 3-2, Step 5). He then has the option of disabling his opponent with kicks or stomps to vital areas. 3-4
9 3-5
10 (3) Throw from rear choke. The opponent attacks the defender with a rear strangle choke. The defender quickly bends his knees and spreads his feet shoulder-width apart (Figure 3-3, Step 1). (Knees are bent quickly to put distance between you and your opponent.) The defender reaches as far back as possible and uses his right hand to grab his opponent by the collar or hair. He then forces his chin into the vee of the opponent s arm that is around his neck. With his left hand, he grasps the opponent s clothing at the tricep and bends forward at the waist (Figure 3-3, Step 2). The defender locks his knees and, at the same time, pulls his opponent over his shoulder and slams him to the ground (Figure 3-3, Step 3). He then has the option of spinning around and straddling his opponent or disabling him with punches to vital areas (Figure 3-3, Step 4). (It is important to grip the opponent tightly when executing this move.) 3-6
11 3-7
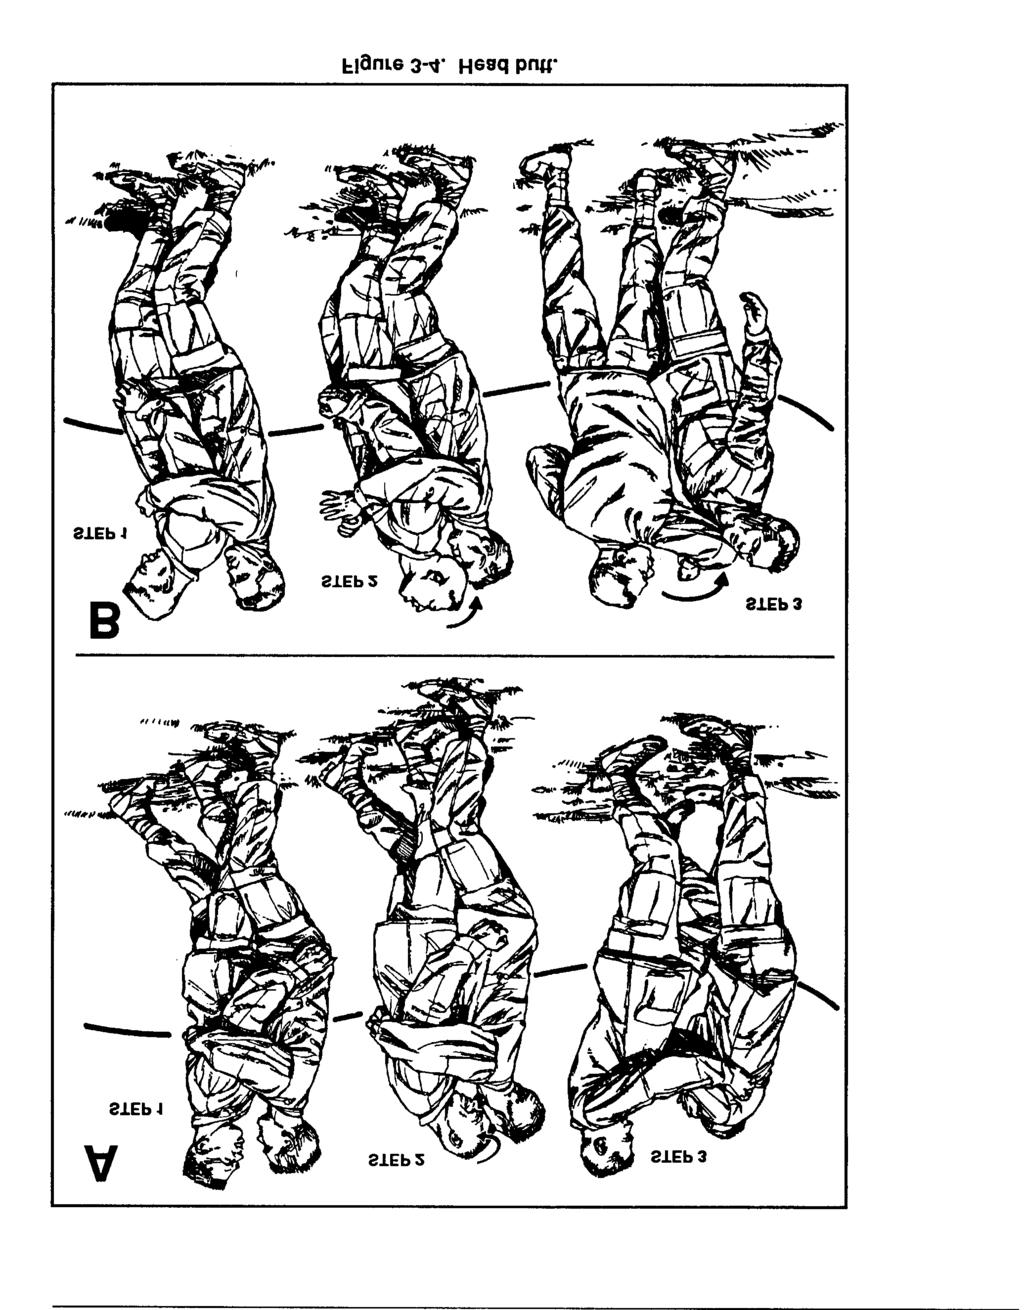
12 (4) Head butt. The head butt can be applied from the front or the rear. It is repeated until the opponent either releases his grip or becomes unconscious. (a) The opponent grabs the defender in a bear hug from the front (A,Figure 3-4, Step 1). The defender uses his forehead to smash into his opponent s nose or cheek (A,Figure 3-4, Step 2) and stuns him. The opponent releases the defender who then follows up with a kick or knee strike to the groin (A, Figure 3-4, Step 3). (b) The opponent grabs the defender in a bear hug from the rear (B, Figure 3-4, Step 1). The defender cocks his head forward and smashes the back of his head into the opponent s nose or cheek area (B, Figure 3-4, Step 2). The defender turns to face his opponent and follows up with a spinning elbow strike to the head (B, Figure 3-4, Step 3). 3-8
13 3-9
14 (5) Rear strangle takedown. The defender strikes the opponent from the rear with a forearm strike to the neck (carotid artery) (Figure 3-5, Step 1). The defender wraps his right arm around his opponent s neck, making sure he locks the throat and windpipe in the vee formed by the his elbow. He grasps his left bicep and wraps his left hand around the back of the opponent s head. He pulls his right arm in and flexes it, pushing his opponent s head forward (Figure 3-5, Step 2). The defender kicks his legs out and back, maintains a choke on his opponent s neck, and pulls his opponent backward until his neck breaks (Figure 3-5, Step 3). 3-10
15 3-11

16 3-2. STRANGULATION Strangulation is a most effective method of disabling an opponent. The throat s vulnerability is widely known and should be a primary target in close-range fighting. Your goal may be to break the opponent s neck, to crush his trachea, to block the air supply to his lungs, or to block the blood supply to his brain. a. Strangulation by Crushing. Crushing the trachea just below the voice box is probably one of the fastest, easiest, most lethal means of strangulation. The trachea is crushed between the thumb and first two or three fingers. b. Respiratory Strangulation. Compressing the windpipe to obstruct air flow to the lungs is most effectively applied by pressure on the cartilage of the windpipe. Unconsciousness can take place within one to two minutes. However, the technique is not always effective on a strong opponent or an opponent with a large neck. It is better to block the blood supply to weaken the opponent first. c. Sanguineous Strangulation. Cutting off the blood supply to the brain by applying pressure to the carotid arteries results in rapid unconsciousness of the victim. The victim can be rendered unconscious within 3 to 8 seconds, and death can result within 30 to 40 seconds CHOKING TECHNIQUES There are several choking techniques that a soldier can use to defeat his opponent in hand-to-hand combat. a. Cross-Collar Choke. With crossed hands, the fighter reaches as far as possible around his opponent s neck and grabs his collar (Figure 3-6, Step 1). The backs of his hands should be against the neck. The fighter keeps his elbows bent and close to the body (as in opening a tightly sealed jar), pulls outward with both hands, and chokes the sides of the opponent s neck by rotating the knuckles into the neck (Figure 3-6, Step 2). The forearm can also be used. 3-12
17 b. Collar Grab Choke. The fighter grabs his opponent s collar with both hands straight-on (Figure 3-7). He then rotates the knuckles inward against the neck to quickly produce a good choke. He also keeps the elbows in front and close to the body where the greatest strength is maintained. c. Carotid Choke. The fighter grabs the sides of the opponent s throat by the muscle and sticks his thumbs into the carotids, closing them off (Figure 3-8). This is a fast and painful choke. d. Trachea Choke. The fighter grabs the opponent s trachea (Figure 3-9) by sticking three fingers behind the voice box on one side and the thumb behind the other. He then crushes the fingers together and twists, applying pressure until the opponent is disabled. 3-13

18 3-4. COUNTERS TO CHOKES A soldier must know how to defend against being choked. Incapacitation and unconsciousness can occur within three seconds; therefore, it is crucial for the defender to know all possible counters to chokes. a. Eye Gouge. The opponent attacks the defender with a frontal choke. The defender has the option of going over or under the opponent s arms. To disable the opponent, the defender inserts both thumbs into his opponent s eyes and tries to gouge them (Figure 3-10). The defender is prepared to follow-up with an attack to the vital regions. b. Shoulder Dislocation. If the opponent applies a choke from the rear, the defender places the back of his hand against the inside of the opponent s forearm (Figure 3-11, Step 1). Then, he brings the other hand over the crook of the opponent s elbow and clasps hands, keeping his hands close to his body as he moves his entire body around the opponent (Figure 3-11, Step 2). He positions his body so that the opponent s upper arm is aligned with the opponent s shoulders (Figure 3-11, Step 3). The opponent s arm should be bent at a 90-degree angle. By pulling up on the opponent s elbow and down on the wrist, the opponent s balance is taken and his shoulder is easily dislocated (Figure 3-11, Step 4). The defender must use his body movement to properly position the opponent upper body strength will not work. He drops his body weight by bending his knees to help get the proper bend in the opponent s elbow. The defender must also keep his own hands and elbows close to his body to prevent the opponent s escape (Figure 3-11, Step 5). 3-14
19 3-15
20 c. Weight Shift. To counter being choked from above while lying on the ground (Figure 3-12, Step 1), the defender places his arms against his opponent s elbows and locks the joints. At the same time, he shifts his hips so that his weight rests painfully on the opponent s ankle (Figure 3-12, Step 2). The defender can easily shift his body weight to gain control by turning the opponent toward his weak side (Figure 3-12, Step 3). 3-16
21 3-17
22 d. Counterstrikes to Rear Choke and Frontal Choke. As the opponent tries a rear choke (A,Figure 3-13, Step 1), the defender can break the opponent s grip with a strong rear-elbow strike into the solar plexus (A,Figure 3-13, Step 2). He can follow with a shin scrape down along the opponent s leg and stomp the foot (A, Figure 3-13, Step 3). He may wish to continue by striking the groin of the opponent (A,Figure 3-13, Step 4). As the opponent begins a frontal choke (B, Figure 3-13, Step 1), the defender turns his body and drops one arm between the opponent s arms (B, Figure 3-13, Step 2). He sinks his body weight and drives his own hand to the ground, and then explodes upward with an elbow strike (B, Figure 3-13, Step 3) into the opponent s chin, stomach, or groin. 3-18

23 3-19
24 e. Headlock Escape. If a defender is in a headlock, he first turns his chin in toward his opponent s body to prevent choking (Figure 3-14, Step 1). Next, he slides one hand up along the opponent s back, around to the face, and finds the sensitive nerve under the nose. He must avoid placing his fingers near his opponent s mouth, or he will be bitten (Figure 3-14, Step 2). The defender can now force his opponent back and then down across his own knee to the ground and maintain control by keeping pressure under the nose (Figure 3-14, Step 3). He can finish the technique with a hammer fist to the groin. 3-20
25 3-21
26 3-5. GRAPPLING Grappling is when two or more fighters engage in close-range, hand-to-hand combat. They may be armed or unarmed. To win, the fighter must be aware of how to move his body to maintain the upper hand, and he must know the mechanical strengths and weaknesses of the human body. The situation becomes a struggle of strength pitted against strength unless the fighter can remain in control of his opponent by using skilled movements to gain an advantage in leverage and balance. Knowledge of the following basic movement techniques may give the fighter a way to apply and gain the advantage in grappling situations. a. Wristlock From a Collar or Lapel Grab. When an opponent grabs the defender by the collar or by the lapel, the defender reaches up and grabs the opponent s hand (to prevent him from withdrawing it) while stepping back to pull him off balance (Figure 3-15, Step 1). The defender peels off the opponent s grabbing hand by crushing his thumb and bending it back on itself toward the palm in a straight line (Figure 3-15, Step 2). To keep his grip on the opponent s thumb, the defender keeps his hands close to his body where his control is strongest. He then turns his body so that he has a wristlock on his opponent. The wristlock is produced by turning his wrist outward at a 45-degree angle and by bending it toward the elbow (Figure 3-15, Step 3). The opponent can be driven to the ground by putting his palm on the ground. 3-22
27 3-23
28 b. Wristlock From an Arm Grab. When an opponent grabs a defender s arm, the defender rotates his arm to grab the opponent s forearm (Figure 3-16, Step 1). At the same time, he secures his other hand on the gripping hand of the opponent to prevent his escape (Figure 3-16, Step 2). As the defender steps in toward the opponent and maintains his grip on the hand and forearm, a zee shape is formed by the opponent s arm; this is an effective wristlock (Figure 3-16, Step 3). More pain can be induced by trying to put the opponent s fingers in his own eyes. 3-24
29 c. Prisoner Escort. The escort secures the prisoner s arm with the wrist bent straight back upon itself, palm toward the elbow. The prisoner s elbow can be secured in the crook of the escort s elbow, firmly against the escort s body for the most control (Figure 3-17). This technique is most effective with two escorts, each holding a wrist of the prisoner. Use this technique to secure the opponent only if rope, flex cuffs, or handcuffs are unavailable. d. Elbow Lock Against the Body. The opponent s elbow can be locked against the side of the body (Figure 3-18) by the defender. The defender turns his body to force the elbow into a position in which it was not designed to move. He can apply leverage on the opponent s wrist to gain control since the lock causes intense pain. The elbow can easily be broken to make the arm ineffective. This movement must be executed with maximum speed and force. 3-25
30 e. Elbow Lock Against the Knee. While grappling on the ground, a defender can gain control of the situation if he can use an elbow lock (Figure 3-19) against the opponent. He uses his knee as a fulcrum for leverage to break his opponent s arm at the elbow. Once the arm breaks, the defender must be prepared with a follow-up technique. 3-26
31 f. Elbow Lock Against the Shoulder. An elbow lock can be applied by locking the elbow joint against the shoulder (Figure 3-20) and pulling down on the wrist. Leverage is produced by using the shoulder as a fulcrum, by applying force, and by straightening the knees to push upward. This uses the defender s body mass and ensures more positive control. The opponent s arm must be kept straight so he cannot drive his elbow down into the defender s shoulder
32 g. Shoulder Dislocation. A defender can maneuver into position to dislocate a shoulder by moving inside when an opponent launches a punch (Figure 3-21, Step 1). The defenderholds his hand nearest the punching arm high to protect the head. The defender continues to move in and places his other arm behind the punching arm (Figure 3-21, Step 2). He strikes downward into the crook of the opponent s elbow to create a bend. Then he clasps his hands and moves to the opponent s outside until the opponent s upper arm is in alignment with his shoulders and bent 90 degrees at the elbow. As he steps, the defender pulls up on the opponent s elbow and directs the wrist downward. This motion twists the shoulder joint so it is easily dislocated and the opponent loses his balance (Figure 3-21, Step 3). NOTE: The defender must keep his clasped hands close to the body and properly align the opponent s arm by maneuvering his entire body. This technique will not succeed by using upper-body strength only, the opponent will escape. 3-28
33 3-29
34 (1) Straight-arm shoulder dislocation. The shoulder can also be dislocated (Figure 3-22) by keeping the elbow straight and forcing the opponent s arm backward toward the opposite shoulder at about 45 degrees. The initial movement must take the arm down and alongside the opponent s body. Bending the wrist toward the elbow helps to lock out the elbow. The dislocation also forces the opponent s head down- ward where a knee strike can be readily made. This dislocation technique should be practiced to get the feel of the correct direction in which to move the joint. 3-30
35 (2) Shoulder dislocation using the elbow. While grappling, the defender can snake his hand over the crook in the opponent s elbow and move his body to the outside, trapping one arm of the opponent against his side (Figure 3-23, Step 1). The defender can then clasp his hands in front of his body and use his body mass in motion to align the opponent s upper arm with the line between the shoulders (Figure 3-23, Step 2). By dipping his weight and then pulling upward on the opponent s elbow, the shoulder is dislocated, and the opponent loses his balance (Figure 3-23, Step 3). If the opponent s elbow locks rather than bends to allow the shoulder dislocation, the defender can use the elbow lock to keep control. 3-31
36 h. Knee Lock/Break. The opponent s knee joint can be attacked to produce knee locks or breaks(figure 3-24)by forcingthe knee in a direction opposite to which it was designed to move. The knee can be attacked with the body s mass behind the defender s knee or with his entire body by falling on the opponent s knee, causing it to hyperextend. 3-32
37 CHAPTER 4 MEDIUM-RANGE COMBATIVES In medium-range combatives, two opponents are already within touching distance. The arsenal of possible body weapons includes short punches and strikes with elbows, knees, and hands. Head butts are also effective; do not forget them during medium-range combat. A soldier uses his peripheral vision to evaluate the targets presented by the opponent and choose his target. He should be aggressive and concentrate his attack on the opponent's vital points to end the fight as soon as possible VITAL TARGETS The body is divided into three sections: high, middle, and low. Each section contains vital targets (Figure 4-1, pages 4-5 and 4-6). The effects of striking these targets follow: a. High Section. The high section includes the head and neck; it is the most dangerous target area. (1) Top of the head. The skull is weak where the frontal cranial bones join. A forceful strike causes trauma to the cranial cavity, resulting in unconsciousness and hemorrhage. A severe strike can result in death. (2) Forehead. A forceful blow can cause whiplash; a severe blow can cause cerebral hemorrhage and death. (3) Temple. The bones of the skull are weak at the temple, and an artery and large nerve lie close to the skin. A powerful strike can cause unconsciousness and brain concussion. If the artery is severed, the resulting massive hemorrhage compresses the brain, causing coma and or death. (4) Eyes. A slight jab in the eyes causes uncontrollable watering and blurred vision. A forceful jab or poke can cause temporary blindness, or the eyes can be gouged out. Death can result if the fingers penetrate through the thin bone behind the eyes and into the brain. (5) Ears. A strike to the ear with cupped hands can rupture the eardrum and may cause a brain concussion. 4-1
38 (6) Nose. Any blow can easily break the thin bones of the nose, causing extreme pain and eye watering. (7) Under the nose. A blow to the nerve center, which is close to the surface under the nose, can cause great pain and watery eyes. (8) Jaw. A blow to the jaw can break or dislocate it. If the facial nerve is pinched against the lower jaw, one side of the face will be paralyzed. (9) Chin. A blow to the chin can cause paralysis, mild concussion, and unconsciousness. The jawbone acts as a lever that can transmit the force of a blow to the back of the brain where the cardiac and respiratory mechanisms are controlled. (10) Back of ears and base of skull. A moderate blow to the back of the ears or the base of the skull can cause unconsciousness by the jarring effect on the back of the brain. However, a powerful blow can cause a concussion or brain hemorrhage and death. (11) Throat. A powerful blow to the front of the throat can cause death by crushing the windpipe. A forceful blow causes extreme pain and gagging or vomiting. (12) Side of neck. A sharp blow to the side of the neck causes unconsciousness by shock to the carotid artery, jugular vein, and vagus nerve. For maximum effect, the blow should be focused below and slightly in front of the ear. A less powerful blow causes involuntary muscle spasms and intense pain. The side of the neck is one of the best targets to use to drop an opponent immediately or to disable him temporarily to finish him later. (13) Back of neck. A powerful blow to the back of one s neck can cause whiplash, concussion, or even a broken neck and death. b. Middle Section. The middle section extends from the shoulders to the area just above the hips. Most blows to vital points in this region are not fatal but can have serious, long-term complications that range from trauma to internal organs to spinal cord injuries. (1) Front of shoulder muscle. A large bundle of nerves passes in front of the shoulder joint. A forceful blow causes extreme pain and can make the whole arm ineffective if the nerves are struck just right. (2) Collarbone. A blow to the collarbone can fracture it, causing intense pain and rendering the arm on the side of the fracture ineffective. The fracture can also sever the brachial nerve or subclavian artery. (3) Armpit. A large nerve lies close to the skin in each armpit. A blow to this nerve causes severe pain and partial paralysis. A knife inserted into the armpit is fatal as it severs a major artery leading from the heart. (4) Spine. A blow to the spinal column can sever the spinal cord, resulting in paralysis or in death. 4-2
39 (5) Nipples. A large network of nerves passes near the skin at the nipples. A blow here can cause extreme pain and hemorrhage to the many blood vessels beneath. (6) Heart. A jolting blow to the heart can stun the opponent and allow time for follow-up or finishing techniques. (7) Solar plexus. The solar plexus is a center for nerves that control the cardiorespiratory system. A blow to this location is painful and can take the breath from the opponent. A powerful blow causes unconsciousness by shock to the nerve center. A penetrating blow can also damage internal organs. (8) Diaphragm. A blow to the lower front of the ribs can cause the diaphragm and the other muscles that control breathing to relax. This causes loss of breath and can result in unconsciousness due to respiratory failure. (9) Floating ribs. A blow to the floating ribs can easily fracture them because they are not attached to the rib cage. Fractured ribs on the right side can cause internal injury to the liver; fractured ribs on either side can possibly puncture or collapse a lung. (10) Kidneys. A powerful blow to the kidneys can induce shock and can possibly cause internal injury to these organs. A stab to the kidneys induces instant shock and can cause death from severe internal bleeding. (11) Abdomen below navel. A powerful blow to the area below the navel and above the groin can cause shock, unconsciousness, and internal bleeding. (12) Biceps. A strike to the biceps is most painful and renders the arm ineffective. The biceps is an especially good target when an opponent holds a weapon. (13) Forearm muscle. The radial nerve, which controls much of the movement in the hand, passes over the forearm bone just below the elbow. A strike to the radial nerve renders the hand and arm ineffective. An opponent can be disarmed by a strike to the forearm; if the strike is powerful enough, he can be knocked unconscious. (14) Back of hand. The backs of the hands are sensitive. Since the nerves pass over the bones in the hand, a strike to this area is intensely painful. The small bones on the back of the hand are easily broken and such a strike can also render the hand ineffective. c. Low Section. The low section of the body includes everything from the groin area to the feet. Strikes to these areas are seldom fatal, but they can be incapacitating. (1) Groin. A moderate blow to the groin can incapacitate an opponent and cause intense pain. A powerful blow can result in unconsciousness and shock. 4-3
40 (2) Outside of thigh. A large nerve passes near the surface on the outside of the thigh about four finger-widths above the knee. A powerful strike to this region can render the entire leg ineffective, causing an opponent to drop. This target is especially suitable for knee strikes and shin kicks. (3) Inside of thigh. A large nerve passes over the bone about in the middle of the inner thigh. A blow to this area also incapacitates the leg and can cause the opponent to drop. Knee strikes and heel kicks are the weapons of choice for this target. (4) Hamstring. A severe strike to the hamstring can cause muscle spasms and inhibit mobility. If the hamstring is cut, the leg is useless. (5) Knee. Because the knee is a major supporting structure of the body, damage to this joint is especially detrimental to an opponent. The knee is easily dislocated when struck at an opposing angle to the joint s normal range of motion, especially when it is bearing the opponent s weight. The knee can be dislocated or hyperextended by kicks and strikes with the entire body. (6) Calf. A powerful blow to the top of the calf causes painful muscle spasms and also inhibits mobility. (7) Shin. A moderate blow to the shin produces great pain, especially a blow with a hard object. A powerful blow can possibly fracture the bone that supports most of the body weight. (8) Achilles tendon. A powerful strike to the Achilles tendon on the back of the heel can cause ankle sprain and dislocation of the foot. If the tendon is torn, the opponent is incapacitated. The Achilles tendon is a good target to cut with a knife. (9) Ankle. A blow to the ankle causes pain; if a forceful blow is delivered, the ankle can be sprained or broken. (10) Instep. The small bones on the top of the foot are easily broken. A strike here will hinder the opponent s mobility. 4-4
41 4-5
42 4-6
43 4-2. STRIKING PRINCIPLES Effective striking with the weapons of the body to the opponent s vital points is essential for a victorious outcome in a hand-to-hand struggle. A soldier must be able to employ the principles of effective striking if he is to emerge as the survivor in a fight to the death. a. Attitude. Proper mental attitude is of primary importance in the soldier s ability to strike an opponent. In hand-to-hand combat, the soldier must have the attitude that he will defeat the enemy and complete the mission, no matter what. In a fight to the death, the soldier must have the frame of mind to survive above all else; the prospect of losing cannot enter his mind. He must commit himself to hit the opponent continuously with whatever it takes to drive him to the ground or end his resistance. A memory aid is, Thump him and dump him! b. Fluid Shock Wave. A strike should be delivered so that the target is hit and the weapon remains on the impact site for at least a tenth of a second. This imparts all of the kinetic energy of the strike into the target area, producing a fluid shock wave that travels into the affected tissue and causes maximum damage. It is imperative that all strikes to vital points and nerve motor points are delivered with this principle in mind. The memory aid is, Hit and stick! c. Target Selection. Strikes should be targeted at the opponent s vital points and nerve motor points. The results of effective strikes to vital points are discussed in paragraph 4-1. Strikes to nerve motor points cause temporary mental stunning and muscle motor dysfunction to the affected areas of the body. Mental stunning results when the brain is momentarily disoriented by overstimulation from too much input for example, a strike to a major nerve. The stunning completely disables an opponent for three to seven seconds and allows the soldier to finish off the opponent, gain total control of the situation, or make his escape. Sometimes, such a strike causes unconsciousness. A successful strike to a nerve motor center also renders the affected body part immovable by causing muscle spasms and dysfunction due to nerve overload. (Readily available nerve motor points are shown in Figure 4-1, pages 4-5 and 4-6.) (1) Jugular notch pressure point. Located at the base of the neck just above the breastbone; pressure to this notch can distract and take away his balance. Pressure from fingers jabbed into the notch incurs intense pain that causes an the opponent to withdraw from the pressure involuntarily. (2) Suprascapular nerve motor point. This nerve is located where the trapezius muscle joins the side of the neck. A strike to this point causes intense pain, temporary dysfunction of the affected arm and hand, and mental stunning for three to seven seconds. The strike should be a downward knife-hand or hammer-fist strike from behind. 4-7
44 (3) Brachial plexus origin. This nerve motor center is on the side of the neck. It is probably the most reliable place to strike someone to stun them. Any part of the hand or arm may be applied the palm heel, back of the hand, knife hand, ridge hand, hammer fist, thumb tip, or the forearm. A proper strike to the brachial plexus origin causes Intense pain. Complete cessation of motor activity. Temporary dysfunction of the affected arm. Mental stunning for three to seven seconds. Possible unconsciousness. (4) Brachial plexus clavicle notch pressure point. This center is behind the collarbone in a hollow about halfway between the breastbone and the shoulder joint. The strike should be delivered with a small-impact weapon or the tip of the thumb to create high-level mental stunning and dysfunction of the affected arm. (5) Brachial plexus tie-in motor point. Located on the front of the shoulder joint, a strike to this point can cause the arm to be ineffective. Multiple strikes may be necessary to ensure total dysfunction of the arm and hand. (6) Stellate ganglion. The ganglion is at the top of the pectoral muscle centered above the nipple. A severe strike to this center can cause high-level stunning, respiratory dysfunction, and possible unconsciousness. A straight punch or hammer fist should be used to cause spasms in the nerves affecting the heart and respiratory systems. (7) Cervical vertebrae. Located at the base of the skull, a strike to this particular vertebrae can cause unconsciousness or possibly death. The harder the strike, the more likely death will occur. (8) Radial nerve motor point. This nerve motor point is on top of the forearm just below the elbow. Strikes to this point can create dysfunction of the affected arm and hand. The radial nerve should be struck with the hammer fist or the forearm bones or with an impact weapon, if available. Striking the radial nerve can be especially useful when disarming an opponent armed with a knife or other weapon. (9) Median nerve motor point. This nerve motor point is on the inside of the forearm at the base of the wrist, just above the heel of the hand. Striking this center produces similar effects to striking the radial nerve, although it is not as accessible as the radial nerve. (10) Sciatic nerve. A sciatic nerve is just above each buttock, but below the belt line. A substantial strike to this nerve can disable both legs and possibly cause respiratory failure. The sciatic nerve is the largest nerve in the 4-8


45 body besides the spinal cord. Striking it can affect the entire body, especially if an impact weapon is used. (11) Femoral nerve. This nerve is in the center of the inside of the thigh; striking the femoral nerve can cause temporary motor dysfunction of the affected leg, high-intensity pain, and mental stunning for three to seven seconds. The knee is best to use to strike the femoral nerve. (12) Common peroneal nerve motor point. The peroneal nerve is on the outside of the thigh about four fingers above the knee. A severe strike to this center can cause collapse of the affected leg and high-intensity pain, as well as mental stunning for three to seven seconds. This highly accessible point is an effective way to drop an opponent quickly. This point should be struck with a knee, shin kick, or impact weapon SHORT PUNCHES AND STRIKES During medium-range combat, punches and strikes are usually short because of the close distance between fighters. Power is generated by using the entire body mass in motion behind all punches and strikes. a. Hands as Weapons. A knowledge of hand-to-hand combat fighting provides the fighter another means to accomplish his mission. Hands can become deadly weapons when used by a skilled fighter. (1) Punch to solar plexus. The defender uses this punch for close-in fighting when the opponent rushes or tries to grab him. The defender puts his full weight and force behind the punch and strikes his opponent in the solar plexus (Figure 4-2), knocking the breath out of his lungs. The defender can then follow-up with a knee to the groin, or he can use other disabling blows to vital areas. 4-9
 as an effective technique when an opponent is rushing him")

 Thumb strike to shoulder joint. The opponent rushes the defender and tries to grab him.")
46 (2) Thumb strike to throat. The defender uses the thumb strike to the throat (Figure 4-3) as an effective technique when an opponent is rushing him or trying to grab him. The defender thrusts his right arm and thumb out and strikes his opponent in the throat-larynx area while holding his left hand high for protection. He can follow up with a disabling blow to his opponent s vital areas. (3) Thumb strike to shoulder joint. The opponent rushes the defender and tries to grab him. The defender strikes the opponent s shoulder joint or upper pectoral muscle with his fist or thumb (Figure 4-4). This technique is painful and renders the opponent s arm numb. The defender then follows up with a disabling movement. 4-10
.")
47 (4) Hammer-fit strike to face. The opponent rushes the defender. The defender counters by rotating his body in the direction of his opponent and by striking him in the temple, ear, or face (Figure 4-5). The defender follows up with kicks to the groin or hand strikes to his opponent s other vital areas. (5) Hammer-fist strike to side of neck. The defender catches his opponent off guard, rotates at the waist to generate power, and strikes his opponent on the side of the neck (carotid artery) (Figure 4-6) with his hand clenched into a fist. This strike can cause muscle spasms at the least and may knock his opponent unconscious. 4-11
48 (6) Hammer fist to pectoral muscle. When the opponent tries to grapple with the defender, the defender counters by forcefully striking his opponent in the pectoral muscle (Figure 4-7). This blow stuns the opponent, and the defender immediately follows up with a disabling blow to a vital area of his opponent s body. (7) Hook punch to solar plexus or floating ribs. The opponent tries to wrestle the defender to the ground. The defender counters with a short hook punch to his opponent s solar plexus or floating ribs (Figure 4-8). A sharply delivered blow can puncture or collapse a lung. The defender then follows up with a combination of blows to his opponent s vital areas. 4-12
49 (8) Uppercut to chin. The defender steps between his opponent s arms and strikes with an uppercut punch (Figure 4-9) to the chin or jaw. The defender then follows up with blows to his opponent s vital areas. (9) Knife-hand strike to side of neck. The defender executes a knife-hand strike to the side of his opponent s neck (Figure 4-10) the same way as the hammer-fist strike (Figure 4-6, page 4-11) except he uses the edge of his striking hand. 4-13
50 (10) Knife-hand strike to radial nerve. The opponent tries to strike the defender with a punch. The defender counters by striking his opponent on the top of the forearm just below the elbow (radial nerve) (Figure 4-11) and uses a follow-up technique to disable his opponent. 4-14
51 (11) Palm-heel strike to chin. The opponent tries to surprise the defender by lunging at him. The defender quickly counters by striking his opponent with a palm-heel strike to the chin (Figure 4-12), using maximum force. 4-15
52 (12) Palm-heel strike to solar plexus. The defender meets his opponent s rush by striking him with a palm-heel strike to the solar plexus (Figure 4-13). The defender then executes a follow-up technique to his opponent s vital organs. 4-16
53 (13) Palm-heel strike to kidneys. The defender grasps his opponent from behind by the collar and pulls him off balance. He quickly follows up with a hard palm-heel strike to the opponent s kidney (Figure 4-14). The defender can then take down his opponent with a follow-up technique to the back of his knee. 4-17
 Elbow strikes.")
54 b. Elbows as Weapons. The elbows are also formidable weapons; tremendous striking power can be generated from them. The point of the elbow should be the point of impact. The elbows are strongest when kept in front of the body and in alignment with the shoulder joint; that is, never strike with the elbow out to the side of the body. (1) Elbow strikes. When properly executed, elbow strikes (Figures 4-15 through 4-21, pages 4-18 through 4-22) render an opponent ineffective. When using elbow strikes, execute them quickly, powerfully, and repetitively until the opponent is disabled. 4-18
55 4-19
56 4-20
57 4-21
58 (2) Repetitive elbow strikes. The attacker on the right throws a punch (Figure 4-22, Step 1). The defender counters with an elbow strike to the biceps (Figure 4-22, Step 2). The attacker follows with a punch from his other arm. The defender again counters with an elbow strike to the shoulder joint (Figure 4-22, Step 3). He next strikes with an elbow from the opposite side to the throat. 4-22
59 c. Knees as Weapons. When the knees are used to strike opponents, they are especially potent weapons and are hard to defend or protect against. Great power is generated by thrusting the hips in with a knee strike; however, use the point of the knee as the impact surface. All knee strikes should be executed repetitively until the opponent is disabled. The following techniques are the most effective way to overpower or disable the opponent. (1) Front knee strike. When an opponent tries to grapple with the defender, the defender strikes his opponent in the stomach or solar plexus with his knee (Figure 4-23). This stuns the opponent and the defender can follow up with another technique. 4-23
 (Figure 4-24).")
60 (2) Knee strike to outside of thigh. The defender delivers a knee strike to the outside of his opponent s thigh (common peroneal nerve) (Figure 4-24). This strike causes intense pain and renders the opponent s leg ineffective. 4-24

61 (3) knee strike to inside of thigh. An effective technique for close-in grappling is when the defender delivers a knee strike to the inside of his opponent s thigh (peroneal nerve) (Figure 4-25). The defender then executes a follow-up technique to a vital point. 4-25
62 (4) Knee strike to groin. The knee strike to the groin is effective during close-in grappling. The defender gains control by grabbing his opponent s head, hair, ears, or shoulders and strikes him in the groin with his knee (Figure 4-26). 4-26
63 (5) Knee strike to face. The defender controls his opponent by grabbing behind his head with both hands and forcefully pushing his head down. At the same time, the defender brings his knee up and smashes the opponent in the face (Figure 4-27). When properly executed, the knee strike to the face is a devastating technique that can cause serious injury to the opponent. 4-27
64 CHAPTER 5 LONG-RANGE COMBATIVES In long-range combatives, the distance between opponents is such that the combatants can engage one another with fully extended punches and kicks or with handheld weapons, such as rifles with fixed bayonets and clubs. As in medium-range combatives, a fighter must continuously monitor his available body weapons and opportunities for attack, as well as possible defense measures. He must know when to increase the distance from an opponent and when to close the gap. The spheres of influence that surround each fighter come into contact in long-range combatives. (See Chapter 6 for interval gaps and spheres of influence.) Section 1 NATURAL WEAPONS The most dangerous natural weapons a soldier posseses are his hands and feet. This section describes natural weapon techniques of various punches, strikes, and kicks and stresses aggressive tactics with which to subdue an opponent EXTENDED ARM PUNCHES AND STRIKES Extended arm punches and strikes in long-range combatives, like those in medium-range combatives, should be directed at vital points and nerve motor points. It is essential to put the entire body mass in motion behind long-range strikes. Closing the distance to the target gives the fighter an opportunity to take advantage of this principle. a. In extended punches, the body weapon is usually the fist, although the fingers may be used for example, eye gouging. When punching, hold the fist vertically or horizontally. Keep the wrist straight to prevent injury and use the first two knuckles in striking. b. Another useful variation of the fist is to place the thumb on top of the vertical fist so that the tip protrudes beyond the curled index finger that supports it. The thumb strike is especially effective against soft targets. 5-1
65 Do not fully lock out the arm when punching; keep a slight bend in the elbow to prevent hyperextension if the intended target is missed KICKS Kicks during hand-to-hand combat are best directed to low targets and should be simple but effective. Combat soldiers are usually burdened with combat boots and LCE. His flexibility level is usually low during combat, and if engaged in hand-to-hand combat, he will be under high stress. He must rely on gross motor skills and kicks that do not require complicated movement or much training and practice to execute. a. Side Knee Kick. When an opponent launches an attack for example, with a knife (Figure 5-1, Step 1), it is most important for the defender to first move his entire body off the line of attack as the attacker moves in. As the defender steps off at 45 degrees to the outside and toward the opponent, he strikes with a short punch to the floating ribs (Figure 5-1, Step 2). Then the defender turns his body by rotating on the leading, outside foot and raises the knee of his kicking leg to his chest. He then drives his kick into the side of the attacker s knee with his foot turned 45 degrees outward (Figure 5-1, Step 3). This angle makes the most of the striking surface and reduces his chances of missing the target. 5-2
66 5-3
67 b. Front Knee Kick. As the attacker moves in, the defender immediately shifts off the line of attack and drives his kicking foot straight into the knee of the attacker (Figure 5-2). He turns his foot 45 degrees to make the most of the striking surface and to reduce the chances of missing the target. If the kick is done right, the attacker s advance will stop abruptly, and the knee joint will break. 5-4
 (Figure 5-3, Steps 1 and 2).")
68 c. Heel Kick to Inside of Thigh. The defender steps 45 degrees outside and toward the attacker to get off the line of attack. He is now in a position where he can drive his heel into the inside of the opponent s thigh (femoral nerve) (Figure 5-3, Steps 1 and 2). Either thigh can be targeted because the kick can still be executed if the defender moves to the inside of the opponent rather than to the outside when getting off the line of attack. 5-5
69 d. Heel Kick to Groin. The defender drives a heel kick into the attacker s groin (Figure 5-4) with his full body mass behind it. Since the groin is a soft target, the toe can also be used when striking it. 5-6
70 e. Shin Kick. The shin kick is a powerful kick, and it is easily performed with little training. When the legs are targeted, the kick is hard to defend against (Figure 5-5), and an opponent can be dropped by it. 5-7
71 The calves and common peroneal nerve (Figure 5-6) are the best striking points. The shin kick can also be used to attack the floating ribs (Figure 5-7). 5-8
72 f. Stepping Side Kick. A soldier starts a stepping side kick (Figure 5-8, Step 1) by stepping either behind or in front of his other foot to close the distance between him and his opponent. The movement is like that in a skip. The soldier now brings the knee of his kicking foot up and thrusts out a side kick (Figure 5-8, Step 2). Tremendous power and momentum can be developed in this kick. 5-9
73 g. Counter to Front Kick. When the attacker tries a front kick, the defender traps the kicking foot by meeting it with his own (Figure 5-9, Step 1). The defender turns his foot 45 degrees outward to increase the likelihood of striking the opponent s kicking foot. This counter requires good timing by the defender, but not necessarily speed. Do not look at the feet; use your peripheral vision. When an attacker tries a front kick (Figure 5-9, Step 2), the defender steps off the line of attack of the incoming foot to the outside. As the attacker s kicking leg begins to drop, the defender kicks upward into the calf of the attacker s leg (Figure 5-9, Step 3). This kick is extremely painful and will probably render the leg ineffective. This technique does not rely on the defender s speed, but on proper timing. The defender can also kick to an opponent s kicking leg by moving off the line of attack to the inside and by using the heel kick to the inside of the thigh or groin (Figure 5-9, Step 4). 5-10
74 5-11
75 h. Counter to Roundhouse-Type Kick. When an opponent prepares to attack with a roundhouse-type kick (Figure 5-10, Step 1), the defender moves off the line of attack by stepping to the inside of the knee of the kicking leg. He then turns his body to receive the momentum of the leg (Figure 5-10, Step 2). By moving to the inside of the knee, the defender lessens the power of the attacker s kicking leg. The harder the attacker kicks, the more likely he is to hyperextend his own knee against the body of the defender, but the defender will not be harmed. However, the defender must get to the inside of the knee, or an experienced opponent can change his roundhouse kick into a knee strike. The defender receives the energy of the kicking leg and continues turning with the momentum of the kick. The attacker will be taken down by the defender s other leg with no effort (Figure 5-10, Step 3). 5-12
76 5-13
77 i. Kick as a Defense Against Punch. As the opponent on the left throws a punch (Figure 5-11, Step 1), the defender steps off the line of attack to the outside. He then turns toward the opponent, brings his knee to his chest, and launches a heel kick to the outside of the opponent s thigh (Figure 5-11, Step 2). He keeps his foot turned 45 degrees to ensure striking the target and to maintain balance. 5-14
78 Section II DEFENSIVE TECHNIQUES A knife (or bayonet), properly employed, is a deadly weapon; however, using defensive techniques, such as maintaining separation, will greatly enhance the soldier s ability to fight and win DEFENSE AGAINST AN ARMED OPPONENT An unarmed defender is always at a distinct disadvantage facing an armed opponent. It is imperative therefore that the unarmed defender understand and use the following principles to survive: a. Separation. Maintain a separation of at least 10 feet plus the length of the weapon from the attacker. This distance gives the defender time to react to any attempt by the attacker to close the gap and be upon the defender. The defender should also try to place stationary objects between himself and the attacker. b. Unarmed Defense. Unarmed defense against an armed opponent should be a last resort. If it is necessary, the defender s course of action includes: (1) Move the body out of the line of attack of the weapon. Step off the line of attack or redirect the attack of the weapon so that it clears the body. (2) Control the weapon. Maintain control of the attacking arm by securing the weapon, hand, wrist, elbow, or arm by using joint locks, if possible. (3) Stun the attacker with an effective counterattack. Counterattack should be swift and devastating. Take the vigor out of the attacker with a low, unexpected kick, or break a locked joint of the attacking arm. Strikes to motor nerve centers are effective stuns, as are skin tearing, eye gouging, and attacking of the throat. The defender can also take away the attacker s balance. (4) Ground the attacker. Take the attacker to the ground where the defender can continue to disarm or further disable him. (5) Disarm the attacker. Break the attacker s locked joints. Use leverage or induce pain to disarm the attacker and finish him or to maintain physical control. c. Precaution. Do not focus full attention on the weapon because the attacker has other body weapons to use. There may even be other attackers that you have not seen. d. Expedient Aids. Anything available can become an expedient aid to defend against an armed attack. The kevlar helmet can be used as a shield; similarly, the LCE and shirt jacket can be used to protect the defender against a weapon. The defender can also throw dirt in the attacker s eyes as a distraction. 5-15
79 5-4. ANGLES OF ATTACK Any attack, regardless of the type weapon, can be directed along one of nine angles (Figure 5-12). The defense must be oriented for each angle of attack. 5-16
80 a. No. 1 Angle of Attack. A downward diagonal slash, stab, or strike toward the left side of the defender s head, neck, or torso. b. No. 2 Angle of Attack. A downward diagonal slash, stab, or strike toward the right side of the defender s head, neck, or torso. c. No. 3 Angle of Attack A horizontal attack to the left side of the defender s torso in the ribs, side, or hip region. d. No. 4 Angle of Attack. The same as No. 3 angle, but to the right side. e. No. 5 Angle of Attack. A jabbing, lunging, or punching attack directed straight toward the defender s front. f. No. 6 Angle of Attack. An attack directed straight down upon the defender. g. No. 7 Angle of Attack. An upward diagonal attack toward the defender s lower-left side. h. No. 8 Angle of Attack. An upward diagonal attack toward the defender s lower-right side. i. No. 9 Angle of Attack. An attack directed straight up for example, to the defender s groin DEFENSE AGAINST A KNIFE When an unarmed soldier is faced with an enemy armed with a knife, he must be mentally prepared to be cut. The likelihood of being cut severely is less if the fighter is well trained in knife defense and if the principles of weapon defense are followed. A slash wound is not usually lethal or shock inducing; however, a stab wound risks injury to vital organs, arteries, and veins and may also cause instant shock or unconsciousness. a. Types of Knife Attacks. The first line of defense against an opponent armed with a knife is to avoid close contact. The different types of knife attacks follow: (1) Thrust. The thrust is the most common and most dangerous type of knife attack. It is a strike directed straight into the target by jabbing or lunging. (2) Slash. The slash is a sweeping surface cut or circular slash. The wound is usually a long cut, varying from a slight surface cut to a deep gash. (3) Flick. This attack is delivered by flicking the wrist and knife to extended limbs, inflicting numerous cuts. The flick is very distractive to the defender since he is bleeding from several cuts if the attacker is successful. (4) Tear. The tear is a cut made by dragging the tip of the blade across the body to create a ripping-type cut. (5) Hack. The hack is delivered by using the knife to block or chop with. (6) Butt. The butt is a strike with the knife handle. 5-17
81 b. Knife Defense Drills. Knife defense drills are used to familiarize soldiers with defense movement techniques for various angles of attack. For training, the soldiers should be paired off; one partner is named as the attacker and one is the defender. It is important that the attacker make his attack realistic in terms of distance and angling during training. His strikes must be accurate in hitting the defender at the intended target if the defender does not defend himself or move off the line of attack. For safety, the attacks are delivered first at one-quarter and one-half speed, and then at three-quarter speed as the defender becomes more skilled. Variations can be added by changing grips, stances, and attacks. (1) No. 1 angle of defense heck and lift. The attacker delivers a slash along the No. 1 angle of attack. The defender meets and checks the movement with his left forearm bone, striking the inside forearm of the attacker (Figure 5-13, Step 1). The defender s right hand immediately follows behind the strike to lift, redirect, and take control of the attacker s knife arm (Figure 5-13, Step 2). The defender brings the attacking arm around to his right side where he can use an arm bar, wrist lock, and so forth, to disarm the attacker (Figure 5-13, Step 3). He will have better control by keeping the knife hand as close to his body as possible (Figure 5-13, Step 4). 5-18
82 5-19
83 (2) No. 2 angle of defense check and ride. The attacker slashes with a No. 2 angle of attack. The defender meets the attacking arm with a strike from both forearms against the outside forearm, his bone against the attacker s muscle tissue (Figure 5-14, Step 1). The strike checks the forward momentum of the attacking arm. The defender s right hand is then used to ride the attacking arm clear of his body (Figure 5-14, Step 2). He redirects the attacker s energy with strength starting from the right elbow (Figure 5-14, Step 3). 5-20
84 5-21
85 (3) No. 3 angle of defense check and lift. The attacker delivers a horizontal slash to the defender s ribs, kidneys, or hip on the left side (Figure 5-15, Step 1). The defender meets and checks the attacking arm on the left side of his body with a downward circular motion across the front of his own body. At the same time, he moves his body off the line of attack. He should meet the attacker s forearm with a strike forceful enough to check its momentum (Figure 5-15, Step 2). The defender then rides the energy of the attacking arm by wiping downward along the outside of his own left forearm with his right hand. He then redirects the knife hand around to his right side where he can control or disarm the weapon (Figure 5-15, Step 3). 5-22
86 5-23
87 (4) No. 4 angle of defense check. The attacker slashes the defender with a backhand slashing motion to the right side at the ribs, kidneys, or hips. The defender moves his right arm in a downward circular motion and strikes the attacking arm on the outside of the body (Figure 5-16, Step 1). At the same time, he moves off the line of attack (Figure 5-16, Step 2). The strike must be forceful enough to check the attack. The left arm is held in a higher guard position to protect from a redirected attack or to assist in checking (Figure 5-16, Step 3). The defender moves his body to a position where he can choose a proper disarming maneuver (Figure 5-16, Step 4). 5-24

88 5-25
89 (5) Low No. 5 angle of defense parry. A lunging thrust to the stomach is made by the attacker along the No. 5 angle of attack (Figure 5-17, Step 1). The defender moves his body off the line of attack and deflects the attacking arm by parrying with his left hand (Figure 5-17, Step 2). He deflects the attacking hand toward his right side by redirecting it with his right hand. As he does this, the defender can strike downward with the left forearm or the wrist onto the forearm or wrist of the attacker (Figure 5-17, Step 3). The defender ends up in a position to lock the elbow of the attacking arm across his body if he steps off the line of attack properly (Figure 5-17, Step 4). 5-26
90 5-27
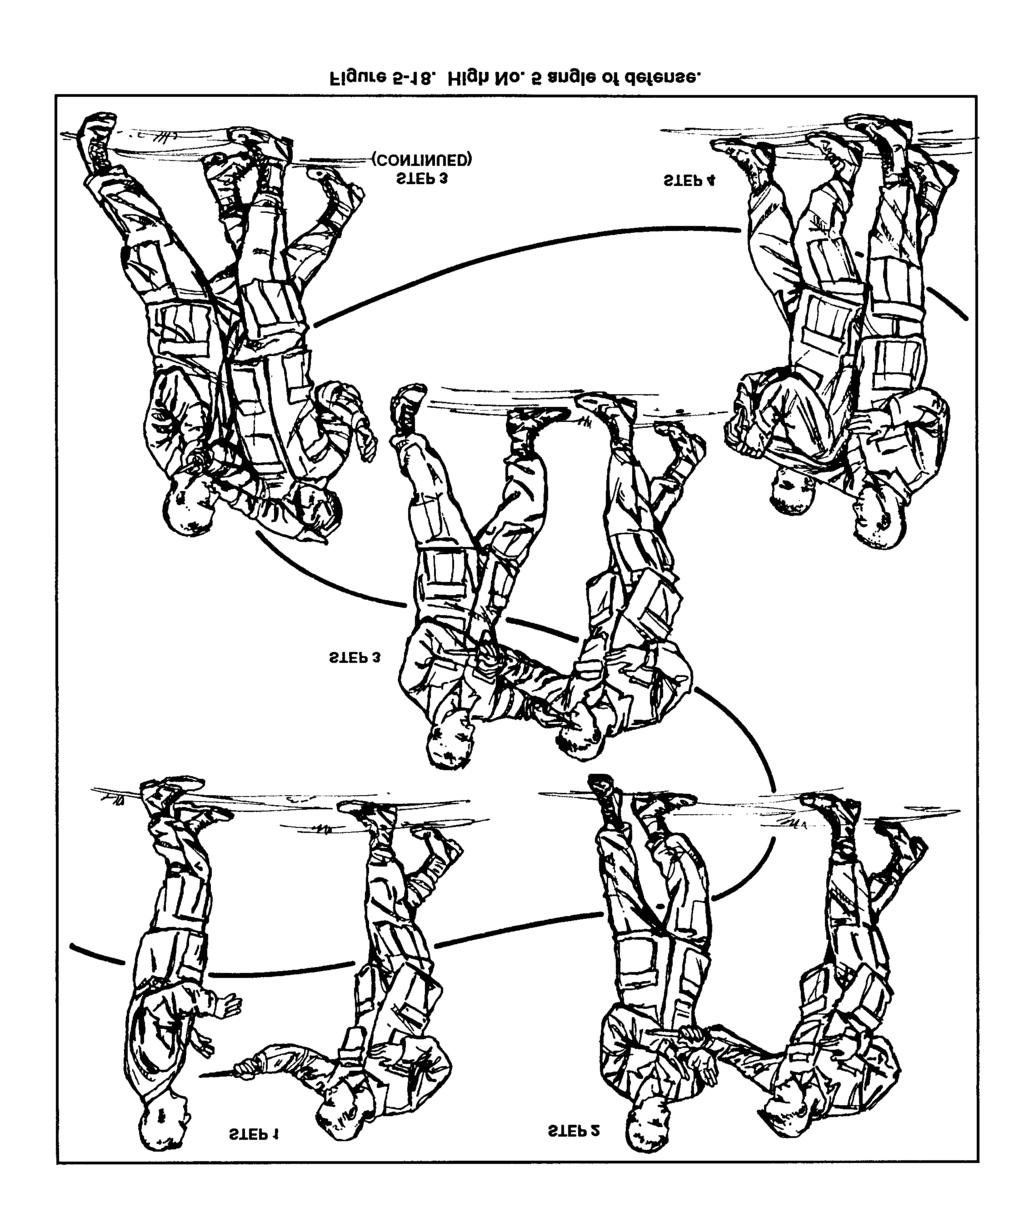
91 (6) High No. 5 angle of defense. The attacker lunges with a thrust to the face, throat, or solar plexus (Figure 5-18, Step 1). The defender moves his body off the line of attack while parrying with either hand. He redirects the attacking arm so that the knife clears his body (Figure 5-18, Step 2). He maintains control of the weapon hand or arm and gouges the eyes of the attacker, driving him backward and off balance (Figure 5-18, Step 3). If the attacker is much taller than the defender, it may be a more natural movement for the defender to raise his left hand to strike and deflect the attacking arm. He can then gouge his thumb or fingers into the jugular notch of the attacker and force him to the ground. Still another possibility for a high No. 5 angle of attack is for the defender to move his body off the line of attack while parrying. He can then turn his body, rotate his shoulder under the elbow joint of the attacker, and lock it out (Figure 5-18, Step 4). 5-28
92 5-29
93 (7) No. 6 angle of defense. The attacker strikes straight downward onto the defender with a stab (Figure 5-19, Step 1). The defender reacts by moving his body out of the weapon s path and by parrying or checking and redirecting the attacking arm, as the movement in the high No. 5 angle of defense (Figure 5-19, Step 2). The reactions may vary as to what is natural for the defender. The defender then takes control of the weapon and disarms the attacker (Figure 5-19, Step 3). 5-30
94 c. Follow-Up Techniques. Once the instructor believes the soldiers are skilled in these basic reactions to attack, follow-up techniques may be introduced and practiced. These drills make up the defense possibilities against the various angles of attack. They also enable the soldier to apply the principles of defense against weapons and allow him to feel the movements. Through repetition, the reactions become natural, and the soldier instinctively reacts to a knife attack with the proper defense. It is important not to associate specific movements or techniques with certain types of attack. The knife fighter must rely on his knowledge of principles and his training experience in reacting to a knife attack. No two attacks or reactions will be the same; thus, memorizing techniques will not ensure a soldier s survival. (1) Defend and clear. When the defender has performed a defensive maneuver and avoided an attack, he can push the attacker away and move out of the attacker s reach. (2) Defend and stun. After the defender performs his first defensive maneuver to a safer position, he can deliver a stunning blow as an immediate counterattack. Strikes to motor nerve points or attacker s limbs, low kicks, and elbow strikes are especially effective stunning techniques. (3) Defend and disarm. The defender also follows up his first defensive maneuver by maintaining control of the attacker s weapon arm, executing a stunning technique, and disarming the attacker. The stun distracts the attacker and also gives the defender some time to gain possession of the weapon and to execute his disarming technique UNARMED DEFENSE AGAINST A RIFLE WITH FIXED BAYONET Defense against a rifle with a fixed bayonet involves the same principles as knife defense. The soldier considers the same angles of attack and the proper response for any attack along each angle. a. Regardless of the type weapon used by the enemy, his attack will always be along one of the nine angles of attack at any one time. The soldier must get his entire body off the line of attack by moving to a safe position. A rifle with a fixed bayonet has two weapons: a knife at one end and a butt stock at the other end. The soldier will be safe as long as he is not in a position where he can be struck by either end during the attack. b. Usually, he is in a more advantageous position if he moves inside the length of the weapon. He can then counterattack to gain control of the situation as soon as possible. The following counterattacks can be used as defenses against a rifle with a fixed bayonet; they also provide a good basis for training. 5-31
95 (1) Unarmed defense against No. 1 angle of attack. The attacker prepares to slash along the No. 1 angle of attack (Figure 5-20, Step 1). The defender waits until the last possible moment before moving so he is certain of the angle along which the attack is directed (Figure 5-20, Step 2). This way, the attacker cannot change his attack in response to movement by the defender. When the defender is certain that the attack is committed along a specific angle (No. 1, in this case), he moves to the inside of the attacker and gouges his eyes (Figure 5-20, Step 2) while the other hand redirects and controls the weapon. He maintains control of the weapon and lunges his entire body weight into the eye gouge to drive the attacker backward and off balance. The defender now ends up with the weapon, and the attacker is in a poor recovery position (Figure 5-20, Step 3). 5-32
96 5-33
97 (2) Unarmed defense against No. 2 angle of attack. The attacker makes a diagonal slash along the No. 2 angle of attack (Figure 5-21, Step 1). Again, the defender waits until he is sure of the attack before moving. The defender then moves to the outside of the attacker and counterattacks with a thumb jab into the right armpit (Figure 5-21, Step 2). He receives the momentum of the attacking weapon and controls it with his free hand. He uses the attacker s momentum against him by pulling the weapon in the direction it is going with one hand and pushing with his thumb of the other hand (Figure 5-21, Step 3). The attacker is completely off balance, and the defender can gain control of the weapon. 5-34
98 5-35
99 (3) Unarmed defense against No. 3 angle of attack. The attacker directs a horizontal slash along the No. 3 angle of attack (Figure 5-22, Step 1). The defender turns and moves to the inside of the attacker; he then strikes with his thumb into the jugular notch (Figure 5-22, Step 2). His entire body mass is behind the thumb strike and, coupled with the incoming momentum of the attacker, the strike drives the attacker s head backward and takes his balance (Figure 5-22, Step 3). The defender turns his body with the momentum of the weapon s attack to strip the weapon from the attacker s grip (Figure 5-22, Step 4). 5-36
100 (4) Unarmed defense against No. 4 angle of attack. The attack is a horizontal slash along the No. 4 angle of attack (Figure 5-23, Step 1). The defender moves into the outside of the attacker (Figure 5-23, Step 2). He then turns with the attack, delivering an elbow strike to the throat (Figure 5-23, Step 3). At the same time, the defender s free hand controls the weapon and pulls it from the attacker as he is knocked off balance from the elbow strike. 5-37
101 (5) Unarmed defense against low No. 5 angle of attack. The attacker thrusts the bayonet at the stomach of the defender (Figure 5-24, Step 1). The defender shifts his body to the side to avoid the attack and to gouge the eyes of the attacker (Figure 5-24, Step 2). The defender s free hand maintains control of and strips the weapon from the attacker as he is driven backward with the eye gouge (Figure 5-24, Step 3). 5-38
102 (6) Unarmed defense against high No. 5 angle of attack. The attacker delivers a thrust to the throat of the defender (Figure 5-25, Step 1). The defender then shifts to the side to avoid the attack, parries the thrust, and controls the weapon with his trail hand (Figure 5-25, Step 2). He then shifts his entire body mass forward over the lead foot, slamming a forearm strike into the attacker s throat (Figure 5-25, Step 3). 5-39
103 (7) Unarmed defense against No 6 angle of attack. The attacker delivers a downward stroke along the No. 6 angle of attack (Figure 5-26, Step 1). The defender shifts to the outside to get off the line of attack and he grabs the weapon. Then, he pulls the attacker off balance by causing him to overextend himself (Figure 2-26, Step 2). The defender shifts his weight backward and causes the attacker to fall, as he strips the weapon from him (Figure 5-26, Step 3)
104 5-7. ADVANCED WEAPONS TECHNIQUES AND TRAINING For advanced training in weapons techniques, training partners should have the same skill level. Attackers can execute attacks along multiple angles of attack in combinations. The attacker must attack with a speed that offers the defender a challenge, but does not overwhelm him. It should not be a contest to see who can win, but a training exercise for both individuals. a. Continued training in weapons techniques will lead to the partners ability to engage in free-response fighting or sparring that is, the individuals become adept enough to understand the principles of weapons attacks, defense, and movements so they can respond freely when attacking or defending from any angle. b. Instructors must closely monitor training partners to ensure that the speed and control of the individuals does not become dangerous during advanced training practice. Proper eye protection and padding should be used, when applicable. The instructor should stress the golden rule in free-response fighting Do unto others as you would have them do unto you. Section III OFFENSIVE TECHNIQUES At ranges of 10 meters or more in most combat situations, small arms and grenades are the weapons of choice. However, in some scenarios, today s combat soldier must engage the enemy in confined areas, such as trench clearing or room clearing where noncombatants are present or when silence is necessary. In these instances, the bayonet or knife may be the ideal weapon to dispatch the enemy. Other than the side arm, the knife is the most lethal weapon in close-quarter combat BAYONET/KNIFE As the bayonet is an integral part of the combat soldier s equipment, it is readily available for use as a multipurpose weapon. The bayonet produces a terrifying mental effect on the enemy when in the hands of a well-trained and confident soldier. The soldier skilled in the use of the knife also increases his ability to defend against larger opponents and multiple attackers. Both these skills increase his chances of surviving and accomplishing the mission. (Although the following paragraphs say knife, the information also applies to bayonets.) a. Grips. The best way to hold the knife is either with the straight grip or the reverse grip. (1) Straight Grip. Grip the knife in the strong hand by forming a vee and by allowing the knife to fit naturally, as in gripping for a handshake. 5-41
105 The handle should lay diagonally across the palm. Point the blade toward the enemy, usually with the cutting edge down. The cutting edge can also be held vertically or horizontally to the ground. Use the straight grip when thrusting and slashing. (2) Reverse Grip. Grip the knife with the blade held parallel with the forearm, cutting edge facing outward. This grip conceals the knife from the enemy s view. The reverse grip also affords the most power for lethal insertion. Use this grip for slashing, stabbing, and tearing. b. Stances. The primary stances are the knife fighter s stance and the modified stance. (1) Knife fighter s stance. In this stance, the fighter stands with his feet about shoulder-width apart, dominant foot toward the rear. About 70 percent of his weight is on the front foot and 30 percent on the rear foot. He stands on the balls of both feet and holds the knife with the straight grip. The other hand is held close to his body where it is ready to use, but protected (Figure 5-27). 5-42
106 (2) Modified stance. The difference in the modified stance is the knife is held close to the body with the other hand held close over the knife hand to help conceal it (Figure 5-28). c. Range. The two primary ranges in knife fighting are long range and medium range. In long-range knife fighting, attacks consist of figure-eight slashes along the No. 1, No. 2, No. 7, and No. 8 angles of attack; horizontal slashes along the No. 3 and No. 4 angles of attack; and lunging thrusts to vital areas on the No. 5 angle of attack. Usually, the straight grip is used. In medium-range knife fighting, the reverse grip provides greater power. It is used to thrust, slash, and tear along all angles of attack. 5-43
107 5-9. KNIFE-AGAINST-KNIFE SEQUENCE The knife fighter must learn to use all available weapons of his body and not limit himself to the knife. The free hand can be used to trap the enemy s hands to create openings in his defense. The enemy s attention will be focused on the weapon; therefore, low kicks and knee strikes will seemingly come from nowhere. The knife fighter s priority of targets are the eyes, throat, abdominal region, and extended limbs. Some knife attack sequences that can be used in training to help develop soldiers knowledge of movements, principles, and techniques in knife fighting follow. a. Nos. 1 and 4 Angles. Two opponents assume the knife fighter s stance (Figure 5-29, Step 1). The attacker starts with a diagonal slash along the No. 1 angle of attack to the throat (Figure 5-29, Step 2). He then follows through with a slash and continues with a horizontal slash back across the abdomen along the No. 4 angle of attack (Figure 5-29, Step 3). He finishes the attack by using his entire body mass behind a lunging stab into the opponent s solar plexus (Figure 5-29, Step 4). 5-44
108 5-45
109 b. Nos. 5, 3, and 2 Angles. In this sequence, one opponent (attacker) starts an attack with a lunge along the No. 5 angle of attack. At the same time, the other opponent (defender) on the left moves his body off the line of attack, parries the attacking arm, and slices the biceps of his opponent (Figure 5-30, Step 1). The defender slashes back across the groin along the No. 3 angle of attack (Figure 5-30, Step 2). He finishes the attacker by continuing with an upward stroke into the armpit or throat along the No. 2 angle of attack (Figure 5-30, Step 3). Throughout this sequence, the attacker s weapon hand is controlled with the defender s left hand as he attacks with his own knife hand. 5-46
110 5-47
111 c. Low No. 5 Angle. In the next sequence, the attacker on the right lunges to the stomach along a low No. 5 angle of attack. The defender on the left moves his body off the line of attack while parrying and slashing the wrist of the attacking knife hand as he redirects the arm (Figure 5-31, Step 1). After he slashes the wrist of his attacker, the defender continues to move around the outside and stabs the attacker s armpit (Figure 5-31, Step 2). He retracts his knife from the armpit, continues his movement around the attacker, and slices his hamstring (Figure 5-31, Step 3). 5-48
112 d. Optional Low No. 5 Angle. The attacker on the right lunges to the stomach of his opponent (the defender) along the low No. 5 angle of attack. The defender moves his body off the line of attack of the knife. Then he turns and, at the same time, delivers a slash to the attacker s throat along the No. 1 angle of attack (Figure 5-32, Step 1). The defender immediately follows with another slash to the opposite side of the attacker s throat along the No. 2 angle of attack (Figure 5-32, Step 2). The attacker is finished as the opponent on the left (defender) continues to slice across the abdomen with a stroke along the No. 3 angle (Figure 5-32, Step 3). 5-49
113 5-10. RIFLE WITH FIXED BAYONET The principles used in fighting with the rifle and fixed bayonet are the same as when knife fighting. Use the same angles of attack and similar body movements. The principles of timing and distance remain paramount; the main difference is the extended distance provided by the length of the weapon. It is imperative that the soldier fighting with rifle and fixed bayonet use the movement of his entire body behind all of his fighting techniques not just upper-body strength. Unit trainers should be especially conscious of stressing full body mass in motion for power and correcting all deficiencies during training. Whether the enemy is armed or unarmed, a soldier fighting with rifle and fixed bayonet must develop the mental attitude that he will survive the fight. He must continuously evaluate each moment in a fight to determine his advantages or options, as well as the enemy s. He should base his defenses on keeping his body moving and off the line of any attacks from his opponent. The soldier seeks openings in the enemy s defenses and starts his own attacks, using all available bodyweapons and angles of attack. The angles of attack with rifle and fixed bayonet are shown in Figures 5-33 through
114 5-51
115 5-52
116 5-53
117 a. Fighting Techniques. New weapons, improved equipment, and new tactics are always being introduced; however, firepower alone will not always drive a determined enemy from his position. He will often remain in defensive emplacements until driven out by close combat. The role of the soldier, particularly in the final phase of the assault, remains relatively unchanged: His mission is to close with and disable or capture the enemy. This mission remains the ultimate goal of all individual training. The rifle with fixed bayonet is one of the final means of defeating an opponent in an assault. (1) During infiltration missions at night or when secrecy must be maintained, the bayonet is an excellent silent weapon. (2) When close-in fighting determines the use of small-arms fire or grenades to be impractical, or when the situation does not permit the loading or reloading of the rifle, the bayonet is still the weapon available to the soldier. (3) The bayonet serves as a secondary weapon should the rifle develop a stoppage. (4) In hand-to-hand encounters, the detached bayonet may be used as a handheld weapon. (5) The bayonet has many nonfighting uses, such as to probe for mines, to cut vegetation, and to use for other tasks where a pointed or cutting tool is needed. b. Development. To become a successful rifle-bayonet fighter, a soldier must be physically fit and mentally alert. A well-rounded physical training program will increase his chances of survival in a bayonet encounter. Mental alertness entails being able to quickly detect and meet an opponent s attack from any direction. Aggressiveness, accuracy, balance, and speed are essential in training as well as in combat situations. These traits lead to confidence, coordination, strength, and endurance, which characterize the rifle-bayonet fighter. Differences in individual body physique may require slight changes from the described rifle-bayonet techniques. These variations will be allowed if the individual s attack is effective. c. Principles. The bayonet is an effective weapon to be used aggressively; hesitation may mean sudden death. The soldier must attack in a relentless assault until his opponent is disabled or captured. He should be alert to take advantage of any opening. If the opponent fails to present an opening, the bayonet fighter must make one by parrying his opponent s weapon and driving his blade or rifle butt into the opponent with force. (1) The attack should be made to a vulnerable part of the body: face, throat, chest, abdomen, or groin. (2) In both training and combat, the rifle-bayonet fighter displays spirit by sounding off with a low and aggressive growl. This instills a feeling of confidence in his ability to close with and disable or capture the enemy. 5-54
118 (3) The instinctive rifle-bayonet fighting system is designed to capitalize on the natural agility and combatives movements of the soldier. It must be emphasized that precise learned movements will NOT be stressed during training. d. Positions. The soldier holds the rifle firmly but not rigidly. He relaxes all muscles not used in a specific position; tense muscles cause fatigue and may slow him down. After proper training and thorough practice, the soldier instinctively assumes the basic positions. All positions and movements described in this manual are for right-handed men. A left-handed man, or a man who desires to learn left-handed techniques, must use the opposite hand and foot for each phase of the movement described. All positions and movements can be executed with or without the magazine and with or without the sling attached. (1) Attack position. This is the basic starting position (A and B, Figure 5-40) from which all attack movements originate. It generally parallels a boxer s stance. The soldier assumes this position when running or hurdling obstacles. The instructor explains and demonstrates each move. 5-55
119 (a) Take a step forward and to the side with your left foot so that your feet are a comfortable distance apart. (b) Hold your body erect or bend slightly forward at the waist. Flex your knees and balance your body weight on the balls of your feet. Your right forearm is roughly parallel to the ground. Hold the left arm high, generally in front of the left shoulder. Maintain eye-to-eye contact with your opponent, watching his weapon and body through peripheral vision. (c) Hold your rifle diagonally across your body at a sufficient distance from the body to add balance and protect you from enemy blows. Grasp the weapon in your left hand just below the upper sling swivel, and place the right hand at the small of the stock. Keep the sling facing outward and the cutting edge of the bayonet toward your opponent. The command is, ATTACK POSITION, MOVE. The instructor gives the command, and the soldiers perform the movement. (2) Relaxed position. The relaxed position (Figure 5-41) gives the soldier a chance to rest during training. It also allows him to direct his attention toward the instructor as he discusses and demonstrates the positions and movements. To assume the relaxed position from the attack position, straighten the waist and knees and lower the rifle across the front of your body by extending the arms downward. The command is, RELAX. The instructor gives the command, and the soldiers perform the movement. e. Movements. The soldier will instinctively strike at openings and become aggressive in his attack once he has learned to relax and has developed instinctive reflexes. His movements do not have to be executed in any prescribed order. He will achieve balance 5-56
120 in his movements, be ready to strike in any direction, and keep striking until he has disabled his opponent. There are two basic movements used throughout bayonet instruction: the whirl and the crossover. These movements develop instant reaction to commands and afford the instructor maximum control of the training formation while on the training field. (1) Whirl movement. The whirl (Figure 5-42, Steps 1,2, and 3), properly executed, allows the rifle-bayonet fighter to meet a challenge from an opponent attacking him from the rear. At the completion of a whirl, the rifle remains in the attack position. The instructor explains and demonstrates how to spin your body around by pivoting on the ball of the leading foot in the direction of the leading foot, thus facing completely about. The command is, WHIRL. The instructor gives the command, and the soldiers perform the movement. (2) Crossover movement. While performing certain movements in rifle-bayonet training, two ranks will be moving toward each other. When the soldiers in ranks come too close to each other to safely execute additional movements, the crossover is used to separate the ranks a safe distance apart. The instructor explains and demonstrates how to move straight forward and 5-57
121 pass your opponent so that your right shoulder passes his right shoulder, continue moving forward about six steps, halt, and without command, execute the whirl. Remain in the attack position and wait for further commands. The command is, CROSSOVER. The instructor gives the command, and the soldiers perform the movement. NOTE: Left-handed personnel cross left shoulder to left shoulder. (3) Attack movements. There are four attack movements designed to disable or capture the opponent: thrust, butt stroke, slash, and smash. Each of these movements may be used for the initial attack or as a follow-up should the initial movement fail to find its mark. The soldiers learn these movements separately. They will learn to execute these movements in a swift and continuous series during subsequent training. During all training, the emphasis will be on conducting natural, balanced movements to effectively damage the target. Precise, learned movements will not be stressed. (a) Thrust. The objective is to disable or capture an opponent by thrusting the bayonet blade into a vulnerable part of his body. The thrust is especially effective in areas where movement is restricted for example, trenches, wooded areas, or built-up areas. It is also effective when an opponent is lying on the ground or in a fighting position. The instructor explains and demonstrates how to lunge forward on your leading foot without losing your balance (Figure 5-43, Step 1) and, at the same time, drive the bayonet with great force into any unguarded part of your opponent s body. To accomplish this, grasp the rifle firmly with both hands and pull the stock in close to the right hip; partially extend the left arm, guiding the point of the bayonet in the general direction of the opponent s body (Figure 5-43, Step 2). Quickly complete the extension of the arms and body as the leading foot strikes the ground so that the bayonet penetrates the target (Figure 5-43, Step 3). To withdraw the bayonet, keep your feet in place, shift your body weight to the rear, and pull rearward along the same line of penetration (Figure 5-43, Step 4). Next, assume the attack position in preparation to continue the assault (Figure 5-43, Step 5). This movement is taught by the numbers in three phases: 1. THRUST AND HOLD, MOVE. 2. WITHDRAW AND HOLD, MOVE. 3. ATTACK POSITION, MOVE. 5-58
122 At combat speed, the command is, THRUST SERIES, MOVE. Training emphasis will be placed on movement at combat speed. The instructor gives the commands, and the soldiers perform the movements. 5-59
123 (b) Butt stroke. The objective is to disable or capture an opponent by delivering a forceful blow to his body with the rifle butt (Figure 5-44, Steps 1, 2,3, and 4, and Figure 5-45, Steps 1,2,3, and 4). The aim of the butt stroke may be the opponent s weapon or a vulnerable portion of his body. The butt stroke may be vertical, horizontal, or somewhere between the two planes. The instructor explains and demonstrates how to step forward with your trailing foot and, at the same time using your left hand as a pivot, swing the rifle in an arc and drive the rifle butt into your opponent. To recover, bring your trailing foot forward and assume the attack position. The movement is taught by the numbers in two phases: 1. BUTT STROKE TO THE (head, groin, kidney) AND HOLD, MOVE. 2. ATTACK POSITION, MOVE. At combat speed, the command is, BUTT STROKE TO THE (head, groin, kidney) SERIES, MOVE. Training emphasis will be placed on movement at combat speed. The instructor gives the commands, and the soldiers perform the movement. 5-60
124 5-61
125 (c) Slash. The objective is to disable or capture the opponent by cutting him with the blade of the bayonet. The instructor explains and demonstrates how to step forward with your lead foot (Figure 5-46, Step 1). At the same time, extend your left arm and swing the knife edge of your bayonet forward and down in a slashing arc (Figure 5-46, Steps 2 and 3). To recover, bring your trailing foot forward and assume the attack position (Figure 5-46, Step 4). This movement is taught by the number in two phases: 1. SLASH AND HOLD, MOVE. 2. ATTACK POSITION, MOVE. At combat speed, the command is, SLASH SERIES, MOVE. Training emphasis will be placed on movement at combat speed. The instructor gives the commands, and the soldiers perform the movements. 5-62
126 5-63
127 (d) Smash. The objective is to disable or capture an opponent by smashing the rifle butt into a vulnerable part of his body. The smash is often used as a follow-up to a butt stroke and is also effective in wooded areas and trenches when movement is restricted. The instructor explains and demonstrates how to push the butt of the rifle upward until horizontal (Figure 5-47, Step 1) and above the left shoulder with the bayonet pointing to the rear, sling up (Figure 5-47, Step 2). The weapon is almost horizontal to the ground at this time. Step forward with the trailing foot, as in the butt stroke, and forcefully extend both arms, slamming the rifle butt into the opponent (Figure 5-47, Step 3). To recover, bring your trailing foot forward (Figure 5-47, Step 4) and assume the attack position (Figure 5-47, Step 5). This movement is taught by the numbers in two phases: 1. SMASH AND HOLD, MOVE. 2. ATTACK POSITION, MOVE. At combat speed, the command is, SMASH SERIES, MOVE. Training emphasis will be placed on movement at combat speed. The instructor gives the commands, and the soldiers perform the movements. 5-64
128 5-65
129 (4) Defensive movements. At times, the soldier may lose the initiative and be forced to defend himself. He may also meet an opponent who does not present a vulnerable area to attack. Therefore, he must make an opening by initiating a parry or block movement, then follow up with a vicious attack. The follow-up attack is immediate and violent. CAUTION TO MINIMIZE WEAPON DAMAGE WHILE USING BLOCKS AND PARRIES, LIMIT WEAPON-TO-WEAPON CONTACT TO HALF SPEED DURING TRAINING. (a) Parry movement. The objective is to counter a thrust, throw the opponent off balance, and hit a vulnerable area of his body. Timing, speed, and judgment are essential factors in these movements. The instructor explains and demonstrates how to Parry right. If your opponent carries his weapon on his left hip (left-handed), you will parry it to your right. In execution, step forward with your leading foot (Figure 5-48, Step 1), strike the opponent s rifle (Figure 5-48, Step 2), deflecting it to your right (Figure 5-48, Step 3), and follow up with a thrust, slash, or butt stroke. 5-66
130 5-67
131 Parry left. If your opponent carries his weapon on his right hip (right-handed), you will parry it to your left. In execution, step forward with your leading foot (Figure 5-49, Step 1), strike the opponent s rifle (Figure 5-49, Step 2), deflecting it to your left (Figure 5-49, Step 3), and follow up with a thrust, slash, or butt stroke. 5-68
132 5-69
133 A supplementary parry left is the follow-up attack (Figure 5-50, Steps 1,2,3, 4, and 5). Recovery. Immediately return to the attack position after completing each parry and follow-up attack. The movement is taught by the numbers in three phases: 1. PARRY RIGHT (OR LEFT), MOVE. 2. THRUST MOVE. 3. ATTACK POSITION, MOVE. At combat speed, the command is, PARRY RIGHT (LEFT) or PARRY (RIGHT OR LEFT) WITH FOLLOW-UP ATTACK. The instructor gives the commands, and the soldiers perform the movements. 5-70
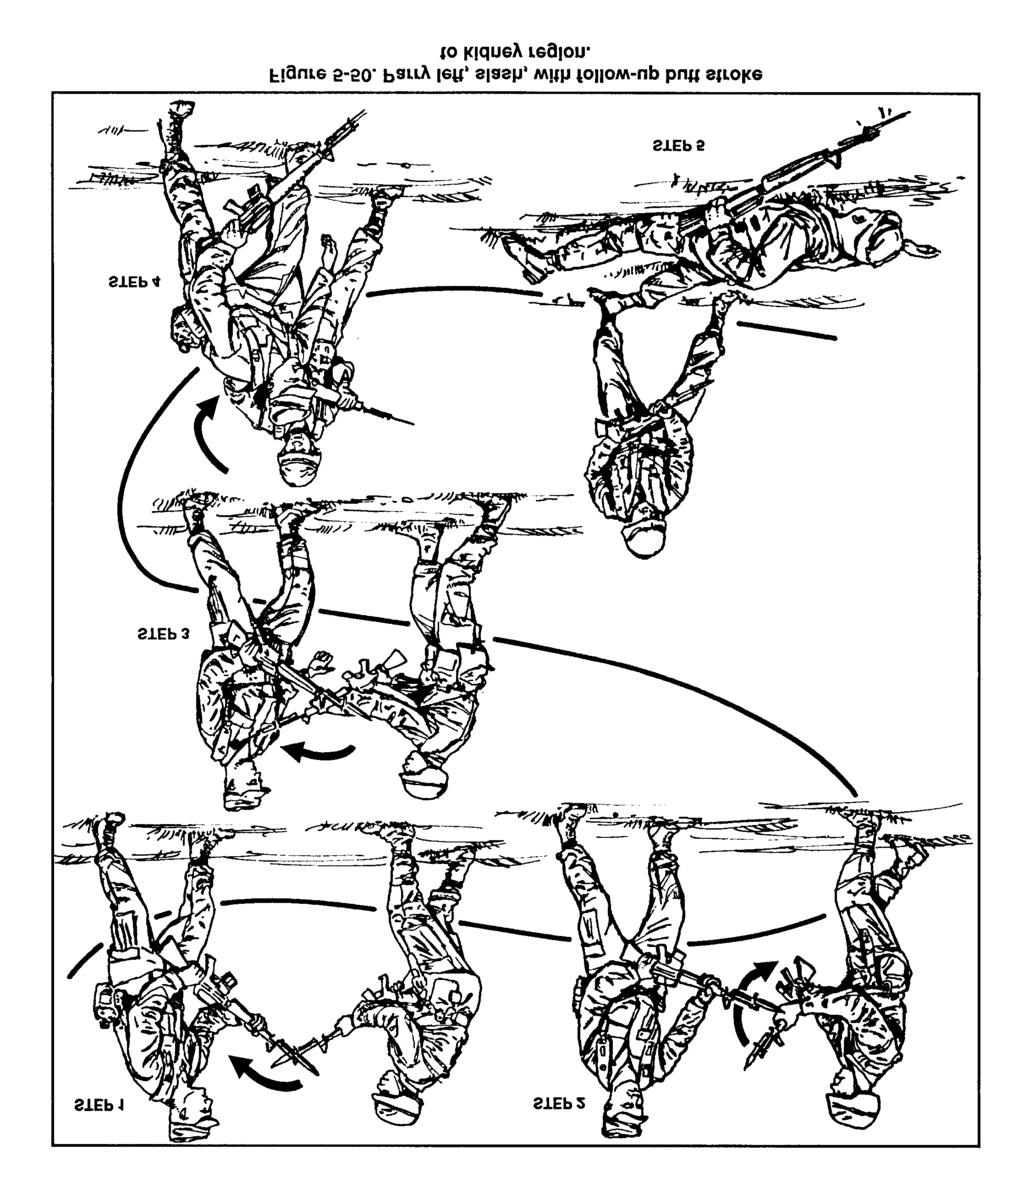
134 5-71
Effective Strikes are KING!
 VITAL TARGETS The body is divided into three sections: high, middle, and low. Each section contains vital targets. The effects of striking these targets follow: Effective Strikes are KING! Effective striking
11 Kyu Preparatory Techniques prior to commencing study of the Fighting Techniques
 CADET 11 Kyu 11 th KYU Preparatory Techniques prior to commencing study of the Fighting Techniques STANCES: Attention Ready Left Lead Fighting Stance Right Lead Fighting Stance Straddle Stance (Horse Riding)
CHAPTER 4 ADVANCED GROUND-FIGHTING TECHNIQUES
 (FM 21-150) CHAPTER 4 ADVANCED GROUND-FIGHTING TECHNIQUES After achieving an understanding of the basics of ground fighting, other elements of fighting on the ground are added. These techniques, however,
How To Start And WIN Any Fight!
 by Grandmaster Dr. Ted Gambordella First Punches That Never Fail Everything You Need To Know To Win Every Fight...You Ever Start! Neck Breaking Kicks That End It Period! Chokes & Throws Ground Finishes
FUNDAMENTALS OF CLOSE COMBAT
 CHAPTER 1 FUNDAMENTALS OF CLOSE COMBAT This chapter describes all techniques for a right-handed person. However, all techniques can be executed from either side. The Marine is depicted in camouflage utilities.
Stanford Kenpo Karate Association BLUE BELT. Version 10/2008 by T. Shem
 BLUE BELT Kenpo Blue Belt Requirements Techniques Supplemental Techniques 1. Thousand Mallets Crossing Swords A 2. Driving the Spike Chinese Eclipse 3. Siege of the Temple Ox Cart B 4. Tangled Wings --
GROUND COMBATIVES TRAINING STEP-BY-STEP INSTRUCTION MANUAL PICTORAL ANNEX FOR EXISTING TSP S
 GROUND COMBATIVES TRAINING STEP-BY-STEP INSTRUCTION MANUAL PICTORAL ANNEX FOR EXISTING TSP S Stand Up In Base - This is the most basic technique. It allows the Student to stand up in the presence of an
SDTS Certification Grade Exam 7: Weapons Offensive Tactics (SDTS Module Combatives Module 9, 11)
") SDTS Certification Grade Exam 7: Weapons Offensive Tactics (SDTS Module Combatives Module 9, 11) Fight with the weapon All weapons are designed to work with your hand to hand training Grip strength and
SDTS Certification Grade Exam 7: Weapons Offensive Tactics (SDTS Module Combatives Module 9, 11) Fight with the weapon All weapons are designed to work with your hand to hand training Grip strength and
FM P r e f a c e
 Preface This field manual contains information and guidance pertaining to rifle-bayonet fighting and hand-to-hand combat. The hand-to-hand combat portion of this manual is divided into basic and advanced
6 th Kup - 5 th Kup (Green belt - blue tab)
") 6 th Kup - 5 th Kup (Green belt - blue tab) Long stance - Double knife-hand strike : Hammer-fist strike : Back-fist strike : Spear-Hand Punch : Back stance Single fist guarding block : Double fist guarding
6 th Kup - 5 th Kup (Green belt - blue tab) Long stance - Double knife-hand strike : Hammer-fist strike : Back-fist strike : Spear-Hand Punch : Back stance Single fist guarding block : Double fist guarding
TACTICAL COMBATIVES COURSE STUDY GUIDE
 TACTICAL COMBATIVES COURSE STUDY GUIDE STANDING TECHNIQUES 1. ROUND KICK (All Minor Tasks) 1. Push off on the ball of your trail leg foot, and then step somewhat toward the target and laterally to the
The basic warrior stance serves as the foundation for initiating knife techniques and is executed as follows:
 Marine Corps Martial Arts Program 2-71 Stance The basic warrior stance serves as the foundation for initiating knife techniques and is executed as follows: The left hand serves as a vertical shield protecting
KRAV MAGA LEVEL 1 CURRICULUM
 KRAV MAGA LEVEL 1 CURRICULUM I. Fighting Stance a. This is the posture the defender takes preparing for a confrontation b. Foot Positions 1. Assuming defender is right handed, he should stand with his
Preparatory Techniques prior to commencing study of the Fighting Techniques
 White Belt with Red Stripe Preparatory Basic Techniques Preparatory Techniques prior to commencing study of the Fighting Techniques STANCES: Attention Ready Left Lead Fighting Stance Right Lead Fighting
 www.theselfdefenseco.com Training System Manual MODULE TWO ADVANCED METHODS OF STRIKING INTRODUCTION MODULE TWO: ADVANCED METHODS OF STRIKING In this module we ll cover some of the more advanced striking
Senior BLACK Belt Curriculum Your Senior BLACK curriculum will take approximately 18 months or 200 classes.
 A black belt is a white belt who never quit. Senior BLACK Belt Curriculum Your Senior BLACK curriculum will take approximately 18 months or 200 classes. Senior BLACK Belt Techniques 1) All WHITE Belt Techniques
KRAV MAGA LEVEL 1 CURRICULUM
 KRAV MAGA LEVEL 1 CURRICULUM Technique Breakdown I. Fighting Stance a. This is the posture the defender takes preparing for a confrontation b. Foot Positions 1. Assuming defender is right handed, he should
The Complete Book of One Steps
 By Grandmaster Dr. Ted Gambordella All the Basic One Steps You need from White to Green Belt. By Grandmaster Dr. Ted Gambordella 1 Since I began my martial arts training over 35 years ago. I have found
1. POST: Options FRAME: Options 1-3
 Name: Date: Class Number: Score: /10 GO / NO-GO UNITED STATES ARMY COMBATIVES COURSE Basic Combatives Course Technical Evaluation 1. POST: Options 1-3 Performance Steps (Must pass 5 of 7) GO NO-GO Student
Copyright 2001 Dr. Ted Gambordella
 INTRODUCTION Tonfa tactics Perhaps no other weapon in karate is as practical, powerful, and versatile as the tonfa, yet no other weapon is so little known and used. Why? I feel that the reasons are twofold.
Seven Star Women s Kung Fu Basics Handout
 Seven Star Women s Kung Fu Basics Handout THREE PRIMARY TARGETS 1. Eyes 2. Throat 3. Knees ALL TARGETS LISTED FROM THE HEAD DOWN 1. Forehead 2. Occipital Bone 3. Zygomatic Temporal Nerve (Temple) 4. Bridge
Warm Ups. Standing Stretches
 Warm Ups Mild warm-ups are a necessity for everyone. The need for warm-ups increases with age as the body becomes less elastic over time. It is recommended that you execute the warm-up routine in this
Appendix 1. Strikes with the Stick and Cane
 Appendix 1. Strikes with the Stick and Cane I have always found jointlocks and takedowns with the stick and cane to be far more interesting than the strikes, most of which are obvious, even to beginners.
UNITED STATES MARINE CORPS Martial Arts Center of Excellence The Basic School Marine Corps Combat Development Command Quantico, Virginia 22134
 UNITED STATES MARINE CORPS Martial Arts Center of Excellence The Basic School Marine Corps Combat Development Command Quantico, Virginia 22134 DETAILED OUTLINE KNIFE TECHNIQUES INTRODUCTION (3 MIN) 1.
Krav Maga Yellow Belt Curriculum
 Krav Maga Yellow Belt Curriculum Prerequisites for advancement: 50 beginner-level class hours, Yellow Belt midterm, and instructor approval Target time: approximately 4-6 months Straight Punch Straight
1 & 3 Step Sparring Techniques
 1 & 3 Step Sparring Techniques These instructions are for reference only to help with your personal training outside of class. They are not a replacement for instruction or training received in class.
Hyung Standards: Sam-Il through Moon-Moo
 General Comments: Always pivot on the ball of the foot. When you pivot on your heel you immobilize your hip. Sam-Il Double middle block starts with both fists at shoulder level. High double forearm block
How to Make a Proper Fist
 How to Make a Proper Fist Bend your index finger so that the first knuckle touches the second knuckle of your thumb, tucking in the fold of skin that is between your thumb and index finger. Then fold your
Introduction To Boxing! The Basics. Stretching Stance Footwork Power Punches Defense Hand wrapping
 Introduction To Boxing! The Basics Stretching Stance Footwork Power Punches Defense Hand wrapping Stretching (A Boxer should always stretch 5-10 mins. Before training..) 2 Arm & Chest Stretches Elbow Pull
Grandmaster Dr. Ted Gambordella
 The Complete Book of Wrist Locks By Grandmaster Dr. Ted Gambordella Everything you need to know about Wrist Locks. By Grandmaster Dr. Ted Gambordella 1 I have always loved to do wrist locks since I first
Copyright 2001 Dr. Ted Gambordella
 INTRODUCTION This book has been written as a training and information manual for people and students who may find that they have to defend themselves in the street from attack by those who may have such
Green Belt Requirements
 Green Belt Requirements Techniques 1. Dancing Cat 2. Gun Attack A, B 3. Slashing Claws 4. Snapping the Vines 5. Rickshaw 6. Fallen Warrior A 7. Striking the Gong 8. Wielding the Torch 9. Soaring Eagle
YELLOW BELT CURRICULUM
 YELLOW BELT CURRICULUM 1. Stance a. Neutral stance b. Fighting Stance 2. Movement a. Forward, Back, Left, Right b. Shadow Boxing c. Movement while on the ground d. Basic Takedown Defense (sprawl) 3. Punches
AIKI COMBAT JUJITS CANE TECHNIQUES
 AIKI COMBAT JUJITS CANE TECHNIQUES White Tiger Productions 2012 Copyright 2013 by White Tiger Production All rights are reserved. Printed in the United States of America. No Part of this book may be used
Yellow Belt Grading Requirements - Details
 Yellow Belt Grading Requirements - Details Stance and movement: Horse Stance Looking for: Feet shoulder width apart or wider. Knees above feet. Feet face forwards. Thighs ideally parallel with ground.
Junior BLACK Belt Curriculum Your Junior BLACK curriculum will take approximately 18 months or 200 classes.
 A black belt is a white belt who never quit. Junior BLACK Belt Curriculum Your Junior BLACK curriculum will take approximately 18 months or 200 classes. Junior BLACK Belt Techniques 1) All WHITE Belt Techniques
Basic Combatives Course Handbook. July
 Basic Combatives Course Handbook July 2017 1 TABLE OF CONTENTS React to Contact....6 Grappling Over Weapons. 7 Post, Frame, Hook with Head Control..13 Option 3...21 Basic Stand-Up Fighting Techniques...29
KRIYA LOWER BACK AND HIPS
 KRIYA LOWER BACK AND HIPS 1. Pelvic Grind Left. Place your hands on your knees and begin grinding yourself in a big, smooth circle going to the left. Lift the chest up high as you tilt the pelvis back,
B-immobility from structural or organic damage
 DRAGON'S TOUCH weaknesses of the human anatomy by: Hei Long This volume (and the ones to follow) concentrates on the 43 major pressure points of the body. Of course, there are quite a few more, but these
Junior White Belt Syllabus
 Junior White Belt Syllabus 1. Mat Etiquette 3. Blocking Kata 4. Side Breakfalls 5. Front Breakfall 6. Rolling Breakfall 7. Back Breakfall 8. Breaking a Front Strangle (2) 9. Breaking a Back Strange 10.
Black Belt KBK Kickboxing Syllabus. Line Work -Punches (Conducted With Bouncing Movement)
") Line Work -Punches (Conducted With Bouncing Movement) 1. Jab, Cross Punch 2. Backfist, Reverse Punch 3. Hook Punch (Lead Arm), Uppercut (Back Arm) 4. Step Through Jab, Cross Punch 5. Step Through Backfist,
Line Work -Punches (Conducted With Bouncing Movement) 1. Jab, Cross Punch 2. Backfist, Reverse Punch 3. Hook Punch (Lead Arm), Uppercut (Back Arm) 4. Step Through Jab, Cross Punch 5. Step Through Backfist,
FM COMBATIVES
 FM 21-150 Table of Contents RDL Homepage Document Information Download Instructions *FM 21-150 FIELD MANUAL No. 21-150 HEADQUARTERS DEPARTMENT OF THE ARMY Washington, DC, 30 September 1992 FM 21-150 COMBATIVES
Marine Corps Martial Arts
 MCRP 3-02B Marine Corps Martial Arts U.S. Marine Corps 18 February 1999 www.carburetor-manual.com Would you like some Free Manuals? http://carburetor-manual.com/free-shop-manual-club-t-13.html Also visit
Yellow Belt Requirements
 Yellow Belt Requirements Techniques 1. Capturing Paws A 2. Sharpening the Blade A, B 3. Escape of the Lamb A 4. Chopping Bamboo A 5. Evading the Samurai A 6. Grasping Honor B 7. Entering the Shrine A 8.
Self-defence. The vulnerable points of your attacker. The weapons to defend yourself. head eyes nose throat. your voice. teeth.
 Self-defence If it should become necessary for you to defend yourself, it is a good idea to be prepared. You can use the following techniques: Use your body language to radiate self-confidence! The weapons
1 & 3 Step Sparring Techniques
 1 & 3 Step Sparring Techniques These instructions are for reference only to help with your personal training outside of class. They are not a replacement for instruction or training received in class.
MSD RYU INTERNATIONAL CLOSE COMBAT KRAV MAGA CURRICULUM
 MSD RYU INTERNATIONAL CLOSE COMBAT KRAV MAGA CURRICULUM YELLOW BELT LEVEL 1 There are no prerequisites or fitness level requirements to start. I. Stance A. Neutral Stance B. Fighting Stance II. Movement
Hyung Standards: Chon-Ji through Choong-Moo
 There are three steps in learning a hyung: 1 Learn the steps 2 Perfect the stances and techniques 3 Apply the attacks and blocks, fight for your life. Ready Stance fists start in front of shoulder and
2990 Lorne Scots Royal Canadian Army Cadet Corps Rifle Drill
 2990 Lorne Scots Royal Canadian Army Cadet Corps Rifle Drill Page 1 of 27 TABLE OF CONTENTS PARA ITEM PAGE Section 1 BASIC RIFLE DRILL 1.1 INTRODUCTION 3 1.2 ATTENTION 5 1.3 STAND AT EASE FROM ATTENTION
FREE-STYLE KENPO KARATE AS TAUGHT BY
 LEE S KENPO KARATE Prancing Deer Curriculum Block #2 Belt Requirements AMERICAN FREE-STYLE KENPO KARATE AS TAUGHT BY Master LOGAN LEE Prancing Deer Techniques: Chinese Thumb Screw Hidden Fist Plucking
United States Army Combatives School LEVEL III
 United States Army Combatives School LEVEL III Boxing stance The boxing stance is used to allow the fighter to assume an offensive posture conducive to attack while still being able to move and defend
Excerpted from French Gymnastics or method to be used for physical education By Hugues Coudol, Translated by P.T.
 Excerpted from French Gymnastics or method to be used for physical education By Hugues Coudol, 1864. Translated by P.T. Crawley, 2017 Principles of French Boxing First lesson One must first exercise the
Team Dojo Novice Test Score Sheet Overall
 Chief Examiner Only Candidate Team Dojo Novice Test Sheet Overall Test Sections Technique Drills Basic Techniques Physical Requirements Basic Kicks Power Kicks Combinations Self Defense Sparring s! - +
10 th Kup White Belt. The Basics
 10 th Kup White Belt Starting Tae Kwon Do as a white belt often feels rather daunting, especially when there are so many students around you that appear to make all the moves seem effortless. Just remember
MHBYW Dynasty Program
 MHBYW Dynasty Program Level 3: Red Skill Properly Executed? Comment Staggered/Square Stance Yes No Motion Yes No Starting Positions Neutral Yes No Top Yes No Bottom Yes No Four Defensive Stops Yes No Head,
PARTNER With all partner stretches: communicate with partner and use caution!!
 - warm up prior to stretching - isolate the muscle group to be stretched - move slowly and smoothly into stretch - use proper mechanics and correct alignment - breathe normal - slowly come out of stretch
Copyright 2001 Dr. Ted Gambordella
 1 INTRODUCTION CHOKES Chokes. If you are in a life or death fight situation and you absolutely want to make sure that the fight will NOT continue, and that you will be the Winner, Choke Them Out! Nothing
Shaolin Chuan Fa Requirements for Purple Belt
 Shaolin Chuan Fa Requirements for Purple Belt Stances The heart of any movement is the stance, because your position and balance dictates your ability to perform the desired strike or kick, or to evade
Pulling and leading. From the first moment you got hold of the Spikey you must aim it at the attacker and stick it
 12 Pulling and leading As mentioned previously, even though this looks like a simple method of attack, it is still very effective and therefore presented to you. an attacker counts on the victim's feelings
Kime no Kata. Tsukkomi (Dagger Thrust to Stomach) Kirikomi (Downward Slash) Nuki kake (Sword Unsheathing) Kirioroshi (Downward Cut)
 Kirikomi (Downward Slash) Nuki kake (Sword Unsheathing) Kirioroshi (Downward Cut)") Kime no Kata Kime no Kata 1 of 12 Most of the following descriptions are taken from Kodokan Judo, Jigoro Kano, published by Kodansha International Tokyo & New York, page 146 and from pages 173 to191. Kime
Kime no Kata Kime no Kata 1 of 12 Most of the following descriptions are taken from Kodokan Judo, Jigoro Kano, published by Kodansha International Tokyo & New York, page 146 and from pages 173 to191. Kime
STEP 1. STANCE. The stance must be a consistent, repeatable and comfortable.
 STEP 1. STANCE The body can be divided into 2 parts the upper body from the hips up and the lower body from the hips down. The upper part of the body must maintain consistent position from shot to shot
CLOSE QUARTER COMBAT B-GL /PT-001 (BILINGUAL) WARNING
 WARNING") B-GL-318-018/PT-001 CLOSE QUARTER COMBAT (BILINGUAL) WARNING Although not classified this publication, or any part of it, may be exempt from disclosure to the public under the Access to Information Act.
B-GL-318-018/PT-001 CLOSE QUARTER COMBAT (BILINGUAL) WARNING Although not classified this publication, or any part of it, may be exempt from disclosure to the public under the Access to Information Act.
LESSON ASSIGNMENT. Remove an Upper Airway Obstruction in an Adult , Clear an Upper Airway Obstruction.
 LESSON ASSIGNMENT LESSON 5 Remove an Upper Airway Obstruction in an Adult. TEXT ASSIGNMENT Paragraphs 5-1 through 5-7. TASK TAUGHT LESSON 081-831-0019, Clear an Upper Airway Obstruction. After completing
Why study..., Women and the..., Children..., Spirit of teaching... Tie the belt, Courtesy, Basis for Promotion, and Passive Guard Position
 TABLE OF CONTENTS ACKNOWLEDGEMENTS...9 FORWARD...10 REFLEECTIONS...12 INTRODUCTION...14 CHAPTER 1...17 Historical overview By Nancy R. Bakemeier CHAPTER 2...33 Why study..., Women and the..., Children...,
8 Pieces of Brocade. 1. Two hands lifting the sky with finger interlocked to harmonize the triple warmers.
 8 Pieces of Brocade Preparing/standing form: Move left feet one step to the left side, feet with shoulder width, relax and bend knee slightly, stand strict, tongue touch the upper jaw, close lower jaw,
Troy s Dorsey Kickboxing Secrets World Champion Troy Dorsey Kick Boxing Secrets
 World Champion Troy Dorsey Kick Boxing Secrets Copyright 2003 Troy Dorsey 1 Copyright 2003 Troy Dorsey 2 Troy with George Forman at the 2000 World Boxing Hall of Fame Banquet Copyright 2003 Troy Dorsey
Movement Chart for Seiunchin Page 1 of 7
 Movement Chart for eiunchin Page 1 of 7 shoulder-width divisions Kata available on video and DVD from your sensei. tart 1 Ichi 2 i tart in parallel stance facing north. Bring your heels together. Bow.
RIFLE DRILL. 1. General. Before commencing instruction in rifle drill, it is important that the cadets receive instruction in the parts of the rifle.
 RIFLE DRILL 1. General. Before commencing instruction in rifle drill, it is important that the cadets receive instruction in the parts of the rifle. 2. Rifle Movements. Unless stated otherwise, cadets
LESSON 2: THE FIRST LIFE- SAVING STEPS
 LESSON 2: THE FIRST LIFE- SAVING STEPS automatic external defibrillators (AEDs) cardiac arrest heart attack heimlich maneuver rescue breathing stroke INTRODUCTION In emergency situations, the people involved
Ab Plank with Straight Leg Raise
 Ab Plank with Straight Leg Raise Position yourself face up with your knees bent at 90 degrees, feet flat on the floor. Your hands should be directly under your shoulders facing forward. While in this position
TARGETS: THE ARMS YIN METAL
 TARGETS: THE ARMS The targets of the arms are vital to developing an understanding of karate. We must consider that our techniques are usually a reaction to an opponent s attack, and an opponent s arms
40 Allied Drive Dedham, MA (office)
") Standing forward flexion Stand facing a mirror with the hands rotated so that the thumbs face forward. Raise the arm upward keeping the elbow straight. Try to raise the arm by hinging at the shoulder as
Standing forward flexion Stand facing a mirror with the hands rotated so that the thumbs face forward. Raise the arm upward keeping the elbow straight. Try to raise the arm by hinging at the shoulder as
S t r e t c h i n g E x e r c i s e s
 Stretches for side of neck: 1. Sit or stand with arms hanging loosely at sides 2. Turn head to one side, then the other 3. Hold for 5 seconds, each side 4. Repeat 1 to 3 times Stretches For the side of
Crowd Control. Course Law Enforcement II
 Course Law Enforcement II Unit XI Crowd Control Essential Question How does a police officer effectively handle a hostile crowd? TEKS 130.294(c) (11)(A)(B) Prior Student Learning Use of Force Estimated
Defense Against Multiple Opponents (36)
") th Dan Requirements th Degree black Belt / General Requirements Successful completion of all requirements for th degree black-belt signifies master-level. All candidates for th degree black-belt must:
th Dan Requirements th Degree black Belt / General Requirements Successful completion of all requirements for th degree black-belt signifies master-level. All candidates for th degree black-belt must:
TARGET FOCUS COMBAT. TARGETS Page I of VI
 TARGET FOCUS COMBAT Page I of VI Targets - 1. They are places where injuries typically occur. 2. They effect the way we breath, think and move! 3. They have a specific associated spinal reflex. It s important
INDEX. Created January 8, 1956 Explanation July 15, 1987 Revised December 1, 1992 Printed April 1999
 INDEX Created January 8, 1956 Explanation July 15, 1987 Revised December 1, 1992 Printed April 1999 * PICTURES HAVE BEEN TAKEN FROM SHOMEN EXCEPT WHERE DESIGNATED. I. Bowing, Handling of Weapons, Key Points
CHINESE MARTIAL ARTS ASSOCIATION WELLINGTON NEW ZEALAND. Sifu Stan Lytras WEAPONS JO
 CHINESE MARTIAL ARTS ASSOCIATION WELLINGTON NEW ZEALAND Sifu Stan Lytras Stan.lytras@gmail.com WEAPONS JO CHINESE MARTIAL ARTS ASSOCIATION - WELLINGTON NEW ZEALAND JO AN OVERVIEW The Jo features in all
Closed stance ( Moa seogi)
") Stance (Seogi) Closed stance ( Moa seogi) - Feet together Correct - Toes Facing straight forward - Stand upright - Legs straight Parallel stance ( Naranhi seogi) - Inner edge of both feet should be 1 foot-length
Stance (Seogi) Closed stance ( Moa seogi) - Feet together Correct - Toes Facing straight forward - Stand upright - Legs straight Parallel stance ( Naranhi seogi) - Inner edge of both feet should be 1 foot-length
RANGER RUMBLE RULES 2019
 Ranger Rumble Rules 2019-1 RANGER RUMBLE RULES 2019 Tournament Type Mission Focus on: Safety and Health Introducing competition to students Teaching sportsmanship and Sport Jiu-Jitsu Creating a community
KATAME-NO-KATA. General Information
 Katame no Kata Guideline Page 1 of 8 KATAME-NO-KATA General Information Officially, the judging of the Kata does not start until the two contestants are on the center of the mat, standing approximately
Sun Salutation Pose #1 Mountain Pose 1
 Sun Salutation Pose #1 Mountain Pose 1 Stand upright with feet together and look straight ahead, hands alongside body and palms forward. Lift abdomen inward and upward. Activate quadriceps and evenly distribute
Shoulder Exercises for Combined Labrum Repair Rehabilitation Protocol
 Shoulder Exercises for Combined Labrum Repair Rehabilitation Protocol The exercises illustrated and described in this document should be performed only after instruction by your physical therapist or Dr.
Movement Assessment & Enhancement Session
 C H A P T E R F O L L O W - U P I M P A C T M O V E M E N T S R O U T I N E Movement Assessment & Enhancement Session E X P E R I E N C E Y O U R G R E A T N E S S C H A P T E R F O L L O W - U P I M P
Blue Belt. Blue Belt with I stripe. Blue Belt with II stripes. Form: Pyung Ahn Sam Dan One Step Sparring: None Self-Defense: None
 Blue Belt Form: Pyung Ahn Sam Dan One Step Sparring: None Self-Defense: None Blue Belt with I stripe Form: Pyung Ahn Sam Dan One Step Sparring: #13, #14 Self-Defense: 1 on 1: #1, #2 Blue Belt with II stripes
SENIOR BELT (WHITE) Grades are awarded by the Founder (or his or her authorised representative) and the Technical Committee of RYR.
 Grades are awarded by the Founder (or his or her authorised representative) and the Technical Committee of RYR.") BELT (WHITE) 1. First Kata of Blocks (11 moves) 2. Rolling Breakfalls (Front and Back) 3. Breaking a Back Strangle (2) 4. Breaking a Front Strangle (2) 5. Straight Arm Lock (Punch to Stomach) 6. Shoulder
BELT (WHITE) 1. First Kata of Blocks (11 moves) 2. Rolling Breakfalls (Front and Back) 3. Breaking a Back Strangle (2) 4. Breaking a Front Strangle (2) 5. Straight Arm Lock (Punch to Stomach) 6. Shoulder
Paul Viscogliosi MD WTF anti-doping & Medical Committee Chair WTF Vice-Chairman Technical Committee
 Paul Viscogliosi MD WTF anti-doping & Medical Committee Chair WTF Vice-Chairman Technical Committee Management of injuries during the fight 1. The central Referee has to manage two things in case of injury:
Techniques Syllabus 6 th Gup. 6 th Gup Techniques Syllabus.
 1 6 th Gup Techniques Syllabus 2 STANCES Bending ready stance A (guburyo junbi sogi A) When standing with a left foot executing a right forearm guarding block, it is called a left bending ready stance
KMSD (NW) Level 1 Instructors Notes Israeli Martial Arts Krav Maga
 Level 1 Instructors Notes Israeli Martial Arts Krav Maga") KMSD (NW) Level 1 Instructors Notes Israeli Martial Arts Krav Maga Teaching Methods & Training Techniques Ownership SA Bradley KMSD (UK) Not for distribution without permission THE BASICS Outlet Stances
KMSD (NW) Level 1 Instructors Notes Israeli Martial Arts Krav Maga Teaching Methods & Training Techniques Ownership SA Bradley KMSD (UK) Not for distribution without permission THE BASICS Outlet Stances
WORLD TAEKWONDO FEDERATION
 WORLD TAEKWONDO FEDERATION POOMSAE SCORING GUIDELINES FOR INTERNATIONAL REFEREES WORLD TAEKWONDO FEDERATION 1 / 43 Stance (Seogi) 2 / 43 Closed stance ( Moa seogi) - Feet together - Toes Facing straight
Introduction. Hi, my name is Bruce and today I'll reveal to you the core. Krav Maga, an Israeli martial art, was originally designed for the
 D I S C L A I M E R O F L I A B I L I T Y A N D W A R R A N T Y This publication describes the author s opinions regarding the subject matter herein. The author and publisher are not rendering advice or
2672 Hastings & Prince Edward Regiment Royal Canadian Army Cadet Corps. Lee Enfield No.4. Rifle Drill
 2672 Hastings & Prince Edward Regiment Royal Canadian Army Cadet Corps Lee Enfield No.4 Rifle Drill Extracts from A-CR-CCP-053/PT001 March 2005 TABLE OF CONTENTS PARA ITEM PAGE Section 1 BASIC RIFLE DRILL
The Classical Circle Dance from Pa Kua Chang. Introduction and Transition 1 Single Palm Change
 1-1 The Classical Circle Dance from Pa Kua Chang The Circle Dance existed before Heaven and Earth. It is the Mother of Creation. And because it lies so close to Creation, how can it lead to destruction?
Senior White Belt Syllabus
 Senior White Belt Syllabus 1. Mat Etiquette 2. Pad Works - Kicks Front Side Roundhouse 3. Back Breakfall 4. Side Breakfalls Left Right 5. Front Breakfall 6. Basic Combinations X-block, pull down, knee,
Accidents happen anywhere
 Bulletin 2325 Maine Farm Safety Program by Dawna L. Cyr, farm safety project assistant, and Steven B. Johnson, Ph.D., Extension crops specialist Basic First Aid Accidents happen anywhere and anytime. The
Tai Chi Qigong Shibashi (2 nd Set): Instruction Manual
: Instruction Manual") Tai Chi Qigong Shibashi (2 nd Set): Instruction Manual By Master Wing Cheung Supplementary material for the Tai Chi Qigong Shibashi video (Video available at www.taichi18.com) Feel free to share this instruction
Tai Chi Qigong Shibashi (2 nd Set): Instruction Manual By Master Wing Cheung Supplementary material for the Tai Chi Qigong Shibashi video (Video available at www.taichi18.com) Feel free to share this instruction
U.S. Shooting Team Balance, Strength and Stability Workout. Shooting Warm-Up
 U.S. Shooting Team Balance, Strength and Stability Workout Shooting Warm-Up Modified by Dan Durben and Sommer Wood from the program originally developed by Amber Darland for the USA Shooting National Rifle
Ice Hockey. Equipment Fitting Guide - Fit to Play the Right Way. Brought to you by: follow
 Ice Hockey Equipment Fitting Guide - Fit to Play the Right Way Brought to you by: coachsafely.org www.helmetfitting.com follow us @coachsafely and @Helmetfitting YOUTH AGE GROUPS: 8-and-Under (mite), 10-and-Under
White to White/Stripe
 Adult Belt Curriculum at Mike Worobel Martial Arts White to White/Stripe 1. Basic Hand Strikes, 8 Point Blocking System, Front Ball Kicks, Front Instep Kicks, Side Blade Kicks, Crescent Kicks, Half Moon
Top 10 Yoga Exercises to relieve Sciatica
 Top 10 Yoga Exercises to relieve Sciatica This is due to compression and inflammation of the spinal nerves. A sharp pain radiates from the lower back to to the leg and foot in a pattern determined by the