User Manual. Wins Scoring System. ( Wins version 6.1 ) STELTRONIC Srl
|
|
|
- Sheila Phelps
- 5 years ago
- Views:
Transcription


 STELTRONIC Srl")


1 Wins Scoring System Interrfacciia League User Manual ( Wins version 6.1 ) STELTRONIC Srl via Artigianale Botticino Sera (BS) ITALY Tel Fax

2 2 Thank you for choosing Steltronic. This user manual has been written for Wins version 6.1, it is also available in pdf format so that it can be viewed on your computer (PROGRAMS\STELTRONIC\MANUALS). In order to make it easy to consult, the manual has been divided into the following chapters: GENERAL Brief Hardware and Scoring System Architecture description INITIAL USE OF WINDOWS, TURNING THE SYSTEM ON AND OFF Fast guide for first time users of the PC and Computer System SETUP OF THE WINS PROGRAM Contains all the information relative to the program settings from selecting time zones to changing on screen animations USING THE SYSTEMS FUNCTIONS Description of how to use the lane rental, time game, bar and other applications EXTERNAL PROGRAMS Install and use the external programs (tournament, Stelgames, etc.) MAINTENANCE Guide to servicing the system TROUBLESHOOTING QUICK GUIDE Troubleshooting and Problem solution guide For extra explanations or technical questions contact the Steltronic Customer Service Department Europe service: Steltronic S.r.l The service is available between 2 pm and 6 pm (Italian time) during week days, with the exception of customers holding a service contract, at the following number: (+39) Fax : (+39) service@steltronic.com, assistel@tin.it USA service: STELTRONIC USA, Inc. Customer service 219 W. 5th Ave Eugene, Oregon - USA Tel+1 (541) (541) Fax +1 (541) StelUSA@A-2Technologies.com jim.osdale@steltronic.com Giovanni Gatta Service Manager - Steltronic S.r.l.
3 3 INDEX GENERAL 1.0 Pg WINS SETUP 2.0 Pg USING THE FUNCTIONS 3.0 Pg USING STELGAMES 4.0 Pg. 104 USING GRAND PRIX 5.0 Pg. 105 ADVANCED BOOKING PROGRAM 6.0 Pg BMP2 Advertising PROGRAM 7.0 Pg BOWLING MOVIEMAKER 8.0 Pg. 126 STELTRONIC FR TOURNAMENTS 9.0 Pg USING LEAGUE INTERFACE 10.0 Pg MAINTENANCE Pg TROUBLESHOOTING GUIDE 11.0 Pg
4 4 GENERAL INDEX GENERAL 1.0 Score system elements Pg. 7 Index of terms used in the manual Pg. 8 Brief look at using windows Pg. 9 How to deal with critical arrests or Windows blocks Pg. 10 Elements of a Main Computer (Front Desk) Pg. 11 Before switching the system on Pg. 12 Turning the scoring system on Pg. 14 Turning the system off Pg. 15 Loading and closing the Wins and Winserv programs Pg. 16 Identification and accessing the Wins program Pg. 17 SETUP OF THE WINS PROGRAM 2.0 Foreword Pg. 20 Adding and deleting cashiers and other users Pg. 21 Loading the Setup menu Pg. 24 General cash desk setup Pg. 25 Time game setup Pg. 30 General rate setup Pg. 31 Bar, Restaurant and Pro-shop setup Pg. 37 Coupon setup Pg. 38 Print option setup Pg. 39 Enabling movies Pg. 40 Selecting animations, backgrounds and play lists Pg. 41 Creating and editing a scrolling text message Pg. 47 Superelex lane computer maintenance and commands Pg. 49 USING THE WINS PROGRAM 3.0 Things to verify before using the program Pg. 51 Main menu icons Pg. 52 System access Pg. 53 Lane icons Pg. 54 Lane control options Pg. 57 Multiple commands Pg. 62 Multiple lane control Pg. 63 instant glow control Pg. 65 Sciba ccd camera multiple set up Pg. 66 Open, close and other available features in multiple commands with open lanes Pg. 67 Lane payment mode set up, frame, time or by the bowler Pg. 69 Opening a single lane (open mode) or a pair of lanes (lane swap mode) Pg. 70 Front desk features available with open lanes Pg. 71 Closing a single or double lane in post or pre paid mode Pg. 73 Adding games or time in pre paid mode to open lanes Pg. 76 Open, close and park time games Pg. 77 Using the waiting list Pg. 78 Using the Park lanes Park games feature Pg. 79 Print games, Re-start games, Pint last receipt. Pg. 80 Correction scores from front desk Pg. 82 Using the Bar, Restaurant and Pro-shop functions Pg. 83 Coupon sale Pg. 84 Refunds Pg. 84 Account set up and use Pg. 85 Bar, Snack bar and mechanic calls Pg. 86 Magnetic card archive Pg. 87 Recorded transactions, Daily report, back up and restore features Pg. 90 Using the employee time clock Pg. 97 Bowler console functions Pg. 99 USING THE AWARD GAMES 4.0 Pg. 104
5 5 GRAND PRIX 5.0 Pg. 105 ADVANCED BOOKING PROGRAM 6.0 Running the program Pg. 107 Icons and commands Pg. 108 Personalizing the program Pg. 111 Adding a booking Pg. 112 Modifying an existing booking Pg. 113 Booking data, memo, etc. Pg. 115 Overbooking or overlapped bookings Pg. 117 Sending bookings to lanes Pg. 118 Print and statistics settings Pg. 119 BMP2 ADVERTISING PROGRAM 7.0 Program commands Pg. 121 Opening and editing a personal image Pg. 122 Sending images to lanes Pg. 125 BOWLING MOVIEMAKER (HOME MADE MOVIES) 8.0 Pg. 126 TOURNAMENT PROGRAM 9.0 introduction Pg. 127 Main menu and program icons Pg. 130 Setting up bowler categories and system icons Pg. 132 Complete Name archive Pg. 133 Bowler archive Pg. 134 Team archive Pg. 136 Hints on singles and team tournaments Pg. 138 New Tournament Pg. 139 Days, Series and Turns Pg. 140 Singles tournament Pg. 141 Team tournaments Pg. 147 Exporting data Pg. 150 New week Pg. 152 Begin a Tournament (week session) Pg. 153 Wins tournament interface Pg. 154 Lane change, substitutions, change order of play Pg. 156 Features available on bowler consoles Pg. 157 Importing data and standings Pg. 158 FAQ s Pg. 161 USING THE LEAGUE INTERFACE 10.0 Pg. 163 MAINTENANCE 11.0 Modem connection Pg. 171 Checking the photocells Pg. 172 Checking the Sciba ccd camera Pg. 173 Substituting and Sciba calibration Pg. 177 Calibrating the touch screen bowler consoles Pg. 183 Setting the A.P.I parameters Pg. 184 Calibrating the Frond desk computer touch screen Pg. 187 Setting and exchanging a lane monitor board Pg. 188 Exchanging a lane computer Pg. 192 Score cycles Pg. 194 Wins diagram Pg. 196 Trouble shooting guide Pg. 210
6 6 General Switching the system on 1.0 Score system elements 1.1 Index of terms used in the manual 1.2 Brief look at using Windows 1.3 Closing the system and dealing with a system block 1.4 Elements of the main computer (Front desk) 1.5 Before switching the system on 1.6 Turning the scoring system on 1.7 Turning the scoring system off 1.8 Loading and closing the Wins and Winserv programs 1.9 Identification and accessing the Wins program 1.10
7 7 Scoring system elements 1.1 The WINS COMPUTER SCORE consists of a number of electronic components connected between one another on a network. In this chapter we have briefly described some of these components. For further, more detailed information consult the TROUBLESHOOTING AND PROBLEM SOLVING chapter. Scoring elements. The heart of the system is the MAIN DESK COMPUTER (also known as Front Desk or Server), a Pentium computer in which all the scoring related programs are stored. The Main Desk is equipped with a mouse, keyboard, external modem, monitor (Touch Screen available on request) and Un-interrupted Power Supply; other peripherals such as receipt printer, alphanumeric cash display, magnetic card reader, score printer, automatic cash drawer, coin interface, time game light On/Off interface, can all also be requested and installed. Extra computers known as ADDITIONAL WORK STATIONS can also be installed on the network, with the Main Desk Computer. These additional work stations can be equipped with all or some of the above mentioned peripherals, depending on what their role will be. The communication between the Main Desk Computer, Lane Computers and any Additional Work Stations is made through a NETWORK switch. The cable used for this network is called twisted pair, category 5 cable and the connectors used are Rj45 connectors. WARNING!! POSSIBLE. WHEN THE SWITCH IS SWITCHED OFF NETWORK COMMUNICATION IS NOT The lane computers are electronic units designated for the automation of the scoring for a pair of lanes. The bowlers scores are visualized on colour lane monitors. The lane computers are connected to the PINSETTER INTERFACE through a serial port, this interface is installed on the curtain wall near the pinsetter and interacts with two pinsetters, (a pair of lanes). There are various models of interface, one for each type of pinsetter, in certain cases, with pinsetters that have the capability of determining the pin count the pinsetter will send the information directly to the pinsetter interface, if the pinsetter does not have this capability then the pin count is made by using the Sciba CCD camera. The SCIBA CCD CAMERA is a LINEAR CAMERA equipped with photocells and installed on the ball return capping about 4 meters from the last line of pins (7 to 10). One Sciba is normally used to read the pin fall on a pair of lanes. (Two may be required, in some cases, if a pair of lanes is split by a column) The bowler can edit names, correct scores and interact with the scoring, by using a BOWLER CONSOLE with Joystick, Button or Keyboard control.
8 8 Index to terms used in this manual 1.2 Main Desk Computer: Central computer. Uninterrupted Power Supply, UPS: Electric back up power unit used to protect the computer from power failure or surges and to allow you to save information in case of power failure. Touch Screen: computer monitor with touch screen installed, used by touching the screen with a finger instead of using the mouse, (mouse can also be installed in parallel). Mouse: standard computer accessory used for selecting pages and by depressing the left button opening screens and sending commands to the computer. The right mouse button is usually used for specific commands and functions. Click: press and release the left mouse button to activate functions. If the monitor has a touch screen simply press the icon with a finger on the screen itself. Double click: 2 fast clicks of the left mouse button are used to activate a program by clicking on the required icon. Drag: place the mouse arrow on an icon and, while keeping the left button pressed, move the icon to the desired position, release the left mouse button to confirm your choice. Icon: graphic symbol which represents a program or button. Checkbox: small box usually accompanied by a short description of what it is for. When you click on a checkbox a small black point or tick appears in its center, the function is active. Task bar: any programs that are running are shown on a grey bar, usually on the bottom of the screen. Start Menu: Main index activated by clicking on the Start icon on the bottom left hand corner of the screen which opens upwards showing the main list of available functions. Single click pointer: this is a selectable setting which allows the mouse arrow to change automatically into a hand symbol when you pass over the top of an icon or folder which can be opened with just one click of the left mouse button instead of a double click. Desktop: This is the main screen of the Windows computer program showing icons and programs. Winserv: Communication program used between the Main Desk computer and the lane computers. Closserv: Special program used to close Winserv. Wins: Bowling Center Management Program. Booking (SABS): Advance Booking Program, for reserving and managing lanes and time games. FR Tournament: Tournament Management Program. BMP2YUV or STR: static image conversion for your own on screen personalized advertising. Stelgames: three on screen bowling related games. Bowling Movie Maker: program for creating and showing your own movies for on screen promotions. Live Sparemaker: program for managing clips of spares realized by actual bowlers.
9 9 Brief looking at using Windows 1.3 * Windows 98, Windows Me, Windows 2000, XP are registered trade marks which belong to the Microsoft Corporation, the use of these terms in this manual is only indicative. Foreword; Your Main Console has been dedicated to bowling center management. We advise the user NOT to install external programs (in particular automatic connections to internet) which can cause changes to the network properties or graphic settings). Steltronic S.r.l. reserves the right to waiver warranty in cases where system malfunctions prove to be caused by misuse of software or settings, if these changes have not been made by an authorized technician. For further information on warranty terms refer to the license and guarantee section. If there are any special requirements, or there are external programs you wish to install, authorization must be applied for when the purchase contract is made, or the order confirmation signed by the proprietor or purchaser of the system. Moving about in Windows The Wins Scoring System operates on Windows 98, Windows Me or Windows 2000,. Windows XP, Operating systems. These platforms allow you to run multiple programs simultaneously (these programs are also defined applications). The active programs are shown on the task bar, as the example shows. TASK BAR The Windows Start button can be clicked allowing you to enter the menu even while other programs are running (open). The main application is usually visualized full screen, while other applications are minimized to the task bar. To move from one open application to another: click on the corresponding button on the task bar or use the ALT and TAB keyboard buttons together. The buttons found on the upper part of the screen frame allow you to perform fast commands like: Minimize window or application to task bar Close window or application Reduce window to a smaller size on the screen In some Windows menus (where the information contained is larger that the window) you use the directional arrows or the scroll bars (vertical or horizontal on the left or the bottom of the open window) to move the contents so that you can see it all. The drop down curtains are opened by clicking on the arrow placed on the right of the curtain name to open the drop down curtain and visualize the contents. To highlight a line of text or the contents of a drop down menu click where the text starts or on the text itself, the text background will turn blue.

10 10 How to deal with critical arrests or Windows blocks 1.4 To close a blocked program with turning the computer off Press the CONTROL, ALT and DEL together and once only. The END TASK APPLICATION window will open. Highlight the program you want to close. WARNING!! DO NOT SELECT EXPLORER!! THIS IS A SUPPORT TO WINDOWS, IF CLOSED RE-SETS THE COMPUTER WHICH RE-STARTS ON ITS OWN!! Click on END TASK. Sometimes you will asked to confirm multiple times, if the blocked program does not respond. Sometimes it is necessary to re-start the computer. If the Main Desk Computer blocks The lane computers can function even when the Main desk computer is off. For the whole duration of the game being played. It is possible to re-start the computer WITHOUT turning the lane computers off. If you need to re-start the Main Desk computer select NO when asked SHUTDOWN LANES? when you exit Wins. When the Main desk starts in Safety mode (windows 98) Do NOT turn the lane computers on. Wait until the Main desk loads Windows and confirm the execution of the provisional mode. Close the Windows session, as soon as the desktop is available and re-start the computer. The main desk starts in provisional mode after having been switched off incorrectly or illegal actions have been performed. When the main desk starts in Scan disk mode (windows 98) Complete the scan disk operation confirming the options. Take note of any corrupted files (if signalled) and communicate these to the Service Department. The main desk starts in scan disk mode after having been switched off incorrectly or it blocked during the Windows shutdown.

11 11 Elements of Main Desk computer 1.5 Elements of a Main desk computer 1 Computer base: contains all the modules for the operation. (hard disk, network board etc.) 2 Monitor: visualizes the program. Touch screen can be installed for easy use. 3 Keyboard: used to insert data; the most used buttons are Enter, Tab, Esc and number keys. 4 Mouse: is used to move the curser on the screen, the left button is used to make selections the right button is used to go to properties or other more specific operations. 5 *Score printer: predefined printer of the system. This printer is used for score prints, daily reports and tournament prints. 6 *Cash drawer: automatic cash drawer for storing bank notes. The cash drawer opens automatically when a cash transaction is made but can also be opened by pressing the icon on the bottom right of the screen. 7 *Magnetic card reader: swipe cashier, bowler and employee cards for their individual functions. 8 *Receipt printer: non fiscal printer for printing receipts; the paper used is thermal, the printer can support 24 or 32 columns. 9 *Cash Display: Indicates amount due to customers. 10 Uninterrupted power supply UPS: anti-blackout device which supplies power to the computer in case of loss of power. * Optional elements

12 12 Before switching the system on 1.6 NETWORK SWITCH Your system network includes and runs through one or more Switches (or Hubs). The Switches or hubs are usually installed in the false ceiling, near the lane monitors, usually next to the first monitor or in the middle of the centre (example: centre with 16 lanes, the switch should be close to lanes 7-8). The switch is almost always (and should be) powered by a dedicated electrical line; the users of the Wins scoring system need to be able to recognise the relative power switches. The switch MUST be turned on BEFORE the main desk computer, otherwise the Winserv program will not start automatically and the Wins program will not be loaded. In this case you would receive this warning Click on OK to close the program. NOTE : If the switch is turned off even the secondary computers (when present) cannot load the program. PROBLEM SOLUTION: 1. Avoid turning secondary computers on. 2. Check the switch status (on or off), if it was left on with the rest of system off, it could be necessary to reset the switch (simply turn the switch off and back on) 3. Click on START from the main desk (Front desk), then click on the WINSERV icon. If the switch has been turned on again and is working correctly the Winserv program will be loaded and minimized on the function bar at the bottom of the screen. At this point you can turn on the other secondary computers. TURNING ON THE SUPERELEX LANE COMPUTERS When first turned on the Superelex lane computers need between one and three minutes to load and check the hard disk and program. The time depends on the number of lanes installed. During this procedure it is important NOT to interrupt the electrical supply in order not to disturb the file check. If the SWITCH is off or the main computer is off, the lane computers will not be able to communicate with the main desk. The Wins program will NOT be loaded until the main desk is switched on and on line. In this case, turn the lane computers off, (wait at least 5 minutes from the first attempt in order to make sure that the system is nit still in load status) check that the switch is ON, restart the main computer and finally turn the lane computers back on. IF THE SWITCH TURNS OFF DURING PLAY The Winserv program blocks itself automatically and shows you the following message: WINSERV ADDRESS ERROR. Repeat operations 2 and 3 from the previous paragraph Problem solution. DO NOT USE THE WINS PROGRAM FROM SECONDARY COMPUTERS, THE MAIN DESK IS NOT AVAILABLE AND AN ERROR MESSAGE WILL BE DISPLAYED, WAIT FOR THE MAIN DESK TO BE ACTIVE. The lane computers will continue to play the active games until they are finished then block the lane on the to continue bowl screen. In order to start the next game you will need to re-establish network communication with the main desk (Winserv program).the active game data is automatically saved on the main desk as soon as you have network communication up and running through the switch with the lane computers.
13 13 INCORRECT ACTIVATION OF A SECONDARY STATION (MAIN DESK NOT ON LINE) When the main desk is not available you will be given a message that says the permanent connection is not available. Close the Windows session on the secondary desk, check that the main desk is available and that the switch is working correctly, re-start the secondary desk. TURNING SYSTEM PERIPHERALS ON AND OFF RECEIPT PRINTER AND CASH DUSPLAY it is not necessary to do anything to turn these on and off, it is advisable to power both these peripherals on the same electrical line using one power button. VGA TOUCH SCREEN MONITOR, be they connected to the main desk or secondary stations, they must be powered in parallel to the computer on which they are installed, therefore it is NOT necessary to turn the monitor off using the button on the front panel of the monitor itself. In any case the Stand by function of most monitors turns the monitor off when the signal is missing from the computer (because it has been turned off). If the touch screen monitor is off while the system is loading Windows the divers will not be loaded and the touch screen will not function, in this case re-start the computer. NOTE FOR WINDOWS 2000 USERS: some models of score printers and serial modems need to be on and on line while Windows is being loaded; vice versa these peripherals will be disabled by the operating system. In this case it will be necessary to re-start Windows. We advise you to leave the peripherals in stand by or to power them through a single power button together with the main computer to which they are connected.
14 14 Turning the scoring system on 1.7 Example of scoring system electrical connections. A SWITCH: device that provides network connection between main computers and lane computers B Uninterrupted Power Supply: device that allows protection for the main computer in case of power surge or loss of power C Main Console (Front Desk): Main Computer for scoring system D Lane Computer: one per pair of lanes E Workstation: secondary computer, the number can vary depending on centre requirements* F Photostrike: device for waiting list entry and bowler photograph for use on lane screens* G Electrical supply box *optional equipment not required for system function Turn the SWITCH (A) on in order to activate the network communication. Turn the Uninterrupted Power Supply (B) on the Main Desk on, press the ON button on the front panel for about 3 seconds. Turn the Main desk (C) on using the button on the computer front panel, check that the monitor comes on. WAIT The computer needs a few minutes to load the system. Some operating systems, for example Windows 2000, require commands from the keyboard, follow instructions on monitor. The WINS program is loaded automatically and you will be asked to identify yourself in order to access the Wins commands. (see next chapter first identification ). It is now possible to turn the Lane computers (D) on, as well as the Secondary computers (E) and the Photostrike (F). The system is ready for use.


15 15 Turning the scoring system off 1.8 Secondary computers: exit the WINS* program. Close all the applications and close Windows. *if the automatic back up has been activated wait for the procedure to finish. Main computer (Front Desk): verify that all lanes and time games are closed; if required print a daily report and run a back up. Go to step 3 whn you are ready to close the system down. Click on the ESC button to close WINS. The system will ask you to confirm. Click on OK. Wait for the confirmation message. Now you can turn the Lane computers off and (when present) the Photostrike. Closing the Main Computer: close any applications you have running ( Winserv will close automatically). Click on the START button. Select SHUT DOWN THE COMPUTER Click on OK to confirm. A warning message will appear on the screen. Confirm the operation by clicking YES. The computer will turn itself off automatically when Windows has finished its close down procedure. Turn off the UPS (uninterrupted power supply) by keeping the OFF button pressed for about three (3) seconds. Turn the SWITCH off at the relative on/off button.

16 16 Loading and closing the WINS and Winserv programs 1.9 When the Main Desk is switched on, Winserv and Wins will start automatically. Winserv is the communication program used between the Main Desk and the Lane computers. WINSERV must always be active when the lane computers are in use. WINS can be minimized or closed if not in use, it s must ALWAYS be open during Leagues or Tournaments. CLOSING WINSERV (for software update only) Click on the START button and run the CLOSERV program by clicking on it. RE-OPEN WINSERV To re-open the WINSERV program simply click on the icon in the START menu. When you need to turn the computer off, Winserv is automatically closed by the Wins program, (see chapter on turning the system On and Off). ESCAPE FROM WINS (without shutdown lanes) Only authorized persons can close the Wins program. Click on the or on the cross at the top right hand corner of the screen. Once out of the program you will be in the area of the computer called DESKTOP. ONLY FOR THE MAIN DESK COMPUTER: When Wins is about to close you will be asked to confirm the lane shutdown?. RELOADING THE WINS PROGRAM To reactivate the Wins program, click on the icon once from the START menu or on the desktop icon, double click in the other cases. Warning!! Wins is available in various languages, click on the icon which corresponds to your language: ITWINS = ITALIAN USWINS = AMERICAN (USA) UKWINS = ENGLISH (UK) FRWINS = FRENCH GRWINS = GERMAN SPWINS = SPANISH SVWINS = SWEDISH NLWINS = DUTCH SUWINS = FINISH CZWINS = CZECHOSLOVAK The Wins icon, or the chosen language is generally copied from the Start menu onto the Desktop area of the computer. If the language is not available look for it in the START menu, then PROGRAMS followed by STELTRONIC this folder contains all the Steltronic programs installed. WARNING! If you click on the WINS icon more than once the following message is shown, wins application already loaded. Click on OK to confirm. WINS will not be loaded a second time.
 RECORD TRANSACTIONS in the Daily Report, attributing each action to a cashier or other authorized user in order to trace and record system use.")
 use the up down arrowstu It is advisable to protect each cashiers entry with a personal password.")
17 17 Identification 1.10 The Wins program asks for user identification. This mechanism has been created for two main reasons: a) CONTROL UN-AUTHORIZED USE OF THE SYSTEM. b) RECORD TRANSACTIONS in the Daily Report, attributing each action to a cashier or other authorized user in order to trace and record system use. The list of Cashiers is shown on the left hand side of the user identification screen. Each button corresponds to one user. To move down the list of cashiers (when more than 20) use the up down arrowstu It is advisable to protect each cashiers entry with a personal password. Passwords and magnetic cards can be changed or removed at any time, by the owner, cashiers can however change their own password simply by performing the identification process twice in a row. IDENTIFICATION Click on the button corresponding to your name, write the password in the box provided (if a password was previously entered), then confirm by clicking OK. If you have been given a magnetic card, pass the card in the swipe after you have clicked on the button corresponding to your name. When using a personal magnetic card the password will not be required for entry, but one should be recorded anyway to avoid un-authorized entry. If you do not click on one of the user name buttons, the program will open with NONE as the user (locked) and no operation can be made until someone checks into the system. ACCESS TO WINS DENIED When you try to perform a task without having checked in the warning will appear asking you if you want to change user, simply click on YES to go to the check in page and follow the standard procedure.
18 18 SYSTEM ACCESS CONTROL The wins program check continuous the user. The Key icon change aspect depending by user: OWNER CASHIER LOCK (ACCESS DENIED) For changing the ACCESS LEVEL simply click on KEY icon Click on the key icon to load the user identification menu. USER SECURITY LEVELS The Owner has top level security clearance and is able to add, delete and modify the cashier security levels, as well as add or remove other employees. The Owner button and magnetic card must be set by the installers or service department. OWNER Access to the entire system with clearance to modify cashier security levels. CASHIER Access to Wins. Individual security levels are determined by the owner. OTHER EMPLOYEES Access is limited to the time clock swipe function. Other employees are considered to be those working in the center but who are not required to work the Front Desk. It is NOT possible to access Wins as other employee. The SERVICE access level is for installers while the FACTORY button is for Steltronic Authorized Personnel only. NOTE for the Owner: Do not leave Wins running with YOUR security level active when not using the system yourself. Click on the key icon. Click on the Locked or None button to reset then confirm with OK. AUTOMATIC USER CHANGE On version 6.1 it is possible to set WINS in automatic mode. In this mode the user will need to check in for every single task. In other words the system will lock itself after every action the user performs. This mode needs to be activated by the owner. The mode can be set to lock after every task or after a certain number of minutes. For further details go to the GENERAL CASH SET UP chapter.
19 Setup of the WINS program Foreword 2.1 Inserting and deleting cashiers and other employees. 2.2 Loading the Setup menu. 2.3 General Cash Setup. 2.4 Time game setup. 2.5 Rate Setup. 2.6 Bar, Restaurant, Pro-shop item set up. 2.7 Coupon Setup. 2.8 Print Option setup. 2.9 Movie enabling Background, animation and play list selection Creating and modifying scrolling text messages Superelex lane computer commands and maintenance. 2.13
20 20 Foreword 2.1 The Wins software is configured by installers using a number of predefined parameters. Number of lanes used, number of time games etc. In the Set up section of this manual you can find information relative to setting the system up with your own personal configurations. We recommend that particular care be taken when setting up the various users of the system and their security level, WINS records all the movements on the system in order to report them on the Daily Report at the end of the day. The magnetic cards which were mentioned are supplied by Steltronic, they are coded in order to recognize each type of card, Owner, Cashier, Employee and Customer. If you require cards ask your distributor or directly to Steltronic. S.r.l. The following steps are required to set up the user menu: Set up the general cash desk configuration defining the time zones, currency and type of rounding to be used etc Create the time game groups (if there are any) Create the tariffs / rates, to be used for bowling and time games. Configure the calendar for special holidays or festivities. Create and configure the bar, pro-shop, restaurant articles and prize game awards. Create the coupons. Configure the print options for the receipts. Select and build the play lists for the on screen movies Access to the set up section for creating and/or modifying tariffs/rates, cash desk set up, special festivities etc is limited to the proprietor or someone with equal security level authorization.

21 21 Adding deleting Cashiers and other users 2.2 WARNING! The following functions are available for the OWNER only. Identify yourself as OWNER. Click on the key icon to enter the identification screen. Click on the button of the user you wish to modify or an empty button to insert a new user. ADD REMOVE MODIFY CASHIER Click directly on the cashier button name. CHECKBOX ON = Function enabled CHECKBOX OFF = Function disabled WARNING! The SETUP functions for cash setup, rate setup and time game set up, if enabled, allow the user to change the price structure. We recommend that the users are only enabled to perform tasks relative to their role in the centre. DELETE USER Clicking on this button to delete permanently the user from Wins DELETE CARD Clicking on this button delete the registered card number. FILL THE INFORMATION Write the name of the user in the space called User name. Write the password in the space provided (letters or numbers can be used) and confirm it by writing it again in the Verify Password space. To validate a magnetic card and attribute it to the user pass the card in the card reader. Click on OK to confirm the options and return to previous screen. Click on OK again to exit. When asked DATA HAS BEEN CHANGED, DO YOU WANT TO SAVE? click on YES. The following page contains an easy guide to setting up users. Enabling the functions they are most likely to require. This is only a guide of course, the owner can decide which of the functions to enable. The centre manager is usually entered as the head cahier in the system and given all functions so that he can operate freely when the owner is not present.
22 22 Suggested functions Cashiers Mechanic Manager Lane closure allows you to open and close lanes X X Other lane functions lane transfer, parking, insert blind score, add X X bowlers to open lanes etc.. Closing time games Open and close pool, table tennis etc Other Time game functions Parking, selling bar items to open time games General income Using the Bar, Pro-shop and restaurant functions SETUP: Cash desk/rates/time games/bar and general income (pro-shop)/receipts. Setting up the rates, prices, time zones, time games, bar item costs etc. Pinsetter interface setup Pin read time, pinsetter off timer. Daily report Access to end of shift (or day) report. Deleting and managing reports Delete history reports Magnetic card archive Consulting the card holder data base Magnetic card archive management Creating, deleting and modifying magnetic card archive info. Account management Using the account program Tournament management Using the tournament interface Print all reports Access to all reports Open cash drawer Enables/disables the button to open drawer Flat Rate payment Flat rate payment allow user to override Wins totals due Coupon Setup Create, modify, delete coupons. Accept coupons Allows user to take coupons in part payment Free game coupons Allows user to take game coupons off number of games bowled Delete Frames Allows user to delete frames in score correction page Modify entry / exit times Add/delete/modify times manually in time card program Edit time card program Modify, consult the time card program reports Install movies Enables user to validate animation movies Access CNT screen Lane control window entry and use Pinsetter interface set up Award game set up run non bowling games X X X X X X X X X X X X X X X X X X X X X X X X X X X X X X X X X X X X X X Lane graphics and lane reboot X X Modify bowler console functions bar call, mechanic call X X response Total Lane reset Access the lane computer service program Data backup X X Data restore X Theme, scrolling text and waiting list management X X Program exit. X X X

23 23 ADDING - REMOVING AN OTHER EMPLOYEE It is possible to insert people into the Wins system who do not work on the desk as cashiers for the sole purpose of using the magnetic card Time Clock program to record their movements, hours worked, entry and exit times etc.. WARNING! The Other employees can NOT access the Wins program they can only swipe their card in the card reader when already switched on by a cashier or higher.. Identify yourself as OWNER, Click on the key icon to enter the identification screen, than click on the OTHER EMPLOYEES button. Click on the Blue bar to activate the Add new button. Insert the name of the person and press the New Employee button to confirm. Swipe the magnetic card in the card reader.. the number given to this employee will appear on the right. TO ADD ANOTHER EMPLOYEE, click on the next empty line of the employee list screen, it will be highlighted in blue, then repeat the operations. Click on OK to confirm and end this operation.


24 24 Loading the Setup Menu 2.3 Main Menu Setup Menu Before you start using the scoring program, it is necessary to go through the general cash setup procedure and rate preparation. All the cash desk settings, pinsetter interface settings, scrolling text edit settings are available in the Setup Menu. Click on the DOCTOR icon to access the SET UP MENU SCREEN. Click on the BALL icon to return to the MAIN MENU. All the Cash register, Wins, Pinsetter interface and Scrolling Text edit settings are in the Set Up menu. In almost all the windows settings the OK button is used to exit the function; if any data has been modified you will be asked to save the changes, when asked DATA HAS BEEN MODIFIED, SAVE CHANGES BEFORE CLOSING? click on YES to confirm. warning!! Set ALL the cash desk, rate settings from the main console. Run the Wins program on secondary computers only when the settings have been saved. General cash desk set up MENU SETUP ICON Bar article set up Restaurant article set up Pro-shop article set up Animation and movie play list selection Coupon set up Bowling and Time game rate set up Create and modify scrolling text messages. Enable and add Movies Time game set up Receipt printer set up Edit Employee time clock Lane computer settings Sciba CCD camera parameter settings Pinsetter interface parameter settings The functions of the following buttons are described in the MAINTENANCE SECTION of this manual.

25 25 General cash set up 2.4 The general settings are inserted into the GENERAL CASH SETUP, like time zones, currency etc. when modifying the time zones, for example, the rates will automatically be divided into the new zones. CURRENCY Shows the current symbol for the currency used. For Lira it is L. Warning! Do NOT use the symbol as the cash display does not support this symbol, as well as some types of receipt printers. MINIMUM Minimum amount that can be used in any transaction. ROUNDING The rounding feature is common to most cash desks. There are three rounding settings available, EQUAL, PLUS, and MINUS DECIMALS Corresponds to the number of decimals the currency uses. for the Euro it is 2. 1OTH FRAME FIXED CLICK IN THE CHECK BOX = bowling is paid by the GAME (up to 12 frames included). EMPTY CHECK BOX = bowling is paid by FRAMES (the 11th and 12th frame in case of spare or strike will be charged extra, not included in the Game total). AMOUNT REQUIRED When active, makes it mandatory for the cashier to use the bank note reference in order to calculate the change to be given. USE BONUS IN PREPAID MODE When closing a prepaid lane in advance, it is possible to print a credit for the remaining frames, which can be used to pay later. CURRENCY Allows you to insert the most frequently used bank notes RESET RECEIPT # This button resets the progressive receipt number to zero. RESET BATTERY INFO Only for centres in which the wireless bowler consoles have been installed: deletes information on the battery status and charge level. SHOEVISION SHOES FOUND This is a percentage figure for Shoevision system.

 TAX AFTER SALE Enable = net price for FLAT RATE - Disable = gross price for FLAT RATE TIME ZONES It is")
26 26 WALK DOWN TIME (min) This is a figure in minutes which will not be charged in prepaid time bowling as the owner is allowing the bowlers these minutes to get to the lanes and prepare themselves to bowl. Only used in prepaid time bowling. FLAT RATE TAX Tax selection for flat rate payment. Its selection depends on QuickBooks or the Tax file (see the SETTING UP TAXES paragraph) TAX FOR SHOES/SOCKS Tax selection for shoes/socks payment. Its selection depends on QuickBooks or the Tax file (see the SETTING UP TAXES paragraph) TAX AFTER SALE Enable = net price for FLAT RATE - Disable = gross price for FLAT RATE TIME ZONES It is possible to divide each day into 4 working time zones, in which you can set different rates of payment. Used for bowling and time games. Wins automatically calculates amounts to be paid when bowling across time zones. The time zones are progressive from 1 to 4.The first time zone determines the starting hour for the day. The same time zones are used for both bowling and time games. The time zones are the same for all the days of the week, therefore the first zone needs to be the earliest opening time even if you open on different hours on various days. For example: if during week days you open at 9 am and Saturday you open at 11 am the first time zone will need to be set at 9 am and then change when the first rate change takes place. AUTOMATIC LOGOUT The LOGOUT function allows the owner to select the way they want the system to lock automatically in each of the mentioned departments, bowling, bar, restaurant and shop. MANUAL: the system will NOT lock itself automatically, the user must press the None or Locked button when moving away from the desk. AUTOMATIC AFTER EACH OPERATION: each time a user wants to do something in Wins the system will ask that user to identify themselves, automatically re-locking when the task been performed. AUTOMATIC AFTER SECONDS: the operator is able to continue using the system normally, if, for the number of seconds set, the user does NOT perform any task in Wins, then the system will lock itself automatically, the user will need to re-identify themselves to perform the next task.


27 27 BY THE BOWLER PAYMENT MODE Rent lanes out to bowlers which does NOT take into account the time spent bowling or the number of games played during that time. It is best used during quieter times of the day or for special promotions devised to give an incentive to bowlers to stay longer and play more. The mode needs to be set up for the days and times required in the general set up first. The bowler rates are then setup so that during the pre-established times the bowlers pay a fixed amount until the time ends. They pay the same amount no matter how long the play or how many games they have. The times during which the rate can be applied is set on this screen, for each day you wish to be able to apply the special way of paying by the bowler. It is not possible to set two time zones within the same day, but the times can be as long or short as you require. The rate for By the Bowler payment mode must be set up in the rate set up section like for the other rates. Warning!! By the Bowler payment mode is ONLY available in pre-paid. ADVANCED PARAMETERS QUICKBOOKS CODES The Book Codes are used by customers with QuickBooks accounting software installed. Insert the existing Quickbooks code if you have the same items already into Quickbooks.(frame bowling, time bowling..). This operation is required for safety in order to stop duplicate codes when exporting data into QuickBooks.
28 28 LANE OPENING OPTIONS START ON PLAYERS NAME: When a lane is opened the cursor will be positioned on the first bowler name space, available in Open and League play mode.if NOT ticked the cursor is positioned on the number of bowlers window. ADD SHOES TO PLAYERS AUTOMATICALLY: The system will automatically insert the same number of shoes as players, available in Open and League play mode. TRANSACTION MANAGEMENT MODE MANUAL: this is the standard setting, when set, the user needs to manually delete and save the data contained in the Daily Report. DELETE AFTER DAYS: this is for users who do NOT use the Daily Report program. The transaction data will be deleted automatically after the number of days set. DAILY AUTOMATIC IMPORT AT: the Daily Report is activated automatically at the hour shown, the system saves the transaction data and deletes the temporary transaction file (which remains recorded in the systems database). PRINT TAX ON RECEIPT: The system separates any tax amounts set from the total amount due from the customer showing the tax amount as a separate figure. BONUS MANAGEMENT (FOR PREPAID BOWLING ONLY) By Bonus we intend a receipt (with serial number) showing the amount (if any) non used by the bowlers who prepaid, (they may be leaving early for various reasons). This operation is of course optional and intended to help with Customer relations without having to hand back cash. PRINT BONUS TO PUT IN CASH: The system prints a receipt for the cash drawer (used in place of money) of any previous credit used to pay for a prepaid lane. GIVE BONUS REFUNDS: If a bowler pays for a game and ends the game before the amount paid is fully used, a credit bonus receipt is printed for the difference due to the bowler which can be used on another occasion. (prepaid only) USING A SECOND CURRENCY From the 1 st of January 2002 all the European countries will start to use the Euro. Each countries currency will continue to circulate for a pre-determined time, during this time the WINS system will be able to accept and calculate change in 2 currencies (the Euro and Local currency).the Wins program has been developed to allow easy access to the exchange rate facility so that the entire process is automatic. USE SECONDARY CURRENCY (Local currency from Jan, 1 st 2002): enables the use of a second currency, for all the systems economic functions. CURRENCY: place the symbol of the secondary (local) currency in this field. USE ONLY THE FULL STOP AS THE DECIMAL DIVIDER, NOT THE COMA. Some printers are not able to print certain graphic symbols, in this case use the first two or three letters of the currency (for example: if the printer can not print the symbol, use Eur. to show the currency on the receipts and daily report prints) EXCHANGE: place the exchange amount in this field, for example One (1) Euro has a fixed exchange rate of Italian lire, DM. TICKET PRINTER SUPPORTS SECONDARY CURRENCY SYMBOL: Click on this box if you want the printer to print the symbol you have entered as the one for the currency ( or Eur.. etc). INVERT CONVERSION RATE: enable this check box when using Euro as the principal currency and the local currency as secondary (the Wins system will fill in the two currencies based on the previous information you have entered) DECIMALS: number of decimal to make a round the secondary rate.
29 29 ADDING BOWLERS Bowlers being added to an open lane can be added in two different ways: ADD IMMEDIATELY: in this case the bowlers being added will interrupt the bowlers who are already on and play until they catch up (same number of frames bowled) with the existing bowlers. From that moment the bowlers return to taking one frame each in turn as shown on the lane monitor. AT THE NEXT GAME START: the bowlers will be shown on the name grid with the wording next game on the top line next to their name. they will start to bowl when the existing bowlers have finished the game they were playing. ASK WHEN TO ADD (best choice): the Wins program will ask when you would like the new bowlers being added to start. If you say NO the bowlers will be added immediately and stop the current game until they catch the others, by saying YES they will start in the next game as described above. WARNING! If on the lane monitor to which you are adding bowlers is flashing to start a new game bowl.. add the bowlers at the NEXT GAME, if you add them immediately the new bowlers will need to complete an entire game (catching up with the others who have bowled one game or more) before starting a new game all together. DATA BACKUP When using the WINS program both the computer configuration and the economical (financial) data is personalized. These modifications are written into files which can only be read by Wins itself. WINS contains a backup procedure which allows you to save the vital data. (cash desk configuration, prices, rates, archives etc) in order to be able to restore if lost for whatever reason. The backup function can be run in various ways: MANUAL: the backup is run when the operator clicks on the backup icon. AUTOMATIC: the backup is run automatically when you have instructed the system to run the backup in the general cash setup, advance functions section. FROM THE TERMINAL: indicate which computer is enabled to run the back up. AT EVERY PROGRAM EXIT: the backup is run every time the operator exit the Wins program on the terminal which has been set to run the backup. AT EVERY PROGRAM EXIT AFTER : after the preset time has elapsed and the operator has exited from the Wins program on the computer programmed to run the backup. WHERE TO SAVE THE BACKUP: Local Hard Disk the file is saved onto the Main Desk hard drive. COPY TO [ ]- the file is copied on the main desk hard drive as well as on the hard disk or floppy of the computer terminal from which the command to backup is run. (C = hard disk, A = floppy) MOVE TO the file is moved and saved to the hard disk or floppy of the computer terminal from which the backup command is given. (C = hard disk, A = floppy)

 and confirm with OK.")
30 30 Time Game Set Up 2.5 The time games are divided into groups. The total number of games is inserted for each group. ADDING A NEW GROUP OF GAMES Click on NEW. The program adds a default name for the new group. Click and highlight the default name you want to replace, then write the name of the group in the space provided. Click on the N box and insert the number of games within the group. Select the icon you wish to represent the new group by clicking on the? button. Browse the pages showing the available icons using the <<>> buttons. Select the icon by clicking on it (the icon frame turns red) and confirm with OK. To add another new group, click on the MODIFY button again and repeat the same operation when all the new groups have been added confirm with OK. REMOVING OR MODIFYING A GROUP OF GAMES Highlight the name of the group from the time game list. The DELETE button deletes the group, the NEW button allows you to change the group settings. CONFIGURING THE A.T.G.P.C. BOARD (ONLY FOR BOWLING WHERE INSTALLED) Operating from the computer on which the ATGPC interface board has been installed after the time game groups have been set up. From the Time Game set up screen, click on the OK + ATGPC port conf. Highlight the group of games to be controlled by the board from the Games not assigned window. Highlight the number of the required game, then click on the assign button. The button corresponding to the assigned port becomes red and shows the game number to which it has been assigned. The RESET button zeros all the selections (settings). Example: the zero port on the board corresponds to Pool table number 1, the relay exit controlled by port zero will switch the light above Pool table number one on and off. The number of ports is determined by the installers, if more than 16 use the arrows to move. The OK button saves and exits. The CANCEL button exits without saving.
 Create, modify rates for bowling by the game (or frame depending on the general cash desk set up).")
31 31 General rate Setup 2.6 The rate set up window is divided into three parts: [1] FRAME BOWLING (GAMES) Create, modify rates for bowling by the game (or frame depending on the general cash desk set up). [2] TIME BOWLING Create, modify time bowling rates. [3] BY BOWLER BOWLING Create modify delete the rates for the By the bowler payment mode. [4] TIME GAMES Add, modify time game rates. The CALENDAR button activates the FESTIVITY program described in the following paragraph. The dates created are shown in the view windows, to scroll through them click on the arrow to the right of the view window, when the drop down curtain appears use the mouse arrow to select the required rate. Each rate must have its own name, a maximum of 30 rates are available for each type of payment form. In the Card rate sections you can create rates to be used in the card archive, in the same way as the standard rates created for the different types of payment for Bowling and Time games.the way in which the rates are set for bowling, time games and cards are the same. The buttons in the different areas with the same names share the same functions: ADD EDIT DELETE Create a new rate. Modifies an existing rate. Deletes the rate. Remember to set the TIME ZONES before setting the rates.
![32 RATE SETUP [1] RATE NAME Mandatory field which describes the rate.](/docs-images/89/99807416/images/32-0.jpg "[2] TIME ZONE The amount for each rate can be different in each TIME ZONE (previously set up in the general cash desk set up screen) and for the DAYS shown.")
32 32 RATE SETUP [1] RATE NAME Mandatory field which describes the rate. [2] TIME ZONE The amount for each rate can be different in each TIME ZONE (previously set up in the general cash desk set up screen) and for the DAYS shown. [3] WEEK DAYS The rates can be different for the various days of the week. Monday to Thursday, Friday, Saturday and Sunday. Various prices can also be set for shoe rental and sock sale. [4] SET AS DEFAULT RATE The system will use this rate as the first choice when calculating amounts due. [5] TAX The TAX section is only used with the USA version of WINS or when the QuickBooks accounting software is used. When this filed is used, the RATE PRICE must be NET, the program will calculate the gross total automatically. [6] [7] RATE AMOUNT Enter the amount you wish to charge [6] is the main number [7] the decimals if any.
 (cash and with magnetic cards) Write the amount you wish to charge for ONE HOUR of bowling PER LANE. The program will divide the amount into minutes when required.")
33 33 BY THE FRAME (GAME) RATE (cash and with magnetic cards) Write the amount you wish to charge for a SINGLE GAME, PER PERSON, the program automatically calculates the amount due for each frame when necessary. BY TIME (MINUTES) (cash and with magnetic cards) Write the amount you wish to charge for ONE HOUR of bowling PER LANE. The program will divide the amount into minutes when required. BY THE BOWLER MODE (cash and with magnetic cards) Write the amount you wish to charge EACH BOWLER during the preset time zones (see page pg. 27). TIME GAME RATES Time games have only one applicable rate, per group. In order to apply discounts you need to use the magnetic cards. In Time Games the amount is PER HOUR of play. The MINIMUM COLUMN allows you to set the minimum amount that is going to be charged. Example: if the hourly rate is 10 Euro and you set 5 Euro as the minimum, then the system will use 30 minutes as the minimum time and charge 5 Euro for anything less than 30 minutes. Anything over 30 minutes will be charged xx /60ths of 10 Euro 42 minutes will be: 10 Euro divided by 60 mins multiplied by 42used = 7.14 Euro FESTIVITY Click on the calendar button to activate the festivity program which allows you to determine and set special festivities. This program has been made so that you can force a certain rate on the chosen day. The special festivity program does NOT stop you from using the other available rates, it simply means that you can set a certain rate for that day. Suggestion: it is a good idea to create special rates for the days you intend to set as special festivities. The program contains a calendar therefore the rates and other various settings will remain valid for all years to come without requiring any changes, unless you wish to make changes. Remember to change the settings for Easter as this period does not land on the same dates each year, like Christmas which may land on a week day. The program calendar is divided into two parts, first six months and second six months. Use the respective buttons to visualize the required period. Saturdays and Sundays are shown in red.
![34 [1] ASSIGN EXTRA FESTIVITY The program divides and shows the year in two parts. Saturdays and Sundays are already highlighted in red. Click on the Assign extra festivity.](/docs-images/89/99807416/images/34-0.jpg "Select the festive day by clicking with the mouse arrow on the day, which becomes red, for example December 25 th (Christmas Day).")
34 34 [1] ASSIGN EXTRA FESTIVITY The program divides and shows the year in two parts. Saturdays and Sundays are already highlighted in red. Click on the Assign extra festivity. Select the festive day by clicking with the mouse arrow on the day, which becomes red, for example December 25 th (Christmas Day). Note: this operation is optional and is only used to show the selected festivities clearly. [2] ASSIGN A RATE TO A SPECIAL DAYS Click on the NORMAL to assign a special rate, to one or more festivities. Select the rate [4] group you want to use by clicking on the BOWLING TYPE: FRAME BOWLING RATE [5], TIME BOWLING RATE [6], BY BOWLER [7]. Select a rate [4], then click on date box you wish to set. The day will turn to blue to show the selected rate has been set for that day. By changing the payment mode setting (Game, Time or By the Bowler) it is possible to set another rate for that same day. CHECKING THE RATES ASSIGNED Click on the SHOW ASSIGNED RATES [3] button. The days assigned to the selected rate [4] will turn BLUE all the others days with a rate (not selected) assigned to them will turn GREEN. With the CLEAR ALL RATES button you can delete all the settings made previously. With the EXIT button you exit the program, the selections and settings made are saved automatically. The calendar settings remain valid for all the years that follow, until changed manually. Windows will change the weekends automatically.

35 35 TAX SETUP (QUICKBOOKS PROGRAM) The Wins program can be enabled to show VAT tax breakdown on receipts and daily reports even for those NOT using the QuickBooks accounting package interface. Ask your distributor for the taxes.iff file with the necessary settings. Setting with QuickBooks program NOTE: this chapter is only for those with the QuickBooks program already installed. Transactions data collected by STELTRONIC WINS can be exported in a format called IIF (Intuit Interchange Format); this file can be imported into QuickBooks for Windows. These transactions include payment of bowling games (with shoe and sock rental), time games (snooker, darts...), pro shop product sales, snack bar product sales and Bar sales. Other cash transactions such as refunds are not included in these transactions. Wins allows you to associate a tax with each group of transactions. Taxes that can be associated are selected from the list of taxes that have been created in QuickBooks. These taxes must be exported by QuickBooks so that Wins is able to group them. 1) In QuickBooks you need to create a separate sales tax item for each tax amount to be reported. To create a single tax item refer to QuickBooks User s Guide, chapter Tracking and paying sales tax,. WINS does not support tax groups, so do not create tax groups to be associated with Wins transactions, but use only taxable items. Tax item creation 2) When you have created all the taxes you want to associate with Wins transactions (taxes for bowling games, for shoe and sock rental, for each group of product you sell), you must create an export file for STELTRONIC WINS. In the File menu select the Export function. Then you have to select the data to include in the export file.
 workstation.")
36 36 EXPORT FILE SELECTION Select the Item list check box N.D. then click OK. In the next window you have to select the file name and the file directory. You must choose taxes.iif as the file name. The directory is: C:\tcpserv\consoles.fld if QuickBooks is installed on the Main Desk K:\consoles.fld if QuickBooks is installed in another (additional) workstation. Click OK to create the export file. If everything is correct in Wins you will be able to select the tax to apply from the list of taxes created in QuickBooks. If you later modify or add some taxes you must repeat these steps to export the new tax file.


37 37 Bar, Snack Bar and Pro-shop Item Set Up 2.7 Note: all three menus are set up in the same way. The NEW button is used to create a new group of items. The DELETE button deletes the highlighted group. The OK button is used to exit. The TAX window selects the tax for the item group. Insert the group name of the item, click on the fictitious name to confirm. Choose the icon you want to assign by clicking on the? button and scroll the pages using the <<>>. Select the chosen icon by clicking on it, a red frame will appear surrounding the icon confirm with OK. The LIST button activates the groups sub-menu. The group name is added automatically as the first item. Press NEW to add a new group. Write the item name and price in the view windows. DELETE removes the highlighted item if necessary. The QUICKBOOKS accounts (code) is assigned by WINS when using QuickBooks interface. The USE IN AWARD GAMES selection makes it possible to use the item from the StelGames program as a prize (refer to the USING THE STELGAMES PROGRAM). NOTE: If the item price is left as zero, every time the article is sold the price will have to be inserted manually. Click on OK to exit.

38 38 Coupons Setup 2.8 Coupons are used to award free games as well as credits to be used in the centre to pay for bowling, time games etc. FREE GAME COUPONS The Free game coupon can be used to award one or more free games. FIXED VALUE COUPONS Are used as prepaid credit towards bowling, time games etc In the Wins program the coupons are managed and accounted for in the Daily Report, they are not included in any report printouts. The window is divided into two sections: Fixed value coupons and Free game coupons. The ADD creates a new coupon. The EDIT varies the settings for the selected coupon. The DELETE button deletes the selected coupon. The OK button is used to exit from the function. The value of the FIXED VALUE COUPON must be inserted.
, at each transaction, the receipt printer is not fiscal.")
39 39 Print Option Setup 2.9 Set the way you want the receipt printer to behave in each of the following cases: Bowling, Time Games, Bar and Generic income (pro-shop), at each transaction, the receipt printer is not fiscal. AVAILABLE SELECTIONS: NEVER The system will never print a receipt for as long as this is checked. REQUEST The system will ask if you want to print a receipt after each transaction and when a time game is opened, press OK to print the receipt. ALWAYS The system will print a receipt each time a transaction is made or a time game is opened, automatically. Save the settings with the OK button SCORE PRINTER PLAYER IMAGE This section will be used only in bowling centre equipped with New PHOTO STRIKE II (with colour photo)

 needs")
40 40 Enabling Movies 2.10 The movies (also referred to as clips) are grouped into packets, normally already installed at source. Currently available on Wins v CD ROM: BASIC 132 basic animations (no characters only animated words). STARBOWL1 30 movies using the three Star, Bow and Ling characters. STARBOWL2 30 movies using the three Star, Bow and Ling characters. STARBOWL3 30 movies using the three Star, Bow and Ling characters. STARBOWL4 30 special birthday movies using the three Star, Bow and Ling characters. BOWLCANO1 30 movies featuring Bowlcano Island 1 BOWLCANO2 30 movies featuring Bowlcano Island 2 In order to use the special Star, Bow, Ling movies a license (one for each packet of 30 movies) needs to be purchased and enabled. These movies are enabled using the following procedure. The BASICS package (132 movies) is installed and included in all the Superelex lane computers and does NOT require a special license. The Movie License can be requested and ordered directly from your nearest Steltronic distributor or from our web page (downloads) by filling in the request form at The following user licenses are also available when filling in the request form: CUSTOM MOVIES LIVE SPARES MOVIE MAKER License for personalized clips made by Steltronic, to show on available lanes. License to use the Live Sparemaker package (see following chapter Live Sparemaker ) License for homemade movies to show on available lanes. RECORDING ONE OR MORE LICENSE Once the license has been purchased you will receive a file via , on floppy disc or directly via modem connection. This INI file should be copied into the TCPSERV\DATI_COM directory. Click on the icon found in the Wins set up screen then on the Add New Clips button. Position the mouse arrow on the clips ini file which has been pasted into the TCPSERV\DATI_COM directory then click on Open. The list of enabled clips (movies) is shown on this screen, along with the expiry date of each one. Click on the EXIT button to return to the previous page. ENABLE THE 30 DAY DEMO LICENSE Install the Demo Movie Licence.txt. file which is located in the TCPSERV directory following the procedure as described above. Once the 30 day period is finished the program will lock (disable) the optional movies.

41 41 Selecting Backgrounds, Movies and Playlists 2.11 The Theme Management program has been created to manage the Animations and Static Images to be shown on the lane monitors. Movies, static images and free lane backgrounds and score grid backgrounds have been divided into different Themes in order to speed up the selection process. For example ALL the 132 movies which do not include the characters Star, Bow and Ling are grouped in a theme called Basics, the static images in the animal section, used as free lane backgrounds are in a theme called Pets and so on. MAIN PROGRAM FUNCTIONS Creation, modification or deletion of one or more Play lists. Addition, or removal of a theme or of one or more images used as backgrounds. Configuration of the Live Sparemaker (when enabled). WARNING! The Themes program is ONLY used for creating and editing play lists, to actually show the images and play lists on lane monitors the command must be given through the CNT command in Wins. OPEN THE THEMES PROGRAM Click on the icon in the Wins set up screen. 1 LANGUAGE selection. 2 ADVANCED OPTIONS button. 3 STATIC IMAGE selection. 4 ANIMATION menu 5 Program EXIT 7 Program version INFORMATION
![42 [1] LANGUAGE SELECTION Open the drop down curtain, select the language you wish to use while operating the program. Not necessary if the language required is already set.](/docs-images/89/99807416/images/42-0.jpg "[2] ADVANCED OPTIONS MENU IMAGE SIZE STATIC IMAGE MENU It is possible to change the size of the ICONS on this page. The icons will be used to show the movie of static images available.")
 Click on the indicator and move it right or left while keeping the mouse button down. Exit and save settings by clicking on OK. The Superelex lane computers can use static images as well as movies.")
42 42 [1] LANGUAGE SELECTION Open the drop down curtain, select the language you wish to use while operating the program. Not necessary if the language required is already set. [2] ADVANCED OPTIONS MENU IMAGE SIZE STATIC IMAGE MENU It is possible to change the size of the ICONS on this page. The icons will be used to show the movie of static images available. The measurement is expressed in pixels. There are two ways to vary the height and width of the Icons: A) Use the arrow buttons to vary the sizes 10 pixels at a time (each mouse click). B) Click on the indicator and move it right or left while keeping the mouse button down. Exit and save settings by clicking on OK. The Superelex lane computers can use static images as well as movies. The static images can be used as backgrounds on available lanes as well as event images like strikes, spares, fouls etc. The left hand side shows the themes and events while the right shows the contents of the events and themes. THE WAY TO SELECT IS THE SAME FOR BOTH. Each event, backgrounds, strikes, etc, contains a choice of predefined themes. Click on each event to open the branch menu which shows the contents of the particular event. Click on the themes within the events to see the images contained. To enable the image of a theme, simply click on the selection box, the tick indicates that the image has been selected. The default setting when the program is turned on enables all the images automatically. It is not possible to modify the order in which the images will be shown on screen. The sequence in which the repeated events like multiple strikes etc are shown can not be modified. Image NOT enabled Image IS enabled
 On the left of the screen you will see the list of events for the various moments of the game.")
43 43 ANIMATION MENU The animation menu is used to create, modify and delete the play lists; use the homemade movies as well as to program the Live Sparemaker options (Homemade movies and live Sparemaker require authorized licenses to be used) On the left of the screen you will see the list of events for the various moments of the game. The size of the screen can be varied by placing the mouse arrow on the borders of the pages and dragging them left or right by clicking on them and keeping the mouse button down while moving. The events written in bold indicate that there are multiple movies in the selection, for example: The dropped pins not leaving split has pins 1 to 9 listed within it, in a sub menu. It is possible to select the desired movie for each type of event. The right part of the screen is divided into two parts, top is Gallery and bottom is Play list. The Gallery shows ALL the available images and movies while the Play list shows the SELECTED images to be shown on screen when this play list is selected on the lanes. The screen area on the bottom left hand corner of the screen shows the preview of the selected movie. A PLAY LIST actually a text file, which contains a list of animations associated to certain events. The Themes program allows you to modify these events by using a simple set of commands: COMMAND KEYS OPEN AN EXISTING PLAYLIST DELETE A PLAYLIST SAVE THE PLAYLIST CREATE A NEW PLAYLIST EXIT THE MENU CREATE A PLAYLIST WITH ALL THE AVAILABLE MOVIES SELECT THE THEME PERSONAL MOVIES (requires authorized license)

 requires an authorized license. Click on the top bar Icons to enable the theme and all of its contents.")
 Click on the add theme button Confirm the operation with YES. WARNING!")
 If a play list has been created automatically and you wish to modify it or you want to select the images manually, simply use the Windows drag and drop")
44 44 CREATE A PLAYLIST There are two ways to create a Play list: Manual,, by dragging and copying the image or movie from the Gallery to the Play list screen. Automatic, by selecting the image or movie and double clicking on it. Whichever method is preferred the first thing to do is to select the theme to show in the Gallery. SELECTING IMAGES BY THEME Click on the theme selection button The themes are shown on the top bar as Icons The default selection enables ALL the themes. The use of the themes (excluding Basics) requires an authorized license. Click on the top bar Icons to enable the theme and all of its contents. The event lists are shown in title form; click on the them to open or close the theme selection. To manually select a theme in an event, click on the selection box on the left of the theme. When selected click on OK to exit. CREATING A PLAYLIST AUTOMATICALLY (recommended choice) Click on the add theme button Confirm the operation with YES. WARNING! The themes program does not limit the use of the movies and images, if you select a unauthorized movie the lanes will NOT use the movie. CREATING OR MODIFYING A PLAYLIST (manually) If a play list has been created automatically and you wish to modify it or you want to select the images manually, simply use the Windows drag and drop method. Click on the event to visualize the contents in the Gallery. Remember that the events in bold contain more events in a sub menu. To place a movie in the Play list from the Gallery click on the movie and while keeping the mouse button pressed drag the movie in the Play list once in the Play list area release the mouse button.


45 45 Once in the Play list the icon will be shown with a number (in brackets) which indicates the order the movie will be shown in (1) is first (2) second and so on. Example: the image on the left of this page shows the BA02B movie as the first movie to be shown in the dropped pins on first ball which don t leave a split, 2 pins. When the bowler on this lane throws his second 2 pins which don t leave split the movie shown will be BA02A and so on until all the movies in this theme are shown. It is possible to insert the same movie as many times as you want in the same event, simply repeat the first step more times. The play list is a continuous sequence, so until it is manually changed, on the lane in question, it will continue to rotate using the enabled movies, every time the event occurs. If, for any event, the play list contains only one movie it will be shown every time the event occurs. MOVIE PREVIEW To preview a movie, click on the movie icon and then on the start arrow of the preview screen on the bottom left hand corner of your screen.. The pause button stops the movie but leaves it on screen, while the stop button actually stops the movie. DELETING A MOVIE FROM THE PLAYLIST Click on the image (icon) in the play list that you want to remove and press DEL on the keyboard The icons (movies) which remain in the play list will be re-numbered. CHANGING THE PLAY ORDER (sequence) Drag the icon from its current position in the playlist to the desired position and release the mouse button. The rest of the movies will be moved one turn to the right. Repeat the operation until all the movies are in the desired order. INSERTING BACKGROUND IMAGES FOR AVAILABLE LANES (lanes not in use) Click on the event CLIPS ACTIVE ON AVAILABLE LANES. If no selection is made the program will insert the default movie. SAVING A PLAYLIST Click on the disc icon then, click on the space below the current list and write the name of the play list, finally click on the SAVE button. The playlist has been saved and is now available in the ANIMATIONS section of the lanes CNT screen. TO CREATE A NEW PLAYLIST Click on the button.

.. The movie must be in MPG format and respect the following characteristics: 25 frames per second. 1.6 Mbytes per second bit rate.")
46 46 USING THE PERSONAL MOVIES FUNCTION Warning! This function requires an authorized license, if the button is not present then the license has not been acquired. The movies contained in the PERSONAL MOVIES gallery can either be supplied by Steltronic or inserted directly by the customer. If you have a movie, which must be in MPG format, it is possible to insert it and visualize it on the lanes as an alternative sparemaker (if you have purchased the live sparemaker license) or other event (if you have purchased the movie maker license).. The movie must be in MPG format and respect the following characteristics: 25 frames per second. 1.6 Mbytes per second bit rate. 352 X 288 pixel in size. Copy the file into the TCPSERV\DV_CLIPS directory on Disc C of the Main Desk. USING THE PERSONAL MOVIE (Movie maker validation) Select the event in which you wish to activate the movie (the example shows active clips ) Click on the icon. Drag the icon into the playlist area. Repeat the procedure if you want to paste the movie into another event. Save the playlist. LIVE SPAREMAKER FUNCTION (Live Sparemaker validation) Click on the icon. Select the LIVE SPAREMAKER event. Drag the icon into the playlist area. When you release the mouse button the Live Sparemaker configuration screen opens. Click directly on the pins knocked down to link the movie to this particular event. (which you previously moved to the playlist). Click on OK to confirm.
, using a predefined font and font size.")

47 47 Creating and editing a scrolling text message 2.12 The FLOWEDIT program allows you create scrolling text messages which can be shown on the lane monitors. The files are created in text mode (file.txt = text mode), using a predefined font and font size. COMMAND KEYS OPEN AN EXISTING TEXT FILE DELETE A TEXT FILE SAVE THE TEXT FILE CREATE A NEW TEXT FILE PROGRAM INFORMATION (VERSION NUMBER) CHANGE BACKGROUND COLOR CHANGE FONT COLOR EXIT THE MENU TO CREATE A SCROLLING TEXT Select a background color by clicking on the button and opening the drop down curtain. Select a font color by clicking on the button and opening the drop down curtain, the font color can be changed within the same message as many times as required


48 48 TO VARY THE COLOR OF THE TEXT At any time while writing the message, click on the font button again and select another color, this can be done as often as each letter in any text line. TO CHANGE THE COLOR OF THE TEXT At any time, highlight the part of the text that you wish to change and then click on the font button, select the colour the change will be made automatically. TRANSPARENCY The TRANSPARENCY effect allows you to see the background under the color of the scrolling text message. This can only be done with the SuperElex lane computer. The transparency level effects the entire line of text, to vary the percentage of transparency, use the arrows or drag the indicator right or left. TO INSERT A PAUSE The text scrolls from right to left on the bottom of the lane screens. It is possible to stop the text at any point and for up to 300 seconds, after which the text starts to scroll again until it comes to another pause or back to this one. To insert a pause, click on the STOP icon, keep the mouse button pressed and drag the icon onto the text line at the point where you want the text to pause, release the button. Click on the icon so that it is selected, then use the arrows or move the indicator to the seconds you want the pause to last. Insert other pauses if required in the same way. To delete a pause click on the STOP icon in the text and press the DEL button on the keyboard. TO VARY THE SCROLL SPEED OF THE TEXT The scrolling text scrolls from the right to left on the bottom of the lane screens, it is possible to vary the speed that the scrolling text travels across the screen as many times as required. To vary the speed, click on the LIGHTNING icon, keep the button pressed and drag the icon onto the text at the point in which you want it to speed up or slow down, release the button. Click on the icon so that it is selected then use the arrows or move the indicator to the speed you want to set. There are three speed options: Slow, Normal, Fast. Repeat the operation as many times as needed. To delete a speed feature click on the LIGHTNING icon in the text and press the DEL button on the keyboard. Once finished click on the floppy disk icon to save the file. WARNING! The file name can be a maximum of 8 letters. When you open an existing file, the save icon is not available, until changes are made.
 as score grid colors are set automatically by Wins.")
 Select the type of signal: PAL (Europe, except France) SECAM (France) NTSC (USA) The two vertical cursors control the movie AUDIO for LEFT and RIGHT.")

49 Superelex lane computer maintenance and commands Each pair of lanes (one Superelex lane computer) can be controlled by entering the Set Up section of Wins (Doctor icon). screen from the The BRIGHTNESS, CONTRAST AND COLOR, commands allow you to vary the quality of the on lane image, only for TV signal (CVBS) as score grid colors are set automatically by Wins. The changes are made in real time using the cursors shown on the screen. The USE AUXILIARY MONITOR button is required to enable the bowler consoles supplied with 14 monitors down on the lanes. (whether they are touch screens or not) Select the type of signal: PAL (Europe, except France) SECAM (France) NTSC (USA) The two vertical cursors control the movie AUDIO for LEFT and RIGHT. The SX=DX box allows you to adjust both left and right speakers at the same time. To use the movie audio amplified speakers need to be installed on the Superelex output. (output is supplied through a standard computer type 1.3 mm plug) The Press to ENABLE touch screens button is ONLY used in centers that have 14 Touchscreen bowler consoles installed in the bowler area. The left and right monitor selection buttons are enabled by pressing this button. To DISABLE the touch screens, click on the button a second time. To calibrate the Touchscreen monitors click on the CALIBRATION button which is active only when the touch screens have been enabled. (see instructions in the Service chapter.) The SYNCHRONIZE FILES WITH SERVER button is ONLY used to copy the new movies into each Superelex lane computers WHEN software upgrades have been made or you have received new movies on CD ROM. Only use the function if necessary, lane by lane.
50 Using the functions Checks to make before using the program 3.1 Main menu Icons 3.2 Accessing the system for cahiers and other employees 3.3 Lane icons 3.4 Lane control options 3.5 Multiple commands 3.6 Multiple lane CNT 3.7 Instant glow command 3.8 Multiple Sciba camera command 3.9 Multiple lane open, close and other functions on open lanes 3.10 Single lane selection for pre, post payment, frame or time bowling 3.11 Opening a lane in open or a pair of lanes in league (lane swap) 3.12 Single functions available from the main desk on open lanes 3.13 Closing an open/league lane, prepaid or post paid 3.14 Adding games or time in pre paid mode 3.15 Opening, closing parking time games 3.16 Using the waiting list 3.17 Using lane parking and time game parking 3.18 Print game scores, restore games, print last transaction 3.19 Score correction from main desk 3.20 Using the Bar, Restaurant and Pro-shop 3.21 Selling coupons 3.22 Refunds 3.23 Account management 3.24 Bar, Mechanic and Restaurant service calls 3.25 Magnetic card archive 3.26 Recorded transactions, daily report, back up, restore data 3.27 Using the employee time clock 3.28 Functions available on bowler consoles 3.29
51 51 things to verify before using the program 3.1 Before using the Wins program it is a good idea to make some checks in order to verify that the system is correctly configured: The system users (cashiers, managers, mechanics) have been inserted. Each user has specific functions enabled in accordance with their role in the centre. The owner password has been recorded. The magnetic card (when present) has been inserted and is active. The time zones have been set. Time games (when present) have been created. The bowling and time game rates have been created. The special festivities have been assigned to a special rate. The Pro-shop articles Bar articles and Restaurant items have been created and given prices.

52 52 Main Menu Icons 3.2 SERVICE AND SET UP MENU MAIN MENU USER LEVEL INDICATION EXIT THE WINS PROGRAM PREVIOUS AND NEXT PAGES EMPLOYEE TIME CLOCK MAGNETIC CARD ARCHIVE LEAGUE AND TOURNAMENT INTERFACE PRINT QUEUES PRINT LAST RECEIPT PARK LANES PARK TIME GAMES RESERVATIONS CALL FOR SNACK BAR SERVICE CALL FOR MECHANIC SERVICE CALL FOR BAR SERVICE BAR MENU RESTAURANT MENU PRO-SHOP MENU CUSTOMER ACCOUNTS REFUND DAILY REPORT MULTIPLE COMMANDS FIXED VALUE COUPONS PRIZE GAME REPORT OPEN CASH DRAWER LANE PAIR ICON TIME GAME ICONS

 icon to open Wins Menu.")
53 53 System access 3.3 As was explained in the previous chapter IDENTIFICATION, the first operation to perform before using the system is that of identifying yourself to the system. The various functions described in this charter depend on the security levels enabled for each user, in fact some buttons may NOT be enabled and therefore the user will not have access. The identification procedure is similar to that of the owner and cashier: click on the name of the user and confirm the data, or pass the magnetic card; if the system is already in use click on the key icon to enter the identification screen. ACCESS FOR OTHER EMPLOYEES If the Wins program require an identification, click on the NONE (LOCK) icon to open Wins Menu. Click on the EMPLOYEE TIME CLOCK icon, this message appears. Swipe the card through the card swipe. The time clock program records each swipe of the magnetic cards, the first time it records the entry time and the next time the exit time.

54 54 Lane Icons 3.4 Every PAIR OF LANES in the main menu is visualized as shown in the picture and is made of various icons. Most of these icons are actually button through which you can access certain functions. It is possible to visualize up to 20 lanes (10 pairs) on each screen of the main Wins menu, while using 25% of the screen for time games. More if no time games are present. When the lane icon is grey it is not possible to perform any function on the lane pair as the Superelex lane computer is loading information, or may be faulty. To see the other pages, when more lanes are present or the lane pairs have been reduced per page, simply click on the arrows and move from one page to the next 1 Lane pair numbers (in this case lanes 1 and 2) 2 Left Lane sale mode indicator (in this case lane 1 is post paid by the game) 3 Right Lane sale mode indicator (in this case lane 2 is post paid by the game) 4 Left lane indicator (in this case lane 1 is in use) 5 Right lane indicator (in this case lane 2 is not in use) 6 Left lane status indicator (in this case lane 1 shows 325 frames bowled) 7 Right lane status indicator (in this case lane 2 shows no frames) 8 Left lane Bowler and Video selection indicator (in this case shows 1 bowler present lane 1) 9 Lane control button for a pair of lanes (in this case lanes 1 and 2) 10 Right lane Bowler and Video selection indicator (in this case there are no bowlers and the empty lane is showing TV) LANE ICON STATUS [4][5] Lane empty in Open mode Lane empty in Open Glow mode Lane empty in Open mode with parked lane present Empty lanes in Grand prix mode Lanes in use in Grand prix mode Lane in use in Open mode Lane in use in Open Glow mode Lane in use in Open mode with parked lane present Lane in use in Open mode with extra frame detected Lane in Open Tournament mode Pair of empty lanes in League mode Pair of empty lanes in League Glow mode Lane empty in League mode with parked lane present Pair of lanes in use in League mode Pair of lanes in use in League mode with extra frames detected Lane in use in league mode with parked lane present Lane in use in League Glow mode Pair of lanes in Tournament mode Warning! Lane computer is faulty. NO IMMEDIATE DANGER Simply turn lane pair off and check lane computer
55 55 LANE RENTAL MODE INDICATOR [2][3] The indicator changes in conjunction with the way the lane is being sold (rented) Each lane is independent POST PAID GAME OR FRAME PRE PAID GAME OR FRAME BY THE BOWLER PLAY MODE PREPAID LANE GAME OR FRAME. (a number of games is placed on the lane and not to individual bowlers, they may even be odd, 10 games with 3 bowlers present) POST PAID TIME PRE PAID TIME EXTRA UNPAID FRAMES DETECTED The EXTRA FRAME selection appears when a score correction has been made deleting a frame or when a bowler throws a ball with the score and pinsetter out of step (score on first ball, pinsetter in second ball) LANE STATUS INDICATOR [6][7] If the indicator is GREEN the lane is being POST PAID (in this case shows 550 frames which have already been bowled). If the indicator is YELLOW the lane is being PRE PAID and the 550 would indicate the number of frames remaining to be bowled. The indicator is also used by Wins to indicate others lane status types: A) If bowlers don t throw a ball for longer that the time set in the SLOW TIME section (see multiple command section) the word SLOW will flash in the indicator of the lane in question. B) If bowlers don t throw a ball for the total time set in both the SLOW TIME and the WAIT TIME section (see multiple command section) the pinsetter will be turned OFF and the word WAIT flashed in the indicator. BOWLER AND VIDEO SELECTION INDICATOR [8][10] The TOTAL BOWLER indicator shows the number of bowlers present on lanes. When the lanes are free the lane indication changes depending on the VIDEO SETTING. Lane in use, 1 bowler Lane TV showing Lane not in use Backgrounds showing Lane not in use Monitor Off To change the Video selection click on the indicator to open the lane settings screen. This selection can also be made through the CNT in the multiple commands.

56 56 MAIN MONITOR SELECTION ON monitor is on with score grids or background images. OFF Monitor ALWAYS OFF AUTO monitor on with score grids, off when not in use VCR SETTINGS ON TV signal ALWAYS ON OFF TV signal ALWAYS OFF AUTO monitor on when lane not in use, TV signal active until the lane is opened (bowlers names sent to lane). AUXILIARY MONITOR (14 bowler s console- new look or winvsion) monitor is on with score grids or background images. OFF Monitor ALWAYS OFF AUTO monitor on with score grids, off when not in use LANE CONTROL BUTTON (per pair of lanes or in multiple) [9] Each pair of lanes has a control button in the center used to enter into the settings screen of the lane pair. Some of these functions are also available in the multiple commands screen. The details is described in the next chapter. To activate a function, clock on the checkbox beside the function description. THE USE OF THE STELGAMES PRIZE GAME PROGRAM IS DESCRIBED IN THE STELGAMES CHAPTER.

57 57 Lane control options 3.5 The commands shown with a BLUE frame control the left lane settings, while the commands with a RED control the right lane settings. The commands shown with a GREEN frame are used for BOTH lanes. The commands will not be run (except for the pinsetter cycle command) until you exit the CNT screen by clicking on OK and then confirming the changes by clicking on YES. CUMULATIVE TOTALS Sums the totals of each game already played to the game being played. BALL SPEED Shows the ball speed for each throw. MPH Shows the ball speed in miles per hour, if NOT checked in Km per hour. STATUS BAR Shows the game standings, it is on the top of the screen above the score grids. SHOW PLAYER IMAGE UPON BOWLING Option available ONLY for centers that have a Photostrike installed. If this is checked the bowler photo will be shown before EVERY throw.
58 58 PINSETTER CONTROL [ON] pinsetter always ON [OFF] pinsetter always OFF [EXT SW.] MGR control (manual switch) [AUTOMATIC] pinsetter is controlled by the scoring system, Lane open = pinsetter ON lane closed = pinsetter OFF 10 PINS IN PRACTICE MODE the pinsetter will cycle and place a new set of pins during practice PINSETTER PHASED WITH SCORE unblocks the ties between the scoring system and the pinsetter ball settings. In this case if the second ball signal is not available the score will continue to detect the game. Use this function only if absolutely necessary. RESET PINSETTER Sends a signal to the pinsetter making it cycle once. WARNING! This command requests you to confirm in case the pinsetter is being worked on by the mechanic. DISABLE CYCLE WITH EMPTY LANE stops the pinsetter cycle when there is no bowler name present SWITCHING ON FOUL LINES (only for some types of interface) switches the foul line on with a low tension power circuit. HDP INCLUDED Inserts the bowler handicap from the first frame. DEMO If active makes the score simulate play without the necessity to throw balls on the lanes. FAST SWAPPING During a League the bowlers bowl on the opposite lane as soon as it is available without waiting for the entire team to move over OPEN LEAGUE Bowling for fun, not organized League or Tournament bowling, no lane movements. LEAGUE Organized bowling League or Tournaments, double lanes with lane swapping after every frame bowled. RESET LANE Button for resetting the lane computer (rebooting) in cases of corrupt files of lane computer malfunction. SCROLLING TEXT Allows you to select a scrolling text message to visualize on the lane pair. LANE LANGUAGE It is possible to select a different language lane by lane, to show bowler screen menu. Open the drop down curtain and select the language.
 and Grand Prix (using either cars or horses as the symbol).")
.")
59 59 LANE SOFTWARE VERSION shows the current lane software version installed BOWLER CONSOLE BATTERY STATUS Shows the battery level on each lane. Only in centers with wireless bowler consoles installed. GAME MODES It is possible to choose to play in 2 different modes: Bowling (using a standard 10 frame grid of varying colours and sizes) and Grand Prix (using either cars or horses as the symbol). The Grand Prix mode Horses or Cars are available as extra options which need to be enabled by Steltronic. For more information about Grand Prix refer to the Using Grand Prix chapter. [BOWLING] standard play mode (predefined). [GRAND PRIX] Grand Prix racing mode horses or cars BACKGROUND This screen is used to show and select the on screen backgrounds to be shown behind the score grids and the THEME which will be shown on the lanes when not in use by bowlers. The selection for THEME and BACKGROUND is made in the same way, simply click on the image (the first time it will be a question mark) select the image or theme you want by clicking on the icon, use the << >> arrows to change page, there are many available. Click on the minute drop down curtain to set the number of minutes that each image should stay on the monitor, or select he movie feature when the Superelex is installed and you want animations to be shown.. ANIMATIONS It is possible to select an image or movie on each individual lane for, strike, spare, gutter, foul. To access the list for each event, click on the drop down curtain next to the event you wish to set, then select the setting type. (None, Movie, Big Frame or Image). When you select image click directly on the icon to open the selection menu. Select the icon of the theme you want to choose then confirm the choice with OK. From the window list of movies you need to select a playlist.
. [MOVIE] predefined setting for Superelex lane computers.")
. [NONE] the scores are shown without any movies or images during play.")
![[SPAREMAKER] only for first ball and gutter balls: graphical image showing where the bowler should aim for in order to have the best chance to close the spare.](/docs-images/89/99807416/images/60-2.jpg "[BIG FRAME] An enlarged view of the frame being bowled. [IMAGE] static image in place of an animation. The static images are divided into themes and are shown in sequence.")
60 60 The playlists are created in with the THEME SELECTION in the SETUP menu In order to access the playlist of each event, click on the arrow next to the selection window and set the action required for each event (none, movie, big frame image or Sparemaker). [MOVIE] predefined setting for Superelex lane computers. The animations which will appear, for each selected event, are those listed in the playlist (movie list) which needs to be chosen. The playlists re created with the THEME SELECTION program in the SETUP section of Wins (see chapter 2.11). [NONE] the scores are shown without any movies or images during play. [SPAREMAKER] only for first ball and gutter balls: graphical image showing where the bowler should aim for in order to have the best chance to close the spare. [BIG FRAME] An enlarged view of the frame being bowled. [IMAGE] static image in place of an animation. The static images are divided into themes and are shown in sequence. [ENABLE LIVE SPARE MAKER] only for users with the live Sparemaker license available in the extra options. When active the Sparemaker is shown using real live bowlers closing the spares actually in play. GRIDS Wins version 6.1 (unlike other versions) allows you to select the type of grids to view scores with on the lanes. The new set of grids are animated grids. You can decide to use the static grids or the moving grids on each lane. Example of moving grids with first bowler turning. Example of static grid The STATIC GRID SIZES section allows you to select between three (3) types of grid. The USE MOBILE GRIDS selection allows you to move from static grids to animated grids. To change the settings click on GRIDS. The STRIKE STYLE selection allows you to choose the type of graphic effect to use for strikes and spares.

61 61 The GRID STYLE TO USE box allows you to determine the color and style of the grids. There are three (3) types. Click on the Show grid style demo to see the selected style. The background on the animated grids is preset. The MAX # OF MOBILE GRIDS TO SHOW section allows you to decide how many grids (bowlers) will be shown on the screen (with animated grids in use) regardless of how many bowlers are actually on the lane. The bowlers not shown will scroll onto the screen at their turn to bowl. The ADVANCED PARAMETERS selection allows you to make more detailed choices regarding animated grids. It is possible to select the use or not use of the grids by the number of bowlers present. Example: if you select NO for the first three (3) bowlers the lane will use static grids, if you send 4 or more bowlers to the lane the animated grids will automatically be used.

62 62 Multiple Commands 3.6 The MULTIPLE COMMANDS allow you to change a setting or send a command to multiple lanes simultaneously. IN order to use the Multiple commands click on the icon on the main screen. Select the starting lane and then the last lane to which you want to send a multiple command. All the lanes between the first and last chosen will be included in the choice. To chose single lanes keep the CTRL button pressed down on the keyboard and click on the single lanes required. The selected lanes will be shown with a yellow frame. The lane icons are blue when the lane is in Open mode and red when in League mode. The icons show a pair of lanes. Once the selection has been made, use one of the following buttons: [1]MULTIPLE LANE CONTROL: enables and disables the lane functions (Handicap, Open, League, Pinsetter control etc.) [2] MULTIPLE SCIBA SETTING: used to change the BANK of the Sciba to move from normal bowling to Glow in the Dark bowling instantaneously. [3] INSTANT GLOW: this command will pass the entire centre to glow settings. [4] MULTIPLE PINSETTER INTERFACE SETTINGS: allows you to vary the API parameters. This is used only for extraordinary service requirements. Consult the System maintenance chapter. [5] MULTIPLE LANE OPEN or CLOSE: the selected lanes can be Opened or Closed simultaneously only if ALL using the same play method, Prepaid, Post-paid, Time, Frame etc.. RETURN: used to Exit the multiple lane command screen.. WARNING! The selected lanes in multiple commands are not available to other desks while open.

63 63 CNT Multiple lane control 3.7 To change the settings simply click on the checkbox. Function NOT enabled on any of the selected lanes. Function enabled on ALL the selected lanes. Function enabled on SOME of the selected lanes. In the MULTIPLE LANE COMMAND there are other functions which are not available in the per pair lane commands screen on the main page. We advise you to pay close attention to the multiple command checkbox settings. The Cumulative Total Ball Speed MPH HDP Included Status Bar Fast Swapping Demo Show Bowler Main Monitor Secondary Monitor VCR Time Games Reboot Lanes Pinsetter Control Lane Language Animations Backgrounds and Scrolling Text are all the same as described in the previous chapter. BOWLER CONSOLE FUNCTIONS- OPEN TOURNAMENTS When not active, totally disables the bowler console functions. CHANGE NAMES Edit names, mark as blind, insert handicaps, skip absent bowler etc ADD BOWLER REMOVE BOWLER Add or remove one or more bowlers. Not active in pre-paid mode. SCORE CORRECTION Enable / disable the access to score correction menu.
64 64 REPEAT Allows the bowlers to erase all the scores at any time during a game. Attention! ALL the frames bowled are counted and charged for in any case. BAR MECHANIC - SNACK BAR A flashing message sign appears on the lane monitors to attract attention for service. RECOUNT PINS Allows the bowlers who notice a wrong score count on the first ball to ask for an automatic recount and score correction. PART / FULL SET Allows the bowlers to set a full set or partial set of pins: available only with certain pinsetters. CHANGE LANGUAGE Allows the bowlers to select the language of their choice. SLOW When the SLOW sign appears on the Front Desk Computer it means that no bowlers on the lane indicated have bowled for at least the time set in the Slow box. The time is set by opening the drop down curtain in this section and selecting the minutes required. WAIT The WAIT time is in addition to the slow time. I13n this example if nobody throws a ball for same period of slow, the lane will give the Slow signal, if 2 minutes later (total of 6 minutes) no balls have been thrown, the lane will give the Wait signal and the pinsetter will be turned off. To re-start the pinsetter the bowler need only to throw a ball down the lane.

65 65 Instant Glow command 3.8 The term Glow identifies a change of light condition in the bowling centre. This may be the entire centre or a part of it. The effect is obtained by switching the normal white lights off and turning black lights on in order to make everything that has a phosphorous contents shine brightly or glow. Since the glow light has a different intensity than the normal white light the cameras (Sciba) will need to be set with different parameters. In order to simplify the white to glow light switching procedure there is a single button in the multiple command section called INSTANT GLOW which will turn the white lights off and the glow lights on, on all the required lanes. The command has two functions: Turning the glow lights installed on the pinsetters on and off. Change the camera (Sciba) parameters from those used for white lights to those for glow lights. In order to be able to use the on off function the two lights need to be connected (white and glow) to the API output connections (low voltage output). Refer to your distributor/supplier for further details. When the button is clicked in order to turn the glow lights on the white lights will be switched off and the glow on. When the turn glow light off (predefined) command is sent, the glow light is switched off and the white light stays on. The lane icons change to show that the glow lights are on. BEFORE USING THE INSTANT GLOW COMMAND The command enables the bank 2 settings on the cameras (Sciba) which indicate the pins knocked down. It is necessary to set the integration time value in Bank 2 in order to ensure that the pins are detected correctly. Perform the following task on all lanes where the glow light have been installed: Turn the pinsetters on and place 10 pins in first ball position. Use the same pins which will be used during glow bowling. Turn all the glow lights on. Enter the set up menu and click on the Sciba icon. Select bank 2. Click on the Set Default to delete any old settings. Select an integration time suitable for reading the pins (from 100 to 180, depending on the type of pins and light, glow or white). Check the pin count using the Calibration function. Verify that the calibration is okay and then carry on with the other lanes. Once finished the value for Bank 2 will be used every time glow bowling is in use. For more detailed information refer to the chapter Camera Calibration, in the maintenance section.
66 66 MULTIPLE SCIBA (CCD Camera) SETTINGS 3.9 The Multiple Sciba Settings has been created so that the Sciba settings on multiple lanes could be changed quickly. During glow in the dark bowling the pinsetter neon is turned off, the only light is a black florescent light. With the normal Sciba parameters the light is not enough for the camera to see the pins correctly. It is necessary to increase the light that enters the camera by lifting the integration time. In order to make the operation quicker to perform as well as simultaneous on all the lanes to be used, a second Bank (usually 2 & 4) is assigned to the Glow settings (with higher integration time). The first Bank is usually assigned to normal day light bowling. When the Glow Bowling is finished the same operation will allow you to return to day light bowling by changing back to Bank 1. ATTENTION! Before proceeding, set the values of day light and glow bowling for the two banks. For more information refer to the PIN READING CONTROL paragraph located in the SERVICE chapter. Click on the CHANGE button by the side of the CURRENT BANK. Select the chosen bank from the list. Highlight to confirm then press on the ESC button to confirm. NOTE: it is possible that different integration times have been set for the same Bank on different lanes. The multiple command, even though an integration time is shown, does not vary the time set on each lane, but simply sends the change Bank message to the lanes.
67 67 Open, Close and multiple commands available on open lanes 3.10 The multiple open and close command can be used for various functions: Open more than one lane in one go. Close or park more than one lane in one go. Change the payment and play mode on more lanes at once (pre / post pay, frame or time bowling by the bowler bowling). Adding or taking away bowlers or skipping bowlers on more lanes. Modify the bumper, pin-tap settings on more lanes. In order to use the function, select the required lanes and click on the icon. CHANGE RENTAL PAYMENT SELECTION Click on the Change button two select an alternative payment mode, as follows: Pre-payment concludes the economic transaction before the bowler names are sent to the lane, in pre-paid mode the number of games to be played by each boiler or the total number of minutes must be inserted. Automatic Game over stops the games or minutes once the preset limit is reached. Minutes selects Time Bowling. Individual Games bowling by Game, per bowler. In Prepaid mode insert the number of games for each player. Total Games bowling by Game, per lane. The number of games to insert in this case is not per boiler but per lane, so the Total number of games to be played must be inserted regardless of the number of players. By the bowler: pre-paid mode by the bowler with a pre-established finish time. AUTOMATIC LANE ASSIGNMENT FOR MULTIPLE BOWLERS ON MORE LANES (default option) In the name insertion page the ALL window is ticked by default. Indicate the total number of bowlers to be send to lanes in the BOWLER window. The program divides (spreads out) all the bowlers on all the available lanes. Click on the SEND button to complete the operation. MANUAL LANE ASSIGNMENT ON MORE LANES Click on the ALL window in order to take away the selection and leave the check box empty. Enter the number of bowlers to be placed on EACH lane then click on SEND.

68 68 MULTIPLE FUNCTIONS AVAILABLE ON OPENED LANES These operations are the same for lanes sold in Open and League mode. If the function is enabled it is possible to do this from the bowler console. To use other functions click directly onto the lane icon in use. PIN TAP BLIND The BLIND scores, generally used during a tournament or league, is equal to the bowlers average minus a pre-established percentage. The PIN-TAP function is used to transform any number of pins knocked down into a strike, this is very useful for small children who otherwise find it difficult to make strikes. USING BLIND: Click on the BLIND button to see the column (otherwise Pin Tap is shown). Insert the BLIND score for the bowler, then click on the check box between the Hdp column and the Blind column to activate the score. To DELETE the blind score, click on the BLIND button and uncheck the check box. Even if the score remains it will not be used. USING PIN-TAP: Open the drop down curtain of the bowler you want to assign a pin tap to, select a score and then press SEND to exit. The system will consider each ball thrown, which knocks down at the least the number set, by the bowler with a pin tap setting as a strike. Example: the bowler has a pin tap setting of 7. If the bowler throws a 6 then it is a 6, if the bowler throws a 9,8 or 7 then it is considered a strike. SKIP- UNSKIP BOWLERS In order to mark one or more bowlers as skipped click on the grey check box market Sc next to the name, then on the SKIP button itself. The skipped bowler will be highlighted on the lanes as skipped and their scores will freeze until the bower is un-skipped. The other bowler will continue to bowl as normal. To un-skip the bowler or bowlers repeat the operation. When skipped bowlers resume play the others (who have been bowling during their absence) will have to wait while the catch up to the same point in the game. REMOVING BOWLERS WITH MULTIPLE FUNCTIONS Select the grey CHECKBOX on the right of the bowlers name. Repeat the operation for all the bowlers who are leaving early. Use the arrow keys <> to move from one lane to the next. Click on the CLOSE button to confirm the operation. DELETING SCORES The REPEAT command zero s the points (score) of the game being played, saving the frames bowled for the payment. Confirm the operation by clicking on OK. Warning!! If the lane is being rented in pre-paid mode the entire game will be taken off the previously paid for games.. MULTIPLE PARK MODE To park all selected lanes click on the PARK button and confirm the operation by clicking on SEND then OK. MULTIPLE CLOSE Click on the CLOSE, button and then confirm with OK.

69 69 Lane payment mode setup (frame, time, etc.) 3.11 Each single lane can be sold in one of the four ways mentioned above. It is NOT necessary to open a lane in order to change the way it is sold. It is in fact possible to pre-set the lane payment and play mode, this will be maintained until the lane mode is changed again. Click on the lane button. Click on the CHANGE button to open the selection screen. PRE-PAYMENT concludes the economic transaction before the bowler names are sent to the lane, in pre-paid mode the number of games to be played by each boiler or the total number of minutes must be inserted. AUTOMATIC GAME OVER Stops the games or minutes once the preset limit is reached. MINUTES Selects Time Bowling. INDIVIDUAL GAMES Bowling by Game, per bowler. In Pre-paid mode insert the number of games for each player. TOTAL GAMES Bowling by Game, per lane. The number of games to insert in this case is not per boiler but per lane, so the Total number of games to be played must be inserted regardless of the number of players. The number inserted is the Total number of games and will be divided between the bowlers present. If the number of games is odd compared to the number of bowlers (e.g. 10 games for 3 bowlers) the scoring system will allow the 3 bowlers to play 3 games each and then show the STOP sign on the lanes. The bowlers must go to the Front Desk and make one of the following choices: a) One or more of the bowlers is removed from the lane so that the remaining number of bowlers can finish the game or games, (in the example above 2 bowlers removed and 1 plays the 10 th game). b) The lane is closed and a credit slip is handed to the bowlers for the last games which have not been bowled (in the example above the 3 bowlers would receive a credit slip for 1 game), which can be bowled at any time. BY THE BOWLER This mode of play is ONLY available during the pre-set times. These have been selected in the General Cash Set up section. In the By the Bowler mode the lane is rented to one or more people until the time that it has been set to end or the manual close because the bowlers want to end. Each bowler will pay the set amount regardless of the actual amount of time or number of games he/she has, to when the end time is reached.
 and if necessary select CHANGE.")


70 70 Open a lane in Open or League mode 3.12 Check the Icon style on the main screen, blue is Open mode Red is League mode, then click on the icon. If you want to change the style of play select OPEN or LEAGUE in the CNT screen for the lane pair. Verify the sale or rental mode (pre paid, post paid, time or games) and if necessary select CHANGE. OPEN LEAGUE There are three ways of inserting bowlers: WRITE THE TOTAL NUMBER OF BOWLERS In the box, then the number of rental shoes being handed out. The bowlers will edit their names from the bowler console, changing the default numbers already present. WRITE THE BOWLERS NAMES In the numbered boxes, then click the shoe box to indicate the number of shoes, (the number of shoes can also be written in the box as in the previous case). WAITING LIST From the waiting list where they have previously been entered, click on the Reservations button. Select the waiting list number from the list available then click on OK to confirm. The waiting list is progressive, however it is possible to select a number further down the list if a group or groups are not ready. The Waiting list bowlers who have a camera icon by their name have been inserted through the Photostrike and have had their photo taken. Once selected the number click on SEND to confirm and send to lane screen.


71 71 Front desk features available with open lanes 3.13 These operations are the same for lanes sold in Open and League mode. If the function is enabled it is possible to do this from the bowler console. Many of this features are available also by multiple commands. ADD BOWLERS Write the name of the new bowlers in the empty windows or simply increase the number in the bowlers window, then press SEND to confirm. The new bowlers are added to the ones already present on the lane in accordance with the way it has been set up on the general cash set up section, advanced parameters: With the NEXT GAME setting active the bowlers ill simply be shown on the lane monitors but will not play until the bowlers already on the lane have finished the current game. With the IMMEDIATELY setting active the newly added bowlers will need to play until they reach the point in the game that the other bowlers have reached, the original bowlers will not play until the new bowlers have caught up. With the ASK WHEN setting active the program will ask when we add the bowlers if we wish them to start right away, click YES, in this game or wait until the next game, click NO. The added bowlers that wait until the next game to start will have a egg timer next to their names. If the lane was rented in Pre paid you will need to take payment from the added bowlers before they go to the lane. REMOVING BOWLERS Click on the grey check box to the right of the bowler that needs to be removed. Click on the CLOSE button to confirm the closure then on YES when asked to confirm again. The remove bowler function is the same as an advance closure.. Pre-paid bowling: if the bowler who is leaving has games, frames or minutes of credit the credit slip will be printed on request (the function must be active in the cash desk set up). Following the confirmation, the program asks if you want to take payment for those leaving (post-paid only). If you click on YES the bowler will be asked to pay right away, if you click on NO the bowlers who finish later will pay everything together. SWAPPING LANES IN LEAGUE MODE ( SWAP BUTTON) Available only on lanes set in league mode: click on the SWAP button and the teams will change from the lane they are on to the other lane in the pair.
72 72 PIN TAP BLIND The BLIND scores, generally used during a tournament or league, is equal to the bowlers average minus a pre-established percentage. The PIN-TAP function is used to transform any number of pins knocked down into a strike, this is very useful for small children who otherwise find it difficult to make strikes. USING BLIND: Click on the BLIND button to see the column (otherwise Pin Tap is shown). Insert the BLIND score for the bowler, then click on the check box between the Hdp column and the Blind column to activate the score. To DELETE the blind score, click on the BLIND button and uncheck the check box. Even if the score remains it will not be used. WARNING! The bowlers using a BLIND score are considered the same as other bowlers by the cash system. If you wish NOT to charge these bowlers, click on the checkbox marked Blind bowlers do not pay BEFORE closing the lane. USING PIN-TAP: Open the drop down curtain of the bowler you want to assign a pin tap to, select a score and then press SEND to exit. The system will consider each ball thrown, which knocks down at the least the number set, by the bowler with a pin tap setting as a strike. Example: the bowler has a pin tap setting of 7. If the bowler throws a 6 then it is a 6, if the bowler throws a 9,8 or 7 then it is considered a strike. SKIP- UNSKIP BOWLERS In order to mark one or more bowlers as skipped click on the gray check box market Sc next to the name, then on the SKIP button itself. The skipped bowler will be highlighted on the lanes as skipped and their scores will freeze until the bower is un-skipped. The other bowler will continue to bowl as normal. To un-skip the bowler or bowlers repeat the operation. When skipped bowlers resume play the others (who have been bowling during their absence) will have to wait while the catch up to the same point in the game. AUTOMATIC BUMPERS Select the bowler that needs bumpers by clicking in the Bmp check box to the right of the name. The automatic bumper function requires the relative hardware connections to be made, if this is not done the command is ignored. DELETING GAMES BEING PLAYED The REPEAT command zero s the score of the current game, saving the number of frames played for payment at the end. Confirm with OK. Warning!! In Pre-paid games the entire game being played will be taken off and the bowlers will have one less game to play left. TRANSFERRING BOWLERS ONTO ANOTHER LANE. (not whole lane, team) Click on the grey checkbox beside the bowlers you are going to transfer. Click on the TRANSFER button and select the destination lane, then confirm. Warning! Transferring bowlers to lanes that are already in use (bowlers joining another team or group) is only possible when the destination lane is set to the same payment mode as the originating lane. MOVING LANES (whole lane, team) Click on the TRANSFER button, select the destination lane, and confirm. MANDATORY CONDITION: the destination lane or lanes must have the same play mode as the originating lane (Open or League mode)

73 73 Closing a lane, pre-or post paid, Open or League NOTE: by pre-paid we mean taking payment BEFORE the bowlers are sent to the lanes to bowl, in order to do this you must specify exactly how many games or minutes the bowlers are going to play. In post-paid the bowlers go to bowl and then pay after they have finished. The operations for post-paid, prepaid, Open or League are similar except in some instances: In Pre-paid the number of rental shoes must be inserted BEFORE the economic transaction is made. When closing an Open mode lane you only close 1 lane, while in League mode you always close 2 lanes. In Pre-paid it is NOT possible to add Bar consumptions, Restaurant items or Pro-shop items to lane accounts. To activate the ECONOMIC TRANSACTION in pre-paid you click on the SEND, button, in post-paid you need to click on the open lane and then on the CLOSE button. One or more lanes sold in pre-paid mode will automatically close when the time or games run out, if you need to close these lanes in advance it is possible to give the bowlers a credit slip for the value of the games or time remaining, which can be used later. To cancel the operation and return to the previous menu click on CANCEL. In the example shown there are 4 bowlers of which 2 have rental shoes and they will play 1 game each. The program applies the DEFAULT RATE (which has either been selected in the cash desk set up screen or attributed to a festive day in the special festivities program) to all the bowlers. In most cases, where there is no difference between the bowlers it is sufficient to click on OK to end the operation. To MODIFY RATES, ADD SOCK RATES, TAKE COUPONS OR USE A DISCOUNT MAGNETIC CARD, the first thing you need to do is highlight the bowler or bowlers you want to act upon. To highlight all the bowlers click on the ALL button. Ti highlight one or more bowlers click on the name or names directly. ATTENTION! To use a Discount Card or a Free Game Coupon, highlight only 1 bowler at a time, then move to the next.


74 74 APPLYING A DIFFERENT RATE TO ONE OR MORE BOWLERS Select the bowler or bowlers. Click on the arrow to the left of the RATES window, then click on the name of the rate you wish to apply. USING A MAGNETIC CARD Select the player that has the card, and swipe the card in the card reader. The card is identified by the system. If the card is a prepaid card for frames or money, then the frames or money will be zeroed (if the card has sufficient credit) for the bowler in question, if the card is a discount card the correct rate will be applied changing the total for that bowler. If other bowlers have cards simply repeat the operation. ADDING THE SOCK AMOUNT Highlight one or more bowlers and click on the SOCK button. Click on the same button again to cancel the addition. USING FREE GAME COUPONS Highlight the bowler and click on the COUPON button which has become visible.. Select the type of coupon which has been presented by the bowler. If the bowler has played more than 1 game and has more than one coupon, it is possible to accept more than one coupon as payment. Complete the operation by clicking on OK. Using the Free Game Coupons does not mean that shoes and socks are not paid for, these must be paid separately and will be left in the bowlers total If other bowlers have coupons simply repeat the operation, one bowler at the time. TO CANCEL THE RATE CHANGES APPLIED OR CARD RATES AND COUPONS USED SIMPLY SELECT ALL THE BOWLERS AND APPLY THE DEFAULT RATE TO THEM ALL. USING THE FLAT RATE ATTENTION! This is ONLY possible if you have the required security level. One or more lanes can be closed while ignoring the default rates applied by the system, the total taken will be recorded on a special report within the Daily Report program. Any previous rate changes for the lane in question will be ignored. Click on the FLAT RATE button and write the TOTAL AMOUNT in the space provided and confirm with OK.

75 75 TERMINATING A TRANSACTION NOTE FOR POST-PAID BOWLING: any Bar or Restaurant consumptions or items purchased from the Pro- Shop and added to the lane account, will all be added to the total and is not divisible between the bowlers. Once the changes to rates, cards or coupons are finished click on the blue OK button to end the transaction. There are various options for terminating a transaction: CASH The bowlers give the cashier cash for the total amount due. If you want to use the change calculation (which may be forced by the owner) click on the fast note buttons to indicate the exact amount paid or click on the EXACT button, the program shows the change. To terminate the transaction click on OK. CREDIT CARD Click on the CREDIT CARD button and, if available, insert the credit card number. The amount taken by credit card will be summed in the Daily Report and taken off the cash amount shown. ATTENTION! The WINS system is NOT enabled in the credit card payment system, one of the special machines available from the back must be used to take payment, Wins limits itself to recording the event for its own reference in the Daily Report. COUPONS (fixed price) If a bowler presents a Fixed Price Coupon click on the COUPONS button, select the type of coupon from the list and insert the quantity if more than one. The program will take the amount the coupon or coupons are worth off the total due. CHARGE This function is used to charge the amount due to the customer who has an account set up, (see chapter on USING THE ACCOUNT PROGRAM. Click on the ACCOUNT button, select the customer account from the list available, then click on CHARGE. BONUS (credit) The bonus amount is a credit which was left at the end of a previous transaction, for example, closing a pre-paid lane in advance leaving the bowlers a credit which they can use later. The bowlers who have a credit will receive a credit receipt from the cashier which they must present when they return to bowl, see Pre or Post Payment Bowling in Game or Time selection the receipt indicates the credit amount and the identification number. Write the identification number on the receipt into the space provided and click on the BONUS button. The credit receipt amount, visible in the Coupon Total line, will be deducted from the total amount due.it is advisable to keep the credit receipts in the cash drawer so that they can be checked against the Daily Report later. If the GIVE CHANGE IN CREDITS function has been selected, it is possible to print a second credit receipt for the customer with the amount of credit remaining after this second operation.


76 76 Adding games or time in pre-paid mode or with automatic game over function selected 3.15 It is possible to add games or minutes to lanes sold in pre-paid mode or with automatic game over enabled for up to 2 minutes after the game has finished; after these 2 minutes the lane will close automatically. ADDING GAMES Vary the number of GAMES in the box, then click on the SEND button to confirm. If the lane has been sold in pre-paid mode proceed with the economic transaction. Example: 3 bowlers have paid for 1 game each. When opened 3 bowlers and 1 game were entered. If the bowlers want to have another game each then change the 1 into a 2. ADDING MINUTES The minute box resets itself and turn blank once the names have been sent to the lanes. Insert the number of minutes you want to add in the minute box as if it were a new entry; the program sums the minutes to the minutes remaining, otherwise they carry on from where they stopped. NOTE: On lanes sold in POST-PAID mode with AUTOMATIC GAME OVER, when the time is over the lane monitor will show a GAME OVER sign and the Main Desk Console will show a negative figure in the minute box, indicating that the lane has finished but is still occupied.


77 77 Opening, Closing, Parking and adding Bar items to a Time Game 3.16 OPENING ONE OR MORE TIME GAMES Click on the icon of the game group to open the game screen. Click on the icon of the game number to be opened. When enabled, you will be asked to confirm the print out of the start receipt with the time and game number. On the game icon just opened you will see the start time appear. Repeat the operation if necessary then exit with the ESC button. CLOSING, PARKING AND ADDING BAR ITEMS TO A TIME GAME NOTE: Time Games have a minimum rate which starts after 2 minutes, if closet before the 2 minutes the game is closet at zero cost. Click on the icon of the time game to close. WARNING! If the customer has a discount magnetic card and wants to use it make sure it is swiped through the card reader BEFORE concluding the transaction with CLOSE BAR Opens the Bar screen from which to select items to add to the time game account. PARK Parks the time game which can be closed later (time games can NOT be re-started once parked). ESC Exits the function, saving bar items if loaded. CLOSE Closes the Time Game and carries out the economic transaction.


78 78 Using the waiting list 3.17 The waiting list are a daily function which is used to manage the excess bowlers in the center and allows you to pre-enter bowler names so that when a lane becomes available it is much faster to send them to bowl. To enter names or groups which are not bowling today it is best to use the S.A.B.S. program. Open mode entry League mode entry ADD NEW RESERVATION To ADD a new entry or group click on the NEW button, in the waiting list section. Write the name in the Reservation name window then insert each one of the bowler names and shoe sizes. The shoe size is not mandatory. In League mode entries it is also possible to insert handicaps and team names. In the MINUTES and GAMES windows it is possible to insert the number that the group will be using when in PRE PAID mode. NEXT RESERVATION For more entries simply click on NEW and repeat the operation. DELETE RESERVATION- RESET COUNTER The DELETE button allows you to delete the highlighted group. The entries are controlled by a progressive counter which allows you to understand who was first, second and so on. This counter can be overridden when, for example, a group is missing or late. To zero the counter click on the RESET COUNTER button. LEAGUE RESERVATION- BOOKING PROGRAM The BOOKING PROGRAM button activates the Advanced Booking Program (if enabled). The LEAGUE BOOKINGS button opens the League stile waiting list (the same as Open but for a pair of lanes at a time.) The groups entered onto the waiting list through the Photostrike machine may be accompanied by the icon of a camera,, these are added automatically to the list. Click on OK to exit the window.

79 79 Using the Park lanes Park games feature 3.18 The PARK LANES (or park time games) function allows you to freeze the game being played and free the lane for other bowlers. The park lanes function is very useful when the center is very full, it allows you to send a new group to a lane without waiting that the group come to the front desk to pay. While the new group is already playing you can close the previous group. PARKING A LANE Click on the lane that needs to be parked. Click on the PARK button inside the lane screen. Confirm with YES. NOTE: a P will appear on the lane icon whether the lane is open or closed. The P will remain until the lane that was previously parked is either, un-parked or closed. PARKED LANES MENU To park a lane being used; click on the lane icon and then on the PARK button, confirm the operation by clicking on YES when asked confirm closure?. To access the parked lanes click on the icon from the main menu screen. The parked lanes are shown with the lane number they came from and the minutes they have been parked. Highlight the lane by clicking on the minute and line number to; close, print or send back to lanes. PRINT Sends the scores to the printer. RE-SEND Allows you to send the parked lane back to any available lane, simply open the drop down curtain to the right of the re-send button and select the lane. CLOSE Starts the economic transaction for closing a lane as normal. ESC Returns to the main menu. PARKING AN OPENED TIME GAME Click on the desiderate time game icon, click on PARK button, confirm with YES CLOSING A PARKED TIME GAME To gain access to the time games click on the time game park icon on the main screen. Select the parked time game to close. Click on CLOSE and complete the transaction.


80 80 Print games, Re-start games, Pint last receipt PRINT GAMES WHILE STILL PLAYING Click on the lane icon then on PRINT. Print scores while still playing Open mode Print games while still playing League mode The PRINT button sends the data directly to the printer. Some printer drivers block the use if the computer while printing, sometimes not allowing you to close the lane; in such cases it is better to print from the print queue once the lane has been closed. PRINTER SET UP PRINTER SETUP is used to check and modify if necessary the printer parameters PRINT PREVIEW The PREVIEW button allows you to visualize, on screen, the pages of scores to be printed. KEY TO COMMANDS PREVIOUS AND NEXT PAGE FIRST AND LAST PAGE SHOW SINGLE PAGE SHOW WHOLE PAGES PRINT EXIT

81 81 PRINT AND RESTORE CLOSED GAMES (print queues) Click on the icon on the main screen. The program positions the selection on the last lane closed. Select the lane to print, click on the PRINT button and confirm the command in the next screen by pressing PRINT again. The program keeps all games on the print queue, Open, League or Tournament, for 8 days from when the lane was closed. Exit the function by pressing the ESC button. PRINT Sends the data to the printer. PREVIEW Shows a print preview on screen. RESTORE Sends a closed lane, game to the lanes. It is necessary to select one of the available lanes. ESC exits the screen. Warning!! Restoring already closed games does NOT mean that the economic account (what they paid or should pay) is also sent back to the lane. The bowlers will be required to pay only the frames or time used fro the moment they are put back onto the lane. If the restore function is used to return a lane that was closed by mistake, you need to: a) restore the game to the lane b) load the amount taken by mistake onto the lane through the pro-shop with a generic name and c) use the refund function to take the amount paid off the daily total. PRINT LAST RECEIPT. Click on the PRINT LAST RECEIPT icon on the main screen. WARNING! No confirmation is requested, the printer will proceed immediately.

82 82 Score correction from Front Desk 3.20 Score correction from the Main desk does NOT stop play on the lanes, the bowlers can keep playing the scores will be updated in real time. Click on the lane button which you need to correct scores on. To CORRECT OR DELETE a throw already bowled click in the throw itself. To ADD a new throw click on the empty frame. The frame of the selected frame become yellow to confirm the selection. ADD increases the points by increments of one pin at a time. DEDUCT decreases the points by increments of one pin at a time. FOUL marks the throw as a foul. DELETE deletes the selected throw. STRIKE. Marks the throw as a SPLIT. SPARE. Marks the throw as a PROVISIONAL. The throw marked as a provisional will be highlighted in the score print out and in the tournament program according to the regulations, the judges can later decide which score to consider as valid. SAVE AND EXIT. ESC without saving UPDATE (in real time the score).

83 83 Using Bar, Restaurant and Proshop functions 3.21 The Wins system records, in separate areas, the Bar, Restaurant and Pro-shop transactions in the Daily Report. The same method is used for all three areas, the only exception being that Bar items are the only ones that can be added to time game transactions. Further more, to add Bar items to lanes there is a Bar button from which to select the items directly in the lane screen simply click on BAR. To open one of the three menus simply click on the Icon which represents the area you need, found on the Main menu. The articles found in these areas can be sold in four different ways: Sale directly to the customer at the counter. Added to lane accounts and paid for when the lane account is paid for at the end of the game (not available with pre-paid bowling). Added to a table with the possibility of immediate or delayed payment. Added to a Time game account (only Bar articles) and paid for at the end. There are two windows on the left of the screen.the top window shows items that were added previously, already on account for the table or lane selected and highlighted in the drop down list below. The lower window shows the items being added to the account now. The buttons vary the quantity of the chosen article To ADD AND ARTICLE click on the product icon shown on the menu on the right hand side of the screen. If the icon represents a group and not just a single item, the list will open showing you all the available items within the group: highlight the item you need within the group, select the quantity using the +1 1 buttons and finally click on OK to confirm. Add all the items you wish using this method, then close the operation in one of the following ways: DIRECT SALE Click on OK, the program closes the transaction immediately. ADDING TO AN OPEN LANE ACCOUNT Select the lane from the drop down list, and confirm with OK. The program asks (if enabled) for confirmation to print. This receipt can be used to communicate the order to the kitchen or bar, or simply handed to the customer to check the purchase. The transaction will be closed when the lane is closed. ADDING TO TABLES IN A SEATING AREA Select the table from the drop down list, and confirm with OK. The program asks for immediate payment. If you click on NO when asked PAYMENT? table account remains open. CLOSE AN OPEN TABLE ACCOUNT Rreturn to the Bar, Restaurant or Pro-shop menu screen, highlight the table to be closet and click on OK and confirm with YES when asked PAYMENT?. ATTENTION! If the customer has a discount magnetic card and wants to use it make sure it is swiped through the card reader BEFORE concluding the transaction with OK. ADDING ITEMS TO OPEN TIME GAMES From the main menu click on icon of the group required. Select the time game you need to add an item to within that group. Click on the BAR button to view the bar screen, select the items you require and click on OK.


84 84 Selling Coupons 3.22 Click on the Coupon icon on the main menu. The coupons sold through this program are accounted for in the Daily Report. Click on the name of the coupon to highlight and select it from the list available. Write the quantity of coupons you are selling in the QUANTITY screen. Click on the SALE button to confirm. Refunds 3.23 This function is used to take cash out of the cash drawer while keeping a record of the movement in the Daily Report, either for correcting mistakes or for taking cash for various reasons. Click on the REFUND button on the Main Menu. Write the reason for making the refund (optional). Write the total to be refunded, or drawn from the cash drawer. Click on the button which applies to the area in which you are making the refund so that it is recorded in the relevant place in the Daily Report. Confirm by clicking on OK.


85 85 Accounting setup and use 3.24 The ACCOUNT function allows you to create customer accounts which allow your privileged customers to have a credit or a debit in the center, it is also used to make League and Tournament payments easier to handle. At the end of any transaction you will find the ACCOUNT button, press this button when you wish to charge the total due to an account rather than take payment. Click on the ACCOUNT MANAGEMENT button on the Main Menu to open the program. Click on CREATE to start a new account. Insert the name of the company or client. In order to set a Credit limit click on the Credit Line check box and enter the credit limit amount in the window on the right. Click on the Prepaid only account to block the credit limit at zero and allow the account holder to use prepaid cash only. Exit with OK to save the settings and return to the main screen. Other commands: PAY To pay into the account. CHARGE A payment made for bowling or other from the account rather than in cash. DELETE Delete the highlighted account. MODIFY Allows you to change the account holders name. ESC Saves the modifications and returns to the main menu.

 In")
. CANCEL exits the screen.")
86 86 Calling the Bar, Mechanic and Snack Bar 3.25 When one of these three functions is activated (called) from the bowler consoles the relative icon will light up on the Main Desk. The flashing symbol relative to the Bar and Snack Bar calls will continue to flash on the lane monitors without stopping play until someone de-activates the call. The Mechanic call only flashes for a few times on the lane screens then stops on its own. BAR CALL In Wins menu the ICON came visible SNACK BAR CALL In Wins menu the ICON came visible MAINTENANCE In Wins menu the ICON came visible CHECK CLOSE PRINT A CALL (BAR-SNACK BAR MAINTENANCE) In the icon window you will see all the active calls as well as the number of minutes since the call was made. Highlight the lane you are going to send someone to or have dealt with and press DONE! PRINT sends the call to the receipt printer. (used to hand to a waiter or waitress so that the call is not forgotten once cleared from the screen). CANCEL exits the screen. WHEN ALL THE CALLS HAVE BEEN ANSWERED THE ICON TURN GREY. IT IS POSSIBLE TO CANCEL THE CALLS FROM THE BOWLER CONSOLES: PRESS ENTER, MOVE TO THE BAR OR SNACK BAR BUTTONS AND REPEAT THE CALL BY PRESSING ENTER.
 The bowler is a member of the bowling centre club, therefore you hold useful information about the bowler.")
 The bowler holding a card is assured of his discount and as a member will have an extra incentive when coming to bowl.")
87 87 Magnetic card archive 3.26 The Wins program includes a Magnetic card system for use as discount (money) or count down (frames or minutes). The card system offers some advantageous functions: 1) The bowler is a member of the bowling centre club, therefore you hold useful information about the bowler. The program therefore becomes a useful bowler database. 2) The transactions made using the magnetic cards are recorded, so you can trace how often a bowler uses the card and how much he spends. 3) The bowler holding a card is assured of his discount and as a member will have an extra incentive when coming to bowl. 4) Using the cards ONLY to award discounts or use special rates, the discounts are tied to the card holders and not all bowlers. The cards used in the Wins system are pre recorded with a numerical code; the card number 1 is always the owners card. In case of loss you need to ask for a duplicate, it is not possible to use the other card numbers as an owner card. The card information is recorded in a database on the computer and the movements, use of the cards can be visualized or printed using the Daily Report. The cards can be requested through your distributor or the Steltronic marketing department by sending an to marketing@steltronic.com. INSERT VERIFY DATA CARD Click on the CARD icon on the Main Menu. To enter the archive simply swipe the card in the card reader or alternatively click on the number button and write the card number in the space.
![88 [1] CARD NUMBER OWNER DETAILS [2] The details are optional. It s maybe possible insert Name, address, city and Sex.](/docs-images/89/99807416/images/88-0.jpg "If you want duplicate the card should be better leave blank these fields until the card will be duplicate.")
88 88 [1] CARD NUMBER OWNER DETAILS [2] The details are optional. It s maybe possible insert Name, address, city and Sex. If you want duplicate the card should be better leave blank these fields until the card will be duplicate. EXPIRE DATE [3] Enter the CARD HOLDER details so that you know who temporarily owns this card followed by the VALIDITY PERIOD (expiry date). VALID TIME ZONES [4] Click on each time zone where the card is allow to be in use. CARD TYPE [5] Pre-paid with credit and/or with discount rate Count down frames. (figure shown is frames) Count down minutes. (figure shown is minutes) A pre-paid credit card is used by deducting the total due from the amount available on the card. If the amount of credit on the card is not sufficient to cover the amount due then the amount outstanding is calculated using the default rate or the special card rate which has been set with this particular card. It is possible to give a card a credit without necessarily setting a special card rate, at the same time a card can be prepared with a special card rate without having a credit added to it. The count down cards (frames or minutes) are used to deduct from the amount due; if the number of frames or minutes does not cover the amount due, the default rate will be used to calculate the amount due after the credit is used.
![89 USE [6] When the Multiple use is selected the card can be used to close ALL the games or minutes used for ALL the bowlers on the lane.](/docs-images/89/99807416/images/89-0.jpg "When the Personal use is selected ONLY the holder can use the card to settle his own account NOT for others. ADD REMOVE CARD RATE [7] NOTE: the card rates must be made in the rate Set up section.")


![DUPLICATING A CARD 10] The card duplication function can be very useful when making a large number of similar promotional cards (for example with free games or promotional discount) on which you do](/docs-images/89/99807416/images/89-3.jpg "not need to write the single customers details but simply a generic name. To duplicate the card first of all create the master card (the card that contains the information you are going to duplicate).")
![Once created click on DUPLICATE [10]. Continue by entering the total number of cards you require.](/docs-images/89/99807416/images/89-4.jpg "Then the card number from which you wish to start the duplication (the system will create the cards in sequential order) confirm the operation with Yes.")
89 89 USE [6] When the Multiple use is selected the card can be used to close ALL the games or minutes used for ALL the bowlers on the lane. When the Personal use is selected ONLY the holder can use the card to settle his own account NOT for others. ADD REMOVE CARD RATE [7] NOTE: the card rates must be made in the rate Set up section. Highlight the RATE to assign to the card, then click on the (or if you prefer click on the F5 button on your keyboard) to confirm. To remove the rate click on the rate to be removed then on RESET button. ATTENTION! The magnetic card program will use the assigned rate even AFTER the rate has been deleted or changed from the Rate Set Up screen. To avoid this, press RESET on the card archive. APPLY % DISCOUNTS [9] If you wish, it is possible to give a percentage discount to the card in these 4 areas: Time Games, Liquor Bar, Restaurant and Pro-Shop. DUPLICATING A CARD 10] The card duplication function can be very useful when making a large number of similar promotional cards (for example with free games or promotional discount) on which you do not need to write the single customers details but simply a generic name. To duplicate the card first of all create the master card (the card that contains the information you are going to duplicate). Once created click on DUPLICATE [10]. Continue by entering the total number of cards you require. Then the card number from which you wish to start the duplication (the system will create the cards in sequential order) confirm the operation with Yes. DELETING A CARD [11] Use the delete button [11] to eliminate the card from the database. Remember that you do not need to have the card in order to delete it or to change the contents, you need only enter the number of the card. For this reason, it is advisable to keep an updated printout of the card archive in order to be able to view the notes without going into each card. For more detailed info refer to the daily report summary and Daily report chapter.

90 Recorded transactions, daily report, back up, restore and deleting print queues Click on the Daily Report Icon on the Main Menu Any Lanes or Time games still open or parked are shown on the top of the summary screen. A Financial Summary is shown in the Totals screen, this summary is for all the transactions since the last Delete Transactions was made. The Totals shown in GREEN are the cash amounts taken, the RED totals are the amounts taken in various forms, in other words NOT cash. The RED totals are Refunds, Payments made with pre-paid coupons, Transactions charged to a customers account, Transactions made with a bank credit card (not to be mistaken with our internal magnetic card system). For more information or to reset the Financial Summary press DETAILS [3]. OPEN CASH DRAWER [1] The Open Cash Drawer button, does just that. CLEAR PRINT QUEUES [2] The Delete Print Queues button allows you to manually delete the entire print queue. IMPORTANT NOTE! The Wins program automatically deletes the lanes stored in the Print Queue which are older than 8 days, ONLY when you enter this screen with every lane and time game close (including any that may have been parked). If this is NOT done the Print Queue list will continue to grow and eventually cause the system to slow down, requiring you to delete the Print Queue manually in order to get it back to normal again. BACKUP RESTORE [4] [5] The BACKUP function is used to save the important Wins data. The back up procedure can be set up to run automatically (options section, advanced parameters of the General Cash Set up section) or manually by clicking on the button itself. The RESTORE option is used in case any damage or loss of data has occurred. Warning!! The data will be restored from the LAST backup. It is advisable to ask for help before running the restore facility.
![91 RESET LANE DATA [6] Warning!](/docs-images/89/99807416/images/91-0.jpg "This function is required Exclusively to resolve serious problems, the use of this function should be limited to authorised personnel (managers, owners,")
")


91 91 RESET LANE DATA [6] Warning! This function is required Exclusively to resolve serious problems, the use of this function should be limited to authorised personnel (managers, owners, head cashiers). The Cleaner program has been developed to resolve lane file problems which have been corrupted due to network problems or main computer (Front desk) malfunction. Examples of corrupt files: the lane icons flash continuously and it is not possible to operate on them from the front desk. The lane computers are connected but the front desk icons remain grey, even though they are visible in the Winserv screen on the front desk, when you click on the lane icons the system records an error. Using the Cleaner program: Turn the lane computers off. Click on RESET LANE DATA [6] Click on NEXT to continue. Select the lanes to reset, click on NEXT to continue Select the emergency procedure you require Click on NEXT to continue. Select the save option for the corrupted files. If you need to send an the computer needs to have an internet connection active. Click on NEXT to continue. The following screens are a summary of the operations performed and a end of operation message. Click on OK. If the operation does not resolve the problem, repeat the operation selecting the next level of emergency procedure. Standard procedure: eliminates the game files. Run this procedure with lanes closed or reset the bowlers once finished. Extended procedure: eliminates the game files and the saved lane settings (language, pinsetter settings animations etc). at the end click on CNT and reset this data. Emergency procedure: eliminates the game files and saved lane settings and pinsetter interface settings. At the end of the procedure click on the CNT button and reset all the settings, click on the doctor icon, enter the setup menu and reset the pinsetter interface settings.
![92 DAILY REPORT [3] Note: the details button is not available if you are using the automatic daily report deletion function, selected in the General Cash Setup section (advanced parameters,](/docs-images/89/99807416/images/92-0.jpg "transaction control). The detail button loads the Daily Report program. Wait until the program has loaded the transaction before continuing.")
92 92 DAILY REPORT [3] Note: the details button is not available if you are using the automatic daily report deletion function, selected in the General Cash Setup section (advanced parameters, transaction control). The detail button loads the Daily Report program. Wait until the program has loaded the transaction before continuing. REMEMBER THAT THE DAILY REPORT PROGRAM CAN BE PROTECTED IN VARIOUS LEVELS FOR EACH USER SO THAT YOU CAN HAVE DIFFERENT USERS PERFOMING A LIMITED NUMBER OF ACTIONS WITHIN THE REPORT. RESETTING THE FINANCIAL SUMMARY Wait until the program loads all the data. Select the current day on the CALENDAR, then click on the CLEAR DAILY TRANSACTIONS. NOTE: deleting transactions does NOT cause the data to be lost, the data is stored within the Daily Report program, you simply reset the Summary. If Quickbooks interface is enabled, a warning message will advise to import data before proceed. The DAILY REPORT works on a 24 hour rotation. The start of its day is determined by the first time zone you set. All the transactions are recorded from the beginning of the time zone up to the same time of the next day in the Daily Report. Every time the Daily Report is opened, the program selects the date of the previous day; this is to make it easier to operate since, most bowling centers close after midnight and the transactions made at 00:01 onwards to the start of the next time zone would be placed in the next days report. If you leave the date set to the current day you would only get the report for the transaction made from 00:01 on The financial data is summarized in various ways within the report program so that the information is available in different ways for centers that like to see the totals separately, together etc Usually, the selection for seeing lane data is ALL lanes ; if you would like to see a certain number of lanes (for statistics for example) click on the lanes you want to be included in the report you are about to print or view on screen.


 removes the selection.")

93 93 In order to SEE the various reports on screen and later print if required, click on the PREVIEW FIRST check box. By clicking on the TO PRINTER checkbox you send the chosen report directly to the printer. The selection remains until you change it again. Whichever checkbox you select the reports are visualized by using one of the two print commands shown. The yellow framed print button will show the reports highlighted in yellow on the list. The blue framed print button will show the reports which have been pre-selected on the right hand side, default reports. SELECTING A PRINTOUT OR SETTING THE PRE-SELECTED REPORTS TEMPORARY PRINTOUT Click on the report you need directly from the list to highlight it in yellow, then click on the Yellow framed Print button. Once you have finished viewing the report or it has printed the selection will disappear. PRE-SELECTED PRINTOUT The pre-selected printouts are permanent. They remain until the owner (or person who has security clearance) removes the selection. Click on the grey button to the right of the report description line. The grey button turns blue confirming the selection. To visualize the PRE-selected printouts use the Blue framed Print button. DAILY REPORT DATE SELECTION Changing the date on the calendar (if the data has not been deleted in the database) allows you to check the data for days or months gone by. For example to check the total transactions for the previous month, change the selection on the month board and then click on the desired report to be printed or visualized.


94 94 EXPORT DATA TO QUICKBOOKS From the MAIN WINDOW, click on TRANSACTIONS, click on EXPORT, click on QUICKBOOKS. The export result will be displayed on the screen. Click on OK to confirm the export operation. A warning message will be displayed to advise the customer to import the data into Quickbooks program. The warning shows the file name and the full path for the file need to be imported. Open Quickbooks program then click on FILE/UTILITIES/IMPORT. Choose the FOLDER and the file name as the description of the REPMAN WARNING. the end of the job close the Quickbooks program. IF YOU NEED TO FORCE OR RE-EXPORT THE DATA TO QUICKBOOKS Click on TRANSACTION, then click on FORCE EXPORTING. Choose the day and the month you need to export. Click on EXPORT button. CUSTOMIZE THE PRINTOUT LINES From the MAIN WINDOW, click on FILE, click on CONFIGURE, click on SERVICES. The SERVICE CODE and the OFFICIAL NAME can t be modified by the user. The PRINT NAME can be edited by the user simply clicking on the field you want customize. DELETING THE DATABASE The deletion of the transactions does NOT delete the financial data help in the database of the computer.
95 95 In order to TOTALY delete data from the computers database: ATTENTION! When the data has been deleted in this way from the database it is NO LONGER available or retrievable. Select the date on the Calendar board. Click on FILE. Click on DATABASE. Click on DELETE DATA. Confirm the operation on the first warning message. A second message asks you if you want to delete the Magnetic Card data also. If you want to keep the card data, click on NO; all other data will be deleted from the database. The next operation packs the database confirm with YES. The Daily Report program prints a progressive number every time you request to see data. To ZERO the print counter, click on FILE then on CONFIGURE followed by ZERO PROGRESSIVE PRINTS. COMMANDS AND BUTTONS USED FOR VIEWING ON SCREEN Print data Previous page Next page First Last page Close this screen Zoom percentage Export the Database When making an EXPORT you will be asked to state the file and support format (floppy, disk etc ) LIST OF AVAILABLE PRINTOUTS NOTE: the printouts selection depends by country or language selection. Some printouts are available only for USA version. TRANSACTION TOTALS ONLY- Short Summary Report of Bowling, Time Game Totals etc..[suggested fast print] BOWLING RATE TRANSACTION FOR SELECTED MONTH - Same data as that in the Transaction Totals but ordered for current month grouped by rates. TRANSACTION TOTALS FOR CASHIER - Daily Report for each cahier. BOWLING TRANSACTIONS - Detailed Report for the days bowling activity. BOWLING TRANSACTIONS FOR SELECTED MONTH -Detailed Report for the months bowling activity. BOWLING RATE TRANSACTIONS FOR SELECTED MONTH - Detailed Report for the months bowling activity, divided per Rate. BOWLING RATES AND TIME ZONES FOR SELECTED MONTH -Detailed Report for the months bowling activity, divided per Time Zone and rates. NON BOWLING TRANSACTIONS - Daily Report for Bar, Restaurant, Proshop and Time Games. NON BOWLING TRANSACTIONS FOR SELECTED MONTH - Daily Report for Bar, Restaurant, Proshop and Time Games for selected month. TERMINAL TRANSACTION TOTAL - Total transactions divided per cash desk.
96 96 EXTRA FRAME BOWLED - Sums the EXTRA frames bowled, these extra frames can be caused by; cashier score deletion, balls bowled with pinsetter out of cycle etc and are signaled with a yellow ball on the lane icon on the Main screen. MAGNETIC CARD USAGE -Summary of the cards used each day. If the cards used are count down cards the summary will also show the number of frames bowled using cards. MAGNETIC CARD USAGE FOR SELECTED MONTH -Summary of the cards used for the month. MAGNETIC CARD ARCHIVE -Prints the cards handed out with card number, bowler name, validity, discounts, rates, and credit level. ALL TRANSACTIONS - Shows ALL the daily financial transactions one at the time. AUTOMATIC RENTAL SHOES COMPARISON - Verifies the number of shoes reported by the cahiers compared with the number individualized by SHOEVISION (when installed). AWARD TRANSACTIONS -Groups the wins for the StelGames program for selected day. AWARD TRANSACTIONS FOR SELECT MONTH -Groups the wins for the StelGames program for the selected month. TOURNAMENTS TRANSACTION -Frames, Games and Operator for the Steltronic FR Tournaments played. CREDIT CARD INCOMES - (Visa type cards, not our internal magnetic cards) Separate report for payments accepted with Credit Cards. [USA version] MAGNETIC CARD DETAILS - Card Archive print report [USA version] MAGNETIC CARD DETAILS NAME - Card Archive print report sorted by name [USA version] MAGNETIC CARD DETAILS TYPE - Card Archive print report sorted by type [USA version] MAGNETIC CARD MONEY SPENT - Card Archive print report with amounts [USA version] BAR/SNACK TOTAL ONLY - Daily amounts for Bar items [USA version] EXTRA FRAME BOWLED (TOTAL ONLY) - Sums the EXTRA frames bowled. [USA version] REFUNDS TOTALS ONLY FOR SELECTED MONTH -total refunds for selected month [USA version] GROUP TRANSACTIONS TOTAL ONLY - Total transactions split by group [USA version] NON TAXABLE TRANSACTIONS TOTALS ONLY [USA version] TAXABLE TRANSACTIONS TOTALS ONLY [USA version] CASHIER TRANSACTIONS TOTALS ONLY - total daily transaction sort by cashier name [USA version] TIME GAMES TOTALS ONLY [USA version] TERMINAL TRANSACTIONS SINCE LAST Z READING -total transaction for each terminal until last clear daily transactions.


97 97 Using the Employee Time Clock 3.28 The Time Clock Program icon is on the service menu. To enter the program click on the Doctor Icon and then the Time Clock icon. SET GENERAL PARAMETERS Click on CONFIGURATION. Click on GENERAL PARAMETERS. Insert the name of the Bowling center on the COMPANY line. DAY START TIME: the program works on a 24 hour cycle. Set the start time of the work shift, which in many cases is not the time the center opens. EXAMPLE: the employees start their shift at 08,30 in the morning. Set the time at 08:30:00 MINIMUM NUMBER OF MINUTES minimum time difference between entry and exit to validate the swipe. Exit the menu with OK. The program has been configured and can now be used correctly. ADDING AN ENTRY MANUALLY If an employee has lost or forgotten his card, the owner, or user with required security level clearance can manually insert an entry time as well as an exit time, as if the employee had in fact swiped his card. Press the F4 button on the keyboard or click on the Manu button. Insert the card number, then the date and time of the entry or exit, in the same way they are entered. Example: Day: 15/10/2000 Time: 11:32:12 Click on OK to confirm. MODIFYING EMPLOYEE MOVEMENTS Click on the Time Clock Icon or directly on the F5 button on the keyboard.

. ALL: visualizes the report for ALL the employees.")
. FROM / TO shows a specific period of time.")
98 98 Select the employee that you want to check on by clicking on him. Click on the OK button to confirm. Highlight the movements that you want to delete. Click on the DELETE to delete the movement. Use the NEW button to insert a new movement. Exit with the END button. TIME CLOCK REPORT MANAGEMENT Click on the report button directly or on the F3 button on the keyboard. SELECTED: allows you to visualize the report by single employee (the selected one). ALL: visualizes the report for ALL the employees. TODAY: shoes the movements the days movements. YESTERDAY: shows yesterdays movements. FROM MONTH START: shows the movements from the beginning of the month. LAST MONTH: shows the previous months movements. DAY: selects the specific day (day/month/year format in numbers). FROM / TO shows a specific period of time. Once the selection has been made continue with the OK button. The program shows the entries and exits for each employee, with all the movements and the total time present in MINUTES. PRINT sends the data to the Score printer. END exits the function.
99 99 Bowler Console Functions 3.29 Access to the bowler console functions depends on the enabled features from the Main Desk Computer. bowler console is NOT active unless there are bowlers on the lane. To access the Bowler console menu press the ENTER button on the keyboard, button or joystick control panel. IT IS NOT NECESSARY TO INTERRUPT THE GAME TO USE THE BOWLER CONSOLE THE BOWLERS CAB KEEP ON BOWLING. NOTE: in the following instructions the term USING THE ARROWS TO MOVE ABOUT means use the joystick, directional button or arrow keys on the membrane keyboard to move the flashing frame onto the required command button. MAIN MENU EDIT NAMES Is used to modify the bowler names sent by default from the Main Desk when opening the lane for use, it is also used for modifying the bowler handicaps, adding and removing bowlers, changing the team name, changing the order of play, mark a bowler as blind, substitute, pacer, skipped etc CLEAR GAME Is used to rub out the current game scores. CYCLE RESPOT Sends a message to the pinsetter which will cycle once (cycle) or reset a full set of pins (reset). BAR CALL Sends a Bar Call to the Main Desk Computer and makes a sign flash on the lane monitors. MECHANIC Sends a Mechanic call to the Main Desk Computer, a sign flashes once to confirm that the call has been sent. RESCAN PINS Is used to take a second picture and therefore automatically correct scores when the first ball score is incorrect, (the score can only be corrected if the camera can see the pin). CORRECTION Is used to correct scores, any frame at any time. LANGUAGE Changes the language used to visualize all the lane functions. EXIT Returns to previous menu.
100 100 EDIT NAME MENU Press ENTER on the bowler console then move to the EDIT NAMES button by using the arrows, press ENTER again. Use the arrows to position the selection frame on the first bowler name you want to modify, or on the team name, then press ENTER to confirm. Check the position of the cursor: if the default numbers where sent from the Main Desk Computer you only need to select the letters one at the time, (to confirm press ENTER) vice versa, if you need to change the names first delete the old name by using the button. To add or change a handicap score use the HDP/NAME button. At the end of the changes move to SEND and press ENTER to return to the previous menu. Repeat the operation for all the bowlers you need to change then at the end use the SEND button to confirm changes made. REMOVING A BOWLER Go into the Edit Names menu then into the select the bowler and then move into the sub-menu and position the cursor on the DELETE button then press ENTER to confirm. The SEND button will take you back to the game while saving the changes. CHANGE THE BOWLERS ORDER OF PLAY Go into the Edit Names menu, select the bowler and go into the sub-menu position the cursor on the MOVE button and press ENTER to confirm. Use the MOVE UP MOVE DOWN buttons to move the bowler into the position you need then use the SEND button to exit. The SEND button will take you back to the game while saving the changes.


101 101 SKIP FUNCTION (USED TO MISS A BOWLERS TURN TO THROW, ONE OR MORE) Go into the Edit Names menu, select the bowlers name then move into the sub-menu and position the cursor on the SKIP button and press ENTER, then return to the main menu with the SEND button. The Skipped bowler is indicated by an arrow which points downwards beside the bowler name. To un-skip the bowler and return to normal play repeat the same operation. The SEND button will take you back to the game while saving the changes. MARK A BOWLER AS A BLIND ATTENTION! In order to be able to mark a bowler as Blind the bowler must have a pre-assigned blind score from the Main Desk computer. It is NOT possible to insert blind scores from the bowler console. Go into the Edit Names menu, select the bowler and move into the sub-menu, position the cursor onto the BLIND button and press ENTER, then return to the main menu with SEND. The bowler marked as BLIND is indicated with a B at the beginning of his name. To un-mark the bowler as blind repeat the operation. The SEND button will take you back to the game while saving the changes. SUBSTITUTING A BOWLER OR MARKING HIM AS A SUBST, PACER OR REGULAR These functions can are only active during a tournament or League using the following programs: Steltronic FR Tournaments, CDE BLSX or Treasure Software Perfect Secretary. Go into the Edit Names menu, select the bowler and move into the sub-menu SUBST designates a bowler as a substitute. The SUBST, REGULAR and PACER buttons are needed to mark the bowler DURING A LEAGUE made from the BLSX 2001 or Perfect Secretary league programs, they are NOT used during an FR Tournament. PACER designates a bowler as a professional who s scores will not count in the competition being played. REGULAR re-designates the bowler as a normal bowler. The CHANGE button is used to SUBSTITUTE a bowler from the initial line up with a reserve during a team Tournament or League. Move by using the arrows to position the cursor onto the SEND button when you have selected the bowler, then press SEND and START to confirm. The bowlers available on the list are those that have been inserted into the Tournament or League database when prepared.


102 102 ADDING A BOWLER Press ENTER on the bowler console, then move onto the EDIT NAMES button and press ENTER again. Use the arrows to position the cursor onto the ADD button the press ENTER to confirm. Insert the name of the new bowler. To add or change the handicap use the HDP/NOME button. At the end of the changes move to SEND and press ENTER then confirm the changes with the START button. CHANGING LANGUAGE ON THE LANE Press the ENTER button on the bowler console then move to the LANGUAGE button using the arrows and press ENTER again. Wait at least a couple of seconds before using the boiler console again so that the system can load the graphic resources again. SCORE CORRECTIONS Press the ENTER on the bowler console, then move to the SCORE CORRECTION button using the arrows and then press the ENTER to confirm. Press the ENTER button followed by the CORRECT button to start the correction. Use the arrows to move the cursor to the frame to be corrected. To ADD A THROW move on the first empty frame and select the score. Highlight the throw to correct and press ENTER. Select the score using the arrow buttons and press ENTER to confirm. Conclude the operation by pressing the END.


103 103 WINS Scoring how to use the external programs System Interrfacciia League

, he wins.")
 and the quantity to give to each winner.")
104 104 Using the STELGAMES 4.0 StelGames is an optional program that can be added to the Wins program and is available only if enabled. STRIKE A sign appears during play that says Throw a strike now and you win a. (the prize is set by the owner or manager, if the bowler throws a strike when the sign appears he wins. BEST CLOSURES This game needs to be activated on multiple lanes in order to be effective (though it can be okayed on only two lanes) The prize is won by the lane and bowler who throws most strikes and spares within the allocated time. LET S BET The program shows a picture on the lane monitor indicating a certain number of pins to be knocked down, if the bowler knocks down the pins shown (e.g. 7 and 8 only), he wins. The games are PER LANE and are activated in the CNT screen of the lane pair icon or in the CNT of the multiple commands. Select the start time and the day to be played. Select the prize you want to give to the winners from the list, (the list is prepared when setting up Bar, Restaurant and Pro-shop items ) and the quantity to give to each winner. The cursor is used to determine the percentage of opportunities the bowlers will have to compete, the 1 equals 1000 frames, so if the cursor is positioned half way the bowlers will have 500 opportunities to compete in 1000 frames (not available in the Best Closures game) Once the selection in complete, confirm by clicking on the OK and YES buttons when asked. Awarding prizes When a bowler has won a prize, a congratulations sign appears on the lane monitor, and the win is recorded on the main desk. Click on the prize game icon on the main menu to open the prize list. To print a WIN receipt click on the PRINT RECEIPT checkbox before each selection. Select the bowler and prize to be handed out. Click on the REMOVE button to hand out the prize. The win will be deleted from the award screen and recorded in the Daily report. Exit by pressing ESC.

. Score correction can only be made on the last ball thrown and only from the bowler console.")


105 105 Grand Prix mode. 5.0 The GRAN PRIX is a special type of game, with different rules to normal bowling. To use the game you need to purchase the software and have it enabled by requesting it through your distributor or directly on the web site at: When using the GRAND PRIX game the bowlers on each lane will race against each other to reach the finish line, preset by the user. GRAND PRIX RULES The game is played in Open style on each lane. Each bowler throws one ball only (first ball, the pinsetter will reset after each ball is thrown). Score correction can only be made on the last ball thrown and only from the bowler console. When the first bowler reaches the finish line the other bowlers on the lane must throw the same number of balls as he has in order for the game to end and the winner be announced. The game continues until the finish line is reached, the game can be ended by CLOSING the lane or by rebooting the lane computer to return to standard bowling. The Grand Prix style will be set per PAIR of lanes. There is NO economical transaction for the lane. The promotional / birthday party game should be charged for using either coupons, the proshop or the account management areas, based on the type of promotion being held. ACTIVATING GRAND PRIX NOTE: the lanes must be closed. Click on the CNT button for the lane pair required. This operation should take just over a minute. Set the number of pins to be knocked down in order to reach the finish line. Select the symbol you wish to see on the lanes: CARS the symbol shown on the lanes for each bowler will be a car. HORSES the symbol shown on the lanes for each bowler is a horse. Note: the symbol for the entire lane can be changed once the game has started without shutting anything down or deleting the scores. Once the game has been set, wins will warn the operator that the lanes will be rebooted. Click on YES to confirm. At this stage it is possible to perform other functions. Reset the number of pins required to win, open the lanes etc. when you exit the CNT window click on OK and the lanes will be rebooted. When in Grand Prix mode, the icons change look. It is now possible to enter bowlers. Remember that any handicap scores entered, even if shown by Wins will NOT be counted in the scores. DISABLE GRAND PRIX Close the lanes. Click on the CNT of the lane pair, click on the BOWLING button and confirm the reboot by exiting the CNT screen.

106 106 Booking program 6.0 Running the program 6.1 Key to Icons and Commands 6.2 Personalizing the Program 6.3 Add New Booking 6.4 Modify an existing booking 6.5 Booking data memo, etc. 6.6 Overbooking 6.7 Sending a booking to a lane 6.8
 the Booking program is already active and minimized on the")
107 107 Running the program 6.1 There are two ways of accessing the Booking Program: A) Access from the Wins waiting list icon. B) Directly from the Booking application. One way excludes the other: if the AUTOMATIC BOOKING PROGRAM START has been ticked in the Desk Configuration screen, (see previous chapter) the Booking program is already active and minimized on the bottom task bar. In this case it is NOT available on the Waiting List screen (the button is gray and can t be clicked). OPENING THE MINIMIZED PROGRAM Click on the button shown on the bottom task bar: OPENING THE PROGRAM THROUGH THE WAITING LIST ICON Click on the WAITING LIST icon. The central section displays the days in the desired hour/day format. The top horizontal line indicates the time and the left vertical line the lane or time game number. To change the time or day visualized simply use the calendar to select the day you want to see.

108 108 Key to Icons and Commands 6.2 [1] Select lanes or time games to be booked [2] Lane or Time Game status icon [3] Lane or Time Game number [4] Booking page [5] New booking [6] Modify selected booking [7] Delete selected booking [8] Print current booking status [9] Undo / Delete last booking [10] Close program [11] Display size (6 hours 12 hours All day week 2 weeks 30 days) [12] Booking status [13] Display size divisions (hours or days) [14] Command bar (file schedule lanes tools languages help) [15] Go back one day [16] Go forward one day [17] Go to today [18] Calendar [1] SELECT LANES OR TIME GAMES TO BE BOOKED Click on the required lanes or group of games.
![109 [2] LANE OR TIME GAME STATUS ICON Each line on the display screen represents a lane or time game.](/docs-images/89/99807416/images/109-0.jpg "The lane or time game status is updated constantly using the same display style a on the Wins main screen: Blue lane = Open mode, Red lane = League mode.")
109 109 [2] LANE OR TIME GAME STATUS ICON Each line on the display screen represents a lane or time game. The lane or time game status is updated constantly using the same display style a on the Wins main screen: Blue lane = Open mode, Red lane = League mode. The occupied lanes show a pin and ball on them. The occupied Time games have a flashing cross on them. The number alongside the icon, [3] represents the lane number or time game number. [4] BOOKING PAGE This is the work area in which the bookings are displayed. You can decide what the work area should look like and display using the 11 and 13 commands. [5] NEW BOOKING Opens a new booking screen. [6] MODIFY SELECTED BOOKING used to edit an existing booking (also possible by double clicking on the booking itself). [7] DELETE SELECTED BOOKING Delete the highlighted booking. Also possible by pressing the DEL keyboard button. [8] PRINT CURRENT BOOKING STATUS Opens the print options page. [9] UNDO / DELETE LAST BOOKING Allows you to move back undoing whatever you last did. [10] CLOSE PROGRAM Exits the booking program. [11] DISPLAY SIZE Allows you to select how many hours or parts of days or full days to visualize at once. [12] BOOKING STATUS The drop down curtain contains the various status names that can be assigned to a booking. [13] DISPLAY SIZE DIVISIONS (HOURS OR DAYS) Allows you to select the type of time frame to show Hours or Days, used in conjunction with point 11. [14] COMMAND BAR (file schedule lanes tools languages help) click on the required name to open the relative drop down curtain.
110 110 FILE MENU Clear Schedule = Deletes the ENTIRE booking status (confirmation required) Print Options = Opens the Print Options menu from where to proceed with the printout Print = Sends the information directly to the printer, skipping Print Options Exit = Exits the program (closing it) SCHEDULE MENU Undo = Moves back and undoes (ignores) the last command you gave. New Appointment = Opens a new booking sheet Edit Appointment = Opens a new booking sheet Delete Appointment = Deletes the selected booking LANES MENU Send to lanes = Allows you to send the booking directly to the lanes Delete Appointment = Deletes the selected booking TOOLS MENU Order = Changes the visualization order of the bookings Options = Opens the menu of available CONFIGURATION OPTIONS LANGUAGES IT, UK, GR, US.. = Abbreviated terms indicate all the languages available with which to use the booking system (changes immediately) HELP About Booking System Notes on the booking version installed CALENDAR BUTTONS The arrow button [15] moves the screen shown back one day. The arrow button [16] moves the screen shown forward one day. The TODAY [17] button shows the screen with today s bookings. [18] CALENDAR Allows you to select the specific month and day in which to make a booking. The week days are shown with a gray box, weekends are in red. Using the arrows you can change the month. To select a certain day click directly on the box which will turn yellow.

111 111 Personalizing the Program 6.3 There are many ways to set the program, make your personal selections in order to take full advantage of the system s capabilities. Click on the Tools then Options menus on the command bar. SCHEDULE ITEMS Snap to grid Time lines Aligns the booking start times with the time division lines on the screen. Indicates the vertical time divisions on the full screen. RULER OPTIONS Split Ruler 3D Ruler OFFICE HOURS Display Office Hours From : To When ticked the dates are shown on the ruler divisions and the date of the screen shown is written on the top line. When not ticked the date of the visualized screen is not indicated. Ruler style can be flat or 3D effect. Shows, in blue, the center opening times. Set the desired open hours here. MINUTES PER GAME The Booking Program works with Time : the customers book the lanes or games for a certain number of minutes. If the lanes in your center a sold or rented out by the Game then the Wins system needs to know how many games to attribute for a certain length of time. Example: Minutes per Game set to 10 minutes. The Booking program will translate a one hour booking into 6 games (6 x 10 minutes = 1 hour) and send the bowlers onto the lanes with 6 games in total. BOOKING TYPE DESCRIPTION Text file in which it is possible to write the various types of bookings your center takes, (Groups, Birthdays etc) so that they can been clearly identified on the booking sheets. This information is not used elsewhere. OK Cancel Exits the screen and saves the settings. Exits the screen without saving the changed settings.

112 112 Add a new booking 6.4 Select the DATE (if different to the current date). Select the type of booking: Lanes or Time Games. WARNING! Verify that the booking status is PENDING. There are two ways to insert new bookings: QUICK METHOD Select a lane and click on the number or icon. Place the mouse arrow at the start time of the booking. Keeping the mouse button pressed down move the arrow to the right to the end time of the booking, a red box will be shown occupying the lane for the time required. Release the mouse button when the end time has been reached. When the mouse button is released you will automatically go into the Edit Appointment Screen. SUGGESTION: If you want to insert the booking details later or consider them not to be required then press OK. It is possible to edit the name, number of bowlers and all other data later. USUAL METHOD Click on the lane number to which you wish to add the booking, then on the button to Open the Edit Booking screen. NEW BOOKING

113 113 Modify an existing booking 6.5 The bookings are shown on the screen as bars.. To select a booking, click once on the bar itself with the mouse button. Use the MODIFY button to open the edit booking screen. To enter the Edit Booking window quickly double click on the booking, the booking screen will open immediately. MODIFY THE BOOKING WITHOUT ENTERING THE EDIT SCREEN To MODIFY the start and end time of the booking without entering the edit screen, place the mouse arrow on the edge of the start time or end time of the bar. You will see the mouse button become a double arrow, keeping the mouse button pressed down move the arrow left or right to change the duration of the booking.. To MOVE a booking from one lane to another or to a different time on the same lane (without changing the duration of the booking). Place the mouse arrow on top of the booking and press, the mouse arrow will turn into a North East South and West arrow, keeping the mouse button pressed move the booking to the desired place. To DELETE a booking, select the booking by clicking on it, the press DEL on the keyboard, or use DELETE in the SCHEDULE command menu. The booking styles and colors change depending on the current booking status: PENDING PLAYING PLAYED RESERVED INSERTING BOOKING DATA Inserting data into a booking is optional, and can be done later if necessary. If NO data (number of bowlers, names etc) is entered, when the booking is passed to Wins to be sent onto the lanes then the information will need to be filled in.
.")

114 114 The Start and End windows show the time the booking is programmed to start and end. Use the arrows to change the time. The bar at the top of the screen shows the lanes or time games and the lane or game selected in Yellow (in this case lane 2). To make a MULTIPLE BOOKING (on more than one lane) simply click on all the lane icons required on this top bar, the number of bowlers inserted will be used for EACH lane (example: booking for 5 lanes bowlers inserted 3. The actual number of bowlers who will go to the lanes is 15.) The DELETE BOOKING button is used to un-select the selected lanes leaving only the initial lane chosen for the new booking selected. The DELETE button deletes the booking (confirmation is required) then exits the screen. The SEND TO LANE button allows you to send the booking to the lane immediately (if the lane is available) WITHOUT considering the hour. OPEN LEAGUE BOOKING A booking can be made in Open play mode (one lane) or league play mode (2 lanes), the default is set to Open play mode so if you need to: Click on the LEAGUE button. Create a new booking using the same method as for Open. The booking screen will be split into two parts, the bowlers on the top half of the screen from 1 to 7 will go to the odd lane and the bowlers on the lower half of the screen 1 to 7 will go to the even lane.

115 115 Booking Data, memo, etc. 6.6 BOOKING DATA Write the reference or booking name in the BOOK NAME box. LEFT, CENTRE, RIGHT AND RIGHT OF BAR The check boxes are used to decide where the booking name will be visualized on the booking screen. BOOK TYPE Allows you to select from the types previously entered in Set Up, Options. MEMO The Memo key could be used for inserting bowlers personal data into the reservation, like an advise of payment, phone, etc. the reservation with memo are displayed differently (see the sample by side) LANE WARNING TIME The warning indicates how long before, a booking goes onto a reserved lane, you want to be warned that the lane will be used if you try to put bowlers onto it. DATE SELECTION The WINS program will use this time and warn the cashier that tries to place bowlers onto a reserved lane, that in xx minutes that lane is reserved. (see example). The default warning time is 30 minutes, but can be changed. The area allows you to make a booking for more than one occasion. Only Today (default) the new booking will only allows you to insert bookings for today. Selected Day allows you to select any single day on the calendar. To use the Every Day, Every Week and Every Month selections you need to select the last day of the booking on the Calendar: For Example: Booking made on Wednesday October 24 th You select the 24 th of January,2002 as the last day of the booking. If you click on: Every Day the booking will be entered every day until Jan 24 th Every Week the booking will be made for every Wednesday until Jan 24 th Every Month the booking will be made for every 24 th until Jan 24 th
116 116 N^ OF PLAYER, N^ OF SHOES, BOWLER DATA Warning!: The player name shoes etc are NOT used when booking a Time Game. Inert the number of bowlers in the N Players window and the number of rental shoes they have in the N shoes window. If you write the actual names of the bowers in the space below it is NOT necessary to insert the number. Write the name of the team (if any) in the Team Name and the handicap (if any) in the Team Hcp window. The team handicap is not required if each bowler has a personal handicap entered. The numbers from 1 to 14 are the number of bowlers and the order of play. When in League mode the first 7 bowers will go to the odd lane and the second 7 bowlers to the even lane. PIN TAP enables the Pin Tap for the selected bowler. SHOES is used to insert the shoe size for each bowler. BLIND is used to insert the blind score to be used if the case call for it. To actually send the blind score to the lanes the CHK must be selected (tikes) alongside the bowlers name. Mark the type of booking in using the BAR STYLE to select the choice, the default is Pending. A reserved lane will not be signaled automatically as the others, (this selection or type of booking is often used to stop lanes being given out while being worked on by the mechanic or something like that). To CHANGE a booking from reserved to pending go into Bar Style and select Pending.

117 117 Over bookings or double booked lanes 6.7 The program allows you to book more than one group on a lane ( overbooking function). It is NOT possible to send more than one booking to a lane so when the time comes you either move or delete the second booking. The Pending bookings are indicated with a RED box. In order to overlap bookings it is best to use ORDER command in the TOOLS menu. The bookings can be made to BRING APPOINTMENT TO TOP or SEND APPOINTMENT TO BACK allowing you to individualize appointments (bookings) quickly. Another way to manage overlapped bookings is to select the Reserved type for one of them, shown as a GREEN box. Remember that the Green reserved booking will NOT be signaled automatically by the computer as due to play. <- Overlapped bookings in Pending type. <- Overlapped bookings in Reserved and Pending types.

118 118 Sending a booking to a lane 6.8 Warning! The Booking program MUST be running at all times to be able to manage the bookings correctly.. When the booking is due to play the booking program send a screen to the cashier at the front desk. The screen shows al the relevant data with the number of bowlers in brackets. At this stage the cashier can: SEND TO LANE Sends the bowlers to the lane with all the pre inserted info (names etc) automatically. ASK ME IN A WHILE If the lane is not ready immediately this makes the system re-present the screen in a few minutes. DEFER APPOINTMENT Opens the booking screen so that the cashier can make necessary changes, start time etc.. DELETE APPOINTMENT Deletes the booking. (confirmation required) DON T ASK AGAIN Cancels the bookings and marks it as played. In order to bring the booking back it is necessary to go into the booking screen and re-mark it as pending The booking program sets the automatic game over automatically on the lanes when a booking is sent there. The game limit is calculated by the system using the minutes per game figure you previously entered. It is possible to change the limit or end time manually, unless the lanes are pre paid, in this case the payment screen will be shown again.

119 119 Printing statistic 6.9 Dal menu del programma Booking, cliccare su FILE e OPZIONI DI STAMPA REPORTS SCHEDULE The printout of the booking schedule should be use for a paper copy of entire database. The printable period is one month. The time distance could be use for printout dividing the day (pre-define :30 minutes). Vary the parameters for having more details.
 you will see a special small window open on the upper half of the monitor desk top area.")


120 120 BMP2 Advertising program 7.0 OPEN THE PROGRAM Click on the START button, then on the PROGRAMS \ STELTRONIC folder, followed by the icon. The program does not have a screen like other programs, (at least not until an image is opened) you will see a special small window open on the upper half of the monitor desk top area. To move the special screen to the where you need it, place the mouse arrow on the blue line at the top where you see SuperElex Image Converter, keep the left mouse button pressed down and drag the screen to the desired place, then release the mouse button, this action is called drag and drop. PROGRAM SET UP The program is usually configured by the installation program itself.if you wish to change some of the settings, for example, the image editor or the destination directory or you simply wish to check the program settings, click on OPTIONS PARAMETERS SETTINGS FOR USING THE BMP2 PROGRAM ON THE MAIN DESK. SETTINGS FOR USING THE BMP2 PROGRAM ON ADDITIONAL COMPUTERS (Back Office etc) Save the changes and exit by clicking on the OK button, use CANCEL to exit WITHOUT saving the changes.
![121 Program commands 7.1 [1] OPEN Command for opening an existing image to convert.](/docs-images/89/99807416/images/121-0.jpg "[2] FILE Contains a list of the most commonly used commands as follows: File - New Container -creates a new theme for images. File - Open opens an existing image to convert.")
121 121 Program commands 7.1 [1] OPEN Command for opening an existing image to convert. [2] FILE Contains a list of the most commonly used commands as follows: File - New Container -creates a new theme for images. File - Open opens an existing image to convert. File - Save saves converted image. File - Save As saves converted image with a new name. File - Edit changes the original image using an editor.. (Paint, Paintshop Pro, etc.) File - Exit exits the program. Convert Image converts the image into the YUV format, used by the lane computers (SuperElex). Colors changes the background color on the converted image, when necessary to change the dimensions. Option Parameters - changes the program configuration parameters. Window Show image visualizes a previously closed image. Help notes on program version. [3] PROGRAM CAPTION BAR Click on this bar with the left mouse button and keep it pressed down to move the screen or window around on the desktop. [4] EDIT Edits the image to be converted using an editor, (Paint, Paintshop Pro, etc.) [5] CONVERT Converts the image loaded in the YUV format. [6] ESC Exits the program [7] SHOW IMAGE Shoes the last, previously closed, image. [8] CONTAINERS Select the theme in which you want to save the converted image. [9] NEW THEME Create a new Theme. [10] SAVE Save the converted image into the selected Theme.


122 122 OPEN EDIT CONVERT, PERSONAL IMAGE 7.2 Some of the most common image formats are BMP, TIF, JPG, etc. The Wins program supports its own special YUV format for lane graphics. The BMP2 program has been made to convert images into the special YUV format. The FIRST operation is to CREATE one or more images to convert. The original (starting) image must have two characteristics: File Format: Windows Bitmap - OS/2 Bitmap (BMP) Maximum Dimensions: 720 x 576 Pixel The image can be taken from various sources, photos, scanned images etc but do NOT use Macintosh as the format standards are not compatible with Windows. OPENING AN IMAGE Copy the image to be converted onto the support desired, Floppy disk, CD or PC Hard Disk. Open the BMP2 program by clicking on the OPEN button. The program automatically identifies the image you have saved. If you have upgraded the center from static image Elex lane computers to 3D animation SuperElex lane computers, it is possible to re-convert all the STR images (used in Elex) to YUV (used in the SuperElex). To select the STR format to be converted open the TYPE OF FILE drop down curtain and select STR. The program will automatically identify the STR files. Select the image, click on the OPEN button to load it. The image is visualized on a window on the Desk top area. are ZOOM buttons which allow you to visualize the image in various sizes.

 due to the difference between the YUV and BMP format, this is ONLY apparent on VGA computer monitors.")

123 123 EDITING AN IMAGE If you need to make last minute changes to the image which you are about to convert, click on the button then on EDIT to open the graphic application which you have predefined. Once the modifications have been made click on SAVE and close the graphic program to return to the BMP2 program.. CONVERT THE IMAGE Click on the button to CONVERT. The program executes the command and shows you the preview of the converted image. You will note that the image is a little flat (wide angle effect) due to the difference between the YUV and BMP format, this is ONLY apparent on VGA computer monitors. This is OKAY The image will look and fit the lane monitors correctly. IF THE ORIGINAL IMAGE SIZE IS SMALLER THAN 720 X 576 PIXEL The program automatically adds a frame while converting the image in order to enlarge it to the required dimensions. The color used for the frame is Blue. To change the color of the frame, click on COLORS on the programs instrument bar and select the desired color.
.")

124 124 SAVING THE CONVERTED IMAGE. Select a destination theme from the CONTAINERS drop down curtain. Click on the SAVE button to complete the operation. CREATING A PERSONAL THEME TO STORE YOUR OWN IMAGES Click on the NEW THEME button. Write the name to be shown in the CONTAINERS drop down curtain (max 8 letters). Write the Theme name. Click on the button to select the Theme icon. Select a BMP file (we recommend the original bmp) which Wins will use to visualize the theme. TO SAVE THE CONVERTED IMAGES IN THE NEW THEME Select the new theme from the CONTAINERS Drop down curtain. Open an image and covert it. Click on the SAVE button to complete the operation.


125 125 Send an image to the lanes (using the Wins program) Press the CNT button on a pair of lanes or use the multiple commands. Click on the BACKGROUNDS button. 7.3 Select the FIXED or a rotation time for the BACKGROUND SEQUENCE FOR EMPTY LANES. Click directly on the desired Icon to select a theme. Select the desired Theme and confirm with OK. Use the <<>> buttons to move from page to page and view all the available Themes. In the minutes box it is possible to set the time each image will be shown on the lane monitors for. DELETE ONE OR MORE IMAGES FROM A THEME The BMP2 program automatically copies the new image into the chosen theme the moment it is selected, in order to allow it to be shown as soon as the theme is selected on the lanes. To delete one or more themes you need to use the THEME SELECTION in the Set up menu of the Wins Service manual. Click on the icon in the Theme Service Set up section, then click on the icon to open the Static Image and Background menu. The left hand side of the screen is dedicated to the events and themes, the right hand side shows the contents of the selected theme. Click on BACKGROUNDS to open the menu. By clicking on the theme the images appear in the right window. To enable or disable the image in a theme, simply click on the check box relative to the image. The rotation order in which the images in a theme are shown on the lanes can not be modified, the images rotate in alphabetical order. Exit the program, any changes are saved automatically DISABLED IMAGE (NO TICK) ENABLED IMAGE (TICKED)
126 126 (Bowling Moviemaker) 8.0 Warning! This program requires a user license in order to work. The MOVIEMAKER program allows you to produce your own in house movies to show on all the Steltronic lane monitors. The home made movie (also referred to as clip) needs to have the following characteristics: File type: MPEG Frames per second: 25 Bit Rate : 1.6 mbyte sec. Screen size: 352 X 288 pixel Audio: Stereo 44.1 khz bit rate: 64 Once produced, save the MPEG movie (clip) in the TCPSERV\DV_CLIPS directory of drive C on your Main Desk, with the.mpg extension. USING THE PERSONAL MOVIE (MOVIEMAKER VALIDATION) From the Set Up and Service menu (doctor Icon on main screen) click on the Themes Program. icon. This will load the Load the animations menu by clicking on the icon. Select the event in which you want to save the movie, the example shows clips playing on closed lanes. Click on the icon. Drag the icon onto the Play list area of the screen. Repeat, selecting all the events in which you want this movie to be shown then save the Play list.
127 127 TOURNAMENT PROGRAM 9.0 General 9.1 Main menu and program icons 9.2 Setting up bowler categories and system icons 9.3 Complete Name archive 9.4 Bowler archive 9.5 Team archive 9.6 Hints on singles and team tournaments 9.7 New Tournament 9.8 Days, Series and Turns 9.9 Singles tournament 9.10 Team tournaments 9.11 Exporting data 9.12 New week 9.13 Begin a tournament (week) 9.14 Wins tournament interface 9.15 Lane change, substitutions, change order of play 9.16 Features available on bowler consoles 9.17 Importing data and standings 9.18 FAQ s 9.19
128 128 General 9.1 The tournament program described in the following manual has been designed by Steltronic for the management of internal and official tournaments and Leagues. The program requires a valid license to function: if the license has not been enabled in the Steltronic validation program it will not work. MAIN FUNCTIONS BOWLER AND TEAM ARCHIVE BOWLER AND TEAM CATEGORIES HANDICAP, SCRATCH AND BONUS POINTS SINGLES TOURNAMENTS TEAM TOURNAMENTS SWEDISH TOP LEAGUE SWEDISH FIRST DIVISION LEAGUE CLASSIFICATIONS BY CATEGORIES, TEAMS, SINGLES, INDIVIDUAL AND COMPLETE CLASSIFICATION SCROLLING TEXT IN REAL TIME OR AT GAME END The tournament program is an external program. In order to manage Tournaments and Leagues there are a number of operation to make in sequence: Creating a tournament Define the type of tournament (for example: Singles, Team) number of games, lane movements, bonus, scrolling text days to bowl etc. Creating the tournament, the first day is set. Inscriptions Insert the bowlers, first line up, reserves and teams with relative handicaps categories blind scores etc. Assign lanes Specify the lanes to be used during the tournament. Export data Sending the tournament data to the Wins program. Start the tournament Bowling the series on the lanes. Import data Importing the score and classification data back into the tournament program.
129 129 PERSONALIZING THE LOGO In order to insert your own logo create a BMP file (bitmap) measuring 512 x 358 pixels in size. The name of the new logo must be LOGO.BMP: copy the file into the TCPSERV\EXTDATA\**\TRREP directory, overwriting the original file linked to your own language: Example: UK version = copy the file into the TCPSERV\EXTDATA\UK\TRREP directory. SECURITY AND SERVICE Database The tournament program uses a database (data archive) for exchanging data. The tournament database is included in the standard Wins back up procedure. There is another security feature: each time the tournament program is opened, the system automatically saves the database with another name, before any changes can be made. If you make mistakes or the database is inadvertently damaged, it is possible to restore the data using the relative command in the tournament program: Click on FILE DATABASE RESTORE FROM BACKUP Confirm the substitution by clicking on YES. The database from the last entry is exchanged with the current one. IMPORT EXPORT FILES The tournament program exports the sessions data to the TCPSERV\TEMP directory on drive C of the Main Desk. There is one single file for each session (day) exported. When modifications are made BEFORE starting the game, the file should be exported again overwriting the previously exported one. When session data is imported, at the end of the games, the file can be moved into a backup directory (TCPSERV\TEMP\TRBCK). We advise you to delete the game sessions periodically, leaving the tournament data, so that the temporary directory is not saturated with data (TCPSERV\TEMP). Use the Wins interface commands to delete the session data. ATTENTION! The TCPSERV\TEMP directory is used as an exchange directory for data movement of other programs as well as tournaments such as BLS2001 or Perfect Secretary Deluxe. The tournament files can be recognized by Tr at the beginning on the file name.

130 130 Main menu and program Icons 9.2 RUNNING THE PROGRAM The Tournament program is an external program which needs to be run using its own commands. We advise you to run the program while Wins is also running, this will make the data exchange easier. To run the program click on the tournament Icon, shown on the left. If the icon is not available on the desktop, click on the START- PROGRAMS STELTRONIC and look for the name Tournaments. The first thing the program does is to test the database. The program window is NOT available until the test is complete. If Wins is not running, a warning screen will appear to let you know. The Blue bar indicates the program version and shows the classic Windows command icons: Minimize the active screen on the windows bar, useful for passing from the tournament program to Wins without closing either program. Open on full screen. Close the program. COMMAND BAR FILE New Tournament Database restore data BOWLERS Bowler archive Class Import Export TEAM Opens the team archive screen. Opens the new tournament screen. Command used for restoring data (see previous chapter) Opens the bowler archive screen Opens the bowler class selection screen Utility for the Finish interface Utility for the Finish interface WINDOWS Position horizontally Position vertically Overlap Close all Typical Windows commands for positioning the various program screens.
131 131 LANGUAGE SELECTION The language selection is the one that has been set in windows as default and generally corresponds to the language of the country you are in, if it necessary to change the language, click on the LANGUAGE SELECTION command moving to it using the mouse arrow. HELP Information about the program. MENU BUTTONS New tournament Swedish tournament archive Singles tournament archive Team tournament archive Bowler archive Bowler Class table Team data archive Exit the program

132 132 Category and Handicap settings 9.3 Before you start setting up tournaments, it is usual, to set up the categories (bowler class) and relative bowler handicaps. The table that is generated for this purpose will be used for all tournaments, the handicaps can be modified while you are setting up each tournament and will only be used for this tournament. SUGGESTION: Using the bowler class setting, even if the handicaps don t correspond, allows you to have more detailed standings reports. Click on the CLASS button to open the table. Place the mouse arrow on the NAME box, to insert the category. It is best to use the initials only. Insert the category handicap in the HCP column; to move down press the ENTER button on the keyboard, twice. If you wish, you can insert the BLIND score for each category. When the bower is absent, during a team League, the bower is assigned a BLIND score in place of the actual score line, this score is usually the bowler s average minus a certain, pre-established percentage. The bowler with the Blind score needs to be checked in the relative check box using the Wins program. In order to maintain the lane change in step when there are an odd number of bowlers you need to use a ghost bowler. The word VACANT is used to show the number of non existent bowlers, placed on the lanes simply for keeping the lane movement right. In the ghost category the BLIND score must be negative (-1). The bowler or bowlers who have a ghost score will not be visualized on the lanes or the standings report. To use the same ghost mechanism for an entire team, refer to the Team archive chapter. Example: 10 lanes in a tournament, 5 bowlers per lane, lanes 1, 3, 5, 7, and 9 with a lane movement of 3 lanes to the right. In order to maintain the correct lane movement you will need to insert 5 ghost bowlers on lanes 2,4,6 and 8 with a ghost category.

133 133 Complete name archive 9.4 The Tournament Archive consists of the information from the Bowler data archive and Team data archive. The functions available in the archives are very useful since they make adding bowlers and teams much faster, during the set up of new Leagues and Tournaments: In fact the bowlers taking part in tournaments and Leagues are the same ones, it is not a good idea to write the names manually each time since mistakes could occur. The bowlers and teams can be added using the archive special functions or directly from the database during the set up or creation of a new Tournament or League. The use of TEAMS deserves a special mention. By TEAM, in the archive functions, we intend sporting society (club) and it s members. When a team is created ALL bowlers are entered, regardless of whether thy are reserves or first line up bowlers. If, during the tournament the team divides its members into more teams or lanes, there are two ways to proceed: a) Use the free assignment (not the team assignments) inserting at least the first series manually. In this way the team can be divided onto multiple lanes. b) Create teams with false names so that they can be used to call bowlers from the bowler archive. The archive has a number of search buttons to make it easy for you to look for and modify data: each archive has a number of personalized print options. If you open the print preview on screen, use the usual commands on the task bar, common to all the video prints (prints seen on screen and not printed). PRINT PREVIEW COMMANDS. 1 Close the application. 2 First page 3 Previous page 4 Total number of pages 5 Next page 6 Last page 7 Stop 8 Print 9 Export data in other format (excel, access..) 10 Zoom

134 134 Bowler Archive 9.5 Click on the Bowler Archive button. ADD A BOWLER Click on the Add new button, then insert AT LEAST the name and surname in the boxes. The Add New button becomes Confirm; click on the button to confirm the addition on the bowler. Complete the information required about the bowler using the Class and Hdc fields (if different from the class handicap) as well as Ave [average]. If teams have already been created, insert the bowler into the club or sporting association. To insert the CARD NUMBER or FEDERAL CODE, digit the number directly in to the appropriate space. To insert the bower s CLASS or CATEGORY click on the arrow positioned on the right of the screen, scroll through the list, select the chosen class, highlighting it in blue then release the mouse button to confirm. If you have entered a handicap BEFORE entering a the class, you will be asked to change the handicap if different to that of the selected category. Click on NO if you want to keep the original handicap. The mandatory fields are, name and surname. The other fields are not mandatory and can be completed at a later stage. If you need to insert more bowlers, click on the Add new button until you have finished then click on EXIT. DELETING A BOWLER Use the Delete button to eliminate the bowler from the archive.
 to use one filter or another use ( Or ). Use the FIND, GO TO FIRST, FIND NEXT, FIND PREVIOUS, FIND LAST to speed up the search.")
135 135 BOWLER SEARCH IN THE Search section you need to digit the bowler data when they need to be visualized or changed In the Mode screen it is possible to use search filters like And or Or, to search through the archive, to use various filters use ( And ) to use one filter or another use ( Or ). Use the FIND, GO TO FIRST, FIND NEXT, FIND PREVIOUS, FIND LAST to speed up the search. The CLEAR SEARCH button resets the screen settings. The ARROW buttons are used to scroll in the bowler archive, from the first bowler, the previous, the next and last. Define the printer setting in the PRINT screen: WINDOW = shows the page to be printed, on screen first (they can then be printed directly from here) PRINTER = sends the page directly to the printer. CP = number of copies required DETAILED LIST = shows the complete list of data, telephone numbers, address etc. SUMMARY LIST= data is limited to: name, surname, initials, team name, category and Handicap.

136 136 Team Archive 9.6 Click on the Team Archive button. ADD A TEAM Click on the Add New button, insert AT LEAST the Team name and click on Confirm which has taken the place of Add new. As soon as it is confirmed the Team composition screen is available, highlighting the first bowler name line in yellow and placing the cursor on it. There are three ways to insert bowlers onto a team: ADDING BOWERS DIRECTLY Insert the bowlers name and surname, one per line, in the team composition screen. The bowlers will be added to the database and the missing ones can be added to the bowler archive. ADD CONVENTIONAL BOWLERS Conventional bowlers are the ghost bowlers (whose name is the same as the name of the tournament): used to practice using the tournament program or during the practice sessions. Indicate the number of conventional bowlers in the space provided then click on Add conventional bowlers. NOTE: the conventional bowler name can be changed at a later stage, even during the tournament. ADD BOWLERS FROM LIST Click on the arrow next to the Add bowler button to open the drop down curtain, select the name from the archive, proceed by clicking on the Add bowler from list.

 click on Modify Team Class. The classes created can be used for all teams in all tournaments.")

137 137 CHANGE BOWLER ORDER Click on the bowler to be moved so that the line is highlighted in yellow. Use the arrows beside the Team composition screen. The other bowlers move in accordance with the change. TEAM CLASSES Assigning a class to a team is useful for creating varying standings (classifications) during mixed regional tournaments, for example. To create the team categories (classes) click on Modify Team Class. The classes created can be used for all teams in all tournaments. Insert the class name and right SEND twice to add, if necessary, a starting score. TO INSERT A GHOST TEAM create a team in the class called GHOST with a starting score of 1 (negative score). To assign the category to the team click on the arrow of the CATEGORY drop down curtain and select the category. At the end click on EXIT. DELETING A SELECTED TEAM. Click on the Delete Team button to confirm the operation. SCROLLING THE TEAMS Use the arrows to scroll through the team list in the archive. SEARCH FUNCTIONS The team search contains the following fields NAME or CODE or CATEGORY. Once the field has been selected click on the SEND button and start the search. TEAM ARCHIVE PRINTOUTS With the LIST button it is possible to access the team list, including the bowlers. In the DESTINATION you can define the way to consult the list: Print preview on screen or Printer. Cp shows the number of copies required (when sent to printer).
138 138 Hints on singles and team tournaments 9.7 We define singles tournaments those bowled with one bowler per team, not affiliated to teams or sporting associations (clubs) for the event in hand. The singles tournaments do not allow reserves. It is therefore not possible to insert them while setting up the tournament. Each substitution requires a bowler name change who will inherit the scores of his predecessor, who actually bowled. The Team name box in singles is used for information only to show the bowlers club name. The team tournaments are played between different clubs the bowler scores are totaled and represent the team total. In the Team tournaments reserves are allowed and should be entered when setting up the tournament. It is possible to delete or substitute an injured or late bowler once the tournament has already started. This can be done between one game and the next from the bowler console or from the Main Desk using the substitute function. Both singles and team tournaments can be played using various modes of play (rules): NORMAL Standard Tournaments without particular rules. SINGLE OR DOUBLE BONUS Tournaments in which a set number of pins is programmed, once reached the set number the team is given a bonus number of pins. PETERSEN (SINGLE OR DOUBLE BONUS) Petersen is an American stile League, a sort of all against all in which all the bowlers and teams play against all the other teams on the lane pairs. The winner of each game earns a number of bonus points to be added to the game totals.the Petersen can be set to give bonus points at two levels of score just like in normal tournaments. If you require the standings divided by categories you must assign the class to the bowlers and teams. It is possible to play singles tournaments with more than one bowler per lane, even if they belong to different teams or have a different class, it is also possible to have separate standings per bowler. The SINGLES and TEAM tournaments use different settings to insert bowlers but keep exactly the same basic principals for the other functions.
 as well as trace the scrolling text standings.")
139 139 New Tournament 9.8 Click on the New Tournament icon or use the File -> New tournament command. The tournament CODE is an automatic and progressive number, used to identify the tournament (some tournaments may share the same name) as well as trace the scrolling text standings. The NAME of the tournament is a mandatory field to fill in. DO NOT USE SPECIAL CHARACTERS LIKE BRACKETS, INVERTED COMERS, COMERS. Using these characters may cause problems with some print options. The DAY is an automatic progressive field; do not vary the data. The SERIES is used to indicate the number of lane changes to make during the tournament. In a Petersen tournament, the number is the same as total number of bowlers (or teams), minus one (1). The GAMES window is used to indicate the number of games in each series. Example: Singles tournament in which each player must bowl 10 games in total, to be bowled moving lanes 5 times. The settings are: Series 5, Games 2. The DATE is a reference and if not varied, is the tournament creation date. The SINGLES or TEAM buttons show the type of tournament. SWEDISH LEAGUE Top League First Division are buttons used only for tournaments played using the Swedish Federation regulations. Click on the CREATE button to confirm the settings and continue, the CANCEL button is used to exit without saving. The program creates the first day of the tournament. NOTE: the tournament program assigns default figures for number of Series and Games, in the case of Team or Singles tournaments. Select the FIRST type of tournament, then correct, if different, the type of tournament, as well as the number of series and games, if necessary. Series and games can also be modified in the days screen and can be different from one day to the next, but NOT from turn to turn.
140 140 Week, Series and Turns 9.9 You must keep one concept in mind at all times, the division between WEEKS and TURNS. When you start a new tournament, you start from the first week, obviously. The WEEK is a session of play in a tournament. The TURNS are subdivisions of the WEEK created automatically, when the number of participants (Bowlers or Teams) is higher than the number of available lanes. The term WEEK does NOT refer to an actual day (or 24 hours period) but instead to a session of play; you can therefore create more than one 0day session which will be played on the same day (date) Each WEEK can be made up of multiple TURNS. In a new week, you can also insert bowlers from a previous WEEK or WEEKS, points included; vice versa a bowler can NOT play in more than one TURN on the same week (session). From one week to the next the tournament rules can be modified; you can decide to use a different number of lanes, series, games, bonus levels as well as play the week as a Petersen or Round Robin. Between one turn and the next of the same week the rules remain the same. The most flexible mechanism for a tournament is the creation of multiple DAYS. The points and bowlers of different week are ALL used in the standings (classifications); if necessary you can select certain weeks for a partial classification. Turns and weeks can be exported separately. The advantage of this operation is that you can modify bowler data even when the tournament has already started. The export of the data belonging to a week implies the import of data at the end of a session of play. Making a partial data export for a week (only one turn or a number of series) it is necessary to make an import BEFORE exporting the series or the remaining turns, if this is not done the totals will be deleted. If you modify the lane assignments for a week you must re-export the data so that the changes take effect. It is not necessary to export a newly created day or turn; it is possible to create different days to be exported at a later stage. In order to avoid mistakes due to rush or confusion it is advisable to export the week a little before the time it is due to be played.

.")
141 141 Singles tournament 9.10 SETTING UP THE FIRST DAY The following tournament data is entered in the GENERAL section: code, name, series, games and start date. If necessary it is possible to modify this data, with the exception of the code. There are two selections for Practice: when the button shows minutes, the number written in the Practice window is the total time you will allow for practice, click on the Frames button to Indicate the number of throws the bowlers are allowed to make for practice, regardless of the time it takes. The Day window shows the number of the day you are programming (setting up). To scroll between the various days of the same tournament use the left and right arrows on the bottom of the screen. The days become available as they are set up (created). The Delete this day button deletes the required day from the database; deleting all the days will delete the tournament. In the Stile selection you decide what type of tournament this is going to be: American (lanes in League mode) or European (fixed lane). The Print Options button allows you to print any of the singles tournaments which have been created. Dest Window = print preview on screen Dest Printer = sends data to printer Cp = number of copies List = prints the list of the singles tournaments


142 142 In the Rules section you can determine the way the tournament should be played. To modify the settings click on the Change Rules button. Normal Petersen Double bonus Single bonus Standard Tournament Each bowler plays against every other bowler. The winner of the head to head gains bonus points which are defined in the Petersen Bonus window which can then be added or not to the bowlers total, depending on the selection made. Tournament with bonus points in which it is possible to determine the score to be reached as well as the bonus to receive once reached. The double bonus setting allows you to select two levels of score to be reached and two bonus s to be awarded. Tournament in which there is only one score level to be reached and one set of bonus points to be awarded. Petersen + Double bonus Petersen + Single bonus Petersen tournament with the possibility of a bonus being awarded once a certain score is reached, over and above the points won in the head to head with the other bowler. Two score levels and two bonus point awards. Petersen tournament with one bonus and one score level to reach. Scratch totals Totals with Hcp indicates the totals without the handicaps (if any). adds the bowlers handicap to the total score at the end of each game. The totals with handicaps or scratch is also used in the standings, (classifications), it can be changed at any time; the program will reset the standings using the new setting. Once the series parameters have been defined, number of games, practice frames or minutes style and rules to be used, you need to insert the days participants. INSERTING BOWLERS 1 Bowler code or membership number 2 Bowler archive search field 3 Bowler position 4 Clear search button 5 Bowler Name 6 Bowler Surname 7 Class or category (activated using the right mouse button) 8 Bowler Handicap 9 Team name or name of sporting association (optional) 10 Starting score, if not zero 11 Buttons used to move the selected bowler (highlighted in yellow)


143 143 There are three ways to insert bowlers participating in a tournament: Add conventional bowlers Insert now Insert bowlers from archive ADD CONVENTIONAL BOWLERS Conventional bowlers are names created by the computer they can be changed at a later stage. This type of insertion is used for training, internal tournaments or even for inserting data quicker. Insert the total number of conventional bowlers in the space provided, the click on Add bowlers. The added bowlers are identified as player 1, player 2, etc. All fields can be edited. INSERT NOW Write, at least, the bowlers Name and Surname in the spaces as well as all the required information. Advice: write names and surname in small letters, move from one space to the next using the Enter button on the keyboard, the program will change the first letter of each name into a capital letter automatically, this shows that the bowlers name has been entered correctly. To open the bowler class window use the right mouse button, scroll down the selection then click on the required class with the left mouse button to confirm choice. INSERT BOWLERS FROM ARCHIVE The fastest way to call a bowler from the archive is to write his/her code (the same as the membership number) in the window and then pressing Enter on the keyboard.to pick a bowler from the archive click on the Add bowler button and open the archive. Highlight the bowlers to add by clicking on them then clicking on the Confirm button. The handicap, class data etc, can be changed without altering the archive.

144 144 ONCE BOWLERS ARE INSERTED The Handicap, Name, Surname and Category fields can be modified, regardless of how they have been inserted. The bowlers are placed onto the assignment table in the order with which they were entered from the top, lane 1, towards the bottom. If you need to move one or more bowlers, changing the order of play, select one bowler at the time and use the arrows in the players movement section, to move the bowler up or down to the required position. It is also possible to change the order of play in the lane assignment screen. The temporary bowlers inserted manually can be added to the archive for future use, simply click on the Add to archive button, if you wish you can also enter teams, having received the team names. An absent bowler whose place needs to be maintained in order not to change the overall order of play must be assigned as a ghost bowler. The next steps to completing the data for the first day are: the creation of the classification or standings on scrolling text (optional), to show on lane monitors and the lane assignments: buttons used in black bold are to indicate the sequence of things to do. Scrolling text for standings is optional. The steps to follow after inserting bowlers are shown in black bold CLASSIFICATION (STANDINGS) SCROLLING TEXT This operation can be performed at any time, but BEFORE exporting data to the scoring system. Write the initial text or welcome text using the colors available. In a Petersen tournament it is possible to show the total points, the bonus points or both in the scrolling text standings. For bowlers and teams you can select to visualize all or the first 10 positions. The optional team field is tied to the insertion of a team name. The Real Time selection, updates the standings text every two minutes while the after each game selection does it between one series and the next.
 remember that if already done, once data has changed you MUST re-export the new data to the scoring system.")
145 145 ASSIGNING LANES ON A SINGLES TOURNAMENT With the lane assignments, you indicate where the bowlers will play the current day of the tournament. The lanes can be assigned and if necessary modified at any time (for example, for a draw) remember that if already done, once data has changed you MUST re-export the new data to the scoring system. Warning: it is NOT possible to modify the bowler, series or game data from the assignment screen. Return to the main screen before assigning lanes Click on the Show lane assignment screen to load the screen. A summary of the settings is shown on the tournament information screen, including: code, day number, date, series and games. The data can not be modified on this screen. Insert the lane movement data for each series, in the Lanes Movement screen. The descriptions are abbreviated: Fst ln Lst ln Pl/ln Skip Str Lm first lane used for the day last lane used for the day indicates the number of bowlers per lane, use the ghost bowlers to maintain the lane movements as required, in case of odd number of bowlers. jump lane: indicate the number of lanes to jump for each movement. For a Petersen tournament leave the data, the program will calculate the lane movements automatically. lane from which the jump will start.


146 146 The movement type is selected by using the buttons alongside the lane movement section. Rotate to right Rotate to left Petersen Round robin Free assignments moves the bowlers from left to right. moves the bowlers from right to left automatic lane movements for Petersen tournaments automatic movements for Round robin tournaments movements are made manually To confirm the assignment click on the Assign button. The Clear lane assignment button delete the previous assignment. Warning! If the assignment chosen is Petersen or Round robin, the program runs a check on the number of series. If the figure is not correct, the program will display a warning message. Exit the lane assignment screen and correct the figure in the main screen. To scroll the series use the horizontal bar. If there are more bowlers or teams than the lanes available the programs divides the bowlers into multiple turns. The turns and first series columns can be edited by the user. To move a bowler from one turn to another change the turn number directly in the space it is shown. If it is necessary to change the lanes in the series press the Free movements button to access all the windows. A white box can be edited and yellow box can not. For the draws, modify the first series, then click on the Assign button again in order to re-calculate the series. It is not necessary to save the assignment, in order to exit the window and save the settings, if valid, click on the Exit button. The Save button allows you to save the assignment as a file, useful if you are going to run other tournaments with the same table. Using the Load button, you can recall the list of the saved assignments. To print a quick lane assignment press the Shift and F12 keys together. The Recap sheet button prints a sheet for each bowler used to write the game totals, the Lanes button prints a global report on the assignments. The next step will be exporting the data to the scoring system, see the chapter on page 28.


147 147 Team tournaments 9.11 There are only a few settings which make a team tournament different from a singles tournament set up. SETTING UP THE FIRST DAY The following tournament data is entered in the GENERAL section: code, name, series, games and start date. If necessary it is possible to modify this data, with the exception of the code. In the Rules section you can determine the way the tournament should be played. There are two selections for Practice: when the button shows minutes, the number written in the Practice window is the total time you will allow for practice, click on the Frames button to Indicate the number of throws the bowlers are allowed to make for practice, regardless of the time it takes. The Day window shows the number of the day you are programming (setting up). To scroll between the various days of the same tournament use the left and right arrows on the bottom of the screen. The days become available as they are set up (created). The Delete this day button deletes the required day from the database; deleting all the days will delete the tournament. In the Stile selection you decide what type of tournament this is going to be: American (lanes in League mode) or European (fixed lane). The Print section allows you to print all the Singles or team tournaments using the List button; click on the Subscriptions button to visualize the list of the teams with relative tournament to which they are assigned. In the Rules section you can determine the way the tournament should be played. To modify the settings click on the Change Rules button. Once the series, number of games, practice frames, style and tournament rules have been defined, you need to insert the teams, bowlers and reserve bowlers participating in the day.

148 148 INSERTING A TEAM The teams can be added to a tournament in different ways: Add conventional teams Insert now Insert teams from archive ADD A CONVENTIONAL TEAM The conventional teams are names created by the program, they can be changed at any time. This type of insertion is used for training, internal tournaments and for faster insertion. Insert the number of conventional teams in the N.teams box. Insert the number of bowlers per team in the Tm size box, then click on the Add team button. You are asked to confirm the operation. All team and bowler fields can be modified. INSERT NOW Write the name of the team and the category (optional). In tournaments which require a ghost team, insert the starting score as a negative figure (eg. 1) in the Pts column. INSERT TEAMS FROM ARCHIVE In order to insert a team quickly, enter its Code in the box, if you know the code press Enter to call up the team. Click on the Add team button to open the archive screen, then select the desired team by clicking on it. There are cases in which a sports association needs to split its bowlers into multiple teams. When calling the team from the archive all the bowlers in it are automatically assigned to the team. To resolve the problem DELETE the bowlers that will become competitors from the team list, using the Delete bowler button, then create a new pretend team in which the remaining bowlers will be placed by calling the up from the archive. The modification does NOT effect on the team in the archive. AVOID adding the bowlers to the database to avoid duplicating names. INSERTING BOWLERS ONTO A TEAM Before inserting bowlers, it is useful to give the team a size. To do this, insert the number of bowlers on the team in the Tm size box. The number of line up bowlers in each team. This selection does not stop you using teams of different sizes. The line up bowlers correspond to the number of white lines in the bowlers section, the blue lines will be used for the reserves. When a team is inserted calling it up from the archive, the first bowlers on the list are considered the line up bowlers, the others reserves. Insert the reserves even when you don t know their names in order to have them available later. The way to add bowlers to a team is the same as described for singles tournaments. To change the order of play in a team, use the bowler movement buttons. An absent bowler whose position needs to be maintained, in order not to change the lane movement selected needs to be inserted as a ghost bowler. If you want to add the teams and the bowlers inserted temporarily in the archive, click in the Add to database button. The next steps to completing the data for the first day are: the creation of the classification or standings on scrolling text (optional), to show on lane monitors and the lane assignments: buttons used in black bold are to indicate the sequence of things to do. Scrolling text for standings is optional.
; remember to re-export the changed data to the scoring system. Warning: it is NOT possible to modify the team, series or game data from the assignment screen.")
149 149 LANE ASSIGNMENTS FOR A TEAM TOURNAMENT With the lane assignment you tell the program where the teams will bowl the current tournament day. They can be assigned and modified at any time. (eg. A draw); remember to re-export the changed data to the scoring system. Warning: it is NOT possible to modify the team, series or game data from the assignment screen. Return to the main screen before assigning lanes Click on the Show lane assignment to load the screen. The assignment method is exactly the same as the singles tournaments. To split a sporting association (club) onto more than one lane, unselect the VISUALIZE TEAMS ONLY button, declare the number of bowlers per lane and insert the first series manually. In case the number of teams are higher that the number of lanes available, the program divides them into multiple turns. The turns and first series columns can be edited by the user. To move a team from one turn to the other change the number directly in the box. If it is necessary to change the number of lanes in the series, click on the Free movement button to access all the boxes. A white box can be edited and yellow box can not. For the draws, modify the first series, then click on the Assign button again, to re-calculate the movements. The next step will be to export the data to the scoring system, see the next chapter.

150 150 Exporting Data 9.12 Data export is a procedure used to move data from the tournament program to the Wins scoring program on the front desk computer. EXPORTING DATA TO THE SCORING SYSTEM DOES NOT MEAN STARTING A TOURNAMENT, it simply moves the tournament you have prepared to the front desk computer, in the correct format, ready to be played when selected. Before proceeding with the export it is necessary to make some checks: The teams and/or bowlers for the day are inserted, the data is correct and the reserves have been inserted. The lane assignment is correct, the scrolling text standings have been set up. If some of this data does not seem correct, it is advisable to correct them BEFORE exporting. WARNING!: it is possible to export a day however many times you wish, obviously, exporting again overwrites the previous export of the same tournament. The scoring export button, once this has been done, becomes invisible in order to avoid mistakes if it becomes necessary to export the same tournament again, simply change one piece of data, anyone. Click on the Export to scoring system to load the export data screen. The bowler table shows bowler and team data, with turns and series. Normally all the series and turns are selected and no particular action is required by the user, to enable them. WARNING! Bowlers defines ghosts, are NOT shown on the export screen!! STANDARD EXPORT If the day runs normally, the bowlers are all present, or they will be modified later in Wins, (see paragraph on substitutions ) click on the Export for button to send the data to the scoring system. At the end of the operation the program will confirm that the export has been successful. Click on OK, then exit the program. Each time the same day is exported more than once, you are asked to confirm if you wish to overwrite.
 even though only one day has been created. A special case is a Petersen with many bowlers to play in multiple sessions, even weekly.")
151 151 PARTIAL, MAKE UP AND SPECIAL EXPORTS During the Tournament or a League, some bowlers or teams do not turn up when it is their turn to play, or simply the series are played in multiple sessions, (times) even though only one day has been created. A special case is a Petersen with many bowlers to play in multiple sessions, even weekly. In order to maintain the automatic lane movement table, the Petersen should be created on one day only. Creating a single day, you can export only the series that are going to be played one at a time, or interrupt a tournament at the end of a series, using the Wins functions provided, a re-sending the next series manually. If you partially export, the scrolling text standings show the totals and the involved bowlers points time by time, interrupting the tournament by hand, the tournament standings on the monitors is global. Whichever the method used is, the standings will include ALL the bowlers. In other cases, there are bowlers that catch up after their turn to play has passed. Instead of creating different days for them, (in the same tournament), it is better NOT to export the data until the period they are going to0 catch up. When partially exporting,the name of the day remains the same: the time you export the catch ups (bowlers who can t bowl at the same time as their team mates for various reasons, such as work etc) the name of the day remains the same; BEFORE exporting data you must make sure that you have IMPORTED the scores of the bowlers exported previously the scores are imported, not deleted. PARTIAL EXPORT There are various ways to select the bowlers. Remember that the lines highlighted in yellow are selected. Unselect All Select All Load Cancels the selection of all those selected. selects all the bowlers as to be exported. cancels all modifications made and reloads the original data, unselecting everything. Selecting the turn in the drop down curtain, and using the select turn button, the turn is marked for export. NOTE: exporting turn by turn, it is possible to modify data between one turn and the next. To select single series or bowlers press the Unselect All button and then click on each single box (line) to be exported. Click on the index of series (2) button to see all the bowlers in the selected series, click on the index of bowlers (1) button, to see all the series to be played by the selected bowler. Finally, click on the EXPORT button, wait for confirmation then click on EXIT. It is now possible to start the session of the tournament, play it later (export at 4 pm but don t start until 6pm) or create a new day or session. Remember that ANY changes made to the days data requires a new export (re-export) of the same day for the changes to take effect.


152 152 New week 9.13 By week we mean a session of play in a tournament. For more details refer to the Days, Series and Turns chapter on page 182. A new day is a new session of play in the same tournament. There are two ways to program a new week: Create a new week, with new bowlers. Use bowlers from previous days with the possibility of importing scores already made previously as well as adding new bowlers or teams. Whichever method is used, once the new day has been created the functions for inserting data, exporting etc, are IDENTICAL to those of the3 previous days created. New week for team tournament New week for singles tournament When a new week is created the previous bowlers or teams are visualized, though NOT SELECTED. If the bowlers or teams for the new week are NEW, simply click on the Confirm button to open a new day. To use teams and/or bowlers from the previous day, use the selection buttons: All teams All bowlers selects all the teams in the window selects all the bowlers in the teams Inserting a value in the box and pressing all players the first button, you select only the bowler or teams up to the indicated position; in order to select the teams or bowlers directly click on each team and bowler highlighting them in yellow. Using the cursor you can determine the percentage of score to import for the highlighted bowlers or teams from 0 (empty box no previous scores imported) to 100 (imports all previous scores). The weeks number is shown in the box at the top of the window. To consult the various weeks of a tournament use the arrow buttons, on the bottom right of the window.

153 153 Begin a tournament 9.14 VERIFY Before you start a session of play, it is better to check the operations made in order to avoid mistakes, here is your check list: Inscriptions The bowlers, teams, rules are set. The scrolling text standings, practice frames/time are set and checked. Lane assignment The lanes are assigned, I have made the draw and verified the lane movement table. Data export The session to be played has been exported to the Wins scoring system (main desk) START OF TOURNAMENT There are two ways top start a session of play: Start game from the tournament program (suggested method) Open the League or Tournament program from Wins on main desk Remember to leave the Wins program RUNNING during the tournament session, if it is closed the tournament will not advance automatically. START THE GAME FROM THE TOURNAMENT PROGRAM This is the fastest way to start a session of play, if the bowler and team data is correct and there is no need to verify the data again, before the game starts. Click on Start Tournament which becomes visible once the data has been exported to the score. The session starts, the bowler names have been sent to the lanes. Decide what the pinsetter status should be following the practice frames/time Pinsetter mode. The pinsetter selection can ALWAYS be modified later using the menu commands in the lane CNT window on the main desk or in the multiple command screen. Select the turn (if there is more than one) to send to the lanes. Click on the Send to lanes button. Close the tournament program, if necessary re-open it at the end of the session in order to import the scores. To modify data or abort the session, use the commands in the Wins interface.
154 154 WINS tournament interface 9.15 Click on the cup icon to open the interface in the Wins program. WEEKS [1] The exported weeks are showed in the top of the window. For visualizing the week already played just click on Shows all data. For begin a week simply select it from the list. TOURNAMENT STYLE [2] The icon represent the tournament style: American (League) is the red icon, European (Open) is the blue icon. START PROGRAM [3] Clicking on the button will run the Tournament or League (CDE) program. The icon change if the week is a file of tournament or League (secretary) BOWLER S DATA [4] In this section the bowler s information for selected lane are available, in real time. Using the command choose lane [5] or tourn [6] it s possible verify the selection for bowlers, lane, and next turns. LANE SELECTION [5] Using this section it s possible scroll the lane involved into the week for displaying the bowlers. NEXT \ PREV\ FIRST\LAST TURN [6] Use this keys for scroll the turn.
155 155 AVAILABLE TURN [7] Turn available for the week. From this selection, it s possible choose the turn ready for send or stop. LANE STATUS LIST [8] Information about the lanes during the game PINSETTER STATUS [9] Establish, before you start, the pinsetter status for when the practice is over. On = pinsetters remain ON Practice = pinsetters in practice mode Off = pinsetters OFF Auto = pinsetters ON when bowlers are on lane Off when not. Extern = manager manual switch (from Main desk control) Suggestion: As soon as some bowlers see their names up on the lane monitors, they start to bowl. If the scoring system is not set to practice, their scores will be market, you need to delete the scores shown during the practice time. It is better to select the pinsetter status to OFF, in this way the problem can be avoided. At the end of the practice time, in WINS, click on the MULTIPLE FUNCTIONS button, select the lanes being used for the tournament, click on the CNT button and select the PINSETTER CONTROL, Automatic, Manual or ON. SEND TURN [10] Send the names to the lanes, START PRACTICE [11] To start the practice frames/time, if a number has been entered in the frames/time box, click on the button. A warning sign is shown (flashing) on the lanes, showing a count down of the minutes or frames allowed, at the end of which, the pinsetters will position themselves in the selected status. STOP TURN [12] The command will stop the game on the selected turn and close the lane.. During the games, the lane computer send and receive from the network the turn and the game automatically. Than, when a lane is available, the lane computer shows the next game ready for bowl without waiting that all players finish the same game. This is a big help for saving time. It s maybe possible that the lane fail to load the game if a black out or any other interruption stops the network. To resume the game, simply choose the turn from the list, than click on SEND TURN button. This will not interrupt the current game on the lane that already receive the turn, simply will start the game on the lane that do not receive the command before. For stop a week that will be played in more days, simply wait, when all bowlers finish the game, stop the next turn. To continue the next days the game, select the week, select the unplayed turn, than click on SEND turn. SWAP LANE AFTER EACH SERIES (TURN) [13] For Dutch league: this command will swap the lane after each series. It s working only with CDE league data. DELETE [14] BEWARE! This command delete the selected week. SCROLLING TEXT STANDINGS / CLASSIFICATION After about 2 to 3 minutes after the start of the session, if the scrolling text has been created in real time, after each series or after each game, it is possible to send the standings text to the monitors as if it were a normal scrolling text message. Using the CNT command either on the main screen lane pairs or in multiple commands, select the scrolling text and exit, confirming the changes. At the end of the tournament, the scrolling text standings will be deleted (after some minutes). The scrolling text can be recognized by the TR at the beginning of the number (code), which is the same as the tournament code.
156 Lane change, substitutions, change bowling order once session has started The following operations are made through Wins, by clicking directly on the lane icons on the main desk. LANE MOVEMENTS During the tournament it may become necessary to move a lane or a pair of lanes to another, lane or pair. To do this, use the normal transfer commands in Wins, in the lane pair icon of the main desk. The program will use the new lane or lanes, for all the series of the day. CHANGE LANES (ONLY LEAGUE) To swap the bowers or teams from an odd lane to an even lane of the same pair, click on the Swap button on the lane screen. SKIP BOWLER CHANGE HANDICAP AND BLIND CHANGE BOWLER NAME SUBSTITUTIONS To freeze a bowlers scores while away, so that the others can carry on bowling, click on the checkbox beside the bowlers name and then the skip button. To un-skip the bowler on his return repeat the operation. Use the Wins commands, the changed data will be saved for all the series. For the Blind scores, other than assigning a figure to the bowler, click on the check box to the left of the blind score. Write the bowler name and surname, with the correct punctuation, surname - comma name. The new name inherits all the previous scores. Use this method ONLY to correct wrong names or in cases which require the complete name change. Warning! The ADD NEW BOWLER section is not implemented in the tournament program, its use is limited to the CDE or PSD League programs. The added bowler will not be considered by the tournament program, the moment it is imported. CHANGE ORDER OF PLAY Highlight the bowler on the lane by clicking on him, then use the arrows to move him. WARNING! A bowler can be changed with a reserve or a new bowler only at the beginning of the first frame of a game or series, NEVER halfway through a game or with flashing sign present, (to start bowl...) on the lane. If the bowler is changed before, the previous game will have to be re-bowled by the new bowler. EXCHANGING FIRST LINE UP BOWLER WITH A RESERVE To exchange a first line up bowler (starting bowler) with a reserve, use the filter buttons to visualize the available bowlers, then use the arrows to move the selected bowlers.
157 157 BOWLERS EDITING SUBSTITUTION Features available on a bowler Console 9.17 Click on ENTER button to load the Menu, then use the Joystick or arrows key to move on EDIT NAME button. FLASHING RED FRAME displays the cursor position. START closes the window and return back to the game, CANCEL escape from the window back to the game. ADD BOWLER ADD button loads the LEAGUE BOWLER S LIST from the Main desk. ONLY the bowlers added from Main Desk can be add on the lanes. The first player in the list is highlighted in yellow. Move the selection to the previous PAGE. Move the selection to the next PAGE. Move the selection to the next NAME. Move the selection to the previous NAME. ENTER confirm the selection. CANCEL quit without saving. MODIFY THE BOWLER Uses the keypad arrows or move the joystick to the left on the players column. Use the UP/DOWN position to move between the player. The players can be edit only one by one. When you are ready, press ENTER button. The WHITE CURSOR blink on HANDICAP area, the RED FLASHING FRAME blink on ENTER. TO MOVE BETWEEN THE BUTTONS use the key arrows or move the joystick UP/DOWN/LEFT/RIGHT position. When the cursor is in desired position, presses ENTER to confirm. ENTER To go back to previous screen and confirm the change MOVE To change the player game position UP MOVE To change the player game position DOWN SKIP To mark SKIP/UN-SKIP the player (a indicate the skipped player) DELETE To DELETE the player BLIND To mark unmark the player as BLIND To DELETE the selected HANDICAP _+ To CHANGE the HANDICAP SIGN (positive negative) 0 9 To ADD or CHANGE the HANDICAP REPLACE To REPLACE the player with another of same team WHEN ALL DESIRED MODIFICATIONS ARE DONE CLICK ON START TO CONTINUE THE GAME.

 simply do NOT move the scores into a safety file.")
158 158 Importing Standings/Classification Data 9.18 At the end of the session of play, the lanes close on their own, returning to their previous status (open etc). Go into the tournament program, open the day which has just been played, then click on the Import from scoring system button. If the day is concluded and is not needed in the future, it can be saved in a safety file, (TCPSERV\TEMP\TRBCK), vice versa type NO and proceed. The imported scores are moved to the standings table which is opened automatically. This operation can be carried out multiple times, (e.g. you can make multiple imports during the tournament to see how it is going) simply do NOT move the scores into a safety file. WARNING! The standings calculation method is chosen with the following settings made in the main, day settings page. If necessary, modify the settings: Scratch totals indicates the sum of the games WITHOUT including the Handicap score. Totals with Hcp adds the bowlers handicap to each game total. Add to total is needed if the Petersen style is selected; when active it sums all the won points to the bowlers total or to the team total. In case of a draw (equal points), the bonus is divided between the bowlers. The program will re-calculate the standings based on the method selected.
. Points = shows the points won by bowlers in case of Petersen. Clear = deletes the points. Confirmation requested.")
.")

159 159 The sort scores by section is used to change the way in which the bowlers are shown, putting them into Name, Code, Team, Class, Total and Average order. POINTS SELECTION Pins = standard screen (current). Points = shows the points won by bowlers in case of Petersen. Clear = deletes the points. Confirmation requested. Load = runs another import and overwrites the totals. All bowlers = if not ticked shown all the bowlers, when ticked it becomes FILTER BOWLERS and shows the bowlers in order of category. Change lane = is used for bowlers who have caught up on different lanes. You need to indicate, for the selected bowler, the lane on which he bowled, (only for League). The Frames button prints the bowlers games. GAME DETAIL Shows the selected bowlers game. In the example above the first game of the first series, (149) for Marco Prevosti. It is possible to modify the scores FRAME by FRAME, the program recalculates the scores automatically. To modify the scores, click on the box. Use the 0 to 9 buttons to select the new score, X for Strike and / for Spare. The throw status is identified by the respective color: Red = score corrected manually or modified Yellow = Split Light Blue = frame market as provisional (see ABC rules). Royal blue = shows that only the game total has been edited and the grid can not correspond. Suggestion: it is possible to insert or vary the score by hand, it is not possible to vary the handicap of the category if incorrect. In order to vary the handicap go to the day screen. The score table becomes inaccessible. Enter into the lane assignment and without modifying click on the Assign button, exit WITHOUT deleting the scores and return to the score table. CLASSIFICATIONS / STANDINGS Only this week = if ticked it will calculate the standings using only today s scores, if not ticked all the played tournament data will be used. Use the selectable printouts for classifications with different days. Frames = prints the detail of the played games

160 160 Individual absolute = prints the bowlers general individual standings, regardless of the personal category Team = prints the team standings / classification SELECTABLE PRINTOUTS Click on Custom reports. In the Week selection it is possible to indicate how many days you want to group together in the classification you want to create. The Only this week button allows you to use only the scores from the days play, All weeks groups all the tournament days already played together. In order to specify different days type the number directly in the box, using the comma as a space between one number and the next. By selecting the team or bowler category (simply highlight by clicking on them) you can order the standings by the selected categories. WARNING! The bowler code, corresponds to the membership number, it will only be printed in the individual standings (singles). The more commonly printed standings fields are: bowler position (1 st, 2 nd etc) name and surname, team, category, handicap, starting points, pins (scratch total), points (bonus) total, number of games, average, single game totals per bowler. The preview window commands are the same as those in the archives.
161 161 Frequently asked questions 9.19 <<I don t remember the sequence of operations for a new tournament>> Create a new day inserting the name of the tournament selecting the type (team or singles), clicking on the Create button. Insert the number of series and games per series. Specify the type of tournament, American (league mode) or European (open mode). Insert the frames/time for practice. Specify the rules of the tournament (normal, Petersen etc.) Insert the teams, bowlers and reserves. Create the scrolling text standings. Assign lanes Export to scoring system Start the day Select the scrolling text with the tournament code. At the end, import the data and run a classifications report. Prepare the followings day (session). <<I have sent the first series to the lanes and just realized that the lane assignments are wrong>> Enter the tournament interface by clicking on the cup on the Wins main screen. Click on the Stop Series 1 button. Enter into the tournament program. Enter into the lane assignment screen, correct the first series and click on Assign again to recalculate the positions. Export the new day to the score, overwriting the previous export. <<I have sent the second (or third etc,) series to the lanes and realized that the lane assignments are wrong. What do I do in order not to lose the previous scores?>> Enter into the tournament interface by clicking on the cup icon on the Wins main screen. Select the series being played and click on the Stop Series button. Enter into the tournament program, IMPORT THE DATE FROM THE SCORING SYSTEM. Moving the data to a safety directory is irrelevant since the data will be overwritten. Enter into the lane assignment window, click on the Free assignment button, remake the assignment manually. Do NOT click on the Assign button and exit by pressing EXIT from the window WITHOUT deleting scores already made. Export the day again to the scoring system, overwriting the previous data. In the tournament cup icon interface window, select the series to be send and click on the Send series button. <<The session is being played and a bowlers handicap or name is written wrong>> Correct the data directly in Wins, maintaining the format (surname - comma - name). <<How can I see the scrolling text standings during a tournament?>> Wait for at least 2 minutes from the start of the session and if the scrolling text standings are in real time. Select the lanes in Wins multiple commands. Click on the CNT button. Select the scrolling text required. the name of the text starts TR0, the rest of the name is the tournament code. E.g. tournament code 9= text TR00009.TXT. <<I need to change a first line up bowler with a substitute>> This operation is possible between one game and the next or one series and the next. If I substitute a bowler between one game and the next in the same series, I need to start a new game, at least one frame, (which I can then delete), any bowler can bowl, so that the change is effective. Click on the lane icon. Click on the substitute button. Move the starting bowler (first line up) into the available bowler area and the reserve onto the lane. Confirm and exit.
162 162 <<My singles tournament has some special lane movements, but the bowlers are not an even number to the lanes and I can t maintain the rhythm of the game>> Create a tournament with an even number of bowlers (e.g. 3 bowlers per lane, 10 lanes = 30 bowlers). Assign the inexistent bowlers the ghost class (blind = -1). Use the automatic assignment or free assignment, it s the same. Export the tournament: during the export you can check that the ghost bowlers are not visible. <<My team tournament has some special lane movements, but the teams are not even to the to the number of lanes involved and I can t maintain the rhythm of the game>> Create a tournament with enough teams. Assign the inexistent teams the ghost class (starting points = 1). Export the tournament: during export check that the ghost teams are not visible. << my tournament has some lane movements not foreseen in the assignment tables (right movement, left Round Robin, Petersen>> Enter the lane assignment. Click on the Free assignment button. Assign the lanes manually and exit. << I need to divide one or more sporting associations onto multiple lanes but the team assignments does not allow it>> Enter into the team lane assignments. Select the lanes involved, enter the number of bowlers per lane and the lane movement, if not 0. Unselect by clicking on the Visualize teams only button in order to see the bowlers. Assign the first series manually. Click on the Assign button for the next series or use the Free assignment button. << I have already played one or more days, I m in the standings and I need to change a handicap or bowlers name for one or more days.>> Modify the data in the day set up screen. Enter into the days lane assignment screen, click on Assign without modifying anything exit, WITHOUT overwriting the scores. Repeat the operation for every day to be modified. Return to the score table. <<I need to modify a bowlers frame or a total>> Vary the data directly in the frame concerned, the program will automatically recalculate the score. <<The cores are shown including handicap and I want to use scratch scores only>> In the day selection click on the Change Rules button. Select Scratch. Return to the score table. << My tournament is a single day Petersen, but the game is going to be played on multiple evenings>> Once the last series to be played is finished, the lanes load the next. Enter into the tournament interface window, stop the series not to be played by selecting it and pressing the Stop series button. To check the standings / classification, import the scores into the tournament program, WITHOUT moving the day into the safety directory. To send the rest of the tournament, enter the Wins tournament interface (cup icon on main screen), click on the series to play and press Send series.

163 163 League iinterrface Using the League Interface 10 The BLS X/2001/2/3 software is a program that runs League bowling (a sort of electronic archive ). The program is seen by the WINS scoring system as an external application and is used as such. The League information is managed by the CDE program which interacts with the WINS scoring using an IMPORT / EXPORT mechanism. EXPORTING The CDE program transmits League Data to WINS (bowler names, handicaps, lanes to be used and the type of week). ATTENTION! Exporting data does not mean start of play. In order to start play on the lanes, the operator has to send the League to the lanes using the WINS program (by clicking on the League and Tournament cup on the main screen). IMPORTING At the end of the session of play, the CDE program imports the score data and transfers them to the score sheets. Import operation is not automatic, the league manager needs to perform the import personally, if this is not done the score sheets remain empty. COMPATIBILITY OF CDE BLS X/2001/2002/2003 < > WINS SCORING SYSTEM The full BASE WINS <> CDE BLS X/2001 interface has been available from WINS version D COMMENTS ON THE CDE BLS X SOFTWARE INSTALLATION The CDE software can be loaded on one computer only per bowling center. If the center has a Back Office, the program should be loaded on this station if not then on the Front Desk NEVER on both. When you purchase the CDE software you need to register yourself as a user, check the install procedures for correct operation. The Score <> League interface is enabled by Steltronic Srl using the INI file. Ask your supplier or the Service Department at Steltronic ( , service@steltronic.com) to activate the system. DO NOT try to force or open the INI file, non authorized use of this file will BLOCK the system automatically. SETTING UP THE CDE SOFTWARE In order to use the CDE program it must be registered. At the moment the CDE program uses a KEY CODE. If you have an older version of the CDE program, you can decide to register the previous version. Click on the REGISTER USING A KEY CODE button. Fill in the form VERY CAREFULLY with all the relevant details and then click on the CLICK HERE button to confirm. We recommend that STELTRONIC be selected in the list of scoring systems. A warning message asks you to confirm the information with OK. WHEN REGISTRATION HAS BEEN MADE YOU NEED TO MAKE SURE THAT THE SCORING SYSTEM S PARAMETERS ARE SET CORRECTLY. THE PROGRAM OPENS AUTOMATICALLY.
 warns you to configure the scoring parameters. Click on OK to continue.")
164 164 Warnings! The follows operation could be performed only by installer. A password will be required. Ask for service if needed. Run CDE BLS and open the Demo league; go to Weekly Duties menu and go to AUTO SCORING. A warning message (SEVERE PROBLEM!) warns you to configure the scoring parameters. Click on OK to continue. Click on the CONFIGURE AUTOMATIC SCORING book mark. Click on the padlock button to modify settings: Insert the password and click on the V to confirm. CDE INSTALLED ON MAIN DESK Scoring System: Steltronic (click on the arrow button to open the drop down curtain). Import export directory: C:\TCPSERV\TEMP Location/Computer Name of front Desk: C:\TCPSERV\DATI_COM Leave the other settings as default and click on the Update Options File button. In order to enable the settings you need to re enter the password and confirm with the V. CDE INSTALLED ON OTHER WORKSTATION Scoring System: Steltronic (click on the arrow button to open the drop down curtain). Import export directory: K:\TEMP Location/Computer Name of front Desk: K:\DATI_COM Leave the other settings as default and click on the Update Options File button. In order to enable the settings you need to re enter the password and confirm with the V.
165 165 USING THE WINS INTERFACE Click on the cup icon to open the interface in the Wins program. WEEKS [1] The exported weeks are showed in the top of the window. For visualizing the week already played just click on Shows all data. For begin a week simply select it from the list. TOURNAMENT STYLE [2] The icon represent the tournament style: American (League) is the red icon, European (Open) is the blue icon. START PROGRAM [3] Clicking on the button will run the Tournament or League (CDE) program. The icon change if the week is a file of tournament or League (secretary) BOWLER S DATA [4] In this section the bowler s information for selected lane are available, in real time. Using the command choose lane [5] or tourn [6] it s possible verify the selection for bowlers, lane, and next turns. LANE SELECTION [5] Using this section it s possible scroll the lane involved into the week for displaying the bowlers. NEXT \ PREV\ FIRST\LAST TURN [6] Use this keys for scroll the turn. AVAILABLE TURN [7] Turn available for the week. From this selection, it s possible choose the turn ready for send or stop.
166 166 LANE STATUS LIST [8] Information about the lanes during the game PINSETTER STATUS [9] Establish, before you start, the pinsetter status for when the practice is over. On = pinsetters remain ON Practice = pinsetters in practice mode Off = pinsetters OFF Auto = pinsetters ON when bowlers are on lane Off when not. Extern = manager manual switch (from Main desk control) Suggestion: As soon as some bowlers see their names up on the lane monitors, they start to bowl. If the scoring system is not set to practice, their scores will be market, you need to delete the scores shown during the practice time. It is better to select the pinsetter status to OFF, in this way the problem can be avoided. At the end of the practice time, in WINS, click on the MULTIPLE FUNCTIONS button, select the lanes being used for the tournament, click on the CNT button and select the PINSETTER CONTROL, Automatic, Manual or ON. SEND TURN [10] Send the names to the lanes, START PRACTICE [11] To start the practice frames/time, if a number has been entered in the frames/time box, click on the button. A warning sign is shown (flashing) on the lanes, showing a count down of the minutes or frames allowed, at the end of which, the pinsetters will position themselves in the selected status. STOP TURN [12] The command will stop the game on the selected turn and close the lane.. During the games, the lane computer send and receive from the network the turn and the game automatically. Than, when a lane is available, the lane computer shows the next game ready for bowl without waiting that all players finish the same game. This is a big help for saving time. It s maybe possible that the lane fail to load the game if a black out or any other interruption stops the network. To resume the game, simply choose the turn from the list, than click on SEND TURN button. This will not interrupt the current game on the lane that already receive the turn, simply will start the game on the lane that do not receive the command before. For stop a week that will be played in more days, simply wait, when all bowlers finish the game, stop the next turn. To continue the next days the game, select the week, select the unplayed turn, than click on SEND turn. SWAP LANE AFTER EACH SERIES (TURN) [13] For Dutch league: this command will swap the lane after each series. It s working only with CDE league data. DELETE [14] BEWARE! This command delete the selected week. SCROLLING TEXT STANDINGS / CLASSIFICATION After about 2 to 3 minutes after the start of the session, if the scrolling text has been created in real time, after each series or after each game, it is possible to send the standings text to the monitors as if it were a normal scrolling text message. Using the CNT command either on the main screen lane pairs or in multiple commands, select the scrolling text and exit, confirming the changes. At the end of the tournament, the scrolling text standings will be deleted (after some minutes). The scrolling text can be recognized by the TR at the beginning of the number (code), which is the same as the tournament code.

167 167 The following operations are made through Wins, by clicking directly on the lane icons on the main desk. LANE MOVEMENTS During the league it may become necessary to move a lane or a pair of lanes to another, lane or pair. To do this, use the normal transfer commands in Wins, in the lane pair icon of the main desk. The program will use the new lane or lanes, for all the series of the day. CHANGE LANES (ONLY LEAGUE) To swap the bowers or teams from an odd lane to an even lane of the same pair, click on the Swap button on the lane screen. SKIP BOWLER CHANGE HANDICAP AND BLIND SUBSTITUTIONS To freeze a bowlers scores while away, so that the others can carry on bowling, click on the checkbox beside the bowlers name and then the skip button. To un-skip the bowler on his return repeat the operation. Use the Wins commands, the changed data will be saved for all the series. For the Blind scores, other than assigning a figure to the bowler, click on the check box to the left of the blind score. CHANGE ORDER OF PLAY Highlight the bowler on the lane by clicking on him, then use the arrows to move him. WARNING! A bowler can be changed with a reserve or a new bowler only at the beginning of the first frame of a game or series, NEVER halfway through a game or with flashing sign present, (to start bowl...) on the lane. If the bowler is changed before, the previous game will have to be re-bowled by the new bowler. EXCHANGING FIRST LINE UP BOWLER WITH A RESERVE To exchange a first line up bowler (starting bowler) with a reserve, use the filter buttons to visualize the available bowlers, then use the arrows to move the selected bowlers.

168 168 CHANGE THE LEAGUE DATA FROM BOWLER S CONSOLE BOWLERS EDITING SUBSTITUTION Click on ENTER button to load the Menu, then use the Joystick or arrows key to move on EDIT NAME button. FLASHING RED FRAME displays the cursor position. START closes the window and return back to the game, CANCEL escape from the window back to the game. ADD BOWLER ADD button loads the LEAGUE BOWLER S LIST from the Main desk. ONLY the bowlers added from Main Desk can be add on the lanes. The first player in the list is highlighted in yellow. Move the selection to the previous PAGE. Move the selection to the next PAGE. Move the selection to the next NAME. Move the selection to the previous NAME. ENTER confirm the selection. CANCEL quit without saving. MODIFY THE BOWLER Uses the keypad arrows or move the joystick to the left on the players column. Use the UP/DOWN position to move between the player. The players can be edit only one by one. When you are ready, press ENTER button. The WHITE CURSOR blink on HANDICAP area, the RED FLASHING FRAME blink on ENTER. TO MOVE BETWEEN THE BUTTONS use the key arrows or move the joystick UP/DOWN/LEFT/RIGHT position. When the cursor is in desired position, presses ENTER to confirm. ENTER To go back to previous screen and confirm the change MOVE To change the player game position UP MOVE To change the player game position DOWN SKIP To mark SKIP/UN-SKIP the player (a indicate the skipped player) DELETE To DELETE the player BLIND To mark unmark the player as BLIND To DELETE the selected HANDICAP _+ To CHANGE the HANDICAP SIGN (positive negative) 0 9 To ADD or CHANGE the HANDICAP REPLACE To REPLACE the player with another of same team WHEN ALL DESIRED MODIFICATIONS ARE DONE CLICK ON START TO CONTINUE THE GAME.


169 169 IMPORTING THE SCORING At the end of the league, the game data can be imported from the CDE program, in the following way: Open the league, then click on WEEKLY DUTIES and AUTO SCORING Click on the IMPORT SCORES button. The imported data is available for classifications etc.
170 170 MAINTENANCE 11 Modem connection 11.1 Checking the photocells 11.2 Checking the Sciba ccd camera 11.3 Substituting and Sciba calibration 11.4 Calibrating the touch screen bowler consoles 11.5 Setting the A.P.I parameters 11.6 Calibrating the Frond desk computer touch screen 11.7 Setting and exchanging a lane monitor board 11.8 Exchanging a lane computer 11.9 Score cycles Wins diagrams Trouble shooting guide 11.12
171 171 Modem connection 11.1 The modem connections allow us to check and if necessary carry out service work on bowling center throughout the world as well as provide software upgrades. The connection is made between Steltronic Service or an authorised service centre and the bowling centre. The telephone line to the modem must be a DIRECT line, not through switchboard or other switching devises. ATTENTION! IF YOU HAVE AN ISDN TELEPHONE LINE YOU NEED A SPECIAL ISDN MODEM. If you do not have a direct line used only for the modem, use the fax line and switching the fax off. Attention! Some modems have 2 sockets for telephone plugs. Insert the telephone cable into the LINE socket. The PHONE socket is used for telephones only. DIRECT MODEM CONNECTIONS Make sure the modem is on and the line is connected. Close the WINS program WITHOUT shutting lanes. Windows 2000 warning: if your Desk is equipped with SERIAL MODEM, be sure that it s connected and ON before running windows If not, it s better shut down the desk and restart or the modem will not recognize by the system. To launch the modem connection: Click on the MODEM CONSOLE icon on the desktop or in the Windows START menu. The PCANYWHERE windows pop up on the screen with waiting for connection
172 172 Checking the sensors 11.2 The Sciba is equipped with 4 photocells (2 per lane) which are used to detect the passage of the ball for the ball speed calculation and for the pinsetter commands. The Photocells are usually mounted on the Sciba and in certain conditions directly on the Capping, the reflectors are mounted on the small capping on the opposite side of the lane. The pinsetter ball cushion micro switch is disconnected so that the pinsetter cycles when the scoring system gives the command. If the pinsetter does not cycle and the score does not advance, it is probable that the photocell has lost its alignment. BEFORE GOING TO CHECK THE PHOTOCELL ALIGNMENT CHECK THAT THE PINSETTER IS NOT BLOCKED FOR REASONS THAT ARE NOT CONNECTED TO THE SCORING SYSTEM (cams badly regulated, blocked motors, etc.) If your system does NOT use the Sciba CCD camera for reading pin fall, (GS10, Vollmer String, Vilati String, KF3000, Spellman string pinsetters) the only photocell is the one used for detecting the ball to calculate the ball speed (except the KF3000, Vilati and Spellman string). If the pinsetter does not cycle check the pinsetter sensors. ATTENTION! TURN THE PINSETTER POWER OFF BEFORE MAKING THIS CHECK. Take the Sciba CCD protection cover off. 1 = Electronic and optical Sciba CCD block. 2 = Photocells 3 = Signal board 4 = Support base There is a RED LED behind each photocell: if the Red light id on he photocell is lined up, if the Red Led is off the photocell is not lined up. In order to correctly align the photocell, loosen the 4 screws on top of the photocell support and move the photocell, aiming at the reflector on the other side of the lane until the red led comes on. When the Red Led comes on the photocell has been aligned. For a perfect alignment we advise you to cover the reflector with a piece of paper leaving only a small hole of about 2 cm in diameter in the centre of the reflector visible, in this way you are sure that the photocell is looking at the centre of the reflector. Repeat the operation for all 4 photocells. If the Red Led goes off after the ball passes even after the photocell has been re-aligned then the photocell may be pointing towards the border of the reflector. Once the photocells have been checked (from a safe distance) test their functionality.
173 173 Checking the Sciba 11.3 By "checking the Sciba CCD" we mean, verify the direction the Sciba is pointing in respect to the position of the pins. This operation is carried out at the Main Desk computer, without any mechanical adjustments to the Sciba CCD itself. The Sciba CCD is a Linear camera which reads the pins on a ideal line as can be seen on the above diagram. All 20 pins (2 lanes) can be seen on the ideal line. The ideal line is at the neck of the pins which, seen from 4 meters, is the point that the pins are furthest from one another. IN ORDER TO OPTIMISE THE PIN COUNT BY THE SCIBA CCD WE ADVISE: Change pins that are damaged or broken at the neck. The neon lights on the lane pair must have the same brightness and intensity, any changes to lighting should be made per pair of lanes. The Sciba is able to read (up to a certain point) even the off spot pins, we suggest that the pinsetter positioning arms be checked on a regular basis. Do not use pins which have black or coloured necks. Turn the pinsetters on that need to be checked. WAIT: the pinsetter pin deck light needs to warm up before giving the correct light. CHECK THE CALIBRATION The pinsetters should be on first ball with ALL 10 pins standing on each lane. The Sciba CCD is able to see the red pins, we advise however to make the calibration settings with standard white pins. Switch the hall lights on just like when there are bowlers; sometimes neon s placed too close to the pins change the light conditions and therefore the pin detection. Click on the SETUP icon, then on the icon of the Sciba to be checked Click on the CALIBRATION icon and wait for the image to appear.

174 174 Example of reading As you can see in the example the pins are represented by the peaks of different heights. The height depends on the distance from the neon light the pin is. Pins 1,3,2 and 5 are the highest peaks as these pins are closet to the light, while pins 7,8,9 and 10 are further away and therefore receive less light resulting in lower peaks. As the example shows the 10 pin peak is half the height of the pin 1 peak, this is okay but a peak lower than the 10 pin would not be detected. The white vertical line shows the ideal position of the pin. If the line is on one side of the peak it is necessary to center it: click on the line with the left mouse button, keep the button pressed and drag the line to the centre of the peak. THE CENTRE IS IN THE MIDDLE OF THE BASE OF THE PEAK. At the end of the calibration click on the camera button to save the settings. It is important that the peaks are a good distance from one another so that the pin detection is good. In cases where it is difficult to get good peaks, move the lines slightly to allow more distance between them. The higher the peak is the more the peak tends to flatten. This phenomenon is known as IMAGE SATURATION when a pin peak is too saturated the Sciba CCD tends to see the pin even when it has been knocked down. Set the light that enters into the Camera by changing the INTEGRATION TIME. If the pin peaks are too high, being saturated with light, the Sciba CCD tends to see them all the time, if the pin peaks are too low the Sciba CCD has a hard time seeing them. Another parameter to consider is the BRIGHTNESS RATIO. WHAT IS BRIGHTNESS RATIO Brightness ratio is the light variation when the pin has been knocked down. In practical terms if the brightness ration is set to 50, the Sciba CCD will detect a pin as fallen when the light, in the area where the pin was when the first photo was taken, varies by at least 50%. WHAT IS INTEGRATION TIME Integration time is the value given to the amount of light in the Sciba area. By lifting or lowering this value you let more or less light into the Sciba, just as if it where a standard camera diaphragm. CHANGING THE INTEGRATION TIME Just like the first operation, select the current bank which is needed for this calibration. We advise you to calibrate the Sciba CCD for normal day light bowling, so change the bank and look for a integration time value which is correct for glow in the dark bowling.
.")

175 175 With SET PREDEFINED you can set the predefined parameters. ONLY USE THE FIRST CALIBRATION (WHEN YOU CHANGE THE SCIBA CCD). Select the CURRENT BANK. Create more banks to save different settings for use with different light situations, with glow lights you need a higher integration time (between 150 and 200). BANK 2 AND 4 ARE DEDICATED FOR INSTANT GLOW (Pinsetter interface A.P.I. only) When the light situation changes (for example from daylight to glow bowling) simply select the preset bank there is no need to change the integration time. Select the INTEGRATION TIME for the bank by clicking on the CHANGE button beside the current value. Chose the value and confirm with OK. AVERAGE INTEGRATION TIME VALUE FOR STANDARD DAYLIGHT BOWLING = 40 AVERAGE INTEGRATION TIME VALUE FOR GLOW IN THE DARK BOWLING = 90 The network frequency refers to the amount of Hertz electricity. It is required to avoid surges caused by using neon lights. EUROPE = 50 HERTZ USA = 60 HERTZ CHINA = 50 HERTZ VERIFYING THE PIN SEPARATION EXAMPLE OF AN IMAGE WITH OVERLAPPED PINS If the Sciba CCD position is not correct or the focus is out it can be regulated, the worst thing is the overlap of pin peaks, causing the Sciba CCD to detect one pin in place of another on the ideal line and scoring it incorrectly. It is also possible, when the integration time is too high, that the light saturates the lens and the peaks overlap (they tend to become one line at the top). If it is not possible to fix the problem by altering the integration time, you need to MECHANICALLY CALIBRATE THE SCIBA. If this does not work, replace the Sciba CCD.


176 176 EXAMPLES OF INCORRECT CALIBRATION The peaks are too LOW; not enough light is entering the lens and the Sciba does not recognize the pins. LIFT THE INTEGRATION TIME. The peaks are too high; too much light is entering the lens; the Sciba recognizes the pins ALL the time, even when they have been knocked down. DECREASE THE INTEGRATION TIME. The peaks are overlapped; the Sciba recognizes one pin in place of another, or worse it recognizes the pin in place of the one next to it. The Sciba may be out of focus. LOWER THE INTEGRATION TIME. IF THE OPERATION IS NOT SUCCESSFUL MAKE A MECHANICAL CALIBRATION.
177 177 SUBSTITUTING A SCIBA 11.4 The Sciba CCD is made up of two parts: The HEAD [1] that contains the electronics and lens. The BASE [2] which supports the photocells and the interface board. More often than not it is not necessary to change the entire Sciba CCD assembly, nor the entire Sciba head. If done carefully it is possible to change the electronic part only without doing a mechanical calibration. TO CHANGE THE SCIBA ELECTRONICS WITH LENS ATTENTION! Turn the power off to the lane computer or turn the I-Retro off (only if I-Retro with direct power model) Take the plastic cover off ( use a screwdriver to disconnect the 9 pole plug). Remove the aluminium lid by unscrewing the 4 lateral screws. Remove the 3 screws (A, B and C) that hold the lens ring. SLIGHTLY loosen ONE of the 2 fixing bolts (D or E). DO NOT LOOSEN THEM BOTH SO THAT YOU MAINTAIN THE CALIBRATION POSITION. Carefully remove the electronic boards from the back of the block, if necessary loosen one the bolts a little more. INSERT THE NEW BLOCK (lens + electronic boards), turn it until it positions itself against the bolt (D or E) which you did NOT loosen, then tighten the loose bolt firmly. Replace the lens ring and tighten the 3 screws tightly, without exaggerating replace the lid. Before calibrating the Sciba from the Main Desk computer click on the SET PREDEFINED button on the Sciba settings screen to load the original settings. Proceed with the calibration from the Main Desk computer. If, during the replacement, the Sciba has moved, return to the mechanical calibration. It is advisable, once checked that the position of the Sciba is correct, to use ordinary nail varnish to block the bolts and screws. Don t use substances which permanently fix the screws and bolts as this will make it impossible to service when required.
178 178 MECHANICAL CALIBRATION This type of calibration is necessary if the Main Desk Computer calibration has failed because you are not able to find an ideal position for the vertical pin lines (sign that the Sciba has moved or needs to be replaced) BEFORE DOING THIS TYPE OF OPERATION ASK FOR ADVISE FROM YOUR SUPPLIER OR FROM YOUR AUTHORIZED SERVICE CENTER. BLOCK THE PINSETTER MOTORS! Take the pins off the pin deck and position the calibration boards supplied during installation. Check if the pinsetter neon is switched ON and that the light conditions are the same as when there are bowlers. Obscure any lights that may effect the pins which are not usually present. These calibration boards need to be positioned on the symmetrically in the center of the lanes so that they are in the position shown on the diagram below: STANDARD POSITION FOR THE CALIBRATION TEMPLATE Switch the Sciba to CALIBRATION, to do this position the black leaver in the UP position. When the Sciba is in CALIBRATION, it does NOT answer to commands from the Main Desk computer. When the Sciba is in calibration the number 10 LED flashes, while the other LED s signal the adjustments to be made. The correct aim is achieved when all 10 LED s are ON and stay ON.
179 179 POSITION OF THE CALIBRATION BOARDS WHEN USING A SINGLE SCIBA Put the first switch of the 4 dip switches next to the black calibration lever to ON. ATTENTION! When the Sciba is single change the pinsetter interface parameters THE AIM IS REGULATED USING ALL THREE MOVEMENTS 1. VERTICAL ROTATION. 2. CLOCKWISE OR ANTICLOCKWISE LENS ROTATION. 3. LIFT OR LOWER THE DETECTION LINE. When you proceed with the Sciba regulation loosen the bolts and screws one at a time for each type of regulation (loosening all the screws would make it impossible). After having set each position it is advisable to tighten the bolts or screws which are loose.
180 180 VERTICAL ROTATION Loosen this nut! Move the Sciba slowly ROTATE TO RIGHT ROTATE TO LEFT OK! The position is correct, tighten the nut. Proceed with the clockwise, anticlockwise lens rotation. IF BOTH LED S REMAIN RED WITHOUT ANY SIGN OF THE GREEN LED: 1. The Sciba distance is incorrect. 2. The integration time is wrong (too high or low). To change the integration time position the black calibration leaver back to it s normal position, down and change the integration time from the Main Desk computer.
181 181 CLOCKWISE OR ANTICLOCKWISE LENS ROTATION Loosen the 3 screws on the lens ring. Use the D bolts to move the lens block clockwise or anticlockwise. Rotate clockwise Rotate anti-clockwise OK! The rotational position has been found, tighten the bolts.
182 182 LIFT OR LOWER THE DETECTION LINE Rotate the bolt to lift or lower. tighten to lift loosen to lower ALL OK! The Sciba mechanical calibration is complete. All 4 LED s are on. Remove the Sciba calibration boards. Use nail varnish to block the screws and bolts. REMEMBER TO MOVE THE BLACK CALIBRATION LEVER TO THE NORMAL POSITION, DOWN. IF YOU FORGET TO DO THIS, WHEN YOU TRY TO USE THE SCIBA ICON ON THE MAIN DESK COMPUTER YOU WILL ONLY SEE THE TIME OUT MESSAGE.


183 CALIBRATING THE BOWLER CONSOLE TOUCH SCREENS Close the scoring on the lanes to be calibrated, verify that the SCROLLING BACKGROUNDS have been selected for the lane. Click on the buttons on the SET-UP menu (same lane computer as is actually installed). Verify that the touch screen is enabled then carry out the calibration by clicking on the CALIBRATE button and following the instructions. Execute the calibration from the bowler console. PRESS HERE TO ENABLE TOUCH SCREENS This button enables the TOUCH SCREEN function on the bowler consoles with 14 monitors; indicate which touch screen by clicking on RIGHT TOUCHSCREEN and LEFT TOUCHSCREEN. The CALIBRATION button allows you to send the calibrate boiler console touch screen signal to the lane.

184 184 SETTING THE PINSETTER INTERFACE PARAMETERS. (A.P.I.) 11.6 The parameters for the pinsetter Interface are configured by the installers. Modify them only if absolutely necessary. Before modifying, inform the service center of the reason for modifying the settings. Click on the PINSETTER INTERFACE button on the SETUP menu for the pair of lanes you need to check and WAIT until the communication starts. If necessary, vary the parameters directly on the screen. First operation: Select the PINSETTER from the list, then click on the SET DEFAULT button to load the most common parameters, finally, modify them as you wish. Selection based on the Pinsetter and Hardware type: HARDWARE CONNECTION NONE installations with 82/30/3000/45 or 82/70 with solid state chassis without modified APS or Brunswick A1/A2 and 82/70 up without APS circuit. 1 ST 2 ND BALL SIGNAL, installations with pinsetters which have had a ball change button installed. APS on 82/70 Up or 82/90 First Generation and 82/30 pinsetters with Steltronic APS modified chassis. STRIKE/GUTTER OUT Enable the signal out (N.O. relays) only for Yangji pinsetters DISTANCE FOR SPEED Measure the distance between the START photocell and the SPEED TRIGGER photocell, in centimetres. On standard installations using standard Sciba CCD s with both photocells mounted on the base plate the distance is 23cm.
185 185 PIN READ DELAY Time, in seconds, that the Sciba CCD waits to take the picture from when the ball passes the START photocell. This parameter is not used when the Sciba CCD is not installed (because the pinsetter does not require a camera). START DISTANCE Measure the distance between the pinsetter START photocell and the LAST ROW (7,8,9,10) in centimetres. In standard installations the distance is 396cm. OFF DELAY Time, in seconds, which the system waits before switching the pinsetter OFF from when the STOP GAME END sign appears on the lane monitor. NO-TAP + 10TH FRAME RESPOT NEVER no cycle to reset pinsetter in case of spare + non strike thrown in 10th frame. MODIFIED CYCLE is used with APS. Simulates a strike and avoids an unnecessary cycle. SECOND BALL EXTRA CYCLE DELAY time, in seconds, which passes between the 2nd ball light coming on and the pinsetter cycle signal being sent. DO NOT WAIT FOR 2ND BALL special cycle for KF3000 pinsetter. When enable, the time in 2nd ball extra cycle starts the countdown from last trigger. SETTING ONE SCIBA PER LANE When 2 Sciba are mounted for two lanes, is necessary setup the I-Retro parameters in right way, as follows: LEFT NEVER STANDARD CROSSED RIGHT NEVER STANDARD CROSSED LEFT NEVER STANDARD CROSSED RIGHT NEVER STANDARD CROSSED LEFT NEVER STANDARD CROSSED RIGHT NEVER STANDARD CROSSED
186 186 LEFT NEVER STANDARD CROSSED RIGHT NEVER STANDARD CROSSED LEFT NEVER STANDARD CROSSED RIGHT NEVER STANDARD CROSSED


187 187 WORKSTATION TOUCH SCREEN CALIBRATION 11.7 Calibrating the computer monitor touch screen in necessary when the cursor does not follow the commando given with the finger correctly. Calibrate the monitor after it has been moved as well. Attention! If the Touchscreen monitor was switched on AFTER the computer had already loaded Windows the TOUCH function is DISABLED. Restart Windows to re-activate the Touchscreen. The touchscreen models in use are ELOTOUCH or MICROTOUCH. Both of these models could be serial (connected to the computers COM 1) or USB. Before proceeding with the calibration, clean the screen with a slightly damp clean cloth, then set the screen to the adequate size. CALIBRATING A MONITOR WITH ELOTOUCH INSTALLED Click on the ELO TOUCHSCREEN icon found in the control panel of Windows (route: START SETTINGS CONTROL PANEL). Click on the CALIBRATE button to activate the menu. Touch the target, while standing directly in front of the monitor. Repeat the operation with all the targets the system presents. The next message asks you to touch the screen in various places to see if the cursor responds accurately. Click on YES to confirm or on NO to calibrate again. CALIBRATING MONITORS WITH MICROTOUCH INSTALLED Click on the MICROTOUCH TOUCHSCREEN icon found in the control panel of Windows (route: START SETTINGS CONTROL PANEL). Click on the CALIBRATE button to activate the menu. Touch the target, while standing directly in front of the monitor. Repeat the operation with all the targets the system presents. The next message asks you to touch the screen in various places to see if the cursor responds accurately. Click on DONE to confirm or on CALIBRATE AGAIN to repeat the operation.
188 188 REGULATING SUBSTITUTING LANE MONITORS 11.8 The lane monitors are set during installation. In time, it becomes necessary to regulate the brightness and contrast, sometimes even the screen dimensions. We recommend that the monitors be cleaned regularly, both screen and electrical parts. For all types of monitor board, all monitors are made from two parts: PICTURE TUBE where the de-magnetizing cable is placed as well as the earth cable. The picture tube is fixed to the frame with 4 bolts in the corners. MONITOR BOARD made up of one or more electronic boards. It is very rare that the Picture tube goes faulty, the component that is changed most frequently is the Monitor board. There are different types of monitor. In this manual we talk about the Hantarex Multistandard and Polo monitors. For information on the Sharp Image monitors sold in the USA use the original factory manual included. Every time you change the monitor board it is necessary to regulate the screen settings. The same operation is necessary if, in time, you see some white transparent lines overlapping the score grids. Attention! For all types of monitors use plastic screwdrivers. Take off all rings, bracelets watches or other metal objects which could cause a short circuit. The SCREEN and FOCUS settings are located on a component called LINE TRANSFORMER mounted on the monitor board. To find this component follow the cable which is connected to the rubber seal attached to the back of the picture tube. TO REGULATE THE SCREEN proceed in the following way: Lower the brightness, contrast and colour to the minimum. Regulate the screen SLOWLY until you see the horizontal lines. Turn in the opposite direction until you make them disappear again. Attention!! If you regulate incorrectly turning more clockwise even when the lines appear, the monitor may turn itself off (auto save function): in this case take the regulation back to the point you started from, then turn the monitor off and back on with the power switch on the monitor board. Regulate the brightness, contrast and colour, also the focus if needed.
189 189 MONITOR HANTAREX POLO/2 28 The CONTROL BOARD is used to regulate the image. RGB signal connector AC IN CONNECTOR RV1 = Brightness RV2 = Trapezio RV3 = Horizontal pitch RV4 = Vertical pitch RV5 = Contrast RV6 = Cushion RV7 = Horizontal phase RV8 = Vertical movement RV9 = Horizontal frequency. The screen settings are on the monitor board. The fuses are on the monitor board near the CN2 connectors. ATTENTION! The POLO/2 monitor boards are installed on 28 and 14 monitors but they are NOT compatible! The boards for the 28 have different components. Specify which model you have when requesting spares.
190 190 HANTAREX QUADRISTANDARD 28 EQ/2 1 EUROSCART connector 2 PRIORITY selector 3 75 Ohm switch (pressed = load inserted) 4 S-VHS, RGB, VIDEO selector 5 CVBS in out 6 Horizontal phase 7 Vertical frequency 8 Vertical pitch 9 Vertical phase 10 Horizontal pitch 11 Focus 12 Screen 13 ON/OFF switch 14 COLOUR NTSC(ONLY) 15 COLOUR regulation 16 ANALOGUE TTL selector (not used) 17 CONTRAST regulation 18 BRIGHTNESS regulation 19 Positive negative Synchronism selector 20 Audio regulation (not used) 21 AC entry. In the base there is a drawer for storing fuses (T2A 250V) 2 & 4 = RGB, 19 negative SYNC

191 191 HANTAREX MULTISTANDARD 28 EQ/3 CONTROL PANEL Press the button for 3 seconds to access the on screen display menu. Use the button to move from one function to the next. Use the + - buttons to change the values. Attention! If no changes are made for 30 seconds, the monitor goes back to normal operation. Lower the contrast, color and brightness to the minimum. The RGB settings are already made by the factory. FOR FURTHER INFORMATION READ THE MONITOR MANUAL.
192 192 EXCHANGING A LANE COMPUTER RGB out for Odd 14 bowler console monitor 2 RGB out for overhead odd monitor 3 Network in 10 base T 4 COM1 (to CA0092A cable) 5 12 VDC out (to CA0092A cable) 6 CVBS in/out 7 COM2 (optional touch screen driver) 8 COM3 9 COM4 10 Fan Speed 11 Led network 12 Optional reset button 13 Even Audio OUT 14 Odd Audio OUT 15 AC IN ( ) 16 AC OUT for ODD overhead monitor 17 AC OUT for EVEN overhead monitor 18 RGB out for even 14 bowler console monitor 19 RGB out for overhead even monitor 20 Keyboard in (maintenance only) 21 VGA out (maintenance only) Before installing the new lane computer, take note of the number written on the IP ADDRESS label.

193 193 FROM THE MAIN DESK COMPUTER Click on START -> PROGRAMS -> STELTRONIC -> IPADDRESS EDIT to open the file containing the nodes. The network nodes are inserted as lines whose reference is an odd lane number. For example as you can see in the image the node of lane 1 and Replace the old network node with the taken from the new lane computer. We recommend that you maintain all the spacing, after the node number there are two spaces then the = and then the lane number. Once finished click on FILE, then SAVE and EXIT.
194 194 Score cycles The following are some hints to how the scoring works: FIRST BALL CYCLE The pinsetter is on and ready for the first ball to be thrown. ONLY the first ball light is on. IF THE SECOND BALL LIGHT IS ON THE SCORING WILL NOT COUNT THE THROW. The bowler throws a ball The ball goes past the photocells The Sciba CCD takes a picture (sample) The I-Retro score delay time setting starts The I-Retro gives the START signal to the pinsetter The ball hits the pins Before time runs out (in any case before the pinsetter picks up the pins left standing) the Sciba takes the first photo The score is sent to the lane computer The pinsetter completes the cycle and switches the 2 nd ball light on. FAST CYCLE FOR GUTTER BALL (SWEEP REVERSE) For pinsetters with APS or similar function enabled, the scoring system is able to skip the sweep operation, for 82/70 up the sweep which was dropped as guard will be lifted. This is used to save the pinsetter an unnecessary cycle, which saves wear, energy and time. The fast cycle is available when: ONLY pin 7 is knocked down. ONLY pin 10 is knocked down. ONLY pins 7 and 10 are knocked down A gutter ball is thrown (no pins hit) STRIKE CYCLE The strike cycle is only made on first ball. The second ball light MUST be switched off before the pins are detected. The Sciba detects a STRIKE (= all pins knocked down) and sends the score to the lane computer.
195 195 FAST STRIKE CYCLE For pinsetters with APS or a similar function enabled, the scoring is able to skip the table operation; the sweep goes down and sweeps all the pins knocked down, the table loads and lowers all 10 new pins without coming down. SECOND BALL CYCLE The pinsetter is on and waits of the second ball to be thrown. The second ball light is ON, if the light is off or goes off before the photo is taken the scoring system will NOT count the throw. FOUL CYCLE The bowler who is bowling passes the foul line making the system activate the foul signal. The pinsetter sends the foul signal to the scoring system. The signal MUST remain active until the ball passes the photocells. The I-Retro sends the foul command (throw not valid) to the lane computer. The bowler throws the ball the ball passed the photocells The Sciba CCD takes a picture (sample) The I-Retro score delay time setting starts The I-Retro gives the pinsetter the START signal The ball hits the pins Before time runs out (in any case before the pinsetter picks up the pins left standing) the Sciba takes the first photo The score is sent to the lane computer The pinsetter completes the cycle and re-loads the pins, then it turns the second ball light off.
196 196 Wins Diagrams The attached diagrams refer to the most common installation configurations. Some installations may be different due to varying interfaces used. Technical terms may in English for practical reasons. Always refer to the codes indicated for when acquiring spares. If there are any doubts, contact your local authorised service centre. NOTE FOR ORDERING SPARES: the hardware and cable codes change if the item has been modified or upgraded, it remains compatible in most cases, check before you purchase by having your existing codes ready to inform the service center when asked. NETWORK CONNECTION WITH A SINGLE HUB/SWITCH NETWORK CONNECTION WITH A TWO HUB
197 197 CVBS LINE CVBS LINE WITH 2 SEGMENT
198 198 ELECTRICAL CONNECTIONS Steltronic USA, Inc. -Electrical Requirements The Steltronic Automatic Scoring System consists of overhead monitors at each pair of lanes and a Cash Control System at the Front Desk computer workstation. Each of these units contain computer components that require clean, dedicated, insulated and isolated electrical circuits. The electrical requirements described in this document are essential to prevent electrical noise from entering the grounding circuit. Warning: All electrical service must be installed by a licensed electrician and must meet all local and national codes. Failure to comply with the instructions contained in this document will void all failure warranties due to electrical noise. If you need written certification that your electrical wiring meets these guidelines, you should have the installing licensed electrician provide the required documents. Steltronic USA assumes no responsibility in determining the correctness of your electrical responsibilities. Steltronic USA, Inc. is not responsible for damage or improper operation of The Steltronic Automatic Scoring which is caused by improper installation or faulty electrical service. When installing the electrical service conduit, wiring and receptacles, the following guidelines must be strictly adhered to. Also see Diagram Two (2) The Scoring System electrical panel must have its own separate circuit branched from the primary service panel. It cannot share electrical service with any other electrical equipment. All plug-in receptacles must be isolated from the conduit. Conduit cannot be used as a ground. ALL circuits to The Steltronic Automatic Scoring equipment must share a common insulated/isolated ground. Improper grounding, multiple grounds or grounding loops can cause erratic behavior and sometimes actual damage to the scoring equipment. In no instance may wires which supply power to The Steltronic Automatic Scoring system share conduit with wires leading to any other equipment. Take extreme care to insure that the ground wire and neutral wires from the Scoring System Electrical Panel are not crossed. Voltage measured between the neutral and hot, ground and hot, or between the neutral and ground wires cannot differ more than 0.2 to 0.7 VAC. A higher differential may cause computer failure. Connect the Neutral and Ground at the Primary Service only. ALL circuits to The Steltronic Automatic Scoring equipment must share a common ground. Improper grounding can cause erratic behavior and sometimes damage to the equipment. DO NOT connect equipment other than The Steltronic Automatic Scoring to this panel or branch circuits. Use only Hubbell IG 5261 or IG 5262 receptacles (or equivalent).
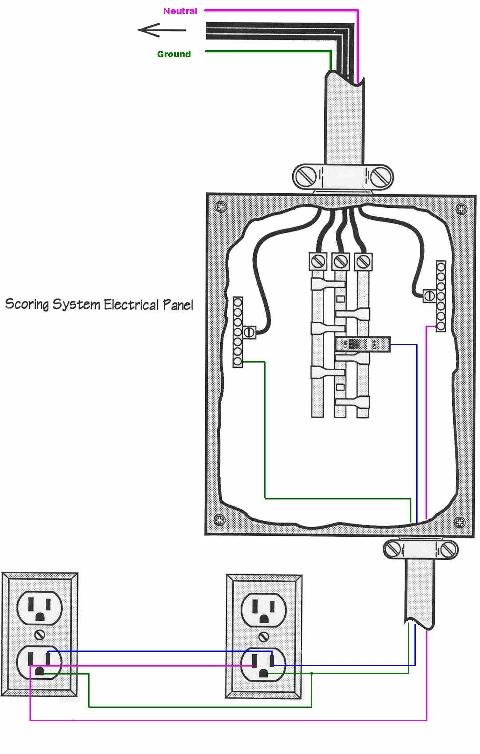
199 199
200 200 LONG CABLE The CAB-Y-CA0092A cable connects the lane computer to the pinsetter interface. The is a universal cable for all models of lane computers and pinsetter interfaces. The standard length is 30 meters. If necessary it can be lengthened up to a maximum of 35 / 40 meters. The CAB-Y-FSAS9A cable is used to connect the pinsetter interface with the Bowler console interface, no matter what type of control the console has ( Joystick, button or membrane keyboard). This cable is not required with WIRELESS BOWLER S CONSOLE OR TOUCH SCREEN BOWLER S CONSOLE.
201 201 SUPERELEX <> RGB MONITOR (HANTAREX RGB POLO) SUPERELEX <> EQ MONITOR (HANTAREX QUADRISTANDARD)
202 202 WORKSTATION CONNECTION
203 203 A.P.I. (PINSETTER INTERFACE) STANDARD SERIES A065 CN1 RS232 to lane Computer CN2 RS232 to Bowlers Console CN3 Sciba with sensors CN4 VDC in CN5 Instant glow connector CN6 2nd Foul in (even/odd) CN7 Cycle Mgr (even/odd) CN8 APS (even/odd) CN9 Bumper out (even/odd) CN10 Maintenance out (even/odd) CN11 Auxiliary Sciba CN12 Shoevision CN13 Output On/Off (low voltage) Foul line / Ball return / Back end motor CN14 1st 2nd ball change(even/odd) LED INDICATION D1 ODD FOUL [IN] D2 ODD SPEED [IN] D3 ODD TRIGGER [IN] D4 ODD 2ND BALL [IN] D5 ODD CYCLE [OUT] D6 ODD CHANGE BALL [OUT] D7 ON/OFF FOUL LINE [OUT] D8 ODD BACK-END [OUT] D9 ODD BAR CALL [OUT] D10 ODD MGR ON [OUT] D11 ODD MGR PRACTICE [OUT] D12 ODD BUMPER [OUT] D13 ODD INSTANT GLOW [OUT] D14 ODD MAINT. CALL [OUT] D15 EVEN FOUL [IN] D16 EVEN SPEED [IN] D17 EVEN TRIGGER [IN] D18 EVEN 2ND BALL [IN] D19 EVEN CYCLE [OUT] D20 EVEN CHANGE BALL [OUT] D21 ON/OFF BALL RETURN [OUT] D22 EVEN BACK-END [OUT] D23 EVEN BAR CALL [OUT] D24 EVEN MGR ON [OUT] D25 EVEN MGR PRACTICE [OUT] D26 EVEN BUMPER [OUT] D27 EVEN INSTANT GLOW [OUT] D28 EVEN MAINT. CALL [OUT] JUMPER SETTINGS J1 ODD MGR DIODE Default OPEN (Diode on ) J2 EVEN MGR DIODE Default OPEN (Diode on) J3 J4 ODD 2nd BALL LIGHT SETTING J5 J6 ODD FOUL LIGHT SETTING J7 J8 EVEN 2nd BALL LIGHT SETTING J9 EVEN FOUL LIGHT SETTING
204 204 A.P.I. FOR 8290 XL BOARD LAYOUT CN1 RS232 to lane Computer CN2 RS232 to Bowlers Console CN3 Sciba with sensors CN4 VDC in CN5 To 8290 chassis (SCORING) CN6 To 8290 chassis (MCU) CN7 Bumper feedback input CN8 Pinsetter cycle (even/odd) CN9 Bumper out (even/odd) CN10 Instant glow (even/odd) CN11 Auxiliary Sciba CN12 Shoevision in CN13 Main-Bar call (even/odd) CN14 Ball return switch out CN16 Foul line switch out CN15 2 nd ball input Mgr (even/odd) LED INDICATION D1 - D2 ODD SPEED [IN] D3 ODD TRIGGER [IN] D4 ODD 2 nd BALL [IN] D5 ODD CYCLE [OUT] D6 - D7 ODD SHOEVISION [IN] D8 AUX A [IN] D9 ODD BAR CALL [OUT] D10 ODD POWER ON [OUT] D11 FOUL LINE ON [OUT] D12 ODD BUMPER [OUT] D13 ODD INSTANT GLOW [OUT] D14 ODD MAINT. CALL [OUT] D15 - D16 EVEN SPEED [IN] D17 EVEN TRIGGER [IN] D18 EVEN 2 nd BALL [IN] D19 EVEN CYCLE [OUT] D20 - D21 EVEN SHOEVISON [IN] D22 AUX B [IN] D23 EVEN BAR CALL [OUT] D24 EVEN POWER ON [OUT] D25 BALL RETURN PWR [OUT] D26 EVEN BUMPER [OUT] D27 EVEN INSTANT GLOW [OUT] D28 EVEN MAINT. CALL [OUT] J1 J2 JUMPER SETTINGS Open = 7-12 VDC Close = 5 VDC
205 205 A.P.I. INTERFACE FOR STRING PINSETTERS S2 Dipswitch setting (X = not used - 0= off 1=ON) X VILATI X X X X SPELLMAN STRING VOLLMER STRING BRUNSWICK GS10 AMF 890 XL NEXT GEN. CPU DIP 4 ON = DEBUG MODE Leds DS1 ON = 5 V OK DS2 ON = 12 V OK DS3 BLINKING = PROGRAM RUN. * Alwys ON: reset the CPU
206 206 ODD PINSETTER EVEN PINSETTER D1 PIN 1 D22 PIN 1 D2 PIN 2 D23 PIN 2 D3 PIN 3 D24 PIN 3 D4 PIN 4 D25 PIN 4 D5 PIN 5 D26 PIN 5 D6 PIN 6 D27 PIN 6 D7 PIN 7 D28 PIN 7 D8 PIN 8 D29 PIN 8 D9 PIN 9 D30 PIN 9 D10 PIN 10 D31 PIN 10 D11 UPPER D32 UPPER D12 TRIGGER D33 TRIGGER D13 FOUL D34 FOUL D14 2^ BALL D35 2^ BALL D VDC D VDC JUMPER SETTINGS DEPEND BY PINSETTERS MODEL.
207 207 A.P.I. INTERFACE FOR GS10 PISETTER (GAMESETTER SERIES) S2 DIP SWITCH SELECTION FOR GS10 PINSETTER OFF ON OFF OFF JUMPERS SETTINGS FOR SI019A/B BOARD 2^ Ball light input 24V

208 208 A.P.I. INTERFACE FOR KF 3000 PINSETTER
Steltronic StelPad User Guide
 StelPad User Guide Steltronic StelPad User Guide Contents Contents... 1 About StelPad and its Features... 3 StelPad System Elements... 3 StelPad Computer Integration with Focus... 4 Enable Custom Graphic
Steltronic Focus. User Manual Manage Focus Tournaments
 Steltronic Focus User Manual Manage Focus Tournaments Steltronic S.p.A. Via Artigianale 34, 25082 Botticino Sera Brescia - Italy Tel: +39 030 2190811 Fax: +39 030 2190798 Service: + 39 030 2190830 http:
Center Command Version 3. Operations Manual
 Center Command Version 3 Operations Manual Version: July 26, 2010 Table of Contents OVERVIEW... 2 OVERVIEW OF COMPUTER SCORE CENTER COMMAND... 2 MAIN MENU FUNCTIONS (IF MODULES INSTALLED)... 3 CENTER
Microsoft Windows Software Manual for FITstep Stream Version 4
 Thank you for purchasing this product from Gopher. If you are not satisfied with any Gopher purchase for any reason at any time, contact us and we will replace the product, credit your account, or refund
-Stand Alone - Wins Scoring System User Manual
 - - Steltronic S.p.A. Via Artigianale 34, 25082 Botticino Sera Brescia - Italy Tel: +39 030 2190811 fax: +39 030 2190798 Service: + 39 030 2190830 Worldwide Service: + 39 030 2190830 Email: service@steltronic.com
XC2 Client/Server Installation & Configuration
 XC2 Client/Server Installation & Configuration File downloads Server Installation Backup Configuration Services Client Installation Backup Recovery Troubleshooting Aug 12 2014 XC2 Software, LLC Page 1
Wickets Administrator
 Wickets Administrator Software For Managing Stored Value Wickets 01/08/2008 Product Details And Operating Instructions Overview This page describes each major function of Wickets Administrator in detail.
CONSOLE-320 ENGLISH. 230A: CONSOLE-320 with cable data output Item 230B: CONSOLE-320 with cable + wireless radio data output
 CONSOLE-320 Item 230A: CONSOLE-320 with cable data output Item 230B: CONSOLE-320 with cable + wireless radio data output Table of contents 1. INTRODUCTION...2 1.1 Power supply...2 1.2 Connections...2 1.3
USA Jump Rope Tournament Software User Guide 2014 Edition
 USA Jump Rope Tournament Software User Guide www.usajumprope.org Table of Contents Contents System Requirements... 3 System Conventions... 4 Phase 1 Tournament Pre registration Preparation... 5 Name Your
szen Eighteen Full Manual 2010 szen Corp
 szen Eighteen Full Manual I Full Eighteen Manual Table of Contents Part I Introduction 1 Part II Tee Sheet Operation 1 1 Using the... Tee Sheet 1 Booking Reservations... 2 Booking Reservations... for Mem
CONSUMER MODEL INSTALLATION GUIDE
 CONSUMER MODEL INSTALLATION GUIDE System requirements Windows System Requirements To use your TOMI and its software, your system should have: A Microsoft Windows compatible PC with a Pentium IV processor
DIVE MEET SCORING INSTRUCTIONS. Day before meet
 DIVE MEET SCORING INSTRUCTIONS Day before meet Physical set up Set up registration/scoring table #1 on 1 meter side and scoring table #2 on 3 meter side of diving well, judges chairs, and award stand as
Race Screen: Figure 2: Race Screen. Figure 3: Race Screen with Top Bulb Lock
 Eliminator Competition Stand Alone Mode - Instruction Manual Main Menu: After startup, the Eliminator Competition will enter the Main Menu. Press the right/left arrow buttons to move through the menu.
FireHawk M7 Interface Module Software Instructions OPERATION AND INSTRUCTIONS
 FireHawk M7 Interface Module Software Instructions OPERATION AND INSTRUCTIONS WARNING THE WARRANTIES MADE BY MSA WITH RESPECT TO THE PRODUCT ARE VOIDED IF THE PRODUCT IS NOT USED AND MAINTAINED IN ACCORDANCE
Integrated Sports Systems (ISS) Inc. Meet Management Suite
 Inc. Meet Management Suite") November 2010 Integrated Sports Systems (ISS) Inc. Meet Management Suite User Guide and Technical Document Version 2.0 Table of Contents Table of Contents... 2 General Concepts... 3 Installation Meet Management
November 2010 Integrated Sports Systems (ISS) Inc. Meet Management Suite User Guide and Technical Document Version 2.0 Table of Contents Table of Contents... 2 General Concepts... 3 Installation Meet Management
Instruction Manual. BZ7002 Calibration Software BE
 Instruction Manual BZ7002 Calibration Software BE6034-12 Index _ Index Index... 2 Chapter 1 BZ7002 Calibration Software... 4 1. Introduction... 5 Chapter 2 Installation of the BZ7002... 6 2. Installation
Quick Start Guide. For Gold and Silver Editions
 Quick Start Guide For Gold and Silver Editions Table of Content Introduction... 3 Prerequisites... 3 Installation and Setup... 4 Download and Install QQEvolution 2... 4 Create Users... 8 Create Agent/CSR/Producer...
ALGE DIVE! ALGE. ALGE-TIMING GmbH & Co
 ALGE ALGE DIVE! ALGE-TIMING GmbH & Co Rotkreuzstrasse 39 A-6890 Lustenau Telephone: +43 5577-85969 Fax: +43 5577-85969 e-mail: office@alge-timing.com Internet: www.alge-timing.com Table of contents 1.
The ICC Duckworth-Lewis-Stern calculator. DLS Edition 2016
 The ICC Duckworth-Lewis-Stern calculator DLS Edition 2016 (DLS2-2016) Installation and operating instructions Queries about program operation should be sent to: Steven.Stern@qut.edu.au 2016 International
Operating Manual. SUPREMA Calibration. Software for Fire and Gas Warning Units. Order No.: /01. MSAsafety.com
 Operating Manual Software for Fire and Gas Warning Units Order No.: 10154656/01 MSAsafety.com MSA Europe GmbH Schlüsselstrasse 12 8645 Rapperswil-Jona Switzerland info.ch@msasafety.com www.msasafety.com
Operating instructions Electrical switching facility pco
 Operating instructions Electrical switching facility pco from software version V1.33 on TABLE OF CONTENTS 1. Before you start... 4 1.1 Brief description... 4 1.2 Using this manual... 4 2. pco integrated
Software Manual for FITstep Pro Version 2
 Thank you for purchasing this product from Gopher. If you are not satisfied with any Gopher purchase for any reason at any time, contact us and we will replace the product, credit your account, or refund
Tennis...32 Stay above...34 Decimal...36 Bundesliga simulator...38 Shooter management...41 Installation...43 Registration...45 Where do I get the
 Content ShotAnalyzer with Scatt and the Häring target system... 3 ShotAnalyzer with Scatt and the Meyton target system... 5 ShotAnalyzer with Scatt and the Disag target system... 7 ShotAnalyzer with Scatt
Software for electronic scorekeeping of volleyball matches, developed and distributed by:
 Software for electronic scorekeeping of volleyball matches, developed and distributed by: Developed for the rules of USports 2017-18 As adopted by Ontario University Athletics for Men s & Women s Volleyball
UNITY 2 TM. Air Server Series 2 Operators Manual. Version 1.0. February 2008
 UNITY 2 TM Air Server Series 2 Operators Manual Version 1.0 February 2008 1. Introduction to the Air Server Accessory for UNITY 2...2 1.1. Summary of Operation...2 2. Developing a UNITY 2-Air Server method
ELIMINATOR COMPETITION DRAG RACE Program Manual Firm Ver 4.11
 ELIMINATOR COMPETITION DRAG RACE Program Manual Firm Ver 4.11 The Portatree Eliminator Super 2000 Competition Track Timer can be used with an IBM Compatible Personal Computer connected through Com Port
The ICC Duckworth-Lewis Calculator. Professional Edition 2008
 The ICC Duckworth-Lewis Calculator Professional Edition 2008 (Version 1.1) Installation and operating instructions Any queries about operating the program should be sent to steven.stern@anu.edu.au 2008
SHIMADZU LC-10/20 PUMP
 SHIMADZU LC-10/20 PUMP Clarity Control Module ENG Code/Rev.: M091/70C Date: 24.10.2017 Phone: +420 251 013 400 DataApex Ltd. Fax: +420 251 013 401 Petrzilkova 2583/13 clarity@dataapex.com 158 00 Prague
1. SYSTEM SETUP AND START TOURNAMENT... 8
 PICTORIAL HANDBALL MATCH STATISTICS (PHMS for Windows 7 Version E5.1) User's Manual November 2011 1. SYSTEM... 6 1.1 INTRODUCTION... 6 1.2 SYSTEM NAME... 6 1.3 SYSTEM FUNCTION... 7 2. SETUP AND START...
For running only the scoresheet application without any video features only some very basic hardware / software requirements have to be fulfilled:
 Digital Scoresheet user manual Requirements For running only the scoresheet application without any video features only some very basic hardware / software requirements have to be fulfilled: Laptop, preferably
WAVE 300 XL. User Instructions
 WAVE 300 XL EN User Instructions by 8151452 EN Wave 300 XL User Instructions Table of Contents 1. SAFETY PRECAUTIONS...2 2. FCC STATEMENT...3 3. INTRODUCTION...3 4. CONTENTS...3 Assembly instructions...4
Inventory User Guide
 Inventory User Guide User Guide ~ Table of Contents ~ Sign On/Select Facility Rates & Inventory Update Tee Times Load Tee Times AutoLoad Schedule Rate Fences Dashboards Revenue At Risk, Rounds & Revenue,
Setting up the Ingenico isc250 Pinpad via USB in Windows 8
 One Blue Hill Plaza, 16 th Floor, PO Box 1546 Pearl River, NY 10965 1-800-PC-AMERICA, 1-800-722-6374 (Voice) 845-920-0800 (Fax) 845-920-0880 Setting up the Ingenico isc250 Pinpad via USB in Windows 8 The
Pegas 4000 MF Gas Mixer InstructionManual Columbus Instruments
 Pegas 4000 MF Gas Mixer InstructionManual Contents I Table of Contents Foreword Part I Introduction 1 2 1 System overview... 2 2 Specifications... 3 Part II Installation 4 1 Rear panel connections...
USER MANUAL April 2016
 USER MANUAL April 2016 Introduction TIEBREAK is a program for real time volleyball game data entry and statistical analysis. Extremely easy to use, TIEBREAK makes it possible to reliably and quickly enter
The examples below are a starting point, and some fine tuning may be required.
 The settings you will see below are supplied as a basic sample of where to start with settings for your pinsetters and how they will operate with Steltronic Focus Software. The examples below are a starting
BVIS Beach Volleyball Information System
 BVIS Beach Volleyball Information System Developments in computer science over the past few years, together with technological innovation, has in turn stimulated the development of tailored software solutions
MyCricket User Manual
 MyCricket User Manual Club Tasks V 2.0, Last Updated: June 10 th 2009 Contents Page ADMINISTRATION TASKS... 3 1. Manage Your Association Details... 3 1.1. First Time Login... 3 1.2. Navigating the Administration
Table of Content IMPORTANT NOTE: Before using this guide, please make sure you have already set up your settings in
 Quick Start Guide Table of Content Introduction... 3 Prerequisites... 3 How to Open QQEvolution 2... 4 How to do Carrier Downloads... 5 Locating a Client in QQEvolution 2... 7 Adding a New Client... 8
McKnight Hockey Association
 McKnight Hockey Association Electronic Evaluation Tool Manual 2013-2014 Table of Contents Introduction...3 Evaluation Tool...3 Login to OneClickIce...3 Evaluations...4 PROCESS...4 Evaluation Procedure...5
DANAGE TIMER System Controller User Manual
 DANAGE TIMER System Controller User Manual The SCORING System is also part of the concept Rev.: 05.10.2011 DANAGE of Scandinavia - Industrivej 13-6310 Broager - Denmark Tel.: +45 74 44 26 36, Fax: + 45
Dive Sheets & Running Events Meet Management Software Tutorial for EZMeet Version 3.1 revised 2/4/2006
 Dive Sheets & Running Events Meet Management Software Tutorial for EZMeet Version 3.1 revised 2/4/2006 Once you have events created in your meet you are ready to enter dive sheets and run your event. INCLUDED
Touch Screen Guide. OG-1500 and OG Part # T011
 Touch Screen Guide OG-1500 and OG-2000 Part # 9000000.T011 Effective 11/2010 External View Internal View 1. Transducer Banks 2. Oxygen Sensor 3. PLC These are the two manifolds with three (3) transducers
Quintic Automatic Putting Report
 Quintic Automatic Putting Report Tutorial www.quintic.com Introduction The Quintic Automatic Putting Report is designed to work as an add on to our premier Quintic Biomechanics analysis software. Auto
Contents. Page. Page. System Settings 10. Components 3. Basic Operation 4. Brightness. Volume (for use with sat nav software only) Play Golf
 Play Golf") User manual Contents Page Page Components 3 Basic Operation 4 Play Golf Starting a new game and selectiing a golf course 5 Find a course using GPS Find a course by name Using Tour Pro Hole View 6 Display
User manual Contents Page Page Components 3 Basic Operation 4 Play Golf Starting a new game and selectiing a golf course 5 Find a course using GPS Find a course by name Using Tour Pro Hole View 6 Display
Mac Software Manual for FITstep Pro Version 2
 Thank you for purchasing this product from Gopher. If you are not satisfied with any Gopher purchase for any reason at any time, contact us and we will replace the product, credit your account, or refund
SWIM MEET MANAGER 5.0 NEW FEATURES
 SWIM MEET MANAGER 5.0 NEW FEATURES Updated January 24, 2014 1 ABOUT SWIMMING MEET MANAGER 5.0 MEET MANAGER 5.0 for ming (SWMM) is HY-TEK's 6th generation of Meet Management software. Provides the very
RUNNING A MEET WITH HY-TEK MEET MANAGER
 SETTING UP THE MEET 1. A database setup for the current season can be found on the CCAA website www.ccaaswim.org this will have the events and other information for the meet setup already in place. 2.
Overview 1. Handicap Overview 12. Types of Handicapping...12 The Handicap Cycle...12 Calculating handicaps...13 Handicap Nomenclature...
 Handicap System Overview 1 The Handicap System...1 Creating a Roster...1 Entering Courses...2 Entering Golfers...3 Entering Scores...4 Viewing Scores...7 Combing two nine holes scores to form an 18 hole
SCW Web Portal Instructions
 LP & JH 7/21/16 SCW Web Portal Instructions Contents Welcome to the SCW Web Portal!... 1 Accessing the SCW Web Portal... 2 Main SCW Web Portal Page... 4 My Profile... 5 Rounds History... 7 Book a Tee Time...
ISS MMS Artistic Swimming
 ISS MMS Artistic Swimming Title page 1 Use this page to introduce the product by Integrated Sports Systems ()SS) Inc. This is "Title Page 1" - you may use this page to introduce your product, show title,
OMNISPORT 2000 SWIMMING QUICK REFERENCE
 Before During After OMNISPORT 2000 SWIMMING QUICK REFERENCE 1. Confirm that the timer is reset. 2. Set the timer to the correct event and heat. The right LCD, line 2 displays E:(event) H:(heat) R:(round)
JOLLY2. Installation user s manual. 6 different operating modes selectable. version 3.3. DATA TO BE FILLED OUT BY THE INSTALLER (Page 1)
") ENGLISH ENGLISH ENGLISH ENGLISH Installation user s manual Warning! electrical scheme modified JANUARY 2005 version 3.3 JOLLY2 DATA TO BE FILLED OUT BY THE INSTALLER (Page 1) 6 different operating modes
ENGLISH ENGLISH ENGLISH ENGLISH Installation user s manual Warning! electrical scheme modified JANUARY 2005 version 3.3 JOLLY2 DATA TO BE FILLED OUT BY THE INSTALLER (Page 1) 6 different operating modes
Online League Management lta.tournamentsoftware.com. User Manual. Further support is available online at
 Online League Management lta.tournamentsoftware.com User Manual Further support is available online at www.lta.org.uk/leagueplanner Contents Welcome... 3 Using this guide... 3 Further support?... 3 Publishing
Swing Labs Training Guide
 Swing Labs Training Guide How to perform a fitting using FlightScope and Swing Labs Upload Manager 3 v0 20080116 ii Swing labs Table of Contents 1 Installing & Set-up of Upload Manager 3 (UM3) 1 Installation.................................
Golf Team Challenge. Product: EA SPORTS PGA TOUR Software Version: Release Date: 10/18/06. Revised 4/21/2009
 Product: EA SPORTS PGA TOUR Software Version: 4.0.0 Release Date: 10/18/06. Revised 4/21/2009 Golf Team Challenge This document describes the new play modes and Operator Menus in EA SPORTS PGA TOUR Golf
Version-E Manual
 Version-E190423 Important Information General Before using your ALGE-TIMING device read the complete manual carefully. It is part of the device and contains important information about installation, safety
To Logon On to your tee sheet, start by opening your browser. (NOTE: Internet Explorer V. 6.0 or greater is required.)
") 1. Log-On To Logon On to your tee sheet, start by opening your browser. (NOTE: Internet Explorer V. 6.0 or greater is required.) (NOTE: Logon ID s must be 7 characters or more and passwords are case sensitive.)
1. Log-On To Logon On to your tee sheet, start by opening your browser. (NOTE: Internet Explorer V. 6.0 or greater is required.) (NOTE: Logon ID s must be 7 characters or more and passwords are case sensitive.)
Wire Buddy Manual IOpath Software
 Wire Buddy Manual IOpath Software Wire Buddy is a calculation reference tool for Electricians and Maintenance personnel. Wire Buddy was created for the Maintenance Electrician. There are many occasions
TOMI PRO MODEL PERSONAL MODEL
 TOMI PRO MODEL PERSONAL MODEL System requirements Windows System Requirements To use your TOMI and its software, your system should have: A Microsoft Windows compatible PC with a Pentium IV processor (1.5
Setting Up the Ingenico isc250 Pinpad via USB
 One Blue Hill Plaza, 16 th Floor, PO Box 1546 Pearl River, NY 10965 1-800-PC-AMERICA, 1-800-722-6374 (Voice) 845-920-0800 (Fax) 845-920-0880 Setting Up the Ingenico isc250 Pinpad via USB The following
Diver-Office. Getting Started Guide. 2007, Schlumberger Water Services
 Diver-Office Getting Started Guide 2007, Schlumberger Water Services Copyright Information 2007 Schlumberger Water Services. All rights reserved. No portion of the contents of this publication may be reproduced
Technology. In the My Files [My Files] submenu you can store all the programs that you have made on the NXT or downloaded from your computer.
![Technology. In the My Files [My Files] submenu you can store all the programs that you have made on the NXT or downloaded from your computer.](/thumbs/74/70002303.jpg "Technology. In the My Files [My Files] submenu you can store all the programs that you have made on the NXT or downloaded from your computer.") NXT Main Menu My Files Files are automatically placed into the appropriate folders. When you download a program using a Sound file to the NXT, the program will be placed under Software files while the
NXT Main Menu My Files Files are automatically placed into the appropriate folders. When you download a program using a Sound file to the NXT, the program will be placed under Software files while the
Club s Homepage Use this feature to return the club s website.
 The first time the golfer logs into the Internet Golf Reservation System, the member # is the club assigned golfer number, the default password is 1234. The golfer will automatically be transferred to
SwimNumber App. Build Custom Smart Workouts Control the Wave Propulsion TM System Achieve Health and Fitness Goals INSTRUCTION MANUAL
 SwimNumber App Build Custom Smart Workouts Control the Wave Propulsion TM System Achieve Health and Fitness Goals INSTRUCTION MANUAL Table of Contents Warning...2 Connecting to Swim Spa...3-7 Swim Spa
Old Kings Oval Electronic Scoreboard. Scoreboard Operation and Advanced Scoring Instructions
 Old Kings Oval Electronic Scoreboard Scoreboard Operation and Advanced Scoring Instructions 1 Introduction... 3 Primary Contacts... 3 Solid Scoreboards 24/7 Support 0458 LED FIX (0458 533 349)Scoring a
Scoreboard Operator s Instructions MPC Control
 Scoreboard Operator s Instructions MPC Control Some features on the keyboard overlay may not be included on the particular model being operated. Since 1934 Retain this manual in your permanent files 1/21/2011
[XACT INTEGRATION] The Race Director. Xact Integration
![[XACT INTEGRATION] The Race Director. Xact Integration](/thumbs/95/123601803.jpg "[XACT INTEGRATION] The Race Director. Xact Integration") 2018 The Race Director Xact Integration [XACT INTEGRATION] This document describes the steps in using the direct integration that has been built between Race Director and Xact. There are three primary
2018 The Race Director Xact Integration [XACT INTEGRATION] This document describes the steps in using the direct integration that has been built between Race Director and Xact. There are three primary
CONTENTS... 2 CONFIGURATION... 3 VENUE MANAGEMENT SETTING UP COMPETITIONS TEAM MANAGEMENT FIXTURING PUBLICATION...
 Contents CONTENTS... 2 CONFIGURATION... 3 VENUE MANAGEMENT... 12 SETTING UP COMPETITIONS... 14 TEAM MANAGEMENT... 19 FIXTURING... 20 PUBLICATION... 26 RESULTS... 27 REPORTING... 31 2 P a g e Configuration
WEST POINT GOLF CLUB USING THE GOLFSOFTWARE PROGRAM FOR THE DRAW AND SCORING
 USING THE GOLFSOFTWARE PROGRAM FOR THE DRAW AND SCORING The new software is made up of 3 modules - Handicap, Tournament and Player Portal. Note that the Handicap module and the Tournament module have separate
System 6 Water Polo. For the System 6 Sports Timer Software User Guide. F872 Rev
 System 6 Water Polo For the System 6 Sports Timer Software User Guide F872 Rev. 20171114 Customer Service Department www.coloradotime.com Email: customerservice@coloradotime.com Phone: 970-667-1000 Toll
Heart Foundation Walking Website user guide for Walk Organisers
 Heart Foundation Walking Website user guide for Walk Organisers Proudly supported by Website User Guide for Walk Organisers Contents 1. Introduction... 2 1.1 Finding the HFW website... 2 1.2 Log in on
REASONS FOR THE DEVELOPMENT
 7 Series 7 Series +24VDC VDC OUTPUT MICROPROCESS. E P IN EXH OUT 7 Series 7 ø,8 8 7 Series 9 5 8 9 7 Series Display features The proportional regulator has a 3 /2 digit display and a three-pushbutton
Quick Start Guide. A. Hardware installation B. Software installation C. Start the software for the first time D. Do your first measurement
 Quick Start Guide This Quick Start Guide describes the hardware and software installation process and the Measurement feature in a simple way. Please follow the sequence of the steps to avoid problems
FIBA Europe Coaching Website. Manual. Practice Section
 FIBA Europe Coaching Website Manual Practice Section CONTENTS Page 1. How to get started 3 Roster Management 4 Attendance 4 Practice Planner 5 2. Drills 8 Search Mask 8 Overview 11 Create Drill 13 3. Plays
HyperSecureLink V6.0x User Guide
 HyperSecureLink V6.0x User Guide Note: This software works with the LS-30 Version (06.0x or later) 1, Hardware Installation: 1-1, Connection Diagram for USB or RS-232 Computer Interface To LS-30 CM1 To
Competition Management
 Competition Management User Guide for the Basketball Network 2016 version 1.3 Table of Contents CONFIGURATION 4 Passport 4 Access via User Management 4 Club and Team Field Settings 5 Manage Competition
Getting to know your Sureshotgps micro V3
 Getting to know your Sureshotgps micro V3 Battery State Symbol Satellite Signal Shows distance to front, centre and rear of each green Hole Number Real Time Power on and Enter Key Down (backward) Key 1
REMOTE CLIENT MANAGER HELP VERSION 1.0.2
 VERSION 1.0.2 MERCHANT SALES: 800-637-8268 New Merchant Accounts PARTNER PROGRAMS: 800-637-8268 New and existing partnerships CUSTOMER CARE: 800-338-6614 Existing merchant account support Statements and
OPERATING INSTRUCTIONS FOR
 OPERATING INSTRUCTIONS FOR MODEL 1232 LED www.sportablescoreboards.com 1 Table of Contents CONTROLLER DEFINITIONS... 3 COMMUNICATION CABLES... 4 Connecting a Hard Wired Cable... 4 Connecting a Wireless
ELIMINATOR INSTRUCTIONS Table of Contents
 ELIMINATOR INSTRUCTIONS Table of Contents 1. PRACTICE MODE A. Toggling from Full to Pro Tree B. Toggling from 1 to 2 Users C. Toggling from Auto to Manual Reset D. Setting the Delay Boxes E. Setting a
Terminals Operators Guide
 Terminals Operators Guide Installation: Go to http://www.rosnet2000.com/uktote/install.html for step by step installation help with images for reference. Minimum Requirements (PC): Windows 2000, Windows
1. Hardware Bookkeeping & Adjustment...7. Access Flow Chart... 7 System Adjustment... 8 Chance Adjustment... 9 Touch Screen Calibration...
 Table of Contents 1. Hardware...2 Connectors Descriptions... 2 Connecting 2nd Screen and Touch Panel (Optional)... 3 Connection Diagram... 4 DIP Switch Settings... 5 36 & 10 PIN Button Layout... 5 Solving
ClubNet System Instructions
 ClubNet System Instructions 1) How to Log into the Website Enter the address www.hgsrc.co.uk Select Court Bookings from the Top menu and you will be presented with the login screen below Enter your Username
MP15 Jockey Pump Controller
 Setup and Operating Instructions MP15 Jockey Pump Controller This manual provides general information, installation, operation, maintenance, and system setup information for Metron Model MP15 Jockey Pump
ScoreKeeper tm. ~ Software for Golf ~ for Microsoft Windows 98 through Windows 7. User's Guide
 ScoreKeeper tm ~ Software for Golf ~ for Microsoft Windows 98 through Windows 7 User's Guide March, 2011 Copyright Mark II Systems. Long Valley, N.J., USA 908-850-5252 www.scorekeeper.com Installation
SENSUS PRO MANAGER (for SENSUS or SENSUS PRO devices) User s Guide -- Windows. Version 2.0 Published October 17, ReefNet Inc.
 User s Guide -- Windows. Version 2.0 Published October 17, ReefNet Inc.") SENSUS PRO MANAGER (for SENSUS or SENSUS PRO devices) User s Guide -- Windows Version 2.0 Published October 17, 2002 2002 ReefNet Inc. 1.0 Introduction The SENSUS PRO data recorder captures the time, depth,
SENSUS PRO MANAGER (for SENSUS or SENSUS PRO devices) User s Guide -- Windows Version 2.0 Published October 17, 2002 2002 ReefNet Inc. 1.0 Introduction The SENSUS PRO data recorder captures the time, depth,
AGW SYSTEMS. Blue Clock W38X
 AGW SYSTEMS Blue Clock W38X Contents table BLUECLOCKS...3 THE EVOLUTION...4 WHAT S NEW!...5 HARDWARE...6 SOFTWARE...7 MULTI COMPANY...8 INSTANTLY...9 EVEN MORE!...10 WHAT S INSIDE HOW DOES IT WORK...11...12
Armfield Distillation Column Operation Guidelines
 Armfield Distillation Column Operation Guidelines 11-2016 R.Cox Safety SAFETY GLASSES ARE REQUIRED WHEN OPERATING THE DISTILLATION COLUMN Wear gloves when mixing alcohol feedstock The column will become
MAROC Computing Guide for running an event
 MAROC Computing Guide for running an event Document History Date Who Summary 09-Oct-13 Keith Roberts Rewrite for new MAROC laptop and OE2010, based on previous MAROC PC Instructions originally authored
Website User Guide for Walk Organisers
 Website User Guide for Walk Organisers Contents 1. Introduction... 2 1.1 Finding the HFW website... 2 1.2 Log in on the HFW website... 2 2. Your Dashboard Screen... 4 3. Basic Online Profile Features...
Hot Springs Village Member Portal User Guide
 Contents Portal Options... 2 Portal Display:... 2 MAIN Options:... 2 E-COMMERCE Options... 2 Annual Registrations... 2 Pets... 2 Boats... 3 Carts... 3 Vehicles... 3 GHIN... 4 Annual Passes... 4 My Transactions...
IMGA PAIRINGS INSTRUCTIONS USING the ONLINE GOLF GENIUS SOFTWARE ROGRAM Revised as of 12/31/2017
 GENERAL INFORMATION: IMGA PAIRINGS INSTRUCTIONS USING the ONLINE GOLF GENIUS SOFTWARE ROGRAM Revised as of 12/31/2017 The cutoff time for tournament entry is 12:00PM (Noon) on the Friday before Tuesday
Golfshot : Golf GPS Android User Guide
 Golfshot : Golf GPS Android User Guide Version 3.5 Scorecard Version 3.5 QUICK TIPS: New in 3.5: Track Menu Track Menu Press the Golf Ball icon in the upper left corner to slide down the Track Menu. Here
Inspection User Manual This application allows you to easily inspect equipment located in Onix Work.
 2016 TABLE OF CONTENTS Inspection User Manual This application allows you to easily inspect equipment located in Onix Work. Onix AS Version 1.0.15.0 03.06.2016 0 P a g e TABLE OF CONTENTS TABLE OF CONTENTS
A GUIDE TO THE LOOSE ENDS HOCKEY LEAGUE WEBSITE PAGE
 A GUIDE TO THE LOOSE ENDS HOCKEY LEAGUE WEBSITE PAGE 1 What Can Be Done Using The League Website: MAIN PAGE: From the main page, click on the man with the newspaper beneath the label News and Archives
Instruction Manual Dräger MSI P7 and MSI P7 plus
 Dräger MSI GmbH Rohrstraße 32 58093 Hagen Tel.: +49-2331 / 9584-0 Fax: +49-2331 / 9584-29 e-mail: info@draeger-msi.de D 923; Edition 2011-01-01 Content 1. General Hints Page 4 2. The Instrument 2.1 Front
ALGE Water Polo Scoreboard
 ALGE Water Polo Scoreboard USER MANUAL Split Second Timing Pty Limited PO Box 1322 Dee Why, NSW 2099 Tel: (02) 9981 6069 Fax: (02) 9981 6070 Email: info@splitsecond.com.au Web: www.splitsecond.com.au Page
Dive Planet. Manual. Rev Basic User Interface. 2 How to organize your dives. 3 Statistics. 4 Location Service and Map View.
 Dive Planet Manual Rev 1.2 1 Basic User Interface 2 How to organize your dives 3 Statistics 4 Location Service and Map View 5 Settings 6 Languages 7 Buddies and guide 8 Backup and restore of the data 9
APA software instruction manual
 1. Starting the program In order to start the control software for the APA device press APAxx shortcut located on the desktop of the supplied computer. XX corresponds to the current software version. When